How do you know when to consider WooCommerce over Shopify as the best option? There are a ton of articles that highlight the deep comparisons between these two different platforms. If you haven’t read any of them, I’ll link to some of my favorites toward the bottom of this post.
But the point of this article is to give you a quick and simple way to know if you should give WooCommerce a second look – especially if you’re thinking about making the move to Shopify. There are good reasons to try each platform. Neither is perfect, and the pros and cons are mostly based on your own context. But with that said, let’s look at four situations where you may want to dig deeper into WooCommerce.
4 Situations where WooCommerce may be a better fit
1) Your store needs multi-lingual support
Shopify has apps like Langify to help you translate your store’s text. But the moment you need to make tweaks to how the store works (like payment gateways), you end up needed to create multiple stores. And managing inventory across them can be a lot of work.
WooCommerce lets you configure different payment gateways, languages, and currencies without any hassle. You can do this via plugins, via its multisite feature, or simply with multiple instances (like Shopify). The fact that you have more options here, at cheaper price points, suggests a second look.
2) You have a large team that works on your store
Shopify charges for each team member that gets a login to your Shopify store for administration. So for large teams, you can end up paying 10x Shopify’s initial listed price tag.
WooCommerce, on the other hand, doesn’t charge you per administrator. It gives you an unlimited number of accounts for free, thanks to its dependency on WordPress.
3) You want to use Stripe to accept payments
If you’re planning on using the Stripe payment gateway, the good news is that Shopify supports it, but not for free. You’ll be paying an additional transaction fee per order. Depending on your site traffic, that can add a lot of unexpected or unwanted overhead, all because of the payment gateway that you want to use.
The plugin that connects WooCommerce to the Stripe online payment gateway is free. More importantly, you don’t pay anything for using it. That’s right – no transaction fees from your host or from the WooCommerce side of things.
4) You plan to grow your store
WooCommerce was designed to grow with you – from a tiny catalog to an online store with tens of thousands of SKUs. That’s part of why companies of all sizes use WooCommerce.
Shopify has two versions and forces you to make the transition from one to the other based on your high traffic. Once you have to move, your price will jump from $299/mo to $2500/mo. That’s a big difference in your overhead that can drastically impact your bottom line.
Additional Resources Comparing WooCommerce and Shopify
I mentioned earlier that I would make sure you had access to additional comparisons between the two platforms. Here are five articles that are pretty even-handed as they look at the two platforms.
Each of these articles leaves the choice up to you, while only comparing things like price, design, cost of hosting, and other factors that keep the two platforms pretty close.
They land on the differences based on how much you want to control things. But as you can see above, we think there are a couple of other reasons you might want to consider WooCommerce.
If you are ready to consider WooCommerce over Shopify, check out Managed WooCommerce hosting, the platform that Hostdedi has created just for WooCommerce stores.
GDPR is about to cause a huge change to data privacy regulations in the EU, starting May 25. Yet while a lot has been said about GDPR, little has been directed at Magento store owners and how GDPR will affect them. Simply installing a plugin may work for some stores, but larger Magento sites are going to need to do more. Read More »
In the video, Chris illustrates one of the actions at your disposal when you have control over your data.
He quickly found twenty-one customers to target with a specific message about a high-end product. And how well do you think that email would sell a premium product versus sending a general message to everyone on a list?
It would sell much better.
And, keep in mind, there’s no reason he couldn’t tailor and send the message later to another customer segment using Glew segmentation tools.
But before we get into Glew segmentation for customers, let’s talk a little about what customer segmentation is, and why it’s so important. (And if you want, you can hear more directly from Chris in this interview he did with OfficeHours.fm on the subject.)
What is customer segmentation and why is it important?
Imagine I’m trying to sell warm winter coats. Would I sell them the same way in Minneapolis as I would in Southern California? Not a chance. That’s because even though every person is unique, people who live in one of these places all act similarly, and still very different from people who live in the other place.
Segmentation allows us to group people by some factor – it could be demographic like location, or psychographic like a preference for luxury items, or behavioral like people who already own a product, or have visited more than 10 times this month.
That’s segmentation. But the reason we do it, is because we believe that those segments will react in roughly the same way to a targeted message. And that’s the why of segmentation. It allows for some level of personalization or customization without the cost of a unique, one-by-one tailored messaging model – which is ridiculously expensive.
If you can group people by a factor that consistently helps you shape your message, and that results in higher conversions, then you can benefit from segmentation.
Glew includes twenty-four predefined customer segments loaded up and ready to go. All of them are ready and available as soon as your store data is successfully connected to your Glew account.
Let’s take a look at five of these and how you can get the most of them.
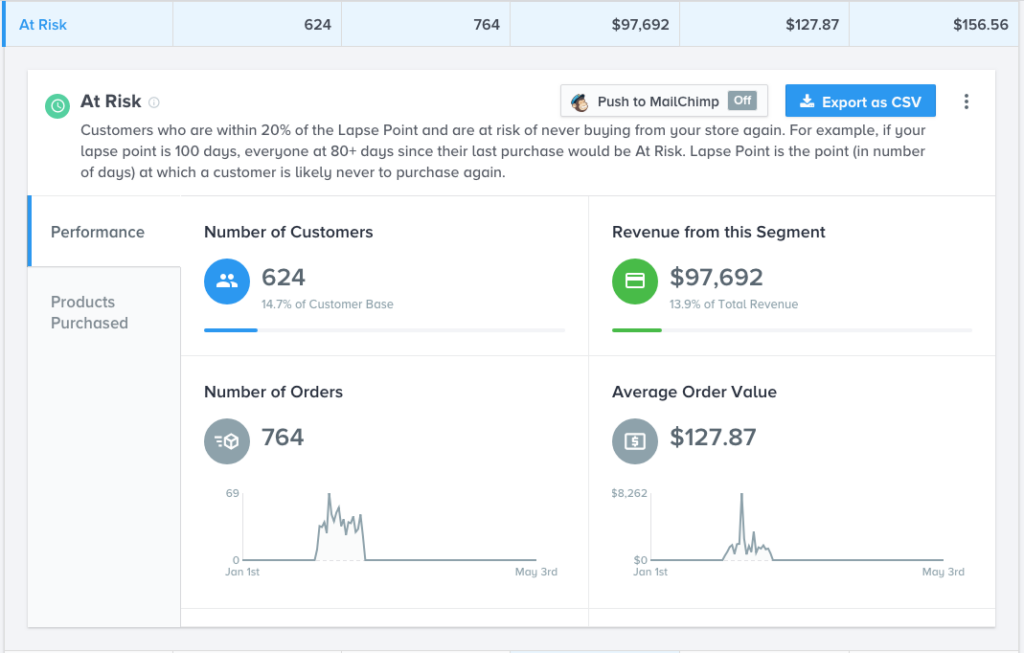
Glew Segmentation #1: At Risk
Here’s how to find this Glew segmentation
In the left-hand navigation column, click Customers, then click Segments. At the top of the main column, click on All Customer Segments to toggle to where only the Predefined Segments are visible. Now scroll down to and then click on the customer segment titled At Risk.
Here’s how Glew builds the At Risk segment
This predefined Glew segment keeps a running list of your store’s customers whose time since last purchase lies within twenty-percent of your store’s lapse point. Your store’s lapse point is calculated for you by Glew and defines the threshold, in number of days, where customers are lost to your store for good.
How do they do that? They do it by looking at your unique store and all of its repeat purchases and calculating the average time distance between orders. That tells them what’s normative on your own store and helps them create the lapse point.
Win-Back Campaign for the At-Risk customer segment
Winning back customers before they’re lost is important because selling to a customer that already knows who you are is easier, not to mention less costly, than finding and winning your store a new customer from a sea of strangers.
The good news is that Glew also captures some product segmentation data. One of their segments is Hot Products. These are products that are selling more than the average in the most recent period. In short, they’re seeing higher than normal period over period growth.
So if you take one of these “viral” products and pick one that has a lower price than the average order value of the customer segment. For example, if your AOV for “at risk” is $82.70, pick a “hot product” that has a price of $59.00. Simple Email Campaign Setup
Autoresponder Sequence: Email 1 | +2 days – Email 2 Set up the email sequence (aka Autoresponder Sequence) in your email service provider and have the sequence start once a specific tag is attached to one of the email addresses on your list. This way you can import the CSV file of your At-Risk customer segment and have this unique tag applied during the process. You’ll also want to protect your customers that follow through on your call to action. Set your marketing automation so that when these At Risk customers return and purchase, the tag will be unattached from their email address automatically as it happens. By removing customers as they move from At Risk to Active, it allows you to also send a follow-up email a couple of days following the first email, for the people that remain At Risk without bothering the newly Active customers that took your first email’s desired action.
Glew Segmentation #2: Low AOV
Here’s how to find this Glew segmentation
In the left-hand navigation column, click Customers, then click Segments. At the top of the main column, click on All Customer Segments to toggle to where only the Predefined Segments are visible. Now scroll down to and then click on the customer segment titled Low AOV.
Here’s how Glew builds this segment
This predefined Glew segment keeps a running list of your store’s customers whose Average Order Value is lower than the average order value that it calculates for your entire store.
Creating a Campaign for the Low AOV customer segment
The trick here is that you can’t sell these folks something really cheap, because that will keep them under the median value that will keep them in this segment forever. So what you have to do is find products that are just over the average of this segment (which is lower than the average AOV for your store).
That won’t help you immediately, but if you keep moving their average up, eventually you’ll get them over the line.
How do you do it?
Use our example above regarding “hot products” and this time find one whose cost is 10-20% higher than the AOV for the Low AOV segment.
Simple Email Campaign Setup
Autoresponder Sequence: Email 1 | +2 days – Email 2
The approach here is the same as what we described above for the first segment.
Use MailChimp?
This is where Glew’s MailChimp integration shines, because with it, Glew maintains three very useful merge tags for you to use in any emails sent through your MailChimp account. Using the merge tags in your MailChimp emails magically includes the top three product recommendations for each customer, including a linked product title and product image. That same magic is available for displaying the items in their cart, as well as displaying their last purchase.
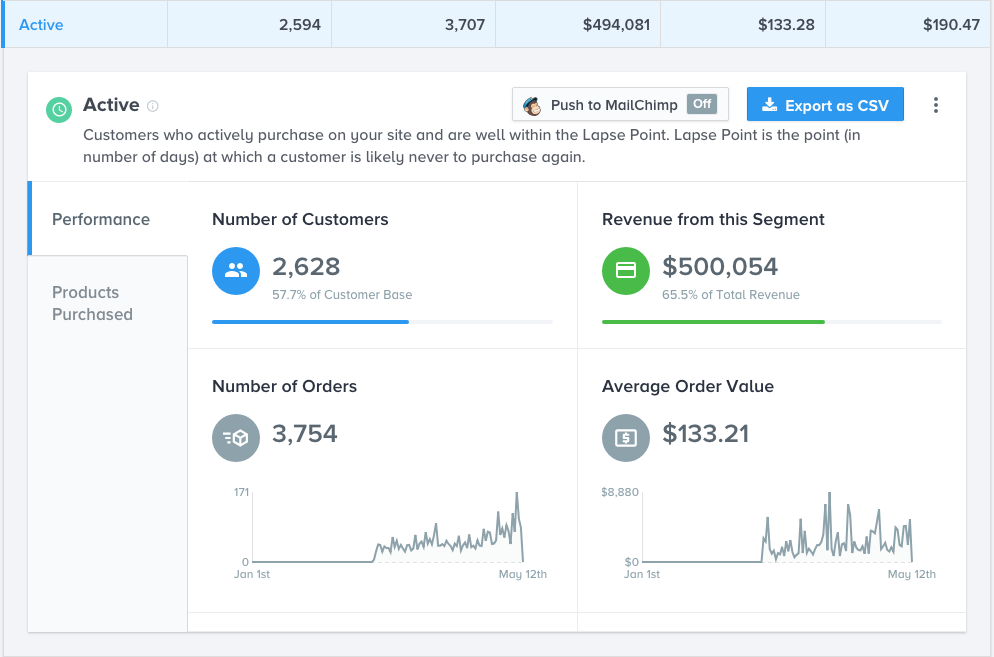
Glew Segmentation #3: Active
Here’s how to find this Glew segmentation
In the left-hand navigation column, click Customers, then click Segments. At the top of the main column, click on All Customer Segments to toggle to where only the Predefined Segments are visible. Now scroll down to and then click on the customer segment titled Active.
Here’s how Glew builds the At Risk segment
This predefined Glew segment keeps a running list of your store’s customers who actively purchase on your site and are well within the store’s lapse point. Your store’s lapse point is calculated for you by Glew and defines the threshold, in number of days, where customers are lost to your store for good.
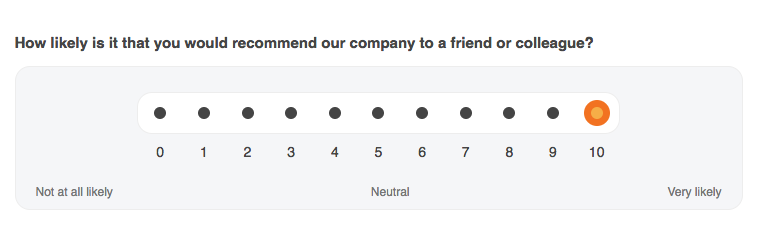
NPS survey of the Active customer segment
If you haven’t already, this is the perfect time to send your Active customer segment an NPS survey, which is an email asking the recipient to rate their willingness to recommend you to their friends on a scale of one to ten. For example:
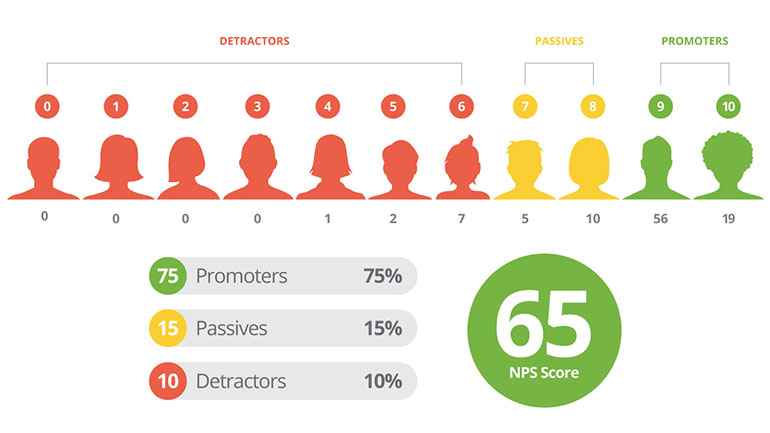
The results of which are explained by:
This is a win-win for your store because you’re learning about the perception of your store’s active users rather than only asking your new customers make and then receive their order. Your second win comes from reminding your store’s active customers to talk about your store on social. When they click between one and ten of the net promoter score, they’re going to be redirected to a page. On that page that they land on after giving you a nine or a ten, make it easy for them to leave a public review on the sites that matter most to your store. On the page people that gave you from one to eight, give them a chance to easily get their issue made right by one of your team members or managers.
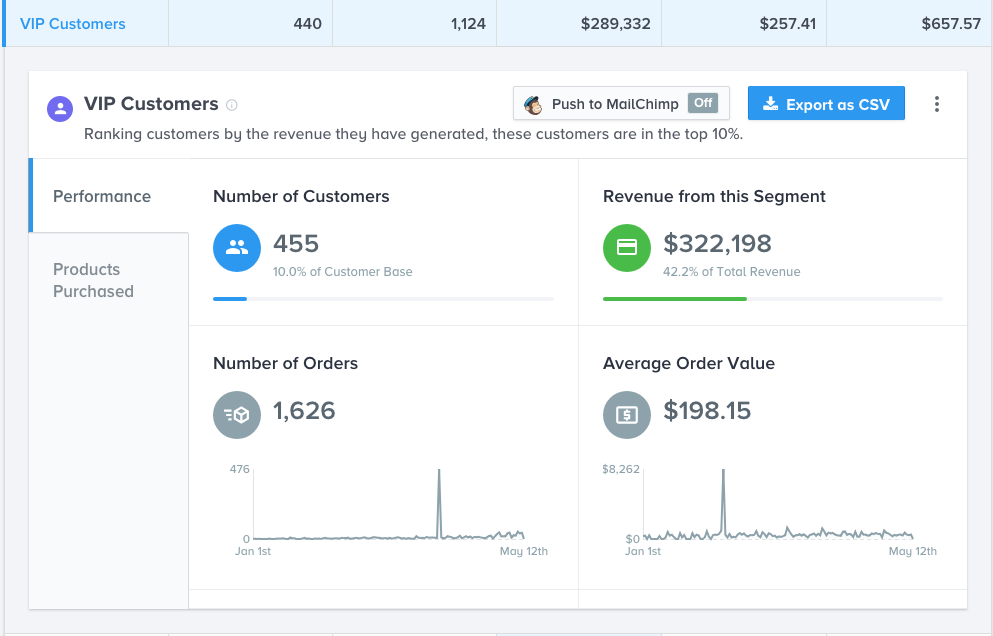
Glew Segmentation #4: VIP Customers
Here’s how to find this Glew segmentation
In the left hand navigation column, click Customers, then click Segments. At the top of the main column, click on All Customer Segments to toggle to where only the Predefined Segments are visible. Now scroll down to and then click on the customer segment titled VIP Customers.
Here’s how Glew finds it for you
The VIP Customers bring in the most store revenue. In Glew this segment is defined as including the top 10% of your store’s customers ranked by total revenue they’ve generated for your store.
Exclusivity Campaign for the VIP Customers segment
Imagine creating a messaging sequence of four emails. You’re not trying to close a deal with these. You’re just nurturing the relationship.
Four Email Campaign Setup
Autoresponder Sequence: Email1– Ask them to reply with a product they would love to buy from you that you aren’t selling right now. This gives them the feeling of being important in your product selection criteria, while also giving you great market feedback.
+5 days – Email 2 – Thank them for being VIPs and let them know what that means. They’ve spent more than 90% of the people visiting your store. Make them feel important. You might create a special place for them to congregate, or a special coupon code, or even simply give them your phone number. If they ever need anything, they’ll know they’re important enough to reach out to you.
+5 days – Email 3 – Invite them to participate in a special event. It could be a round table discussion, a visit to your physical store, or a private webinar. But make sure to highlight that they’re the only ones being invited.
+5 days – Email 4 – This is where you can make an “ask,” as far as selling them something. Follow Chris’ example from the video and tell them the right story, at the right time, for the right product.
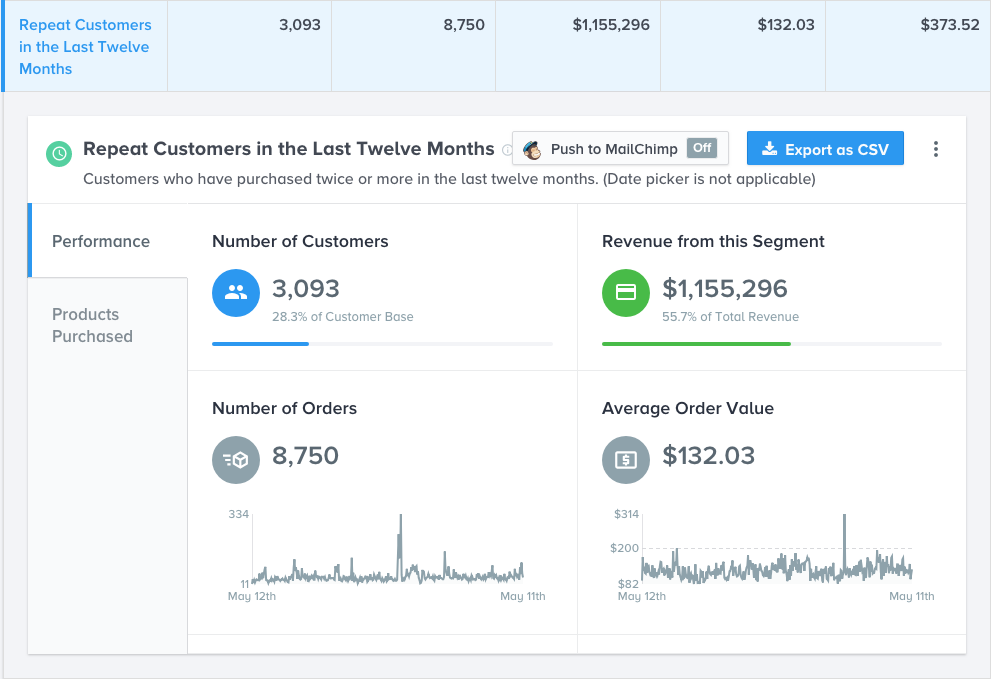
Glew Segmentation #5: Repeat Customers in the Last Twelve Months
Here’s where to find this Glew segmentation
In the left-hand navigation column, click Customers, then click Segments. At the top of the main column, click on All Customer Segments to toggle to where only the Predefined Segments are visible. Now scroll down to and then click on the customer segment titled Repeat Customers in the Last Twelve Months.
Here’s how Glew finds it for you
This predefined segment in Glew keeps a running total of the customers that have purchased twice or more from your store in the past twelve months.
Thank You Email (w/ Gift Card) for this customer segment
Imagine that you wanted to send a $5 gift card as a thank you for these customers. You’d do a similar thing as you did before – sending multiple emails to help make sure that they open one of them. Think about sending it three times over 7 days. But the trick here, like we talked about before, is to make sure in your email provider, that you create a tag and then remove the tag when someone clicks the link.
If you don’t do that, you’ll end up sending $15 to people instead of $5.
A Side Note on keeping your Glew Data Clean
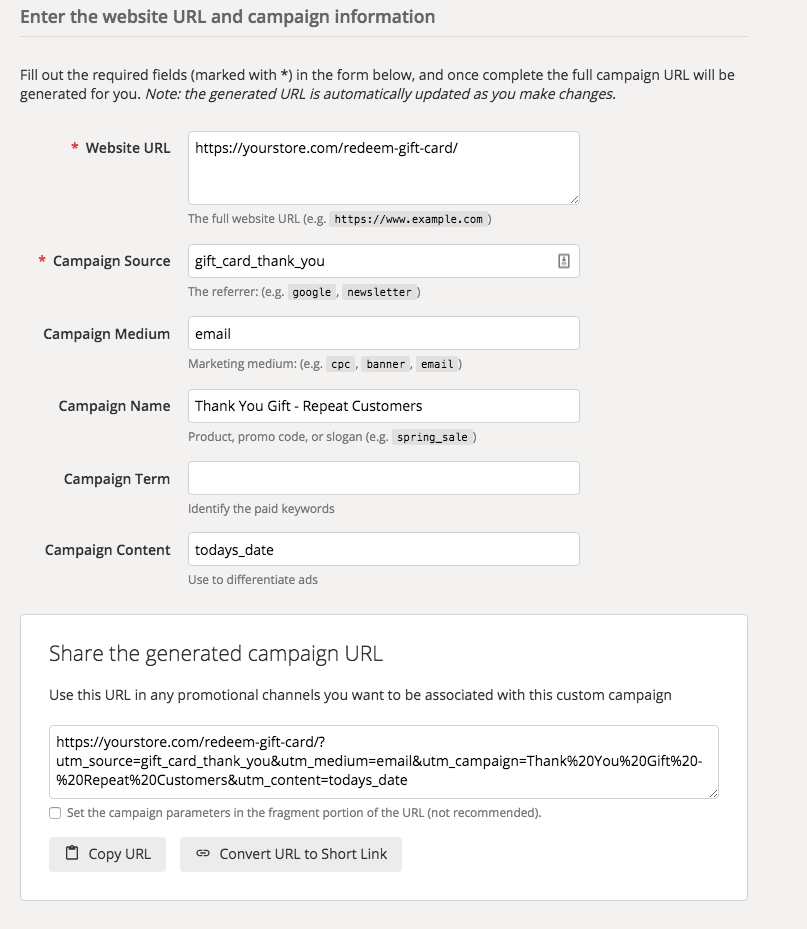
By now you likely are noticing that will all this email going out, and how Glew works, that using campaigns (additional data on your URL strings) will help you. So given that we’ve just gone over how to send a lot of different emails out, let’s also quickly look at how to create campaign URLs.
When you use a tool like below, you’ll end up with a special longer link that you can put in your email. Some email service providers (like ConvertKit) have their own approach for doing this, so your mileage may vary here.
Website URL: The page they will land on when they click this link.
Campaign Source: In Glew, you can filter customer segments by this. When filling this out in the url builder, I answer the question: where did the customer find this link in order to click it?
Campaign Medium: I fill this out with email, when using for emails.
Campaign Name: I want to understand this data on the backend within the reporting, so I try to answer the questions of what the campaign focus is and whom the campaign was focused upon.
Campaign Content: This being a single broadcast email that may be repeated to different future versions of the same customer segment, I used the date the email was sent.
Conclusion
The idea in the video is key, craft experiences for your customers that they’ll love and appreciate, which returns them to your store. And remember, Glew already starts with 24 predefined segments and, thanks to our partnership, Glew comes standard when you trust your store with Hostdedi’ Managed WooCommerce Hosting.
You’re here… so you’re likely aware of the staggering statistic stating that close to seventy-percent of all online carts are abandoned. Which also means you recognize cart abandonment as one of the most important problems facing your online store. Not good.. you need some cart abandonment options.
Wondering how to get started on your prevention efforts for abandoned carts?
Let’s start with understanding the top ten reasons people give for abandoning their online shopping cart.
Top 10 Reasons People Abandon Their Cart
Extra costs too high (shipping, tax, fees)
The site wanted me to create an account
Too long / complicated checkout process
I couldn’t see / calculate total order cost up-front
Website had errors / crashed
I didn’t trust the site with my credit card information
Delivery was too slow
Returns policy wasn’t satisfactory
There weren’t enough payment methods
The credit card was declined
As you can see, everything matters to people trying to decide whether they trust your store enough to make a purchase or not. For instance, fifty-nine percent of consumers say they factor shipping cost into their ordering decision.
Watch this video or keep reading for some options you have to assist with abandoned carts.
7 Cart Abandonment Options for WooCommerce in 2021
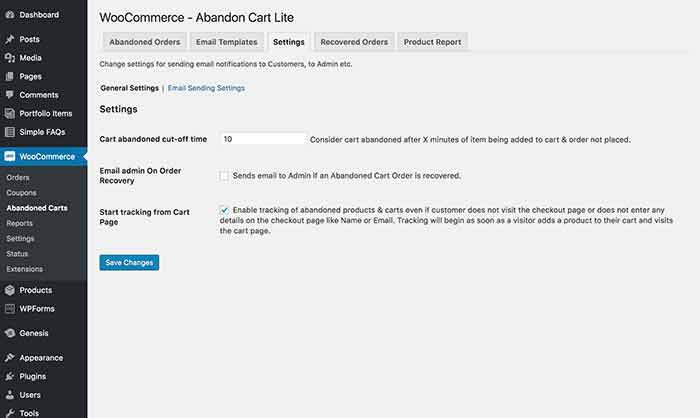
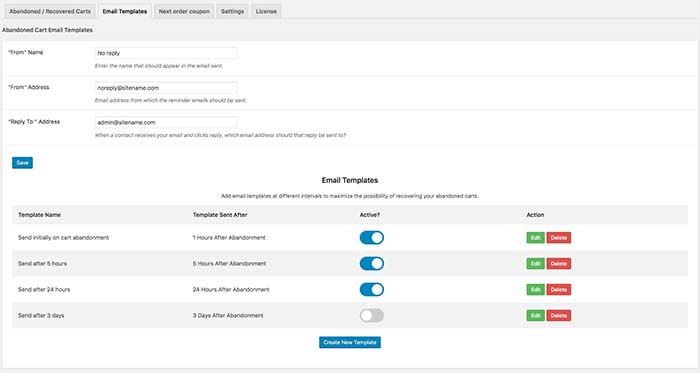
Cart Abandonment Option #1: Abandoned Cart Lite for WooCommerce (Free Plugin)
You can install Abandoned Cart Lite for WooCommerce in your WordPress backend. Activating the plugin adds an additional sub-menu under WooCommerce aptly titled “Abandoned Carts.”
This newly created sub menu of WooCommerce is where all of your cart abandonment efforts are held when using this plugin, which is not complicated.
This plugin lets you change the amount of time that defines an abandoned cart (aka the cart abandoned cut-off time) expressed in minutes. You can also choose to have an email notification sent to the store admin each time an abandoned cart is successfully recovered.
The Abandoned Cart Lite plugin includes abandoned cart reporting by product, as well as by order. And the product reporting includes totals for both abandonment and recoveries per product.
The one thing to note about this plugin is that, while it’s free, it may have a cost to run – as it could slow your store’s performance because of the way it writes to the database. And a slow site can impact your conversion.
The free version of the YITH Recover Abandoned Cart for WooCommerce plugin allows you to manually trigger an email to your logged in users that abandon their cart.
And while the free version also allow you to set the amount of time you want to pass before a cart is considered abandoned, that’s the extent of the settings for the free version.
This bare-bones approach to the free plugin is something you should carefully consider before choosing this plugin.
The ability to track abandoned carts of unregistered shoppers is only possible in the premium version.
Cart Abandonment Option #3: Retainful – WooCommerce Abandoned Cart Recovery Emails and Next Order Coupons (FREE Plugin)
Retainful is a popular abandoned cart recovery plugin for WooCommerce stores. The free plugin lets you automatically send a series of cart recovery email reminders (aka drip campaign) at well-timed intervals. Your customers can recover carts with a single click and complete the purchase.
With Retainful, you can capture all the carts including guest carts, collect email, set a cut-off time for abandoned carts in order to trigger recovery emails. And you have the full control over the email scheduling. The emails can include the cart summary and personalized shortcodes. It can stop sending the emails automatically as soon as the cart is recovered.
Most importantly, you can also track the performance of your abandoned cart email campaigns. You can view the list of customers who have abandoned carts, view live carts (customers using the cart at that moment) and measure revenue made with recovered carts as well.
And the biggest plus with Retainful is that you can do more than just automating cart recovery email notifications. It helps you drive repeat purchases by sending single-use coupons for next purchases within the order notification emails itself. This helps you retain your customers and motivate them to purchase again.
Cart Abandonment Option #4: Abandoned Cart Pro for WooCommerce (Plugin is $119/yr)
This is the full-featured commercial version of the Abandoned Cart Lite, which we covered above. The plugin sells for $119/year/store from TYCHE Softwares.
One thing to consider before use, this plugin uses WP-Cron to send emails. That means your website is acting as your email server, and is dependent on WP-Cron (which can be managed by your host). That’s not always the best way to set things up….and if your host deactivates WP-Cron automatically on every WordPress installation, this plugin will not work for you.
The good news is that you’d know pretty quickly if it won’t work. And the even better news is that you can test it on your site using the Lite version and then upgrade to this Pro edition. That all said, they do offer a 30-day money back guarantee.
My favorite feature (and I wish all retargeting software did this) is that it stops sending emails automatically once a customer either makes a purchase or uses a cart recovery link.
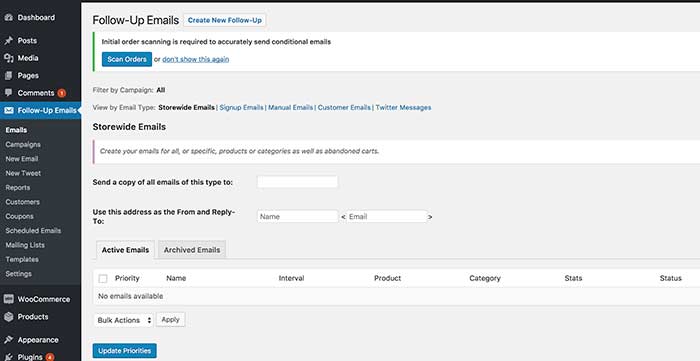
Cart Abandonment Option #5: Follow-Ups for WooCommerce (Plugin is $99/yr)
Follow-Ups for WooCommerce is a paid solution, $99/year/site, sold and supported in the official WooCommerce extensions store.
Follow Ups for WooCommerce integrates with many other WooCommerce plugins.
For example, when you add Follow Ups to a store running WooCommerce Subscriptions, the integration supports sending follow ups to your subscribers around their subscription ending as well as follow ups based on their next payment being due.
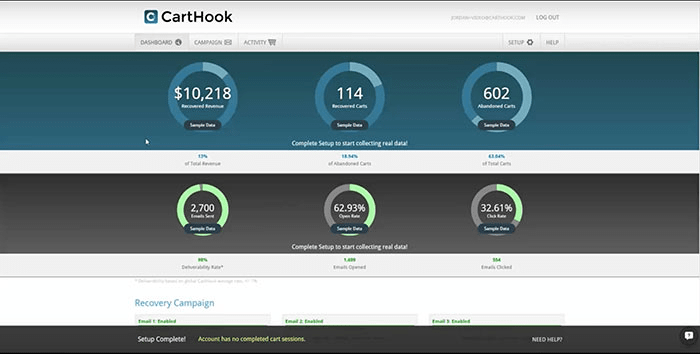
Cart Abandonment Option #6: Carthook – (SaaS starts around $600/yr)
Carthook is a Software as a Service (SaaS) solution. This means the work it’s doing is off of your server, and that you don’t need to install updates every time a new feature arrives.
Cart recovery best practices are built into Carthook. The first thirty days with all customers serve as a free trial.And the amount of revenue that your store recovers during the free trial determines which paid plan you’re on going forward. Plans start at $50/mo for up to $1K in recovered revenue each month.
Carthook automatically creates campaigns that have the three outbound emails per missed order. There aren’t any limits to how many total emails you send out each month.
As for email scheduling with Carthook, you can choose from a list of preset delays for emails.
Cart Abandonment Option #7: Jilt – (SaaS starts around $600/yr)
With Jilt, cart recovery best practices are also built in. The monthly cost is determined by how many customers Jilt engaged for your store over the month, not the quantity of emails sent. So you could send 5 or 50 emails to the same engaged customer and there’s no additional cost. But if you add more customers who are engaged, the cost goes up.
The first 25 MCEs are free. And $49/mo gets your store up to 100 MCEs a month.
Like Carthook, Jilt includes a one-click link back to the abandoned cart. And you have full control over email scheduling with Jilt.
Get Built In Cart Abandonment Technology With Hostdedi
WordPress 5.0 was released on December 6, and with it has come the WordPress Gutenberg Editor. Designed to make creating great websites easier, the Gutenberg editor has made waves in the WordPress community. The new editor has changed the site creation experience significantly. The addition of a new blocks system is designed to make things easier for beginners but may take some getting used to for veteran WordPress users. Whether you’ve made the move to WordPress 5.0, or are still thinking about whether the upgrade is worth it, this guide will walk you through how to manage a page and its content with Gutenberg. This is our guide to Gutenberg. Read More »
If you hear people talking about KPI metrics, or more explicitly eCommerce KPI metrics, and didn’t want to be the one that raised your hand to ask what they were talking about, we have you covered.
Let’s begin with a couple of definitions to make sure we’re on the same page as we walk our way through a glossary of your store’s eCommerce KPI metrics.
Common Definitions to Know
eCommerce is defined as commerce conducted via the internet. This can be business to business, business to consumer, consumer to business, or consumer to consumer.
Key Performance Indicator (KPI): is a quantifiable measure of success/failure against a goal.
A Metric is defined as a system or standard of measure.
And keep in mind, you set your business goals. These KPI metrics help you measure performance against your chosen goals.
Definitions of KPI Metrics
1. Average Page Load Time – (6.06s)
The average amount of time, in seconds, it takes for your complete page to load in your website visitor’s browser. This is important to your store because reducing the average page load time by 1.6 seconds would increase annual revenue growth by 10 percent.
2. Average Server Response Time – (1.04s)
The average amount of time, in seconds, it takes for your server to respond. Can be overlooked in favor of optimizing the page. However, if the server response is slow, a well optimized page will still load slow. Google recommends a server response of under 200ms.
3. Pages per Session – (5)
The average number of pages visited per session for each specific website visitor. This metric is significant because if visitors are leaving your website before visiting other pages, that works against your conversion goals. On the other end of the spectrum, if visitors are viewing loads of pages but not converting, that may mean your messaging is not clear enough for visitors to trust and buy.
4. Session Duration – (3m 24s)
The average amount of time each website visitor session lasts. The longer your visitors spend on your website, and in your store, the better. Unless we’re talking about your checkout pages, where too much time being spent works against conversion.
5. Bounce Rate – (38 percent)
The percentage of your website visitors who left without visiting a second page on your site. It’s significant, because if too many people are leaving your website without visiting additional pages, that will work against your store goals.
6. Mobile Page Views
The number of pages viewed using mobile devices. A higher percentage of mobile pageviews correlates with higher revenue growth per Wolfgang Digitals 2017 KPI Report.
7. Tablet Page Views
The number of pages viewed using tablets. Higher than average Tablet Pageviews also correlates with revenue growth per Wolfgang. But keep it in perspective, since the same report states that desktop users were 164 percent more likely to convert than mobile, while desktop visitors accounted for 61 percent of all online revenue.
8. Pinterest Traffic
The total amount of visitors from Pinterest for a chosen period of time. This is significant, because Wolfgang did not classify Pinterest as a social network; rather, it was classified as an “intent-driven research engine.” Wolfgang found that a higher proportion of Pinterest traffic correlated with a higher Average Order Value for their stores.
9. Instagram Traffic
The total amount of visitors from Instagram for a chosen period of time. This is significant because even though Instagram’s only clickable links are the single profile links, Instagram still had higher order values than Twitter, Pinterest, and Facebook.
10. Website Traffic
The total traffic to your website for a given period of time. Significant toward calculating other KPIs, as well as for tracking your website’s traffic trend over time.
11. Traffic Source
Below is a Google Analytics report answering the following question: “Which channel did a website visitor find your store through?”
Google Organic Traffic – (32 percent) Organic traffic from Google merely means someone found you by searching and clicking your link in the search results. On average, this is where most of the traffic comes from.
Google CPC Traffic – (23 percent) Total traffic to your website from paid (cost-per-click) Google advertisements. This is significant because Google CPC generates 25 percent of all revenue.
Direct Traffic – (21 percent) Where they came directly to your website, includes loyal and repeat customers. In Google Analytics, this also includes what is called “dark traffic.”
Traffic From Email – (1 percent) Total website visitors from links in emails. Important because stores who get more traffic from email average a higher average order value. And email still drives three times as much revenue as Facebook.
Facebook Organic Traffic – (2 percent) Facebook organic traffic accounts for visitors to your website that did not come from your paid advertisement via Facebook ads. Significant in evaluating your social marketing strategy efforts through your store’s Facebook page.
Facebook CPC Traffic – (2 percent) This is the traffic coming from your Facebook ad spend. The significance to your efforts will depend on the goal you set for your Facebook ad spend, but these visitors and seeing where they go after the landing page is also helpful.
Bing Organic Traffic – (1 percent) Organic traffic from Bing means someone found you by searching and clicking your link in the Bing search results. It’s significant if you can associate it with other metrics, specifically average order value and/or higher lifetime value.
Yahoo Organic Traffic Organic traffic from Yahoo means someone finds you by searching and clicking your link in the Yahoo search results. It’s also significant if you can associate it with other metrics, specifically average order value and higher lifetime value.
12. Email Opt-In Conversion Rate
Total number of email subscribers for a period of time divided by the total site visitors for the same period of time and then multiplied by 100 for the percentage. Significant in evaluating your email opt in messaging. Is it working to take strangers that visit your website and convert them into email subscribers?
13. Shopping Cart Sessions
Total number of website visitors who began a cart session, by adding an item to your shopping cart. The total number of shopping cart sessions helps determine the shopping cart abandon rate. Also important as a trend over time with the question being, are there more or are there less cart sessions initiated month-to-month?
14. Shopping Cart Abandons
Total number of website visitors who began a cart session but did not move on from the shopping cart to the checkout page. The average is right at seventy-percent of shopping cart sessions end in abandonment. Establishing the total number of abandoned carts allows you to track how many carts you’re able to reclaim via your cart abandonment efforts.
15. Shopping Cart Conversion Rate
The percentage of website visitors who began a shopping cart session and completed the checkout process. How many shopping cart sessions converted is extremely significant as a store owner. A low rate means you need to remove friction from your shopping cart conversion process.
The percentage of shopping cart sessions that do not complete checkout. Found by taking the total number of completed purchases for the time period and dividing it by the total number of shopping cart sessions for the same period and then multiplying the number by 100 for the percentage. Managing this number is a quick path to more revenue each month.
17. Customer Acquisition Cost (CAC)
Helps you see how much it costs your store to acquire a new customer. Find your CAC by dividing your marketing spend by your total number of customers. It’s helpful at a macro level to manage your return on investment from your marketing spend.
18. Gross Profit Margin – (in the 30-40 percent range)
Is expressed as a percentage of your revenue that turns into profit. It being gross profit margin, it only subtracts your cost of goods sold from your total revenue and you then multiply that number by 100 for the percentage. Significant in managing your store’s profit margin.
19. Net Profit Margin
Start with total revenue, aka all the sales, fees, and other monies collected by your store and then subtract out the cost of goods sold, taxes, operating expenses, and interest paid and then multiply that amount by 100 to find your net profit margin. Significant in managing your store’s profit margin.
20. Percent Returning Customers
The percentage of returning customers is found by taking the number of returning customers (those buying for the second time or more), and then dividing it by the total customers. Take the product and multiply it by 100 to express it in a percentage. Selling more to current customers is cheaper than paying to acquire a brand new customer, right?
21. Revenue Growth
Is found by taking the current period’s revenue and subtracting the prior period’s revenue. Divide that number by the prior period’s revenue and then multiply by 100 for the percentage. At a macro level, this is significant to know which way your revenue total is moving. Up or down? And at what rate?
22. Revenue by Traffic Source
The total revenue for a specific source of website traffic over a chosen period of time. Helpful to determine your most profitable traffic sources as you allocate your marketing budget moving forward.
23. Revenue on Ad Spend
Total amount of revenue attributed to a specific ad spend/campaign. Significant as part of determining your return on investment from your ad spend.
24. Number of Transactions
The total number of transactions for a given period of time. This is helpful in determining other metrics, and is typically important to store owners that this number consistently trend in a positive direction.
25. Cost per Conversion
How much does it cost for each of your store’s conversions? Found by taking the total cost for the traffic and dividing it by the number of conversions. This is significant in helping you determine if your advertising spend is driving conversions to your product.
26. Cost per Click – (Adwords average is ~$2)
The total cost for each click of an advertisement, each of which delivers a website visitor. Significant because it’s one way to measure the return on investment into your store’s paid advertisements.
27. Customer Lifetime Value (LTV)
Calculating a customer’s lifetime value seeks to forecast the total revenue each customer will generate over the course of their customer lifespan with your store. The “simple” version of the calculation involves multiplying the annual revenue per customer by the customer relationship in years, then subtracting the customer cost of acquisition.15 (Find much more here. And here.)
28. Average Customer Lifespan
The number of days the average customer remains a customer of your store. Your business isn’t a short term proposition, so the longer the average customer lifespan, the better for your store.
29. Customer Retention Rate
The percentage of customers from a specific time period that return and purchase as compared to an earlier, equal time period. Significant because a high percentage of returning customers is an indicator of successful stores.
30. The Rate of Discount
Defines the interest rate used in discounted cash flow analysis to determine the present value of future cash flows.14 Significant in the more complicated formulas for customer lifetime value.
31. Gross Margin
Found by taking your store’s total sales revenue and subtracting the cost of goods sold. Then divide the product by revenue and multiply by 100 to get gross margin (expressed as a percentage). Significant in managing your store’s profitability, as the higher the percentage of gross margin, the more revenue that becomes profit for your store.
32. Average Gross Margin per Customer Lifespan
Found by finding the percentage of profit margin per customer from the total revenue per customer lifetime. Plays a role in complicated customer lifetime value formulas.
33. Average Order Value – ($217.82)
The average value of your store’s orders is found by taking the total store sales and dividing it by the number of transactions. Significant to most store owners but keep in mind that the higher the average order value the lower your conversion rates, because pricey purchases take more clicks.
34. eCommerce Conversion Rate – (1.56 percent)
The total number of store transactions and divide it by the total visitors to your online store and then multiply that number by 100 for the percentage. This is significant because it shows on a macro level how successful your store is at turning visitors into customers.
35. Visits to Purchase
The average number of store visits required for a customer to purchase. If it takes too many visits for people to purchase, you will want to look for ways to remove friction from your checkout process. And be sure you have social proof as well as trust items throughout your checkout process.
36. New Customer on First Visit
The percentage of visitors who purchase on their first visit. Most shoppers will not buy on their first visit, so if you have an inordinate amount of first time customers, that is a good thing.
37. Unique Online Buyers
The total number of unique online buyers that visited your store over a given period of time. Helpful to drill down to the total unique buyers amid all your return buyers.
38. Average Cost per Order
Gives the average advertising cost per order. Find it by dividing the total investment into marketing by the store’s total number of orders. Helpful in evaluating your advertising dollars against the number of online orders your advertising is driving in your store.
39. Conversion by Traffic Source
Total number of conversions specific to a traffic source. Tracking conversions back through the traffic source they originated is always helpful for allocating future marketing budget for your store.
40. Conversion by Device Type
Total number of conversions specific to a device type. Knowing which device your shoppers use to convert is helpful for your marketing budget as well. For store owners, keep in mind that desktops still generate 61 of revenue versus smartphones and tablets.
41. Shipping Error Rate
Track the number of shipping errors. Found by dividing the total number of erroneously shipped orders by the total number of orders shipped. Significant because it helps you manage your shipping success rate, which influences customer happiness.
42. Product Views per Session
The average number of products a potential customer views during their session with your store. Too many product views per session can portend of confusing copy on your products page. Or lack of clarity on the specifics of how the shipping process plays out for your store.
43. Average Shopping Session Length
Measure the average amount of time a single person spends on your site that concludes with a checkout. If your average shopping sessions are too long that’s a reason to remove friction from your checkout process.
44. NPS – Net Promoter Score
Measures how likely someone is to recommend your store. Found by asking customers to rate their likeliness to recommend your store on a scale of one to ten. Significant because it helps you monitor how happy your customers are with your store. And anytime you’re talking about customer intent to share your store with others, you want to keep a close eye on.
45. Average Email Open Rate – (16.75 percent)
Percentage of emails sent that are opened. Significant because people have to open your emails to buy from you. And if your emails are not being opened, consider running some A/B tests on your email subject lines in order to learn which subject lines your audience opens more often.
46. Email Click Through Rate – (2.32 percent)
Percentage of emails where a link was clicked. The whole point of an email sent from your store is to have it opened and then to have them click on a link within the email. Making click-through rate important for anyone doing digital marketing.
47. Refund Rate
As an eCommerce store owner, you’re going to have some refunds. But if your refund rate is too high, there’s a problem with customer expectations on product pages and in your checkout process.
48. High Traffic Periods
You want to be aware of the period of time that your high traffic lasts. It’s different for every store. For instance, you may send an email to your email list each morning after which you have an hour of very high traffic. Much like staffing for a retail store, knowing your high traffic periods and verifying them via analytics each quarter for changes, helps you make sure your customers are cared for in the manner you expect.
49. Average Page Weight
Check the page weight of your most visited pages. Track the average page weight in the interest of better page load times for your store’s pages. Run the individual urls through GTMetrix.com and it will tell you how fast each page loaded as well as the weight of each page in kilobytes.
50. Daily Traffic – Total Visitors/Day
Keeping a handle on your store’s day-to-day foot traffic, helps you plan resources for concurrency of customer orders. For online stores, think of your hosting resources along the same lines of staffing your brick-and-mortar location.
51. Subscriber Growth Rate
Designed to determine how many new subscribers you’re attracting through the various ways people can connect with your brand. It’s significant to see how your message is resonating with your audience. Find this ratio by adding together the number of leads, registrations, and signups. Then multiply that total by your conversion rate for the same period of time to get your subscriber growth rate.
52. Value Per Visit
Find the value per visit metric by taking the total store revenue for a period of time and dividing it by the total visitors for the same period of time. This is helpful to provide context when planning your marketing activities.
Want to read more about eCommerce KPI metrics?
Here are some resources to digest more resources on eCommerce KPIs.
Here’s the good news – you don’t have to keep an eye on all of these KPI metrics all the time.
Set your store goal, then choose the KPI metrics that help you measure your store’s performance against the goal. For those key performance indicators, setup a daily or weekly reporting so that you can regularly check in on how things are going.
What’s really exciting is that if you’re using our Managed WooCommerce Hosting productfrom Hostdedi, you’ll have access to tons of data and KPI metrics via our partnership with Glew.io.
There are a lot of ways to keep up to date with the Magento industry. The community is incredible and you’re almost never left in the dark on new developments. So why should you dedicate time to travelling to and attending a conference, especially when it’s all already available online?Read More »
Google is a major source of eCommerce traffic, both on the desktop and on mobile. eCommerce store owners can’t afford to ignore search engine optimization, but I come across many sites that would fail even the most basic of SEO audits. Smaller eCommerce stores may not have the resources to hire an SEO specialist, but most don’t need to. Implementing some of the WooCommerce SEO best practices doesn’t take deep expertise, and WooCommerce makes it even easier.
In this article, I’m going to talk about the low-hanging fruit that every eCommerce store should have in order, but which, in my experience, are often left to chance.
Where is the content?
The number one WooCommerce SEO mistake I see in stores is a lack of content. Without content, there is nothing for Google to index. Product pages with an image and a gnomic SKU identifier don’t cut it.
Write unique descriptions for each product. You don’t have to write 500-word essays for every product, but a hundred words of descriptive content can make a big difference.
Don’t neglect title and meta description tags: they give important clues to Google and are used in search results. Yoast WooCommerce SEO provides a more friendly interface for creating rich SEO-friendly product pages.
Finally, consider blogging. It’s a great way to get more content on your site than a product description affords and provides assets that can be shared on social media.
Keywords matter
When the web first got started, you would inject your keyword hundreds of times on your page. This allowed search engines to find your page and deliver it to those searching for it. Times have changed though and that practice doesn’t make sense. There is a happy medium between going keyword-crazy and ignoring them altogether. They are less important than they once were because search engines are more sophisticated about user intent and natural language processing, but ignoring keywords is a mistake.
Use keyword research tools like the AdWords Keyword Planner to discover relevant keywords for your products, including long-tail keywords, and incorporate them in on-page content and metadata.
Slow and steady doesn’t win the race
Site performance is vitally important to eCommerce search engine optimization and is a WooCommerce SEO mistake I see quite often. Slow eCommerce stores will not perform as well as faster competitors, all else being equal. Use tools like Google PageSpeed Insights and GTMetrix to assess the performance of your WooCommerce store. Both will advise you of changes you can make to improve performance.
Hosting is the most important contributor to performance. As your store grows, the low-cost shared hosting plan you started out on might not cut it anymore.
Consider upgrading your hosting account.
Mobile-friendliness isn’t optional
For several years now mobile searches have outgrown desktop searches. So it’s no wonder that eCommerce merchants have to provide a positive experience for their mobile shoppers. If they don’t, Google will send its mobile users elsewhere.
Today’s best solution from a design trend is to build a mobile-first responsive design. You have thousands of responsive WooCommerce and WordPress themes to choose from, so there is no reason you shouldn’t be able to offer an outstanding experience to mobile shoppers. The top two contenders I really like are Astra Pro and GeneratePress.
Structured data makes eCommerce stores machine-friendly
Finally, give Google and other crawlers a hand with structured data. Structured data helps machines to understand your site and can result in better-looking search results and social media shares. I’ve already mentioned Yoast WooCommerce SEO, which can help out here too by providing configuration options and an interface for adding rich Schema.org and OpenGraph data to your eCommerce store.
Want to Learn More?
These five suggestions are just the beginning of eCommerce search engine optimization, but they provide WooCommerce retailers with a solid foundation for future optimization. Here are some helpful links to other Hostdedi blogs on similar topics:
Docker is a company that offers container-based development and services that enable you to deploy Docker for local WordPress development.
They offer a free software you can use to leverage containerization in your development process.
With Docker, you can build your WordPress sites, web apps, databases, and much more in containers rather than installing the necessary services on your machine directly.
The use-case I want to talk about in this post is using Docker for local WordPress development. I’ll walk you through the benefits you can get from using Docker, and the full installation process.
At the end of this post, you’ll have:
Installed Docker on your machine and
Set up your first local WordPress site using Docker
Like this content? Subscribe now and have more just like it sent straight to your inbox.
Why use Docker for local WordPress development?
There are multiple reasons you might want to use Docker for local WordPress development. I switched to Docker in my development for many of those reasons, and I don’t look back.
In my eyes, Docker brings quite a few benefits over the traditional development setup:
The containers are stable and guarantee you’re running the same services (versions, configurations, etc.) every time
Developing inside containers brings independence from the OS you’re using and makes your apps portable
You can configure containers with docker-compose files to meet your particular needs (e.g., I added WP-CLI to my WP container)
Docker makes it super easy to move WordPress websites from one platform to another.
Docker doesn’t care if the container runs on Mac, Linux or Windows. The services inside the container are always identical.
Let me explain my development setup and rationale.
My main development machine is a powerful Windows PC. It is hooked to an external monitor and is the machine I work most of the time on.
The secondary development machine in my setup is a MacBook Pro from late 2014. I use it mostly when I’m on the go, during meetings, or for presentations.
At the end of 2017, I faced the decision to either upgrade my MacBook or invest in a Windows machine. Being reasonably cheaper and far more powerful, the Windows machine was the rational choice to make.
With that came the challenge to develop WordPress sites on two diverse platforms, Mac OS and Windows.
As I researched how to keep my local development setup as flexible as possible, I came across Docker.
Just after a few weeks, I fell in love with it.
Most developers know that different versions of PHP, Apache, MySQL or nginx can cause mysterious errors. With Docker, you don’t need to worry about those anymore.
A container platform is a complete solution that allows organizations to solve multiple problems across a diverse set of requirements. It is more than a piece of technology and orchestration – it delivers sustainable benefits throughout your organization by providing all the pieces an enterprise operation requires including security, governance, automation, support and certification over the entire application life cycle.
Follow the installation wizard and authorize the Docker.app during the installation process by entering your password. Note: The app will need elevated privileges to run.
Click Finish once the installation routine is completed.
That shouldn’t be too complicated. If you encounter errors during this process, you can always reference docs.docker.com for help.
Since Docker does not start automatically after the installation is done, let’s start the daemon manually.
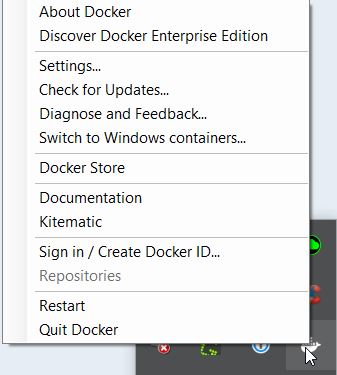
On Windows, search for Docker and select Docker for Windows.
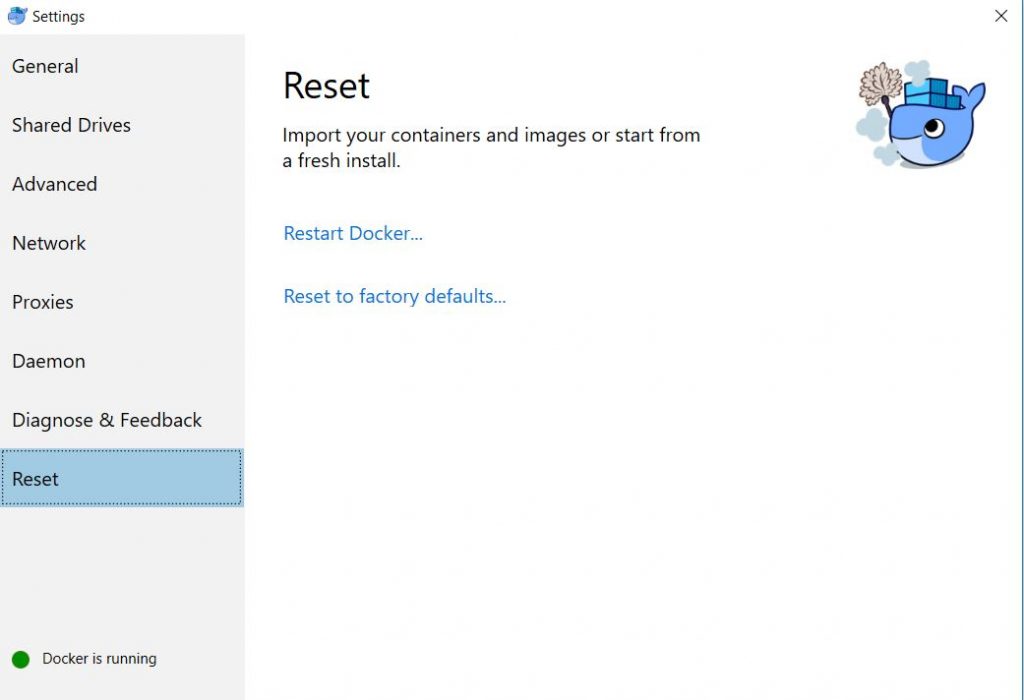
After you started the app, you’ll see that the Windows taskbar at the bottom or Mac’s bar at the top now shows the Docker icon. When you hover your cursor over it, a tooltip comes up that says “Docker is running.” Good job!
Step #2: Sign in to the Docker Cloud using your Username and Password
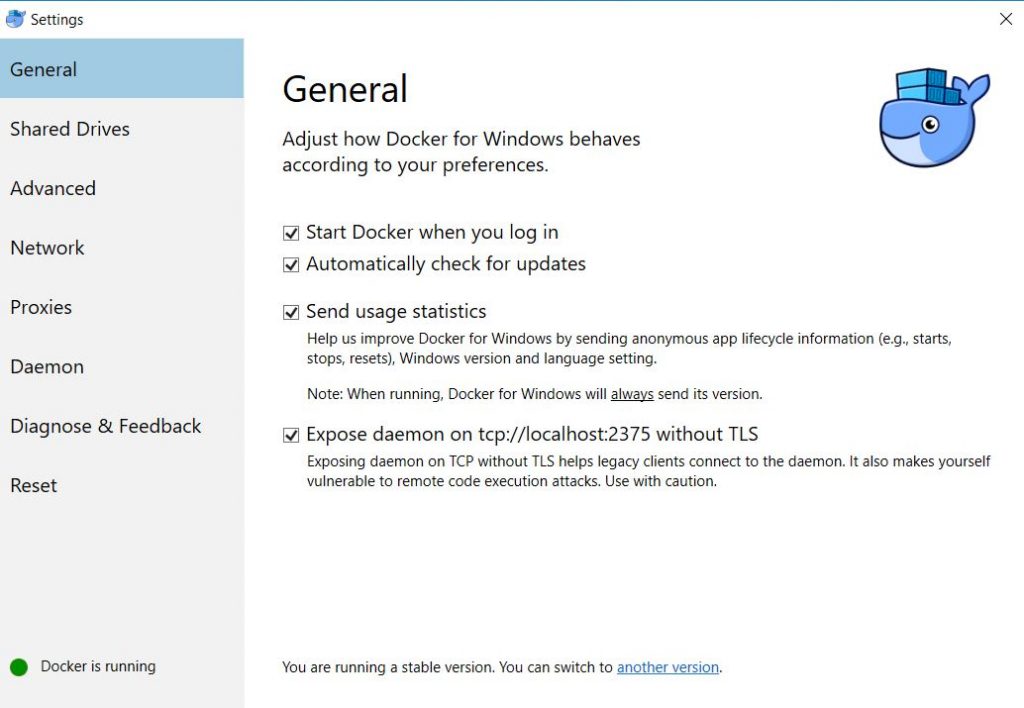
Configuring Docker for Local WordPress Development
Now that you have Docker running, it’s about time to configure it. Let me walk you through the options you have.
Start Docker when you log in.
Do you need Docker every time you boot your computer or do you want to start it manually? The choice is up to you.
Automatically check for updates: I like being on the latest stable version of Docker. Hence this option is a must for me.
Send usage statistics: Providing information to the Docker team might help them make it better. Turning it off will not affect your everyday work with Docker.
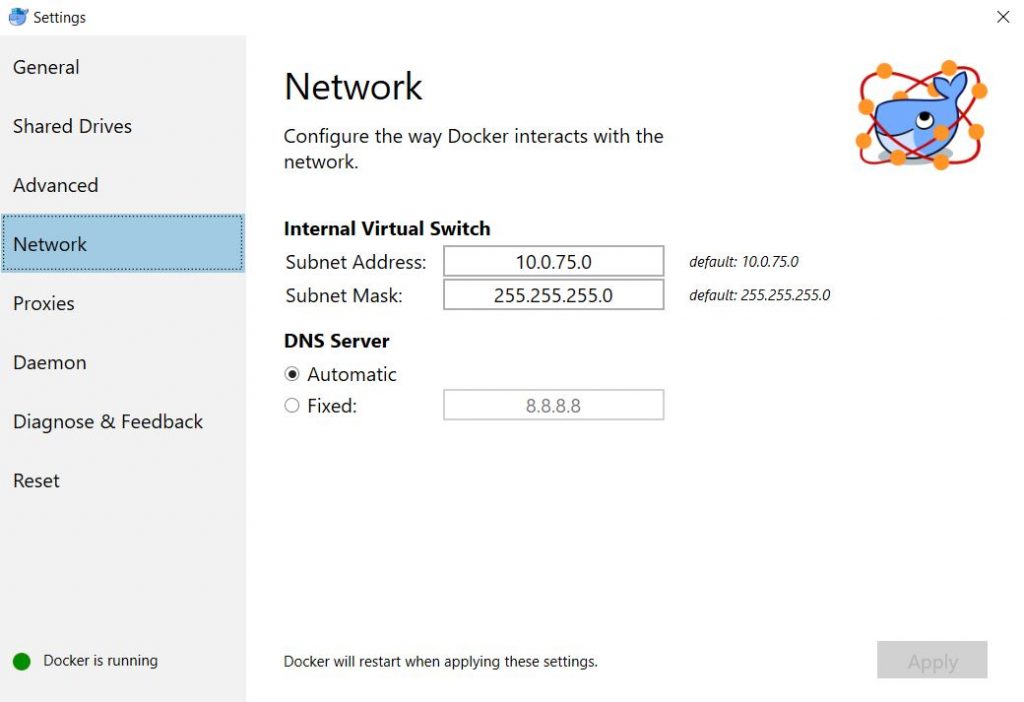
Expose daemon on tcp://localhost:2375 without TLS: The Docker daemon handles creating the containers that will later contain your applications and the images, which serve as a blueprint for containers. According to the Docker daemon documentation, it’s “conventional to use port 2375 for un-encrypted, and port 2376 for encrypted communication with the daemon.” Depending on your architecture, you might want to turn this option off on production systems. For local environments, I don’t think it’s a big deal.
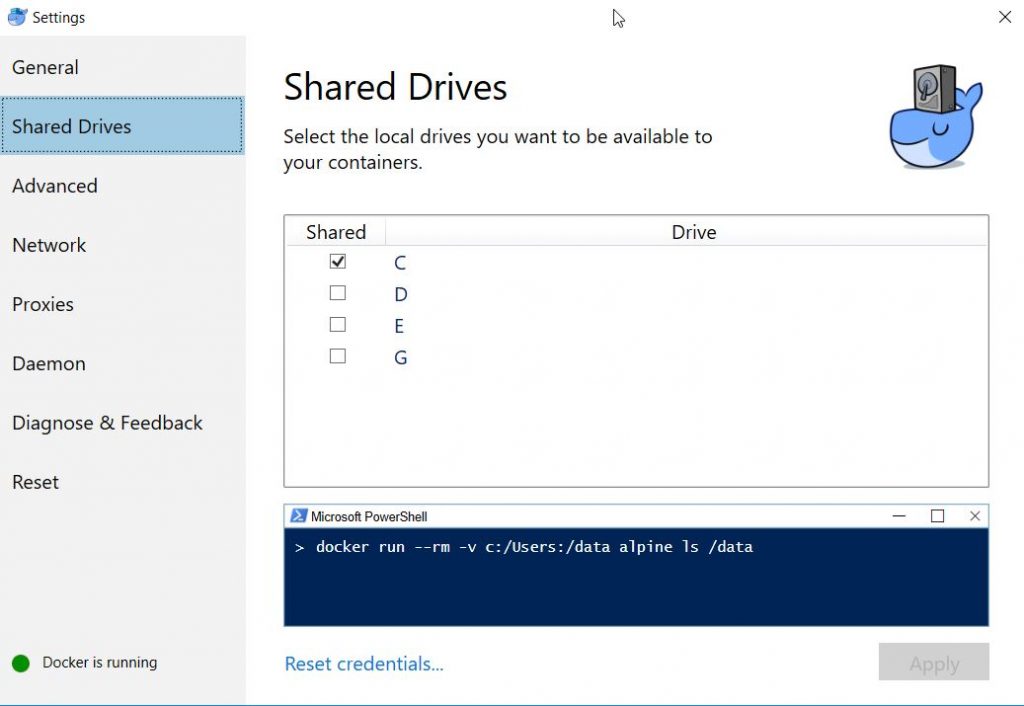
On this screen, you configure where your development files will be located. I have mine on the C: drive in the User home folder. We need to tell Docker which hard drives it is allowed to access in its containers so that we can work on local files just as we’re used to and have the changes we make reflect in the containers.
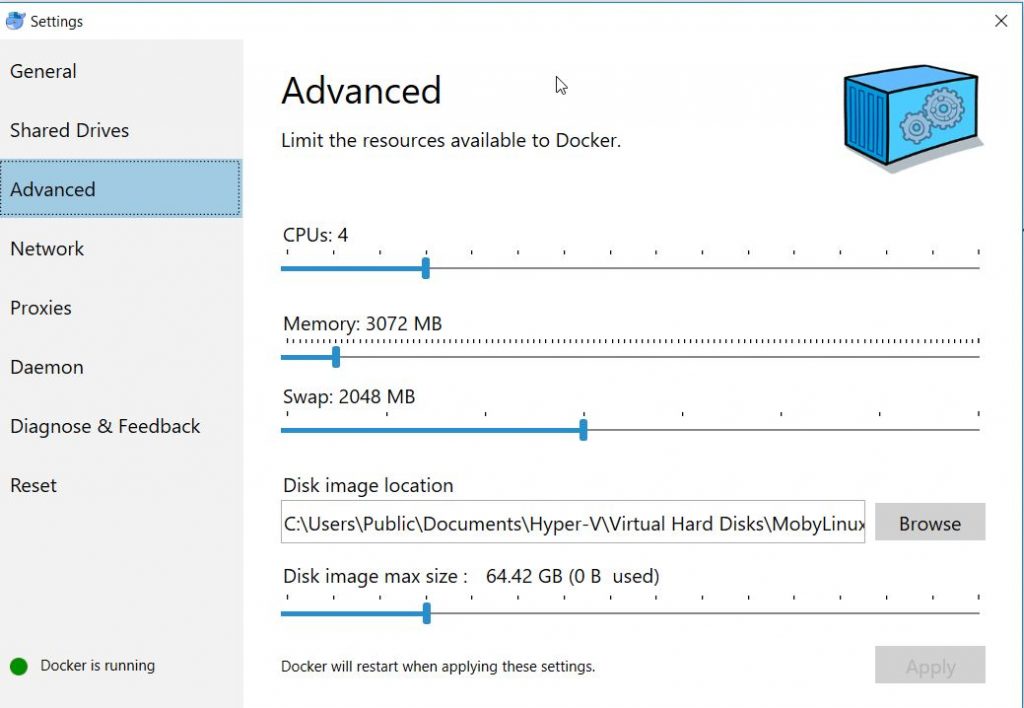
How much hardware Docker can use will depend on the specifications of your computer. For me, with a Ryzen 1700x and 32GB RAM, this configuration works without any hiccups. One thing you can see though is that Docker (on Windows) requires Hyper-V to be running. That’s also outlined in the Readme file I linked above when talking about the prerequisites for the installation.
The network configuration will also depend on how your network is structured. My home network has a pretty simple architecture (benefits of a home office), so I didn’t have to change any of this.
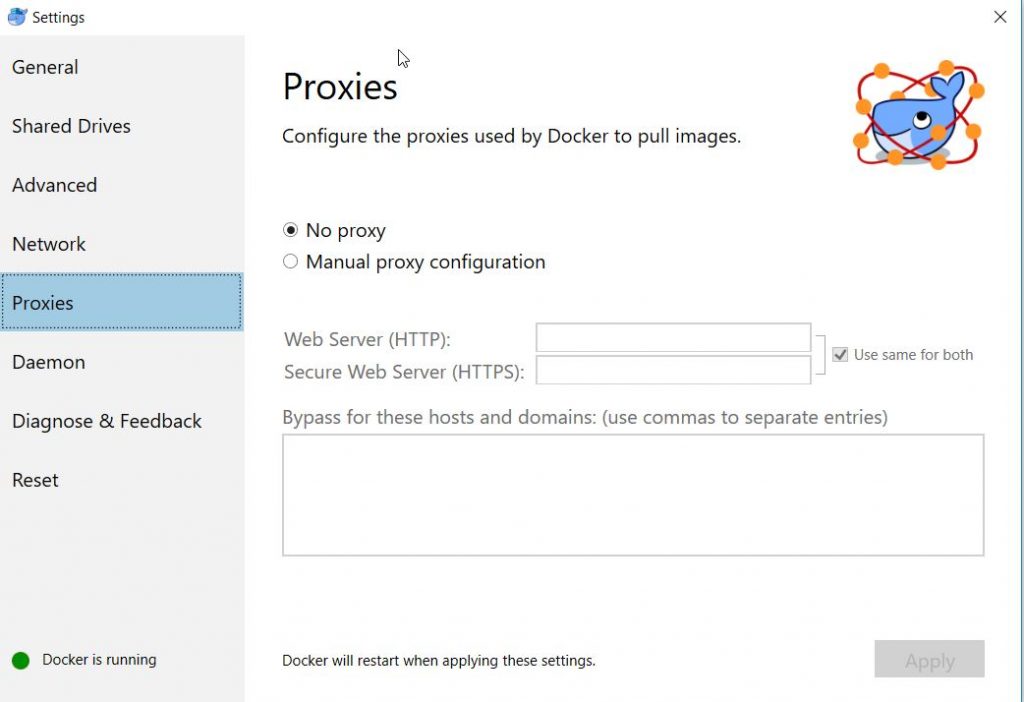
Again, I don’t run any proxy servers in my home office. If you use one, you’ll be able to configure it in this tab. This ensures Docker can connect to the Internet, download the images for your containers, and pull updates.
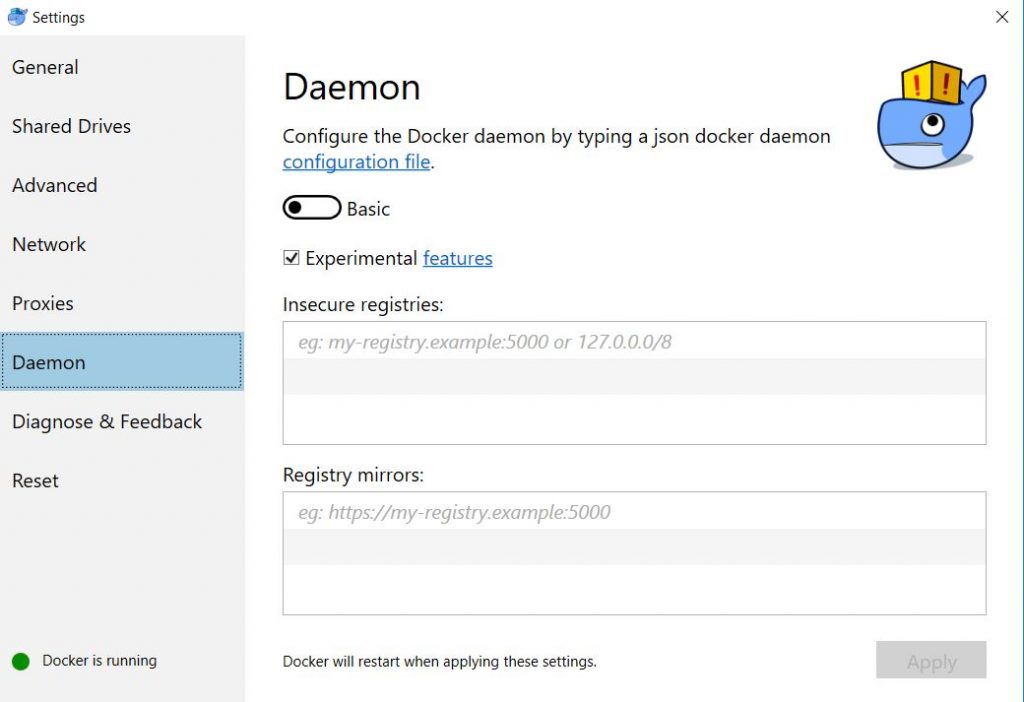
We briefly talked about the Docker daemon above. The daemon’s task is to talk to the kernel, build and manage your containers and create the system calls to make.
For local development, I haven’t found the need to change the daemon’s configuration. This will likely be a different story for using it in a production environment, but let’s keep that for a later article.
Nothing to configure here, but a bunch of helpful links in case Docker is not running as intended and you want to do some troubleshooting.
Sometimes, nothing but restarting Docker helps. This is where you would trigger that restart or even reset your entire configuration.
How to deploy your first local WordPress on Docker
Making sure docker-compose is set up
Now that Docker is set up and configured let us talk about a helper tool called docker-compose.
To quote the documentation:
“Compose is a tool for defining and running multi-container Docker applications. With Compose, you use a YAML file to configure your application’s services. Then, with a single command, you create and start all the services from your configuration.”
Sounds handy, doesn’t it?
On desktop systems like Mac or Windows, docker-compose is included in the main application. Linux users will first have to install Docker and then head over to this page to grab the installation instructions for docker-compose: https://docs.docker.com/compose/install/
Getting the instructions from Docker directly is the best way to ensure you got the latest version of them.
To ensure it is set up correctly, run docker-compose -v in your shell (CMD, PowerShell, Bash, etc.).
The output should be something like:
“docker-compose -v” should print the version number. Compare that to the version number shown on the Docker website to make sure it’s the latest.
Note: I’m running docker-compose from the WSL in Windows 10, works smoothly!
Building a container for WordPress
To start building WordPress websites, you’ll need a container that makes the required services available. We’ll need at least two containers:
A web server (we’ll use Apache)
A database server (we’ll use MySQL)
As you likely know, a web server and database are the bare fundamentals you need to run WordPress.
It can be quite painful and time-consuming to manage just those two services across multiple OS, to keep the local environment, staging area and production area in sync, or to troubleshoot errors in WP that are caused by misconfigurations of those services.
Since my setup involves working on Mac and Windows, I wanted to save myself from that pain.
That repository contains a configuration file for docker-compose, which is what we’ll need right now. I added comments to it, so you can modify the instructions to fit your preferences.
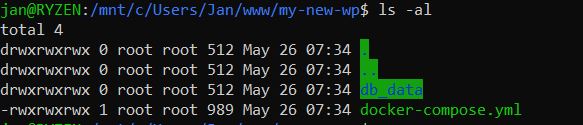
If you’re building a new WP site, clone the docker-compose.yml from my repo into the folder where the fresh WP install will live.
The folder contents would then look like this:
I created an empty db_data directory and put the docker-compose.yml into place.
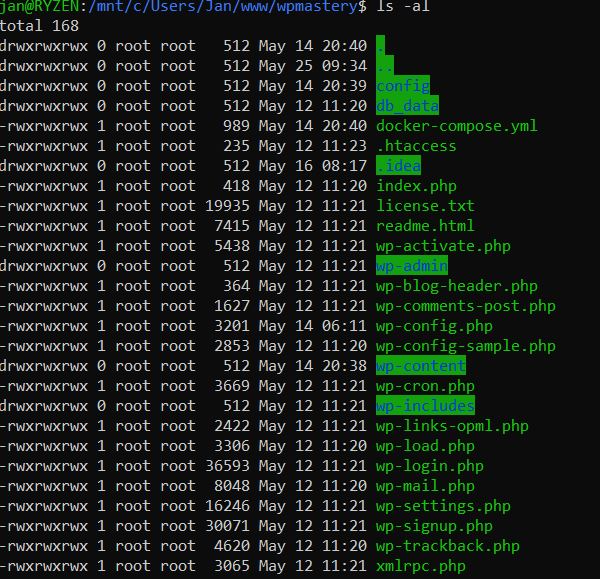
If you want to run an existing site in a Docker container, place the docker-compose.yml from my repo in the root folder of the existing site.
The folder contents would look like this:
The .idea directory comes from my IDE PHPStorm; the config directory is used to load custom php.ini / mysql.cnf files into Docker.
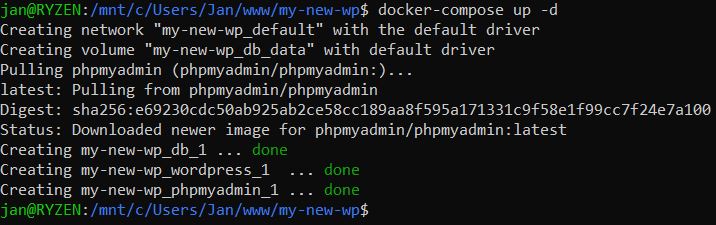
In a shell, cd into the directory and enter: docker-compose up -d
The following will happen:
Docker will download the images you specified in the docker-compose.yml file. In this case, it’ll download MySQL, my WordPress container (that comes with WP-CLI), and PhpMyAdmin
The containers will start and expose themselves to the ports you specified in docker-compose.yml
You’ll be able to import the WP database [e.g., through PhpMyAdmin] and adjust the wp-config.php file to match the database config from docker-compose.yml (see comments in the compose file)
Your terminal will show you exactly what it is doing:
Docker pulled the PhpMyAdmin image from the cloud. It already had MySQL, and the WordPress image saved locally from other projects.
If you are working on an existing WordPress site, you can directly access the website now in the browser. I have set the docker-compose.yml to listen on http://localhost:8080 – but you can change that to your personal preference of course.
You can also use your IDE to start coding on the website, any file changes you make will reflect in the Docker container in real-time.
At this point, you’re pretty much done with this tutorial and could start working on your code. Congratulations!
Note: If you want to install a new WordPress site in the Docker container, please read on.
How to use WP-Cli with Docker
The beauty of using Docker images is that you can add services and packages to them.
In my workflow, I use WP-CLI in almost all of my projects – even if it’s just for installing or the search-replace functionality. So I added it to the WordPress images that I have set up in the docker-compose file.
Once you created the container using: docker-compose up -d you’ll get the IDs of three containers that have been created. In the above example, those are:
my-new-wp_db_1 -> referencing MySQL
my-new-wp_wordpress_1 -> referencing the web server
my-new-wp_phpmyadmin_1 -> referencing PHPMyAdmin
For convenience, I included WP-CLI in the web server image. So we can now download the latest WP version into the container using: docker exec my-new-wp_wordpress_1 wp core download
As you can see, when you prefix the WP-CLI commands with “docker exec your_container_name,” you can execute them normally.
So, let’s proceed with setting up the WordPress configuration file wp-config.php in the new Docker container via WP-CLI:
We configured those database values in the docker-compose.yml file, feel free to change them to your preferences. However, make sure that you’re using the exact values in the wp-config.php.
Next, let’s proceed with the installation itself:
And BOOM! Your site is now online, congratulations!
Now you can start developing on your fresh install.
Further reading on Docker for local WordPress development
As you can tell, this post covers the bare fundamentals of getting started with Docker for local WordPress development. Of course, you can do a whole lot more with these tools!
Hence, I thought I’d include a couple of links for further reading:
With Managed WordPress Hosting from Hostdedi, we take the hassle out of hosting by handling all plugin and platform updates automatically. We also compress your images for a lightning fast site experience for every visitor.
Choosing the right data center location can feel as though it’s one of the most important decisions you’ll make when taking your business online. On top of the sheer volume of choice, you also have to confront some very real performance requirements. A good choice means an optimized web environment capable of reaching your entire audience. A poor one means an unstable connection and efficiency problems. So how do you choose a data center location?
Throughout the US, there are around 3 million data centers. That’s one data center for every 100 people. However, not all of these are housed in the colossal structures you’ve seen in movies. Many are the size of a closet (or smaller) and hold just single websites for small and medium businesses. For many, this might be a good starting point, but as an online presence becomes increasingly important (and its reliability paramount), making the switch to a managed hosting provider is a necessity. In 2017 alone, $18.2 billion was invested in building out data centers capable of housing these businesses.