CAll Us: +1 888-999-8231 Submit Ticket

Choosing a CMS for Your Site

Drupal vs JoomlaJoomla and Drupal are two competing Content Management Systems (CMS) that help site owners to build and manage their content.  Both are well-established with large and committed communities, but the guiding philosophy of each is unique.

For Joomla, ease of use combines with added functionality to create a platform for beginners and intermediates. For Drupal, functionality reigns supreme, creating a place where site owners can create user experiences that dazzle and inspire.

Both are excellent content management systems, but there are differences that should be considered before a site owner commits to either. This article aims to look at these differences in detail.

Unsure if either Drupal or Joomla is right for you? Why not also compare two other popular content management systems? CraftCMS and WordPress.


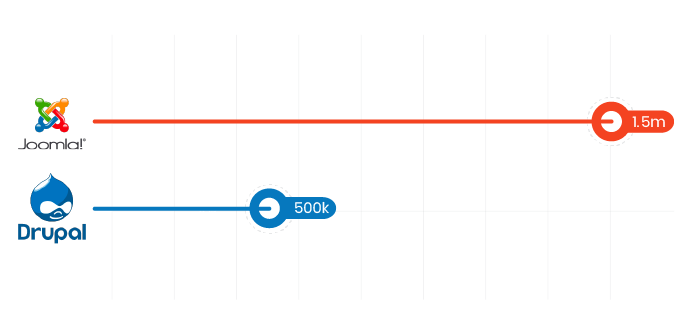
Drupal and Joomla In Numbers


Taking a look at the number of live websites, Joomla comes out on top with over 1.5 million currently in use. Comparatively, Drupal has just over 500,000.

Drupal vs Joomla in numbers

But don’t let this difference fool you. Just 0.8% of Joomla sites make it into the top 100k sites worldwide, compared with over 6% of Drupal sites. In actual numbers, that translates to Drupal having twice the number of Joomla sites present in the top 100k sites list.

As we’ll look at later, there are several reasons for this. In a chicken and egg situation, Drupal’s performance and functionality lead to a better user experience, but the fact that it offers so much developer control also means that it’s used by bigger companies.


Drupal Vs Joomla: Pros and Cons


Drupal Pros

Incredible control

Drupal affords site owners complete control of the user experience. Add additional functionality, create unique designs, and boost your SEO efforts.

A huge selection of available modules

Drupal has over 43,000 powerful modules available for site owners to tap into, offering additional functionality and control.

A very secure platform

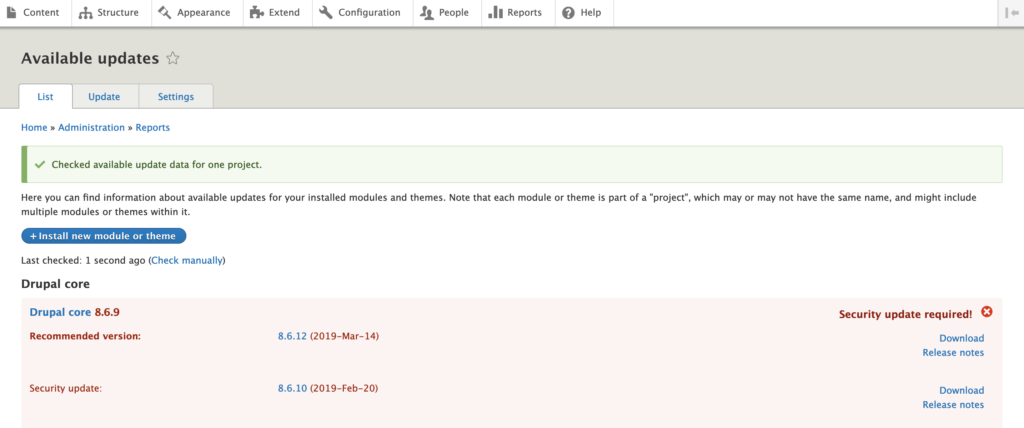
Despite some notable problems in the past (see Drupal Security) Drupal is one of the most secure CMS available thanks to an incredible security team monitoring and fixing issues.  

Drupal Cons

Complicated Development

Drupal isn’t the easiest platform available. Complex development procedures and knowledge of code are needed to get the most out of the platform.


Joomla pros and cons

Joomla Pros

Easy to use

Joomla is a great application for those who have some level of technical experience but aren’t able to fully manage technical coding tasks.

Lots of Extensions

There are over 7500 extensions. Nowhere near as many as Drupal, but still a lot.

Joomla Cons

Lacks some functionality

Joomla isn’t the best application for those looking for complete control over functionality. Unfortunately, you won’t find some features in a Joomla install.

No Official Template Directory

While templates and themes are available for Joomla, there is no official directory for them. This can make getting started tough.


The Comparison


Ease of Use


Joomla and Drupal are designed for different types of users. Joomla is built for users who need a little more flexibility. Drupal is built for developers and content management experts who need complete flexibility.

It’s because of this that Joomla is often used for blogs and small business sites, while Drupal is used to build custom websites for large organizations that depend on its highly configurable content management features.

If you’re new to building websites, Drupal can be tough to get started with. But if you’re a developer or a content management professional, you’ll love what Drupal can do for you.

Joomla isn’t as complex as Drupal but it’s also not as user-friendly or flexible as some of the other alternatives available. Whether that’s a good thing depends on what you want from your CMS.

The reason that Joomla is a little harder to navigate than some other content management systems is because it takes a more flexible approach. However, while Joomla is less complicated than Drupal, it’s also less flexible for users who host non-standard content and need complete freedom to build a custom content management framework.


Drupal

Joomla

– Lacks a sleek UI, focusing instead on functionality + Sleek UI
– Requires coding knowledge + Doesn’t require coding knowledge
– Customization options are huge + Customization options are large but not overbearing
+ Lots of flexibility – Not as much flexibility
+ Easy search engine optimization (SEO) + Easy search engine optimization (SEO)

While Drupal does offer its users more, it does so at an expense to ease of use. For this reason, we’re giving this section to Joomla.


Functionality


Drupal is unbeatable in terms of functionality. Originally designed to offer content managers and site owners a platform capable of building the custom online experiences they wanted, it has remained true to that to this day.

Some of Drupal’s best features include:

  • Site performance and search engine optimization
  • Multilingual functionality
  • Content curation and management made easy with Frames
  • Decoupled implementation
  • eCommerce capability
  • Over 43,000 modules

Each of these features combine to make Drupal the functionality powerhouse that it is.

Drupal functionality is accessed through its user interface

By comparison, Joomla lacks some of the functionality built into Drupal, and by doing so provides the ease of use mentioned above.

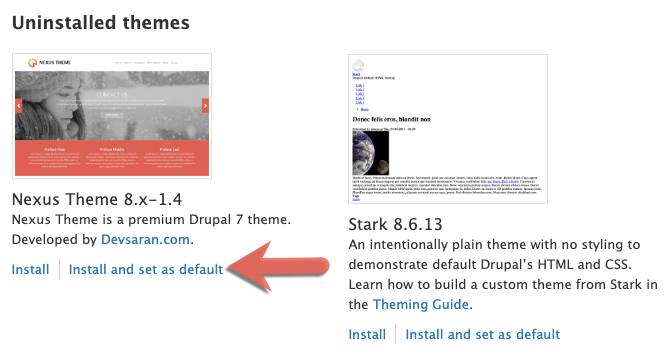
One of Joomla’s biggest disappointments is the lack of an official theme directory. While there are a number of Joomla themes and templates available for beginners, these are not offered through an officially monitored and maintained directory. For this reason, these themes can have implications with regard to site security.  

Despite this, Joomla still includes some positive features, including:

  • Built in registration system for user management
  • Powerful site search
  • Multilingual support
  • Tags and categories
  • Over 7,500 official extensions

Despite a good effort by Joomla, Drupal wins in terms of functionality.


Security


Choosing a secure CMS is important. Not only does it prevent information leaks, it can also play an important part in how google treats a website.

Luckily, both Drupal and Joomla have been around long enough to provide secure, safe experiences for site owners and visitors.

While both platforms have experienced breaches in the past, they are both generally very secure. One of the reasons for this is that both CMS have teams of security experts monitoring and patching issues as soon as they come to light. They both also allow you to improve security yourself through built-in customizations.

That being said, with Drupal’s incredible developer community, there are some very powerful security modules available for the platform. This includes the Drupal Security Kit, which allows for the extension of  built-in Drupal security features through the addition of CSP, HSTS, and more.

If you’re looking for the most secure platform, then Drupal wins here – but only by a fraction.


Performance


Increase search ranking, improve user experience, and get a grade of A+: all things you can achieve by focusing on site performance. So it’s no wonder that all CMS, not just Drupal and Joomla, compete in this area.

From the outset, Drupal has an advantage, primarily because it’s known to be a lightweight and easily scalable CMS. While Joomla offers some basic caching implementations and GZIP compression, Drupal’s huge selection of modules allow for even more customization.

When the two CMS are placed in similar operating conditions and with similar hardware, Drupal tends to perform better, being able to handle higher numbers of visitors before it begins to slow down.

That being said, regardless of what CMS you choose, it’s always important to run it on a powerful hosting foundation. At Hostdedi, we offer a range of optimizations that can improve site speed and scalability significantly.

Primarily, this includes unique caching rules, compression techniques, and a web application firewall that doesn’t get in the way of strong performance.

While hosting is an important part of the performance piece, we’re going to give this section to Drupal because of the performance gains it offers out of the box.


Support


Joomla and Drupal are both actively developed and frequently updated. Joomla typically sees minor releases every one to three months, with major releases every year. Joomla has millions of users, thousands of developers, and is likely to exist for many years to come.

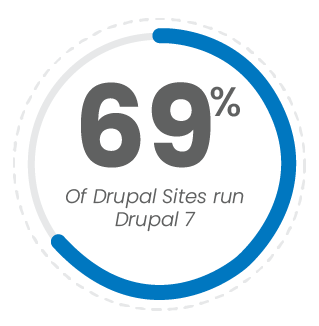
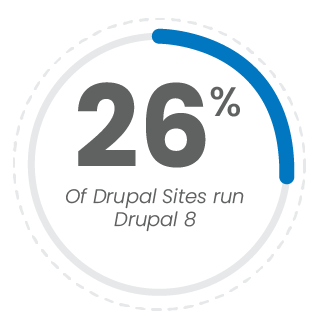
Drupal has a fixed release cycle which its developers stick to for the most part. Major versions of Drupal are supported longer than most other content management systems, providing stability for business users. Drupal 8 was released in 2015 and will be supported through the end of 2021.

Joomla is the second most popular content management system on the web, and it has a large and vibrant community. There is a wide array of volunteer and professional support available. Its documentation is well-written and comprehensive. The Joomla forums are friendly, and you’re likely to find an answer to any question. In short, if you use Joomla, you’ll have plenty of help.

The Drupal Community also provides excellent documentation, user groups, and forums. As you would expect from a CMS that targets enterprise organizations and large-scale businesses, there are many Drupal developers, agencies, and service providers who provide professional services for Drupal users.


Cost


Joomla and Drupal are both free. You can download them today without paying a cent, but there are costs associated with any website, including web hosting, design, and development.

The cost of web hosting depends on the number of visitors the site receives. Take a look at our cloud hosting solutions for a good outline of what you can expect. It is possible to host both content management systems on inexpensive shared hosting, but that’s only viable for the smallest sites. If a site receives more than a handful of concurrent users or is expected to scale, managed shared hosting or cloud hosting is a better option in both cases.

A  fully-functional Joomla site can be built without any additional costs. This includes adding free extensions from the official extension store, or free themes from unofficial sources.  

Drupal expects its users to have the expertise to build a custom front-end. It includes a default theme, but it’s minimal and is expected to be used as an example or a foundation for a custom theme. There are free and premium Drupal themes, but most Drupal users build a bespoke theme, which requires a working knowledge of PHP, HTML, Javascript, and CSS. If you aren’t a developer, you will probably have to pay someone to design and develop your site for you.


Joomla vs. Drupal: Summary


Joomla is an excellent general-purpose content management with decent out-of-the-box flexibility. If you want more control over how content is categorized and displayed, you should consider Joomla.

However, if you’re looking for complete control, Drupal is more capable than Joomla and is ideal for large and complex content management scenarios faced by enterprise organizations.

Posted in:
Drupal

Source link

Adding More Content to Your Site


Welcome to Part 5 of our series, Getting Started with Drupal 8. Go here for Part 4.

Previously, we covered the basics of managing content and creating graphics, metadata, teasers, and blocks. This chapter provides you with a few more essentials, like comment management, forums, and menus.

As with earlier entries, the images reflect changes made during previous lessons using the default Drupal 8 theme, Bartik. Recreating these changes is not necessary, but if you’re using a different theme, or have added modules, what you see will differ from the provided images.

Contents

Although there’s a school of thought that allowing your visitors to comment invites a world of headache, it has the benefit of encouraging people to interact with your website. Properly moderated, comments function as free content for your site.

While it potentially invites spam and certain types of negative behavior, Drupal 8 gives you everything you need to mitigate these inconveniences.

Setting Comment Policy

The default Drupal 8 comment policy is reasonable for many sites. To view your current settings, go to your Admin Menu (Manage) and click People, then click the Permissions tab.

Setting Drupal 8 Comment Policy menu

Only authenticated users — visitors that are currently logged in to their registered account — can post comments. Anonymous users can only view comments. Your ideal settings will vary according to your needs and wants, but here’s a few guidelines:

  • Administer comment types and settings and Administer comments and comment settings are only appropriate for site admins.
  • Anonymous users should have only the View comments permission. This will discourage spam and abuse.
  • If you want authenticated users to have the ability to comment, the only mandatory permissions are Post comments and View comments.
  • Whether you grant the Edit own comments permission to authenticated users is purely up to you, though most users appreciate the ability to do so.  
  • If you anticipate more than a few authenticated users, we recommend leaving Skip comment approval enabled to prevent micromanagement headaches.

Comments Admin Page

 For the sake of demonstration, we already created an authenticated user and added some comments to this site.

To view all comments for your site, go to your Admin menu and click Content, then click the Comments tab.

From the Comments page, you can perform a variety of useful functions:

Drupal 8 content admin page

  1. View Unapproved comments if you chose to require comment approval.
  2. Filter by Subject, Author name, or Language.
  3. Perform an Action (Delete or Unpublish) on all comments you’ve selected with the check boxes.
  4. View any comment by selecting its Subject.
  5. View any author’s account information (see below for how to block users).
  6. Perform an Edit or Delete Operation on an individual comment.

It is possible to block troublesome users by clicking their username (option 5 above), then the Edit tab. In the Status section, select the Blocked option, then click Save.

  It is also possible to access user accounts from your Admin menu by selecting People, then their username. From there, you can reset passwords, change roles, and perform other useful functions.

Drupal 8 blocking user selection

Page-Specific Settings

When viewing comments as an admin, you can Delete, Edit, or Reply to any comment.

Drupal 8 forum comment options

Although you can restrict comments according to content type, it is also possible to adjust settings for specific pages. To do so, navigate to your content and click the Edit tab.

Drupal 8 edit tab

In the Comment Settings section, choose Open, Closed, or Hidden, as desired..

Drupal 8 comment settings

Comments and Content Types

Default Drupal provides two content types: Article and Basic page. To view content types, go to your Admin menu, then select Structure > Content types

Although it’s possible to create additional types, let’s just focus on how to tailor comments for each type.

Drupal 8 content types

By default, the Basic page type does not allow comments, though for demonstration purposes, let’s change this now:

  1. In the Basic page row, click Manage fields.
  2. Only one field appear, named Body. Click Add field.
    Drupal 8 add field button
  3. From the Select a field type drop-down list, select Comments. In the Label field, enter comments. Click Save and continue when done.
    Drupal 8 add fields menu

  4. Confirm the default settings by clicking Save field settings.
  5. The Settings page controls how comments appear on the page, allowing you to toggle Threading, set a comments-per-page value, and other options. Click Save Settings to save the default.
  6. Comments are now enabled for Basic pages. You can Delete the comment field from the Operations menu; however, doing so permanently deletes all comments in that content type.
    Drupal 8 operations menu

Forums

Drupal 8 allows for the creation of forums, which can give your community members another way to interact with one another.

Initial setup

Follow these steps to install and set up the Forums module:

  1. From your Admin menu, click Extend.
  2. On the Extend page, type “Forum” in the search field. Select the Forum checkbox, then click Install.
    Drupal 8 Extend page

  3. We have now created our first forum, “General Discussion.” The web address will be yourdomain, followed by /forum. We can test it as user by visiting that web address in another browser (one in which you are not logged in as site administrator).

    Note we are unable to post because our permissions prevent unregistered users from creating forum posts.
    Drupal 8 forum page

Unfortunately, our forums are currently accessible only to people that know the web address. Let’s fix that now:

  1. Copy the forum web address to our clipboard.
  2. While logged in as admin, locate the pencil icon corresponding to the menu bar at the top of the page.
    Drupal 8 pencil icon

  3. Click Edit Menu.
    Drupal 8 edit menu option

  4. This page shows our current menu items and provides several options. Click Add link.
    Drupal 8 main navigation options

  5. In the Menu link title field, enter “Forum.” In the Link field, enter the web address for your forum (paste from your clipboard). Click Save when done.

Our forum is now set up with the name “General Discussion,” and any visitor can easily find it!

Posting topics

Posting a forum topic looks much like creating other types of Drupal content. Any admin or user with appropriate permissions can add new topics in that forum by clicking Add new Forum topic.

For demonstration purposes, here’s an example with several posts in our General Discussion forum.

Drupal 8 posting topics

Adding Forums

Perhaps we’d like several more options beyond “General Discussion.” To get started adding the, go to your Admin menu, then select Structure > Forums.

On the Forums page, click Add forum.

Drupal 8 add forum button

  The Add container option adds content much like the Add forum option, but users cannot add topics to containers. Think of it as a read-only bulletin, though admins can delete or edit them at any time.

On the Add forum page, enter a Name and, if desired, a Description. It is often wise to designate another URL alias. If you enter no value, it will be yourdomain.com/forum/#, where # is a number. If you want to replace # with something else, you can do so, but precede anything you type with a forward slash (/). Click Save when done.

Drupal 8 forum settings
This returns Drupal to the Forums page. Note you may reorder forum topics from this page by dragging-and-dropping the crossed arrow icon as needed, then clicking Save.

Drupal 8 forums page with new topioc

When we created our forum, we edited the Main navigation menu. Let’s take a closer look at the other default menus in Drupal 8.

Editing Menus

Where menus appear on your nodes depends on your theme, though you can always alter their placement and function.

To get a better sense of where these menus currently appear, navigate to your homepage as admin and click the pencil icon near any block. If the pencil icons aren’t present, click Edit on the upper right. If the block is a menu, the Edit menu option will appear.

Drupal 8 edit menu option closeup

It is possible to access the same Edit menu option from the Drupal 8 Menus page. To get started, go to your Admin menu, then select Structure > Menus.

The Menus page shows all menus for your current theme. The default theme, Bartik, provides five menus: Administration, Footer, Main navigation, Tools, and User account menu.

Drupal 8 default menus

You can edit any menu by selecting Edit menu from the Operations column. For example, edit the Main navigation menu to see the change we implemented earlier when creating our forum.

Drupal 8 editing menus

Maybe we want the order to be Home, About Us, then Forum. To reorder them, drag-and-drop the crossed arrow icon as appropriate. Click Save when done.

Drupal 8 cross arrow icons

Placing Menus

You can add menus to any block from the Block layout page. We spent some time with blocks in Part 4.

To access this page, go to your Admin menu, then select Structure > Block layout.

Locate your desired block, then click Place block.

On the Forums page, click Add forum.

Drupal 8 placing menus

 Remember, you can click Demonstrate block regions to see how your theme organizes block on your nodes.

From the Configure block page, you can change the title, menu level, and the region of the page in which it appears. You can also restrict the visibility of this block by content type, page, or role. Click Save block when done.

Drupal 8 configuring blocks

For more about how blocks function in Drupal 8, see Block Basics in part 4 of this series.

Next Steps

You now have a decent grasp of the fundamentals of Drupal 8, but there’s much more to learn! If you haven’t done so already, we recommend exploring the available themes and modules from the Drupal website.

When you’re ready, consider learning about Views, which allows you to fetch content from the database of your site and present it to visitors as lists, posts, galleries, tables, blocks, reports, and so on. We may cover Views more in a later entry, but for now, feel free to get started on the Drupal website.

Posted in:
Drupal

Tags:

Source link

Drupal SEO: 5 Best Practices

Drupal SEOAs a popular CMS, Drupal is a great platform for making the most of a site’s SEO value. However, it’s also a complex beast, with its ability to create customized experiences both elevating its popularity and complicating its implementation. For this reason, creating the best possible SEO experience with Drupal means paying attention to details you may not have to with alternative CMS.

Yet don’t think that this makes Drupal any less of a powerful CMS in terms of SEO value. In fact, Drupal’s need for advanced tweaks affords it unrivaled versatility in delivering nuanced experiences that can truly narrow in on user experiences and journeys. If implemented correctly, Drupal can offer users of your site an organic search experience you won’t find elsewhere. 

To help you avoid some of the most common pitfalls, this article takes a look at some Drupal SEO best practices, providing a good template for the knowledge that helps Drupal developers deliver organic search experiences that truly exemplify the platform.


What You Need to Know

SEO begins with an understanding of how sites are read and indexed by search engines. For different CMS, this process changes as they create pages and store data differently.

So it goes to reason that the more widespread a CMS is, the more likely search engine crawlers are going to be optimized to understand it.

5 percent of CMS users use Drupal

According to Builtwith, Drupal is used by 5% of CMS users. This positions Drupal comfortably as the second most popular CMS after WordPress. So it should come as no surprise that Drupal is one of the better platforms available for those looking to optimize organic discoverability of their site.

However, as mentioned previously, the platform is also complex. Proper SEO means a deeper understanding of what SEO best practices have been set by search engines, and how to make sure they are implemented from both technical and on-page perspectives.

This is especially important with Drupal due to its focus on near-unlimited functionality and the caveats that can quickly arise when implementing advanced features.

Don’t forget, Drupal SEO also means knowing which Drupal version your site is running on. Drupal 7, for instance, requires users to implement clean URLs for a better SEO experience. Drupal 8, though, comes with clean URLs by default. Different versions require different implementations.

69 percent of sites run Drupal 726 percent of sites run Drupal 8
Currently,  Drupal 7 is still used by the majority of Drupal site owners. Over 69% of sites still run Drupal 7, while just over 26% of sites run Drupal 8. While much of this guide will also apply to previous versions, it is primarily aimed at Drupal 8 users. If you’re just starting out in the Drupal space, we recommend starting with Drupal 8.


Drupal SEO: Best Practices

Instead of delving into a general list of SEO tactics like most blog posts on Drupal SEO do, we’re going to take this opportunity to look at SEO specific to Drupal.


Language Differences

By language, we mean coding language. Each language causes web elements to interact differently. From an SEO perspective, this can have a huge effect on how your site is crawled and how users interact with it.

Coding langues and how common they were in 2018

According to a survey by Stack Overflow, JavaScript is the most popular coding language available, being used by 69.8% of respondents. This is followed closely by HTML and CSS, used by 68.5% and 65.1% of respondents respectively.  

Under the JavaScript modernization initiative, headless and decoupled JavaScript implementations have become increasingly common. In this environment, an understanding of how code can affect SEO is vital.  


An understanding of how JavaScript can effect SEO is especially important as search engines will, in some cases, not read JavaScript or other esoteric code properly. This can lead to a potential loss of rankings and page value.

MediaCurrent’s state of Drupal 2019 provides a good starting point for understanding which coding languages are going to be more applicable in 2019. We recommend sticking with JavaScript and CSS, and begin getting to grips with Python and Java for the next-gen of web apps.

As a developer it’s important to implement coding best practices and not just opt for a mess of CSS styles and JavaScript implementations. 


Content Parsing With Structured Data (Schema)

Structured data from schema.org’s microdata vocabulary improves how search engines understand the content of your website. It does this by allowing you to highlight content and define its context.

For instance, if you are running a cooking website, recipe schema will allow you to define and publish specific elements and their properties such as cooking time, nutrition data, the ingredients list, direction, and more.

By telling search engines the context of individual pieces of content, they are more likely to show it in featured snippets (the famed rank zero). Below is an example of this done with a recipe for apple pie.

using schema to mark up recipe directions

There are two ways to get started with Drupal schema. You can either begin the markup process manually, or you can implement it automatically by installing a module.

If you want to get started with Schema manually, get ready for a lot of HTML code tagging with schema properties. Start by inserting the following HTML at the top of your page and defining a relevant schema.org page. In the example below, we use the recipe schema page.


<div itemscope itemtype=”https://schema.org/recipe”>


You can then define individual elements by inserting one of the properties you find on that page into existing tags. For example:


<h3 itemprop=”cookTime”>30 minutes</h3>

<h3 itemprop=”nutrition”>100 calories<h3>


For a more detailed look at schema markup and how to implement it on your Drupal site, check out the Search Engine Journal’s informative article on how to get started with schema.

If you would rather implement schema automatically, you can install the Schema.org Metatag module. This module allows for content creators to add schema values as JSON LD in the head of web pages. It currently offers full support for Drupal 8.


A Properly Configured Sitemap

In order for all of your content to be found by search engines, it’s important to have a properly configured site map. To do this, we recommend installing a Durpal module. At the time of writing, the most popular sitemap module available is the XML sitemap module.

The XML sitemap module allows you to automatically update and submit a sitemap to ASK, Google, Bing, and Yahoo. Moreover, it follows specifications outlined at sitemaps.org.

Perhaps because it is still in alpha for Drupal 8, the XML sitemap module has not seen as high an adoption rate with Drupal 8 users as it has with 7 users. Almost 90% of sites that run the XML sitemap module are still running Drupal 7, just 6% are running on Drupal 8.

If you’re running Drupal 8, we recommend opting for the less well known simple XML sitemap. This module is able to generate multilingual hreflang and image sitemaps. It supports Drupal content types out of the box and is a great replacement for site owners looking to stay up to date.

Drupal is available in 100 languages

Simple XML sitemap’s ability to provide multilingual sitemaps is also vital for modern sites that cater to multiple regions. As of 2019, Drupal is available in over 100 languages. Appearing in searches for as many of those as possible can make a huge difference to the user experience.

While simple XML sitemap is used by just 41,000 websites, 100% of those are running Drupal 8.


Site Speed Is Important

Site speed has been a ranking factor since April 2010. It is something you should be considering. From an SEO perspective, there are three main areas that can lead to quick and quantifiable site speed increases.

  • On-page asset delivery
  • Page design
  • Hosting infrastructure

We previously looked at some of these in more detail, and provided a series of simple website optimizations anyone can do.

However, with hosting, it’s becoming increasingly important to have a competent system operations admin behind your infrastructure to get the most out of it.

Take, for instance, the importance of caching in speeding up page delivery. Applications like NGINX and Varnish can speed up asset delivery, yet can be tricky to configure. We offer a hosting infrastructure with these caching techniques enabled and configured by default.

Remember, a lot of hosting providers offer seemingly impossible Time To First Byte (TTFB) speeds. However, if you’re worried about SEO, TTFB isn’t the metric you want to look at.

Instead, you should be looking at time to render and time to activity. These provide you with the metrics that really affect user experience.


Understanding Drupal Views and Duplicate Content

(Drupal 7 and lower only)

Views are one of Drupal’s strengths. They allow you to easily manage, view, and sort lists of content from a single location. In fact, they have been deemed so useful that they became a part of core with Drupal 8.

Yet while views provide a powerful interface for organizing and managing content, the way in which they are generated can cause problems with duplicate content. SEO 101: duplicate content isn’t good.

The reason views can easily lead to duplicate content is due to exposed filters, which can lead to several URL paths directing towards similar content. These URLs can be read as individual pages, with their on-page content only being minorly different from one another.

If you’re still working in Drupal 7 or earlier, it’s important to implement a simple fix. Simply pull up your Robots.txt file and add the lines below:


#Disallow page variables
Disallow: /*&
Disallow: /*page=0


You can find more on editing for views here.

Note that Drupal 8 installs clean URLs by default and it can not be disabled.


The Bottom Line: Is Drupal SEO Friendly?

In terms of SEO value, Drupal still stands as one of the best CMS to operate within. That being said, it does require some clear optimizations and tweaks to ensure that all content is being read by search engines the way that it is meant to be.

What’s great about Drupal is the ability to install additional modules that will handle all of this for you. We identified several great examples above that gives Drupal the versatility and power it needs to perform better.

Posted in:
Drupal

Source link

Adding Content to Your Site

Adding Content to Your Drupal 8 SiteOn to Part 4 of our series, Getting Started with Drupal 8. Go here for Part 3.

Previously, we covered the basics of customizing your site, setting permissions and roles, and giving your visitors a way to contact you. This entry provides you with a few more tools for adding and managing content in Drupal 8.

Our screen captures reflect changes we made during earlier entries in this series, without modules and with default Drupal 8 theme, Bartik. Recreating these changes is not necessary, but if you’re using a different theme, or have added modules, what you see will differ from our images.

Contents

Graphics & Text Styles

In a previous article, we created a simple blog post. To get a better feel for how to wrangle graphics and text styles, we’ll create an “About Us” page for our website, FearTheSquirrel.

From your admin menu (click Manage), click Content, then click Add content. Or, select Add content from Shortcuts.

Click Basic page.
Basic Page Selection

In the Title field, enter “About Us.” In the Body field, enter one standalone sentence, followed by a few paragraphs. We’re using mostly “lorem ipsum” placeholder text, but feel free to use whatever you like.

The bar along the top of the Body section allows you to adjust text size and appearance, as well as add hyperlinks, images, and other elements common to text editors. Highlight the first sentence, and click the B icon to make it bold.
Text editor and sample text

Before continuing, note the Source button, which will show your text as HTML. You can enter or edit HTML while in this mode. Click Source again to revert.

To add an image, click the image icon, then click Choose File to upload an image. If necessary, use the one provided below.

Squirrel Image

After uploading your image, fill the Alternative text field, which will help screen readers and people with vision impairments. Decide which Align option appeals to you, but leave the Caption option alone for now. Click Save when done.

Drupal 8 Insert Image Page

To publish, confirm the Published check box is selected, then click Save.

 TipYou can preview content at any time by clicking . Click Back to contend editing to return to your editor.

Once published, note the View, Edit, and Delete tabs. These tabs are only visible when logged in as a user with permissions that allow content editing.
Drupal 8 View Edit Delete tabs

Metadata, or “data about data,” is used by search engines and other websites to gather information about your content.

Return to your previous post and click the Edit tab; or, click Content from your admin menu, find your recent post, then click Edit.

Drupal 8 Sample Revision Log Entry, "added metadata"

While we’re here, it’s worth noting the Revision Log on the right. Enter “adding metadata.” Getting into the habit of this now will make it easier to track revision history when managing your content later.

In Menu settings, select the Provide menu link check box. Parent item and Weight change how it appears in the menu, but leave these alone for now.

Drupal 8 Menu Settings

The URL alias field re-assigns the web address of this node from the default, which is currently your domain, followed by /node/, then a number; for example, https://mydomain/node/9. Change the URL alias to “/about-us”, and don’t forget the forward slash (/)!

Drupal 8 URL Alias Menu entry, "/about-us"

Authoring information allows you to designate an author and change the date of authorship., The author must match the username of a content author for your site.

Drupal 8 Authoring Information menu

Promotion options is useful for when you want to highlight important content. Leave these selections unchecked for now.

Click Save when ready. Go to your homepage, then click your newly created About Us menu option.

About Us location on Drupal 8 homepage

 TipIt’s usually worthwhile to view recent changes as an external visitor. To do so easily, visit your site in an alternate browser.

Should you need to view the revision log or revert to a previous version, click the Revisions tab.

Drupal 8 Revisions Tab

In the Revisions Log, you can view any previous version, read log messages, and Revert as needed.

Drupal 8 Revisions tab options

Teasers

As the name suggests, a teaser is an abbreviated view of your content. Teasers make it easier for visitors to find content that interests them, and ignore content that does not. Before continuing, go to your home page and create a new post (Shortcut > Add Content > Article). You can choose your own content if you prefer.

In this example, we’re entering “Caught in the Act!” in the title field, placing mostly “lorem ipsum” text in the Body field, and adding the image of the vile creature below.

Red Squirrel caught in the act of being cute

Once we publish, the teaser appears:

Note the Read more option near the bottom of the teaser.

Drupal 8 post with squirrel picture

By default, Drupal 8 allows you to customize the appearance and behavior of teasers by content type. Additional themes and modules can expand your options, but for now, let’s stick with the default Bartik theme.

To customize a teaser, go to your admin menu and select Structure > Content Types. In the Article row, select Manage Display from the drop-down menu.

Drupal 8 Content Types menu

 TipOn this page, it’s also possible to create additional content types by clicking . It is possible to administer an attractive Drupal website without creating additional types, but some admins will appreciate the option.

You are now on the Default tab within the Manage Display page. Click the Teaser tab.

Drupal 8 teaser tab

From this page, you can change your teaser options as needed, just keep in mind it affects all content of this type.

For example, to adjust the size of the image in the teaser, click the gear icon the Image row. Set the Image style to large, then click Update

It is also possible to reorder items in the Field column by clicking and dragging the icon corresponding to each field.

Reordering Drupal 8 teasers

Newsfeeds

Visitors can click the orange RSS link icon at the bottom of any page to subscribe their news reader to your site. Just as with teasers, can customize how this content appears in their news feeds, and the interface is nearly identical.

To customize RSS, go to your admin menu and select Structure > Content Types. In the Article row, select Manage Display from the drop-down menu, then click the RSS tab. Make your changes, then click Save when done.

Content Management

As your site grows, so will the need for one “point of truth” for managing your content. From your admin menu, click Content.

 TipAlthough it is possible to manage your content directly from the database, do not attempt to edit content in the database; use the Drupal interface instead. If you need to manipulate images, most are found in sites/default/files, though any related to specific themes and modules will be in those folders.

Basic Interface

This page shows every published and unpublished node on your site. From here, you can edit and delete individual nodes from the Operations column.

Drupal 8 Content Management interface

You can also can perform operations on multiple nodes at once. To do so, 1) select the check box corresponding to each article, 2) select an action, then 3) click Apply to selected items.

Drupal 8 options for operations on multiple nodes

 TipYou can also manage comments and files from this page by selecting the Comment or File tab near the top of the page.

Filters

Eventually, your site will contain too many nodes to manage effectively without a filter, which appears at the top of this page.

Drupal 8 Filter options

The Title field functions as a search bar, though it will search only titles, not topics or keywords. The Content type, Published status, and Language options are self-explanatory. However, remember you can add content types, which will give that filter greater significance.

Block Basics

Blocks provide you an easy way to “layer” important information without getting in the way of your core content. Blocks can look different based on who is viewing them (user, admin, and so on), but only users with appropriate permissions can

Configuring blocks

You can interact with blocks on any node by clicking Edit on the upper right, then clicking the pencil icon near any block.

First, let’s check out the “Tools” block on our homepage. Click near that block, then Configure Block.

Drupal 8 Edit Block options

From the Configure block page, you can change the title, menu level, and the region of the page in which it appears. You can also restrict the visibility of this block by content type, page, or role.

Drupal 8 Configure Block options

For now, let’s just remove this block. Click Remove block at the bottom of the page, then confirm.

Block Layout

From your admin menu, select Structure > Block Layout. This view shows all the blocks on your website, though as noted above, it’s possible to restrict individual blocks to certain pages, roles, and content types.

Drupal 8 Block Layout options

From the Operations column, it is possible to Configure, Disable, or Remove any block. The Configure option opens the same page described in the above Configuring Blocks section.

The Block column shows various regions: Header, Primary menu, Secondary menu, Highlighted, and so on. You can move blocks by either clicking and dragging them from one region to another (use the pencil icon), or select a new region from the dropdown list in the Region column.

 Tip: Use the tabs near the top of the page to compare block layouts between themes.

Click Demonstrate block regions to see a graphical representation of all regions.

Drupal 8 Demonstrate Blocks page

While it is not possible to move blocks from this view, it will give you an idea of their placement. When done, click Exit block region demonstration to return to the Block Layout page.

Creating blocks

From the Block Layout page, click the Custom Block Library tab, then click Add custom block.

As when creating content, note you can insert links and images.

Enter some text in the Block description and Body fields, then click Save.

Drupal 8 Add Custom Block menu with sample entries

Return to your Block Layout page. You can either add your newly created block to an existing region, or designate a new one, though the process is very similar either way.

 Tip: Remember, if you’re curious about where the Sidebar second region is, click Demonstrate block regions.

Select a new block by scrolling to the Sidebar second option, then click Place Block. Locate your newly created block in the provided list, then once again click Place Block.

This brings you to the Configure Block page for your newly created block, which you can always edit later. See the Configuring Blocks section for more information about your options. Click Save Block when ready.

Return to your home page to view the results!

Next Steps

That’s all for now, but we’re not done yet! Part 5 will dive into comment management, shortcuts, using views, and other tricks of the Drupal 8 trade.

Posted in:
Drupal

Tags:

Source link

The New Drupal Layout Builder

The New Drupal Layout Builder
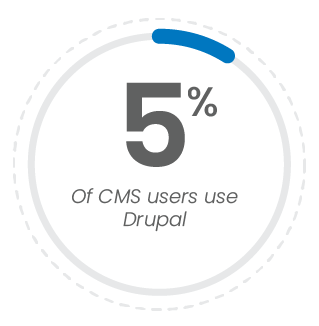
April 10, 2019 – Drupal 5.7 is just three weeks away, and with it will come the Drupal layout builder.

Drupal has always been about accessibility, and the last several years have only seen that commitment ramp up as the teams behind the open source platform have begun to invest more in matching the true ideals of open source.

The layout builder marks a new stage in the CMS’s life; one in which content creators and managers no longer have to rely on developers for the minutiae of complex Drupal builds. Instead, content updates can be deployed quickly and effectively through a WYSIWYG editing interface.

The New Layout Builder: What to Expect

The new layout builder is essentially a WYSIWYG, with default theme previews, per entity customization, and connection between entity display, and views and other blocks.  

A powerful design tool, Drupal’s layout tool goes beyond standard layout builders by allowing sitewide edits to templated content. This incredibly powerful feature means that site builders and content managers can add content to pages throughout a site with minimal effort and time commitments.

What to Expect With the New Drupal Layout Builder

Another strong feature is the ability for content creators to easily create and push custom pages with unique designs and layouts. By adding blocks to a blank page, creators can easily push videos, maps, text, or custom-built widgets. As adoption increases for the layout builder, we expect more modules to appear that will add increasingly diverse functionality to the builder.

The Layout Builder: When Can I Get It?

If you’re looking to stay ahead of the crowd, you can actually download and install the beta module for the layout builder now. This will give you access and time to explore the new feature’s functionality before going live with it.

The full release will be with Drupal 8.7 in three weeks. Keep an eye on the layout initiative page for more up-to-date information.

Hostdedi and the New Layout Builder

If you’re looking to start adopting Drupal and the new layout builder with Hostdedi, you can currently install the module on your Drupal instance and begin working with it. Alternatively, when Drupal 8.7 is released, you can either update your instance yourself, or you can get in touch with our support team and they will update your Drupal site for you.

As always, we recommend testing any new updates on a development site before going live. We especially suggest doing so with the layout builder, to see how and if it will affect your existing site.  

Posted in:
Drupal

Source link

Navigating Drupal 8

Welcome to Part 2 of our series, Getting Started with Drupal 8. Go here for Part 1.

You’ve installed Drupal, updated it to the most current version, and know how to back it up. Next up is learning the basics of how to navigate the interface and manage your content. Let’s jump in! 


Contents

Interface Tour

You’ve installed Drupal, updated it to the most current version, and know how to back it up. Next up is learning the basics of how to navigate the interface and manage your content.

When you visit your site, you must first log in to your admin panel to make any changes. Once you do, it’ll look something like:

Drupal Terminology: Nodes and Blocks

Most information in Drupal is presented either in nodes or blocks. Node content is essentially the core content of the page, like an article, blog entry, forum post, and so on. Blocks are smaller units that usually add some basic element of utility to the page, like search bars, login buttons, navigation tabs, and other at-a-click functions featured on most websites.  

You may view all editable blocks on your current page by clicking on the upper right. You may now edit any block by clicking , followed by Configure Block. As you can see in the image below, almost any block can be configured to your exact specifications. We’ll dive more into this later.

Your Drupal Admin Panel

The admin panel on the top of the page has everything you need to create content, manage users, and perform other critical functions. It has three options: Manage, Shortcuts, and admin.

Shortcuts gives you a quicker way to access your favored site functions. For now, it shows only two: Add content and All content, though it is possible to customize this later. admin allows you to adjust your contact information and login credentials.

For now, let’s focus on Manage, where you will find the bulk of actions necessary to administer your Drupal site.

Click Manage open your admin panel.

 Tip: To alternate between vertical and horizontal menus,  click  or , as appropriate.

Content

This lists all of your site’s content, comments, and files, and also allows you to create new content.

You currently have no content. We’ll circle back around to this later in the Creating Content section.

Structure

This is a powerful tool that gives you many ways to configure your content. Just note its location for now, we’ll explore this more in a later entry.

Appearance

This is where you add themes and view ones already installed. Themes change the appearance of your site. We’ll explore this further in the Installing Your First Theme section.

Extend

This page allows to install, view, and uninstall modules, Drupal’s version of plug-ins, which add new functions to your site. Modules can be somewhat tricky to deploy, so leave this alone for now.

Configuration

From here, you will execute most of your administration tasks, like content authoring, automation, basic site settings, and many other essential functions. We will spend more time in this area in a later entry.

People

Here, you manage users, permissions, and roles. Drupal is known for deep default functionality for user administration, and can be particularly useful for managing the efforts of larger teams with specific roles. We will user administration further in a later entry in this series.

Reports

This provides various tools for assessing the health of your site. Here, you can check for updates, read your logs, and run status reports, among other useful information.

Creating Content

  1. To get started, either select Manage > Content, or select Add Content from the Shortcuts tab.

  2. Click .
  3. You now see two possible content types: Article and Basic page. Select Article.

  4. Fill the Title and Body fields with something simple.

  5. At the bottom of the page, note the Published check box. If you clear the Published check box before clicking , it will appear as an unpublished draft on your Content page. For now, leave the Published check box selected and click .

You will now see your newly published content, otherwise in Drupal as a node. Note the web address, or URL, which ends in “node/” followed by a number. For example, https://8ac818c39-731.hostcli.net/node/4. Although it is possible to customize this URL, for now just note the terminology and the numbering system.

If you scroll down on the page, you will see an area to add comments because you’re viewing your post as a site admin. 

Admin view with ability to comment.

It is often informative to view your website as a casual visitor by accessing it from another browser, one where you are not logged in as a site admin. By default, your visitors can view comments, but are unable to create them. It is possible to adjust your site permissions to tweak these settings, but leave them as is for now.

Visitor view without option to comment.

Editing, Tags, and Images

  1. Return to your admin panel, then click Shortcuts > All content.
  2. Find the article you just published, then click .
  3. In the Tags field, enter a few tags, separating each with a comma.
  4. Attach an image to your post. In the Image section, click . Select any image from your local device, then click Open.
  5. In the Alternative text field, enter a short description of you image to assist screen readers and enhance accessibility.
  6. Click   when ready.
  7. Visit your page from another browser to see it as a visitor will. It should look something like:

Installing Your First Theme

  1. If this were an established site,  this is where you would back up your site as an insurance policy against a misbehaving theme. Because this is your first install, you may skip this step.
  2. From your admin panel, select Manage > Appearance.
  3. To open the Download & Extend page on the Drupal website in a separate browser window, click themes while pressing Ctrl (Windows) or Cmd (Mac).

  4. On the Drupal Download & Extend page, refine your search as follows:
    Maintenance status: Actively maintained
    Development status: Any
    Core compatibility: 8.x
    Status: Full projects
    Stability: Has a supported stable release
    Security advisory coverage: Has security advisory coverage
  5. Click . Scroll down until you see the Nexus theme, which is a relatively simple and versatile option for those new to Drupal. Click Read more.

  6. Whenever researching themes and their features, take time to read the Installation and Dependency notes. As noted in the description, the Nexus theme requires e jQuery Update module. Click the jQuery Update link to learn more.

  7. Good news! The Downloads section contains below note, so we’re good to install the Nexus theme:
  8. Return to the Nexus theme page. Scroll down until you see the green box containing version 8.x (it may read later than 8.x-1.4). Right-click on the tar.gz download link and copy it to your clipboard.


  9. Return to your site’s appearance page (Manage > Appearance). Click .
  10. In the Install from a URL field, enter the link you copied in Step 7. Click .
     Tip: It is also possible to download a module to your local device, then upload it using the Upload a module or theme archive to install option.
  11. Drupal will notify you of the result. To install the Nexus theme, click Install newly added themes.


  12. On your Appearance page, scroll to the Uninstalled themes section, find the Nexus Theme, and click Install and set as default.

  13. Once installed, click Back to site on the upper left. Enjoy your new theme! To revert to your default theme (Bartik), return to your Appearance page, find Bartik, and click Set as Default.

Installing Modules

Use caution when adding modules. Although adding modules is much like adding themes, it involves a little more risk because they can sometimes affect your site in unwelcome ways. Before adding any module, make sure you have a backup.

  1. If this were an established site, this is where you would back up your site as an insurance policy against a misbehaving modules. Because this is an early install, you may skip this step.
  2. To start the process, click Manage > Extend, then click .

  3. To open the Download & Extend page on the Drupal website in a separate browser window, click modules while pressing Ctrl (Windows) or Cmd (Mac).

  4. Repeat Steps 4 – 6 from the Installing Your First Theme section, but for your desired module instead of the Nexus theme.
  5. Repeat Steps 8 – 13 from the Installing Your First Theme section, but do so from your admin panel, using Manage > Extend admin panel instead of from Manage > Appearance.

Next Steps

Watch this space for Part 3 of our Getting Started with Drupal 8 series, where we’ll explore more ways to customize your site, keep it secure, manage comments, and more!

Posted in:
Drupal

Tags:

Source link

Drupal Security: A Complete Guide


Drupal SecurityDrupal is a secure CMS used by almost 3% of websites worldwide. Since its creation in 2000, the web application has seen limited vulnerabilities when compared with other popular CMS platforms. For this reason, organizations around the world have decided to rely on Drupal to provide them with the site foundation they need to remain secure.

However, Drupal is not flawless. There have been vulnerabilities associated with the CMS – some of which have been severe for site owners. These vulnerabilities have often attacked outdated or unmaintained areas of Drupal Code. In many cases, these attacks would have been prevented if site owners had adhered to security best practices.

Starting with a brief history of Drupal security, this guide looks at what exploits are most commonly attributable to Drupal, how you can protect your site, and who can help you to protect your Drupal site.

We’ll cover:

What security vulnerabilities are most common with Drupal

How to prevent those vulnerabilities from causing damage

Who is responsible for specific areas of site protection

Where you can go for more information and guidance

Is Drupal Secure?
How to Keep Drupal Secure
Who Can Help With Drupal Security
Conclusion


Is Drupal Secure?

Drupal is often praised as being highly secure. At its foundation lies a stable source code with limited vulnerabilities and a sizeable support community. According to research by Imperva, Drupal is more secure than most other popular web applications, including WordPress, Magento, and Joomla. In 2018, it was found that only 11% of 2018’s identified vulnerabilities came from Drupal, far below the number attributed to WordPress.

Web Application Vulnerabilities in 2018 Dispersion

Yet Drupal still remains vulnerable and those vulnerabilities exist in varying form. CVE research identified a total of 323 recorded Drupal Vulnerabilities since 2002. Of these vulnerabilities, 42% were cross-site scripting (XSS) issues and 14% were code execution vulnerabilities. Other vulnerabilities that were statistically apparent included SQL injection and bypasses.

14 percent of drupal vulnerabiltiies are code execution42 percent of drupal vulnerabilities are xss

Drupal Security in 2018

In 2018, Drupal was the web application target of choice for many attackers. Despite having fewer vulnerabilities than counterparts, the vulnerabilities it did have were relatively easy to exploit.

Two of the worst attacks of 2018 came in the form of Drupalgeddon2 and Drupalgeddon3 (also known as CVE-2018-7600 and CVE-2018-7602). These vulnerabilities were exploited by remote attackers injecting malicious code. This code then allowed them to mine data, scan internal networks, insert trojans, and more.

Druaplgeddon2

The first of these, Drupalgeddon2, struck on March 23. It worked through a code injection vulnerability associated with Drupal’s forms. A carryover from Drupal 6, the form rendering process vastly improved the way form markup was done, but ultimately led to an exploitable entry point in the email field. 94% of attackers used the vulnerability to scan sites for other vulnerabilities, while 2% attempted Crypto mining.

Once discovered, the introduction of a new WAF rule by Hostdedi meant that this exploitation was quickly stopped for our clients.

Druaplgeddon3

Drupalgeddon3 then struck in late April. Again attacking the form API, this flaw resided in the destination parameter. Again, this was a code execution vulnerability that led to site takeovers. While Drupalgeddon3 was just as severe as Drupalgeddon2, it actually resulted in fewer recorded attacks due to requiring the attacker to be authenticated on the attacked host. A properly configured WAF from a hosting provider like Hostdedi would have been able to prevent this attack from taking place.

Drupal Security in 2019

Several sources have predicted that injection vulnerabilities will continue to grow in number, largely because it’s possible to make money with these attacks. For Drupal site owners, this means that it’s important they secure their sites and ensure they have an up-to-date WAF. Learn more about the Hostdedi WAF.

Another exploit that will be taken advantage of is outdated PHP versions. 2019 has seen PHP 7.0 and 7.1 reach end of life, meaning they will no longer receive security updates. Drupal is developed in PHP, so all site owners should make it a priority to update their PHP version. PHP versions can quickly be changed by Hostdedi cloud clients in the Client Portal. We recommend testing any changes on a dev site before sending to a production site.


How To Keep Drupal Secure

Keep Modules and Core Up to Date

Keeping modules up to date is as important as keeping your site up to date. Community contributions are released constantly, with many addressing important security risks. The further you fall behind with Drupal updates, the more vulnerabilities your site will be exposed to and the more likely you are to have a security lapse.

If your site is not updated, you will be reminded of this when you go to create new content. This warning message should not be ignored – especially considering that it’s a relatively quick fix.

To find and install new updates to your Drupal site, simply open Reports, then click Available Updates and Check Manually. Once you’ve found security updates, you can click download and install them by clicking the Install New Module Or Theme
button.Finding Updates in Drupal 8

If you’re starting a new site, it’s always a good idea to start with the latest version of Drupal. You can find the latest version of Drupal on their site: drupal.org.

Implement Better Passwords

As a PCI compliant hosting provider, this is something we come across frequently. Passwords are important and should always be chosen carefully. We’ve all heard the joke about the user whose password is “password”. But if we take a look at the top 25 passwords used globally, we begin to realize that it’s more than just a joke.

Implementing a better password may just mean using a password generator. These allow you to define parameters for what password you need and then generate it. If you’re afraid of not remembering your password, a password storage tool such a LastPass can help.

Finally, even with a better password, you should still be implementing additional security measures. We always recommend 2FA.

Add Drupal Security Modules

The first security module you should be adding is one that enables 2FA. The Two-factor Authentication (TFA) module is perfect for this. Note that at the time of writing this module is in alpha for Drupal 8.

Other security modules that will help you to lock down your site include:

Login Security: Deny login access based on IP address and number of login attempts.

Automated Logout: Log users out after a user-defined timeout period.

Session Limit: Limit the number of simultaneous sessions per user.

SpamSpan Filter: Blocks bots from finding email addresses by obfuscating them.

Prevent Indexing of the Login Page

You access your Drupal admin panel by logging into your site. An attacker can do the same. A simple and effective way to prevent unauthorized logins to your site is to prevent indexing of the login page by search engines. This makes it harder for an attacker to find your login page. You can do this by entering the following line in your Robots.txt file under Paths.

Disallow: /user/login

Check Files Permissions

File permissions play an important role in Drupal security implementation. They allow you to see which people are able to read, write, and modify content on your website. If you open permissions up to too many people, it is easy for attackers to gain access to your site. Conversely, if they’re too strict, you can end up breaking parts of your site.

Drupal themselves talk about how to secure file permissions. As a general rule, it’s important to keep permission for core files and directories such as modules and index.php locked to admin users only.

Block Important File Access Entirely

Certain files are sensitive and shouldn’t be accessed by anyone other than the site’s primary administrator. This includes upgrade.php, cron.php, install.php, and authorize.php. To do this, you can add the following to your .htaccess file.

<FilesMatch "(upgrade|cron|install|authorize).php">
    Order deny, allow
    deny from all
    Allow from 1[Insert Your IP]

Block Bad Bots

Bots, crawlers, and scrapers are a constant danger to sites. If they don’t do anything else, they can steal your bandwidth. In most cases, security extensions like SpamSpan Filter and Session Limit can help to ease the effects of bad bots. However, there are sometimes instances where it’s important to block bad bots not covered by these modules.

To block bad bots at the server level, you’ll need to limit the number of user-agent strings by adding the following to your .htaccess file.

RewriteEngine On
RewriteCond %{HTTP_USER_AGENT} ^.*(agent1|Wget|Catall Spider).*$ [NC]
RewriteRule .* - [F,L]

If you host your Drupal site with a secure hosting provider, always check to see what they are doing to protect your Drupal site from bad bots. Nexess ensure bad bot protection for clients across our entire network by limiting traffic from known offenders and employing continuous site monitoring to identify new ones.

Always Keep a Backup of Your Site

It’s recommended that you always have an up-to-date backup of your site. This does not mean just relying on your hosting provider’s backups. In some cases, corruption and vulnerability exploits can damage both their backup and the original. For this reason, it’s recommended to also store a backup of your site locally.

This can be done in a variety of ways. We recommend storing a backup of your MySQL databases and your Drupal file directory. With Hostdedi it is possible to automate this process and download site backups through your control panel. We recommend making a full backup.

Install an SSL Certificate

An SSL certificate is a small file that digitally adds a cryptographic key to an organization’s domain. This allows for secure connections from a web server to a browser through https. SSL certificates are particularly important for login and checkout processes. By keeping the information being transferred secure, it prevents attackers and identity thieves from accessing that information.

98 percent of shoppers won't proceed past an unsecured site warning

For eCommerce sites, an SSL certificate can make a huge difference to revenue. 61% of shoppers will not purchase from an unsecured site and 98% will not proceed past an unsecured site warning.

If you’re unsure what SSL certificate is right for you site, we recommend looking at our SSL FAQ. Note that it’s important to install an SSL certificate for more than just security. In 2014, Google announced that the presence of https will influence site ranking in search results.


Who Can Help You With Drupal Security?

The Drupal security ecosystem relies on three groups to help identify issues, fix breaches, and maintain security for site owners. Each of these groups has a vital role to play and can help in unique ways, If you’re a Drupal site owner and run into a problem, these are the four main groups who can help.

Developers

With firsthand experience navigating your Drupal site, your developers are uniquely placed to identify and fix issues that may have been missed. Often, dedicated Drupal developers will contribute to a Drupal site on a daily basis, whether that’s one or multiple. This means that they are constantly collecting information about potential vulnerabilities. Moreover, a developer may be the most immediate source of help available.

Hosting Providers

Hosting providers are your second line of defence against vulnerabilities. Often, if you are hosting with a reliable provider, their infrastructure is optimized to try and protect you against vulnerabilities and security exploits. This often includes the implementation of a WAF (Web Application Firewall). A well secured WAF can mean a quick fix for dangerous vulnerabilities such as Drupalgeddon2 and Drupalgeddon3.

Project Maintainers

Project maintainers are on the frontlines of security, finding new problems every day and implementing solutions. There are more than 15,000 active project maintainers in the Drupal community and each one contributes their own areas of expertise, from plug-in modules to core. If you’re looking for a fix, or want to report on a vulnerability you’ve found, they are a good point of contact.

The Drupal Security Team

The Drupal security team are the core force behind protecting Drupal instances. Comprised of some of the world’s leading web security experts, the Drupal security team are always on call to assess and fix any issues that arise.

Drupal Security Advisories

Drupal themselves have a detailed list of security advisories. If you’re in charge of security for a Drupal site, it’s advisable that you check these relatively frequently. To make things easier, each is marked depending on its security risk. If you see something that is highly critical, and your site meets the conditions, you should update your Drupal instance as soon as possible.

You can find the list of Drupal Advisories here.

If you’re unsure about whether you are affected, or would like help from the Hostdedi team in employing a fix, you can contact support. They will help to resolve the vulnerability for you.


Conclusion

Drupal is one of the most secure web applications around, but this doesn’t mean that you can sit back and do nothing. If you want your Drupal site to remain secure, it’s important to regularly update your site and follow security best practices as outlined above.

By following the best practices outlined in this guide, your site will remain safe and secure. However, it’s important to keep in mind that a “one size fits all” approach is not always the best way to proceed. You may find that by limiting permissions or editing defaults, your site will break.

For this reason, it’s highly recommended to first try all changes on a development site and then implement on production.

If you’re still unsure on something regarding Drupal security, why not speak to a Hostdedi team member? We can walk you through how to keep you site secure and how our Drupal hosting solutions are engineered to maintain Drupal security.

Posted in:
Drupal

Source link

Getting Started with Drupal 8

Getting Started with Drupal 8So you’ve weighed your choices and decided Drupal is the best fit for you!

As discussed in our recent Drupal Vs WordPress Cagematch, it takes a developer skill set to get the most out of Drupal. Even so, it can be worthwhile to explore Drupal and get an idea of what it has to offer. Or, perhaps you’re a developer-in-training looking to dip your toes into the CMS ocean.

This is part 1 of a short series designed to show you the basics of installing, updating, and backing up Drupal 8.

Contents

Installing Drupal 8

Unless you’re a developer, installing Drupal isn’t for the faint of heart. Drupal.org has extensive documentation on how to go about it, but we suggest a simpler alternative, one that involves clicking a button.

Our Drupal cloud solution makes it easy and quick, and we back every account with a 30-day money back guarantee. You can read about our Drupal cloud offering on our website, but the best place to start is our Knowledge Library with How to create Hostdedi Cloud accounts.

As noted in that article, you’ll need three things to get started: 1) Client Portal login credentials, 2) your valid credit card, and 3) a registered domain name (if you don’t have one yet, we can help).

When choosing your platform, select Drupal, toggle the Auto-Install, and you’ll be up and running within minutes.

Once installed, you can view your live site by clicking on your secondary domain name from within your Client Portal.

When you visit your site for the first time, you’ll see something like:

Your site is live, albeit in a humble, uncooked state. Now, time update your installation to the latest version! 

Updating Drupal 8

Although we install Drupal 8, it falls to you to update to the most current stable release. We strongly recommend staying current on releases. No content management system (CMS) is immune to exploits, and staying current is the first line of defense against malicious activity.

This entry provides two options for updating your installation: the command line (CLI) or Secure File Transfer Protocol (SFTP).  Both methods require SSH access.

Attention: The Drupal development team recommends Composer for updating purposes, though it requires familiarity with dev-centric language. See the official Drupal documentation for details.

If you’re unfamiliar with the CLI, then SFTP is your best option. Many SFTP applications are available. This document features Cyberduck because it’s free, safe, and relatively easy to use, though many other suitable options are available. For details about how to use it, please see How to transfer files to a server with SFTP.

Take note!

  • This process won’t update any modules or themes. If this is a new installation, this won’t matter now, but it will matter later. Third party extensions require separate updates, and overlooking them exposes your site to possible attack.
  • For anything other than new installs, back up your site before continuing.
  • This process will remove any modifications to files like .htaccess, composer.json, and robots.txt. If and when you’ve modified these files, save them somewhere so you can reapply them post-update.

Step 1: Put Your Site Into Maintenance Mode

  1. Log in to your Drupal admin panel. Click Manage > Configuration > Development.
  2. Select the Put site into maintenance mode check box, then click Save configuration.

Step 2: Remove Old Files

Choose one of the below methods.

Using the CLI

  1. Navigate to your Drupal installation:
    cd /path/to/your/drupal/directory
    
  2. Remove the core and vendor directories:
    rm -rf core vendor
  3. Remove all files in the top-level directory:
    rm -f *.* .[a-z]*

Using SFTP

  1. Select your Drupal directory. In this example, it’s mydrupalsite.com.


  2. Select html.


  3. Delete the core and vendor directories.

Step 3: Download and Extract Update Files

Choose your preferred method below.

Using the CLI

  1. Issue the following, but replace x, y, and z with the updated Drupal version number; for example, /drupal-8-6-13.tar.gz:
    wget https://ftp.drupal.org/files/projects/drupal-x-y-z.tar.gz tar zxf drupal-x.y.z.tar.gz
  2. This command creates a new directory, drupal-x-y-z/, which contains all updated Drupal files and directories.
  3. Change to the new directory, and copy the core and vendor directory and the files in the top-level directory to your Drupal installation directory. As before, replace x, y, and z with the updated Drupal version number:
    cd drupal -x-y-z cp -R core vendor /path/to/your/drupal/directory cp *.* .[a-z]* /path/to/your/drupal/directory

Using SFTP

  1. Download the latest release from the Drupal website to your local device and extract the archive.
  2. Within Cyberduck or another SFTP application, upload the new core and vendor to your Drupal installation by clicking-and-dragging from your local machine to your top-level directory.


  3. As mentioned in the Take note section, this is where you would reapply modifications to your .htaccess, composer.json, or robots.txt files. Since this is a new installation, you may skip this step.

Step 4: Update Database Tables

  1. Verify you are logged in as your site admin.
  2. In your browser, update your core database tables by visiting http://www.example.com/update.php, but replace www.example.com with your domain name.

Step 5: Run Status Report

  1. From your Drupal admin panel, navigate to Manage > Reports > Status report.


  2. Resolve any warnings or errors.

Step 6: Remove Your Site From Maintenance Mode

  1. Return to your Drupal admin panel.
  2. As in Step 1, from your admin panel, click Manage > Configuration > Development > Maintenance Mode, or just click Go online from the green bar notification.
  3. Clear the Put site into maintenance mode check box, then click Save configuration.

Step 7: Clean Up Files (If Necessary)

If you used the CLI method in Step 3: Download and extract files, remove the Drupal release files by issuing the below command. As before, replace x.y.z with the release version number.

rm drupal-x.y.z.tar.gz
rm -rf drupal-x.y.z/ 

Keeping Drupal Up to Date

It is best practice to stay current. There are several ways to stay informed, and we recommend using all of the below methods:

Backing Up Drupal

Backups are your failsafe. If you’re not already in the habit of doing so, we strongly recommend the best practice of making them regularly. As is often the case with Drupal, there are many possible methods. We will focus on two: Drush and the backup_migrate module

Using Drush

For those with developer skills, Drush may offer the most direct method. For details on Drush and additional resources, see the Drupal documentation.

Using the backup_migrate Module

If Drush and the CLI don’t appeal to you, it is possible to add a module that allows you to set up automatic backups.

  1. In your browser, visit https://www.drupal.org/project/backup_migrate/ and download the most current tar.gz of the backup_migrate module to your local device.
  2. From your Drupal admin panel, select Manage > Extend.
  3. Click .
  4. From the Upload a module or theme archive to install option, click Choose File. Select the tar.gz file you downloaded in Step 1, then click .
  5. Click Enable newly added modules.
  6. Scroll to the Other section and select the Backup and Migrate check box. Once again, click .
  7. From your Drupal admin panel, navigate to Manage > Configuration > Development > Backup and Migrate.
  8. Though you can perform a manual backup by clicking , we recommend setting up daily automatic backups. Click the Schedules tab.
  9. In the Daily Schedule row, click . Select the Schedule enabled check box (1), then set Frequency to Run every 1 Days (2). Click  when ready (3).

Daily backups are now configured! If you are a Hostdedi client and relatively new to Drupal, we recommend contacting our support for assistance with restoring your site from a backup.

Next Steps

Keep an eye on this space for more about Drupal, including tips about how to create content, administer a team, and other essentials. In the meantime, feel free to experiment with your new site!

Posted in:
Drupal

Tags:

Source link

Cagematch: Drupal Vs WordPress

Drupal vs wordpress
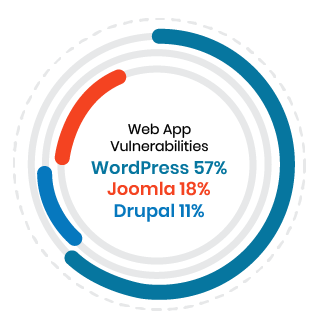
When it comes to designing a worthwhile website, the choice of content management system (CMS) may not be readily apparent. Complicating this choice are the almost-tribal sentiments of each system’s loyalists, each convinced of the “rightness” of their favorite. But both are open source, free to use, and provide a multitude of plug-ins and modules.  So which is the real winner of a Drupal vs WordPress standoff?

Drupal 8 just saw release, but it’s definitely not for everyone. Based on our experience, the go-to for nearly one-third of all websites is WordPress. It dominates 60% of the CMS market. Why deviate?

To find the answer, let’s toss Drupal 8 and WordPress into a cage and see who comes out on top!

Ease of Use

WordPress is known for its 5-minute install and for low barrier-to-entry. Many newbies cut their teeth on WordPress and end up with an adequate and reasonably fast, if not glamorous, website. As noted below, themes are plentiful and can easily turn a plain-Jane sight into something you’d be proud to show the public.

To get there with Drupal, you’ll need the skills of a developer. What Drupal lacks in simplicity, it makes up for in power and flexibility, but this is a deal-breaker for people that just want to publish a blog or make a small, functional website for their fledgling business.

Winner: 

WordPress is the Winner

Themes and Plug-ins

The awesome thing about WordPress is the sheer number of plug-ins and themes, and the relative ease of deploying them. Many are free, though not all are created equal, and paying for premium items can yield better support and overall product. For example, WooCommerce is free and gives limited eCommerce capabilities to WordPress, but expect to dip into your wallet if you want to add features or payment types.

For brevity, we’ll extend the definition of “plug-ins” to include what Drupal calls “modules.” Drupal has plenty of options for plug-ins and themes, though nowhere near as many as WordPress, and you’ll once again need the “D” word to properly make use of them.

Winner:

WordPress is the Winner

Security

WordPress doesn’t have a great reputation for security. Its popularity makes it an attractive target for prospective attackers, as does its status as an amateur-friendly CMS. Furthermore, while WordPress is quick to respond to security threats, the same cannot be said from many of the same plug-ins that make it so popular.  The more you add, the greater the threat becomes, as each plug-in serves as a possible vector for attack. Is it possible to maintain a secure WordPress site? Absolutely. It starts by choosing an experienced web host (*cough* we might know one *cough* *cough*), and finishes by you taking steps to stay current on each and every theme and plug-in on your site.

As long as you’re running Drupal 7 or later, you’re as safe as New York State, the Government of Australia, whitehouse.gov, Twitter, eBay, and NASA, all of whom use Drupal. This should not be interpreted to mean that Drupal sites are immune to security threats. Rather, the smaller number of poorly-coded plug-ins and themes, combined with the more developer-centric requirements, make it less vulnerable to Internet villany.

Winner:

Drupal is the Winner

Flexibility

WordPress was born as a blogging platform. It tends to be best suited for websites presenting most of their information within articles, as opposed to albums of interconnected information. Time and the devoted efforts of the open source community have diversified it considerably, although you’ll need to rely on plug-ins to broaden its functionality.

Drupal can do anything. We advise against choosing it as your blogging platform, but if you have developer know-how or the resources to hire one, the potential is virtually limitless. Drupal is also innately mobile-friendly and has stronger core support for multilingual content. Finally. WordPress plug-ins themselves tend to be “plug-and-play” solutions, while Drupal plug-ins offer richer customization capabilities.

Winner:

Drupal is the Winner

Access Control

WordPress was designed with simplicity in mind, allowing for easy and swift editorial collaboration among a handful of team members. This is great for blogging, but won’t offer enough granularity for any enterprise requiring a team with numerous roles and permissions. This can be extended with a plug-in, of course, but that’s another one to find, watch for vulnerabilities, possibly even pay for.

With a built-in access control system that allows fine-tuned control, Drupal is the clear winner here. You can create custom roles, set multiple levels of user permissions with different degrees of access, and grant multiple roles to a single user. Even if such granularity doesn’t appeal to you now, it gives you scalability if and when your team grows.

Winner:

Drupal is the Winner

Support

Both WordPress and Drupal have eager and knowledgeable online communities that love nothing better than to bring others into the fold. You’ll find no shortage of online tutorials and documentation for either platform.

That said, if you’re looking for developer support — optional for WordPress but practically mandatory for Drupal — you’ll pay more for the latter than the former. This is simple supply and demand, as WordPress developers vastly outnumber their Drupal brethren.

Winner:

WordPress is the Winner

Drupal vs WordPress: Who’s the Winner?

We know, we know! We don’t like ties, either.

Looks like you’ll have to play judge and cast the deciding vote for who has earned the right to build your site. If it helps, we’re happy to help you host WordPress or Drupal, and we’ll keep any “tribal sentiments” to ourselves.

Drupal

WordPress

Ease of Use Not user-friendly to lay persons; developer assistance advised Gets the job done easily and quickly; easy to install
Themes and Plug-ins Not as many, harder to install Many and easy to install
Security Favored by governments; user knowledge tends to make it more resilient to attack Each theme and plug-in is a potential vulnerability; popularity makes it a favorite target of attackers
Flexibility Better at anything other than blogging, provided you have dev skills; innate mobile and multilingual functionality Great for blogging; needs plug-ins for everything else; effective plug-ins can be costly
Access Control Innate fine-tuned control Limited without plug-ins
Support Helpful community, but developers are more costly than their WordPress counterparts Helpful community, developers are optional and less costly

Posted in:
Content, Drupal, WordPress

Source link

What Is It and What Are the Advantages?

Headless Drupal- What Is It and What Are the Advantages
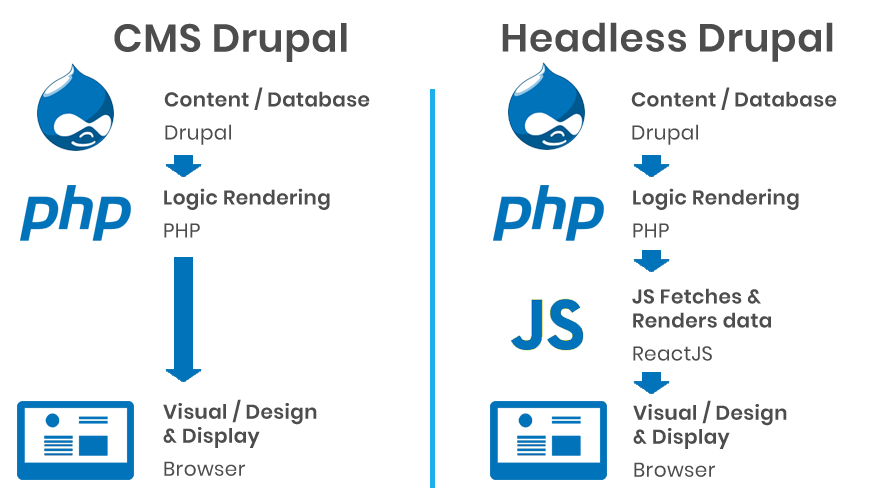
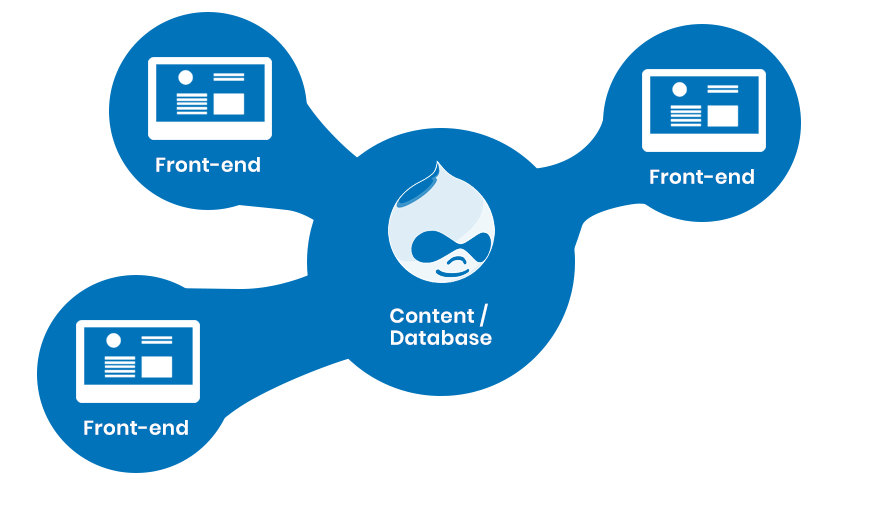
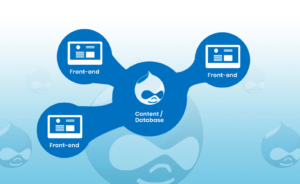
This article looks at Headless Drupal, providing an overview of what it is, and what some of the pros and cons are to implementing it.

Traditional Drupal website have often been monolithic. This has meant that Drupal is responsible for both content management on the back-end and content rendering on the front-end.

Headless architecture changes this by implementing a decoupled approach to site design. For many, the new approach is seen as innovative and the future of web development. For others, headless architecture brings a worrying lack of clarity to development processes and business practices.

If you’re thinking about moving to a headless Drupal environment, then keep reading to find out what the pros, cons, and facts are.  

What is Headless Drupal?

Headless Drupal (also know as decoupled Drupal) is a new way to develop and deliver websites.

Traditional CMS website models use PHP rendering to deliver website content through a user’s browser.

Headless Drupal instead allows content to be delivered to users through a separate front-end application. This means that a Drupal instance does not decide on the styling for a website. Rather, a separate application decides how data from the Drupal instance is displayed. This allows for an added layer of functionality and customization. In the example below, that application runs on ReactJS.

Headless Drupal vs tradtitional CMS drupal Diagram

What this front-end application runs on is different depending on the developer.  We’ve displayed ReactJS above as it is currently one of the prefered technologies for headless implementations.

What Are the Benefits of Headless Drupal?

There are several reasons to adopt headless Drupal, the most common of which is because site owners and developers want to integrate technologies and designs that are otherwise incompatible with a standard Drupal installation.

This is especially true when a developer wants to implement multiple front-ends. There may be one desktop front-end, one mobile front-end, a widget front-end, and an app front-end. Each of these are able to render and display the same information in unique ways.

And when it comes to apps and widgets, headless also allows for offline access. Site contents can be downloaded and rendered quickly through the “application” front-end itself. This changes the typical web server / user connection relationship, and also means that content is delivered much more quickly, even when online.

Due the restructuring of the CMS / front-end relationship, security is also improved. It is easier for system administrators to limit access to areas of the infrastructure. Content is created and published through one system, and delivered to readers through another.

What Is Limiting Decoupled Drupal?

Fully decoupled Drupal has several advantages, but all new technologies come with downsides, and headless is no exception. One of the main disadvantages is that much of Drupal’s out-of-the-box functionality is lost instantly. The ability to preview content before it is published goes away without additional coding, as does control over styling through the editing interface.

From an application perspective, competition over which app is in charge of how and what content is displayed can also potentially become an issue. This especially true when you’re dealing with multiple front-ends.

A diagram Headless Drupal fontend vs backend

Which front-end delivers to mobile? Which delivers to desktop? Which delivers to an app? Managing this process can be complicated and requires additional work for it to be implemented properly.

From a business perspective, responsibilities take on a new meaning. Cooperation between web design and creation becomes more of a priority. Appropriate access also needs to be distributed to different teams, especially if there are multiple decoupled front-end interfaces present.

To avoid these issues, it’s important to understand the breadth of a move to headless and map out what the shift will look like from both a technology level, as well as a business one.

Headless Pros and Cons


Pros

Cons

Faster, more flexible content delivery New Implementation Procedures
Future-proof design for CMS/front-end updates Can’t see live previews
Better security Relies on multiple technologies
Easier 3rd party integrations More complex to to configure and deploy

Examples of Headless Drupal Projects

There are numerous examples of headless Drupal websites. A short list includes:

The Tonight Show with Jimmy Fallon – Uses Node.js and Backbone.js

Lullabot – Uses Node.js and ReactJS

Weather.com – Uses Angular.js

The Tonight Show With Jimmy Fallon

The Tonight Show With Jimmy Fallon is an example of a headless Drupal site

The Tonight Show with Jimmy Fallon makes use of a headless Drupal instance to great effect. The site loads quickly and you can see unique web design features and animations throughout the site.

Lullabot

Lullabot headless implemention came with routing problems

Lullabot also implemented a headless instance on their site. However, they encountered routing issues during the setup. Routing is where an application or CMS decides where to send a visitor’s requests. They go into more detail in their article on this, but it’s an important problem to keep in mind when thinking of making the move to a complex decoupled Drupal site.

Hostdedi and Headless Drupal

We are currently able to support headless Drupal instances on our cloud infrastructure. We also currently offer Node.js support. At this point in time we’re working to improve support for Node.js and other languages such as Python.

Don’t forget, if you’re going to spin up a headless Drupal site, we recommend testing on one of our dev sites. Learn how to spin up a Hostdedi dev site.

Posted in:
Drupal

Source link