CAll Us: +1 888-999-8231 Submit Ticket

Split-Test WooCommerce With Google Optimize

You know it is important to drive traffic to your WooCommerce store, since a portion of this traffic will become customers. However, how do you know whether your site is efficient at turning visitors into customers?

The number of visitors who become customers is called the conversion rate. Conversion rates are important for any growing WooCommerce store to track and work to optimize. One highly effective way to optimize store conversion rates is by setting up experiments using Google Optimize to see what makes your conversion rate improve. 

This article will help you set up Google Optimize split testing with your WooCommerce shop. After completing this tutorial, you’ll understand how you can test design parts and wording to increase your conversion rate. So follow along, you don’t need to be a developer or coder! I promise that I’ll keep things simple.

I’ve broken down this article into three sections:

  1. How To Set up your Google Optimize Account
  2. Integrate Google Optimize with your WooCommerce shop
  3. Configure your first split test in Google Optimize

I highly encourage any WooCommerce shop owner with a reasonable amount of traffic (at least 5,000 unique visitors per month) to set up split tests. They’re a fantastic tool to discover which parts of your site structure or wording limit your conversion rates. You can use Google Optimize to set up these tests for free, which is perfect to begin with. Examples of common split tests are testing which color the “Add to Cart” button should be to encourage clicks hiding or showing trust labels on the Checkout page, the wording of the “Checkout” button, and other important elements on your shop website. 

For this example, we’ll run an experiment on the “Checkout” button and will compare two different colors against each other. Let’s get started!

Set up your Google Optimize Account

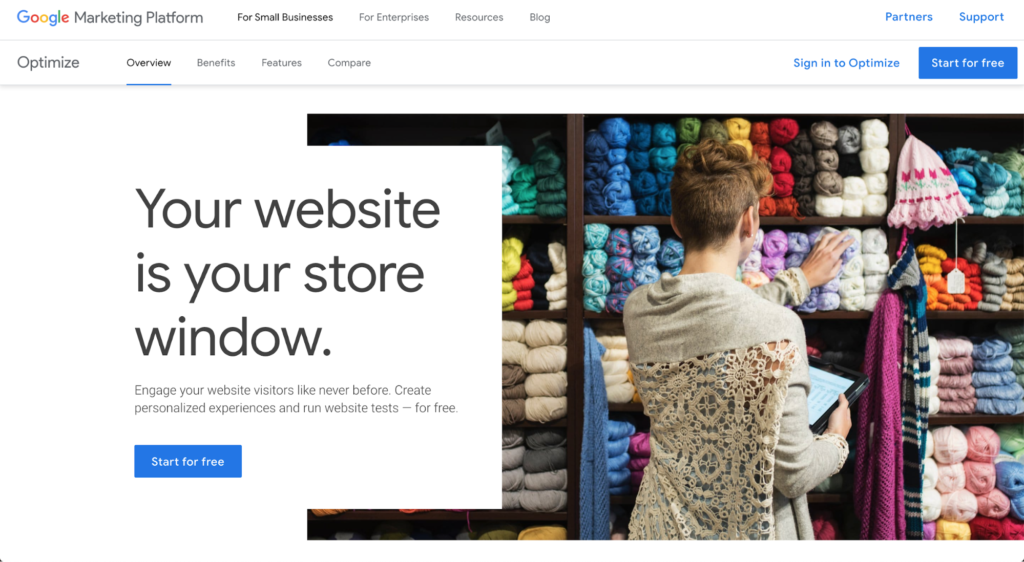
Creating your Google Optimize account is straight-forward, especially if you’re already using a Google. Head over to https://marketingplatform.google.com/about/optimize/ and click on the “Sign in to Optimize” button in the top right corner. If you do not have a Google account yet, you’ll have to create one.

Google Optimize website

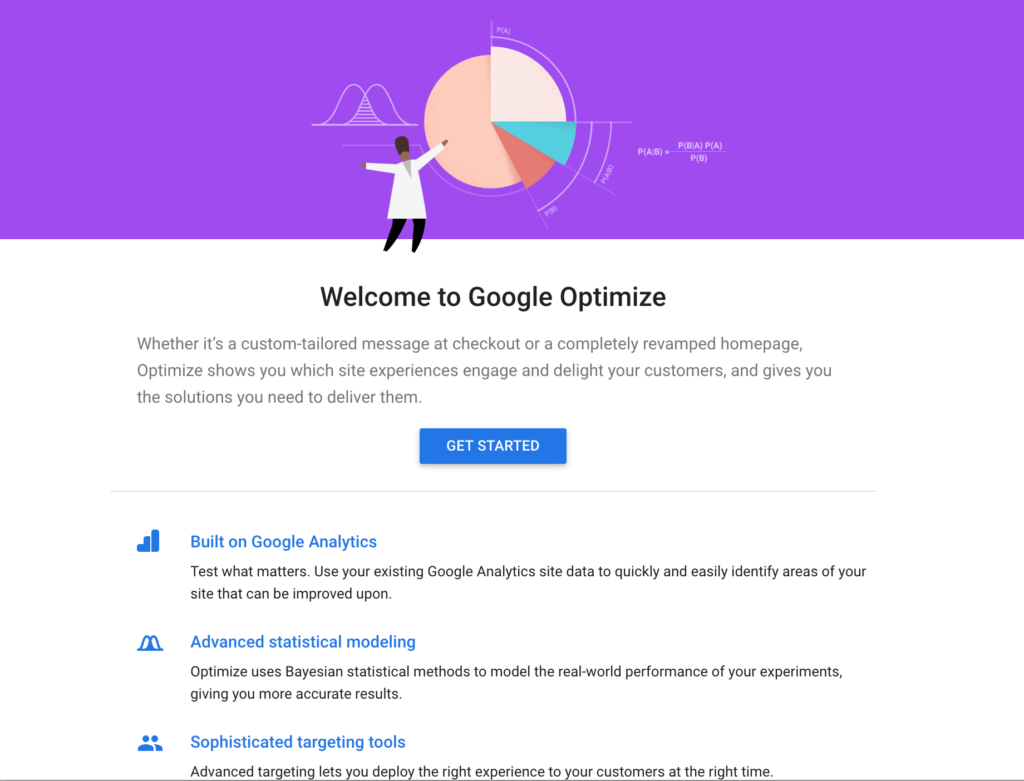
After you’ve created your account, you’re greeted with a wizard that’ll walk you through the setup process. Let’s go through it together.

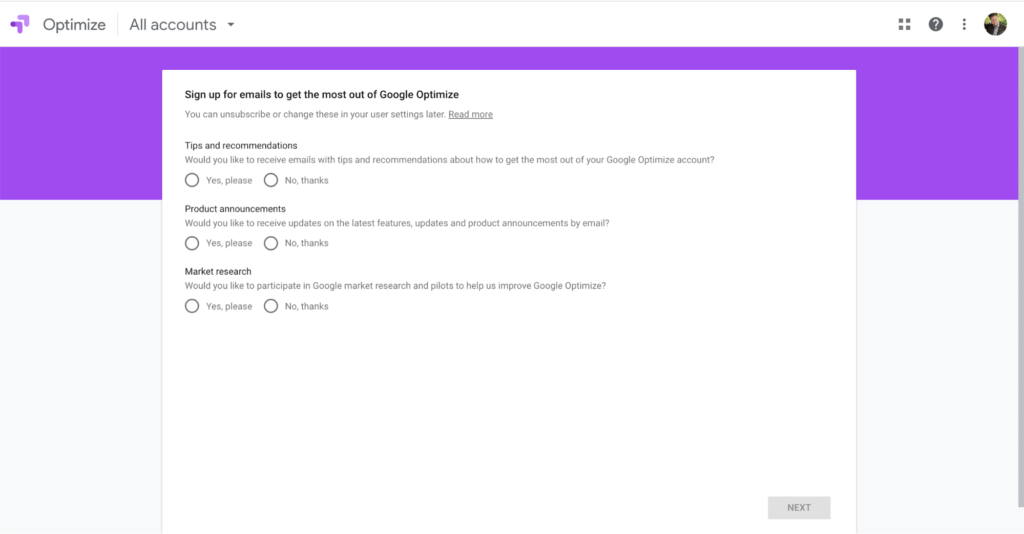
The first step in the wizard is that Google asks you to subscribe to their various email newsletters. It’s up to you if you want more emails in your inbox – I certainly do not. So, I’ll tick “No” for all of these boxes.

Google Optimize newsletter signup

Step 2 is to configure your first Google Optimize account. You’ll be asked all sorts of questions related to data privacy and GDPR, which heavily depends on the physical location of your business. In the US, you have less strict rules that apply than in the European Union. Here’s a great article on what eCommerce retailers need to know about GDPR.

Google Optimize Account Settings

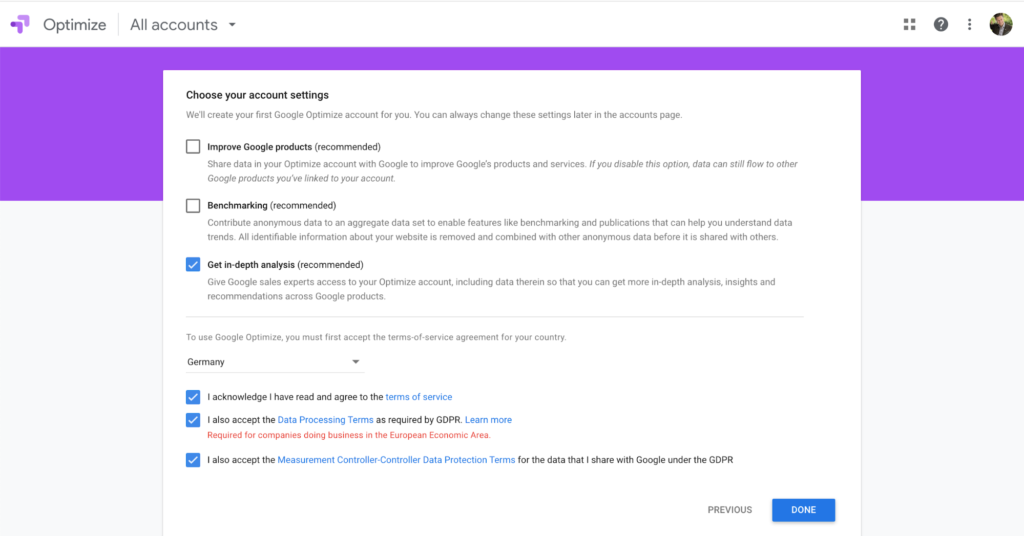
Since I live in Germany, I have to accept boxes about GDPR. I also do not want my data to be shared with other Google services that I have not linked into my account manually. You’ll want your Google Analytics account linked to Google Optimize – to get the most out of your data. But other than use-cases like that, I want to keep my data private.

That’s it! Your account is now set up and you’re ready to create your first split test experiment.

Integrate Google Optimize with your WordPress installation

After completing your account setup as described above, Google will ask you to create your “first experience”. Experiences are the way Google groups experiments that run on a single website. So if you have multiple sites or shops and you want to integrate them into Google Optimize, you’ll have to create one experience for each of them.

Google Optimize Create First Experience

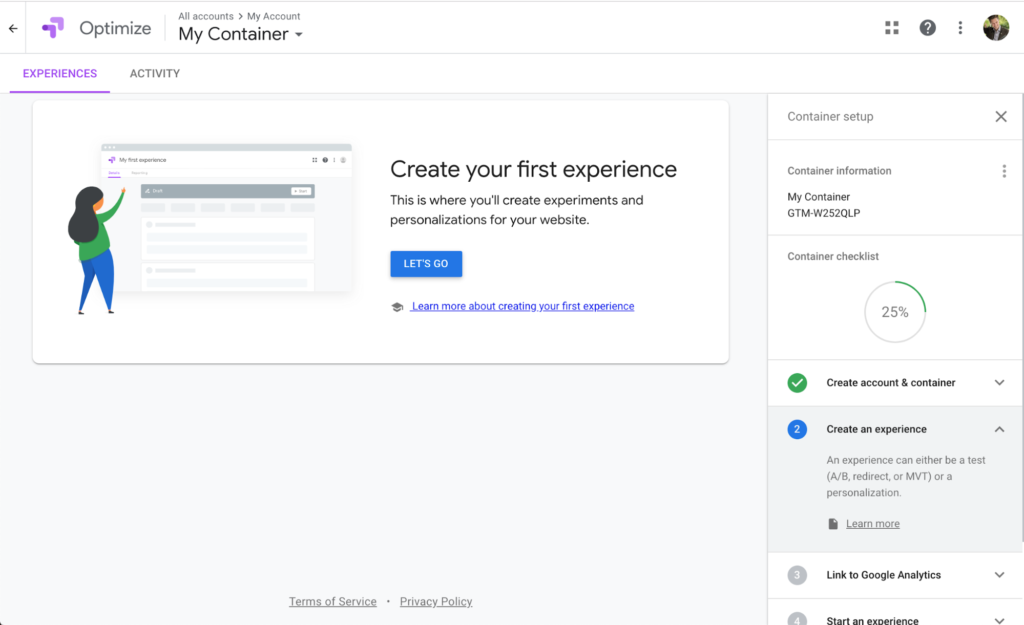
As you can see in the section on the right, we’re 25% done with creating that experience. In this part of the tutorial, we’ll customize the name of our container, setting up the foundation for your split test, and link it to Google Analytics.

To organize containers, I like to use the target website’s URL as their name. You can easily change the container name by clicking on the three vertical dots right beside “Container information” in the right sidebar. 

Google Optimize Container Setup

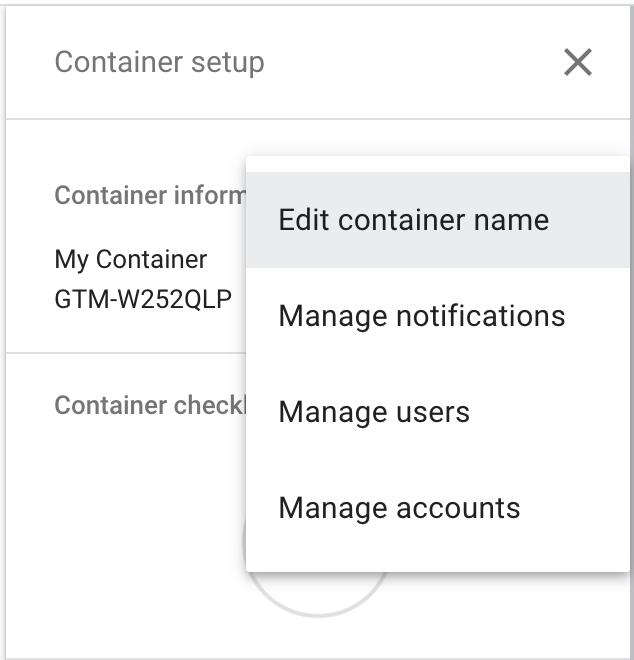
Click on the “Edit container name” and enter whatever name helps you recognize the website this container is integrated with. For the purpose of this tutorial, I’ll go with “Woo Google Optimize Demo.”

Configure your first split test experience in Google Optimize

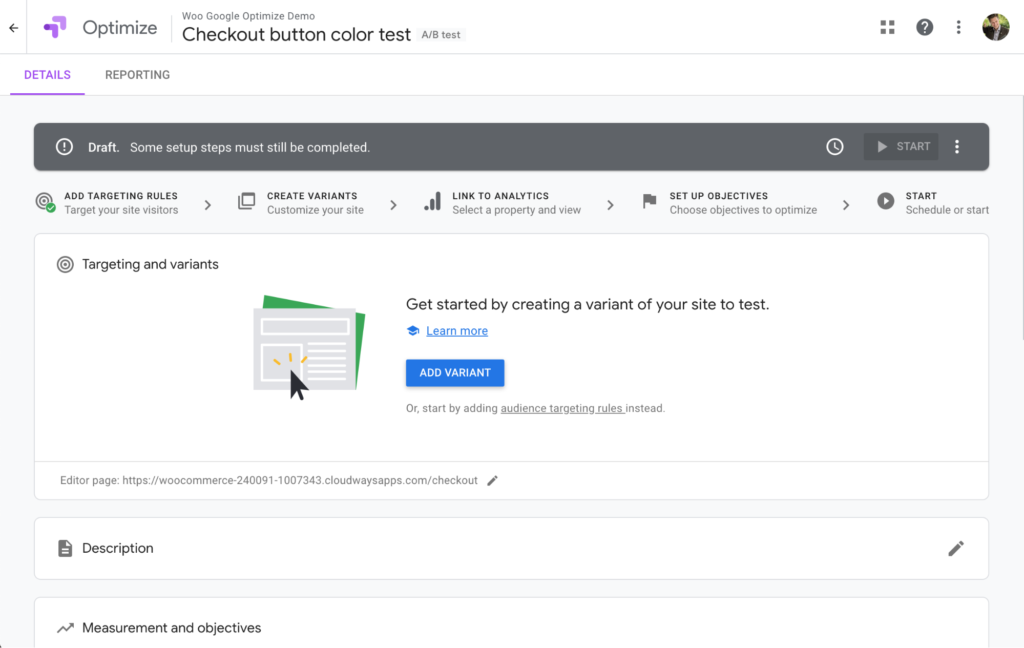
Now that you have your container appropriately named, let’s walk through setting up your first split test for your WooCommerce shop. First, click on the blue “Let’s Go” button, which will open a new area on the right of your screen.

Google Optimize Create Experience - Step 1

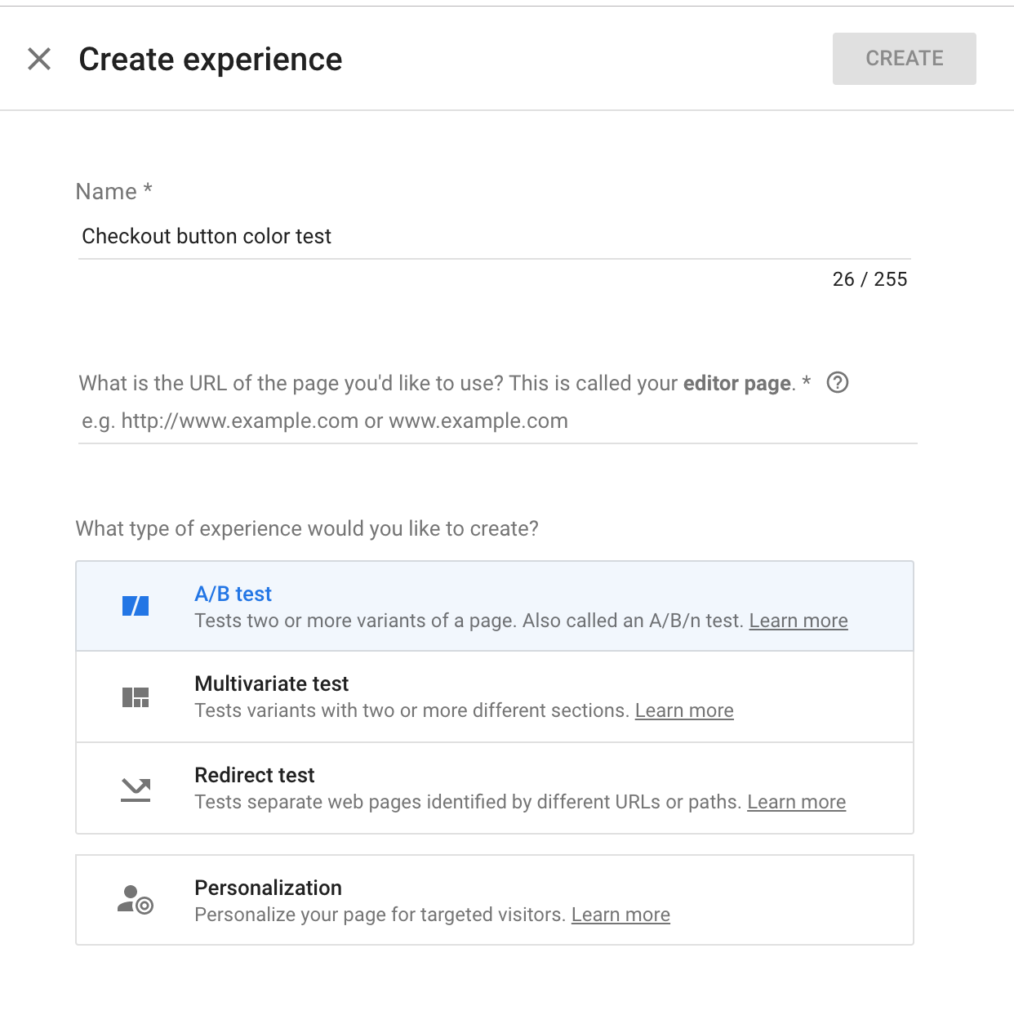
In that area, you can specify a name for your experience. I called mine “Checkout button color test” for this example. You have to specify the URL of the page you want to run the experiment on, which would be the Checkout page URL.

You can further specify what type of experience you want to run. Google Optimize offers four different types:

  • A/B test. This lets you create one variant of the original page and compares them to each other, by sending one part of your traffic to the original and the other part to the variation.
  • Multivariate test. This lets you create multiple variations of the original page. I would only use that when you have a serious amount of traffic, otherwise, it’ll take a long time to deliver trustworthy results.
  • Redirect test. You can redirect a part of your traffic to a different page than the original one. This is great if you want to compare two entirely different page layouts, or if you want to drive a part of your traffic to a subdomain of yours.
  • Personalization. You can use this type of experience to personalize your website’s content, depending on certain rules. E.g. you can target countries and provide information specific to those countries (like GDPR checkboxes only for EU-based customers on Checkout).

For this tutorial, we’ll set up a simple A/B test to compare two different checkout button colors against each other. 

Create variant

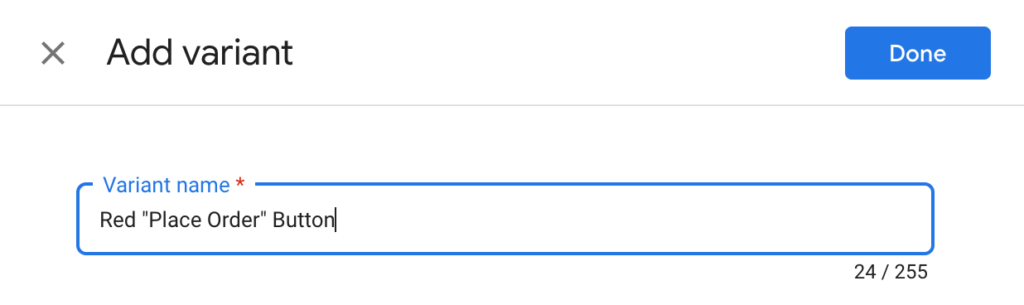
Click on “Add Variant” in the next screen and give the variant a name that will help you recognize what you are testing. In my case, I’ll switch the “Place Order” button on the Checkout page to a red background color – so “Red Place Order Button” makes sense for this tutorial.

Add Variant

Click on “Done” which will take you back to the overview screen. Before we can proceed to configure the test, we need to make sure that we actually have a product in the cart so that the Checkout page is accessible and we can do the change.

Targeting and Variants

Google Optimize will try to open the Checkout page as soon as you click on “Edit” to configure the variant. So you need to ensure that you have a tab open with your WooCommerce shop, and are on the Checkout page. 

Additionally, please make sure that you have the Google Optimize extension for Chrome installed. Here’s the link to the Chrome Web Store (the extension is free).

Place Order button

Ok, let’s continue and configure the A/B test by clicking on “Edit”. You’ll see that Google Optimize will reload and now open your Checkout page. That’s why we need to have a product in the cart so that we can actually see that page and do not get redirected to an empty cart page.

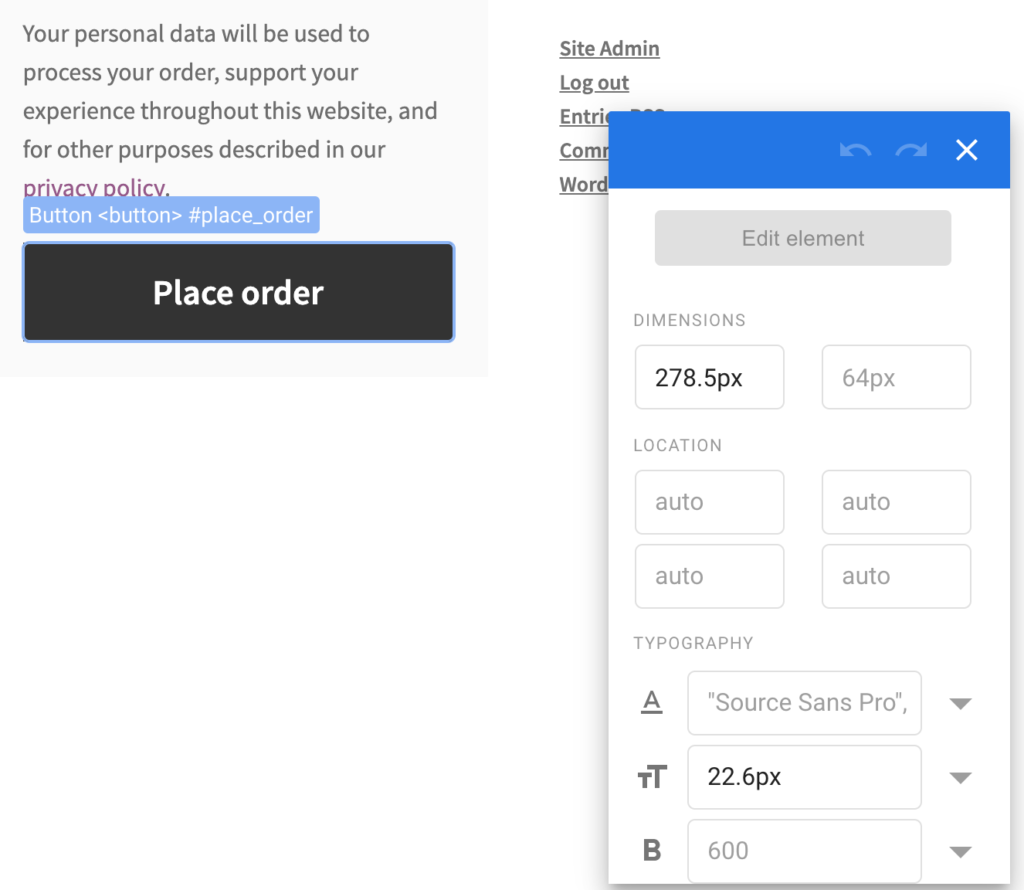
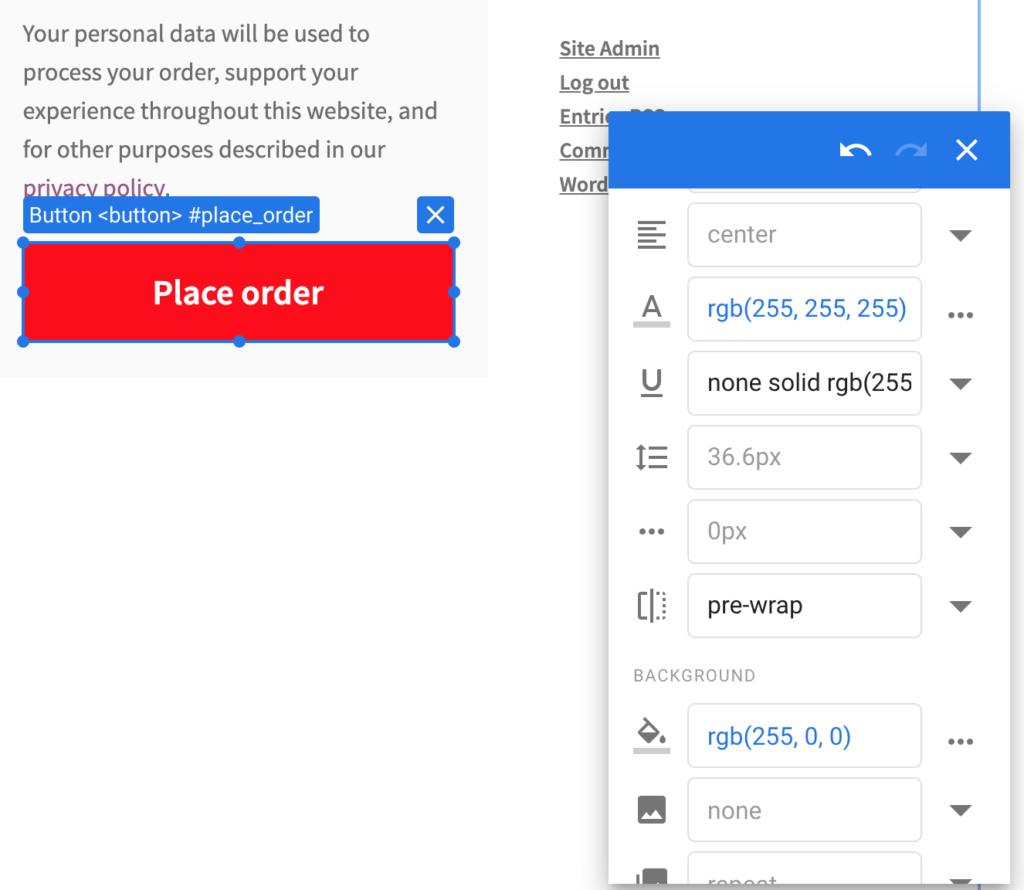
As soon as you start moving your mouse over the screen, you’ll see that each HTML component of your Checkout page gets highlighted. Navigate to the “Place Order” button and click on it. That’ll open the attributes window you can see in the screenshot above.

Changing the background color and text color is super simple. In that attributes window, scroll down until you see the fields for text color and background color, and update the values to whatever colors you want to test. In this example, the “Place order” button has a black background with grey-ish text. I’ve changed that to white text on a red background in the A/B test.

Place Order Variant

With that done, I have fully configured the A/B test variant and can hit “Save” in the top right corner of the variation editor. 

Sidenote: do not test more than one element per variant. When you do test more than one change per variant, you will not know which visual change actually caused a change in visitor behavior on your website.

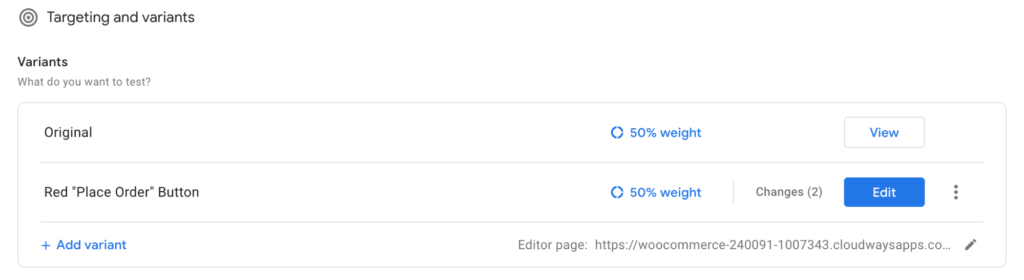
Going back to your overview screen, you’ll now see that the Google Optimize variant will say we’re testing two changes – but don’t let that confuse you. It’s never recommended to test more than one element at a time, and that’s what we’re doing here. One change has been the font color, and the other change has been the background color of the button. It is still just one element that we’re testing.

The next step is to connect your Google Optimize account with your Analytics. Therefore, you need to click on the “Link to Analytics” button in the progress bar or scroll down to the section titled “Measurement and Objectives.”

Google Optimize Draft

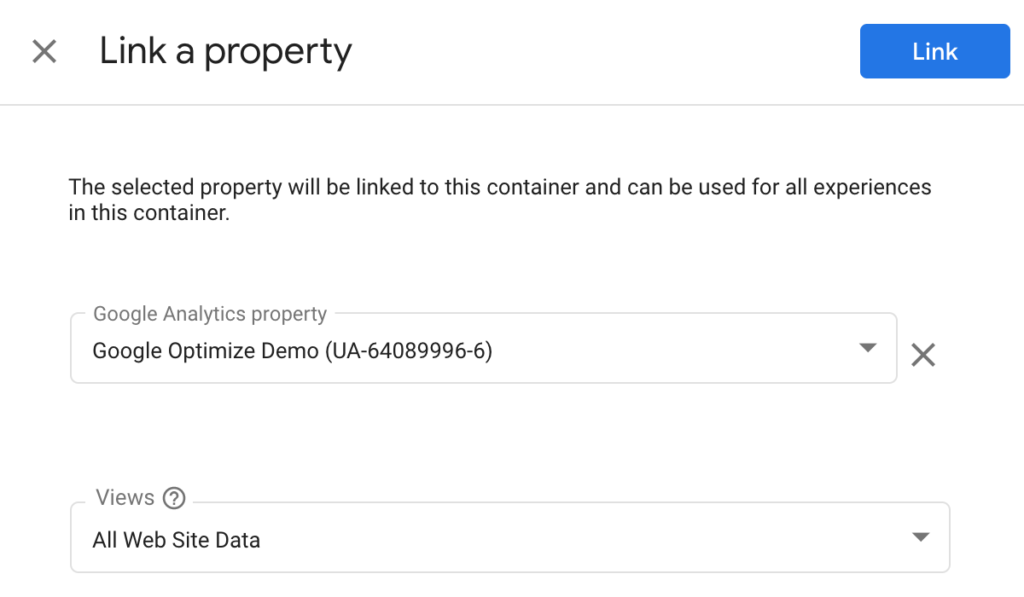
There, you can click on the “Link to Analytics” button and pick the right property and view. Sidenote: please ensure that Google Analytics is set up properly on your WooCommerce shop before proceeding.

Link Property

You’ll then be presented with a code snippet that you need to put onto your website. How to implement this exactly depends on your Google Analytics configuration (universal tracking vs. global site tag). For this example, I’m using the global site tag integration, so all I have to do is to add one line of code to my site. Google Optimize does a great job of explaining here, so read through the instructions carefully.

One last step we have to do is to set up a tracking event for the “Place Order” button. We need to tell Google Analytics to track the clicks on the button so that Google Optimize can use the tracked data as a custom objective for the split test. Without that click tracking, Google Optimize will not be able to determine the winning variation from our test – because it will not have the right data to do so.

There are multiple ways to add click tracking to your WooCommerce site; my favorite way is using Google Tag Manager. I will not go deep into setting up the entire tracking process here, as that would be a post in itself. However, I highly recommend reading through this article on Medium if you haven’t set up click tracking before. 

Once you’ve set up Google Tag Manager with the right tags and deployed it on your WooCommerce site (e.g. using this free plugin), you’re ready to set up a custom objective in Google Optimize.

Measurements and Objectives

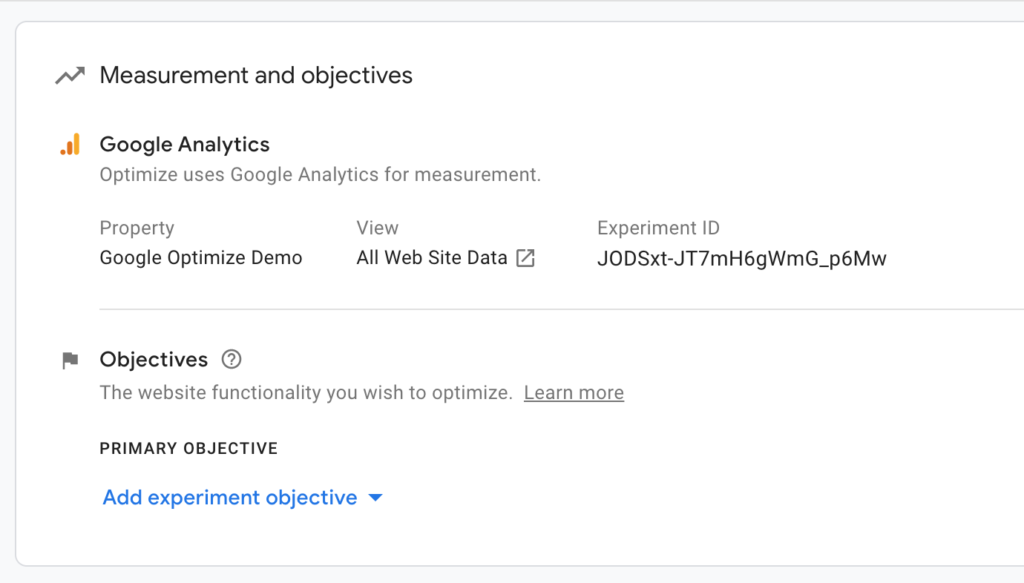
Click on “Add experiment objective” and choose “Create custom.” That will give you a screen where you define your own tracking rules.

Place order button clicked

Please note that the “Event Label” value has to match the label you configured in Google Tag Manager. For Google Optimize to be able to track this custom event – the click on the “Place order” button – the event labels have to match in Google Optimize and Google Tag Manager. You can also use “Event Action”, “Event Category”, or “Event Value” as rule parameters, but for this tutorial, the label will do.

After saving your custom objective, you can run the Diagnostics tool to validate that your Google Optimize experiment is set up correctly. Remember that Optimize needs Google Analytics to load on your page. So if you excluded your user from being tracked (e.g. blocking tracking for all admins in WP), it’s likely that this validation will fail. If that happens, I recommend that you include your user in the Google Analytics tracking temporarily. Alternatively, you can open your WooCommerce shop in an incognito window and verify that all the codes for Google Tag Manager, Google Analytics and Google Optimize are being loaded in the code of your shop.

At this point, your experience should be up and running properly. You can use the Live Debug Mode from Google Optimize and browse your site to validate the experience. You’ll see that Chrome shows you an area below the website that gives you insights on how Google Optimize is working on your WooCommerce site.

Live debug

In this screenshot, you can see that the experience has been applied and some additional information, like the variant I’m seeing and the URL that caused the variant to be triggered.

Finally, you’re ready to collect the test data and optimize your WooCommerce site for more conversions and revenue. This process can be confusing, so if you get stuck at any point, reach out on Twitter and I can help: @iamjankoch. Happy testing!

Source link

Happy 17th Birthday WordPress – Hostdedi Blog

Today WordPress turns 17 years old. If you’ve been in web development a long time you’ll know that the only thing that stays the same is how fast things change. 

Just since I started dabbling in web development in college all of these happened:

  • We learned how to lay things out with HTML tables
  • Then we learned how to use CSS for styling and layouts
  • We learned how to use Javascript for interactive elements
  • Then came Javascript frameworks like Prototype which was quickly eclipsed by jQuery
  • Then server side languages became really popular like ASP & PHP
  • The world moved onto Ruby on Rails and Python for a bit and it seems like React and JavaScript frameworks are having a comeback

The web world is constantly moving and most technologies only last 2-3 years before people abandon the technology for something new & shiny. But that’s most technologies, and today we’re talking about WordPress, which turns 17 years old. One more year and it can buy lottery tickets.

What Makes WordPress so Special

WordPress isn’t just surviving. It’s thriving. According to W3Techs WordPress powers 36% of the internet and it’s still rising. 🤯

So today I want to discuss what makes WordPress so special. Why does WordPress thrive while other technologies – even the most popular – only last a couple years?

I reached out to some of my long time WordPress friends to find out.

Democratize Everything

I love WordPress because it pioneered the democratization of the web. Anyone, even people who can’t code, can stand up a simple website, a magazine, or even a store using WordPress. Looking towards the future is exciting because now that we have everyone publishing, the next set of interesting problems come up for us to solve: how do we best deliver this content? How do we make this experience not only democratic, but also delightful? How do we improve?

Christie Chirinos – Product Manager for Managed WooCommerce hosting

WordPress made it possible for anyone to publish. Because WordPress is open source & GPL licensed you don’t need anyone’s permission to do anything. You don’t need to get approval from a board, submit an application, or explain to anyone what you’re doing.

You can set up WordPress on a host and start building.

I love that WordPress is versatile enough to serve content creators, store builders, and big businesses while at the same time providing the warm hug of a unique collaborative social community.

Mendel Kurland, Agency Developer Advocate

Mendel Kurland, who many of you know if you’ve been to WordCamps in the past 5 years,appreciates the versatility. WordPress was born a blog and it evolved to sell t-shirts, manage memberships, and power enterprise businesses. It’s incredibly flexible which is what makes it so appealing.

WordPress is whatever you make it – you can keep it super simple or build something exceptionally complex while still maintaining its ease of use. The flexibility empowers you to scale as big as you want, when you want, and how you want. Also, when you use it, you’re joined by one of the most diverse communities in the world. With an enormous global community and more than 300 local communities, it’s easy to find, share, and collaborate with other people who love WordPress as much as you do.

Jess Frick, Product Manager for Managed WordPress

If you want to make a blog chronicling bread baking  🍞 during a pandemic go for it. If you want to start your eCommerce empire selling bread machines, go for it. And if you’re just hungry for warm oven-baked-bread (as I am ✋) then start your own photo blog where you eat bread and post pictures of it. WordPress does it all. 

Once this pandemic is over, I strongly recommend you check out your local WordPress community. The code behind WordPress is only half the magic. The rest is in the community.

Opportunities & Growth

WordPress as a software tool has given me a career I never thought existed. WordPress as a community has given me a life I never thought I would be able to have.

Andrew Norcross, Senior Engineer & Developer Advocate

There’s an entire ecosystem built in & around WordPress and if you look, you’ll be able to find a place where you can sell your skills and expertise. WordPress has a thriving community where designers recommend copywriters who recommend website builders who recommend hosting companies who recommend premium plugins.

The industry is growing and it’s incredibly open. We’re all here to support each other.

Financial Freedom

It’s pretty gauche to quote yourself so I won’t add a quote of my own, but I will add something important that builds on the previous point.

WordPress has enabled me to constantly experiment. Over the years I’ve:

  • Sold websites as a freelancer
  • Sold both Ninja Forms & WooCommerce plugins
  • Wrote 3 books about WooCommerce
  • Helped organize both in-person and online conferences

I’ve been so incredibly fortunate to work in an industry where everyone is experimenting. I’ve been able to experiment and play with WordPress on the weekends and evenings and earn a little extra money. And while the money is great, it’s really that extra knowledge that’s helped me. If you like learning and making a little money while you do so there’s still so much untapped potential.

WordPress is Special

WordPress is special. Not just to the people who work at WordPress companies but to people who want to build a website, run a store, develop a career, and people who want to belong in a community.

So, from all the WordPress nerds here at Hostdedi, Happy Birthday, WordPress!

Source link

Pros and Cons for the New WooCommerce Payments

The WooCommerce team released WooCommerce 4.1 in early May, and with it came two big new features: The Marketing Hub, and WooCommerce Payments. Today we’re going to look into WooCommerce Payments, how it can improve your business, some of the potential downsides, and under what circumstances you should look into using it.

Where You Can Find WooCommerce Payments

Before we get to what WooCommerce Payments does, it’s worth sharing where users can expect to find WooCommerce Payments. It’s built right into the welcome wizard, so every new store owner will see this as an option. And unless you already have experience with eCommerce, and you have a favorite payment gateway (pretty sure I’m the only one that nerdy), you’re likely to choose WooCommerce Payments because it’s made by the same company and has WooCommerce in the name.

WooCommerce Payments in welcome wizard
WooCommerce Payments in the welcome wizard

WooCommerce Payments is currently only available in the US for stores that use US dollars. So if you don’t see it in the welcome wizard and you are located outside of the US, that’s most likely why.

Their plan is to slowly add more countries and currencies over time. Based on WooCommerce’s international appeal, I expect support for Canada, the UK, and other Western European countries to come next.

Note: if you want to use WooCommerce Payments and you’re outside of the US, you can sign up to be notified.

What You Can Expect from WooCommerce Payments

Payment gateways do two essential things:

  1. Accept and process credit cards 💳 on your site
  2. Manage payments, refunds, disputes, and deposits.

And WooCommerce Payments does all of these. 😎 

Best of all, WooCommerce Payments does all of this within your site. So you can not only accept credit cards on your site (which is commonplace and best practice), you can also manage payments, refunds, and disputes from your WordPress admin.

Being able to do all of this reduces a lot of friction for store owners. First, it’s one less account you have to manage, and one less username/password you have to get from a client or share with a developer.

It also allows a store owner to do everything from one interface. Since it’s only two clicks to move from the order screen to the transaction screen where I can view the payment details, including fraud risk, previous transactions, and fees, it’s more likely I’ll check those details out. You can also view and manage deposits from WooCommerce Payments into your business bank account. 

This gives store owners a more well rounded understanding of their business, and when you do need to review potential fraud, see when your next deposit will hit your bank account, or dig into financial details it’s going to save so much time. 

This extension makes WooCommerce the hub for your business, instead of simply the place where you update your products.

Requirements for WooCommerce Payments

Before adding WooCommerce Payments, make sure your infrastructure meets these minimum requirements:

  • PHP 5.6+ 
  • WordPress 5.3+ 
  • WooCommerce 4.1+ 
  • Jetpack 5.3+ (this is a temporary requirement)
  • An SSL certificate (to use the payment gateway in live mode)

Note: PHP 7.3, free SSL certificate, and the latest version of WordPress, WooCommerce, and plugins are included for those on Managed WooCommerce hosting at Hostdedi.

Why You Should Trust WooCommerce Payments

I have used WooCommerce for years and trust them to build high-quality, functional, and customizable eCommerce software. 

But accepting payments is an entirely different field, so you may have some concerns.

Luckily for all of us, WooCommerce is focusing on what they do best: eCommerce software. WooCommerce Payments is a white labeled version of one of the best and most popular payment gateways on the market: Stripe.

If you’ve used Stripe, you know they’re incredibly reliable and offer transparent pricing. 

Limitations of WooCommerce Payments

Beyond being limited to the US and using US dollars, there are a few limitations to be aware of, including functionality, compatibility with 3rd party applications, loss of historical data, and your fees.

Limited Functionality

I’m a huge fan of recurring revenue, and one of the most powerful recurring billing features in the entire eCommerce landscape is WooCommerce Subscriptions. 

Right now you can’t use automatically recurring payment with this gateway. So if Subscriptions are a big part of your business, I recommend staying with your current payment gateway.

Compatibility with Apps

Another great thing about Stripe is that a lot of infrastructure has been built directly on top of it. Some applications, such as Baremetrics, have a direct integration with Stripe. 

So, if you use an application like Baremetrics or another bookkeeping or accounting application, you would have to enter all of that data manually. I’d recommend sticking with your current setup for now.

Cannot Import Historical Data

It should come as no surprise to anyone who knows me that I’m a huge data nerd. If you’ve been in business for a few years, you have a huge amount of data about your customers, including how much they purchase and how often.

A lot of this data should be in WooCommerce, but some data is saved in the payment gateway, and currently you cannot import historical data into WooCommerce Payments.

If you’re a giant data nerd, or have very invaluable data that you don’t want to lose, you might want to wait until WooCommerce Payments lets you import your historical data.

Negotiated Payment Gateway Fees

One of the last points could be one of the biggest depending on the size of your  store. The standard pricing with modern payment gateways like Stripe and WooCommerce Payments is 2.9% + .30.

What some merchants don’t know is that you can negotiate better rates once you start bringing in significant money. There aren’t any rates set in stone, but the rule of thumb is if you make over $80,000+ a month you can negotiate rates with your payment gateway. 

You might be able to go from 2.9% + .30 down to 2.5% + 0.30. That’s a huge jump and helps increase your profitability. This might not seem like a lot for smaller stores, but if you make $1,000,000 in revenue, you could pay $29,000 in fees. With negotiated rates you’ll drop that to $24,000. 

As much as I like the utility of putting a payment gateway directly in the WooCommerce admin, it isn’t worth $5,000 in additional fees. So, if you have negotiated rates, you’ll definitely want to continue with your existing payment gateway.

The Future

WooCommerce is putting a lot of effort into WooCommerce Payments as they expand territories, currencies, and compatibility with extensions and apps.

If you like the idea of WooCommerce Payments, it will very likely be coming to you soon. Some businesses will likely have to wait until the advanced features are added, or negotiated rates become possible, since that’s a huge money saver. But if you’re starting a brand new store, or you just started your store, I definitely recommend exploring WooCommerce Payments.

Source link

Everything You Need to Know About WooCommerce Shipping

Offering multiple shipping options is a great way to keep your customers happy and reduce your abandoned cart rates. With just the built in options in WooCommerce you can create a variety of shipping options for your customers and you can do even more with a few premium extensions. 

WooCommerce Specific Shipping Options Overview

The WooCommerce shipping setup integrates smoothly with your WordPress website. When you add the plugin and activate it, you can immediately configure a variety of basic shipping options and create combinations to suit your business. 

There are three steps to follow when setting up basic WooCommerce shipping: 

  1. Set up Shipping Zones
  2. Add Shipping Methods and Rates
  3. Assign a Shipping Class (Optional)

First, set up your shipping zones to specify areas of the world where you ship goods. You can also list countries or geographic areas where you do not offer shipping. 

Once you’ve set up your shipping zones, the next step is to add standard shipping methods and rate options within zones for a flat rate, free shipping, and/or local pickup. There are ways to expand these options, and we’ll cover them later. 

The last step is to assign a shipping class to each item in your product range. This helps you to customize the shipping method and rate for individual items. Let’s look at these steps in more detail. 

Shipping Zones 

These zones let you define specific areas around the world where you will ship goods, and the shipping methods and rates you will offer within that zone.

Zones can be wide-ranging areas such as countries or continents, or they can be specific zip codes or states.  

For example, you could set up three general zones e.g., U.S. Domestic, Europe, and other. Then within each zone, specify the method of shipping available.  

When you’re setting up your shipping zones, you will notice there’s a default zone installed called Locations not covered by your other zones

Shipping zones

This option will capture customers who don’t fit into any of the specified shipping zones. You’ll want to make sure you have at least one option in this default zone. Otherwise customers will get the message: No shipping methods offered to this zone and they won’t be able to checkout.

Shipping Methods

The core plugin offers three basic shipping methods: flat rate, free shipping, and local pickup. You can add various options within these three methods.  

The flat rate option is a fixed cost you can offer using product shipping classes or per order or by individual product items. 

Free shipping can be offered across your entire product range, or only if certain rules are met. 

For example, free shipping can become an option with a coupon code entered, or when the customer reaches a minimum total cart value. 

However, if you want to offer local pickup, you need to be more specific and identify the regions or zip codes that qualify for this option. One example would be a Los Angeles-based business offering local pickup within the southern California area.

Options could be even more specific and list zip codes within a 40-mile radius of L.A. where local pickup options would be available. 

With WooCommerce shipping you can create as many shipping zone and method combinations you need for your business and customize each zone.

Shipping Rates

The flat rate, free shipping and local pickup options come with the basic WooCommerce plugin. They’re quick and easy to set up and could be all you need when you start selling online. 

However, if you want to offer your customers a wider range of options, the WooCommerce table rate shipping extension lets you do this. For example, you can create a shipping rule based on an item’s weight by defining the minimum and maximum weight range or number of items per package. 

You can be even more specific by listing the shipping classes for which this rule applies, or add rules based on destination and price. You pay a monthly or annual subscription fee for this but many feel it’s worth it for the additional flexibility it adds to your WooCommerce shipping options. 

Assign Shipping Classes

If all of your products cost the same amount to ship, or you’re going to use some of the premium extensions for getting rates from providers, then you don’t have to setup shipping classes.

But if you have products with very different shipping costs such as t-shirts and framed wall posters, you can set up a shipping class for each product type. And you can use these classes to affect how much shipping costs in the checkout process.

Each time you add new products to your store, you can assign a unique class, or group them with other product lines under shipping classes you’ve already set up.

WooCommerce Extensions and Plugins for Premium Shipping

Using third party plugins lets you expand your range of WooCommerce shipping options and offer real time shipping methods from main carriers like FedEx, UPS, or the United States Postal Service (USPS). 

The WooCommerce Table Rate Shipping plugin enables you to set up unique shipping options using a range of variables e.g., product class, shipping zones, weight, or the number of items being shipped. It can be used for domestic and international deliveries. 

Several shipping carriers offer their own dedicated plugins (USPS and FedEx are two examples). Using these extensions with your WooCommerce store lets you offer real-time shipping quotes from your regular suppliers. 

If your business ships internationally or has distribution centers overseas, there are plugins that let you access local postal services in specific countries — like SAPO International Parcel Service. This gives you real time shipping rates within the South African postal service, and lets you offer shipping options by air or ground. 

ShipStation

ShipStation is another powerful WooCommerce plugin that connects smoothly with your WooCommerce store and helps you automate order fulfillment and sales processes. Although you still need to install shipping plugins (e.g., FedEx or USPS) to get up-to-date costs, ShipStation lets you monitor your business for order processing, invoicing, and inventory levels, and gives real-time analytics.  

If ShipStation is more than you need, WooCommerce shipping plugin Print Invoices & Packing Lists lets you easily manage invoices, packing lists, and customer emails within your store, and you can customize documents to mirror your business brand. Customers can also check their order status and invoices any time with the My Account option. 

If you run a dropshipping business, the WooCommerce Dropshipping plugin helps you manage your customer orders and dropshippers.

Shipping Extensions for WooCommerce

This list offers a few WooCommerce shipping plugins and premium extensions you can use with your online store. Explore their different features to find the WooCommerce plugin that’s ideal for your business.

How Does WooCommerce Calculate Shipping?

When a customer adds items to their cart, WooCommerce calculates shipping charges based on the products selected, shipping class, size, and weight. Once the customer enters their delivery address, the WooCommerce shipping calculator works out a cost based on their location and the shipping methods available. The customer can see this information on the cart page. 

You can also manually adjust your shipping rates and add additional charges for multiples of an item, discounts for purchasing specific products, handling fees, or taxes.

Let’s set up WooCommerce shipping for our T-shirt business, and create options for shipping using the ready-to-use features already loaded into WooCommerce. 

How to Set up Basic Shipping in WooCommerce

Here are the basic steps for setting up shipping in WooCommerce. This excellent WooCommerce Shipping How-to from FitSmallBusiness.com has additional details if you need them.

1. Create Your Shipping Zones 

On your WooCommerce dashboard, select WooCommerce > Settings > Shipping

Next, select Add shipping zone

WooCommerce Setup Shipping Zones

Give your new zone a name, add the zone region and set up as many as you need. 

When you’ve set up your zones, you can leave them as general regions, or edit them to list as regions or zip codes. 

To edit a zone, Go to the Shipping zones screen. Move the cursor over the zone name to see the Edit and Delete options.

Select Edit and add regions or zip codes on the next screen. 

Save your changes. 

2. Add Shipping Methods

Add shipping methods in WooCommerce

For each zone, select Add shipping method and highlight one option from the drop-down list. 

Select Add shipping method to save. 

By repeating these steps, you can offer multiple zone / shipping method options within your store.  

Edit Shipping Methods 

To edit shipping methods, hover the cursor over the zone name, select Edit then hover over the method you want to edit, and select Settings.  

Edit shipping method in WooCommerce
Set shipping method cost in WooCommerce

In Flat rate Settings, you have the option to set the Tax status to None or Taxable. Your choice will be applied to all flat rate costs for this zone, and tax rates are calculated using the business address you entered when setting up your store.

If you want to add extra charges within your flat rate shipping option, add them using the Cost field and the formats below.  

Flat Rate charge per order – to add a charge to every order, enter a number (e.g., 4).  You don’t need to add currency symbols as WooCommerce uses the currency you chose during the store setup. 

Flat Rate charge per item – to add a charge to every item placed in the cart, enter the formula, [qty]*1.50. For our T-shirt business, it means $1.50 is added to every shirt purchased. If a customer buys five items, then $7.50 will be added to the total cart value. 

Flat Rate percentage charge – to add a fee based on a percentage of the customer’s cart value, enter the formula [cost]*12. In this case, an extra charge of 12% will be calculated and added to the cart total. 

3. Add Shipping Classes

Use this option to group specific products together or create shipping methods for individual items. For example, our framed artwork will have its own unique class as it’s oversized and heavy. But our T-shirts could be grouped with other items in an existing class. 

Create Shipping Class in WooCommerce

Go to WooCommerce > Settings > Shipping > Shipping Classes  

At the bottom corner of the screen, select Add shipping class.

Enter the name of your class. Leave the slug field blank as it fills automatically and use the Description field for notes.

Select Save shipping classes. The new class will appear. 

Save shipping class in WooCommerce

The number 45 on the T-shirt line is the number of products grouped under that class.  

By completing all these steps, you have set up basic shipping options in your WooCommerce store, and can offer your customers flat rate, free shipping, and local pickup.

Source link

Migrating from Shopify to WooCommerce

In 2019 I ran a Kickstarter campaign for my game Fry Thief. I successfully funded and delivered 500 packages to my backers. That left me with a little under 1,500 copies remaining, which I hope to sell through conventions and through my website. In the interest of time, I set up a quick store on Shopify.

Laid Back Games Shopify Store
My Laid Back Games store on Shopify

Functionally speaking, the site works great, and I think it looks pretty good too. When people find my site they choose one of the two versions of my product they want, they place their order, Shopify calculates shipping costs, taxes, and processes the credit card. From end to end, it is a functional eCommerce store. However, I did have one big problem:

My site felt slow, but I didn’t know how slow, so I loaded up GTMetrix to evaluate my speed.

  • It took 6.4 seconds to load
  • My PageSpeed score was 71% (C )
  • YSlow score was 61% (D).
GTmetrix data for Shopify store
Performance on Shopify

If you think 6.4 seconds is a long time, to load you’re correct. It’s a very long time in the ADD world we live in.

And the data supports this. To look at just one example, according to Akamai, a two-second delay in page load time can increase bounce rate by more than 100%. That’s basically half of my potential customers walking into the store and immediately leaving without even bothering to look at my product. So speed is incredibly important.

Now that the fundraising campaign is in the rearview mirror, I want to move to a faster platform. My hope is that I can improve the speed of my store and therefore the number of sales (without having to do any extra marketing). 

Migrating to Hostdedi

The first step is to move everything over to WooCommerce. That includes products, customers, and orders. It’s easy enough to export all of those out of Shopify through the admin.

Unfortunately, each eCommerce software exports & imports data in a unique format. So there are two choices:

  1. Import the data yourself
  2. Use the free migration service on Hostdedi

I highly recommend you send all of the data to Hostdedi. They can import and validate the data for you since it’s incredibly easy, and there won’t be data loss.

In my case, since I only had a single product and a few dozen orders, I thought I’d want to learn how to do it myself. WP Import All comes with the Hostdedi Managed WooCommerce hosting account. It took a little over an hour to import my customers, orders, and products without errors.

Once I loaded all of my data, rebuilt the home page, and customized my theme, I took another speed test. This time my site loaded much faster!

GTmetrix performance report for WooCommerce on Hostdedi
After moving to WooCommerce on Hostdedi
  • It took 2.3 seconds to load
  • My PageSpeed Score was 72% (C )
  • YSlow Score a 66% (D)

It’s interesting to note that my site loads a whole 4 seconds faster just moving to the Hostdedi platform. This performance increase is mostly from moving to higher quality infrastructure. If you notice my PageSpeed Score & YSlow Score are still pretty terrible and there’s a lot of room for improvement.

“My site loads a whole 4 seconds faster just moving to the Hostdedi platform”

Performance Improvements on Hostdedi

One of the lesser known things about Hostdedi is that we have a 15 day performance challenge where we’ll copy your existing site over to our servers and show you how fast it could run.

I had one of the amazing engineers take a look at my site and in a single afternoon he optimized the site faster than I had hoped. 😍

{{image of speed test}}

  • 0.6 seconds to load
  • My PageSpeed Score is 97% (A)
  • YSlow Score a 87% (B)

The site now loads 10X faster than my Shopify site and performs all of the same functions.

GTmetrix performance report for WooCommerce on Hostdedi after optimization from engineers
After a Hostdedi engineer optimized the site

Since I’m a technology nerd there are still a few areas I can try to optimize to get my YSlow Score up to an A grade.

I can’t imagine any user abandoning a site while waiting ½ second. In fact, because the website is so snappy, users just have to read a few seconds, make their decision, and then (hopefully) checkout.

Other Benefits

The main reason I migrated from Shopify to WooCommerce was speed and that was definitely solved. But another reason that was annoying was that I could never receive email notifications.

I had to constantly check my store and eventually I installed the Shopify app on my phone so I would get a push notification. I reached out to support who were friendly and promised to send the issue to developers but I never heard back.🤷‍♂️

One of the advantages of an open system like WooCommerce is if something doesn’t work (like email notifications) you can switch that system out for a new system. You could hire a developer to debug the issue yourself, if you find an area to fix you can create a patch and either submit it to WooCommerce core to help everyone or if it’s something specific to your setup you can use it yourself. 

I love ♥️ being on an open system. The next time I run into an issue I’ll fix it myself or hire someone to help.

Wrap Up

There are lots of incredibly easy-to-set-up eCommerce platforms. And if you need to build a site quickly and you don’t want to worry about a thing then a closed platform could be great. But as soon as you want to customize or optimize your store in any way then you really want to look into an open platform like WooCommerce or Magento. 

Open platforms like WooCommerce or Magento let you replace any individual piece that you don’t need or any piece that’s underperforming. As you can see, I did most of this myself and moved my site from 6.4 seconds down to 0.6 seconds load time. Speedy sites make happy customers. And happy customers lead to more sales.

Source link

My Secret Weapon Training Clients on WordPress

At the end of every WordPress project, after the final website is launched into the world, there is one final task to complete: educating the client on how to use WordPress. The length and depth of the training depends on not only the client’s technical savvy and familiarity with WordPress, but also the complexity of the website itself.

When it comes to educating clients on how to use WordPress, there are several common ways freelancers and agencies fall short with clients:

  • They fail to account for the depth of training that will be needed based on the client’s knowledge and complexity of the site, so the cost of the training is not properly accounted for in the client agreement.
  • They try to cram all of the training into one single training session and it is rushed and stressful.
  • They cover too much and the client feels overwhelmed, and begins to tune out.
  • They don’t prepare the client for the training sessions and properly set expectations about what can be achieved.
  • They start from scratch and reinvent the wheel with every client.
  • They are surprised by the client showing up to a website training with members of their team—and now they’re teaching a group instead of an individual.

When starting out my own agency, I unfortunately experienced all of these scenarios which used up valuable time, added stress to my day, and made it harder for my clients to do what they wanted to do. 

As I worked to establish repeatable systems and processes, I created a client management system to improve the client experience and increase profitability. As part of that process, I began to explore options to not only deliver better WordPress training to clients but make it more enjoyable, engaging, and stress-free.

My goal was to:

  • Provide detailed, consistent WordPress training (no matter who was delivering it).
  • Ensure all clients have a baseline understanding of how WordPress works.
  • Shorten the WordPress training sessions to no more than 60 minutes, including client Q&A.
  • Reduce the total number of training sessions per client.
  • Reduce the amount of beginner questions asked by clients during the training.
  • Reduce the amount of support clients required in the 30 days post-launch.

WordPress Training Videos

One of the solutions I came up with was offering my clients a set of WordPress training videos that would take care of the basics. 

The idea was that these pre-recorded videos would get the clients up to speed on how to use WordPress and I would then only be responsible for providing training on the custom features created for their unique website and answering their questions. I also had the idea to provide all clients who sign a monthly support agreement continued access to the videos as a bonus.

But here’s the thing: 

I didn’t have time to create all of the WordPress training videos I needed. I didn’t have the right equipment to do it. And I didn’t want to be responsible for recreating them every time WordPress pushed out an update.

Luckily, that’s when I discovered WP101. 

With the WP101 Plugin you can provide clients 31 WordPress training videos right inside their WordPress dashboard, which is awesome. But what I love most about WP101 is that you don’t have to use the plugin. Instead, you can choose to embed the WP101 WordPress training videos on your website with the white label option, which keeps clients coming back to your site over and over again.

How I Leverage The WP101 Videos

For several years, the WP101 suite of WordPress Training Videos—which now includes Gutenberg—has been an integral part of my client website training process. Leveraging the WP101 videos has not only saved countless hours of time but provided more value for my clients while helping boost profits.

Let me explain…

STEP 1: Introduce The WordPress Videos

I introduce the collection of WordPress videos to my client during the development stage of the website build, providing them with a secret URL and a password. While my team is building out the site, I ask the client to watch all of the videos—each less than 5 minutes in length.

STEP 2: Make The Videos A Prerequisite

When planning the official website launch, I set a date for the WordPress training session with my client. At this time I do three things:

  1. I remind them to watch the training videos provided
  2. I ask them to write down any questions they have
  3. I let them know that watching the videos is a prerequisite to the hands-on training. If they don’t watch the videos, we reschedule the training session, which also delays the client receiving the keys to the site.

STEP 3: Host A Quality Training

By making the WP101 videos a requirement for the website training session, I guarantee every client is showing up to the session with the prerequisite understanding of how WordPress works and how to use it. 

This means I can skip over that information during the live training. Instead, my time with the client is focused on the specific features built for their site, the plugins used, and the questions clients might have, which results in a better, more engaging, higher value training.

STEP 4: Provide Ongoing Access To The Videos

If a client signs on for ongoing, monthly website support, they receive continued access to the WordPress training videos for as long as they remain a client. This means that when they have turnover on their team, they can have their new staff watch the videos and get up to speed or if they forget something, they can watch the video and get it done quickly. This single step alone has practically eliminated all post-launch client support requests, which has saved time, reduced resources, and increased profits.

My Advice To You

As you can see, while my goals were lofty, they all were achievable with the right tools.

Some of you might read this, click over to the WP101 Plugin site, see the price for the Professional Plan (which is worth every penny), and think: 

“I don’t want to pay their annual fee. I’ll create my own videos.” 

Truthfully,  yes, you could do that. But to do so you would need to invest in the right audio/video and sound equipment, write each individual video script, record all the screencasts, perform hours of editing, create splash images, and upload the final videos to a video hosting site, which you also need to pay for. Then after spending a crazy amount of hours to finish the videos, WordPress will push out an update, they’ll change things in the user interface (UI), and you’ll have to do it all over again.

So my advice to you is: 

  • Think about how much your time is worth and consider how much you charge per hour and how many hours this would take you.
  • Then think about the amount of stress you already have in your life and ask yourself if this will create more stress by piling on more work.
  • Finally, check out the WP101 Plugin again, do yourself a favor, and just say yes. Buy it, integrate it into your workflow, and benefit from their hard work and ongoing updates.

Editor’s note: WP101 videos are included for free with our Managed WordPress and Managed WooCommerce hosting

When you build in efficiencies that benefit you by saving time and increasing profits, and benefit the client by delivering a quality product that adds value to their experience, everyone wins. Plus, when the client’s last interactions with you as part of their website project are positive, engaging, and valuable, they’ll remember those good feelings later and provide a better testimonial.

The Tools You Choose Affect Profitability

While choosing to leverage the WP101 videos in my agency has helped improve the level of services I provide clients, the biggest impact is the effect that decision has had on my ability to land monthly support clients and increase the profitability of my projects. 

What’s amazing about this approach is that you can do the same thing with other tools like Hostdedi’ Managed WordPress hosting, which takes care of image compression, automatic updates for WordPress and plugins, automatic daily backups, automatic SSL, and staging environments, as well as access to developer tools and no pageview/traffic limits.

Source link

Virtual Team Building: Putting the Fun in Fundamentals

This was originally posted on the Liquid Web blog.

Liquid Web’s Executive Vice President and General Manager on creating a virtual team building atmosphere where individuals feel valued, supported, and part of a community.

A company culture in which employees feel challenged, work with people they enjoy, and work for people who “have their back” creates an atmosphere of high performance, loyalty, positivity, and frankly, fun.

In my last blog, fundamentals of management, we talked about the fundamentals being more critical than ever given our current global pandemic situation. Now, as we face the reality of an extended stay-at-home work-life situation, it is also imperative that we maintain a strong community for the sake of our employees. A company culture in which a worker feels valued and supported as an individual is vital in even the best of circumstances. Given the current global situation, the importance of maintaining your culture and your “community” magnifies. 

In my experience, keeping employees motivated and with high morale take priority, and it’s essential to make sure you have these bases covered:

  • Ensure each employee knows how they fit into the bigger picture, and how their role contributes to the success of the company.  
  • Reinforce with employees that management “has their back,” that employees are empowered, can take some risks, and that you’ll be there to support them.  
  • Take the time to ensure employees feel valued and are compensated fairly for the job they are doing. Sure, everyone would like to make more money, but sometimes that’s not what it’s all about. Make sure their compensation is fair and equitable to their peers for the job they are doing.  

And then, to tie it all together, most employees want to have a sense of community – not just from the neighborhood in which they live, but in their place of work, as well. Layering on a strong sense of community in a way that matches your culture can take your team from good to great.   

People are happiest when working in an environment that is in line with their values. A company culture in which employees feel challenged and are working alongside people they enjoy creates an atmosphere of positivity and productivity. And a part of liking someone is knowing someone—like really knowing them—on a level deeper than what their role is in the company. In times like this, it is essential that people feel connected to one another. 

Here’s where the FUN in fundamentals can come in…

Now is a great time to spend time thinking about how you all stay connected. Here are some things we are doing at Liquid Web to ensure that our team doesn’t feel isolated, and that every single employee knows that we have their back while keeping morale high and infusing some fun into a virtual work setting. A little something for all interests and personality types.  

I’d love to hear what you’re doing – hit me up @cawheeler99 on Twitter and share!

Themed Meetings

If you have a recurring meeting on the calendar, consider adding a bit of fun by giving it a theme. Every Friday, wear a certain color. My team enjoys Hat Fridays. Try different themes based on a decade or destination.

Games

At the beginning of meetings, ask someone to send in a photograph. Everyone has to guess who sent it in. When the sender is identified, they get a chance to share a bit about the photo they sent and why it’s meaningful to them. 

Gift Exchanges

Draw names using a gift exchange generator, set a budget, and let the fun begin. If budget is an issue, try doing a DIY gift exchange in which gifts must be made using only items that the giver has on hand in their home. This is a really fun way to let employee creativity shine. 

Netflix Watch Parties

This is a fun way for employees to stay connected. We’ve also opened this up to families and have kid-friendly viewing options. 

Roulette Hangouts

Groups of 4-6 participants are randomly selected to have a 15-30 minute hangout session to talk shop, interests, or favorite Baby Yoda memes. Sample questions are provided as a starting point to get the ball rolling, but participants are free to talk about anything they want to get the conversation flowing.

Virtual Home Tours

Ask employees to share their favorite part of their home, whether that’s a room, a piece of furniture, or an object. Find out what’s bringing employees comfort in these times when so many of us are housebound. 

Art Exchanges

Employees fill out a questionnaire about their interests and personality. They are then matched with an employee from a different location. The two swap questionnaires and, based on the other person’s answers, they paint or draw a small 4×4 piece of art for their new friend. 

Volunteer Initiatives

Set up Slack channels based on locations that allow employees to share information about ways to help in their communities. 

Hidden Talents

Hosting a virtual Talent Show is an excellent way to get to know your colleagues better. Everyone gets five minutes. Acts can range from serious to silly. Laughter is inevitable and you might just discover a secret opera singer in your midst. 

Happy Hour Team Meetings

This is a great way to unwind at the end of the week. Close out the week with a meeting that allows teams to check in about the week over their beverage of choice. 

Themed Photo Contests

Every week, choose a stay-at-home friendly theme (like food, pets, from my window) and host a photo contest. Feature the best submission at the start of a team meeting.

Resource-Sharing for Parents and Caregivers

Start a Slack channel for sharing resources like online learning, tips for keeping kids entertained, and how to balance working from home while managing education at home. 

For large companies with lots of employees, variety is essential. Try different approaches and see what resonates. One silver lining of these very trying times is that, if we can find ways to forge the connections that this season calls for, we will know one another more deeply—and we may even be more productive—than we ever have before.   

Be safe out there, and have some FUN!

Source link

How to Become a Freelance WordPress Developer

With more than 35% of all websites using WordPress, you can tell it’s absolutely massive and is very much still growing. There is still a ton of room for good people to do good work and create a thriving business with WordPress. Today, we’re going to look into becoming a freelance WordPress developer.

I’m going to talk about getting started as a WordPress developer but you can use this same advice if you are a designer or even a writer in the WordPress space. Yes, you will need to find different teaching resources, but the most important elements, like making good decisions and building your reputation, are essentially the same across different fields.

WordPress.org Homepage

Start With Why

If you want to start your own business, it needs to begin with a pretty good reason. Sure, the freedom of working where & when you want is great, but you can get that with many jobs now. You don’t need to take on all the terrible parts of running a company yourself to get freedom in where you work.

That means you need to have a separate reason to run your own business outside of having freedom. One of the reasons I work for myself is that in addition to getting to write what I want, I get to take the time to help parents run a business that lets them be an awesome father or mother. Taking a job at a company would mean that I can’t sit down in the middle of the day to write about being a dad running a business.

I accept all the downsides of running my own business because I get to help the parents I interact with be the awesome people they dreamed of being. When I’m having a down day because someone hasn’t paid me, I remember someone I’ve helped and keep pushing forward.

Ask yourself:

  • Why will I put up with the hard days of working for myself?
  • Who specifically can I help by working for myself that I can’t help otherwise?

Understanding Your Value

The next thing to tackle when you work for yourself is understanding the value you bring to the table. 

When you’re starting as a developer it’s easy to think that the most valuable thing you bring to the table is writing code for your clients. Your clients also think that this is the highest value thing you do for them but you’re both wrong!

Coin jar

The most important thing an experienced developer brings to the table is the wisdom to make good decisions. When you know which of the 10 WordPress form plugins suits this project best, you are bringing value to the table. 

Making the right decision about putting code in a plugin or in the theme is another valuable bit of knowledge that clients don’t have. The code you type out is simply the visible evidence of that knowledge.

A good way to start talking about value with your client is in your initial email with them. I’ve shared my initial client email previously. Please note, the questions center around the value that the client expects from the project. I don’t worry much about the hours that something will take when I’m starting to talk to a client. At that point of the process they don’t even care.

The only thing a client cares about is that your fees provide value to them. They want to know that if you’re going to charge $5k to build their site, they’re going to get at least $10k of value out of it in the next year. If you want to charge well for your services, then you need to show your clients that they will get value from the work you do.

If you leave the value question to chance then you’re not going to win much work.

Ask yourself:

  • How can I show my client they’ll make 3X or more from my work?
  • Where can I help a client avoid known problems?

Learning the Field

WPSessions

There are a few steps to learning any field. First, it starts with some research so that you know what the best sources of information are. One good spot to start for almost any field is LinkedIn Learning. They hire top professionals in the industry to provide training.

For WordPress development you can get some deeper dives once you’ve got a handle on the basics:

The biggest mistake that people make as they start learning anything is waiting for too long to get their work out there in the world. You will always be better tomorrow. Your code will be cleaner, your writing will be more concise, and your design will be tighter.

Start putting your work out there by picking a personal project, building it and then sharing it with people. Share it on social networks and ask for feedback. Most people in WordPress remember everyone that helped them and are happy to spend a few minutes helping someone that is just starting out.

Finding Your First Freelance Job

Jobs.WordPress.Net

Now, how about finding your first job as a WordPress professional? Do you know where to start?

When you don’t know anyone you’re going to need to use places like Craigslist, Upwork and Fiverr to find clients. When I started out on my own, I made a rule that I needed to make 10 new contacts a day with potential clients. Sometimes at the end of the day, that would be done just by new emails coming in via an ad on Craigslist but other days I’d search far and wide for anyone to contact about doing work for their WordPress site.

Two popular places to get started at are Fiverr and Upwork so let’s take a quick look at both options.

Fiverr

Fiverr is no longer people doing jobs for $5. You can put a range of prices on your work. On Fiverr, you put your ad out there and then customers come to you to get you to do the work. You don’t have to come up with a custom proposal for each project you want to work on.

Even 10 years into building sites on WordPress, I’ve used Fiverr to try out new services because of the built-in audience. I may reduce the prices a bit to hit the audiences that Fiverr attracts, but otherwise, it’s the same service I’ll use with clients once it’s been tested, adjusted, and validated as something people want.

Upwork

Like Fiverr, Upwork has a built-in audience of projects. Some companies will only work with contractors that use Upwork as a platform. If you’re looking for a large selection of projects, then you can log in to your Upwork account and select from a huge volume of projects.

The downside with  Upwork is that you have to create a proposal for each project you want a chance at working on. That adds a bunch of unpaid administrative work to your plate.

Both of these platforms are valuable under different circumstances. Decide which one is right for your current situation, timelines, and gaps in current project load.

Other places to find WordPress work

If you don’t have your daily quota of new contacts, start to go through these sites to make sure that you reach out enough potential clients to keep your business going. To really take your career to the next level though, you need to start building your reputation in your field.

Use Blogging to Build your Reputation as a Freelance WordPress Developer

If you’re working for yourself, your goal should be to position yourself as an expert so that customers come calling looking for your expertise. To get that happening you need to take the initiative and start showing customers that you are an expert before they work with you.

One of the easiest ways is to start publishing your own content on your site. When I began my WordPress journey every time I’d have a problem that I had to look up and solve I’d write a blog post about the problem and the solution. I’d make sure to title my content with the search terms I had used at the beginning of my journey.

This quickly got other developers to notice me, and 10 years later Hostdedi asked me to write for them. I write for Hostdedi now because someone on their team noticed my work and started to follow me.

If you can, take the time to write something and add a screencast explaining the problem. Some people will prefer the video and others will prefer to read through the text of your post, or maybe even just jump to the code. Even if you’re just starting, teach what you’re learning once you have a bit of a handle on it.

When I was writing about WordPress code issues, a single post solving a problem brought in $15k that year alone, and then $10k a year for the next five years based on a single client that found that content. My quick easy fix was something they could do themselves, but they had a bunch of other problems with their eCommerce site that they needed me to fix. Even a few weeks into your learning journey, what feels easy for you will be amazing to someone else.

Becoming Your Own Boss Takes Work

Working for yourself is not all beaches and breaks. It takes lots of work to succeed as your own boss, but you can do it. To build a successful WordPress Development business make sure you have a solid reason why you’re working for yourself. Take the time to understand the value you provide to your clients so you can charge properly. Learn to find your ideal customers, and market yourself as a professional.

If you can do these things, then you can become a freelance WordPress Developer and run a business that you love to work in.

Source link

When Not To Push the Panic Button

These are times of authentic fear, uncertainty, and doubt. The last thing any of us – or any of our bottom lines – need is the dissemination of falsehoods or false choices intended to drive panicked business decisions. Unfortunately, shamefully, and near daily, we come across such messages relating to the Magento 1 platform (M1) end of life next month.

Disruption? Yes, absolutely. Despair? Absolutely not. 

Deep breath. 

Some vendors would have you believe that maintaining PCI compliance is incompatible with staying on Magento 1. From multinational financial services to “solopreneurs in ecommerce,” businesses that rely on the M1 platform are NOT tethered to an expensive migration to Magento 2 at the end of June 2020. We know this because Hostdedi has been the leading hosting provider for Magento stores for more than ten years. 

We also know – now more than ever – that uninterrupted sales and services are top of mind. Thus, we designed Hostdedi Safe Harbor for those who cannot afford to – or need more time to strategize – or do not wish to migrate to M2. Stay with Magento 1, and our Safe Harbor product provides security and technology updates for an extended period of time. 

Hostdedi is a PCI DSS Level 1 provider across all hosting solutions. Our platform is aligned with PCI compliance requirements, offering your customers the secure buying experience they expect. Hostdedi Safe Harbor offers security procedures and safeguards that exceed compliance requirements.

You can also connect with us about alternative platforms that can meet the needs of ecommerce enterprises large and small, from high-paced to mid-level to newly launched. 

As previously shared in this space by my amazing colleagues and by me (please see below), you have options. Even 60 days out. Interim or otherwise, Hostdedi Safe Harbor may be the place and the space you need as you consider the following: 

  • The customizable flexibility, stability, and security of M1’s open source platform
  • Cost and time relating to re-platforming/migrating
  • Magento 1 is incredibly stable as it’s already been vetted by the entire Magento community.
  • Patches, patches, patches
  • Customization on the back end can mean replatforming costs upwards of 100k 

Here at Hostdedi, we are a big tent provider and love helping companies of all sizes – those who use the open-source version of Magento or those who use the enterprise version. We don’t champion doomsday either/or scenarios. Nor do we believe that adversity mandates an adversarial approach. History has shown that when people work together to put forth thoughtful solutions, we can collectively meet any challenge – today or tomorrow. The same holds true for all of us at Hostdedi and in our work with customers. Side by side, site by site, store by store. Let us show you how. 

Source link

Always Own Your eCommerce Store

Last year, we sold my late father-in-law’s pocket knife collection on eBay. It was the right platform for a project like that. He had collected an impressive number of knives over his long life, but the total amount we were able to sell online was about $5,000 over the course of a few months.

EBay works for selling a few knives but if I were actually going into the knife business, there is no way I would have entrusted my livelihood to a third-party platform. As recent events have shown, there are a number of risk factors that you can’t control when you take that approach. 

Here’s a few things that you should think about when deciding whether to set up your own online store vs. using a platform or marketplace.

Control and Analyze Your Data

Amazon gave testimony to Congress last year that it uses “‘aggregate customer data’ to inform its private label brands”. This means they use 3rd party sellers information to create their own version of everything from data cables to clothing. They’ve learned what types, lengths, colors, and sizes sell best – by letting their resellers figure it out for them while giving them the data in real-time.

Direct access to your analytics data is also important. As your site traffic grows, you (or an agency you hire) can analyze data from Google, Yahoo, Glew and other sources to find out where your marketing is succeeding or failing, and where your site converts well and where it doesn’t. As your business matures, you can even personalize your product recommendations, customer experience, and even pricing based on who is visiting your site.   

Control Your Reputation (and Refunds)

Your reputation as a seller is important. If you treat customers badly, word will get around, and that’s as it should be, but the major marketplaces are sometimes buyer-friendly to a fault. Before choosing to open up online on someone else’s store, read their forums to find out what experiences other sellers have had. A 2019 eBay scam forced a seller to spend a lot of time disputing a refund with eBay, and it’s likely that thousands of other sellers were affected. 

Decide What Products You’re Willing to Sell

There are a number of legal products that are nevertheless banned from different platforms. We actually found that one of my father-in-laws knives was considered a gravity knife – legal in most states but not sellable on eBay. CBD products, firearms and related items, vaping products – the list goes on and on. What’s worse, it’s subject to change. Shopify once welcomed firearms-related products, but changed course in 2018, leaving merchants scrambling to find a new solution.

When you own your own ecommerce store you’ll never have to replatform because someone in an office somewhere decides it’s no longer appropriate.

Decide What Payment Processor to Use

Controversial products like the ones mentioned above are sometimes not allowed because of the preference of the platform or the marketplace owner. But sometimes they are not allowed because they are considered higher risk credit card transactions. That’s fair enough, but when your platform of choice doesn’t work with the card processor you need, the effect is the same – you’re out of business. 

Having a choice about your card processor is also important because card processors vary widely in the fees and percentages they charge for each transaction. Some SaaS platforms charge transaction fees if you DON’T use their in-house payment processor, on top of the fees charged by your merchant bank. If you do enough volume, these fees can really add up.

Decide How (and When) You Will Do Fulfillment and Shipping

Amazon again made the news recently when it announced that it would restrict shipping of items it deemed “nonessential” during the COVID-19 crisis. While this action may be necessary during these unprecedented times, it illustrates the power that Amazon has over their customers who have opted for Amazon fulfillment and shipping. If you’re a seller on Amazon you literally can’t make money since Amazon isn’t fulfilling those non-essential orders.

Setting up your own fulfillment operation is easy enough for most small businesses, and as you scale you can either grow your own fulfillment operation or negotiate with other fulfillment centers that operate worldwide – unless you’re locked in to a platform that determines this for you.

Operating a small online business requires you to make a number of hard choices – being locked into a platform or marketplace that dictates these choices for you can make it difficult to succeed. Look at WooCommerce or Magento open-source platforms which preserve your ability to grow and adapt your business.

Source link