Everything You Need to Know About WooCommerce Shipping
Offering multiple shipping options is a great way to keep your customers happy and reduce your abandoned cart rates. With just the built in options in WooCommerce you can create a variety of shipping options for your customers and you can do even more with a few premium extensions.
WooCommerce Specific Shipping Options Overview
The WooCommerce shipping setup integrates smoothly with your WordPress website. When you add the plugin and activate it, you can immediately configure a variety of basic shipping options and create combinations to suit your business.
There are three steps to follow when setting up basic WooCommerce shipping:
- Set up Shipping Zones
- Add Shipping Methods and Rates
- Assign a Shipping Class (Optional)
First, set up your shipping zones to specify areas of the world where you ship goods. You can also list countries or geographic areas where you do not offer shipping.
Once you’ve set up your shipping zones, the next step is to add standard shipping methods and rate options within zones for a flat rate, free shipping, and/or local pickup. There are ways to expand these options, and we’ll cover them later.
The last step is to assign a shipping class to each item in your product range. This helps you to customize the shipping method and rate for individual items. Let’s look at these steps in more detail.
Shipping Zones
These zones let you define specific areas around the world where you will ship goods, and the shipping methods and rates you will offer within that zone.
Zones can be wide-ranging areas such as countries or continents, or they can be specific zip codes or states.
For example, you could set up three general zones e.g., U.S. Domestic, Europe, and other. Then within each zone, specify the method of shipping available.
When you’re setting up your shipping zones, you will notice there’s a default zone installed called Locations not covered by your other zones:
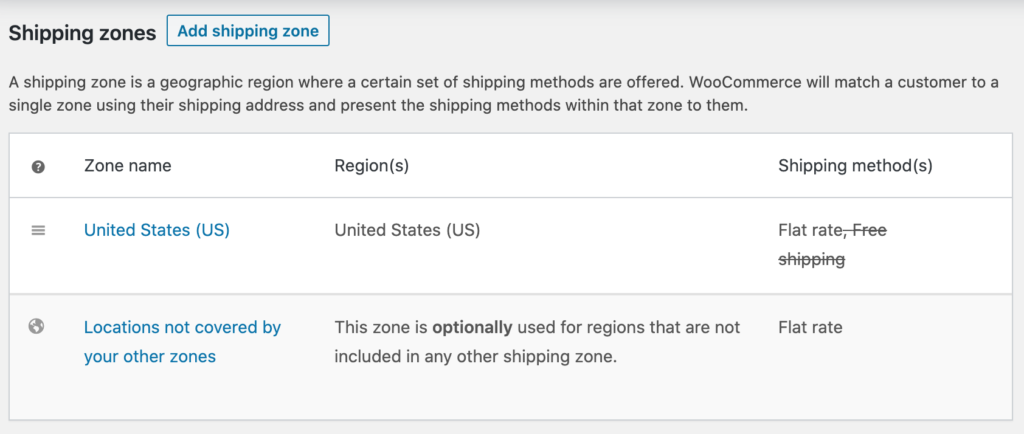
This option will capture customers who don’t fit into any of the specified shipping zones. You’ll want to make sure you have at least one option in this default zone. Otherwise customers will get the message: No shipping methods offered to this zone and they won’t be able to checkout.
Shipping Methods
The core plugin offers three basic shipping methods: flat rate, free shipping, and local pickup. You can add various options within these three methods.
The flat rate option is a fixed cost you can offer using product shipping classes or per order or by individual product items.
Free shipping can be offered across your entire product range, or only if certain rules are met.
For example, free shipping can become an option with a coupon code entered, or when the customer reaches a minimum total cart value.
However, if you want to offer local pickup, you need to be more specific and identify the regions or zip codes that qualify for this option. One example would be a Los Angeles-based business offering local pickup within the southern California area.
Options could be even more specific and list zip codes within a 40-mile radius of L.A. where local pickup options would be available.
With WooCommerce shipping you can create as many shipping zone and method combinations you need for your business and customize each zone.
Shipping Rates
The flat rate, free shipping and local pickup options come with the basic WooCommerce plugin. They’re quick and easy to set up and could be all you need when you start selling online.
However, if you want to offer your customers a wider range of options, the WooCommerce table rate shipping extension lets you do this. For example, you can create a shipping rule based on an item’s weight by defining the minimum and maximum weight range or number of items per package.
You can be even more specific by listing the shipping classes for which this rule applies, or add rules based on destination and price. You pay a monthly or annual subscription fee for this but many feel it’s worth it for the additional flexibility it adds to your WooCommerce shipping options.
Assign Shipping Classes
If all of your products cost the same amount to ship, or you’re going to use some of the premium extensions for getting rates from providers, then you don’t have to setup shipping classes.
But if you have products with very different shipping costs such as t-shirts and framed wall posters, you can set up a shipping class for each product type. And you can use these classes to affect how much shipping costs in the checkout process.
Each time you add new products to your store, you can assign a unique class, or group them with other product lines under shipping classes you’ve already set up.
WooCommerce Extensions and Plugins for Premium Shipping
Using third party plugins lets you expand your range of WooCommerce shipping options and offer real time shipping methods from main carriers like FedEx, UPS, or the United States Postal Service (USPS).
The WooCommerce Table Rate Shipping plugin enables you to set up unique shipping options using a range of variables e.g., product class, shipping zones, weight, or the number of items being shipped. It can be used for domestic and international deliveries.
Several shipping carriers offer their own dedicated plugins (USPS and FedEx are two examples). Using these extensions with your WooCommerce store lets you offer real-time shipping quotes from your regular suppliers.
If your business ships internationally or has distribution centers overseas, there are plugins that let you access local postal services in specific countries — like SAPO International Parcel Service. This gives you real time shipping rates within the South African postal service, and lets you offer shipping options by air or ground.
ShipStation
ShipStation is another powerful WooCommerce plugin that connects smoothly with your WooCommerce store and helps you automate order fulfillment and sales processes. Although you still need to install shipping plugins (e.g., FedEx or USPS) to get up-to-date costs, ShipStation lets you monitor your business for order processing, invoicing, and inventory levels, and gives real-time analytics.
If ShipStation is more than you need, WooCommerce shipping plugin Print Invoices & Packing Lists lets you easily manage invoices, packing lists, and customer emails within your store, and you can customize documents to mirror your business brand. Customers can also check their order status and invoices any time with the My Account option.
If you run a dropshipping business, the WooCommerce Dropshipping plugin helps you manage your customer orders and dropshippers.
Shipping Extensions for WooCommerce
This list offers a few WooCommerce shipping plugins and premium extensions you can use with your online store. Explore their different features to find the WooCommerce plugin that’s ideal for your business.
How Does WooCommerce Calculate Shipping?
When a customer adds items to their cart, WooCommerce calculates shipping charges based on the products selected, shipping class, size, and weight. Once the customer enters their delivery address, the WooCommerce shipping calculator works out a cost based on their location and the shipping methods available. The customer can see this information on the cart page.
You can also manually adjust your shipping rates and add additional charges for multiples of an item, discounts for purchasing specific products, handling fees, or taxes.
Let’s set up WooCommerce shipping for our T-shirt business, and create options for shipping using the ready-to-use features already loaded into WooCommerce.
How to Set up Basic Shipping in WooCommerce
Here are the basic steps for setting up shipping in WooCommerce. This excellent WooCommerce Shipping How-to from FitSmallBusiness.com has additional details if you need them.
1. Create Your Shipping Zones
On your WooCommerce dashboard, select WooCommerce > Settings > Shipping
Next, select Add shipping zone
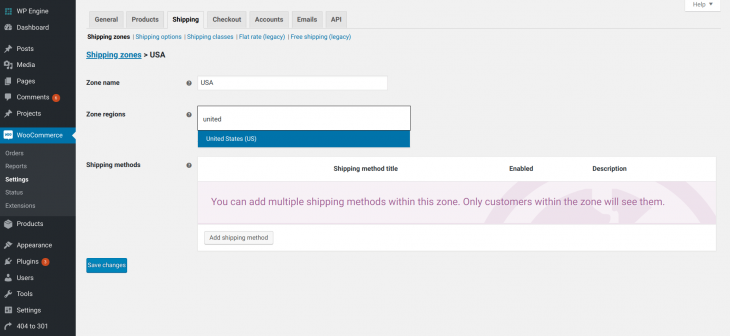
Give your new zone a name, add the zone region and set up as many as you need.
When you’ve set up your zones, you can leave them as general regions, or edit them to list as regions or zip codes.
To edit a zone, Go to the Shipping zones screen. Move the cursor over the zone name to see the Edit and Delete options.
Select Edit and add regions or zip codes on the next screen.
Save your changes.
2. Add Shipping Methods
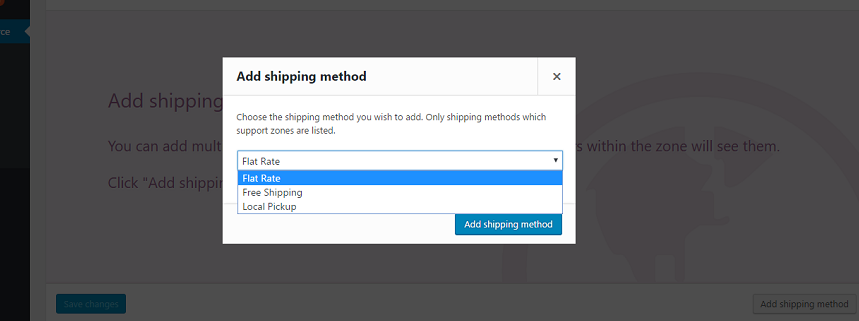
For each zone, select Add shipping method and highlight one option from the drop-down list.
Select Add shipping method to save.
By repeating these steps, you can offer multiple zone / shipping method options within your store.
Edit Shipping Methods
To edit shipping methods, hover the cursor over the zone name, select Edit then hover over the method you want to edit, and select Settings.

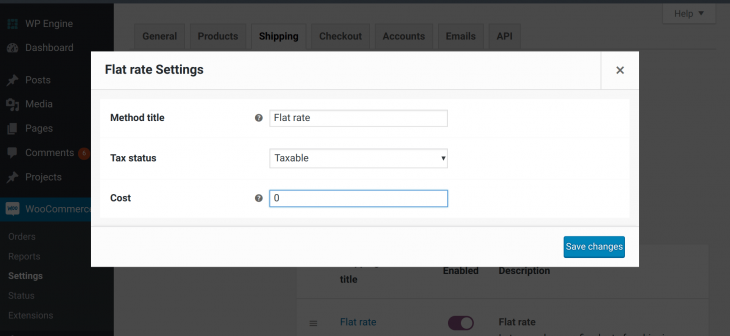
In Flat rate Settings, you have the option to set the Tax status to None or Taxable. Your choice will be applied to all flat rate costs for this zone, and tax rates are calculated using the business address you entered when setting up your store.
If you want to add extra charges within your flat rate shipping option, add them using the Cost field and the formats below.
Flat Rate charge per order – to add a charge to every order, enter a number (e.g., 4). You don’t need to add currency symbols as WooCommerce uses the currency you chose during the store setup.
Flat Rate charge per item – to add a charge to every item placed in the cart, enter the formula, [qty]*1.50. For our T-shirt business, it means $1.50 is added to every shirt purchased. If a customer buys five items, then $7.50 will be added to the total cart value.
Flat Rate percentage charge – to add a fee based on a percentage of the customer’s cart value, enter the formula [cost]*12. In this case, an extra charge of 12% will be calculated and added to the cart total.
3. Add Shipping Classes
Use this option to group specific products together or create shipping methods for individual items. For example, our framed artwork will have its own unique class as it’s oversized and heavy. But our T-shirts could be grouped with other items in an existing class.
Go to WooCommerce > Settings > Shipping > Shipping Classes
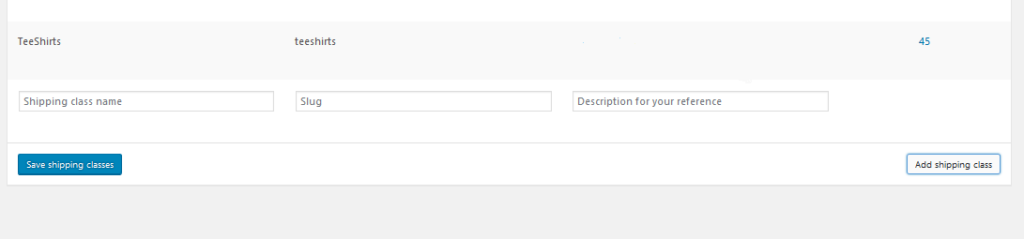
At the bottom corner of the screen, select Add shipping class.
Enter the name of your class. Leave the slug field blank as it fills automatically and use the Description field for notes.
Select Save shipping classes. The new class will appear.

The number 45 on the T-shirt line is the number of products grouped under that class.
By completing all these steps, you have set up basic shipping options in your WooCommerce store, and can offer your customers flat rate, free shipping, and local pickup.

Curtis is a husband, father, developer and business coach. He specializes in helping people build a business that lets them spend time with their family instead of working all the time.