If you’ve ever had to work with servers, you’re probably familiar with UTC time, also known as Coordinated Universal Time. UTC time is the standardized time used by most computers and servers around the world.
On some level, any time your server does anything at a specific time or on a schedule, you’re using UTC time. Here’s a few examples:
Scheduling a sale
Scheduling a blog post
Charging someone’s monthly subscription order
Sending out follow up emails
UTC Offset
UTC is universal. For example, if my New York, USA server and my server in Sydney, Australia should have the exact same UTC time. This works well for computers while humans use the local time for keeping time.
To make times a little easier to work with servers, use an offset.
New York uses UTC-4h or UTC-5h when not in daylight savings time.
Sydney uses UTC+10h and UTC+11h when in daylight savings.
These offsets will affect all of your scheduled actions. If you have a blog post scheduled for 8am the server will use the offset to determine when the post should publish.
Application Offset
In addition to a UTC offset for your server time, there are also application offsets. Here’s the timezone settings in WordPress which can be found under Settings -> General:
Whatever application you use (WordPress, Magento, etc.), you’ll likely have similar timezone settings.
These applications will often guess or set a default location. Sometimes this is based on your server location. For example, if my store is in Denver (which is mountain time) and my server is in New York (eastern time) my application will likely assume I want to use eastern time.
And if I want to close an application or end a sale at midnight it might actually end at 10pm mountain time and midnight eastern time. You’ll always want to check your applications local time to make sure it’s correct.
Why Are My Scheduled Actions Firing At the Wrong Time?
Generally speaking, you don’t have to know what UTC time is. But when you run into an application not working correctly, you’ll have to dig in and see where a time is set incorrectly.
First, you’ll want to check your application (WordPress, Magento, etc.) and make sure those settings are correct.
If your application settings are correct, then you’ll want to make sure your server has it’s offset set correctly.
If you’re using Managed WordPress, Managed WooCommerce, or Magento Cloud you can reach out to support for help. We’ll make sure your UTC time is set correctly, check your application settings, and point you in the right direction if it’s a 3rd party app.
Patrick Rauland is obsessed with ecommerce. He’s built ecommerce websites for clients, worked for WooCommerce doing support, development, product management, and helped plan their yearly conference (WooConf).
Whether your WordPress website is a personal blog, ecommerce store, or hosting website, choosing the right SEO plugin shouldn’t be ignored. In this post, we’re comparing the top SEO plugins for WordPress, so you can learn how to best optimize your site for search engines. Doing this the right way will improve your search visibility, page and post ranking, boost your traffic, and improve your sales.
You may have heard about the Yoast SEO plugin by now which is currently the most popular All-In-One SEO tool for WordPress.
But, did you know that there are also other well viable options on the market as well? SEO Optimization tool Rank Math has built a huge and successful community in a short period.
This proves that while you are building your fantastic website with quality content, ready for visitors to consume, you don’t have to think about things such as; will anyone see my content or if my website is good enough.
With so many great solutions out there, driving the website traffic has never been this easy.
In this article you will learn the following:
What are SEO Plugins for WordPress
SEO tips everyone should use
6 Best SEO Plugins compared
Let’s get started!
What are SEO Plugins for WordPress
The great thing about SEO plugins is that even if you are not SEO-savvy, you can still take advantage of the latest SEO tweaks. They provide a great all-in-one solution for the end-user.
All you have to do is choose the Plugins option on your WordPress Dashboard, click “Add New”, type the name of the plugin in the search bar, Install, and Activate.
Most of these SEO Tools come either with a free version and optional premium version as well. Just keep in mind that none of these tools is a perfect “do-it-all” option.
There are a lot of other things to consider when it comes to search engine optimization such as keyword research.
This brings us to the next chapter.
SEO Tips You Should Consider
Even though all-in-one SEO tools are great, there are other important things you have to do as well.
If ranking high on Google and other search engines was easy as walking, everyone in the world would have a successful website and do this.
Since that is not the reality, and the majority of published posts don’t get any traffic, here are some useful SEO tips that we recommend.
KEYWORD RESEARCH
This is the most important step to take. There are many great free and paid tools that will ease your keyword pursuits such as Ahrefs and Ubersuggest.
Once you have found a niche with relatively low competition you are ready to go. Oh and don’t forget to export as many keywords as you can for future use.
USING SOCIAL MEDIA TO YOUR ADVANTAGE
You have published a few posts and pages, so what do you do next? Share all your post on all major social media websites such as Facebook, Instagram, Youtube, and Pinterest.
Join all major groups, follow the biggest profiles, and don’t forget to take part in discussions as often as possible.
LINK BUILDING
To rank your page on the first page of search engines, you shouldn’t forget to build links from other websites and use internal links.
Since links are an important ranking factor and each acquired backlink is viewed differently by Google, do not sleep on this.
PRICING: Free/Premium(from $104.50) ACTIVE INSTALLATIONS: 5+ million WP SCORE: 4.9 out of 5
KEY FEATURES:
Keyword optimization
Readability check
Redirect feature
Google Search Console integration
Automatic creation of XML sitemap
Excluding the “noindex” types of content from being indexed in search engine results
Title and meta description templates
Duplicate content detection
Regular updates
Open Graph data for sharing posts on social media
Yoast SEO is the most popular SEO tool for WordPress, and for a reason. It has over 5 million active installations and over 25.000 five star user reviews.
It comes as a free and premium version. While the premium option comes with extra things like redirect manager, internal link suggestions and block, content insights. The free option is great as well.
It is the complete SEO tool that helps websites to rank higher in search engines, and the Yoast team provides regular support on wordpress.org forums(Premium Users).
Anyone new or old to WordPress should at least give the free Yoast version a try.
PRICING: Free/Premium(coming in Fall 2020) ACTIVE INSTALLATIONS: 500.000+ WP SCORE: 4.9 out of 5
KEY FEATURES:
Easy to follow Setup Wizard
User-Friendly Interface
Google Webmaster Central Integration(In progress)
Keyword Comparison & Google Trends Tool(TBA)
Google Crawl Errors
Contextual Help (tooltips, notices, help tabs, etc)
Image SEO
Schema rich snippets and article schema
News Sitemap for Submitting Websites on Google News(TBA)
Ping Search Engines
Manage meta tags such as noindex, noarchive and such
Rank Math is the new player in the SEO website optimization game and the fastest-growing as well. Some would argue that it’s also the most powerful.
This fantastic tool lets you optimize your website for search engines and social media. Unlike Yoast, Rank Math is still a free tool packed with premium options which otherwise, you would have to pay for.
The premium version is gonna be released very soon with more features that are announced on their official Facebook page. If you are still doubting whether you should switch from Yoast to Rank Math, don’t worry, you can do this easily by the 1-click migration wizard which comes integrated by default.
PRICING: Free/Premium(from $57) ACTIVE INSTALLATIONS: 2+ million WP SCORE: 4.7 out of 5
KEY FEATURES:
XML Sitemap support
RSS Sitemap
Google AMP support
Google Analytics support
Schema.org Markup
Support for SEO on Custom Post Types
ONLY free plugin to provide SEO Integration for e-Commerce sites, including WooCommerce
Nonce Security built into All in One SEO Pack
Generates META tags automatically
Built-in API so other plugins/themes can access and extend its functionality
If you don’t want to use Yoast or Rank Math, consider the All-in-One SEO Pack as your third option. As with the before-mentioned plugins, it also does the same thing, and it has a clean and user-friendly interface.
It offers a wide range of features, both free and paid tools to which help your website. One of the neat features this plugin offers is that you can use it to edit .htaccess file without FTP and edit your robots.txt file which is suited even for complete beginners.
As with Yoast and Rank Math, it also supports AMP (Google-friendly mobile version of your website). You can also optimize the WooCommerce store for SEO, and it’s packed with additional addons as well.
PRICING: Free/Premium for $39 ACTIVE INSTALLATIONS: 100.000+ WP SCORE: 4.9 out of 5
KEY FEATURES:
Redirections and 404 monitoring
Google Analytics stats in your WordPress dashboard
Video XML Sitemap
Titles & metas
XML sitemap
HTML sitemap
Backlinks from integration with Majestic
Keyword suggestions for your content via Google’s Suggestion tool
Google Structured Data Types: product, recipe, review, FAQ, course, article, event, local business, and video
Google Page Speed integration
SEOPress is a popular, fast, and simple SEO friendly plugin tool for website optimization. This is all thanks to its affordable price, clean interface that comes with a comprehensive set of features.
As with other SEO plugin tools in this list, expect to find open graph support, image, and content, XML sitemaps, meta title, and description features integrated within the plugin.
This means that you don’t have to slow down your website with other plugins that do one specific thing since SEOPress provides that in one affordable package.
What differentiates this plugin from others in its price range is a unique feature of discovering new keywords via Google’s Suggestion tool.
PRICING: Free/Premium(from $7) ACTIVE INSTALLATIONS: 100.000+ WP SCORE: 4.9 out of 5
KEY FEATURES:
Duplicated content protection
XML Sitemap(Basic & Google News)
SEO Management for Robots direction, 301 redirects, and Canonical URLs
SMO management for Open Graph, oEmbed, RSS management
Includes structured data for breadcrumbs, corporate contact, blog posts, site links, search box
Automation for the title, robots, Facebook tags, Twitter card, and structured data generation
Google Search Console integration
Bing webmasters tools
Pinterest Analytics
Google AMP
SEO Framework is the only plugin on the list which claims to be a white hat SEO tool and it’s a great alternative to Yoast and Rank Math.
More lightweight than others and can intelligently generate critical SEO meta tags. This is achieved by reading a user’s WordPress environment in any language.
Design vise, the plugin is clean, simple, and looks like a part of WordPress. What it offers differently than others in the game is a colorful scale that shows you exactly what should you do next.
You can start with SEO Framework for free without any obstructive ads harassing you while you work. I would single out two fantastic features of this plugin and those are:
Uses a focus subject instead of a focus keyword, encouraging you to write more naturally
Without any additional plugin, SEO Framework removes spam comments
Side-by-Side Comparison
Let’s do a quick rundown of all five Seo Plugins, compare their features, and see how they stack against each other.
While Rank Math is completely free and has clear advantages against other plugins, keep in mind that a premium version is coming out in the coming months.
Yoast
Rank Math
All-In-One SEO Pack
SEOPress
SEO Framework
Free Version Available
Yes
Yes
Yes
Yes
Yes
Annual Pricing
$39/site
N/A
$57/site
$39/site
$105/two sites
Rank Tracking
Yes
Yes
Yes
Yes
Yes
On-Page Optimization
Premium
Yes
No
No
No
XML Sitemap
Yes
Yes
Premium
Yes
Yes
Customer Support
Premium
Yes
Premium
Yes
Yes
Conclusion
SEO can get hard and confusing without the right tools. While using any of the mentioned tools is great on its own, here are some other options to accompany top SEO plugins for WordPress you should check out:
If we had to choose only one from all of these plugins, that would be Yoast in case you want a right-out-of-the-box simple and easy-to-use plugin. Otherwise, Rank Math is a tremendous option for those who like to fiddle around with extra features.
Either way, your website needs SEO optimization, so it’s best to just pick one tool and stick with it, as there is something for everyone on the list.
It is alright if you don’t become an SEO expert in one day, as these things take time. Try to take it easy and have fun.
Using password protection provides an added layer of security to your website. When password protection is enabled, any visitor requesting access to view your website url, or temporary domain name, will trigger a prompt asking for a username and password to gain entry. Once a user provides valid credentials, they will have access to the website as normal.
This is a handy tool during the migration process to a Hostdedi cloud hosting plan or upgrading your existing hosting plan. After the migration process is finished, enabling password protection should be standard practice for website owners who want to verify everything is working as normal, before changing DNS records and sending traffic to the new server. This process is also known as going live.
It is recommended that all staging and development sites enable password protection to prevent search engine bots crawling the site, indexing content and providing links on the search results pages.
Customers not on a cloud hosting account, or unable to enable password protection by following the steps in this article are encouraged to create a support ticket and talk to a support technician.
The benefits of enabling password protection
It’s a common practice these days for website owners and developers to utilize a staging and/or development environment. There are many benefits including the proper way to test WordPress updates, fix/determine the issue of a bug and to even rebuild the website while keeping the production site fully intact.
Three of the major benefits to enabling password protection include:
Search Engine Optimization (SEO) & Page Rank
Sales on the correct website
Hidden from hackers
SEO & Page Rank
Search Engine Optimization (SEO) is the key to every website being found on the internet. Each page, post or e-commerce product can have it’s own individual SEO strategy while contributing to the overall success of the website itself. Once a page is published on your website, search engine robots crawl your site and start assigning value to the page in order to help determine the overall score. This score is used to determine where your website ranks in a Search Engine Result Page. Also known as SERPs.
One of the biggest benefits to having password protection enabled is the privacy from search engines like Google, Bing and Yahoo. These services provide robots that crawl the internet and index all available information. Which is great for any Production website using an E-commerce solution. However, duplicate content and outdated information can hurt your page rank. In almost every case, a staging or development site is a direct copy from production. Enabling password protection denies every visitor to the site, human or robot, unless a username and password are provided. Eliminating any chances of a secondary site to harm the SEO & page rank of your live website.
The same is true during the migration process. Technically speaking, when you sign up for a Managed WordPress Hosting plan, our services create a temporary domain name in order for the site to become “alive” in order to import or migrate a website from one host to another. After the migration process, if you do not enable the password protection feature, you run risk of having multiple websites saying the same thing. And all you were trying to do was move hosts.
Sales on the correct website
If a search engine bot is able to identify and crawl a secondary website, the search engine will start to index the page and deliver the search results to an end user. Which is never a good thing. Especially these days when we start talking about desktop and mobile traffic. Users on a desktop device might take notice of the website address and realize they are in the wrong place. However, not everyone knows different website environments and will consider the site they are currently using to be the “Production” or live website. The user will place a transaction on the staging site and will expect their products to be downloaded or delivered. Enabling password protection on your secondary site can prevent this from happening in the future.
This in itself might cause more issues down the line.If a sale is made on the Staging site, the same will not show on the Production site. The sale will also be incorrectly identified. Meaning the sales id could be #112 on the staging site, but the production site’s last sale was id #674839. Other things like remarketing, analytics tracking and email drip campaigns can also be missed as the staging site was not created to do the same things as production.
Hidden from Hackers
Having one website is enough to worry about. Not just the maintenance and execution of the site. High ranking websites are often seen as potential targets. Production websites are usually thought of as “Stable” and very unlikely to be exposed to a potential hack. Mainly because the code living on the Production environment has been tested and vetted by the team. Which is a great thing. A secondary website might not be so lucky.
There have been many cases where a new version of a WordPress theme or plugin has discovered a security issue and needs to be fixed. Well, if you installed the latest version of the theme or plugin, the secondary environment is now susceptible to an attack. Due to the code still being in place and the website being a front facing public entity. Enabling password protection will stop any hack attempt from happening on the front end of the website.
Setbacks to using Password Protection
Newton’s third law states “for every action, there is an equal and opposite reaction.” The same is true with enabling password protection. Requiring a username and password be entered in order to view the website can be tough enough. Especially if you’re running a team of more than a few people. Hopefully everyone is using a tool like a password manager and has access.
Another setback to using password protection is denying data to be delivered from one site to another. When using a WordPress plugin like Jetpack, users have the option of using the WordPress.com CDN and a feature called Photon. When enabled, all images inside of the media library are uploaded to the Photon CDN. When a page is loaded, WordPress loads the image from the CDN and not the media library. This is a practice commonly used to enhance page speed. However, when Jetpack is enabled on a secondary environment with password protection enabled, the images will not load on page. Your only option is to disable the Photon feature or remove the password protection.
Headless WordPress is another area where password protection can cause more harm than good. Headless WordPress uses the backend of WordPress plus the WordPress Rest API to provide a data endpoint. This data endpoint is used by popular Javascript libraries like React and Gatsby to build the front end of a website or application. If the website has password protection on, the front end of the website or application will not be able to show any content. This can be hazardous to teams when trying to debug an issue, fix an error or build a new feature.
It’s very important to understand that Password Protection is used to hide the content of a website from visitors passing through. Password Protection does not stop access to the server itself. A developer can use a SFTP program, the command line and deployment methods to manipulate the website files. If a hacker was to gain access to those credentials, the results could be detrimental to the environment, website and business.
Enabling password protection in the Hostdedi portal
You will need to login to the portal to enable password protection.
In the Hostdedi portal, click on the Plan tab to view your current hosting plans.
Click on the name of a hosting plan to access the plan dashboard.
Next you will see a list of websites installed on the plan. Click on the name of the website to access the site dashboard.
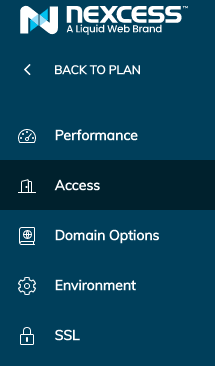
Once inside of the site dashboard, click on the access tab.
Once the table loads, you’ll see the section titled “Password Protection”.
There is a toggle switch customers can use to enable the feature. Customers are provided with the username on screen. Customers must click on View Password to retrieve the password to gain entry to the website. Customers can also reset the password at any time.
What Automatic WordPress Plugin and Theme Updates Look Like
As of WordPress 5.5, WP Admin contains a column in the plugins table and on individual themes’ detail screens enabling site administrators to enable (or disable) automatic updates.
Twice a day, WordPress will check to see if newer versions of your installed plugins and/or themes are available and, if you’ve opted into automatic updates, install the latest versions.
If any plugin or theme should fail to update, WordPress will revert that change and send an email to the site’s administrator.
Should I enable automatic WordPress plugin and theme updates?
The short answer, unfortunately, is “it depends.”
If you’ve worked with WordPress for a while, you’ve probably heard (or experienced) horror stories about plugin updates going awry: broken functionality, plugin incompatibilities, or even the dreaded “White Screen of Death” (WSoD) have occurred.
For a hobby site or personal blog, these may be a minor annoyance, but for stores running on platforms like WooCommerce, this can have a significant financial impact.
Ultimately, whether or not you enable automatic updates will come down to your risk tolerance and how much you trust the developers behind your favorite plugins and themes.
Note: For Hostdedi customers, you can rest assured that we’re taking daily backups of both your sites’ code and content. We also have visual regression testing to validate that the update went smoothly. If something goes wrong, we can have your site up and running again in short-order.
With that in mind, here are some tips to reduce the chances of an unattended plugin and/or theme update going off the rails:
Use single-purpose plugins from trusted developers
There are hundreds of thousands of WordPress plugins and themes available, but they are not all built the same.
Automattic, the company behind WordPress.com, maintains several of the most popular WordPress plugins: Jetpack, WooCommerce, Akismet, and more. They also have entire teams of developers and support technicians (“Happiness Engineers”) dedicated to the ongoing development of these plugins.
Likewise, companies like iThemes, Yoast, Sandhills Development, and Awesome Motive have built extremely popular plugins and products installed on millions of WordPress sites, but tend to run smaller teams that may be focused on multiple products concurrently.
Not all plugins have this same level of attention, though. In fact, many WordPress plugins are the result of a single developer scratching a particular itch and sharing their work with the world. The developer may not be interested in providing support, or may not have plans to update the plugin moving forward.
If you’re running a plugin that’s maintained by bigger names in the WordPress community, the chances of a plugin update completely breaking your site is likely far smaller than a small developer who may not have the bandwidth for handling support requests nor a solid QA process.
Your best bet is often to stick to plugins and themes from known entities. You might also consider incentivizing the developers of the plugins and themes you depend on; the plugin may have been free to install, but maintenance of a free plugin still takes time.
Similarly, try to avoid using plugins that try to do too much: the less an individual plugin is responsible for, the less likely it is to break in new and spectacular ways or have conflicts with other plugins.
Never modify plugins or themes directly
Sometimes a plugin does almost everything we want or a theme is almost perfect, and it can be tempting to tweak a value in the source and call it a day.
Unfortunately, the next time that plugin or theme gets updated, these changes are wiped away as WordPress replaces the entire plugin/theme directory with the newly-downloaded version.
A better approach is to extend the plugin or theme using actions and filters (collectively “hooks”) to make adjustments without touching the third-party code.
In the case of themes, we can further extend and/or override parts of the theme by creating a child theme.
Follow the development of critical plugins
If there are a handful of plugins that are crucial to your business, it may not be a bad idea to subscribe to any updates the developers might publish.
For instance, a WooCommerce store owner would likely benefit from subscribing to the WooCommerce Developer Blog — even if you’re not a developer, these blogs often hold details about the new features (and potential conflicts) in future releases.
Some of the larger communities (including WooCommerce) have dedicated Slack teams, where users can interface directly with the plugin developers.
Create (and Test!) Regular Backups
Sometimes, things will go wrong; whether an update goes awry, a site gets hacked, or an editor accidentally deletes a very important post, it’s always a good idea to have backups readily available.
If you want to have a second backup of your site (or first, if your host doesn’t offer backups), you may consider a plugin like UpdraftPlus or BlogVault, which let you schedule backups to external services.
It’s not enough just to create the backup, though; on a semi-regular basis, you should be restoring site backups to a development or staging environment to make sure everything you’re expecting to see is present. Don’t wait until you’re restoring a broken site to discover that some crucial data wasn’t included in your archives!
Automate the Testing of Updates
There’s a big movement towards automation these days, and you can take advantage of these tools and techniques to make sure your sites are always behaving as you expect.
For example, you might use a service like Reflect to write a series of automated tests for your site. Specify key URLs, tell the service where to click and what to look for, and instruct it to run the tests every few hours. Should the tests ever fail, you’ll get an email alerting you to the fact that something has gone wrong.
Of course, if you’re running tests every 12 hours but plugin updates are happening somewhere between those intervals, you may find that your site is broken for hours before you even know about it!
This is where your web host comes in: if you’re on any sort of Managed WordPress hosting plan, your host should be proactive in letting you know if updates are breaking your site.
For example: at Hostdedi, we don’t simply apply every plugin update as it becomes available. Instead, we perform what’s known as Visual Regression Testing before each and every plugin update. Here’s how it works:
First, we determine a set of important, representative URLs on a site: the homepage, shopping carts, product catalogs, blog posts, etc.
Next, we create a copy of your site within our network, and take screenshots of these key URLs; these serve as the “before” snapshots.
Once we have a set of screenshots, we upgrade the plugin on the cloned site, then take fresh screenshots of those same URLs to get our “after” images.
Finally, with both before and after screenshots in-hand, we compare these images to see if anything has changed on any of the pages and/or if any errors have popped up; if nothing has changed, we go ahead and upgrade the plugin on the production site. If however we do detect differences, we alert you (and show our work) so you can decide whether or not to upgrade the plugin in question.
What’s the point of Managed WordPress hosting if I have automatic updates?
Whether you opt for WordPress’ native automatic updates or the more sophisticated offerings included in your Hostdedi Managed WordPress/WooCommerce hosting, keeping your site performant, secure, and online extends beyond just keeping things up-to-date.
Every day, we’re tweaking configurations and building new features to squeeze every bit of performance out of our platforms, built by people who know WordPress inside and out. From auto-scaling to Content Delivery Networks (CDNs), our platform is designed from the ground-up for speed, security, and ease of use. At the same time, we’re partnering with industry leaders to deliver the best of the WordPress community for a low, monthly price and backing it all up with best-in-class, 24/7 support.
Whether you opt to use WordPress core’s automatic updates or trust us to handle them for you, know that Hostdedi is there for you every step of the way.
We’ve been talking a bunch about unit tests lately, starting with the basics, and then moving up to adding tests to a plugin, so you could see it in practice. We’ve also covered how to use Github Actions to deploy your site automatically to your host. Today, we’re going to take pieces from both of these concepts and combine them, so that we’re running our tests automatically with Github actions when we push new code to the repository.
The easiest way I’ve found to get started is with WP Testing Tools from Valu Digital. The team at Valu Digital has provided a fairly easy way to get your tests up and running on Github Actions. We’re only going to cover how to use their base template to start from scratch with your plugin development so that you can run tests. Adding their test setup to an existing plugin takes a bit more work.
Add WP Testing Tools Setup to an Existing Plugin
To start, clone the repository onto your local computer.
Next, we need to grab the plugins folder from inside the repository as that will be the base for our plugin. Migrate that folder to where you want your new plugin and rename it to match the plugin name you want to use.
Dealing with Composer
This testing setup requires Composer, which you don’t need to be intimately familiar with today. I’ll cover Composer in detail in a future post. For now, you’ll need to run composer install to install the required dependencies for WP Testing Tools.
Unfortunately, I’ve found that the repository is missing some required Composer packages so we’ll need to make sure these are also installed with the following commands.
Wait, I got memory errors with Composer. Help! It probably doesn’t matter and you shouldn’t get them in Github Actions so you can ignore it for now.
Now we have the proper tools installed, you can push to Github and you’ll see that the unit tests run without issue. This plugin still isn’t ready for us to build on though so let’s get to renaming the other strings in it and make it our own.
Setting Up Plugin Files
We can start by renaming the plugin header information found in plugin.php. Name it whatever suits your plugin and make the author yourself. We’ll also need to change the namespace and class entries so that we’ve named them properly for our project. I’m changing the namespace to my company name and using PluginBase as my class name for this tutorial. You can see my working renamed file below. I’ve also cleaned up the comments to make it easier to read.
<?php
/**
* Plugin Name: Hostdedi - Github Actions Unit Tests
* Plugin URI: https://nexcess.net
* Description: Plugin base that runs unit tests with Github Actions
* Author: Curtis McHale
* Version: 0.1.0
*
* @package example
*/
if (!class_exists('SfndesignPluginBase')) {
require_once __DIR__ . '/vendor/autoload.php';
}
SfndesignPluginBase::init();
Now in composer.json, we have a few things to change around as well. Make sure that you’re listed as the author of the plugin and change the links to Github Issues and Source to match your repository. You’ll also need to change the namespace of your plugin under the autoload entry. I’m using my company name so mine says Sfndesign. You can see my changed composer.json file below.
Now we need to change the name of the Example.php file found in the src directory. I’m going to call it PluginBase.php to stick with the format we’ve been using. Next, open that file and change the namespace to Sfndesign and the class name to PluginBase. You can see the adjusted file below.
<?php
namespace Sfndesign;
class PluginBase {
public static function init() {
define( 'EXAMPLE', 'initialized' );
add_action('the_title', function () {
return 'EXAMPLE TITLE MOD';
});
}
}
Now that we’ve made these adjustments we need to run composer update again so that Composer registers the new autoload paths that are needed with our renamed files.
Finally, to make sure the whole thing is working well, I find it easier to change their initial test found in tests/ExampleTest.php to something that will return true no matter what. You can see this code below.
public function testInit()
{
$this->assertTrue(true);
}
Now that we’re set up, you can initialize your plugin as a git repository and then push it to Github. Once you’ve done this you should see an action running under the Actions tab for your repository and everything will come back green because your unit test has been run.
Throughout the last few posts, we’ve written tests and used Github Actions to automate parts of our process. Now, it’s up to you to use these tools in your client projects. You won’t write tests later, so make sure you start your projects with tests from the beginning. If you want to go even deeper with testing there is an excellent course by Fränk Klein that explains Unit Testing in WordPress. It’s already on my list to go over so that I can get better at my testing practices.
Curtis is a husband, father, developer and business coach. He specializes in helping people build a business that lets them spend time with their family instead of working all the time.
Contact forms are needed on almost all websites. Luckily, there are a number of easy-to-use WordPressform plugins on the market.
A contact form is a way to gain feedback from customers or allow them to contact you directly through your site. The most commonly used form plugins all have a pretty similar set of features and integrations.
Allows you to view form entries
Works with a captcha service
Works with Zapier
Works with Mailchimp and other marketing services
The marketplace has shifted a fair bit from the contact form options that used to be available for free and feature complete form plugin options. There are now so many solid options to pick from that choosing a contact form plugin for your site all comes down to which one you prefer and how well it works for you.
Ask yourself these questions to work out which form plugin solution is the right one for you.
Do I need the paid version of this plugin or will the free version work?
Will I need more add-on and features for my forms down the line?
Caldera Forms
Caldera Forms is a solid, free form plugin that has more options than most. Caldera Forms is developed by Saturday Drive, the same company behind Ninja Forms. Caldera Forms has an easy to use drag-drop interface for building forms. You could use Caldera Forms for building a simple contact form, a simple booking form, a credit card payment form, or a rating form.
One of the best free form plugins
It contains all of the features you will need
Easy to use
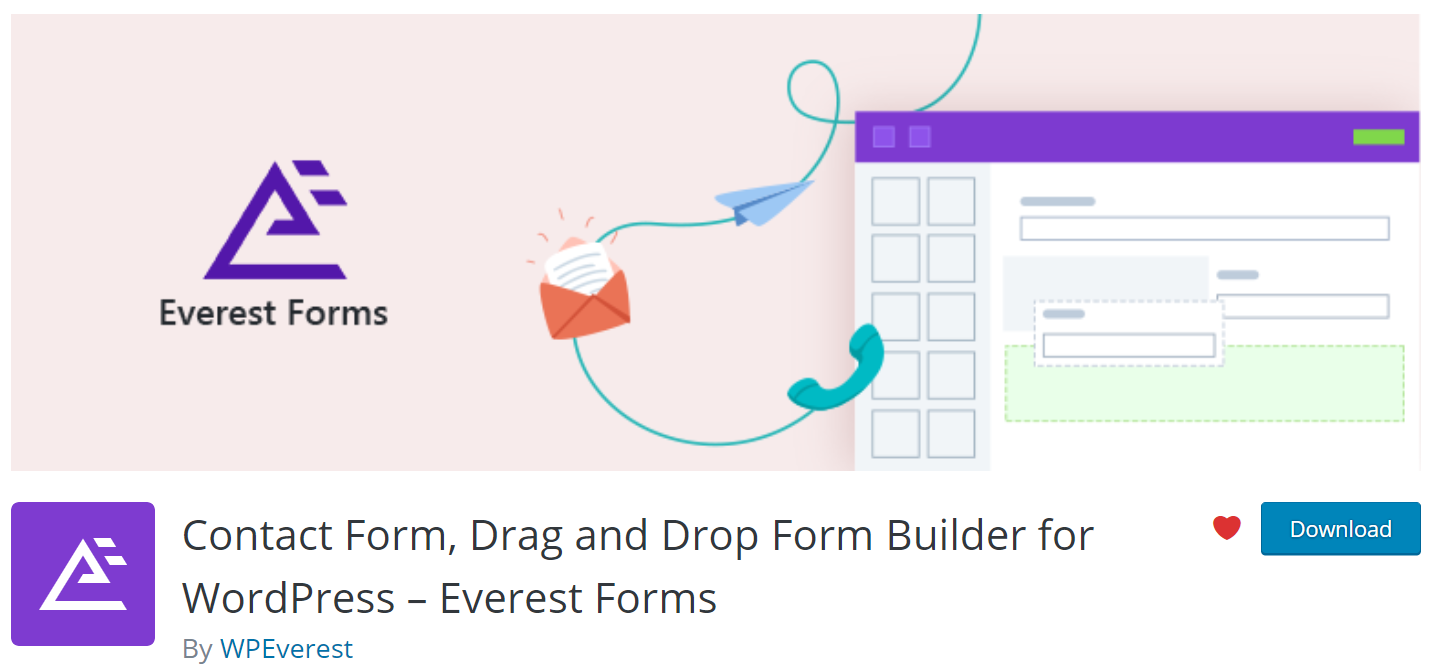
Everest Forms
Everest Forms plugin has a complete set of features and is another option worth checking out on your site. WPEverest is the company behind Everest Forms.
Drap and drop
Clean UI
Easy to use
Forminator
Forminator is a pretty new form plugin from WPMU DEV. It offers a very complete set of features in the free version.
Drag and drop form blocks
Complete set of integrations with common services
Includes a block for the block editor
Email routing
Front-end post submissions
Multi-fie upload field
The only feature that is not in the free version of the Forminator plugin is the e-signature feature which offered in the Pro version. Forminator is worth checking out.
Feature complete
Is not a limited form plugin
Solid for a free plugin
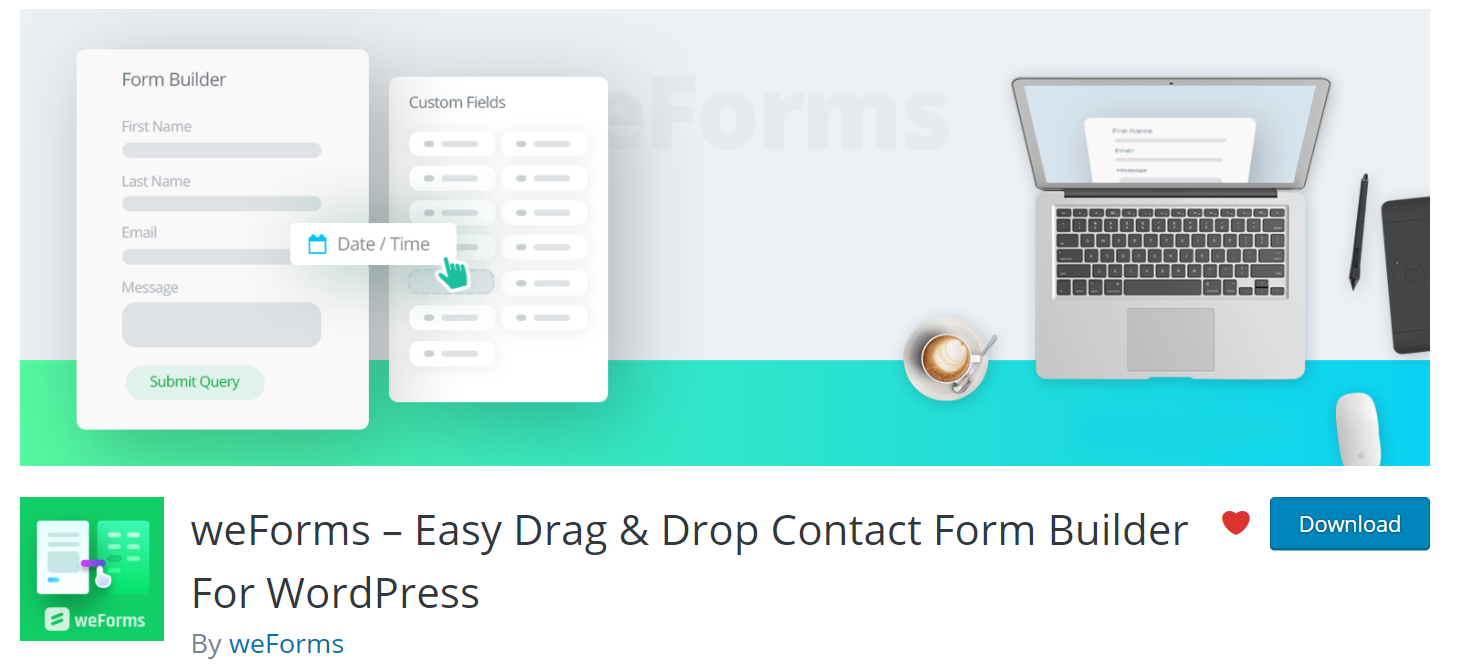
weForms
weForms is another solid plugin that comes with a huge range of features built-in. BoldGrid is the company behind weForms. If you are using the block editor then weForms comes with a block.
It just works
Easy UI
Has a number of built-in features
Metform
The MetForm plugin works with Elementor which means that you can control the form from within the Elementor page builder on your site. Wpmet is the company behind MetForm.
Clean UI
Works in Elementor which means you can edit forms in Elementor
Has a number of integrations built-in
Contact Coldform
One the easiest to use simple form plugin options for a contact form is Contact Coldform. Jeff Star is the plugin developer behind the Contact Coldform plugin.
Easy to use
Works well
Basic and does exactly what it says
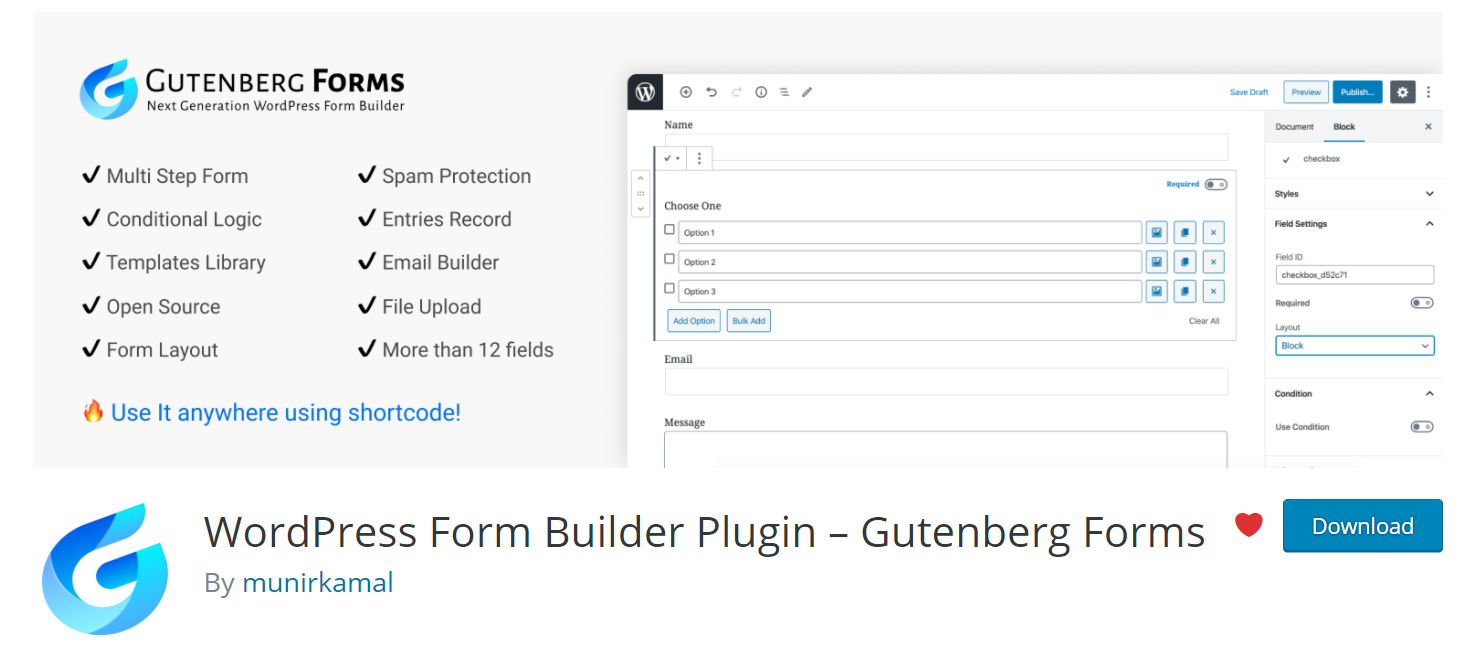
Gutenberg Forms
If you are using the block editor on your site then one of the recommended form plugin for the block editor is Gutenberg Forms.
Works with the block editor
Native in the block editor
Easy of use
Contact Forms by Gutenforms
If you are using the block editor on your site then another recommended form plugin for the block editor is Contact Forms by Gutenforms.
Simple forms
Block editor compatible
Simple to use
Honorable mentions for more well-known form plugins for WordPress include Gravity Forms, Ninja Forms, and Formidable Forms. Ninja Forms and Formidable forms both have versions which are on WordPress.org. Gravity Forms is a premium form plugin which comes with many features and add-on plugins for extra features and integrations. Ninja Forms and Formidable Forms also come with add-on features and all have pretty similar levels of features and add-ons, and well-priced plans.
Please take the time to test drive any of the contact form plugins we’ve mentioned on your staging site. After you have tested the form plugin of your choice, you can now begin creating all of the needed forms on your site.
We’ve talked a bunch about writing tests for your WordPress code, but one thing we haven’t touched on yet is why you should spend the extra time and money to write them. If you’re a manager or business owner, why should your developers ship features a bit slower as they take time to write tests?
Testing as an Investment
Today we’re going to tackle that management question. I want you to start viewing testing practices as an investment instead of an expense to your business.
Reduce Regressions
How much do you like it when your site breaks? If you’re like me, you hate it. I’m betting that at some point you wonder how on earth your developer could break the site. They must be terrible…right?
Wrong.
They’re just human like you and they make mistakes.
Good testing strategies can stop your projects from breaking. When you’re writing code and running tests, a good test suite will show you when something breaks. Then you can fix it right away when the work is fresh in your head.
Good testing can also cut down on debugging as you fix issues. Instead of wondering where on earth a problem is happening in the code, a failing test can show you where exactly you need to look.
For those times you do find old bugs that break stuff, writing a test to catch this scenario means that in the future the code won’t break in the same way. No more chasing a bug around thinking you’ve fixed it. Good tests will tell you that the bug is squashed.
Deployments Are Easier
There was a time when I refused to deploy client sites on Thursday or Friday because I didn’t want to work on weekends. Two things fixed this issue. First, a repeatable deployment process let me know that I couldn’t mess things up with some silly FTP error. Second, writing tests let me know that my code didn’t affect anything else on my client sites that needed to work.
Now you’ll find me deploying code many times each day, even on Friday afternoon.
For clients, that means they don’t have to wait till Monday for a feature to release, if we get it approved on Thursday. My clients are happier because I can ship features as soon as they’re ready to go.
Changes Become Easier
Have you ever worked on a project where some portion of the code was a black box that one person knew about, but who didn’t work there anymore? You’re terrified that if you even think about touching this code you’ll awaken the Kraken and lose a month of your life as you wrestle a mythological beast back into submission.
Good testing stops this from happening.
When you have good test coverage, anyone can swap in and work on a part of your system. When anyone can work on the code in your project, you’ve decreased the risk to your business because you’re not reliant on that single developer who can manage the Kraken.
This also extends to changing out big parts of your system, like the database you choose to use. If you’ve got a good test suite written you can change the layers of your application independently and know that they’ll still interact properly because your tests pass.
Tighter Developer Feedback Loops
It’s far easier to fix issues that have just been created. Curtis of 6 months ago must have had no idea what he was doing, because I’ve seen that code and had no idea what was going on. Writing decent tests can prevent this from happening because you find those bugs as you’re writing code instead of stumbling across it months later. Instead of trying to find the same mind space you were in months ago, you’re sitting in the code, fully understanding it and ready to fix any issues that come up.
The Only Thing Developers Write Less of is Documentation
I’ve looked at lots of code in my career and spent lots of time trying to figure out what on earth is going on with some websites I’m working on. If there is one thing developers write less than tests, it would be good documentation. Sure many say it’s important, but very few write any documentation at all.
While I’d love to say you need to write both tests and documentation, I’d settle for tests because they act like documentation.
When I take over a project with tests I can easily jump into the project and start writing code without hours spent trying to figure out what is happening. I know that when I break something, the tests should tell me I broke something. If I find an issue later, I add it to the tests, thus adding to the documentation on how the code should be working.
Tests make it easier for any developer to pick up your project without you needing to worry that everything will get broken because they were not the ones that have worked on it since the start.
Improved Reputation
The reputation of your business is everything. If you have a reputation for shipping good work on time that doesn’t break, then you’re going to get more work. Testing can help you build this reputation.
Instead of breaking code as you “fix” things, you’ll see a failing test and fix it before the client knows there was an issue. Happy clients refer new clients, who can, in turn, become happy clients.
When you step back and think about it, your job isn’t to simply write code for customers. Your job is to write code that works to fulfill the needs of customers. When you add testing practices to your workflow you will be able to deliver on that better.
Your code will break less. You’ll be able to ship working features more often.
Your customers will be happier as you serve them better.
Stop making excuses and use testing practices to provide a better service to your customers.
Curtis is a husband, father, developer and business coach. He specializes in helping people build a business that lets them spend time with their family instead of working all the time.
If you were running a retail store circa 2010, chances are you had an experience like many others at the time. The Web offered a new opportunity to expand your physical store, and Magento was the best solution for the job. So you found your platform, built your strategy, asked one of your trusted employees to moonlight as a product photographer, and fired up the office computer to get to work.
As you started building your site, you soon realized that creating the perfect store meant sitting in the office trying to learn a new piece of software instead of selling. Hiring a local developer wasn’t cheap, but eventually the site was everything you thought you wanted, and you started marketing it everywhere. Sales trickled in, but never really lived up to your expectations.
Over the next couple of years, you realized through customer feedback and your own testing that your slow sales weren’t about inventory or addressing consumer needs. The site had slowed to a crawl, your web developer had become more difficult to get a hold of, and product pages weren’t coming up in search engines. Something needed to change. But rebuilding your website is expensive and time consuming and you didn’t want to take on another project. Until you had to.
An end for Magento 1
At the end of 2018, the Magento organization announced that support for Magento V1 (likely the version you’ve been using) would cease on June 30th, 2020. So after finding the right person to do the job of upgrading, optimizing, and re-building your store to drive those sales you were looking for, the software that your store runs on will now not be modernized, optimized, or updated moving forward. So what should you do next? Carpe Diem! See the grand opportunity in front of you to upgrade – and develop the site of your dreams that’s bigger, stronger, faster than before.
Case in Point: The path forward for a small business in Houston
At the end of last year, Stogies World Class Cigars in Houston realized that after five years, they weren’t seeing the sales benefit they’d hoped for in their online store. Even worse, hiring the talent needed to fix page speed and search engine issues was cost-prohibitive. Since the team at Stogies wanted to reduce their maintenance costs, as well as manage future updates, content, and layout changes in-house, WooCommerce was the strongest option for migrating from M1. Building atop the Hostdedi Managed WooCommerce platform immediately reduced future software update costs. Built-in automatic plugin / update testing and upgrades meant that Stogies could focus on merchandising and optimizing the purchasing path for buyers. Speed was also a big concern. When they came to Hostdedi, pages on their website often took15+ seconds to load. As a result, sales were low online but great in stores. So another priority was to decrease load speed – because they knew by speeding up the site, more traffic and increased sales were soon to follow.
Content and Creative are King
After finding the right platform in Managed WooCommerce, they knew it was important to bring forward the visual aspects of the old website while still keeping the site snappy. Afterall, the crew at Stogies was proud of how their website looked, just not how it was performing. After testing 50+ themes, we recommended they use Astra, the best performing theme for their site.. From there we paired Astra with the Beaver Builder plugin to allow for easy future editing of layouts and sales pages.
Serving up a Seamless Customer Experience
It’s important that when a previous customer returns to a website, they recognize the landscape. The website should operate the same (or better) than it did before. We evaluated every bit of the customer experience from the old Stogies website, and were able to duplicate most of the functionality with off-the-shelf plugins included as a part of the Hostdedi WooCommerce platform.
Moving customer accounts and orders
The last step before testing the entire site was to make sure that customer accounts, previous orders, product data, and content were all transferred to the new website. Magento and WooCommerce are extremely different in the way that they store information. Using an easy-to-use import plugin for WordPress, we were able to successfully recreate all customer accounts, orders, and other data within their new WooCommerce site.
The moment of truth
After almost five years of dealing with the frustration of a slow, underperforming website, it was time to pop the cork on a bottle of bubbly, re-launch the website, and see whether or not the work to rebuild in WooCommerce was successful.
The results were staggering
Within a month after launch, traffic increased 20%-50% per-day (over the previous year). Time spent by potential customers on the site increased by minutes, and average page load speed decreased from 5.11 to 2.14 seconds. Traffic from search engines increased by 181%, and new visitors were up by 67%. Most importantly, revenue started to double month-over-month.
Why WooCommerce and not Shopify?
As we set out on the journey to help Stogies turn their stale store into an online powerhouse, we took a deep look at what it would take to build it on Shopify. While it’s possible to build a simple beautiful store with Shopify, we ran into problems with even small customizations. We found that customization capabilities were either free and limited or expensive and detailed. We also found that some of the features or customizations needed for our build would require ongoing support from a third party developer- – something we’d set out to eliminate for the Stogies crew.
We matched each site feature with it’s Shopify counterpart, and here is the fully-loaded cost estimate:
Annual Costs
WooCommerce
Shopify
Non-NegotiablesProduct reviews, homepage slideshow, brand bar, from the blog section, recent products, product variations
In short, WooCommerce is a third of the cost of Shopify and doesn’t require as much custom development.
We’re here to help you move forward
While Stogie’s results are extraordinary, they’re not unique. Modernizing, updating, and migrating your store to a fast WooCommerce platform will bring years of frustration with your online store to an end. Whether you’re working with an expert or managing your own store, we’re here to help.
Mendel is the Agency / Developer Advocate for WooCommerce at Hostdedi and a WooCommerce & WordPress expert. He loves helping store builders solve complex problems for their clients.
At Hostdedi, we spend a considerable amount of time optimizing our infrastructure to make your Magento 2 store faster. After years of research and development, we’ve pulled together the ultimate Magento 2 performance checklist:
Remove unused modules: Magento 2 comes with many pre installed modules that aren’t always needed. Yireo created a great module to disable the optional modules you don’t need through composer. The idea behind the module is quite simple: you replace any unused module with nothing to avoid loading unused modules and classes. This module and a complete how-to can be found here: https://github.com/yireo/magento2-replace-tools
Enable CSS/JS minification and merging: Minifying and merging CSS files can greatly improve load times and the general performance of your store by cutting the number of requests your site makes when loading a page. You can minify and merge CSS and JS files from the admin panel by navigating to the Developer tab under Stores > Configuration > Advanced (keep in mind this tab will only show if you are using developer mode). Magento recommends using a 3rd party plugin like Baler or MagePack for JS bundling given that Magento’s bundling mechanisms are not optimal and should only be used as fallback alternatives.
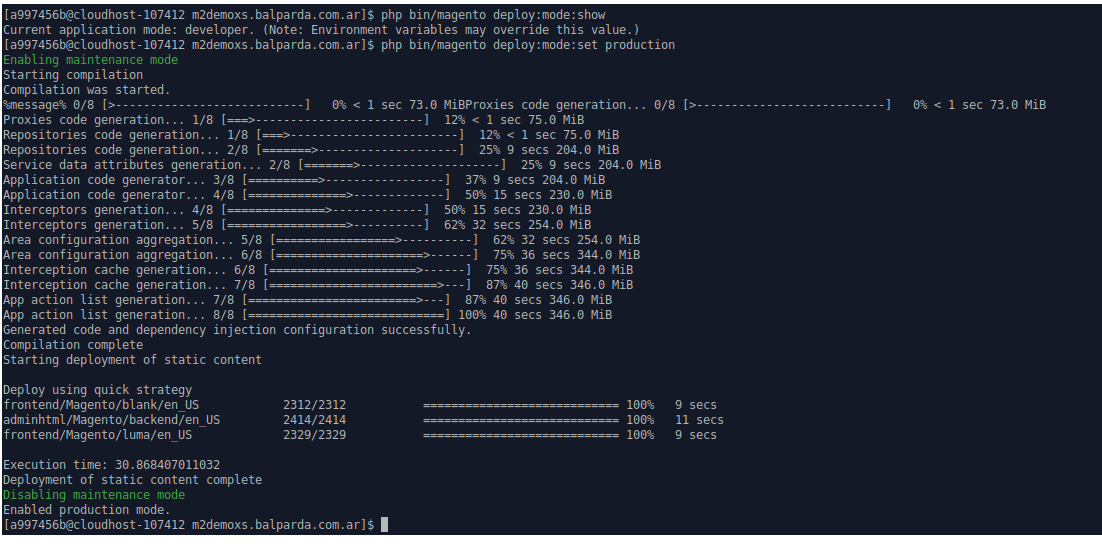
Enable production mode: While this one might seem simple, the number of sites we see using a different mode in Magento is staggering. No one should be running Magento 2 in production in a different mode, but we still see too many stores running on either default or developer mode. The best way to switch modes is via CLI:
php bin/magento:deploy:mode:show
to see which mode is your store using and
php bin/magento deploy:mode:set production
to set production mode
Use Redis for session/default and full page cache: Redis is one of the most used key/value database engines and Magento 2 comes with integrated support to use it as a both session storage and default/full page. To configure your store to use Redis, run the following commands from your root folder:
You can find a complete list of Redis configuration parameters and values for sessions here and for the full page cache here.
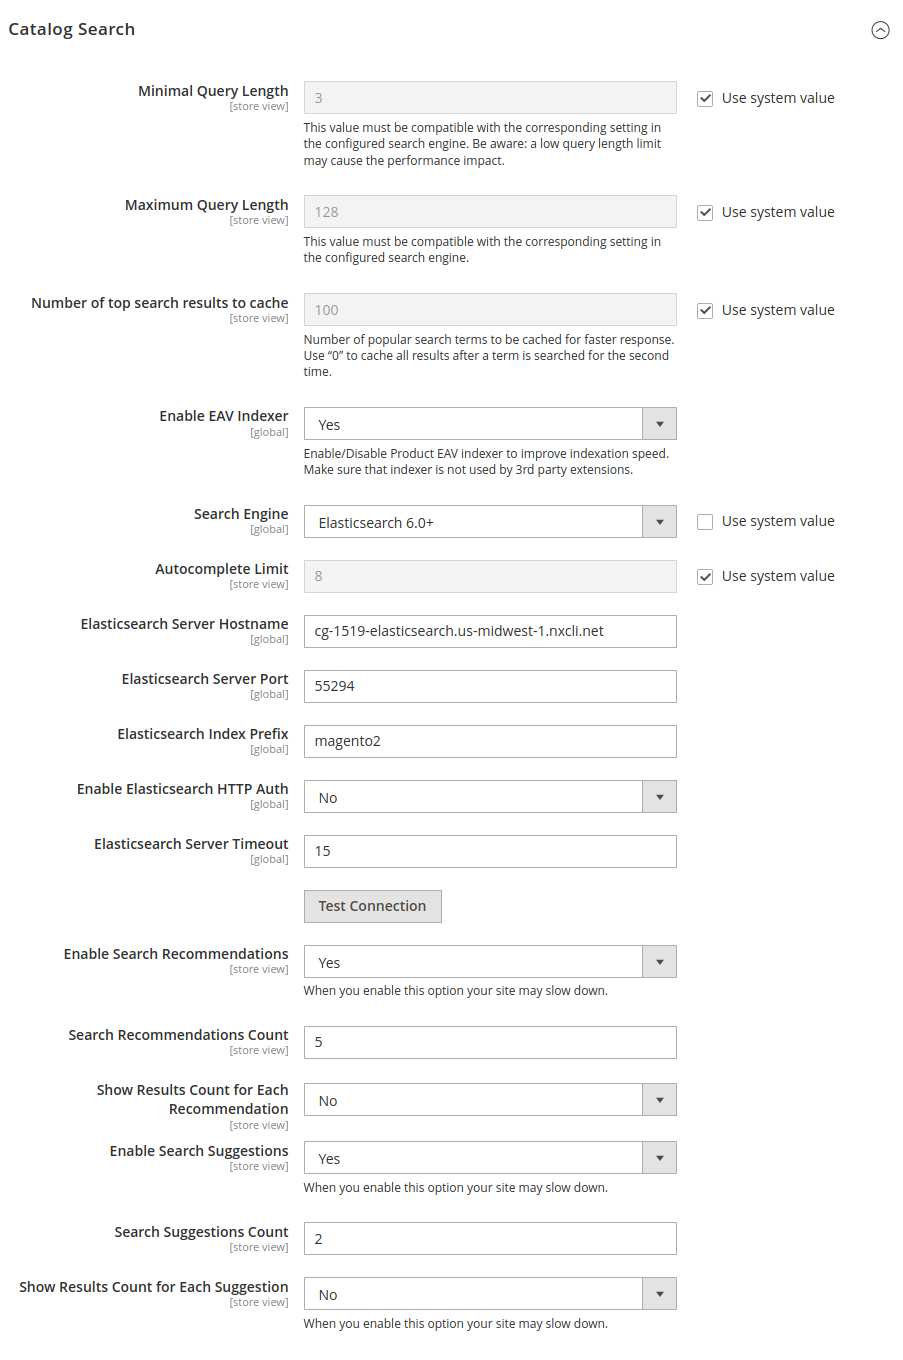
Use Elasticsearch for Magento’s catalog search: Since Magento 2.4, MySql was deprecated (and removed) and Elasticsearch was introduced as the catalog search engine, greatly improving the speed and results of the searches. To enable Elasticsearch, navigate to your admin panel and under Stores > Settings > Configuration > Catalog > Catalog > Catalog Search you will find a tab called Search Engine. Configure your store to use your Elasticsearch endpoint, click Test connection and if everything worked, you’re all set. You can find the complete list of parameters to configure Elasticsearch here.
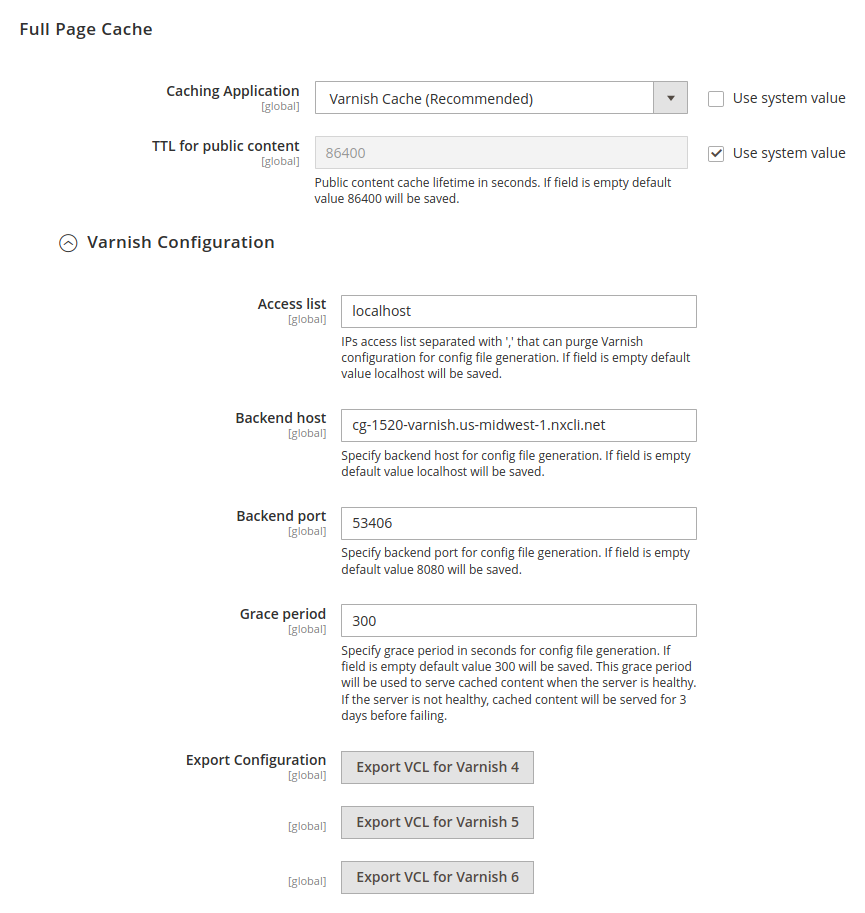
Use Varnish to speed up your response time/TTFB: You either love or hate Varnish but at the end of the day, it greatly improves the TTFB, and if configured correctly, it can do wonders for the general usability and user experience of your site. Magento 2 features an out of the box integration, making Varnish configuration really simple. To configure Varnish, navigate to Stores > Settings > Configuration > Advanced > System > Full Page Cache, select Varnish from the Caching Application list and configure the rest of the options. A full list of all the parameters you can use to configure Varnish can be found here.
You can also configure Varnish from the CLI by running:
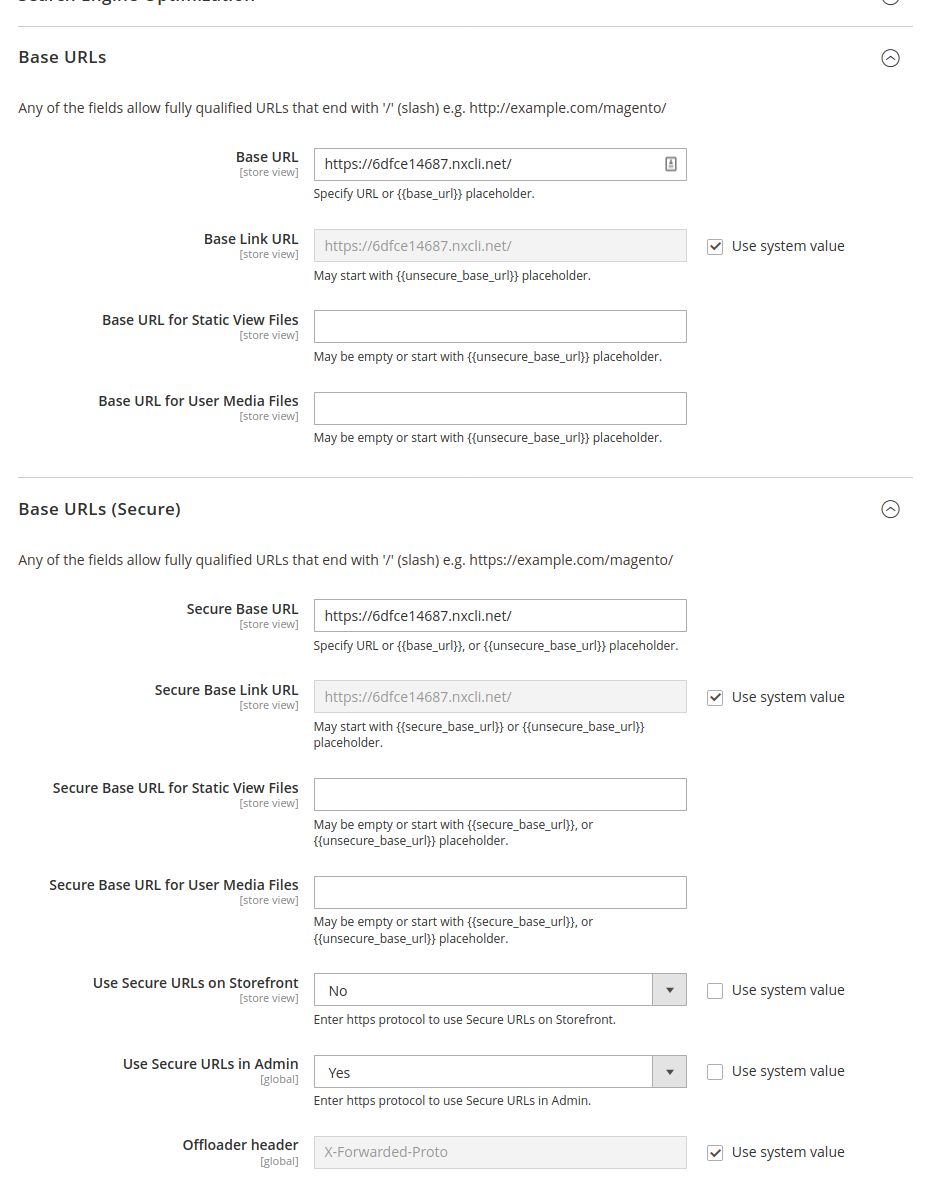
Use a CDN: A content delivery network is normally used to store media and static assets at edge servers near your customers for faster delivery. This means your assets are physically closer to your customer, resulting in faster response times. Configuring a CDN for Magento is not as straightforward as it should be but it can be achieved by using the admin and navigating to Stores > Settings > Configuration. Under General, click on Web and expand the Base URL sections. Once there, update the Base URL for Static View Files and Base URL for User Media Files with the URL of your CDN endpoint where static view and javascript files are stored. Do the same for Base URLs (Secure) and once done, click Save config. You might need to flush/clean your cache for this change to take effect. If everything worked as expected, you should be seeing your CDN url being used to serve most of your site’s static files.
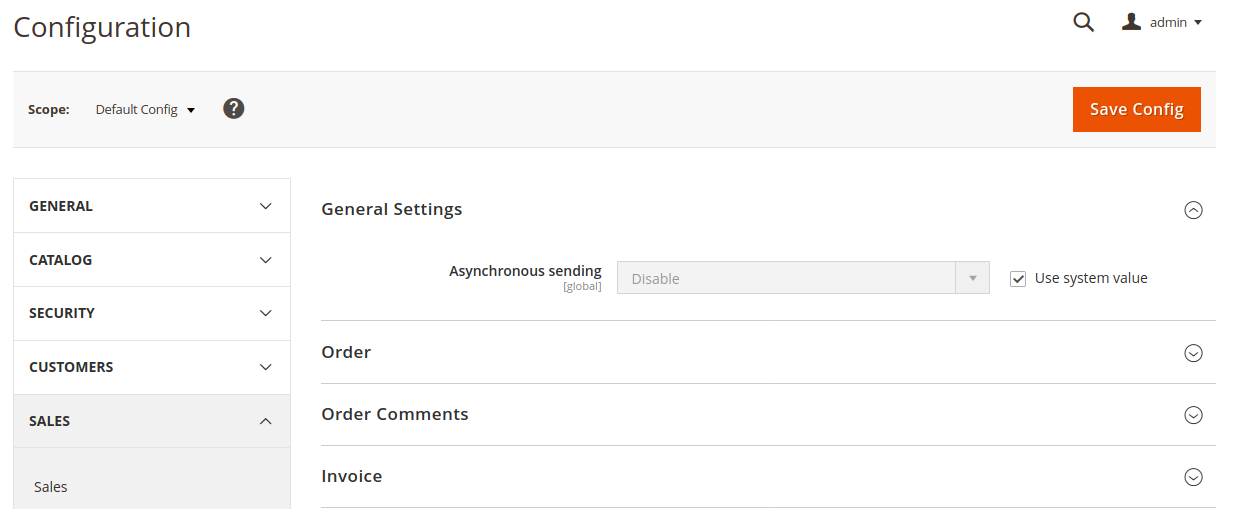
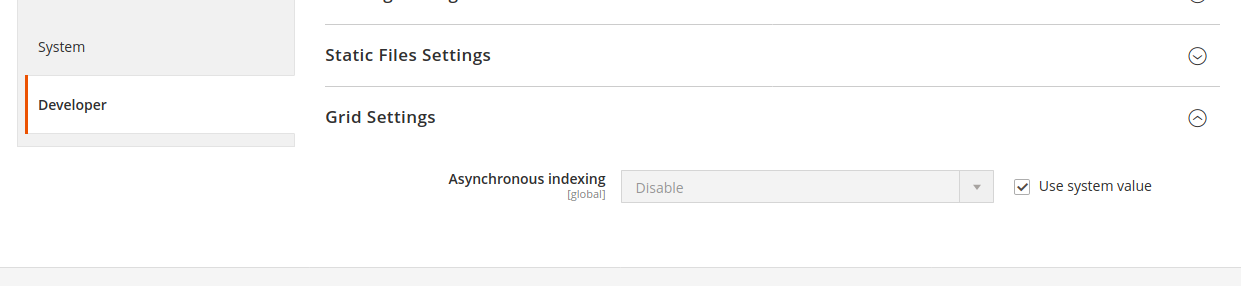
Enabling the Asynchronous email notifications, Asynchronous order data processing: during times of high concurrency, you might want to move processes that handle checkout, order processing email notifications and stock updates to the background. To enable async email notifications, go to Stores > Settings > Configuration > Sales > Sales Emails > General Settings > Asynchronous Sending
You can activate Asynchronous order data processing from Stores > Settings > Configuration > Advanced > Developer > Grid Settings > Asynchronous indexing
When enabled, orders will be placed in temporary storage and moved in batch to the Order grid without any collisions.
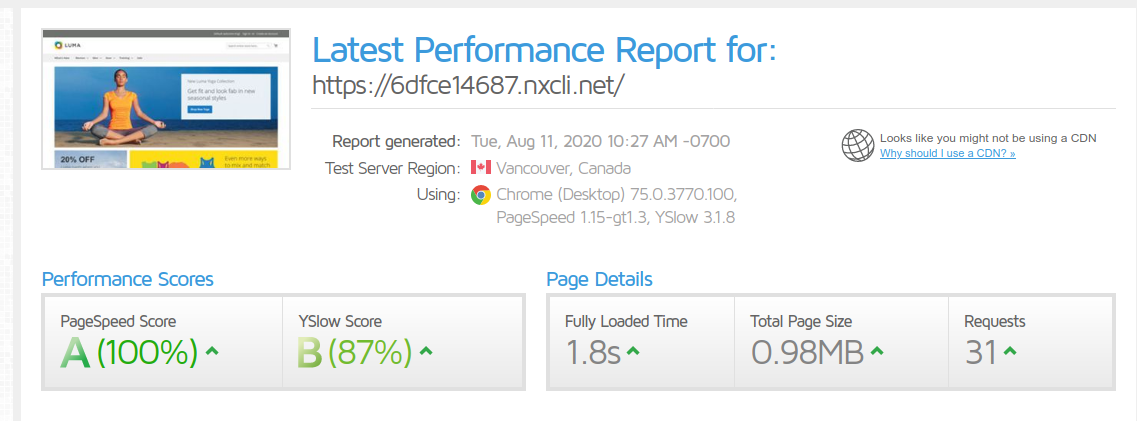
While there are no real magic tricks, we tried this guide in our cloudhosts and ended up with an A and a page load under 2 seconds on GTMetrix 🥳
If you’d like assistance enacting these changes, or are interested in our Managed Magento offering, please reach out to our award-winning support team 24/7/365 at [email protected].
Who is Miguel? If you’re part of the Magento community, chances are you already know. As a Magento Master and open source Community Maintainer, Miguel can be found traveling the world imparting his Magento wisdom at events and approving pull requests everywhere else.
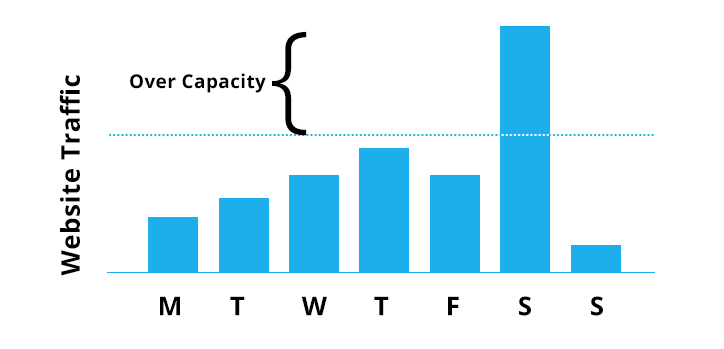
One of the greatest advantages of hosting your website in the cloud is the ability to scale up or down quickly. Usually scaling will just take a few minutes and you can double or triple your server capacity.
Compare this kind of scalability to traditional hosting solutions where you have your own server (where it can take days or weeks to get a new server online), and you can immediately see why hosting in the cloud makes good sense.
Generally speaking, you choose your hosting plan based on where you are in your business lifecycle. If you know you’re near the limits of your plan you can upgrade quickly and prevent any downtime or slowness for your users. But what happens if your plan is the right size for you most of the time, but you have occasional traffic spikes – like when you launch a new product? That’s when auto scaling can save the day.
What is Auto Scaling?
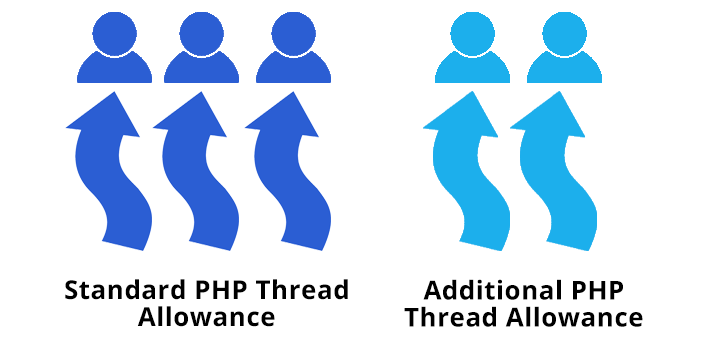
If you’ve never heard of auto scaling before you can think about it like an HOV lane on the highway. When Hostdedi Auto Scaling is enabled, if our servers detect a surge of traffic, we’ll automatically open up an ‘HOV lane’ to manage the expanding traffic. The added resources (or lanes in our example) will keep your website experience fast & snappy, ensuring an undisrupted experience for your visitors.
How does Auto Scaling Work?
Auto scaling works by allocating additional resources from a resource pool. It gets triggered by analyzing PHP threads (also known as PHP workers) every minute, to see if demand outstrips supply. Once demand exceeds capacity, PHP threads are automatically scaled. Auto scaling then re-tests requirements every 10-minutes until it is no longer needed.
Back to the HOV lane example – if we see that your highway is in bumper to bumper traffic, we’ll add extra lanes to the highway to make sure each car can go as fast as they want.
The Benefits of Auto Scaling
Address Variable Traffic Demand – Without Having to Upgrade
Few sites see consistent traffic 24/7/365. Auto Scaling provides you with the ability to address these traffic fluctuations. For example, imagine that a small business owner named Jerry finds himself with consistent performance issues on Saturdays.
After analyzing the traffic, Jerry finds that Saturdays are particularly busy periods on his website. He thinks he might need to upgrade to a larger hosting solution, but after a cost-benefit analysis, he doesn’t see the ROI because the other six days of the week don’t have any issues. So if he could adjust his cloud hosting resources only on Saturdays, then he can stick with his plan that makes sense, but address the traffic issue that needs to be managed.
He can do exactly that with Hostdedi Cloud Auto Scaling. All Jerry needs to do is leave the feature enabled (our Auto Scaling is enabled by default). On Saturdays, Auto Scaling will automatically add more resources to his site and he’ll reap the rewards of satisfied visitors that could turn into customers.
Eliminate Additional Costs
Every Hostdedi plan across Managed Magento, Managed WooCommerce and Managed WordPress gets 24 hours of auto-scaling for free. So, if you have traffic spikes for less than 24 hours a month it won’t cost you a single penny. You can get the benefits of a higher plan for your current plan cost.
Other hosts might force you to upgrade, or even worse, let your site crash forcing you to lose sales. We’re your business partner. And we’re not in the business of letting you down.
What’s Next for the Enterprise? Advanced Auto Scaling
On a larger scale, if you’re looking for predictable performance for extreme traffic spikes, our Hostdedi Advanced Auto Scaling offering provides unlimited support for the heaviest of traffic loads without having to buy, configure, deploy and migrate to larger environments.
As an example, if you’re planning on a national TV appearance or you have an army of influencers who can drive traffic your way for a flash sale, with Advanced Auto Scaling, you can add as many resources as you need. Not just 10 PHP workers (which are the resources from the higher level plan), but 10, 20, 30, 40, or even more PHP workers to cover you without worry.
Advanced Auto Scaling costs $99/mo and which will shift all of the PHP workers from your current infrastructure into a PHP Container. As you need more resources (to be able to handle more concurrent users), you can add additional containers with 10 PHP workers a piece for $50/day. No commitment, no long-term contract. With Hostdedi Auto Scaling and Advanced Auto Scaling, you are at-the-ready to handle traffic spikes whenever they occur.
Patrick Rauland is obsessed with ecommerce. He’s built ecommerce websites for clients, worked for WooCommerce doing support, development, product management, and helped plan their yearly conference (WooConf).