Hold the body wash gift sets, and put that cookie tin DOWN – here are the presents the solopreneurs in your life ACTUALLY want this Christmas.
A Better Chair
For the traditionalists who still sit in chairs while they work, a new office chair is always sliding down the wants and needs list. Trust me – just get them a new one (ideally one with lumbar support).
The only people who don’t need a new chair are the people who no longer sit in chairs to work.
For People to Stop Putting ‘10X’ In Their Subject Lines
A girl can dream, right?
Blue Light Blocking Glasses
We look at our computers and phones a LOT, and we don’t need a lecture – we need blue light blocking glasses. These little bad boys block the spectrum of blue light responsible for wreaking all sorts of havoc on our brains, from causing migraines, to the insomnia that makes us impossible to deal with.
Buy them for us. PLEASE.
An Electronic ‘Notepad’
Techies and screen-addicts though we may be, most of us carry a scattering of notebooks that contain all manner of highly-important information that we can never seem to find, let alone tag and search for.
Don’t tell us to use Evernote (because we’re already using that too), get us this amazing electronic notepad that mimics what we love about writing things down, in a way that we can actually reference and use.
Alcohol. Lots of Alcohol.
Just kidding. Or are we…?
Entrepreneurship is stressful, and when you’re your own boss, it’s five o’clock when we say it is.
A Physical Time Tracker
Because we forget to change the task on our Pomodoro apps all. The. TIME.
This awesome little time tracker is fully customizable by task, and sitting right in front of your keyboard, is a heck of a lot easier to remember to use than an app.
A Neck and Shoulder Massage
Neck and shoulder pain is a common psychosomatic response to mental stress, and entrepreneurs have a lot of it.
Unfortunately, we also don’t have an hour to lay on somebody’s massage table.
Spare us the lecture on work/life balance, and give us a robot to do it for us.
Something to Hit Between Meetings
Gyms are closed, and business marches on. Give us something besides a broken copy machine to take out our rage on, like this desktop punching bag (please).
A Decision Paperweight for the Impossible Choices
“Can you get that to me by Friday” just got a whole lot easier to answer with this hilarious paperweight from Uncommon Goods.
A Reusable Notebook
Don’t have the Beyonce budget for an electronic notebook? This affordable physical notebook by Rocketbook is reusable, and syncs up with an app to keep handwritten notes organized.
Scribble, snap, and upload, and wipe it clean to start all over again.
Inspirational Wall Art
Remind the entrepreneurs in your life what leadership potential looks like, with an inspirational poster like this one.
For You to Start Using Their Scheduling Link
For real man. We’re busy. GRAB SOME TIME.
A Book by One of the Greats
If Michael Scott’s Somehow I Manage isn’t on our desk already, it needs to be there yesterday.
Desktop Whiteboard for Capturing Brilliance
The only reason we don’t have one already is because we haven’t found a place for it. This whiteboard fits right above your keyboard, and is the perfect place for scribbling during meetings.
Sustainable On-Ear Bluetooth Headphones
New headphones are always a need, and these headphones by LSTN sound as good as they look. Make sure anything you buy for this crowd is bluetooth capable, with a built-in mic, and background noise reduction is always a nice bonus.
Now Here’s What to Get YOURSELF
Entrepreneurs – solopreneurs ESPECIALLY – manage a lot. Finding clients, accounting, doing the actual WORK they’re selling to end users.
And all the while, WordPress and WooCommerce updates blindside us. We don’t manage our own sites particularly well. The old adage of ‘the cobbler’s family has no shoes’ proves true, and it’s making us look bad.
So BEFORE another plugin breaks, and BEFORE you miss an update that compromises your site’s security, switch to a managed host who will take care of the minutiae for you, so you can focus on what you do best.
Explore affordable Managed Hosting plans by Hostdedi, and reclaim your time.
Destiny Hagest provides value-aligned copy and content that use marketing as a force for good. She’s a writer. She’s a consultant. But she’s also a consumer, and a person living on this planet. Destiny wants to see great brands achieve more market share. She wants to see you win.
How much effort have you put into your product page? Yes, I know you found information and images from the manufacturer and added them. Sure, you named the product and maybe if you were really working on good product pages, you took an extra picture of the product in use to highlight what it really looks like to your customers.
But I know most ecommerce sites don’t even go that far.
About 10 years ago I worked in retail and one of my jobs was to add products to our site, but only after everything else was done and if the boss couldn’t find anything extra for me to do. This was shortsighted and meant that they didn’t see much business from their online store. But if you don’t put any effort into your product pages, the natural outcome is little traction with your site.
It’s important to remember that your online users can’t touch your product. They can’t ask a salesperson a question or get specific feedback on how the product worked for someone they can talk to. Customers are reliant on the information you provide them to help them make a purchase.
Today we’re going to talk about how to design a great product page. Remember, from the product name to the reviews, your product page is a landing page. Its job is to sell your products to your customers.
Product Name
If your product page is a landing and sales page, then the first thing you need to look at is the name of your product. This is the title of your page and you should spend just as much time thinking about this as you would for any blog post you want to rank well in search engines. The more descriptive your product name is, the better it is, at least up to a point.
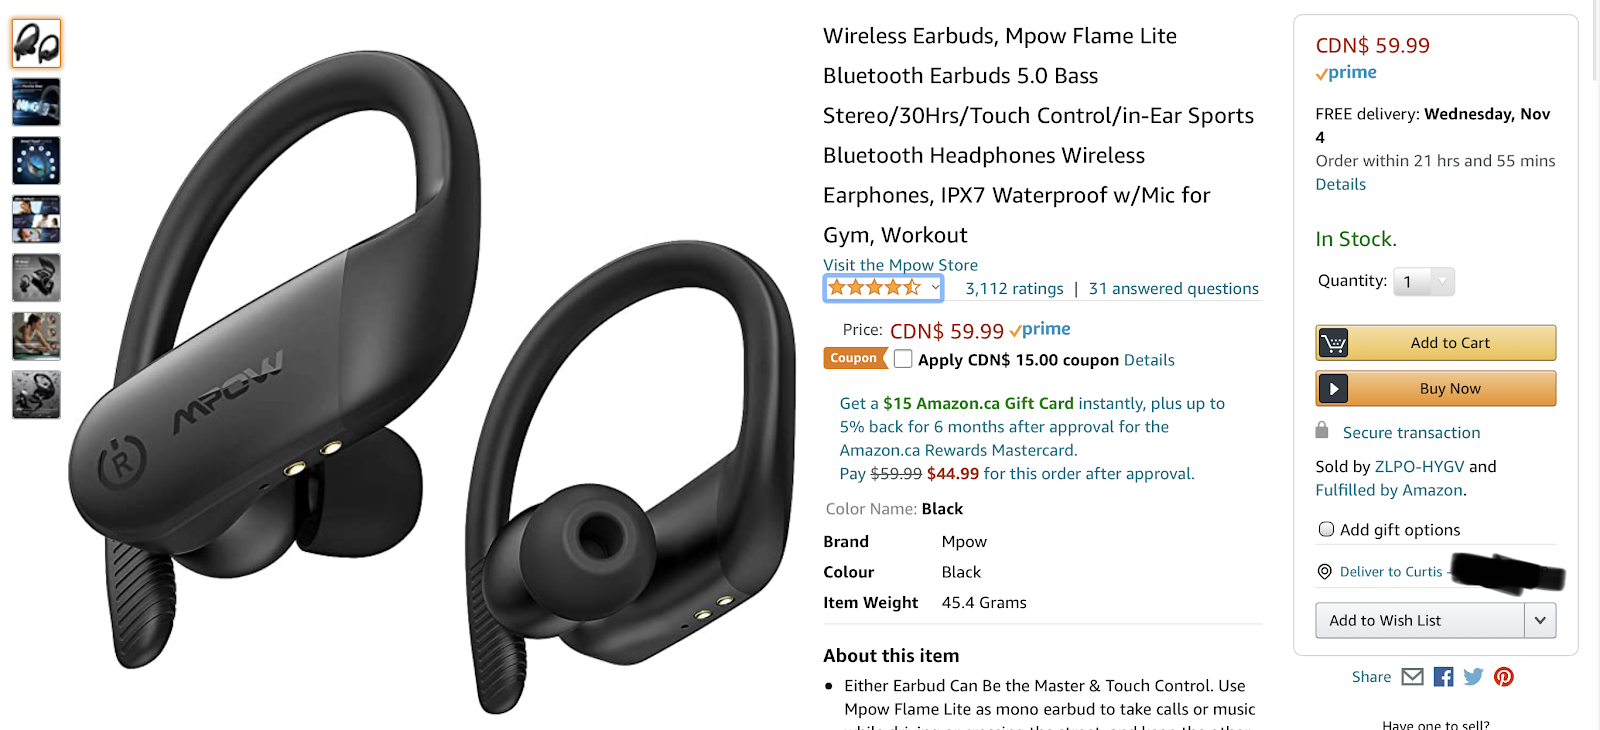
We’ve all seen ridiculously keyword-stuffed Amazon product titles. We want to use a descriptive product name, but not crossover into the realm of these overloaded titles.
Take a look at these Mpow headphones on Amazon.
If you’re looking for waterproof Bluetooth sports headphones with controls on the headphones, the title is a great match. I think it’s getting close to being a bit long, but just by reading the product name, you get a summary of all the features that the headphones provide.
When you’re looking at your product names use the Google Keyword Planner to investigate what terms are ranking well for your product. Use these terms to help you craft a well-optimized title that will bring customers to your landing page.
Description
When it comes to your product description, the first thing to ask yourself is “what questions will myom customers have”. A description that answers your customer’s questions poorly will mean they make a purchase they’re not happy with. Then they’ll want to return it, and you may get a poor review on the product.
As you write your product description ask yourself what questions the customer will have about your product? Your goal is to answer the questions and deflate the objections that customers will have so that they feel confident in their purchase.
Good product descriptions are jargon-free. They’re not heavy on marketing text, but are to the point and clear. If you’re talking about 5 different feature highlights, use bullet points so that readers can scan to get the information they need quickly.
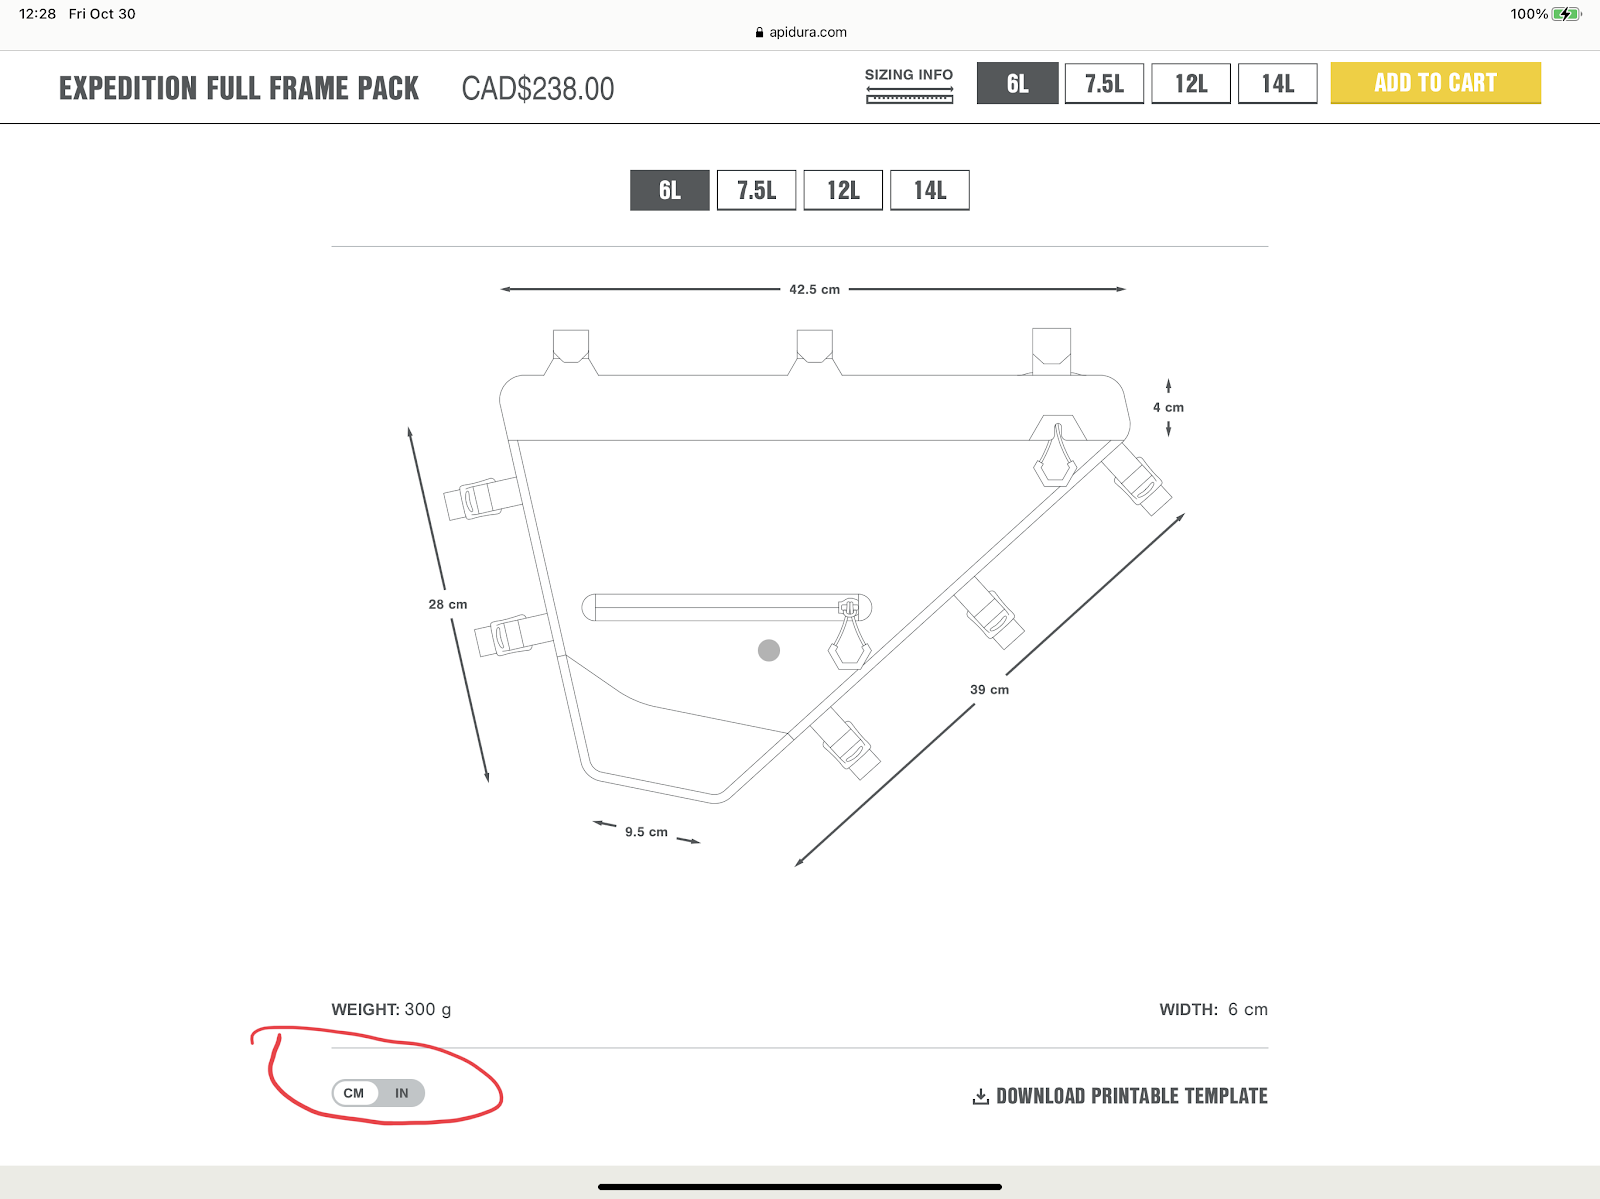
If you’ve got many of the same types of products, say dishwashers, then take the time to standardize the language across suppliers. Don’t list measurements in inches for one product and then centimetres for other products. Standardize on one method, or if you deal with international clients let them choose what measurement they want to see. You can see a great example of this with Apidura Cycling bags. They let users change between inches and centimetres for their bag measurements. This puts their users in control.
Product Images
After your product name and description, it’s important to focus on the images you provide to your customer. Remember, they can’t touch the product. They can’t tell how big it is, or exactly what shade of blue it is. They are relying entirely on you to provide this information with your images.
There are two ways to go with product images. You can choose to use a backdrop with other stuff that matches the product, or you can go with a flat white version. Keep the style consistent including the dimensions used with the final images. I think the best option is to have a combination of both of these options.
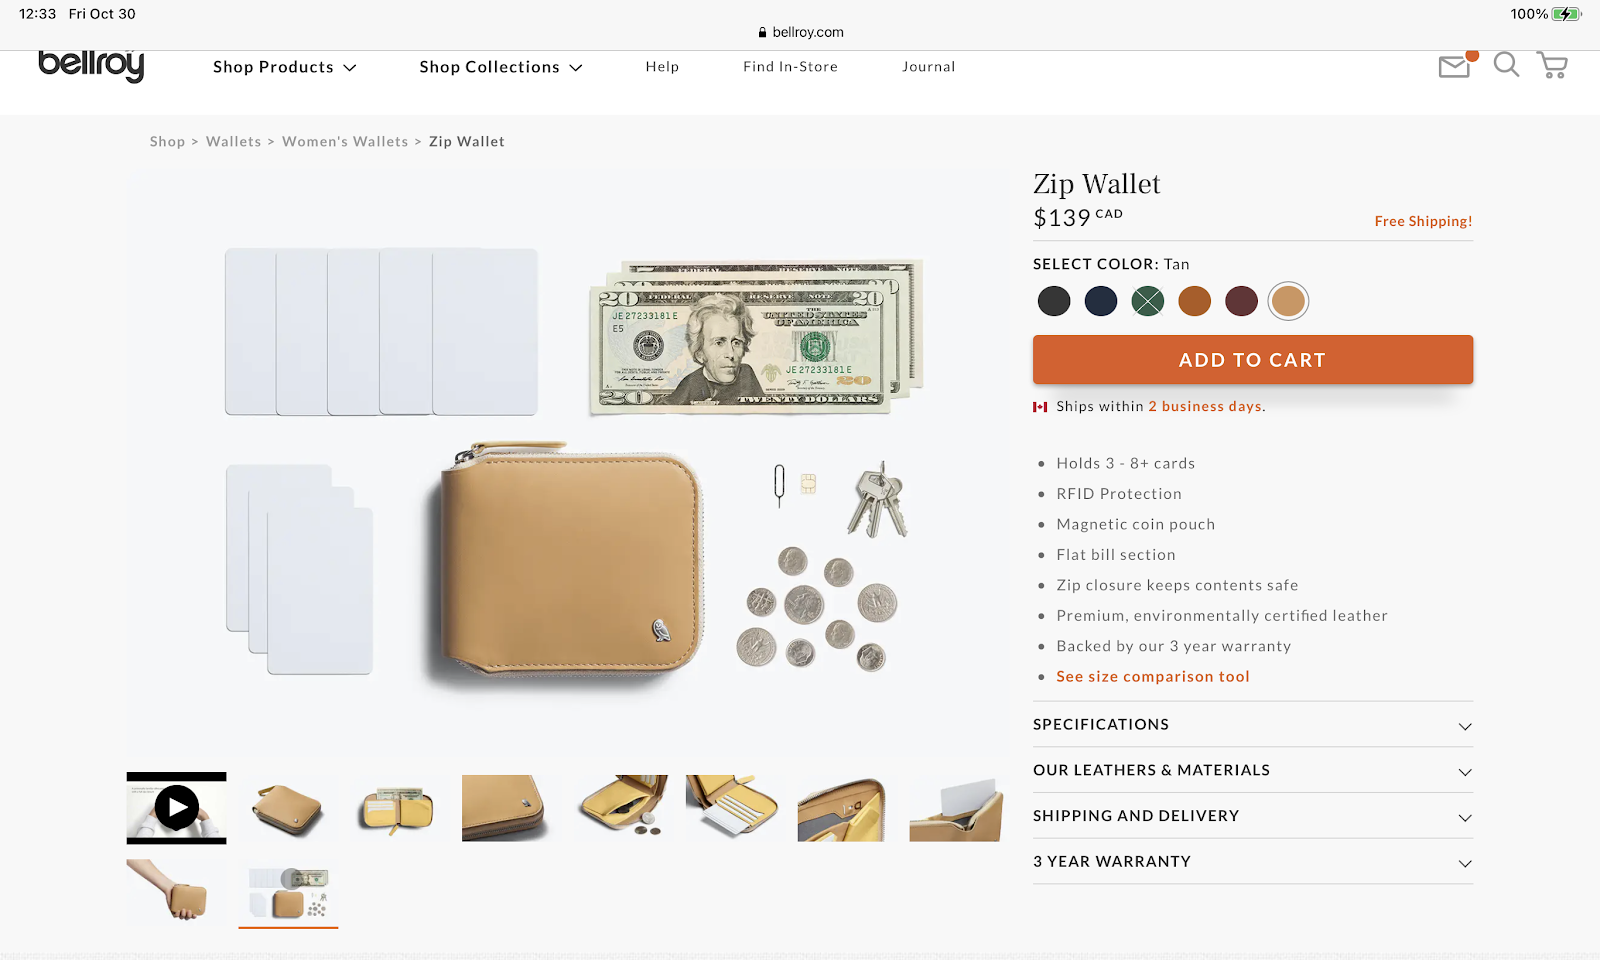
Bellroy is a great example of both methods combined. They show you several images of their products on a flat white background. They also add it with known items, like physical bills and blank cards that are the same size as credit cards. You get to see high-quality uncluttered photos to judge colour and texture, then clean photos that help you get an idea of the size of items you’re looking at.
Bellroy also provides high-quality images for each color option for a product. You don’t have to guess based on a color swatch, you can see exactly what you’re choosing as you make changes.
While this may look like a lot of work, it’s just a bit of work and a small investment. You don’t need a fancy camera. Any smartphone in the last few years will do. If you don’t have natural light, then you will need to purchase a consistent light source. You can usually find the Godox SL60W for under $200. If you’re dealing with small products and want to have an extra clean background, then look at a softbox. You can find these on Amazon for as little as $30.
With a light source and a softbox, all it takes is a bit of practice. Take a bunch of test images from different angles. If you spend a weekend playing around you’ll improve greatly so that you can get good images for Monday.
If you’re looking for a great walkthrough on product photography, check out the video below by Peter McKinnon.
Once you’ve got the images, take a few minutes to edit them for color and contrast. Most people use a sized template so that every image on the site is the same size.
If you’re not sure what this means, it’s like having a company letterhead you always use. In this case, it’s a Photoshop file that’s 2000X2000 and every image you take goes on the same template so that your site images look uniform.
Then once you have your images on the template looking how you want them, save them out in a web format. Look to keep them under 700kb if possible. To help with this at the final stage you can use tools like Kraken to optimize the images as you upload them.
Putting some effort into your product images will help your store stand above the competition.
Adding To Cart
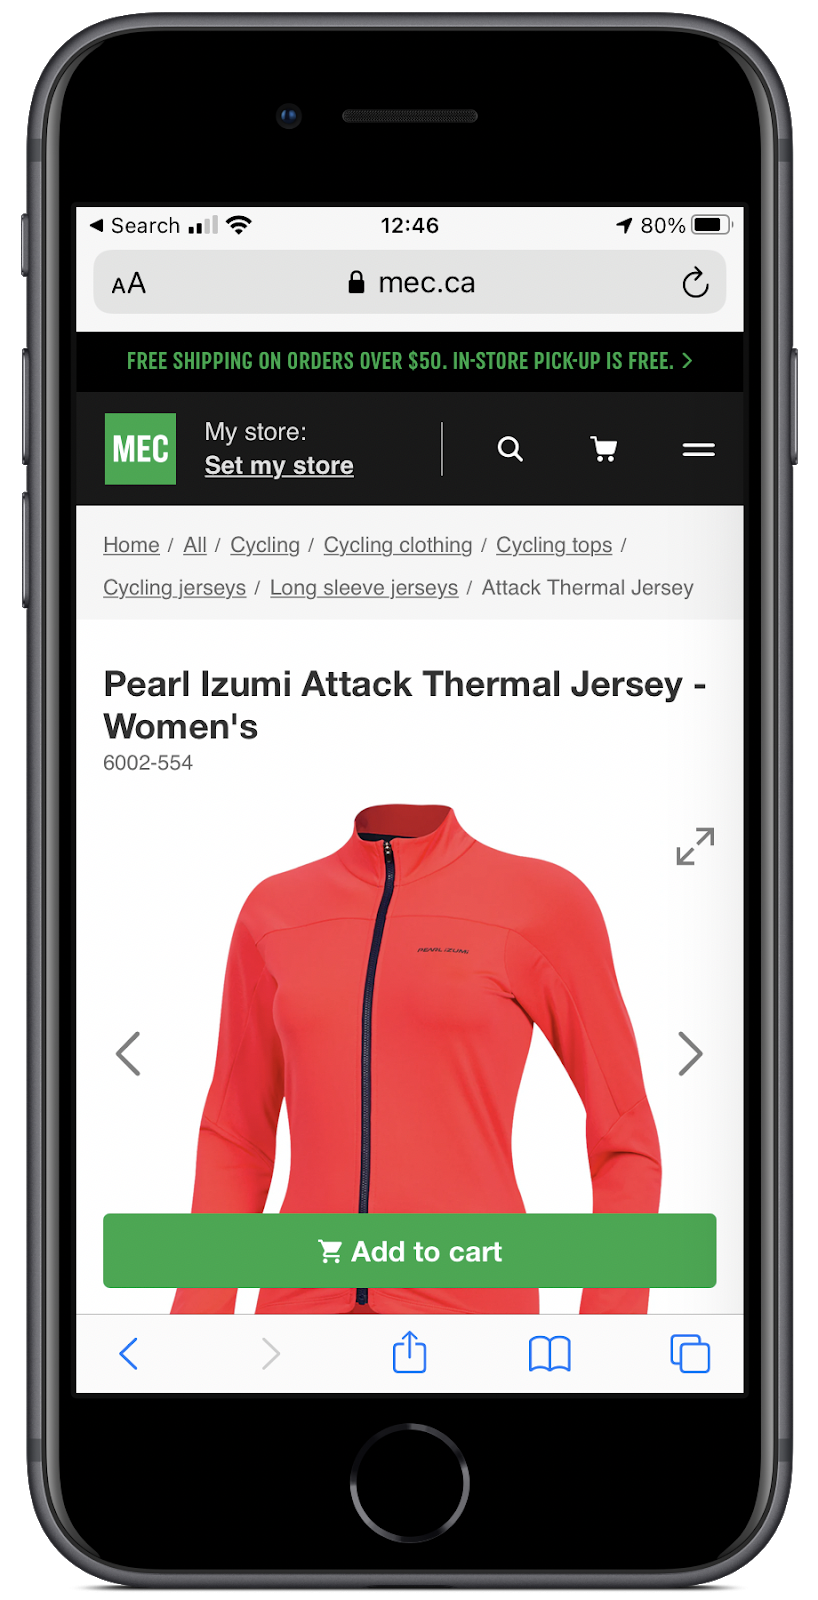
Next, your add to cart button. There are a few mistakes that many sites make with this crucial interaction. First, make sure that users can see the button without scrolling across all devices. It should be obvious and a contrasting color from the rest of your site so that it stands out. You can see a good example of this on MEC below.
Note that they have a nice product image, and the purchase button is in a vibrant green and stays with the customer as they scroll on a mobile device.
You also need to make sure that it’s clear to the user something happened when they add something to the cart. Luckily WooCommerce has this as a default with a banner being displayed to a user after a product has been successfully added to the cart.
The second most important interaction after your main purchase button may be the option to add a product to a wishlist. A good spot for this is just below the main purchase CTA. I have many wish lists on Amazon for when I’m ready to revamp parts of my office. I already have my desk video setup all picked out in a wishlist. When it’s time to purchase I just need to add all those products to my cart, and then checkout.
Showing your product in use can show how easy it is to use to customers that are concerned about that. Yes, it might mean some duplicate information, but highlight the benefits and deflate the objections with your videos, just like you do with your marketing copy. Some studies suggest that a good product video increases conversion to sale by 84%. Videos are also known to have higher click through rates in search.
You can see this if we head back to Bellroy. The first thing that comes up with their products is a video of their product in use.
Just like good product photos don’t have to be a huge investment, decent video doesn’t have to be a huge investment. The light I recommended above is a great video light. Your recent smartphone is a decent video camera. Add a lavalier microphone to this setup for $50 and you’ve got a good video setup.
Pricing
When it comes to pricing, it’s pretty straight forward. Make sure you don’t hide any price increases from your users. If the blue version is more expensive, change the price when the user selects the blue version (don’t worry both WooCommerce & Magento do this out of the box). Just under the price is also a good place to add product availability information. Don’t let your customers try to add something to the cart only to find that the product isn’t available in their chosen combination of size and color.
Social Proof: Reviews
Did you know that user reviews are 12 times more powerful at convincing people to purchase than your marketing copy is? That means you need to employ ratings on your site. Display the overall rating, usually stars, at the top near your product title and description. Then after all the product information your customers want, display the reviews you’ve gathered from users.
It’s important to make your reviews filterable, and don’t censor bad reviews. I’ve often read the bad reviews for a product to find the pain points and then purchased because I don’t care about any of the major issues with it.
One great plugin to help enhance the reviews on your site is WooCommerce Product Reviews Pro. This plugin will let you add product photos and user videos to your reviews to supercharge your social proof.
Remember, your product page is a landing page and should be optimized for search engines and to convert visitors to customers. As I said when I talked specifically about mCommerce, make sure that you A/B Test the changes you’re making to your product pages to help ensure that they’re having the effect you expect. If you can put a bit of effort into your product pages, you’ll see big rewards in your sales.
Curtis is a husband, father, developer and business coach. He specializes in helping people build a business that lets them spend time with their family instead of working all the time.
One thing 2020 has taught us is the importance of an online presence. And many people have taken the extra time at home to start side hustles. The Internet is the way to do it.
So much of the buying process has moved online which means there is a larger pool of searches and potential customers. Affiliate marketing is positioned just right to capitalize on this increased web activity.
Building a website and designing a website are different things. The process below will help you build without needing to write any code. The good news is there are many tools available to everyday people, and we will point out which ones are worth choosing to save you time and money.
As an entrepreneur, your time is most valuable, so let’s get started.
7 Steps to Build an Affiliate Marketing Website
1. Choose your Niche
One of the first rules veteran affiliate marketers point out is finding your niche. Narrow down your focus to a single industry with only two or three affiliate products you promote.
“Choose a niche and work with companies within it. You can be an affiliate for just about anything, but readers won’t trust your opinions or click your links if you’re not an authority. Similarly, a reader might even write off your entire site as spam if it’s stuffed with irrelevant links. Do your best to select affiliate programs that fit naturally with our content.”
Your objective will be to create as much content as you can about the topics within your niche. So be sure to pick something you enjoy and have knowledge about – otherwise it will become a chore to you and eventually you will stop.
Some examples of niches:
Travel
Finance
Web Hosting
Fashion & beauty
Video games
Outdoors
Fitness & nutrition
3D printing
Science experiments
DIY crafts
Some niches are more profitable and competitive than others, so be sure to do some research before committing to a niche. You should look at what other content creators have published to get an idea of what you could create. Perhaps there is a topic that is not covered, or topics you know much more about.
If you can create content that is updated with new information, or in a format that is more engaging, then it is an opportunity to explore.
The list goes on and almost every category has a way to implement affiliate marketing. Often the key to winning is finding ways to be creative in how you deliver your content.
2. Pick a Domain Name
First, you need to name your website by picking a domain name. For example, nexcess.net.
This can be changed later so don’t feel stuck if you can’t decide just yet. Most hosting companies will let you use a temporary domain as a placeholder.
It’s common practice to find a domain name that is the same name as your business name or your personal name. You can also select from different TLDs (top level domains) like .com and .net.. For about $15, you can register a new domain for a year.
Try to avoid using hyphens and keep the length as short as possible. This helps visitors more easily type and find your website. Make it memorable and easy to say.
Also, take the time to check social media platforms to see if the matching username is available.
3. Choose WordPress
WordPress has now become the leading CMS (Content Management System) for building websites of all types.
It doesn’t matter if your site is a blog, store, membership site, or forum. WordPress is very versatile because it is free and open source.
With WordPress, you are the owner of your website content, which means you can use affiliate links to monetize. This makes WordPress unlike other platforms that restrict what you can have on your site and even delete your work if they choose.
Many independent developers have already created themes and plugins you can add to your site to make it look unique and function exactly how you want. That sounds technical, but it’s actually very easy to install and remove plugins with only a few clicks. The good news is that most plugins are free to install.
WordPress sites need to be hosted in order to be accessible on the Internet. Hostdedi has built specific hosting plans optimized for WordPress sites to be fast and secure. With Hostdedi, it is very quick and easy to set up your hosting, so you can focus on building up your site.
We host your websites on our servers where our experts manage the routine tasks of security and performance. This is called “managed hosting” because unlike shared hosting, you would normally be responsible for the maintenance of your sites.
Daily backups, automatic updates, and uptime monitoring is taken care of when you host your site with Hostdedi. But if you do need help, we are always available 24/7 by phone, chat, and email.
We also offer hosting plans optimized for WooCommerce stores, which is a specific type of WordPress site that utilizes the WooCommerce plugin to turn your site into a streamlined online store.
4. Get Hosting for Your Site
Next, it’s time to set up your hosting account. Hostdedi offers various plans for the needs of all types of websites. And if you already have a website, our team can migrate if for free to Hostdedi.
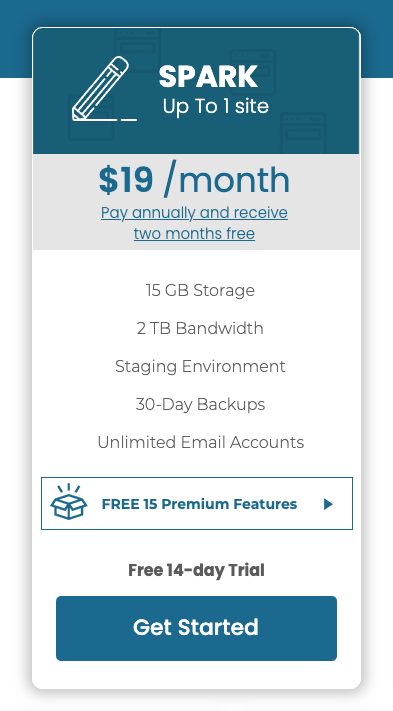
For this guide, we will use the Spark plan. It is a great option for new websites and beginners, while still getting amazing performance. There is even a 14-day free trial (no credit card required) if you want to test it first.
There is the option to save by prepaying annually for your hosting, or to pay on a monthly basis. There are no contracts, and you can always upgrade once your website has started growing.
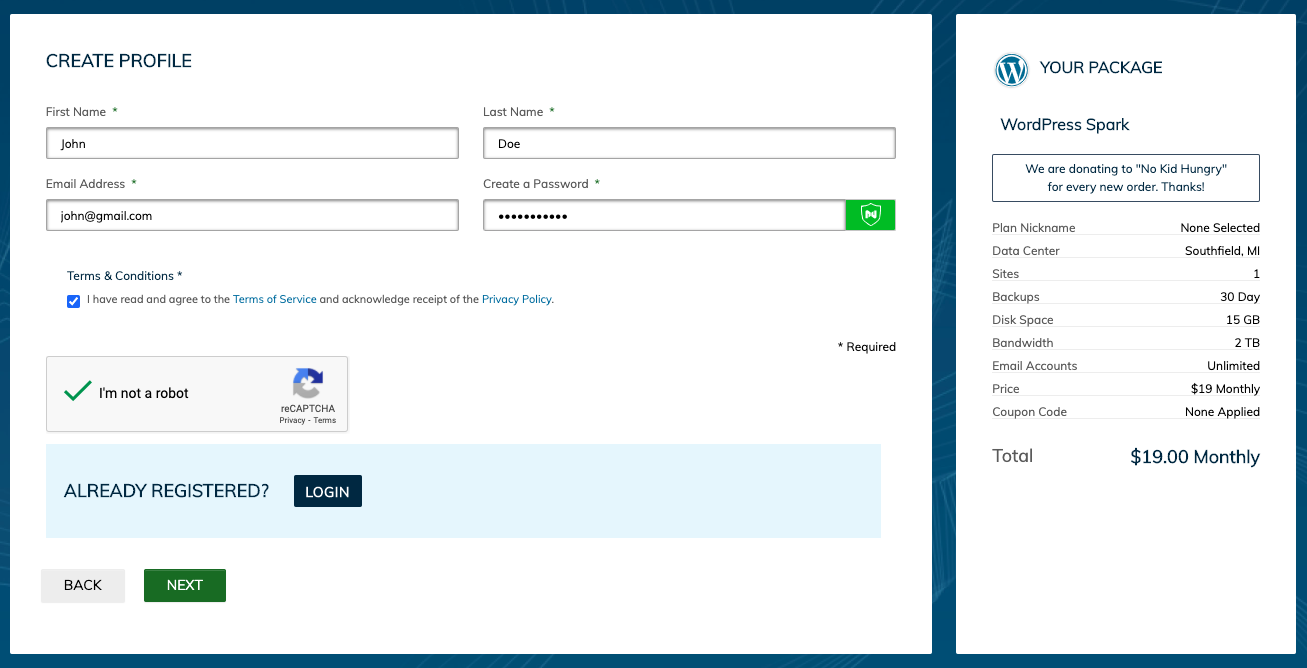
Once you have selected your plan, you will create your Hostdedi account. Just enter your name, email, and create a password.
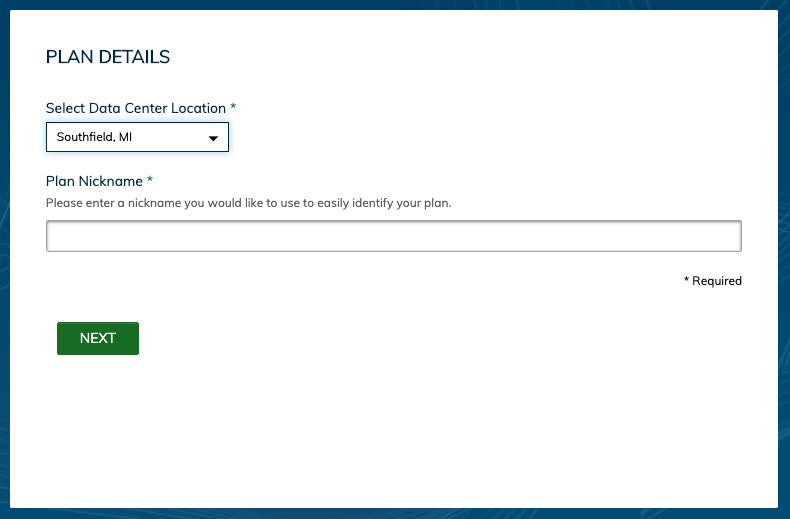
Select which of our data centers should host your website. We have locations all over the world:
Southfield, Michigan
London, UK
Sydney, Australia
San Jose, California
Amsterdam, Netherlands
Then create a nickname for your hosting plan. For example, “My Travel Blog”.
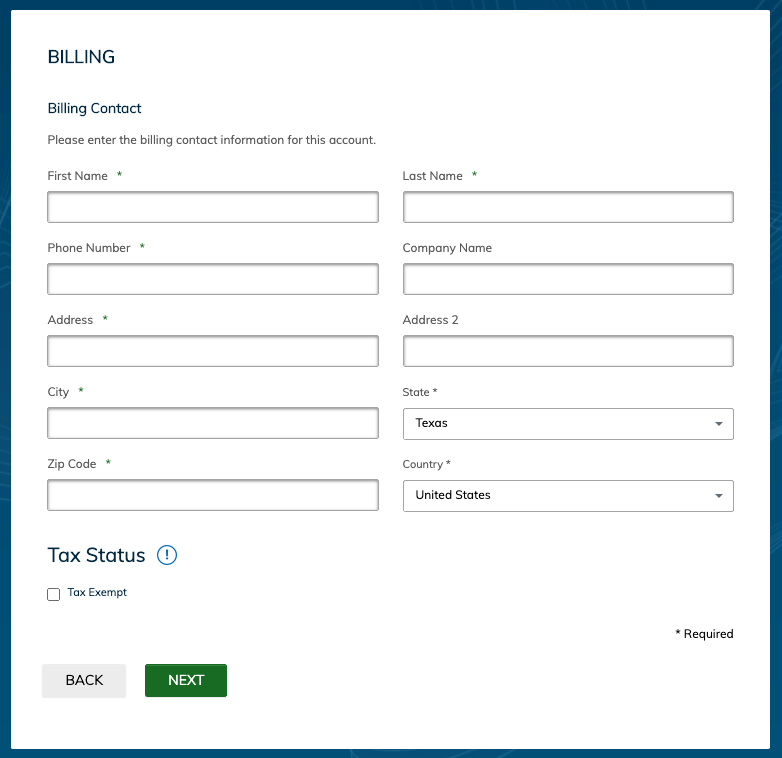
Enter your personal information.
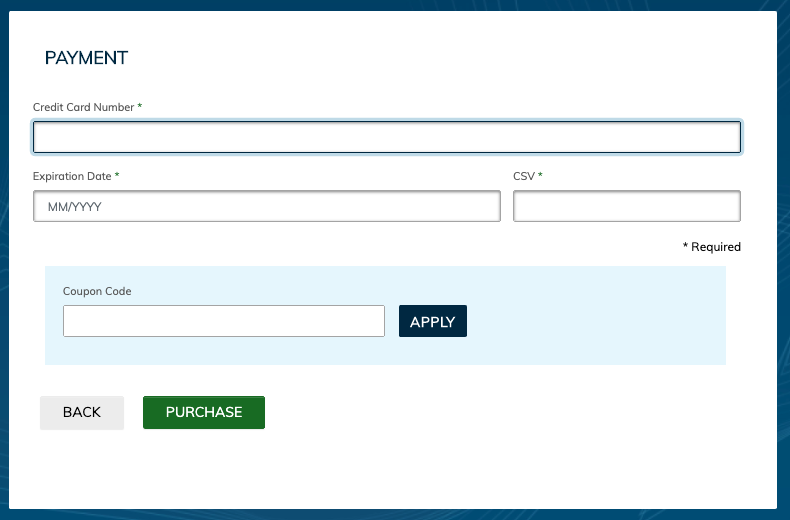
Enter your payment details. If you have a coupon code, you can apply it here and see your discount. Click purchase.
Next, you will receive a welcome email with your receipt and a link to login to your account. It will also provide contact information for our support team if you ever need some help.
From your Hostdedi dashboard, you will have access to your domain names and website settings.
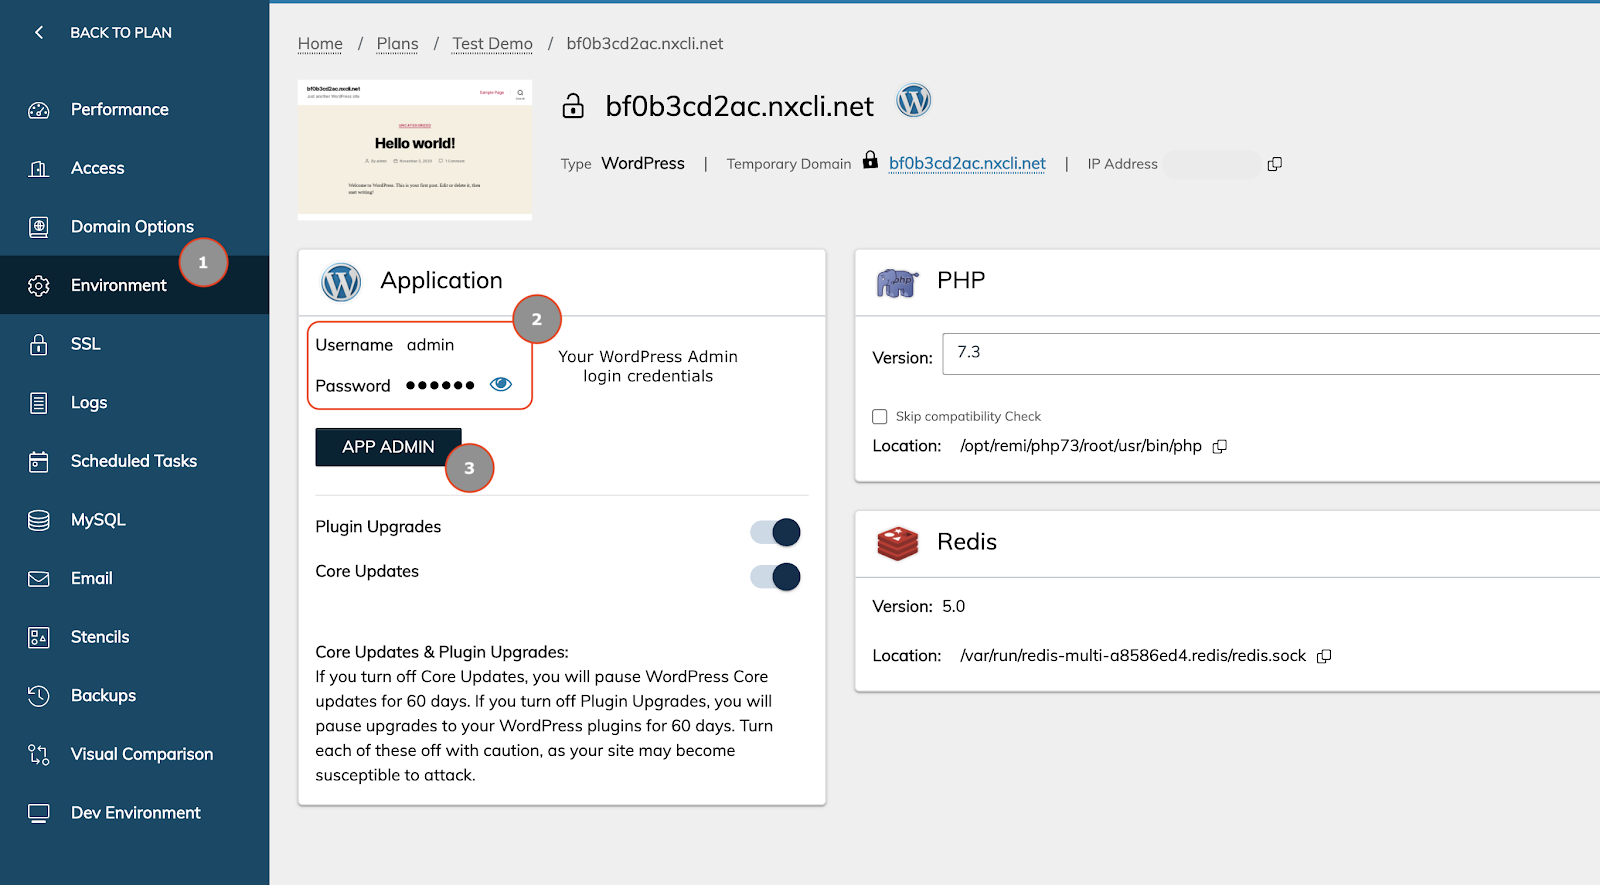
To login to your WordPress dashboard for your site, click on Environment. Your login credentials are found there. Next, click App Admin. Alternatively, you can type your domain’s login URL in the browser. For example, https://mydomain.com/wp-admin/
Both of these methods will take you to the login page for your WordPress site.
5. Install a Theme and Add Plugins
Enter your credentials to login to your WordPress dashboard. Here is where you will be able to design your site, create blog posts, add plugins, and much more.
It may look a bit intimidating, but as you explore, you will find it is very easy to navigate. A great thing about WordPress is the community and the large amount of helpful resources to help with just about any question. It’s only a Google search away.
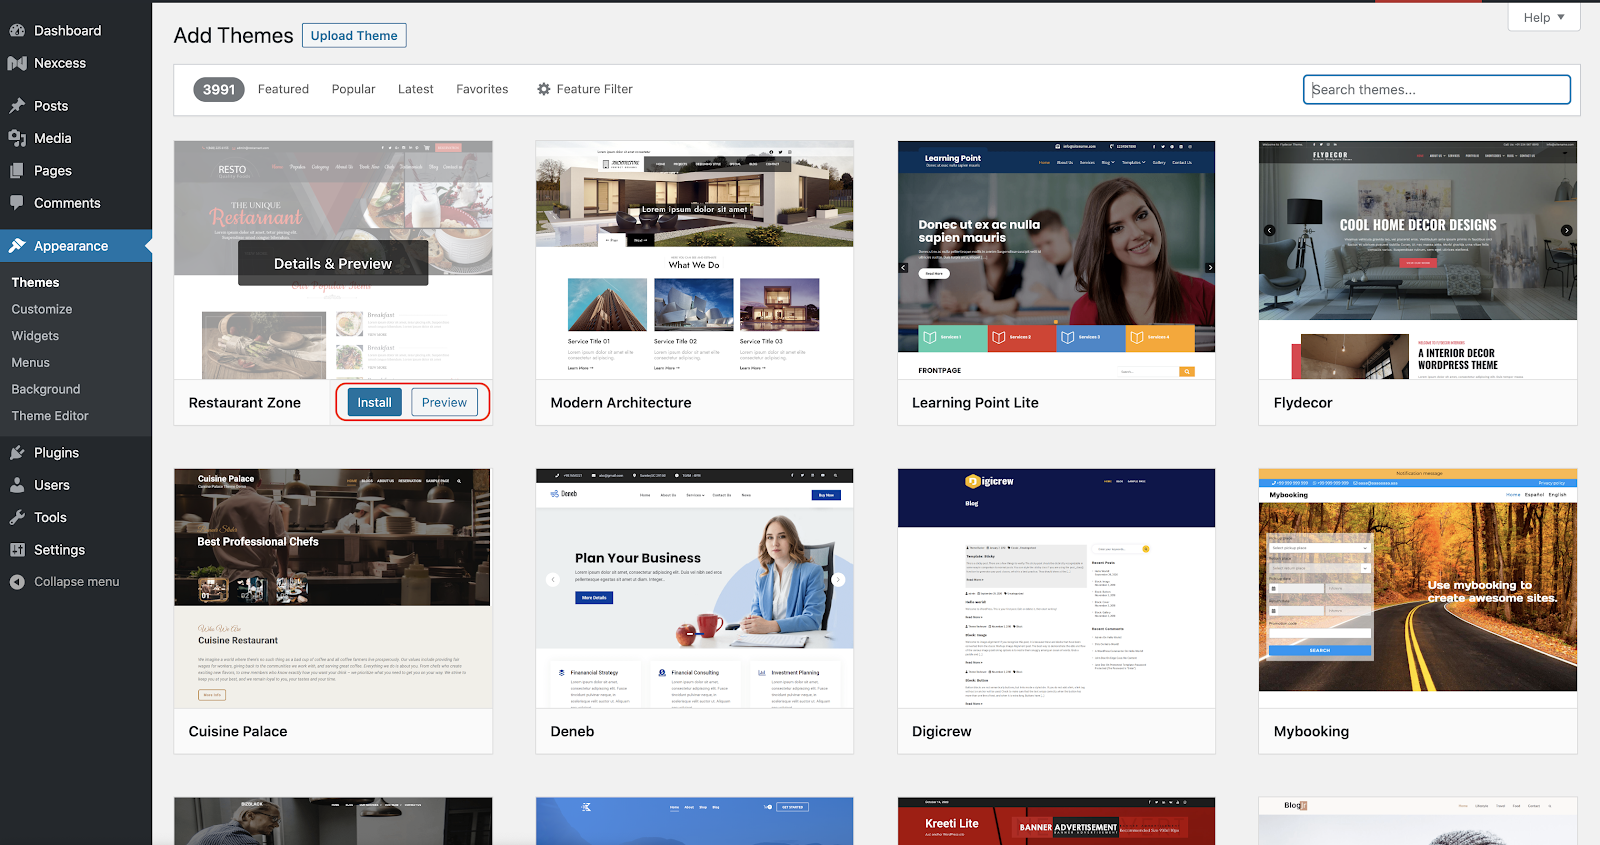
Next, you need to install a theme. These are pre-built layouts that change the design of your website. Go to Appearance, Themes, and Add New. You can always come back and change it later. There are even premium themes you can buy such as the Astra theme.
Click the Install button – it’s that easy. Then go to Appearance, and Customize to see what your theme can do and make it look how you want. Once you have configured the theme to your liking, click Activate to update your live website.
Plugins are extensions that add a function to your website. Let’s say you want your visitors to be able to contact you directly from your site – there are several plugins that will do this. Go to Plugins, and Add New. Just like themes, you can search for plugins that fit your needs.
Pay attention to the reviews and what people are saying about the plugin. Also, take into consideration which plugins have active support, since you don’t want to build functionality on your site around a plugin that may not have support down the road, leading to vulnerability issues.
6. Publish Your Affiliate Content
This is the meat of your affiliate marketing strategy, and the reason people will come to your site. A good practice is to publish often and publish valuable content.
Another reason WordPress is so popular is because creating posts is not difficult at all. This helps content creators be able to publish new content more quickly.
To reiterate – it helps immensely to focus on topics you are passionate about. Boredom will hinder you from working on new content and ultimately earning any affiliate income.
“If you are looking to build an affiliate marketing website the key to your success is keeping it as niched as possible. Affiliate marketing and SEO go hand in hand. So do your keyword research and keep things as niched as possible. Publish as much quality content as you can for the first 6-9 months. Stay the course and you will start to see significant traffic and conversions after those first 9 months of hustle.”
Over time, if you have created quality content, then it will begin to rank on search results and be shared. This is the true test to know if you are adding value to your audience. The result of that will be them beginning to use your affiliate links.
While creating your content, you should be aware of, and seek out, affiliate opportunities within your niche that fits well with your target audience.
7. Promote Your Affiliate Links
Determine which products your audience will benefit from the most and which offers affiliate commissions. Most companies will have an affiliate page that lists these details.
Promoting too many affiliate products can have a negative effect on your image. The foundation of being an affiliate marketer is earning a level of trust with your audience. These days, the Internet collectively has become more aware of how to spot websites with the sole intent to sell.
Once you have been approved into an affiliate program, you can begin using your affiliate links. Each company provides you an affiliate account that you can log into to see your performance and earnings. Here, you can copy your affiliate links.
Then you can insert your affiliate links into your articles. YouTube allows affiliate links to be placed in the video descriptions. And Linktree is a tool for adding affiliate links to your Instagram bio.
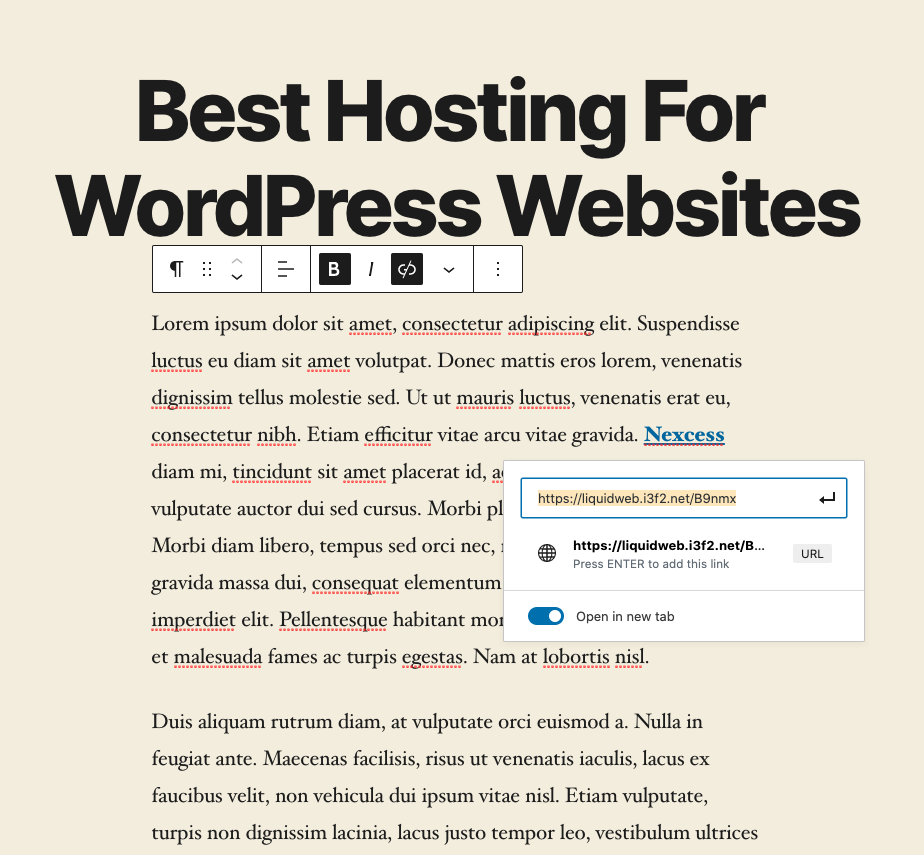
To add affiliate links in WordPress, go to your WordPress dashboard and click on Posts, then Edit under your selected post. Affiliate links can be embedded into text, buttons, or images. Select or highlight where you want to add the link and click the hyperlink icon. Paste your affiliate link into the field and press Enter.
Finally, click Publish in the top right corner of the page to update the change on your live website. Shortly, any new visitors to your site will be able to use your affiliate link.
Serious affiliate marketers monitor their traffic and conversions. Installing Google Analytics will show you the activity on your website. Some WordPress plugins like Google Site Kit let you see your traffic data from your WordPress dashboard.
Simply pasting affiliate links is not enough. To be successful, you will need to find what strategies work for you to promote your affiliate content. Connecting with other like minded authorities in your niche is a great place to start.
Sign Up to Become a Hostdedi Affiliate Today
Now that you have built your website, you may be a good fit for our Hostdedi affiliate program. If you believe your audience would be interested in our hosting services, sign up to become an affiliate. We hold regular affiliate contests for opportunities to win extra cash and other bonuses.
Using password protection provides an added layer of security to your website. When password protection is enabled, any visitor requesting access to view your website url, or temporary domain name, will trigger a prompt asking for a username and password to gain entry. Once a user provides valid credentials, they will have access to the website as normal.
This is a handy tool during the migration process to a Hostdedi cloud hosting plan or upgrading your existing hosting plan. After the migration process is finished, enabling password protection should be standard practice for website owners who want to verify everything is working as normal, before changing DNS records and sending traffic to the new server. This process is also known as going live.
It is recommended that all staging and development sites enable password protection to prevent search engine bots crawling the site, indexing content and providing links on the search results pages.
Customers not on a cloud hosting account, or unable to enable password protection by following the steps in this article are encouraged to create a support ticket and talk to a support technician.
The benefits of enabling password protection
It’s a common practice these days for website owners and developers to utilize a staging and/or development environment. There are many benefits including the proper way to test WordPress updates, fix/determine the issue of a bug and to even rebuild the website while keeping the production site fully intact.
Three of the major benefits to enabling password protection include:
Search Engine Optimization (SEO) & Page Rank
Sales on the correct website
Hidden from hackers
SEO & Page Rank
Search Engine Optimization (SEO) is the key to every website being found on the internet. Each page, post or e-commerce product can have it’s own individual SEO strategy while contributing to the overall success of the website itself. Once a page is published on your website, search engine robots crawl your site and start assigning value to the page in order to help determine the overall score. This score is used to determine where your website ranks in a Search Engine Result Page. Also known as SERPs.
One of the biggest benefits to having password protection enabled is the privacy from search engines like Google, Bing and Yahoo. These services provide robots that crawl the internet and index all available information. Which is great for any Production website using an E-commerce solution. However, duplicate content and outdated information can hurt your page rank. In almost every case, a staging or development site is a direct copy from production. Enabling password protection denies every visitor to the site, human or robot, unless a username and password are provided. Eliminating any chances of a secondary site to harm the SEO & page rank of your live website.
The same is true during the migration process. Technically speaking, when you sign up for a Managed WordPress Hosting plan, our services create a temporary domain name in order for the site to become “alive” in order to import or migrate a website from one host to another. After the migration process, if you do not enable the password protection feature, you run risk of having multiple websites saying the same thing. And all you were trying to do was move hosts.
Sales on the correct website
If a search engine bot is able to identify and crawl a secondary website, the search engine will start to index the page and deliver the search results to an end user. Which is never a good thing. Especially these days when we start talking about desktop and mobile traffic. Users on a desktop device might take notice of the website address and realize they are in the wrong place. However, not everyone knows different website environments and will consider the site they are currently using to be the “Production” or live website. The user will place a transaction on the staging site and will expect their products to be downloaded or delivered. Enabling password protection on your secondary site can prevent this from happening in the future.
This in itself might cause more issues down the line.If a sale is made on the Staging site, the same will not show on the Production site. The sale will also be incorrectly identified. Meaning the sales id could be #112 on the staging site, but the production site’s last sale was id #674839. Other things like remarketing, analytics tracking and email drip campaigns can also be missed as the staging site was not created to do the same things as production.
Hidden from Hackers
Having one website is enough to worry about. Not just the maintenance and execution of the site. High ranking websites are often seen as potential targets. Production websites are usually thought of as “Stable” and very unlikely to be exposed to a potential hack. Mainly because the code living on the Production environment has been tested and vetted by the team. Which is a great thing. A secondary website might not be so lucky.
There have been many cases where a new version of a WordPress theme or plugin has discovered a security issue and needs to be fixed. Well, if you installed the latest version of the theme or plugin, the secondary environment is now susceptible to an attack. Due to the code still being in place and the website being a front facing public entity. Enabling password protection will stop any hack attempt from happening on the front end of the website.
Setbacks to using Password Protection
Newton’s third law states “for every action, there is an equal and opposite reaction.” The same is true with enabling password protection. Requiring a username and password be entered in order to view the website can be tough enough. Especially if you’re running a team of more than a few people. Hopefully everyone is using a tool like a password manager and has access.
Another setback to using password protection is denying data to be delivered from one site to another. When using a WordPress plugin like Jetpack, users have the option of using the WordPress.com CDN and a feature called Photon. When enabled, all images inside of the media library are uploaded to the Photon CDN. When a page is loaded, WordPress loads the image from the CDN and not the media library. This is a practice commonly used to enhance page speed. However, when Jetpack is enabled on a secondary environment with password protection enabled, the images will not load on page. Your only option is to disable the Photon feature or remove the password protection.
Headless WordPress is another area where password protection can cause more harm than good. Headless WordPress uses the backend of WordPress plus the WordPress Rest API to provide a data endpoint. This data endpoint is used by popular Javascript libraries like React and Gatsby to build the front end of a website or application. If the website has password protection on, the front end of the website or application will not be able to show any content. This can be hazardous to teams when trying to debug an issue, fix an error or build a new feature.
It’s very important to understand that Password Protection is used to hide the content of a website from visitors passing through. Password Protection does not stop access to the server itself. A developer can use a SFTP program, the command line and deployment methods to manipulate the website files. If a hacker was to gain access to those credentials, the results could be detrimental to the environment, website and business.
Enabling password protection in the Hostdedi portal
You will need to login to the portal to enable password protection.
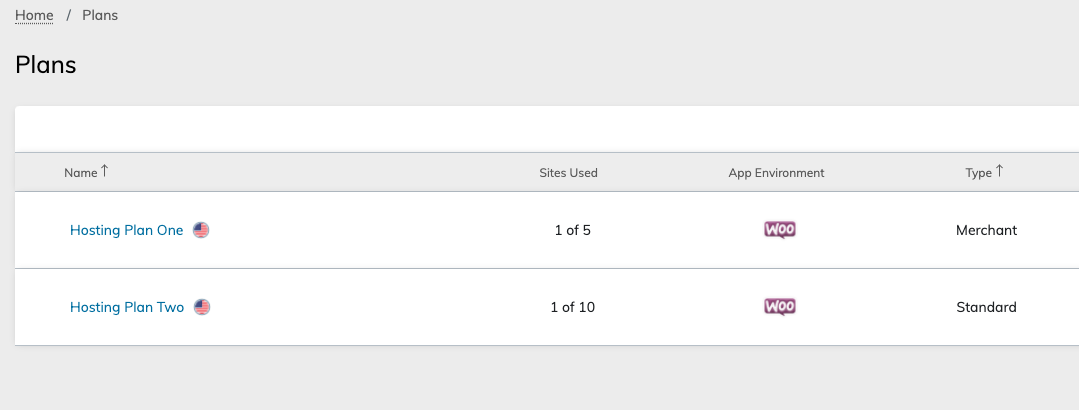
In the Hostdedi portal, click on the Plan tab to view your current hosting plans.
Click on the name of a hosting plan to access the plan dashboard.
Next you will see a list of websites installed on the plan. Click on the name of the website to access the site dashboard.
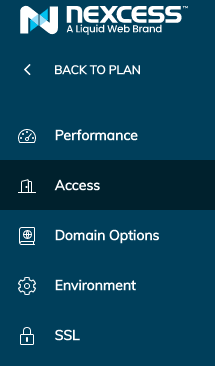
Once inside of the site dashboard, click on the access tab.
Once the table loads, you’ll see the section titled “Password Protection”.
There is a toggle switch customers can use to enable the feature. Customers are provided with the username on screen. Customers must click on View Password to retrieve the password to gain entry to the website. Customers can also reset the password at any time.
We’ve talked a bunch about writing tests for your WordPress code, but one thing we haven’t touched on yet is why you should spend the extra time and money to write them. If you’re a manager or business owner, why should your developers ship features a bit slower as they take time to write tests?
Testing as an Investment
Today we’re going to tackle that management question. I want you to start viewing testing practices as an investment instead of an expense to your business.
Reduce Regressions
How much do you like it when your site breaks? If you’re like me, you hate it. I’m betting that at some point you wonder how on earth your developer could break the site. They must be terrible…right?
Wrong.
They’re just human like you and they make mistakes.
Good testing strategies can stop your projects from breaking. When you’re writing code and running tests, a good test suite will show you when something breaks. Then you can fix it right away when the work is fresh in your head.
Good testing can also cut down on debugging as you fix issues. Instead of wondering where on earth a problem is happening in the code, a failing test can show you where exactly you need to look.
For those times you do find old bugs that break stuff, writing a test to catch this scenario means that in the future the code won’t break in the same way. No more chasing a bug around thinking you’ve fixed it. Good tests will tell you that the bug is squashed.
Deployments Are Easier
There was a time when I refused to deploy client sites on Thursday or Friday because I didn’t want to work on weekends. Two things fixed this issue. First, a repeatable deployment process let me know that I couldn’t mess things up with some silly FTP error. Second, writing tests let me know that my code didn’t affect anything else on my client sites that needed to work.
Now you’ll find me deploying code many times each day, even on Friday afternoon.
For clients, that means they don’t have to wait till Monday for a feature to release, if we get it approved on Thursday. My clients are happier because I can ship features as soon as they’re ready to go.
Changes Become Easier
Have you ever worked on a project where some portion of the code was a black box that one person knew about, but who didn’t work there anymore? You’re terrified that if you even think about touching this code you’ll awaken the Kraken and lose a month of your life as you wrestle a mythological beast back into submission.
Good testing stops this from happening.
When you have good test coverage, anyone can swap in and work on a part of your system. When anyone can work on the code in your project, you’ve decreased the risk to your business because you’re not reliant on that single developer who can manage the Kraken.
This also extends to changing out big parts of your system, like the database you choose to use. If you’ve got a good test suite written you can change the layers of your application independently and know that they’ll still interact properly because your tests pass.
Tighter Developer Feedback Loops
It’s far easier to fix issues that have just been created. Curtis of 6 months ago must have had no idea what he was doing, because I’ve seen that code and had no idea what was going on. Writing decent tests can prevent this from happening because you find those bugs as you’re writing code instead of stumbling across it months later. Instead of trying to find the same mind space you were in months ago, you’re sitting in the code, fully understanding it and ready to fix any issues that come up.
The Only Thing Developers Write Less of is Documentation
I’ve looked at lots of code in my career and spent lots of time trying to figure out what on earth is going on with some websites I’m working on. If there is one thing developers write less than tests, it would be good documentation. Sure many say it’s important, but very few write any documentation at all.
While I’d love to say you need to write both tests and documentation, I’d settle for tests because they act like documentation.
When I take over a project with tests I can easily jump into the project and start writing code without hours spent trying to figure out what is happening. I know that when I break something, the tests should tell me I broke something. If I find an issue later, I add it to the tests, thus adding to the documentation on how the code should be working.
Tests make it easier for any developer to pick up your project without you needing to worry that everything will get broken because they were not the ones that have worked on it since the start.
Improved Reputation
The reputation of your business is everything. If you have a reputation for shipping good work on time that doesn’t break, then you’re going to get more work. Testing can help you build this reputation.
Instead of breaking code as you “fix” things, you’ll see a failing test and fix it before the client knows there was an issue. Happy clients refer new clients, who can, in turn, become happy clients.
When you step back and think about it, your job isn’t to simply write code for customers. Your job is to write code that works to fulfill the needs of customers. When you add testing practices to your workflow you will be able to deliver on that better.
Your code will break less. You’ll be able to ship working features more often.
Your customers will be happier as you serve them better.
Stop making excuses and use testing practices to provide a better service to your customers.
Curtis is a husband, father, developer and business coach. He specializes in helping people build a business that lets them spend time with their family instead of working all the time.
When it comes to processing payments online these days, most people don’t even bat an eye. Shoppers are paying with credit cards, over email, and through Facebook, but for ecommerce sites, payment security risk aversion is integral to how they do business.
Here’s how to make sure that your clients’ sites are staying compliant, and what to do when you’re dealing with an out of date application that’s reached end-of-life.
What does it mean?
First of all, let’s get our heads around what PCI compliance even means.
Originally set by the major credit card companies, the PCI Security Standards Council formed these parameters for payment processing compliance to protect their cardholders from security threats and fraud.
Using a set of qualifications to determine the safety of a point of sale terminal or ecommerce website, these standards are now mandatory best practices between businesses who process card payments and their customers.
The standards for PCI compliance are as follows:
Install and maintain a firewall configuration to protect cardholder data
Do not use vendor-supplied defaults for system passwords and other security parameters
Protect stored cardholder data
Encrypt transmission of cardholder data across open, public networks
Use and regularly update anti-virus software or programs
Develop and maintain secure systems and applications
Restrict access to cardholder data by business need to know
Assign a unique ID to each person with computer access
Restrict physical access to cardholder data
Track and monitor all access to network resources and cardholder data
Regularly test security systems and processes
Maintain a policy that addresses information security for all personnel
For developers, a separate set of standards has been set by the PCI SSC to ensure websites are processing electronic payments securely:
Do not retain full magnetic stripe, card verification code or value (CAV2, CID, CVC2, CVV2), or PIN block data
Protect stored cardholder data
Provide secure authentication features
Log payment application activity
Develop secure payment applications
Protect wireless transmissions
Test payment applications to address vulnerabilities
Facilitate secure network implementation
Cardholder data must never be stored on a server connected to the Internet
Facilitate secure remote access to payment application
Encrypt sensitive traffic over public networks
Encrypt all non-console administrative access
Maintain instructional documentation and training programs for customers, resellers, and integrators
Maintain instructional documentation and training prog
Penalty fines for non compliance can range between $5,000 and $100,000 a month, and inevitably wind up being the merchant’s responsibility. Additionally, merchants can face steeper transaction processing fees, or even the inability to process electronic payments for their customers in the future for non-compliance.
What Developers Need to Know About PCI Compliance
Thankfully, payment applications and payment gateways have taken care of much of the technical side of ensuring that payments are processed securely. As a developer or site builder, your primary responsibility where PCI compliance is concerned is to ensure that your applications meet the PCI SSC’s standards and stay up to date.
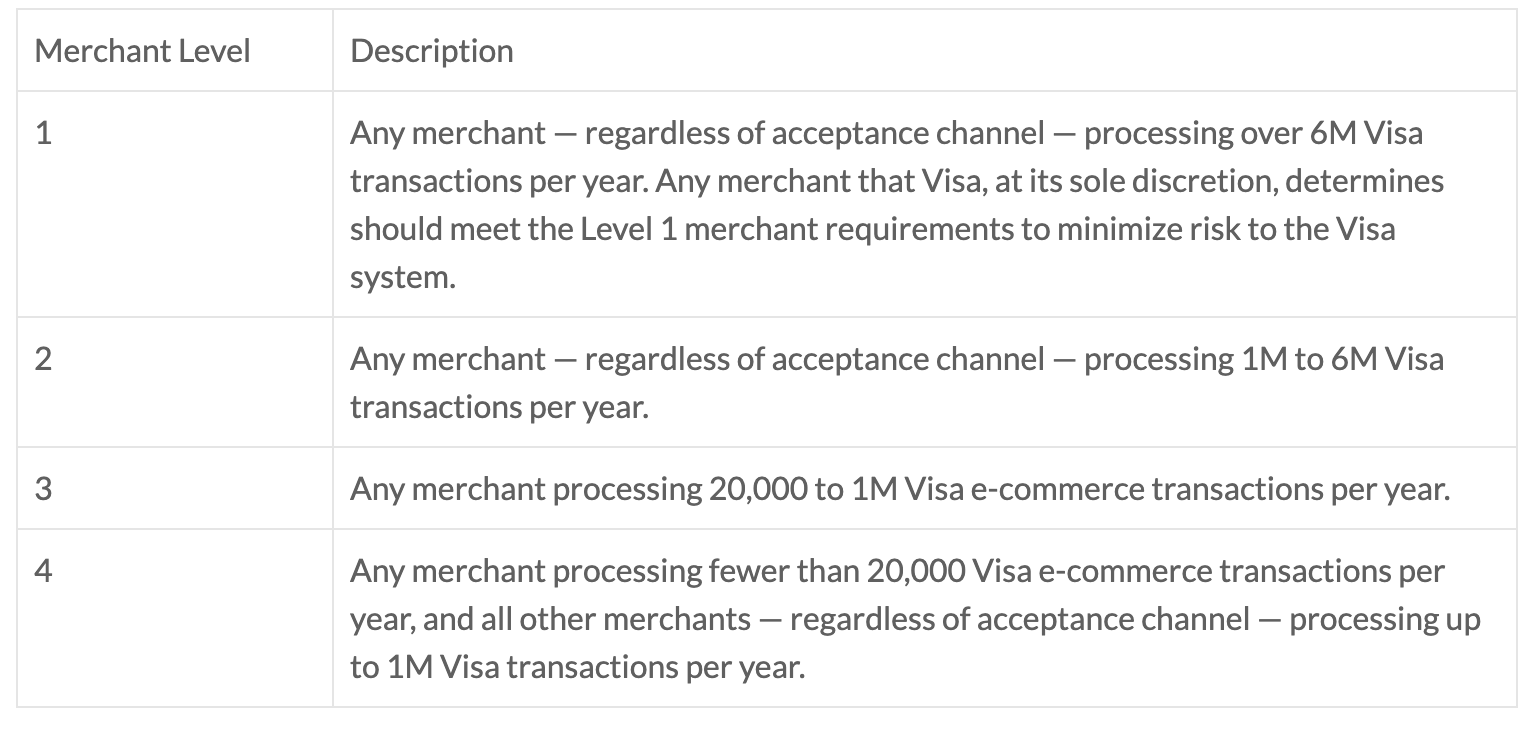
PCI compliance standards are determined by the volume of transactions which a merchant processes. The merchant is assigned a compliance level requirement based on the volume of business that he or she does, and the security of their sites may be tested by an approved scanning vendor, or ASV.
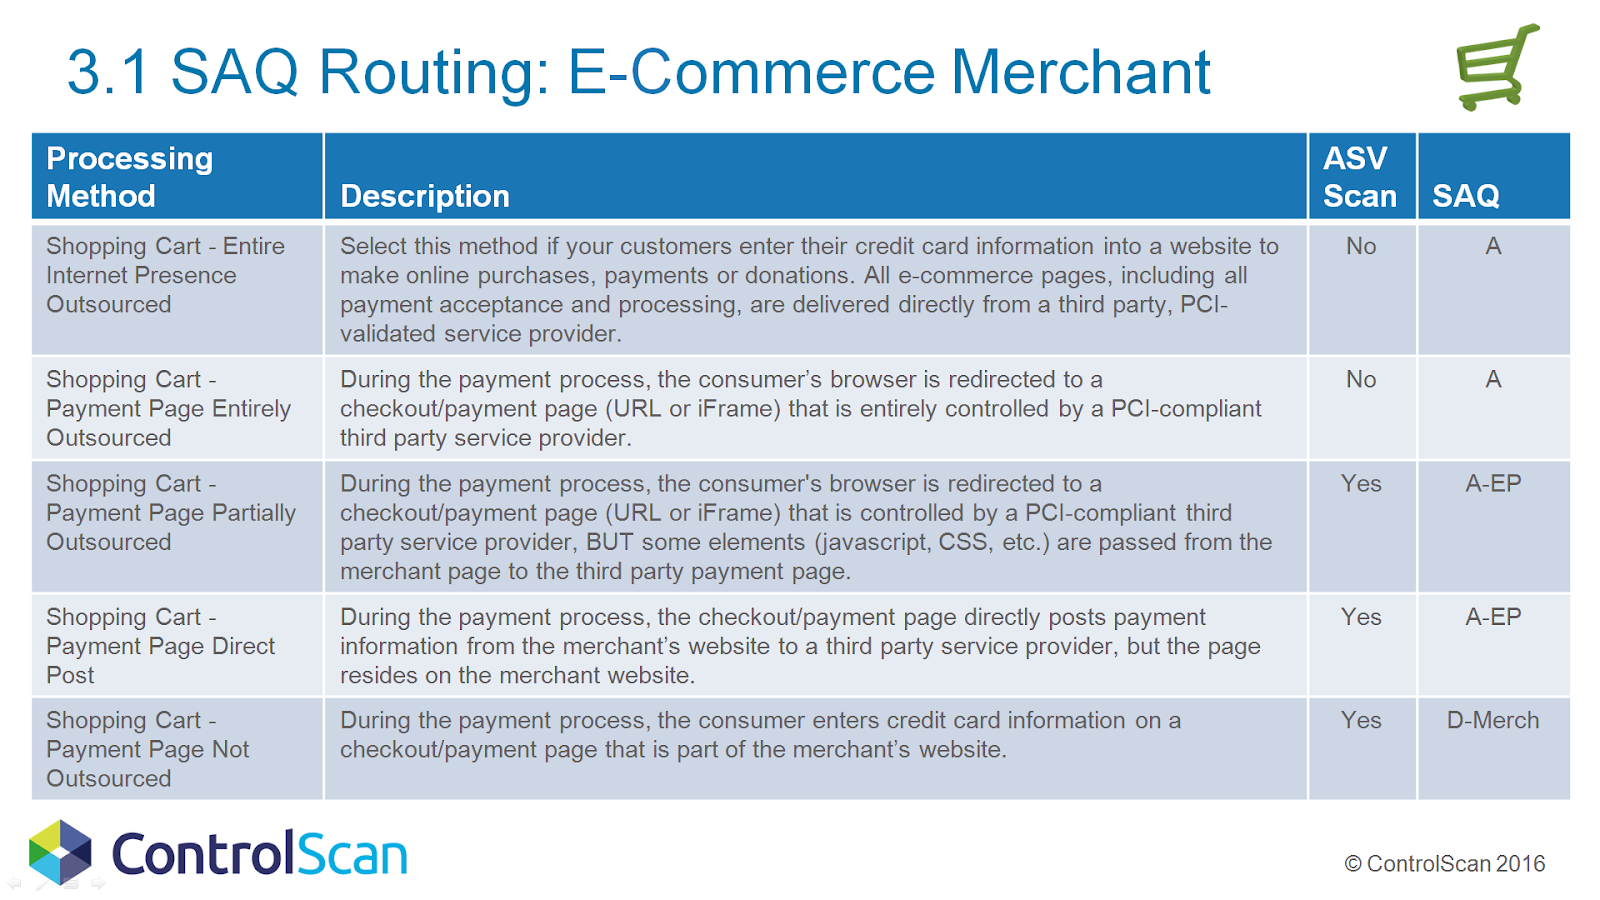
Ecommerce sites fall under PCI SAQ 3.1 and have the following standards:
Whether your client requires an ASV really depends on which payment processors and ecommerce applications you’re running their site on. These charts depict the flow of data, so that you can determine whether your client’s site will need an ASV or not.
The burden of site security is ultimately on the site administrator, which may be you. If that’s the case, the strongest prevention for noncompliance is pretty straightforward:
Make sure plugins stay up to date
Ensure that software updates and security patches get installed
Maintain stringent server security standards
Make sure ecommerce applications are up to date
What End of Life Means for PCI Compliance
Recently, Magento 1 reached end-of-life, putting thousands of ecommerce sites into a compliance grey area when Adobe stopped issuing official security updates.
While the ecommerce application itself represents only a small part of what PCI compliance truly entails, for merchants still running their ecommerce sites on Magento 1, the important thing to note is there will no longer be security patches and updates issued for the platform. They’re on their own unless they’ve invested in a solution like Hostdedi Safe Harbor.
This primarily applies to number seven in the list of PCI compliance measures for developers:
Test payment applications to address vulnerabilities.
With Magento no longer looking after security updates for Magento 1 users, it begs the question: can an ecommerce site be PCI compliant on an ecommerce application that’s reached end of life?
Yes. Hostdedi has done it with Safe Harbor.
What to Do When a Platform Reaches End of Life
Magento was built on Hostdedi servers. When Magento 1 started approaching end of life, our engineering team jumped to work developing a solution that would allow merchants to decide for themselves when to migrate.
For many Magento 1 store owners, making the move to Magento 2 in the wake of COVID-19 wasn’t financially realistic. Site migrations are expensive and complex, and with so much upheaval and uncertainty, many were understandably scared to make the leap.
So the engineering team at Hostdedi came up with a compromise. Hostdedi Safe Harbor was built to address Magento 1 end-of-life, keeping ecommerce sites and stores owners PCI compliant until at LEAST the end of 2021, so they can migrate on their own time.
With regular security patches made by the team who literally started with Magento, Hostdedi is able to keep Magento 1 sites and stores PCI compliant until they’re ready to make the switch.
End of life doesn’t have to mean the end of PCI compliance.
Click here to learn more about Hostdedi Safe Harbor, or open the chat window at the bottom right of your screen to speak to sales.
Destiny Hagest provides value-aligned copy and content that use marketing as a force for good. She’s a writer. She’s a consultant. But she’s also a consumer, and a person living on this planet. Destiny wants to see great brands achieve more market share. She wants to see you win.
5 things you need to start thinking about now, so you can implement before holiday shopping starts this fall.
In February of 2019 I launched my first ever crowdfunding campaign where I was able to raise enough capital to manufacture goods in China and ship them to the US to start my board game company.
While this took a lot of planning to pull off – it actually made the launch of my first game incredibly easy. So easy, I thought I was forgetting something the entire time but it turned out I could actually just relax and let my marketing automations do the work for me.
Today I want to share how you can use the same strategies to automate your sales and marketing for the Black Friday/Holiday shopping weekend and make money without stressing yourself out.
Design Landing Pages
First things first: design any landing pages. Landing pages are a way to highlight products & content specific to a campaign, sale, or interest. Not all stores need landing pages but if you have certain products heavily discounted it’s worth putting them all on one page so visitors can view the best deals, get interested in your store, and then start adding things to their cart.
Unless you only have one or two key products, landing pages are one of the best places to send your fans. And if you plan on doing any advertising or newsletter blasts (hint – you should be thinking about both of these) then a landing page is one of the best places to send them. And it’s why you should start with this a month or so before the sale.
Create Tracking Links
I’m a big fan of tracking & measuring everything possible so that I can figure out what worked and in future years double down on the strategies that made me money and ignore the ones that didn’t work. And since each industry is so different in ecommerce what makes perfect sense for one industry may not work at all in another so you will have to try various strategies and learn and improve each year.
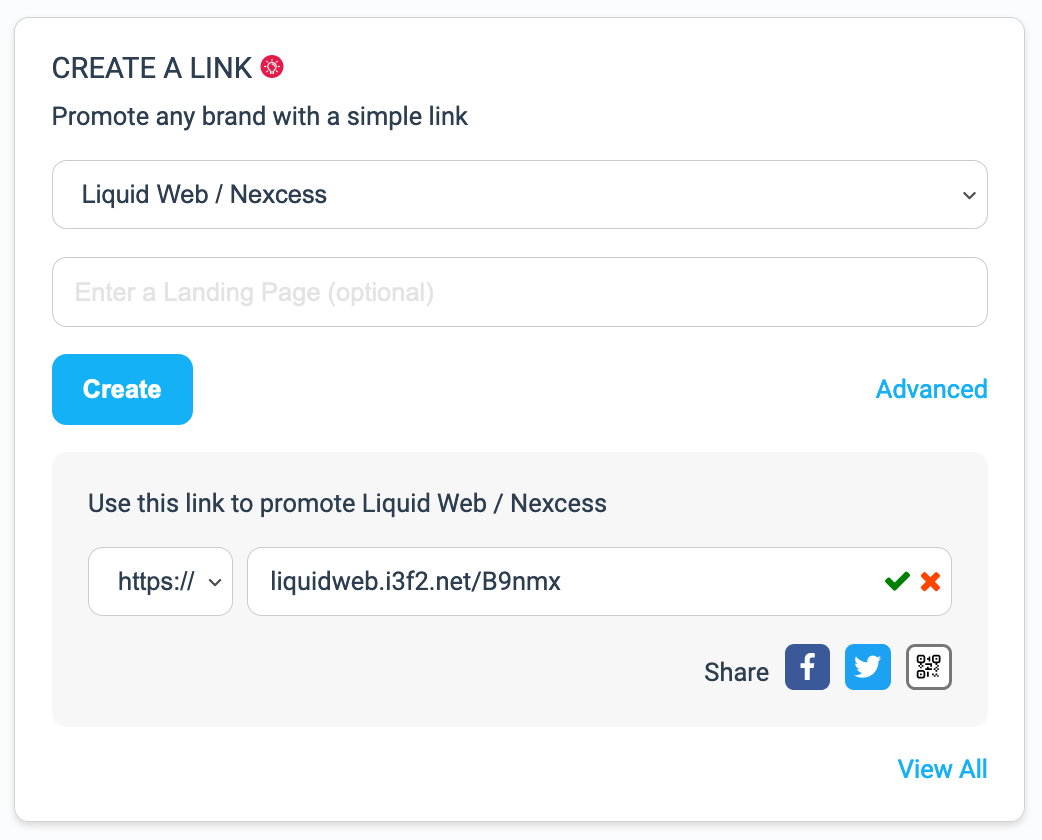
One of the ways to monitor this is with UTM parameters. You can create UTM parameters using a generator for any campaign you’re running and in tracking software like Google Analytics you can see where people are coming from.
As an example I created custom links for all of the influencers who made videos about my products. And while many of them sent over dozens of people who ended up purchasing the product one of the influencers only had one confirmed sale.
In future years I wouldn’t use this influencer again. Since my product is only $15 getting one sale isn’t worth all the admin time spent emailing back and forth and sending them a demo product.
Here’s a few custom links you could create for your site:
Links from Twitter
Links from Facebook
Links from your newsletter
Links from influencers
Links from forums / discussion groups
Links from your email signature
Etc.
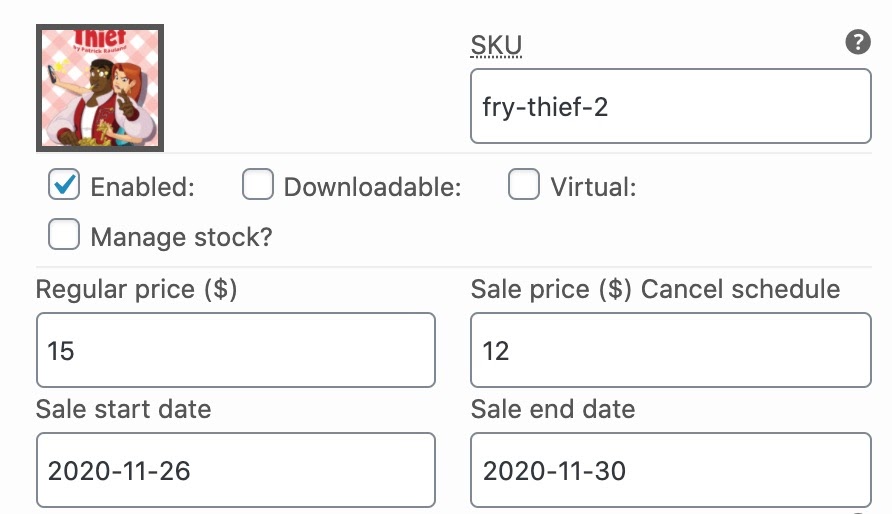
Schedule Sale Prices
Once you have all of your landing pages & links set up it is time to schedule the sale prices. Whether you use WooCommerce, Magento, BigCommerce, or another online store just about all of them let you schedule both the start & end of sale prices.
Here’s what it looks like in WooCommerce.
If you’re doing a storewide discount, discount an entire category, or other more complicated setups, this isn’t typically included in the core software but there’s almost always apps, extensions, and modules that let you do this.
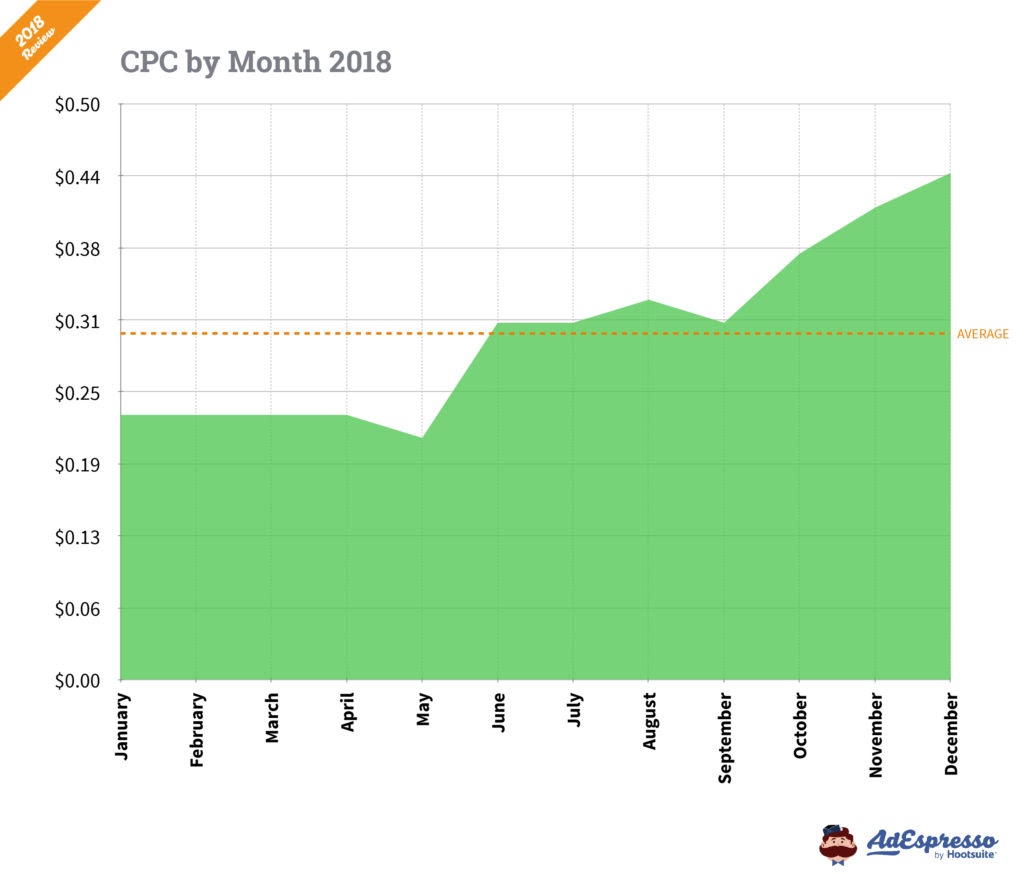
Plan Your Ad Strategy
Every retailer knows that Black Friday is one of the biggest sales opportunities of the year and many retailers go all out with advertising right before Black Friday. That means ad prices soar right before Black Friday so you’ll quickly find your self spending more than you make if you don’t plan in advance.
One of my favorite strategies is to come up with new ad concepts in spring, A/B test them throughout the summer, and wind them down in the fall. When Black Friday comes around you can retarget your existing audience which is far cheaper than targeting new people who are probably overwhelmed by the amount of ads and will be unlikely to trust a new company.
If you haven’t started ads and you’re reading this today, there’s still plenty of time. Get some ads out there next week and start building your audience so you can retarget them down the line.
Schedule Email Blasts
You have landing pages, tracking links, and all of your products are discounted. Now comes arguably the most important piece. Letting people know!
And yes, you can and should announce things on social media & on your website but today we’re going to talk about your #1 asset and that’s your email list.
These are easy to schedule in any email marketing tool. And what you want to do is setup a bunch of emails and you can send them to segments of your email list based on how active & how much they spend on your store.
Here’s what’s coming on Black Friday (7 days ahead)
Here’s what’s coming tomorrow (1 day ahead) – For people who regularly open your emails
Black Friday is here (Black Friday)
Don’t Forget Black Friday (Saturday) – For people who didn’t open yesterdays email
Don’t Miss the Best Sale of the Year – For people who have made multiple purchases
And you can create even more than this and if you have a large list with even more data you can continue segmenting your list and writing emails for those segments.
Preparation is Key
At the end of the day it’s all about coming up with a plan. Almost all of the tools out there have scheduling functionality so once you make a plan, write a few emails or lines of ad copy go ahead and get it scheduled.
I planned my crowdfunding campaign for 6 months and raised $10,000 off a non-existent product. With a few months to go you have plenty of time to build your audience, come up with attractive deals, and let your audience know about those deals.
Good luck!
Patrick Rauland is obsessed with ecommerce. He’s built ecommerce websites for clients, worked for WooCommerce doing support, development, product management, and helped plan their yearly conference (WooConf).
In 2020, DTC ecommerce has proven to be another sensible way to reach your customers, and many brands are looking at starting from B2B and transitioning to direct to consumer.
Those of us working in ecommerce have been seeing the shift for a while now. As more and more stores transitioned their inventory online, the ecommerce boom wasn’t just happening – it was inevitable.
Fast forward to spring of 2020 though, and NOBODY could have predicted what happened next.
Massive store closures triggered the single largest exodus from brick and mortar the world has ever seen, with more than 100,000 small businesses in the US alone closing for good as a result of the COVID-19 shutdowns.
But small businesses weren’t the only ones to take a hit. Larger retailers like Neiman Marcus have filed for bankruptcy in the last few months, and that list continues to grow.
All things considered though, the pandemic has thrown into sharper relief the need for a stronger ecommerce presence for many of these retailers. Record-breaking numbers are rolling in for ecommerce for 2020, including a growth spurt that put the industry four to six years ahead of schedule.
The Problem With Wholesaling During COVID-19
Even in spite of many shoppers setting their sights online, manufacturers saw major hits to their B2B sales as brick and mortar stores shut down. Those relying on wholesale relationships to float their revenue took devastating hits in the midst of the shutdowns.
As consumers turned to ecommerce sites like Amazon though, the fallout continued. In mid-March, Amazon restricted their B2B purchasing of nonessential goods in the wake of unprecedented demand for household staples.
As Amazon made room in their warehouses for hand sanitizer and toilet paper, purchase orders for nonessential goods rolled to a trickle or stopped completely, and manufacturers saw B2B sales plummet.
In the scramble to recover these revenue losses and brace for a potential second wave of retail shutdowns, many manufacturers are turning to DTC ecommerce models.
What Is DTC and a DNVB?
DTC stands for direct-to-consumer. It’s an ecommerce model wherein the brand sells directly to consumers, rather than through retailers, essentially cutting out the middleman. Some DTC evangelists will tell you the goal is to handle production, sales, distribution, and marketing under one roof and never go wholesale, but in 2020, it’s proven to just be another sensible way to reach your customers, and many brands are looking at starting from B2B and transitioning to DTC.
A DNVB is a digitally native vertical brand that starts this way. Best typified by brands like Avocado Green Mattress and Allbirds, DNVBs typically start with a simple product line (typically one or two options), clear, crisp branding, and a strong mission-driven component.
With brick and mortar sales remaining unstable and manufacturers now dealing with the fallout from their Amazon backlogs, DTC ecommerce is looking more attractive all the time – and consumers are taking notice, too.
Mission-Driven Shoppers Are Fueling the Fire
Interestingly, DTC brands are creating evangelical customers and devoted fan bases centered around two things:
Amazing products
A unifying brand mission
Consumer data shows that millennials now make up the majority of buying power in the US, and are 63% more likely to purchase from a brand because of their mission and values.
This data, coupled with the boom the DTC sector has seen from innovative consumer goods startups has created a replicable business model that’s looking all the more attractive to manufacturers who entered the industry through wholesaling.
Four Components of a Successful DTC Ecommerce Site
Over and over again, we see brands killing the game in DTC ecommerce, and the best of them have a few things in common:
Clean branding. Visually-driven shoppers respond to powerful messaging and clean logos. Brands like Tushy and Anese are leading the pack with memorable branding that leaves a mark in a saturated market.
Smooth UX. At Hostdedi, we know that an ecommerce site’s performance is directly linked to its ability to generate revenue. The best DTC ecommerce sites have an intuitive layout, load fast, and have a smooth interaction with their shoppers.
Simple product lines. They say simplicity sells, and that’s certainly the name of the game in DTC ecommerce. Strong DTC brands typically have one or two flagship products they make their mark with and expand on.
Strong missions. The data supports that today’s consumers are more conscious of their purchasing decisions than ever. Making your mission clear and building your brand around it (instead of as an afterthought) will literally win you more sales, and good karma.
Is It Time for You to Go DTC?
If COVID-19 has taught us anything in ecommerce, it’s that you can’t have enough backup plans. Diversifying how and where you sell your products makes all the sense in the world. Those high-volume retail POs may seem nice for a while – until they vanish, and your revenue vanishes with it.
Build resiliency, connect with your customer base, and get in on the thrill that is DTC ecommerce. Talk to one of our experts today about what it would take to get your brand online and selling DTC.
If a product in your ecommerce store has global appeal, start thinking about a plan for shipping internationally. Shipping overseas isn’t the same as shipping within the country.
Here’s a primer on the customs issues, international shipping costs, and other logistics you’ll manage as you begin shipping around the globe. Keep in mind that there’s rarely universal truth in international shipping. Get individualized quotes for your own products so you know how much it’ll really cost.
What is international freight and what is the cheapest international shipping?
Since shipping overseas is usually more complicated than domestic shipping, international freight logistics can present some unique challenges for eCommerce businesses. Some companies specialize in international freight and handle the logistical challenges for you.
For small orders sent to your customers, you probably won’t have to think too much about customs issues. Even if you do outsource this process entirely, however, it’s worthwhile to learn more about how international shipping works for your products. You’ll be more adept at troubleshooting and improving your shipping processes.
Shipping domestically can be very straightforward. You pay a single amount and your package gets delivered. But costs associated with international shipping may include the following:
Customs charges
Customs brokerage costs
Ground transportation
Maritime transportation
Air transportation
When you ship, you’ll need to choose a carrier to transport your package for you. There are three different types of carriers, and they all work a bit differently. They also frequently work together. Even if you choose one of these, it’s possible that your carrier will contract out part or all of the shipping to another one on this list.
International Carrier
If you choose an international shipping carrier such as FedEx or DHL for the entire route, some or all of your shipping costs may be rolled into your postage. International carriers are responsible end-to-end for shipments and generally permit more visibility across the entire process than a national carrier working with a shipping partner would.
This option may be more expensive than the other two and doesn’t necessarily allow you as much flexibility, but it’s likely a simpler and less time-consuming choice.
National Carrier
A national carrier handles your packages within a specific country. They may not provide service outside that nation’s borders, or they may contract with local carriers to transport packages through other countries. You can work directly with a national carrier, but you’ll need to ensure that someone is still transporting the packages once they leave national borders.
One example of a national carrier is the United States Postal Service (USPS). USPS has international reach by working with local partners to transport your packages. When a partner is delivering a package, USPS may not allow as much visibility into the shipping process which means you may not have access to much information when you ship internationally.
For a small package that only weighs a few pounds, choosing a national carrier might be cheaper than your other options. Larger or heavier packages may be better off with an international carrier or freight forwarder.
International Freight Forwarder
A third party can organize the handoff between USPS and the final carrier while also handling any customs issues. This is what an international freight forwarder does. They have permission from you to take on freight and have their own agents handle the customs and shipping logistics along the way.
You could use multiple carriers and arrange the logistics yourself but in practice, this may be too complicated and time-consuming. That’s where outsourcing can make sense. For example, you may decide to ship a package from within the U.S. to the Canadian border through USPS, then have another carrier take it from there.
Cheapest Way to Ship Internationally
Shipping to other countries is not just one process. There’s so much that depends on the country. To send your products overseas, consider the end country destination and plan accordingly.
Consider these country-specific sections for more information. This is just a starting point, so be sure to do your own research just to be safe.
Cheapest Way to Ship to Canada
Shipping to Canadian consumers can be complex. Although you generally shouldn’t have a problem shipping to most Canadians, Canada is a diverse country with a variety of different shipping arrangements and options. Some Canadians live in very isolated, rural areas that may make shipping a more expensive process while others are in urban areas with an abundance of affordable shipping options.
Retailers must be prepared to work hard in order to win Canadian customers. Having convenient shipping is a good start. Whatever you can do to make purchasing from you easier is probably worthwhile.
Online purchases made by Canadians do incur customs duties and other taxes, and paying these is the responsibility of the buyer. Although these costs are not coming out of your own pocket, you should know that these expenses do directly impact how much your shoppers can spend with your business. By keeping costs for your customers low, you could even offset some of these expenses and make it more likely that you’ll win their business.
Besides import costs, Canadians also pay sales taxes for their province and a Goods and Services Tax (GST) to their federal government. GST represents 5% of the total. Local sales taxes bring this amount higher.
If your products are relatively cheap, you probably won’t lose business because of import duties. Recent updates to customs processes and costs mean that Canadian customers ordering from American businesses are exempt from paying customs costs on purchases up to $150 CAD, with some exceptions. This is up from the previous $20 CAD limit set in 1985. The old $20 rules still apply with items shipped through Canada Post, so keep in mind the larger limit only applies to private carriers such as FedEx.
When you ship to Canadians, you have a lot of options.
Shipping Options for Sending Items to Canadian Buyers
Canada Post, the national postal service, is one great option for retailers. You can also use FedEx, UPS, DHL or Purolator. Here’s where you may also want to consider Canadian geography when you’re shipping. Some of your customers may live in isolated communities and you may need to account for longer shipping times. As a result, some carriers such as FedEx, have different policies within Canada. FedEx Ground ships in four days or less within the US, but in Canada, takes up to seven days for shipments.
You can use an individual carrier or use a multi-carrier shipping option that hands off packages to a new carrier at the border. Although the usual U.S. carriers you’re probably familiar with are available, the additional choices you gain within the Canadian border may be worth it. Purolator, for example, is known for reliable next-day shipping by 9 a.m. and 10:30 a.m. to Canadian addresses. When shipping packages, having this option available to customers may be a helpful selling point.
Cheapest Way to Ship to the U.K.
In the U.K., eCommerce businesses have several options for shipping within the country such as the Royal Mail and DHL. You also have UPS international, FedEx, and even USPS international shipping. Shipping to the U.K. can be an expensive venture with a USPS Small Priority Mail Flat Rate box costing $36 and a Large Flat Rate box costing $94. Your costs will certainly be higher than shipping domestically, but that doesn’t mean shipping to the U.K. is completely cost-prohibitive for retailers.
Imported goods need to follow the U.K. guidelines. Some of this may involve more work and recordkeeping on your part unless you outsource part or all of this process.
You should find out if you’ll owe Value Added Tax (VAT) and have to collect it for your customers. Many eCommerce sellers are required to create their own VAT registration and request information from customers to help with location verification and tax reporting — even if you’re not based in the U.K.
These rules may change. At time of writing, the U.K. was planning to leave the European Union which could result in different policies.
Cheapest Way to Ship to Australia
When you’re shipping to Australia, you have several options. You can use an international carrier such as UPS, FedEx, or DHL. You could also use USPS. With Flat Rate International options available, you can reduce your costs for shipping a package to Australia.
Customs costs may not be as much of an issue for you if your products are valued at less than $700 — which is about the minimum taxable amount for Australians who are buying products online and having their purchases shipped. GST imposed by the Australian government applies for more expensive purchases.
If you use a freight forwarder or shipper, they’ll provide a Self-Assessed Clearance (SAC) Declaration for the Australian government when your package arrives at the border. Otherwise, you’ll be responsible for providing the SAC.
Cheapest Options for International Shipping
You can streamline your international shipping and save money by creating a process. If you want a game plan for how you’ll ship internationally when orders arrive, take the time to decide in advance which countries you’ll be selling to, and create a system for taking care of shipping. As your business operations grow, you may need a more formal internal process for packaging and shipping including designated job descriptions for team members you have in charge of the process. For automated or outsourced shipping, plan how you’ll transport packages to the carrier, or sign up for a pick-up service.
Your cheapest overall option may be outsourcing your shipping to a service such as Parcel Monkey or Easyship. These services can take advantage of volume discounts on international shipping and pass the savings along to you. In some instances, this can cut half of your shipping costs.
Before you make any shipping decisions, carefully consider your options and find out what every shipping service has to offer for your business and your customers.
Choosing the Best International Shipping Service
Business owners should shop around and consider several important factors when looking for the right shipping service. Start with an example order and calculate the cost and options offered by several different carriers.
Before you make a list of carriers to compare, you may want to consider what you’ll need in a package shipping service. Specifically:
Product categories you ship
Countries you ship to
Countries you plan to ship to later as your business grows
How much of the regulations and customs process you need to outsource
See how every option stacks up against the others and note any questions or concerns you have for further research. Of course, you’ll also want to compare:
Price
Arrival time
Convenience for your customers
Shipping experience for you
Every time you ship internationally, you have the option of using one single carrier or using a multi-carrier shipping option.
Automating Your Shipping with the WooCommerce Shipping Plugin
If you’re using WooCommerce, a shipping plugin can help you ship more efficiently. Balance multiple carriers along with a busy array of incoming orders and have costs calculated for you. A variety of different plugins are available with various features designed to make shipping calculations easier and enable quick comparisons among carriers.
With a plugin, your site can calculate shipping rates accurately and provide customers with multiple choices. This feature allows you to provide different price points and shipping times so buyers can make their own decisions.
Once you’ve automated your shipping, your online store can run with less guesswork and greater simplicity for both you and your customers.
Founded 20 years ago, Hostdedi managed platforms have always provided agencies with the ability to deliver the site experiences their clients expect. Built on the four pillars of speed, security, scalability, and service, our solutions are designed to help your website realize its potential. Visit Hostdedi.net today and see how we can help.