CAll Us: +1 888-999-8231 Submit Ticket

Why ModSecurity Should Be Your Web Application Firewall

Why Modsecurity

ModSecurity helps to protect your site from a variety of attacks by matching up known attack patterns and identifying anomalies. Here’s what you need to know about the web application firewall and how it protects you.


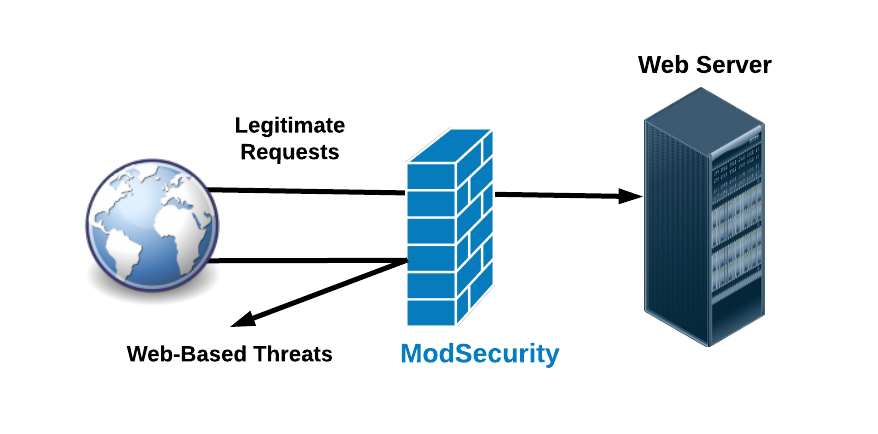
What Is ModSecurity?

ModSecurity is a web application firewall designed to protect against web-based threats (we’ll come back to these later), including:

  • Brute-force attacks
  • SQL injection
  • cross-site scripting

ModSecurity works by detecting and blocking requests that match signatures of known attack patterns and/or through the use of anomaly scoring. On occasion, ModSecurity may misinterpret a legitimate user’s actions as a threat. Such users will usually encounter a 403 “Forbidden” HTTP status code.

Diagram of How ModSecerity works

Finding The Issue

The first step to identifying mis-sent 403’s is investigating your website’s error logs. If these logs indicate your site blocked a legitimate request, ModSecurity may be the cause. Resolving the issue is usually a matter of confirming the blocked request was indeed legitimate, then either adding a whitelist or adjusting ModSecurity’s ruleset to prevent it from blocking similar legitimate requests in the future.

If we host your website, and you don’t have the time or resources to investigate, our support team can do it for you. Just open a ticket through the Client Portal, and we can examine your logs, determine the cause, and apply one of our application-specific rulesets. These rulesets help ModSecurity better recognize legitimate users, and include Magento, WordPress, and other platforms featured on our website.

Brute-Force Attacks

Brute-force attacks attempt to access your site’s admin panel with fast, repeated attempts to guess the password. This method follows a consistent pattern. First, the password is entered into the login form, then sent to the server. If the attack succeeds, the server rejects the password, and content management system (CMS, like Magento, WordPress, and so on) returns an unauthorized token, which redirects the user to the login page. Brute force attacks repeat these login attempts at a furious pace and continue until they succeed, or are detected and stopped.

When the web server notices a high rate of failed logins, ModSecurity blocks the IP address attempting to log in. However, our settings require a relatively high number of failed password entries before perceiving those attempts as a brute force attack. If you are a legitimate user struggling with a password, you will come nowhere near this threshold.

SQL Injection

ModSecurity uses a similar technique to derail SQL injection, a common form of attack that attempts to exploit vulnerabilities in an application to insert a malicious SQL statement into your database. These statements normally run automatically as part of database operation. If successful, these attacks can change or disclose your data without your knowledge, or even destroy such data.

SQL injection usually inserts these statements into entry fields, such as those requesting usernames or passwords, and require a security vulnerability that allows user input to be unexpectedly executed as an SQL statement. While the technical details are beyond the scope of this entry, it’s enough to know that ModSecurity resists these nefarious activities.

Cross-Site Scripting (XSS)

In cross-site scripting (XSS), malicious users inject scripts into the HTML of vulnerable websites. When an unsuspecting user clicks the compromised content, the script gains all permissions attached to that user’s system. With this method, attackers can learn login credentials, upload viruses, and even gain administrative access.

ModSecurity intervenes by detecting and blocking requests that attempt to exploit this class of vulnerabilities.  

ModSecurity Alone Isn’t Enough

Like any security system, ModSecurity cannot credibly claim perfection. It will, however, make you a harder target. Combined with other best practices like prompt installation of your application’s security patches, a strong password policy, cautious deployment of plug-ins, and two-factor authentication for admin access, ModSecurity plays a key role protecting your website.


For help getting the most of ModSecurity, or for general inquiries, please contact our 24/7 Support Team by email or through your Client Portal.

Posted in:
Hostdedi

Source link

Upgrade PHP for Free in Your Client Portal

speed up your site upgrade to php 7.2 for freeLike any reputable web host, we keep our software house in order. First and foremost, this means using the most current stable releases whenever possible. We advise our clients to do the same.

For our clients, the rub is that some applications refuse to “play nice” with the most current stable release. Although older software can solve compatibility issues, it’s critical to know the bare minimum standard and choose accordingly. While older software can be useful, it can also expose you to security vulnerabilities and performance deal-breakers.

Technology changes fast, sometimes frustratingly so. PHP is no exception. Like all software, PHP generally deploys new versions more quickly than some software developers are ready to support them. If you’re a Hostdedi client, we offer the flexibility of changing PHP versions at will, which allows you to take advantage of newer PHP releases as they become compatible with your other applications. See the “Change Versions Without Hassle” section for details.

A Brief History of PHP

Initially launched in 2005, PHP version 5 is already well past its prime. Subsequent releases offered incremental performance improvements, and version 5.6 (August 2014) is currently the only supported version. Both it and the newer PHP 7.0 will reach end-of-life (EOL) at year’s end, but more on this later.

PHP 7.0 saw release in December 2015, delivering fundamental changes and improvements to the PHP interpreter. PHP reported a 50 percent speed increase over the version 5.6. Other enhancements included significantly reduced memory usage, improved exception handling, consistent 64-bit support for modern operating systems, and the removal of many old and unsupported SAPIs and extensions.

Following the success of PHP 7.0, 7.1 and 7.2 were released in 2016 and 2017, respectively. As with previous releases, each one further increased performance. As time of publication, PHP 7.3 is in beta release and expected to be available as a stable release in late 2018.

Stay Current to Stay Healthy

Each new version of PHP offers multiple benefits over its predecessor.

Improved Performance. PHP 7 is at least twice as fast as PHP 5.6 for most applications. This has been proven in numerous benchmarks and white papers, and switching your site to PHP 7 usually doesn’t require modifications to your code.

PHP 7 also has a smaller memory footprint, which means more available memory, better performance, and more concurrent visitors on your website – all on the same hardware.

Even if your site is incompatible with PHP 7.0 or later, even moving a very old version of PHP 5 to PHP 5.6 will grant noticeable performance benefits.

Security. At the time of writing, PHP 5.5 and older are considered end-of-life. They have no further active development, and no one is working to patch critical vulnerabilities. If your website is running PHP 5.5 or earlier, you are exceptionally vulnerable to attack, and this exposure will only grow over time.

PHP 5.6 and 7.0 are currently in a security-support-only state. This state contains no active development but still benefits from patches for newly found vulnerabilities. It is important to note that both PHP 5.6 and 7.0 will be also becoming end of life at the end of this year.

PHP 7.1 and 7.2 are both in active development, with 7.2 being the most recent stable release. PHP 7.2 will will be both supported and patched until November of 2020.

Modern Software Compatibility. While most older applications written for PHP 5 can be moved to PHP 7.X without issue, newer applications tend to require at least PHP 7.0. If your site requires PHP 5, you’re missing out on features and extensions written exclusively for PHP 7, often compounding the issues of poor performance and compatibility.

Look Before You Leap

In many cases, changing your site from PHP 5 to PHP 7 will be seamless. However, older software that relies on functions deprecated between version 5 and 7 will cease to function properly after the change.  

Before changing your PHP version, check the software creator’s website for a list of compatible PHP versions. In some cases, additional patches are available to make a given piece of software compatible with a newer PHP version.

At the time of publication, most modern releases support PHP 7.0 and 7.1. With PHP 7.2 being the newest stable release, some applications have yet to achieve full compatibility.

Change Versions Without Hassle

Our hosting plans have multiple PHP versions installed and available, including PHP 5.6, 7.0, 7.1, and 7.2. In addition, existing Classic (non-Cloud) plans also have PHP 5.3, 5.4, and 5.5 available for legacy reasons.

If you’re a Hostdedi client, you can change your environment’s PHP version at will through your Client Portal. As stated above, this change is not entirely without risk. This is why we require our clients to manually change their PHP version, rather than perform such changes on their behalf.

We strongly advise against the use of anything below PHP 5.6. It is no coincidence PHP 5.6 is the minimum supported version on our Hostdedi Cloud plans, and all newly created accounts are automatically set to PHP 7.1, which serves as a solid compromise between modern compatibility and security. When newer PHP versions become available and more widely compatible, we will bump the default version higher.

The Road Ahead

We recommend all clients check their current PHP version by using one of the two methods provided in the “Changing Versions Without Hassle” section. If you’re not already running at least version 7.1, we strongly encourage you to explore the feasibility of upgrading to it. If your software does not support 7.1, upgrading EOL versions to 5.6 will still be beneficial. If you have compatibility concerns, feel free to contact our Support team at [email protected] or through your Client Portal.

We also are developing a plan to identify and assist clients that remain unaware they’re running an EOL PHP version. In the near future, we will begin upgrading clients those versions to at least version 5.6. This plan will test sites for compatibility before placing that site into an update queue, and we will communicate with these clients throughout the entire process. We will provide further details as they become available.


Brad Boegler is director of system operations at Hostdedi. With over a decade in systems administration, he oversees our internal systems and was the author of The Definitive Guide to Optimizing Magento 2.

Posted in:
News Releases

Source link

5 Steps to a Successful Website Migration

5 steps to a successful website migrationWebsite migrations can be scary, but they don’t have to be. Here are 5 steps for making your moving experience as seamless as possible; starting from knowing what you need to back-up, and finishing with full DNS propagation and your new hosting solution going live.

It’s not every day you decide to change hosting providers or upgrade your solution. If you’re with a high-quality provider and haven’t had any problems, you may only ever do this a handful of times as your site grows. When you do decide to go through with a migration, you will likely go through the five stages below.

  1. Backing up your website
  2. Moving your website’s data
  3. Testing the new website
  4. Migrating your DNS
  5. Enjoying your new hosting environment

We believe in seamless website migrations for everyone, which is why we’ve put together 5 steps for making sure your site migration is as easy and relaxed as possible.

You may be moving somewhere new because you were unhappy with your old provider but don’t rush. Canceling your old hosting provider before completing a migration can mean days or weeks of downtime, depending on how complex your migration is and whether you encounter any issues.

Unless your old hosting provider engages in daily backups and maintains them after you leave, you could lose your entire site. Even if you do have a backup, your SEO value can plummet, and a whole host (pun intended) of other problems can occur.

A good Migration should mean consistent site traffic. Not a sudden drop or decline.

Good Traffic Results from a migrations

A good migration

Bad Traffic Results from a migrations

A bad migration

That’s why we always suggest making sure to…

One of the first things you should do during a migration is to create a local backup of your website. Despite everyone’s best intentions, technology doesn’t always go to plan and a small database corruption can cause issues.

If you haven’t canceled with your previous provider, they may still have backups located on a third-party server. Hostdedi offers daily hosting backups and archives them for 30 days. In most cases, you can use these backups to restore your site. However, it’s always a good idea to make sure you have a local one as well.

If you’re coming from a hosting provider with a cPanel interface, you can head to the page ‘Backup’ in your control panel. Here you’ll be able to download a copy of your “public_html” directory (which contains most of your site information). You can also grab a backup of your MySQL database too.

Hostdedi provides full backups through our control panel. Click on Backups -> Backup Now, and then click continue. You can also select to only perform a partial backup if you prefer.

How to backup your Website for a Migration

Most hosting providers will have an easy to access backup feature available. If you can’t find one, get in touch with their support team.

“No, I don’t need to check. It’s ready, let’s go live,” is something every migration expert dreads hearing.

Going live without testing a site after a migration is like playing a game of Risk and not knowing what pieces you’ve got in play. While there’s a chance everything will work out well, there’s also a chance something will go wrong and you end up stuck with nowhere to go but start over.

A short checklist of what to test includes:

There may also be things you should check specific to your site. If you’re an eCommerce store, for instance, you may want to test the checkout process.

Do this by heading to your domain registration control panel and then “Domain Name Servers”. From here you’ll be able to see what your nameservers actually are.

Find Out Your Nameservers

If you’re interested in checking this out on your own machine, open up a command prompt and enter

dig +short NS yoursite.com | sort.

If you’re using the Hostdedi DNS service and have successfully repointed your domain, you should see at least one of those below:

ns1.nexcess.net

ns2.nexcess.net

ns3.nexcess.net

ns4.nexcess.net

ns5.nexcess.net

ns6.nexcess.net

ns7.nexcess.net

Ns8.nexcess.net

If you don’t then don’t panic. It may be that you’re with an alternate DNS provider. It can also help to know how far along the path to full website migration you are (if you’re not the one in charge).

Remember that DNS record changes can take 12 to 24 hours, so don’t be surprised if this information doesn’t change immediately after you’ve altered your DNS. Just like with our first point, don’t cancel your old service before your new one is good to go.

Once you’ve changed your DNS, you’re going to want to let it complete propagation. You shouldn’t experience any downtime during this period, but you will want to make sure that you don’t make any changes to your site.

There’s nothing worse than posting new content during the propagation cycle and finding you’ve lost it the next day.

If you’re interested in checking the status of your DNS propagation, try the Hostdedi DNS checker to see how far it’s gotten.

Making Migration Easy

Remember, Hostdedi offers free migration assistance on all of our solutions, meaning that making the switch from one provider to another couldn’t be easier. We make migrations easy and seamless.

Posted in:
General

Source link

Mission Critical Environments

This week’s 30-minute session was with Doug, the Hostdedi data center facilities manager, covering everything you need to know about mission critical environments. He began by saying that maintaining reliability and security for mission critical environments is… mission critical. He then took marker to wall to expand on that.

What are Mission Critical Environments

Mission critical environments are hosting environments integral to the consistent and reliable running of a data center. This primarily includes servers, but data centers need to maintain other elements too.

  • Infrastructure (buildings)
  • Redundancies (backup generators, etc)
  • Tools (disaster recovery, maintenance)
  • Other unknowns that may be a danger to reliability and uptime.

Factors Important to Mission Critical Environments

For mission critical environments to remain stable, professionals have to ensure the stability and security of onsite equipment. A few of the factors that are most important for doing this are included below.

Disaster Recovery

In the event of a disaster, your data center should have a disaster recovery plan ready. A good disaster recovery plan will minimize downtime and ensure your site is back online as soon as possible after a disaster event. This can include, but isn’t limited to:

  • Backup generators
  • Infrastructure features
  • Tools for solving problems
  • Trained onsite staff

Preventative Maintenance

Prevention is the best cure, and nowhere is that more evident than with data centers. Waiting for something to fail, whether it’s a server, power supply, or something else, is a recipe for reduced uptime and low-quality hosting.

Preventative maintenance means keeping an eye to ensure that hardware and infrastructure remain operating at full capacity with failing elements replaced before they become a problem.

Risk Management

Managing risk takes place everywhere, but it is no more critical than in a data center facility. As indicated above, risk is something to be avoided and finding a solution before a risk becomes a problem is a top priority.

Redundancy

Redundancy includes backups used if primary sources of power, connectivity, or something else go offline. For data center facilities trying to maximize uptime, redundancies are crucial. In many cases, data centers do not have control over when something goes wrong. Redundancies can help to mitigate any issues that arise.

Design mission critical environments for these things

Final Thoughts

Keeping mission critical environments secure and reliable is one of the most important tasks in a data center and involves looking at what might go wrong and finding the best way to prevent it. Thanks to Doug for showing us some of the ways in which that is done.

Want to know more about how we maintain mission critical environments? Contact our sales team.

Posted in:
General

Source link

What Are Clusters? Whiteboard Wednesday With Jason

This week’s Whiteboard Wednesday saw Jason, one of our hosting infrastructure experts, take marker to wall with an introduction to clusters: what they are, how they work, and why they may be right for you. Here’s our summary of what Jason’s 30-minute session revealed.

What Are Clusters- Explained FullWhat Is a Cluster?

A cluster is an enterprise level hosting solution that provides the necessary infrastructure for high traffic sites that need flexibility. They manage this by spreading the hosting load across what are called nodes. This increases performance and improves concurrent user capacity.

How Does a Cluster Work?

As already covered, Cluster’s work by spreading incoming requests and hosting load across several different nodes. These nodes are also known as web application servers and they primarily store your website.

How do Server Clusters work diagrame

A load balancer is responsible for making sure that the nodes and their content are managed and served accurately and quickly. By using multiple nodes, server clusters are able to eliminate single points of failure and increase the availablity of a website beyond that of other single server hosting solutions.

In addition to nodes, clusters can also include a range of other add-ons and elements. These include, but aren’t limited to:

  • Additional Web Application servers
  • Fileserver
  • Database
  • Caching server
  • Search server
  • Staging server

How Does Load Balancing Work?

Think of load balancing like the line into your favorite venue. There are a lot of people wanting to get in but there isn’t enough capacity inside. The venue is your website.

Instead of trying to get as many people into the venue as possible – causing a cramped and less enjoyable experience – you start to split each of those lines up and send them to different parts of your venue (send them to different nodes).

If you still find the venue filling up, then it’s very easy to expand the size of your venue. This means that you’re not restricted by a set number of nodes and add-ons, and can keep expanding as much as you need to meet your capacity requirements.

Final Thoughts

Clusters are a great option for larger businesses with sites that need to meet high-volume traffic requirements and reliability standards. They are also flexible and capable of growing with your website and your business.

If you like the flexibility of Clustered hosting but don’t think you need such a large solution, why not explore the promise of our cloud solutions.

Posted in:
Web Hosting Basics

Source link

The Right Way To Add Custom Functions To Your WordPress Site

WordPress is rightly famed for the vast array of plugins and themes it makes available to site owners. If you want to add a feature to your WordPress site, you will almost certainly find a plugin that does the job.

But, on occasion, you may find yourself in need of a minor tweak or piece of bespoke functionality that isn’t available as a plugin. The solution is to add a snippet of custom code to the site. WordPress is a PHP application and WordPress plugins and themes are written in the PHP programming language. As a WordPress hosting client, you have access to the same hooks and tools WordPress developers use.

You don’t even have to be a PHP expert to do this. There thousands of pre-made snippets around the web that you can adapt to your own purposes. Take care though, there are security implications to adding code to your site and badly written code can stop your WordPress site from working altogether. Make sure you know what a function does and that it is compatible with your version of WordPress before you add it to your site.

Once you have discovered the need for a function and written it from scratch or adapted a prewritten function, where should you put it?

There is a wrong way and a right way to do this. If you do it the “wrong” way, your function may work initially, but it is likely to stop working when you update your site.

How Not To Add Functions To WordPress

The two most common “bad” ways to add functions are editing an existing plugin or editing the functions.php file.

Don’t edit plugin files. If your snippet changes the functionality of a plugin, it might seem sensible to add the new code directly to the plugin. But, when you update the plugin, the files you have changed will be overwritten and your code will disappear.

The functions.php file is not a general purpose dumping ground for custom code. The functions.php file belongs to your theme. If the code you want to add is theme-specific, then functions.php is a good place to put it. But, when you switch themes, the new theme will not have the custom code. Avoid putting general-purpose custom code in functions.php.

The Right Way To Add Custom Functions

There are a couple of ways to add custom functions that will last beyond your next update or theme switch.

The Code Snippets Plugin

The Code Snippets plugin is designed for exactly this purpose. It provides a graphical interface for adding code snippets to a WordPress site. You can add as many snippets as you want, enable and disable them easily, and export them in a format that can be imported into other WordPress sites with the Code Snippets plugin.

Build A Custom Plugin

You might find the idea daunting, but it is not difficult to build a custom plugin that can be installed on a WordPress site alongside third-party plugins.

The basic structure of a minimal plugin looks like this:

  • A folder with the same name as your plugin, e.g. my-plugin. This is not essential but it’s useful if you want to add more files in the future.
  • A PHP file inside that folder called my-plugin.php

In the my-plugin.php file, add the following text:

<?php
/*
Plugin Name: Example Plugin
*/


That is essentially all you need to create a plugin, although it won’t do anything yet. To make it useful, you need to add your custom function to the PHP file and then upload the folder to the plugin directory of your WordPress site, usually wp-content/plugins/.

If you need to add new functions, you can simply overwrite the old version with your changes.

For more information about creating custom WordPress plugins, take a look at the Writing a Plugin guide in the ever useful WordPress Codex.

Posted in:
WordPress

Source link

Five Tasks That Will Keep Your Store Running Smoothly

Like any complex piece of software, Magento requires a bit of maintenance every now and again. As your store evolves and your business grows, new products and customer accounts are created and deleted, extensions and themes are installed or modified, and the general day-to-day operations of the store leave their mark.

Diligently maintaining your store will ensure that it remains secure, fast, and reliable as the years go by. In this article, I’m going to focus on five of the most common tasks that Magento store owners should add to their to-do lists.

Applying Security Patches

The Magento teams regularly release security patches that fix vulnerabilities in the software. The patches are released shortly after vulnerabilities are discovered by Magento’s developers or security professionals. If you don’t install patches soon after they are released, your store may be vulnerable to attacks by criminals and to data theft.

We advise Magento store owners to monitor the Magento Security Center, which publishes the details of patches as they are released. If you are unsure how to apply a patch, take a look at our Knowledge Library article How to patch your Magento store.

Find and Fix 404 Errors

404 is the HTTP response code that web servers send to browsers when they can’t find the requested resources. Over time, you will move or delete product and content pages from your Magento store. If you aren’t careful, links from other pages on your store will be broken, resulting in 404 errors when shoppers try to visit them.

404 errors create a poor user experience and too many can have a negative impact on a store’s standing in search results. It’s a good idea to regularly use a tool like Screaming Frog’s Broken Link Checker to find and fix any 404 errors on your store.

Log Rotation

Magento logs information about what happens on a store in the database, including customer activity, orders, visits, and more. That information can be very useful, but the logs grow over time and can take up a lot of space and degrade database performance.

Magento can automatically remove stale logs, but this capability is turned off by default. If you want Magento to automatically clean its logs, find out how to turn on log cleaning in our guide to Magento database maintenance.

Backing Up

If your Magento store is compromised by bad actors or damaged by human error, it is easy to restore it from a backup. But if you don’t back up, incidents of this sort can be catastrophic.

Magento 2 has a built-in backup system that you will find in the dashboard under System -> Tools -> Backups. You can choose to backup the whole store with “System Backup”, the database and media, or just the database.

It is a good idea to perform regular system backups and to move the resulting files off your Magento server to a safe location.

Flushing The Image Cache

Magento caches product images in a dedicated cache. The Catalog Image Cache can sometimes become very large over time as new products are added and old products are deleted. Flushing the cache (removing the images) can free a large amount of disk space.

You will find the cache controls in the Magento 2 admin menu under System -> Cache Management. At the bottom of the Cache Management page is a button that will flush the Catalog Image Cache.

If you choose to flush the Catalog Image Cache in this way, there is likely to be a performance impact as Magento regenerates the cache of existing product images. You may prefer to only remove older cached images with a command such as this:

 find /path/to/magento/media/catalog/product/cache/* -type f -mtime +180 -exec rm -f {} ; 


As always, make sure you understand exactly what this command does before running it.

With regular maintenance, your Magento store will remain fast, secure, and reliable as your eCommerce business grows. Don’t forget, our expert Magento support team is on-duty round-the-clock to answer your questions.

Posted in:
Magento

Source link

Does Your WordPress Theme Meet The Official Standards?

Themes in the WordPress Theme Repository could be used by hundreds of thousands of WordPress hosting clients. The official WordPress themes have over a million active users. A popular free theme like Sydney is used on over 200,000 sites. If a theme in the official repository has compatibility issues or security vulnerabilities, many thousands of WordPress sites are affected.

The WordPress team wants to catch problems before they are pushed out to thousands of websites, so every theme undergoes a battery of tests before being allowed onto the repository.

The tests are carried out by the theme review team, which maintains a list of standards. A WordPress theme does not have to comply with these standards, but if it doesn’t it will not be allowed on the repository, one of the reasons it’s a good idea to get free themes from the repository rather than from developer’s websites.

In the past, reviews were done manually, but since April 2018 much of the process has been automated with the Theme Check plugin. Developers will be familiar with automated testing, and the Theme Check plugin applies the same process to WordPress themes, allowing the review team to carry out thousands of tests with the click of a button.

The Theme Check plugin is available to theme developers and WordPress users who want to check whether their theme sticks to the rules.

WordPress Theme Standards

The theme review team wants to make sure that its requirements are implemented in every theme in the repository. The requirements cover a wide gamut that includes coding, accessibility, proper use of WordPress hooks, ensuring that all expected files are present, and more. You can see a full list of the requirements here.

In addition to the requirements, there are recommendations. The theme reviewers would prefer for themes to implement the recommendations, but they are not necessary for inclusion in the repository. The theme review team also maintains a complete list of recommendations.

Using The Theme Check plugin

The Theme Check plugin carries out thousands of tests for the requirements and recommendations, and additional informational tests to point out minor coding and formatting errors.

The plugin can be installed on the Add Plugin page of your WordPress site’s admin area. When activated, it adds a Theme Check entry in the Appearance section of the admin menu.

From the Theme Check page, WordPress users can run the tests on any theme installed on their site. Thousands of tests are run almost instantly and the results displayed as a report on the same page.

For this article, I ran the tests on the official Twenty Seventeen theme, and as you would expect it passed the requirements tests with flying colors, with only a recommendation and a couple of informational notices.

If you aren’t a theme developer, may never need to install the theme check plugin, but it is good to know that it’s available if you ever want to run a test on your WordPress site’s theme.

Posted in:
WordPress

Source link