CAll Us: +1 888-999-8231 Submit Ticket

Doing Product Pages Right – Hostdedi Blog

How much effort have you put into your product page? Yes, I know you found information and images from the manufacturer and added them. Sure, you named the product and maybe if you were really working on good product pages, you took an extra picture of the product in use to highlight what it really looks like to your customers.

But I know most ecommerce sites don’t even go that far.

About 10 years ago I worked in retail and one of my jobs was to add products to our site, but only after everything else was done and if the boss couldn’t find anything extra for me to do. This was shortsighted and meant that they didn’t see much business from their online store. But if you don’t put any effort into your product pages, the natural outcome is little traction with your site.

It’s important to remember that your online users can’t touch your product. They can’t ask a salesperson a question or get specific feedback on how the product worked for someone they can talk to. Customers are reliant on the information you provide them to help them make a purchase.

Today we’re going to talk about how to design a great product page. Remember, from the product name to the reviews, your product page is a landing page. Its job is to sell your products to your customers.

Product Name

If your product page is a landing and sales page, then the first thing you need to look at is the name of your product. This is the title of your page and you should spend just as much time thinking about this as you would for any blog post you want to rank well in search engines. The more descriptive your product name is, the better it is, at least up to a point.

We’ve all seen ridiculously keyword-stuffed Amazon product titles. We want to use a descriptive product name, but not crossover into the realm of these overloaded titles.

Take a look at these Mpow headphones on Amazon.

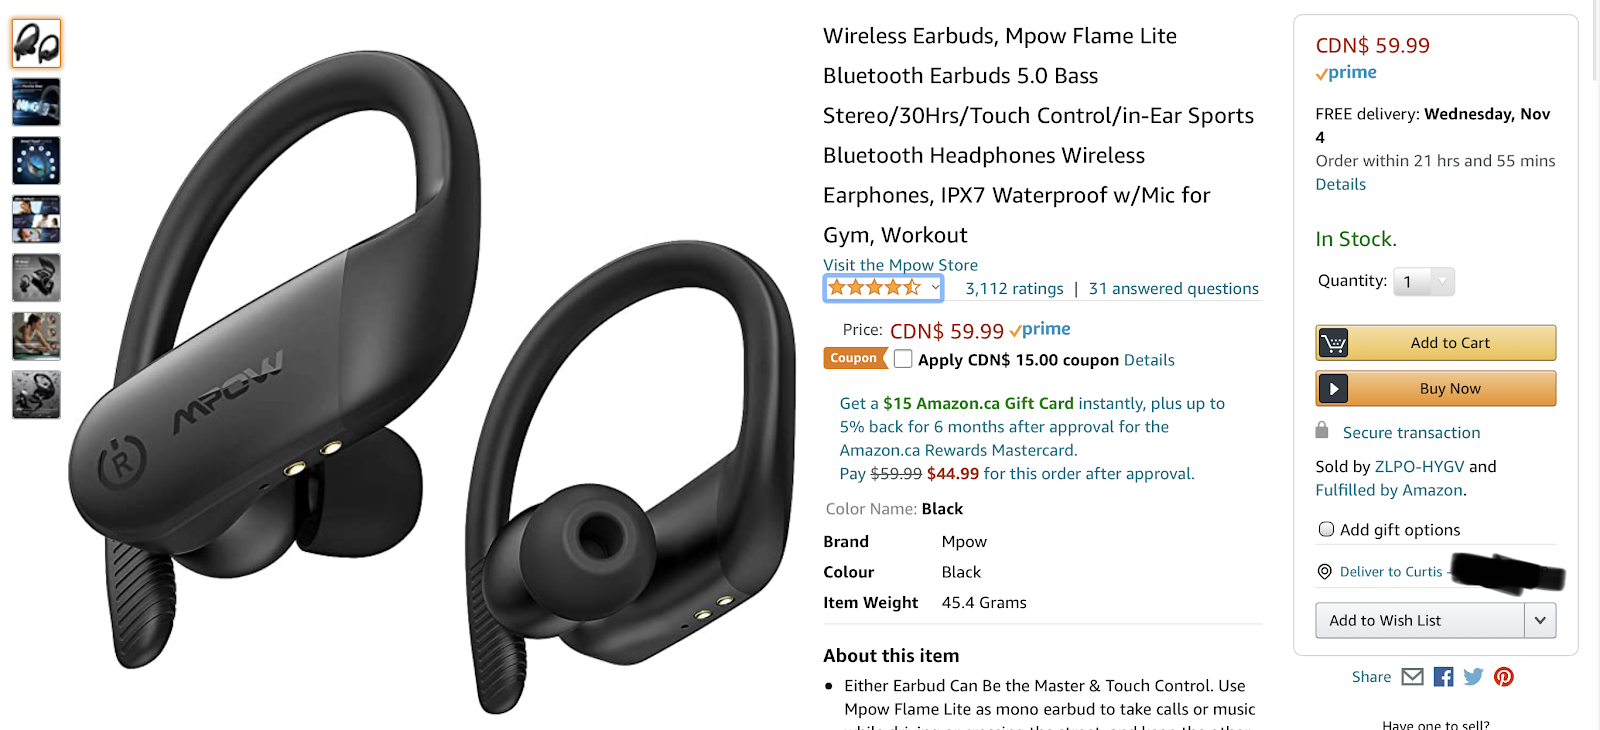
If you’re looking for waterproof Bluetooth sports headphones with controls on the headphones, the title is a great match. I think it’s getting close to being a bit long, but just by reading the product name, you get a summary of all the features that the headphones provide.

When you’re looking at your product names use the Google Keyword Planner to investigate what terms are ranking well for your product. Use these terms to help you craft a well-optimized title that will bring customers to your landing page.

Description

When it comes to your product description, the first thing to ask yourself is “what questions will myom customers have”. A description that answers your customer’s questions poorly will mean they make a purchase they’re not happy with. Then they’ll want to return it, and you may get a poor review on the product.

According to Nielsen Group, 20% of missed purchases were because a product didn’t have the information a customer was looking for in the description. If users don’t see the information they’re looking for in your product description, they’re going to turn to Google. That means you risk having them find the product at a better price elsewhere. Making your customers search to get more information is just like losing the purchase and all future purchases from your customer.

As you write your product description ask yourself what questions the customer will have about your product? Your goal is to answer the questions and deflate the objections that customers will have so that they feel confident in their purchase.

Good product descriptions are jargon-free. They’re not heavy on marketing text, but are to the point and clear. If you’re talking about 5 different feature highlights, use bullet points so that readers can scan to get the information they need quickly.

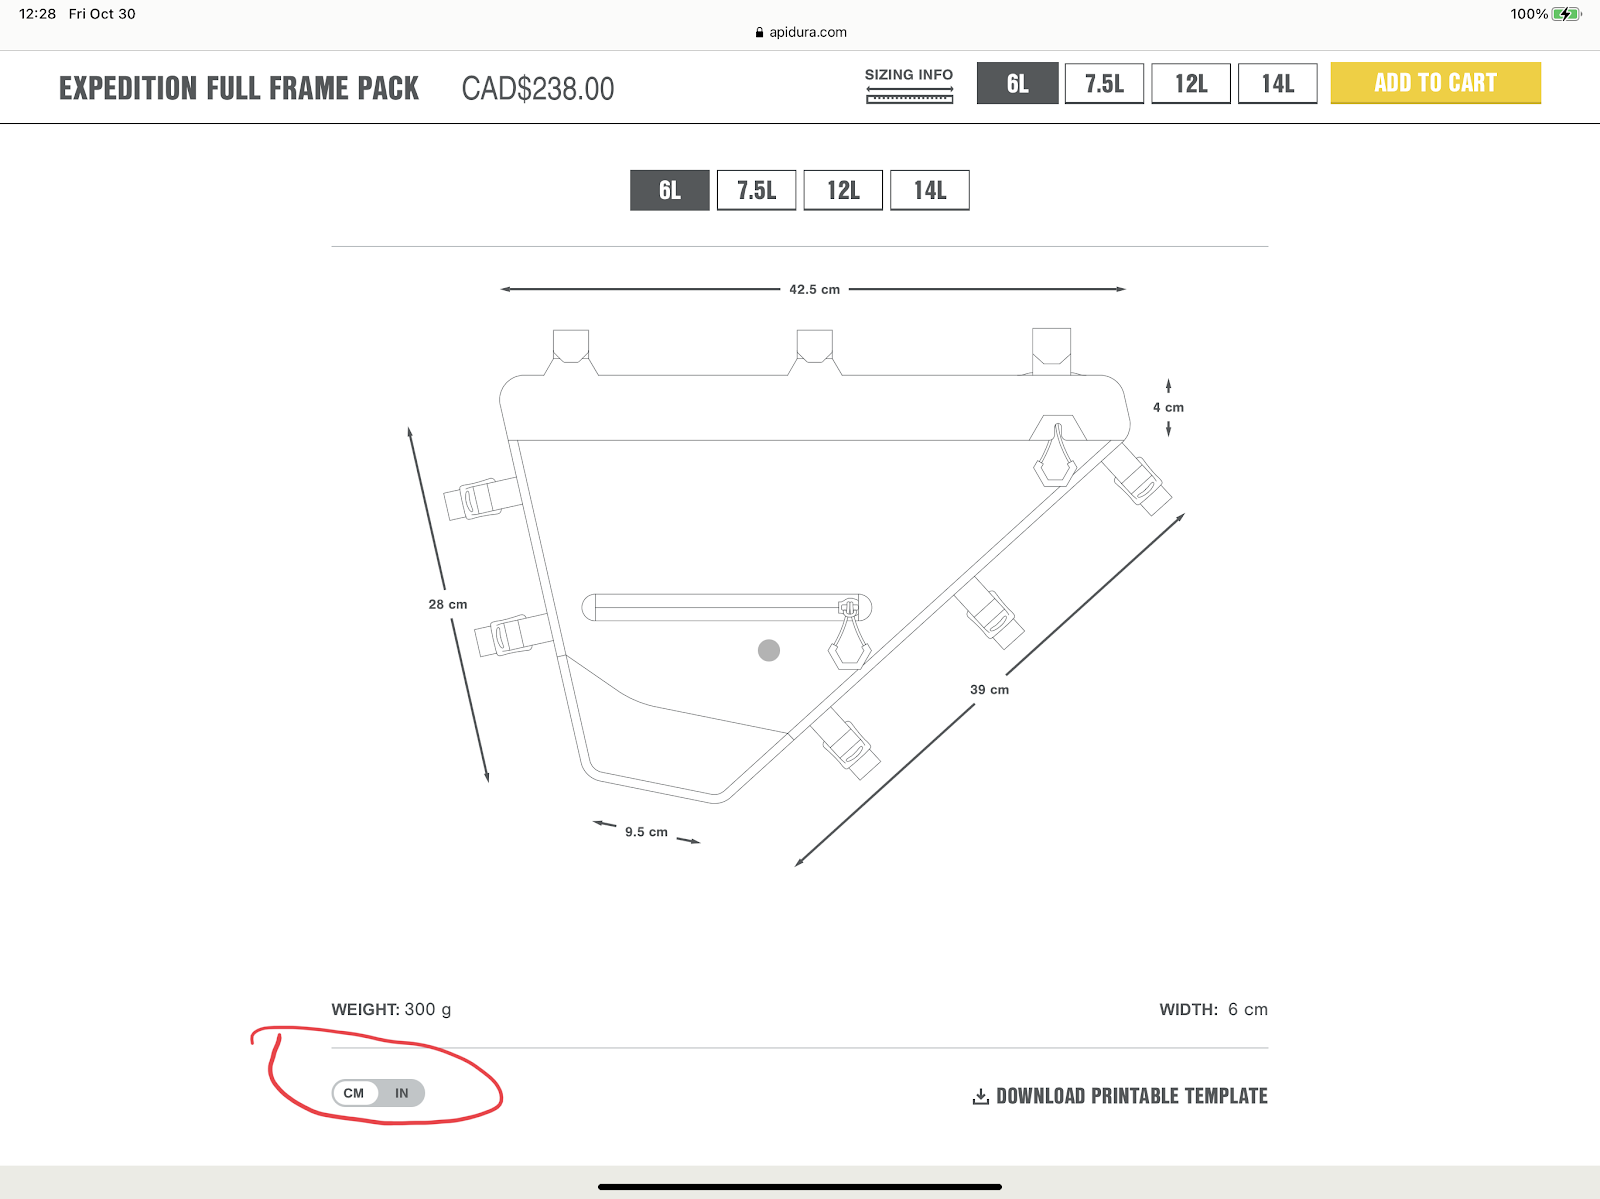
If you’ve got many of the same types of products, say dishwashers, then take the time to standardize the language across suppliers. Don’t list measurements in inches for one product and then centimetres for other products. Standardize on one method, or if you deal with international clients let them choose what measurement they want to see. You can see a great example of this with Apidura Cycling bags. They let users change between inches and centimetres for their bag measurements. This puts their users in control.

Product Images

After your product name and description, it’s important to focus on the images you provide to your customer. Remember, they can’t touch the product. They can’t tell how big it is, or exactly what shade of blue it is. They are relying entirely on you to provide this information with your images.

There are two ways to go with product images. You can choose to use a backdrop with other stuff that matches the product, or you can go with a flat white version. Keep the style consistent including the dimensions used with the final images. I think the best option is to have a combination of both of these options.

Bellroy is a great example of both methods combined. They show you several images of their products on a flat white background. They also add it with known items, like physical bills and blank cards that are the same size as credit cards. You get to see high-quality uncluttered photos to judge colour and texture, then clean photos that help you get an idea of the size of items you’re looking at.

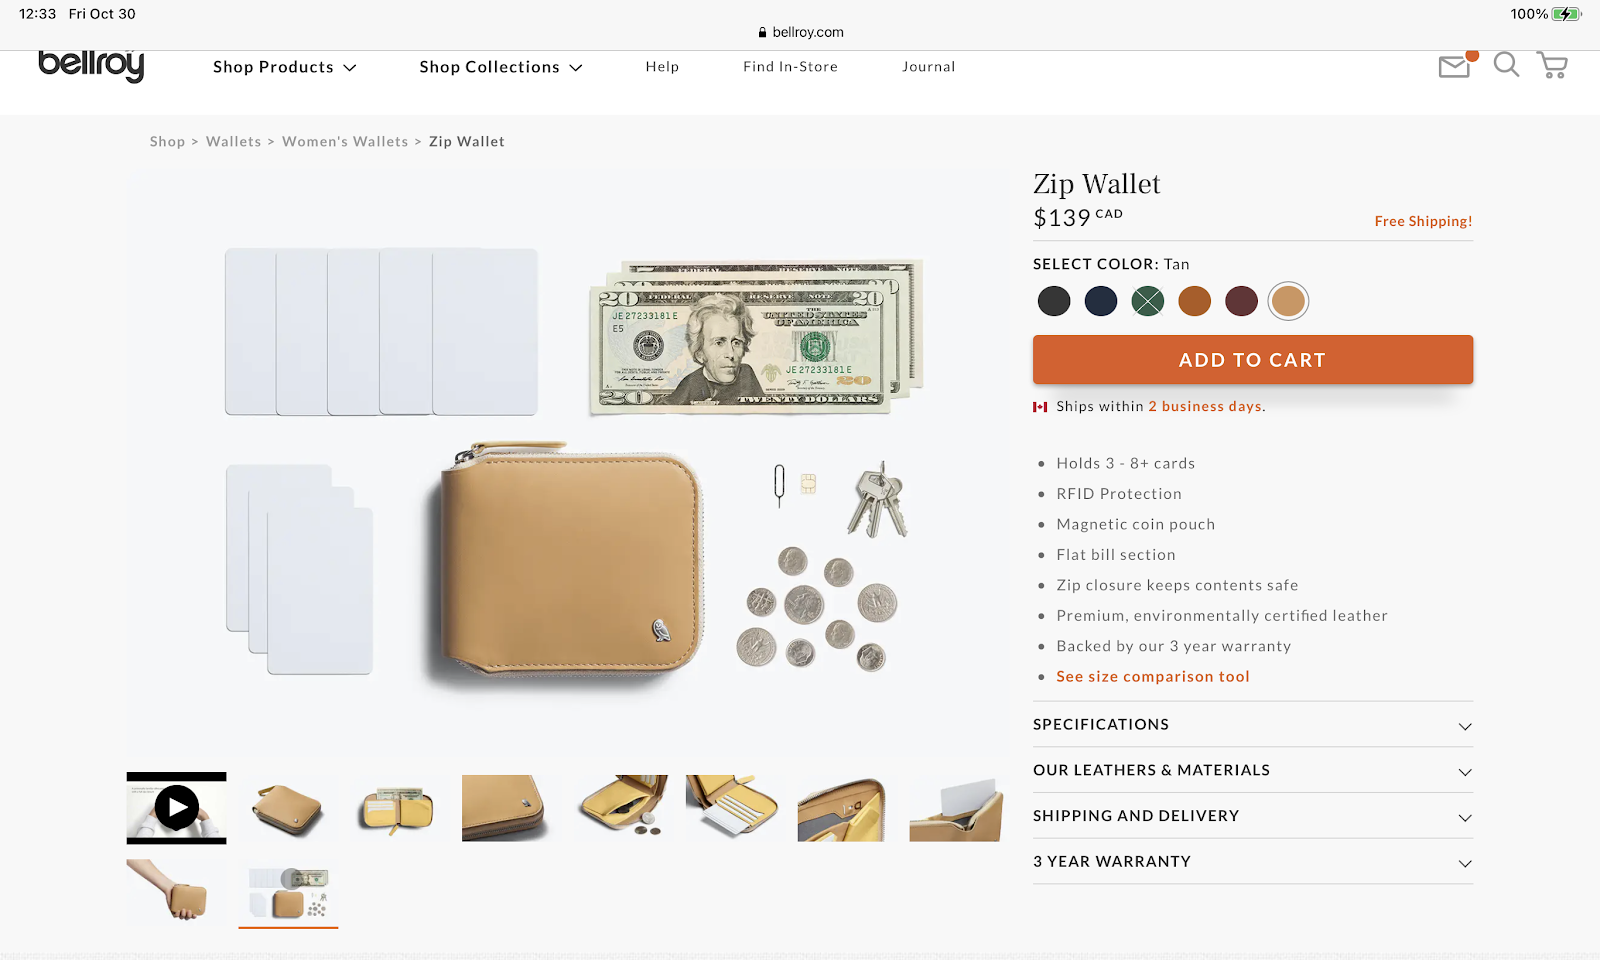
Bellroy also provides high-quality images for each color option for a product. You don’t have to guess based on a color swatch, you can see exactly what you’re choosing as you make changes.

While this may look like a lot of work, it’s just a bit of work and a small investment. You don’t need a fancy camera. Any smartphone in the last few years will do. If you don’t have natural light, then you will need to purchase a consistent light source. You can usually find the Godox SL60W for under $200. If you’re dealing with small products and want to have an extra clean background, then look at a softbox. You can find these on Amazon for as little as $30.

With a light source and a softbox, all it takes is a bit of practice. Take a bunch of test images from different angles. If you spend a weekend playing around you’ll improve greatly so that you can get good images for Monday.

If you’re looking for a great walkthrough on product photography, check out the video below by Peter McKinnon.

Once you’ve got the images, take a few minutes to edit them for color and contrast. Most people use a sized template so that every image on the site is the same size. 

If you’re not sure what this means, it’s like having a company letterhead you always use. In this case, it’s a Photoshop file that’s 2000X2000 and every image you take goes on the same template so that your site images look uniform. 

Then once you have your images on the template looking how you want them, save them out in a web format. Look to keep them under 700kb if possible. To help with this at the final stage you can use tools like Kraken to optimize the images as you upload them.

Putting some effort into your product images will help your store stand above the competition.

Adding To Cart

Next, your add to cart button. There are a few mistakes that many sites make with this crucial interaction. First, make sure that users can see the button without scrolling across all devices. It should be obvious and a contrasting color from the rest of your site so that it stands out. You can see a good example of this on MEC below.

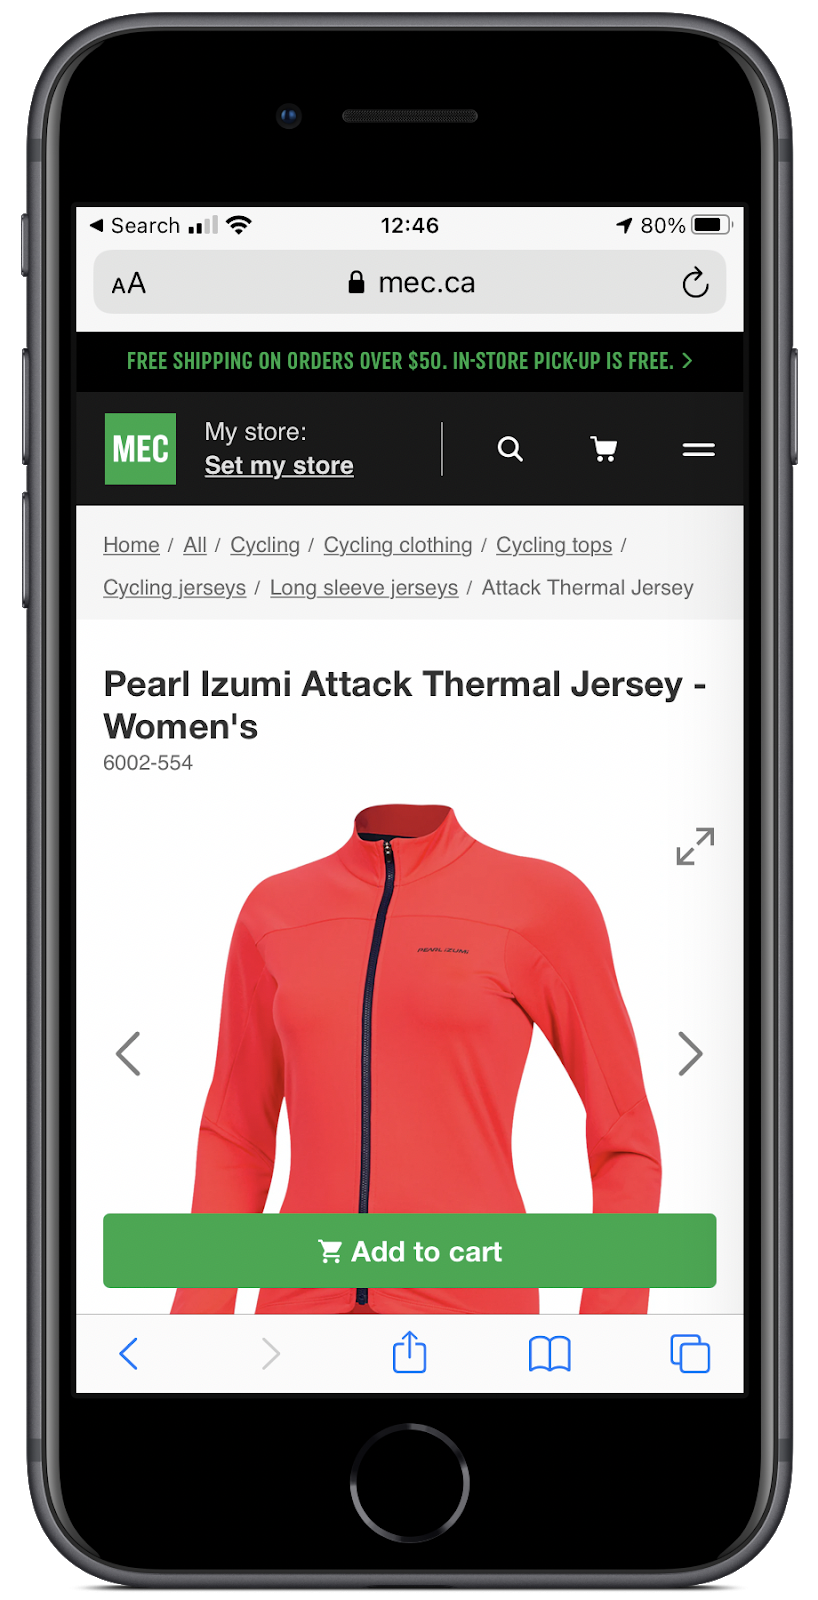
Note that they have a nice product image, and the purchase button is in a vibrant green and stays with the customer as they scroll on a mobile device.

You also need to make sure that it’s clear to the user something happened when they add something to the cart. Luckily WooCommerce has this as a default with a banner being displayed to a user after a product has been successfully added to the cart.

The second most important interaction after your main purchase button may be the option to add a product to a wishlist. A good spot for this is just below the main purchase CTA. I have many wish lists on Amazon for when I’m ready to revamp parts of my office. I already have my desk video setup all picked out in a wishlist. When it’s time to purchase I just need to add all those products to my cart, and then checkout.

Showing your product in use can show how easy it is to use to customers that are concerned about that. Yes, it might mean some duplicate information, but highlight the benefits and deflate the objections with your videos, just like you do with your marketing copy. Some studies suggest that a good product video increases conversion to sale by 84%. Videos are also known to have higher click through rates in search.

You can see this if we head back to Bellroy. The first thing that comes up with their products is a video of their product in use. 

Just like good product photos don’t have to be a huge investment, decent video doesn’t have to be a huge investment. The light I recommended above is a great video light. Your recent smartphone is a decent video camera. Add a lavalier microphone to this setup for $50 and you’ve got a good video setup.

Pricing

When it comes to pricing, it’s pretty straight forward. Make sure you don’t hide any price increases from your users. If the blue version is more expensive, change the price when the user selects the blue version (don’t worry both WooCommerce & Magento do this out of the box). Just under the price is also a good place to add product availability information. Don’t let your customers try to add something to the cart only to find that the product isn’t available in their chosen combination of size and color.

Social Proof: Reviews

Did you know that user reviews are 12 times more powerful at convincing people to purchase than your marketing copy is? That means you need to employ ratings on your site. Display the overall rating, usually stars, at the top near your product title and description. Then after all the product information your customers want, display the reviews you’ve gathered from users.

It’s important to make your reviews filterable, and don’t censor bad reviews. I’ve often read the bad reviews for a product to find the pain points and then purchased because I don’t care about any of the major issues with it.

One great plugin to help enhance the reviews on your site is WooCommerce Product Reviews Pro. This plugin will let you add product photos and user videos to your reviews to supercharge your social proof.

Remember, your product page is a landing page and should be optimized for search engines and to convert visitors to customers. As I said when I talked specifically about mCommerce, make sure that you A/B Test the changes you’re making to your product pages to help ensure that they’re having the effect you expect. If you can put a bit of effort into your product pages, you’ll see big rewards in your sales.

Source link

How to Build an Affiliate Marketing Website

One thing 2020 has taught us is the importance of an online presence. And many people have taken the extra time at home to start side hustles. The Internet is the way to do it.

So much of the buying process has moved online which means there is a larger pool of searches and potential customers. Affiliate marketing is positioned just right to capitalize on this increased web activity.

Building a website and designing a website are different things. The process below will help you build without needing to write any code. The good news is there are many tools available to everyday people, and we will point out which ones are worth choosing to save you time and money.

As an entrepreneur, your time is most valuable, so let’s get started.

7 Steps to Build an Affiliate Marketing Website

1. Choose your Niche

One of the first rules veteran affiliate marketers point out is finding your niche. Narrow down your focus to a single industry with only two or three affiliate products you promote.

“Choose a niche and work with companies within it. You can be an affiliate for just about anything, but readers won’t trust your opinions or click your links if you’re not an authority. Similarly, a reader might even write off your entire site as spam if it’s stuffed with irrelevant links. Do your best to select affiliate programs that fit naturally with our content.”

Kyla, WP Explorer

Your objective will be to create as much content as you can about the topics within your niche. So be sure to pick something you enjoy and have knowledge about – otherwise it will become a chore to you and eventually you will stop.

Some examples of niches:

  • Travel
  • Finance
  • Web Hosting
  • Fashion & beauty
  • Video games
  • Outdoors
  • Fitness & nutrition
  • 3D printing
  • Science experiments
  • DIY crafts

Some niches are more profitable and competitive than others, so be sure to do some research before committing to a niche. You should look at what other content creators have published to get an idea of what you could create. Perhaps there is a topic that is not covered, or topics you know much more about.

If you can create content that is updated with new information, or in a format that is more engaging, then it is an opportunity to explore.

The list goes on and almost every category has a way to implement affiliate marketing. Often the key to winning is finding ways to be creative in how you deliver your content.

2. Pick a Domain Name

First, you need to name your website by picking a domain name. For example, nexcess.net.

This can be changed later so don’t feel stuck if you can’t decide just yet. Most hosting companies will let you use a temporary domain as a placeholder.

It’s common practice to find a domain name that is the same name as your business name or your personal name. You can also select from different TLDs (top level domains) like .com and .net.. For about $15, you can register a new domain for a year.

Try to avoid using hyphens and keep the length as short as possible. This helps visitors more easily type and find your website. Make it memorable and easy to say.

Also, take the time to check social media platforms to see if the matching username is available.

3. Choose WordPress

WordPress has now become the leading CMS (Content Management System) for building websites of all types.

It doesn’t matter if your site is a blog, store, membership site, or forum. WordPress is very versatile because it is free and open source. 

With WordPress, you are the owner of your website content, which means you can use affiliate links to monetize. This makes WordPress unlike other platforms that restrict what you can have on your site and even delete your work if they choose.

Many independent developers have already created themes and plugins you can add to your site to make it look unique and function exactly how you want. That sounds technical, but it’s actually very easy to install and remove plugins with only a few clicks. The good news is that most plugins are free to install.

WordPress sites need to be hosted in order to be accessible on the Internet. Hostdedi has built specific hosting plans optimized for WordPress sites to be fast and secure. With Hostdedi, it is very quick and easy to set up your hosting, so you can focus on building up your site.

We host your websites on our servers where our experts manage the routine tasks of security and performance. This is called “managed hosting” because unlike shared hosting, you would normally be responsible for the maintenance of your sites.

Daily backups, automatic updates, and uptime monitoring is taken care of when you host your site with Hostdedi. But if you do need help, we are always available 24/7 by phone, chat, and email.

We also offer hosting plans optimized for WooCommerce stores, which is a specific type of WordPress site that utilizes the WooCommerce plugin to turn your site into a streamlined online store.

4. Get Hosting for Your Site

Next, it’s time to set up your hosting account. Hostdedi offers various plans for the needs of all types of websites. And if you already have a website, our team can migrate if for free to Hostdedi.

For this guide, we will use the Spark plan. It is a great option for new websites and beginners, while still getting amazing performance. There is even a 14-day free trial (no credit card required) if you want to test it first.

There is the option to save by prepaying annually for your hosting, or to pay on a monthly basis. There are no contracts, and you can always upgrade once your website has started growing.

Once you have selected your plan, you will create your Hostdedi account. Just enter your name, email, and create a password.

Select which of our data centers should host your website. We have locations all over the world:

  1. Southfield, Michigan
  2. London, UK
  3. Sydney, Australia
  4. San Jose, California
  5. Amsterdam, Netherlands

Then create a nickname for your hosting plan. For example, “My Travel Blog”.

Enter your personal information.

Enter your payment details. If you have a coupon code, you can apply it here and see your discount. Click purchase.

Next, you will receive a welcome email with your receipt and a link to login to your account. It will also provide contact information for our support team if you ever need some help.

From your Hostdedi dashboard, you will have access to your domain names and website settings.

To login to your WordPress dashboard for your site, click on Environment. Your login credentials are found there. Next, click App Admin. Alternatively, you can type your domain’s login URL in the browser. For example, https://mydomain.com/wp-admin/

Both of these methods will take you to the login page for your WordPress site.

5. Install a Theme and Add Plugins

Enter your credentials to login to your WordPress dashboard. Here is where you will be able to design your site, create blog posts, add plugins, and much more.

It may look a bit intimidating, but as you explore, you will find it is very easy to navigate. A great thing about WordPress is the community and the large amount of helpful resources to help with just about any question. It’s only a Google search away.

Next, you need to install a theme. These are pre-built layouts that change the design of your website. Go to Appearance, Themes, and Add New. You can always come back and change it later. There are even premium themes you can buy such as the Astra theme.

Click the Install button – it’s that easy. Then go to Appearance, and Customize to see what your theme can do and make it look how you want. Once you have configured the theme to your liking, click Activate to update your live website.

Plugins are extensions that add a function to your website. Let’s say you want your visitors to be able to contact you directly from your site – there are several plugins that will do this. Go to Plugins, and Add New. Just like themes, you can search for plugins that fit your needs.

Pay attention to the reviews and what people are saying about the plugin. Also, take into consideration which plugins have active support, since you don’t want to build functionality on your site around a plugin that may not have support down the road, leading to vulnerability issues.

6. Publish Your Affiliate Content

This is the meat of your affiliate marketing strategy, and the reason people will come to your site. A good practice is to publish often and publish valuable content. 

Another reason WordPress is so popular is because creating posts is not difficult at all. This helps content creators be able to publish new content more quickly.

To reiterate – it helps immensely to focus on topics you are passionate about. Boredom will hinder you from working on new content and ultimately earning any affiliate income.

“If you are looking to build an affiliate marketing website the key to your success is keeping it as niched as possible. Affiliate marketing and SEO go hand in hand. So do your keyword research and keep things as niched as possible. Publish as much quality content as you can for the first 6-9 months. Stay the course and you will start to see significant traffic and conversions after those first 9 months of hustle.”

Kelan & Brittany Kline, The Savvy Couple

Over time, if you have created quality content, then it will begin to rank on search results and be shared. This is the true test to know if you are adding value to your audience. The result of that will be them beginning to use your affiliate links.

While creating your content, you should be aware of, and seek out, affiliate opportunities within your niche that fits well with your target audience.

Determine which products your audience will benefit from the most and which offers affiliate commissions. Most companies will have an affiliate page that lists these details.

Promoting too many affiliate products can have a negative effect on your image. The foundation of being an affiliate marketer is earning a level of trust with your audience. These days, the Internet collectively has become more aware of how to spot websites with the sole intent to sell.

Once you have been approved into an affiliate program, you can begin using your affiliate links. Each company provides you an affiliate account that you can log into to see your performance and earnings. Here, you can copy your affiliate links.

Then you can insert your affiliate links into your articles. YouTube allows affiliate links to be placed in the video descriptions. And Linktree is a tool for adding affiliate links to your Instagram bio.

To add affiliate links in WordPress, go to your WordPress dashboard and click on Posts, then Edit under your selected post. Affiliate links can be embedded into text, buttons, or images. Select or highlight where you want to add the link and click the hyperlink icon. Paste your affiliate link into the field and press Enter

Finally, click Publish in the top right corner of the page to update the change on your live website. Shortly, any new visitors to your site will be able to use your affiliate link. 

Serious affiliate marketers monitor their traffic and conversions. Installing Google Analytics will show you the activity on your website. Some WordPress plugins like Google Site Kit let you see your traffic data from your WordPress dashboard.

Simply pasting affiliate links is not enough. To be successful, you will need to find what strategies work for you to promote your affiliate content. Connecting with other like minded authorities in your niche is a great place to start.

Sign Up to Become a Hostdedi Affiliate Today

Now that you have built your website, you may be a good fit for our Hostdedi affiliate program. If you believe your audience would be interested in our hosting services, sign up to become an affiliate. We hold regular affiliate contests for opportunities to win extra cash and other bonuses.

Subscribe to our affiliate newsletter to learn more.

Source link