Adding More Content to Your Site

Welcome to Part 5 of our series, Getting Started with Drupal 8. Go here for Part 4.
Previously, we covered the basics of managing content and creating graphics, metadata, teasers, and blocks. This chapter provides you with a few more essentials, like comment management, forums, and menus.
As with earlier entries, the images reflect changes made during previous lessons using the default Drupal 8 theme, Bartik. Recreating these changes is not necessary, but if you’re using a different theme, or have added modules, what you see will differ from the provided images.
Contents
Although there’s a school of thought that allowing your visitors to comment invites a world of headache, it has the benefit of encouraging people to interact with your website. Properly moderated, comments function as free content for your site.
While it potentially invites spam and certain types of negative behavior, Drupal 8 gives you everything you need to mitigate these inconveniences.
Setting Comment Policy
The default Drupal 8 comment policy is reasonable for many sites. To view your current settings, go to your Admin Menu (Manage) and click People, then click the Permissions tab.

Only authenticated users — visitors that are currently logged in to their registered account — can post comments. Anonymous users can only view comments. Your ideal settings will vary according to your needs and wants, but here’s a few guidelines:
- Administer comment types and settings and Administer comments and comment settings are only appropriate for site admins.
- Anonymous users should have only the View comments permission. This will discourage spam and abuse.
- If you want authenticated users to have the ability to comment, the only mandatory permissions are Post comments and View comments.
- Whether you grant the Edit own comments permission to authenticated users is purely up to you, though most users appreciate the ability to do so.
- If you anticipate more than a few authenticated users, we recommend leaving Skip comment approval enabled to prevent micromanagement headaches.
Comments Admin Page
To view all comments for your site, go to your Admin menu and click Content, then click the Comments tab.
From the Comments page, you can perform a variety of useful functions:

- View Unapproved comments if you chose to require comment approval.
- Filter by Subject, Author name, or Language.
- Perform an Action (Delete or Unpublish) on all comments you’ve selected with the check boxes.
- View any comment by selecting its Subject.
- View any author’s account information (see below for how to block users).
- Perform an Edit or Delete Operation on an individual comment.
It is possible to block troublesome users by clicking their username (option 5 above), then the Edit tab. In the Status section, select the Blocked option, then click Save.

Page-Specific Settings
When viewing comments as an admin, you can Delete, Edit, or Reply to any comment.

Although you can restrict comments according to content type, it is also possible to adjust settings for specific pages. To do so, navigate to your content and click the Edit tab.

In the Comment Settings section, choose Open, Closed, or Hidden, as desired..

Comments and Content Types
Default Drupal provides two content types: Article and Basic page. To view content types, go to your Admin menu, then select Structure > Content types.
Although it’s possible to create additional types, let’s just focus on how to tailor comments for each type.

By default, the Basic page type does not allow comments, though for demonstration purposes, let’s change this now:
- In the Basic page row, click Manage fields.
- Only one field appear, named Body. Click Add field.

- From the Select a field type drop-down list, select Comments. In the Label field, enter comments. Click Save and continue when done.

- Confirm the default settings by clicking Save field settings.
- The Settings page controls how comments appear on the page, allowing you to toggle Threading, set a comments-per-page value, and other options. Click Save Settings to save the default.
- Comments are now enabled for Basic pages. You can Delete the comment field from the Operations menu; however, doing so permanently deletes all comments in that content type.


Forums
Drupal 8 allows for the creation of forums, which can give your community members another way to interact with one another.
Initial setup
Follow these steps to install and set up the Forums module:
- From your Admin menu, click Extend.
- On the Extend page, type “Forum” in the search field. Select the Forum checkbox, then click Install.

- We have now created our first forum, “General Discussion.” The web address will be yourdomain, followed by /forum. We can test it as user by visiting that web address in another browser (one in which you are not logged in as site administrator).
Note we are unable to post because our permissions prevent unregistered users from creating forum posts.


Unfortunately, our forums are currently accessible only to people that know the web address. Let’s fix that now:
- Copy the forum web address to our clipboard.
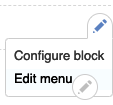
- While logged in as admin, locate the pencil icon corresponding to the menu bar at the top of the page.

- Click Edit Menu.

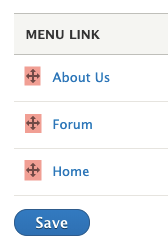
- This page shows our current menu items and provides several options. Click Add link.

- In the Menu link title field, enter “Forum.” In the Link field, enter the web address for your forum (paste from your clipboard). Click Save when done.


Our forum is now set up with the name “General Discussion,” and any visitor can easily find it!
Posting topics
Posting a forum topic looks much like creating other types of Drupal content. Any admin or user with appropriate permissions can add new topics in that forum by clicking Add new Forum topic.
For demonstration purposes, here’s an example with several posts in our General Discussion forum.

Adding Forums
Perhaps we’d like several more options beyond “General Discussion.” To get started adding the, go to your Admin menu, then select Structure > Forums.
On the Forums page, click Add forum.

On the Add forum page, enter a Name and, if desired, a Description. It is often wise to designate another URL alias. If you enter no value, it will be yourdomain.com/forum/#, where # is a number. If you want to replace # with something else, you can do so, but precede anything you type with a forward slash (/). Click Save when done.

This returns Drupal to the Forums page. Note you may reorder forum topics from this page by dragging-and-dropping the crossed arrow icon as needed, then clicking Save.

Menus
When we created our forum, we edited the Main navigation menu. Let’s take a closer look at the other default menus in Drupal 8.
Editing Menus
Where menus appear on your nodes depends on your theme, though you can always alter their placement and function.
To get a better sense of where these menus currently appear, navigate to your homepage as admin and click the pencil icon near any block. If the pencil icons aren’t present, click Edit on the upper right. If the block is a menu, the Edit menu option will appear.
It is possible to access the same Edit menu option from the Drupal 8 Menus page. To get started, go to your Admin menu, then select Structure > Menus.
The Menus page shows all menus for your current theme. The default theme, Bartik, provides five menus: Administration, Footer, Main navigation, Tools, and User account menu.

You can edit any menu by selecting Edit menu from the Operations column. For example, edit the Main navigation menu to see the change we implemented earlier when creating our forum.

Maybe we want the order to be Home, About Us, then Forum. To reorder them, drag-and-drop the crossed arrow icon as appropriate. Click Save when done.
Placing Menus
You can add menus to any block from the Block layout page. We spent some time with blocks in Part 4.
To access this page, go to your Admin menu, then select Structure > Block layout.
Locate your desired block, then click Place block.
On the Forums page, click Add forum.

From the Configure block page, you can change the title, menu level, and the region of the page in which it appears. You can also restrict the visibility of this block by content type, page, or role. Click Save block when done.

For more about how blocks function in Drupal 8, see Block Basics in part 4 of this series.
Next Steps
You now have a decent grasp of the fundamentals of Drupal 8, but there’s much more to learn! If you haven’t done so already, we recommend exploring the available themes and modules from the Drupal website.
When you’re ready, consider learning about Views, which allows you to fetch content from the database of your site and present it to visitors as lists, posts, galleries, tables, blocks, reports, and so on. We may cover Views more in a later entry, but for now, feel free to get started on the Drupal website.
Posted in:
Drupal