If you are anything like me, you have a hard time choosing a WordPress theme for your site. There are thousands of premium themes and even more free themes. I’ve spent many an hour scrolling through theme marketplaces, opening theme pages in dozens of tabs, and scrutinizing demonstration sites – all in an effort to find the perfect theme for a project.Read More »
Most Store Builders are open to taking on just about any project that comes across their desk, but the most successful Store Builders focus on providing “best in class” service to clients in a specific niche.
Most designers and developers dislike everything about the sales process, but they love the end result: they get more clients. So while selling a prospect on how great you are may feel icky and uncomfortable, sales calls are a necessity if you want to stay in business.
I’m one of those designers who doesn’t particularly enjoy the sales process:
I don’t want to have to convince someone else I’m worth investing in or worth hiring
I don’t want to regale someone else with tales of my greatness and success (ew!)
I don’t want to spend hours jumping through hoops or sitting on multiple phone calls or in meetings with someone who might not even hire me
The problem is clients are the greatest asset of any service-based business and because I want to get more clients and stay in business, I knew that I needed to get comfortable with sales conversations — or at least shorten the sales cycle and close sales faster.
Here are 13 ways you can shorten the sales cycle and get more clients for your WordPress agency:
1. Build Rapport With Testimonials
Testimonials that demonstrate a before, during, and after perspective help prospects see themselves achieving the same thing when working with you. This recognition of value and possible achievement will build rapport with prospective clients before they even contact you.
By leveraging testimonials that tell stories on your website, in your marketing materials, and even in your proposals and sales contracts, you remind prospects that you have helped others just like them achieve similar goals.
2. Build Trust With Case Studies
Every bit of effort put into your sales and marketing efforts needs to be aimed at building trust and positioning you as the only choice in the eyes of your ideal clients. When prospective clients come to the sales call already trusting you, you are able to go deeper about their needs in your sales conversation.
Case studies are one of the most effective ways to quickly build trust, showcase your expertise, and encourage prospects to reach out. Case studies give you the opportunity to:
Walk a prospect through the design and development process step-by-step, in a safe, non-salesy way
Show prospects what you can do for them and what kind of results they can achieve
Demonstrate what’s possible and inspire them to take action
3. Provide An FAQ
When a prospective client fills out your project inquiry form, consider providing an FAQ sheet they can download on the Thank You page. By giving them a list of frequently asked questions up front, you can set the prospective client at ease, establish your expertise and professionalism, and build excitement about the sales call. The FAQ sheet will also answer basic questions before the sales call, allowing you to get to the important conversation about the why behind the project, the requirements, and the goals more quickly.
Get more content to help grow your web business delivered straight to your inbox. Subscribe to the Hostdedi Blog.
4. Identify All Of The Stakeholders
Have you ever gotten 30-40 minutes into a sales conversation only to discover that you are speaking to a middleman who is not the decision maker? Or, have you ever gotten partway through a project only to have someone you’ve never even heard of step into the project and make changes that were detrimental to keeping the project on time and within budget?
If this has ever happened to you, here are two things you need to do during the sales process:
Speak with the primary stakeholders and main decision makers to help eliminate future misunderstanding and confusion. Make sure that from the start, the person paying your bill understands the full scope of work, budget, and timeline.
Identify all stakeholders. Often there isn’t just one person making the decision about your work, but a committee of people that will want/need to provide their opinions. Ask up front who the stakeholders will be and don’t be afraid to ask, “Is this everyone? Is there anyone else that may show up mid-project and want to be involved?”
5. Focus On The Client’s Why And Needs
Contrary to popular belief, the sales call isn’t all about you, what you do, and why you’re great — it is about your client, why they are reaching out now, why this project, what they need, and the difference getting it done will make in their business.
On a successful sales call, there needs to be a natural give and take in the conversation, but overall, you should be asking questions and the client should be doing most of the talking. In the first half of the sales call, keep the conversation focused on the client, their emotional why and their needs.
Then in the second half of the call, after you’ve listened, validated, and made an emotional connection with the client, it’s time to talk features and specifics so you can create an accurate proposal.
6. Create Unique Packages
Many times, when prospects reach out about working with you on their WordPress project, they are also reaching out to other freelancers or agencies. They want to speak with you and receive a proposal so they can compare your proposal side-by-side with your competitor’s proposal.
While comparing apples to apples is easy, comparing apples to fully cooked meals is much more difficult. By creating unique packages, it becomes much more difficult to compare you with your competitors and go with the lowest price because the items being compared are not the same.
With unique packages, your prospects must evaluate the total package, deliverables, and value, instead of just the price — and that is worth its weight in gold because when you compete on price, no one wins.
7. Offer Limited-Time Rewards
If a potential client is still on the fence, offer them a limited-time reward — something awesome they will receive only if they sign the contract and pay the deposit by a certain date. A limited time offer looks something like this:
If we get the signed contract and deposit by [DATE], we can:
Begin your project on [DATE]
Include [SMALL FEATURE] at no extra charge
Get the project done by [DATE]
Add [SERVICE] at no extra charge
Include [SERVICE] without extending the launch date
These incentives can be a great way to get more clients from the fence to ready to sign the contract.
8. Increase The Project Value With Bonuses
Consider including bonus items in your packages to not only set them apart from the competition but to make it a no-brainer to hire you. Any bonuses offered need to be relevant to your prospective client’s project and help them move forward with their overall business goals.
Consider offering bonuses such as:
Checklists and templates
Ebooks or reports
How-to guides or manuals
Resources and tools
An extra training session or webinar
A free copy of a product or program you sell
9. Get More Clients by Training Prospects To Say Yes Throughout The Sales Process
The entire sales call comes down to getting the prospective client to agree that you’re the best choice. Train your client to say yes by providing opportunities to agree with you throughout the sales conversation on small details. This way, when the time comes to say yes to hiring you, it feels natural and easy.
To do this, you can add short questions to the end of the statements you make, like:
Is that right?
Do you know what I mean?
Wouldn’t you agree?
Are we on the same page?
Does that make sense?
How does that sound?
10. Provide Payment Options
Make it easy for your prospective clients to say yes by eliminating price objections and offering flexible payment options and payment plans.
Accept a variety of forms of payment, including cash, check, bank transfer, PayPal, and credit cards
Offer automatic payment plans or payment plans based on project milestones
Work with clients to invoice according to their needs, rules, timelines, or formatting requirements. Some may not pay an invoice unless the purchase order is clearly included. Some may need invoices 30 days in advance, some may require you to send them by snail mail.
The only parts of payment you need to stand firm on are:
Receiving payment on time
Receiving the nonrefundable deposit
Receiving the final payment prior to launch or delivery of materials
11. Leverage Urgency and Scarcity
Using urgency and scarcity as a sales tactic only works if it is done with integrity. Being dishonest and deceitful about urgency and scarcity is one of the quickest ways to erode trust and lose a potential client.
In client services, urgency and scarcity apply to the fact that there is a limit on your availability, capacity, and time and if the prospective client doesn’t act now, they may lose the opportunity to work with you or meet their deadline.
If you’re almost booked out or you have very little time open in your schedule, let the prospective client know: “We’re almost completely booked solid. We would love to work with you on your exciting project, but if we don’t receive the signed contract by [DATE], we won’t be able to fit your project in until [LATER DATE].”
If the client has a strict launch deadline, but they are dragging their feet on signing the contract, let them know: “If we don’t have a signed contract by [DATE], we will no longer be able to work within the initial timeline we discussed.”
12. Ask For The Sale
The sales process doesn’t end until you have a signed contract in hand and the first non-refundable deposit made. If you stop actively courting a potential new client, you will lose the sale. It is imperative that you stay in contact, follow up, and stay top of mind consistently until you hear a definitive yes or no.
The bigger the project is, the longer the sales process will be. Depending on the size of the project, you may want to:
Send a link to an article or resource relevant to their project or business
Offer to answer questions
Offer to come in and meet with all stakeholders
Provide an idea you had for their project to let them know you have been thinking about it and are excited to work together
Send a snail mail note thanking them for the opportunity to talk about their project
13. Reinforce Your Expertise
When the sales call is over, reinforce your expertise by providing the client with an opportunity to learn something new from you.
Let the client know that you gave a talk at [EVENT] that is relevant to their project and send them a link to the slide deck
Send the client a link to a blog post you wrote that is directly tied to a part of their project or their website goals
Provide a link to a guest post you wrote on a website that would impress them
Share a link to a webinar or online training you offered that would help them gain clarity about their project
Providing the prospective client a resource like this gives them something to do while you put together the proposal, and reinforces your expertise and experience.
It is Easier Than You Think to Get More Clients
As you can see from the 13 ways to close sales faster and get more clients for your WordPress agency or freelance business, making more sales is a lot easier than you think. None of the tactics are difficult to implement and they all will position you as the only choice so you can get more clients with ease.
Next Steps for Success
Review your sales process and document it step-by-step. Then compare this list with your own process to see where you can add something extra to delight prospective clients and shorten the sales cycle.
Nowhere does your website design and user experience impact sales more than on your product pages. They’re the digital “display cases” that present your products in their best light, motivating shoppers to press the “Add to Cart” button. Effective product pages are beautiful, informative, and streamlined. They also express your unique brand.
There’s no reason to reinvent the wheel when it comes to (re)designing your WooCommerce product pages. Instead, get design inspiration from store owners with exceptional strategies. Then take advantage of the ability to customize WooCommerce product pages. Here are five inspiring, customized WooCommerce product pages along with the plugins, tools, and tips to get started today.
Improve Your Product Images
Your product copy may be on point, but if your pics are off, sales will suffer. Your product images sell more than you ever could with flowery prose. Put enough resources into getting the highest-quality imagery you can, which might require hiring a professional photographer.
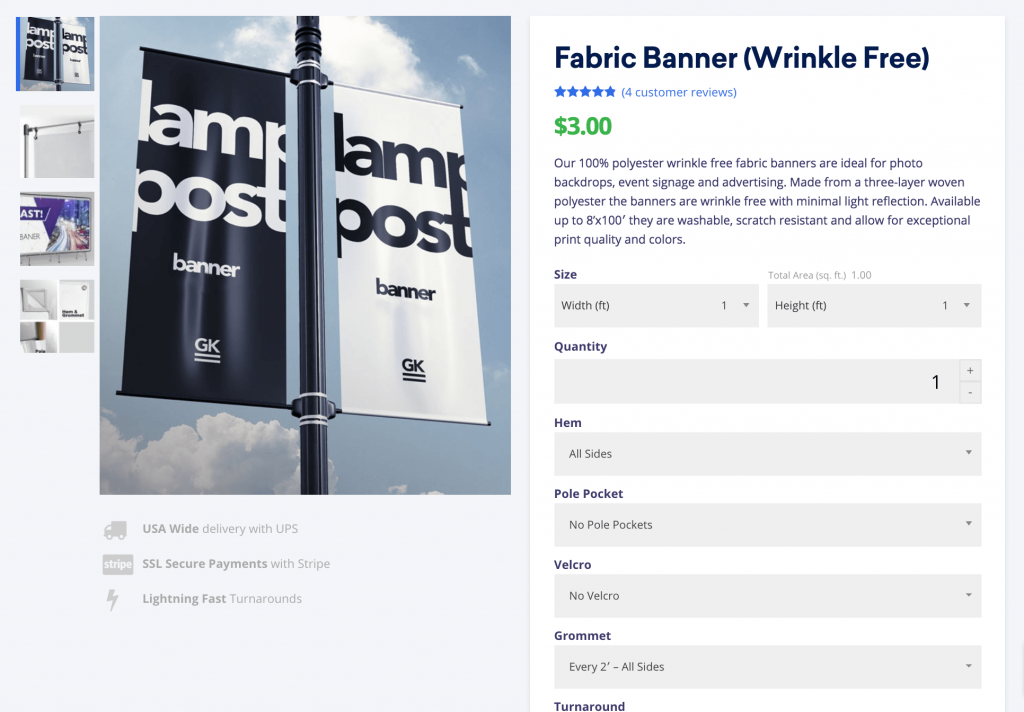
One WooCommerce site that gets their images right is the large format printer Gorilla Printing. The company’s product pages present their signs, screens, and banners from different angles and contexts. The more ways a customer can view a product, the more confident they’ll feel in making the purchase.
Gorilla Printing uses the standard product thumbnail navigation sidebar that comes standard with WooCommerce templates like Storefront. Although the sidebar isn’t customized, their designers choose good secondary images that show multiple views of products, hardware accessories, positioning, and hanging options.
Image swap plugins can display a secondary product image when the user hovers over your product on a category or other taxonomy page (such as showing the back of a t-shirt when the user hovers on the image). If you want to forego plugins and take a more customized approach, there’s also custom coding for rollover image swap as well.
Make sure to capture images with enough resolution to show your product details. But remember: High-res images are large files. They can slow your page-load speeds. Avoid this by optimizing your product page images.
Get more content tips for improving your store delivered straight to your inbox. Subscribe to the Hostdedi Blog.
Improve Your Product Description
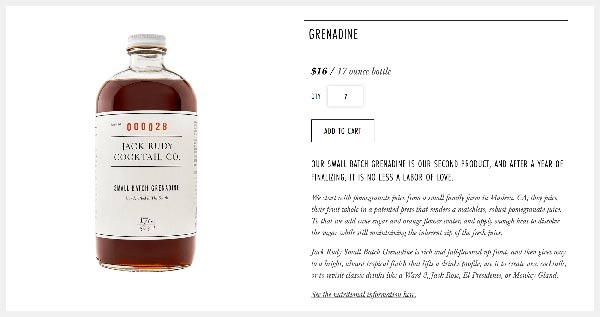
If you’re into finely crafted cocktail tonics and equally potent product descriptions, look no further than Jack Rudy Cocktail Co.
Effective product descriptions include a short and long section. The short blurb is for quick page scans, while the longer section goes more in depth. The Jack Rudy Small Batch Grenadine product page is a good example of this two-part approach.
The short description provides helpful, relevant information: “Our small batch grenadine is our second product”. Next, the ending adds some brand flair—“labor of love”—to suggest the company’s passion and craftsmanship.
The longer section follows providing relevant facts about the product’s production and adding an enticing description of their grenadine’s taste profile — using strong, evocative language like “full-flavored”, “bright”, and “tropical finish”.
In your product descriptions, tell a story about your product that goes above and beyond its basic features. Jack Rudy’s product descriptions illustrate how to convey branding on your product page—how to personalize your company so shoppers feel more comfortable buying from you. Eliciting positive feelings at the point of sale is a powerful way to boost sales.
Test Your Pricing Placement
The first two steps of the shopper’s search on a product page typically goes like this: “Is this what I’m looking for?” and then “Can I afford this?” If your product prices don’t jump out at shoppers, you’re frustrating them early on. You’re putting up an unnecessary obstacle on their mission to buy. Don’t lose sales because of this simple design flaw.
Many WooCommerce themes place the price next to the product title, near the top of the page, and on the right side—a location that aligns best with how we actually scan a website—and looks comparable to most other eCommerce websites.
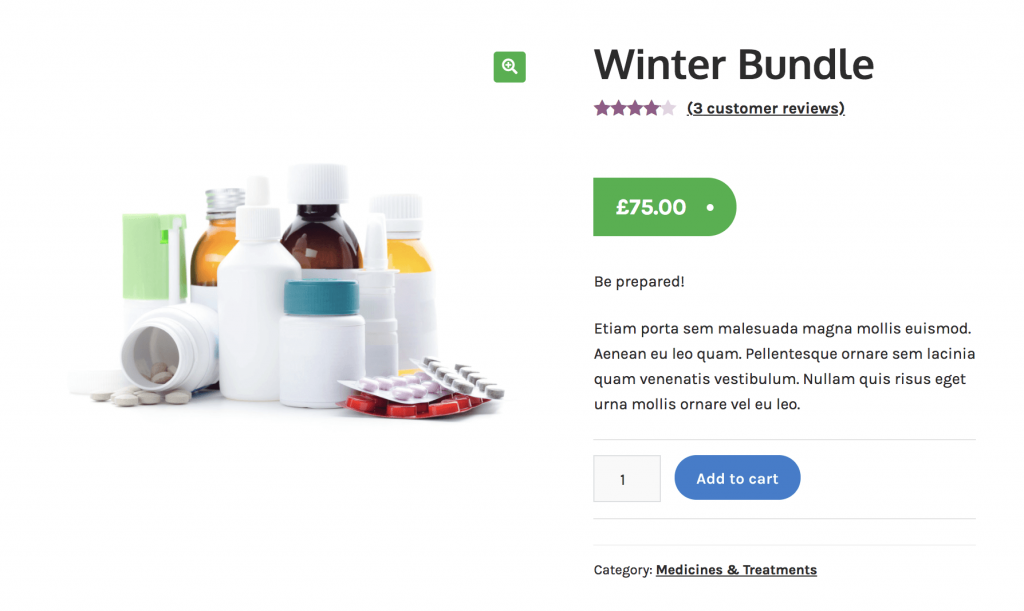
Pricing example from Pharmacy child theme for Storefront
Best practices also say that if you want to make it easier for the user to quickly understand the price, you can customize WooCommerce product pages so that:
The price is displayed in a larger font size
Text is bolded
Font color is highly visible
All three are relatively easy CSS changes on most websites.
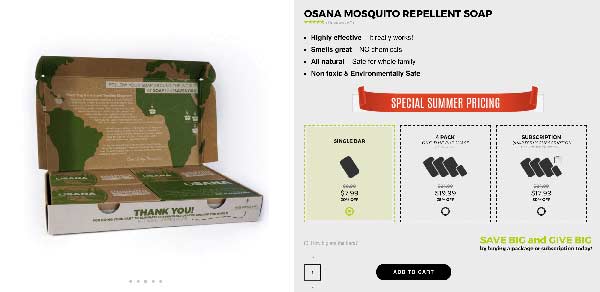
But, some online retailers like Osana have taken an extra step in formatting their pricing. Osana—a company that sells mosquito repellent soap— uses custom boxes to help users instantly see how buying a 4-pack of soap vs. a quarterly subscription saves them money. Most default themes would use a drop-down selector to change units, boxes, etc., and make the customer explore that drop-down in order to understand the pricing options. Here, every available option and its corresponding price are already listed.
To help the customer even more, Osana adds an icon to the pricing pack. The icon, in conjunction with the product title, quickly communicate what product is being selected. As if that’s not enough, they also include radio buttons and a yellow highlight feature to show which product choice is currently ready to be added to their cart.
For a business that earns better customer lifetime values from bulk orders and subscriptions, dedicating time to testing and designing custom layouts will help raise their conversion rates.
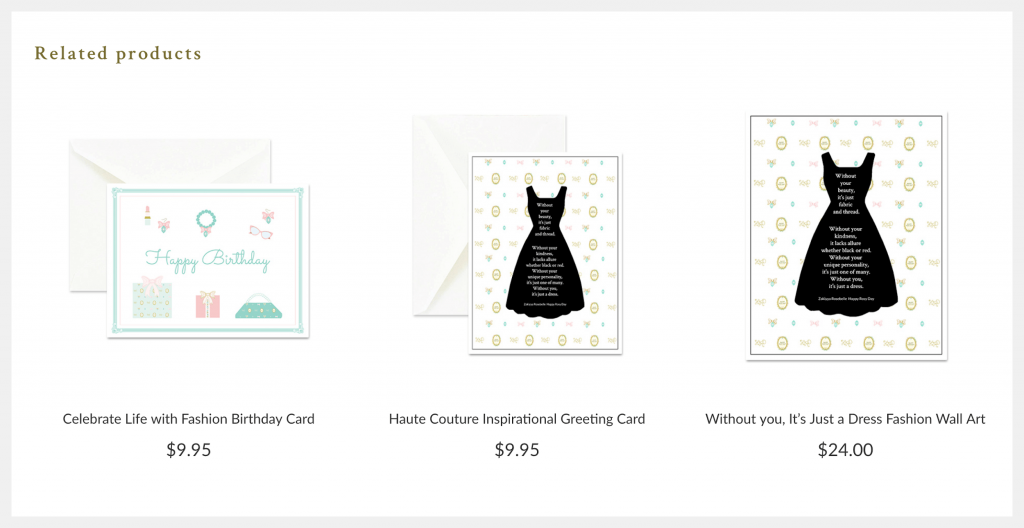
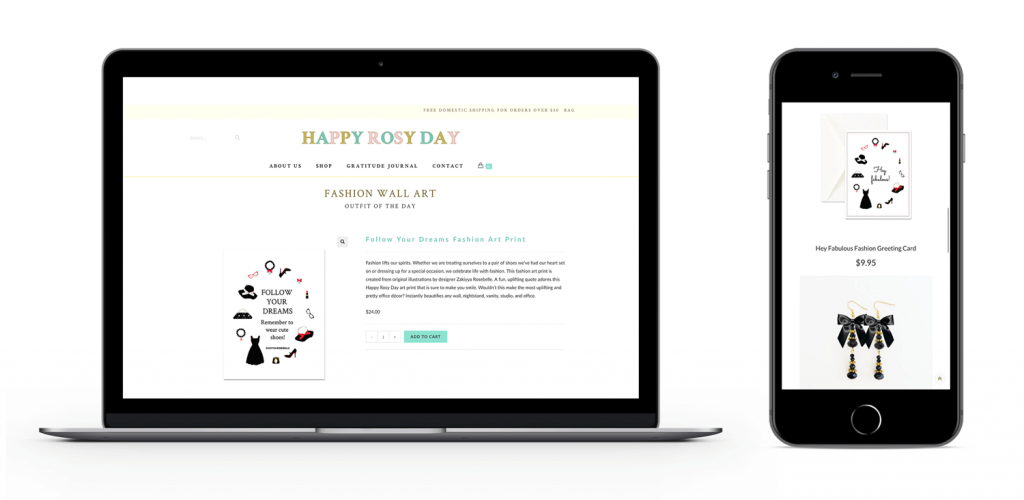
Spend More Time on Related Product Recommendations
Designer and author Zakiyya Rosebelle is the founder of Happy Rosy Day, an online stationery and journal purveyor based in San Francisco. Smart store owners like Rosebelle use the “Related products” feature on their product pages to up-sell or cross-sell customers. The “people-also-bought” strategy of upselling is mastered by mega-companies like Amazon, but smaller stores like Happy Rosy Day can deploy them just as effectively.
Happy Rosy Day takes a minimalist approach to page design. Pages have a clean, white background, minimal text, and a simple related product layout. “I have discovered that a clean, simple, and responsive product page is the most effective,” says Rosebelle. “I design my product pages so they are very simple and easy to use, yet they are beautifully branded and optimized.”
Rosebelle chooses to list three related products on her customized WooCommerce product page—a good number for scanning the page horizontally (desktop) or vertically (mobile). The images are beautiful and related to the main product. Don’t annoy shoppers with products that don’t relate to their search history. Also, when deciding on the number of products that appear, avoid giving customers too many choices.
Some product page templates automatically pull products with similar tags or categories into your related products section. By adding specific products to categories or giving them tags, you can influence what related items are presented.
You can also manually relate items as up-sells or cross-sells. Up-sells are similar items—of higher quality and price—that you can recommend to customers on your product page. Cross-sells are complimentary items a shopper might be interested in after purchasing the product. For example, after a customer adds a mountain bike to their shopping cart on a sporting goods site, they get cross-sell offers on a bike helmet, riding gloves, and bike lock.
A good product page layout has elements that work as a whole, not randomly placed where there’s room. Pages have two basic sections: “above-the-fold” content—what is visible when the page loads—and “below-the-fold” content— what the shopper must scroll down to see.
Above-the-fold content makes the sale, while below the fold content is supplemental and adds value, like social proof or suggested products. Include all the information a shopper needs for an immediate purchase above the fold, such as:
Product image
Product title
Description
“Add to cart” button
Size, color, and quantity selector
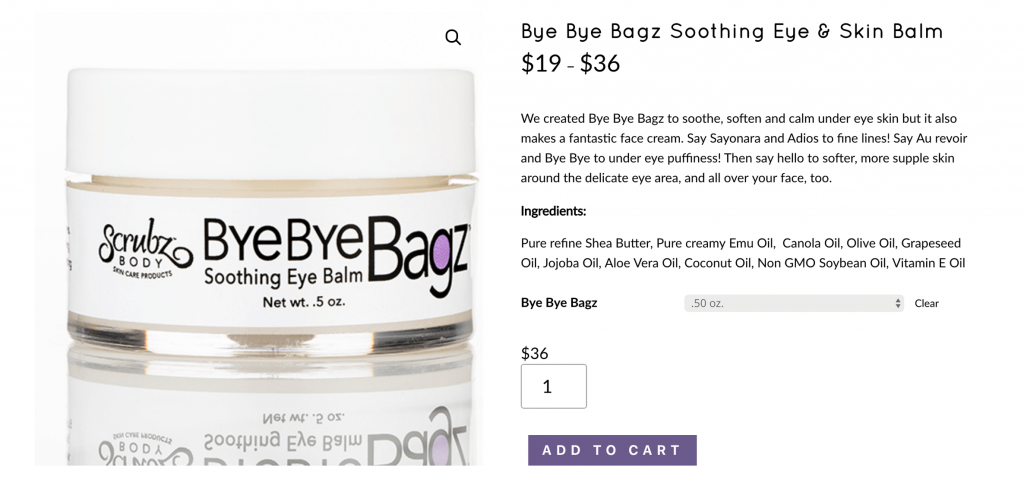
The skin care site ScrubzBody sports a product page layout that’s ideal for any eCommerce site. Founder Roberta Perry explains how their research influenced the site’s design:
“First we did customer surveys. Then we did heat maps. The biggest thing we changed was the menus. We had a drop-down then side-out menu type. I had too many subheads across the top. We went to a Mega Menu setup and adjusted so that things were in the places people were looking for them… we used the Anthem Child Theme for Divi with WooCommerce as our eCommerce. I love the flexibility, and I can make changes and additions with ease.”
ScrubzBody’s above-the-fold layout includes the product title near the top. Nearby, the price is clearly visible. The description and ingredients sections are separate sections, helping the shopper find the information they need. And the “Add to Cart” button stands out in the company’s purple-branded color, next to the product image.
Some customers may not understand the click-to-zoom interface required. However, mouseover zooms invite customers to examine your products by simply moving their pointer.
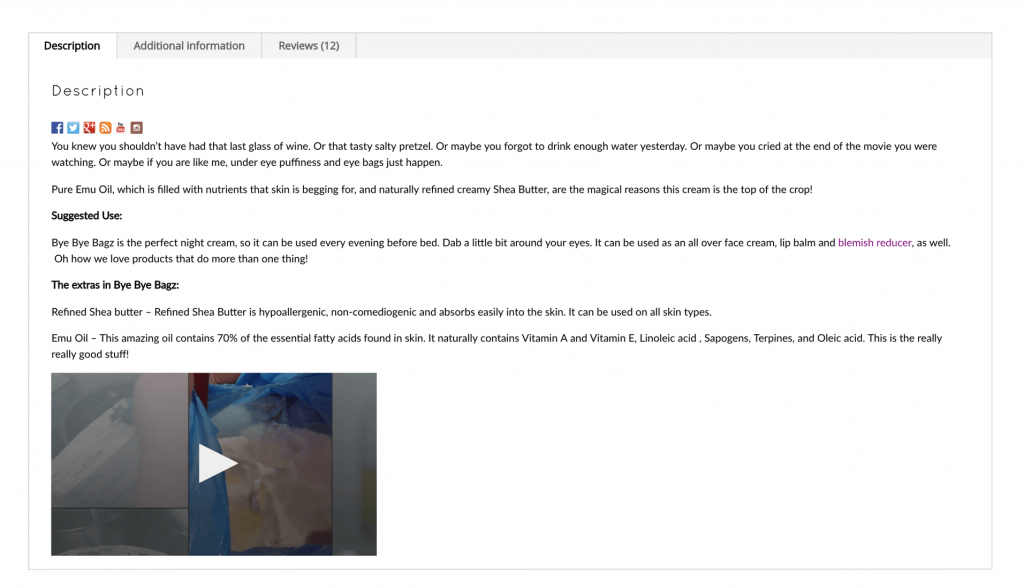
Below the fold, Perry includes a custom product tab section with more product information, an instructional video, and some customer reviews. Tabbed content areas like these offer customers valuable information in a compact form—no need for them to endlessly scroll while using the site’s mobile version.
The ScrubzBody product page layout works well because its designers take advantage of helpful WooCommerce plugins, follow best webpage design practices, and provide customers enough information to feel confident buying.
Before You Start Writing New Code
Before you start shifting things around on your product page, take a few moments to gather some useful data to help inform your design choices. No need to change things that are working.
Heat Maps
Website feedback tools like Hotjar give you data on how visitors interact with your page. You’ll be able to see what specific page elements shoppers are clicking on the most and the least. You may find they’re clicking on a word or image expecting a link when none exists.
See What Amazon’s Doing
Online retailers like Amazon, Walmart, and Kohl’s set the standard for online shopping, and have designed every digital inch of their websites for maximum effect. As a result, their customers come to expect specific layouts, elements, and experiences from a product page. Mimic the look and feel of these retail giants. Include common features like variation swatches so customers can see your products in different colors, patterns, and materials.
Backup and Test Your Site
Don’t waste your time and money. Backup your wp-content folder and WordPress database before making changes to your product pages. If something goes wrong, you can at least go back to previous versions. Also, you don’t want to waste your design changes because they conflict with WordPress or plugin updates. Create a staging copy of your website to test its functionality before pushing it live.
Product images, descriptions, and price placement can often be pushed down the ladder of priorities when managing your online store. But “small” design elements like these have big implications for sales. By taking the time to fine-tune your eCommerce site, you’re showing your customers that you’re taking that extra step to make their shopping experience exceptional. They’ll reward you with more sales. But don’t stop with just these design suggestions. There are plenty of other design elements to optimize for your WooCommerce site.
Adding WooCommerce to the Genesis Framework is one of the best ways to build a stable and fast running eCommerce site. Due to the nature of the Genesis Framework, it has some quirks though. In this article, I’m going to walk you through the most important steps of the installation and customization process for your new shop.
You’ll see what you get straight out of the box when installing WooCommerce and the Genesis Framework. It comes with a shop with a very basic design and a rock-solid code foundation.
With the strategies outlined in this article, you’ll be able to customize headers and footers on your new WooCommerce installation to match your corporate identity, you’ll know which plugins help you run WooCommerce efficiently with Genesis (and other themes), and you’ll understand how you can integrate WooCommerce into your own child theme based on the Genesis Framework.
Before we start, let me say a word of warning. Do NOT follow along with this tutorial on your live online shop but instead set up a copy of your shop or a brand-new installation. We’ll start from scratch with a shop that doesn’t look good in the beginning and will likely not even match your corporate identity the slightest bit. Doing this tutorial on a shop that’s exposed to live traffic will definitely hurt your sales numbers.
The Installation Process
For demonstration processes, I’ll start the example website for this post with a blank WordPress installation on my local Docker environment. You’ll be able to follow along with any WordPress site that’s updated to the recent version (4.9.8 at the time of writing).
If you do not yet have a website ready, I recommend looking into Hostdedi’ plan for Managed WooCommerce Hosting. Once your store grows more popular, you’ll be forever thankful for having a reliable web hosting company and platform.
Installing the Genesis Framework
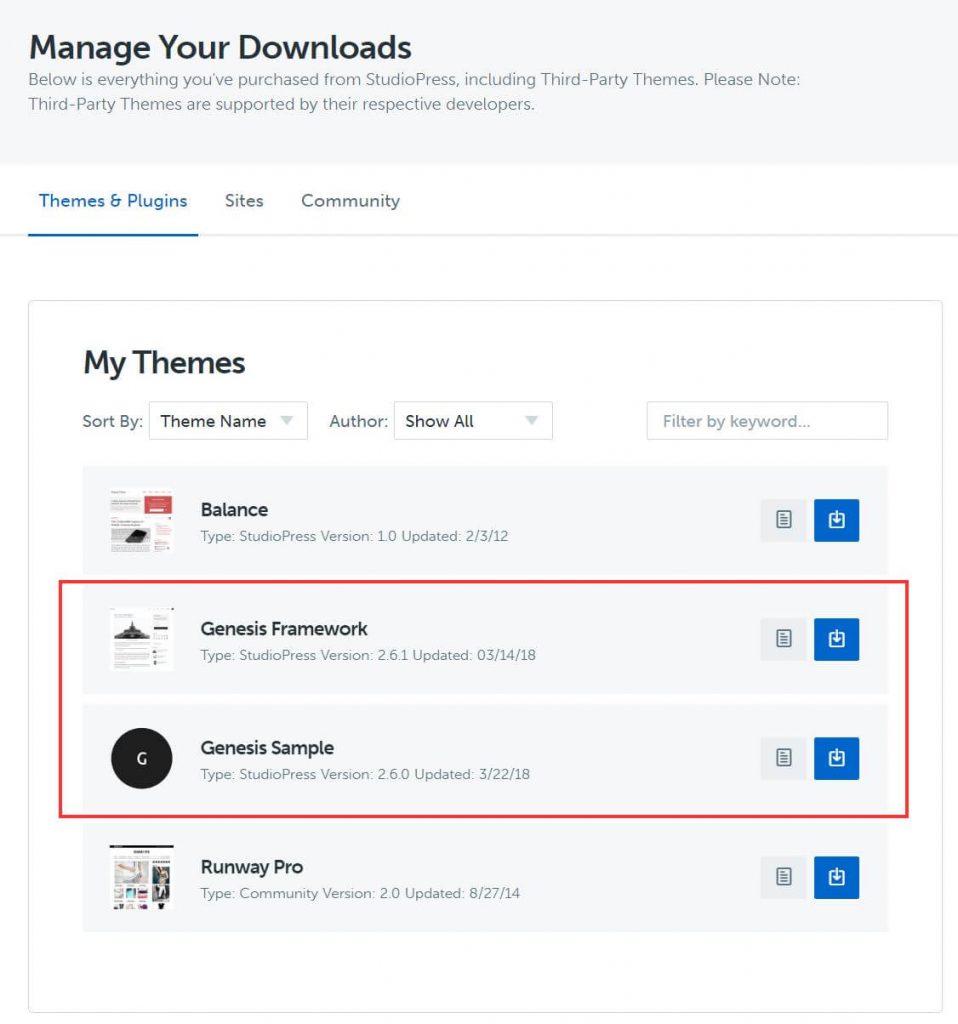
The first step in adding WooCommerce to the Genesis Framework is to install both components. You’ll need a license for the Genesis Framework, which you can obtain at the StudioPress website. After you got your license, you’ll receive a login to the download area for the Genesis Framework, which looks like this:
Go ahead and download the two highlighted themes. Depending on the license you bought, you might see more Genesis-based themes in this area. We’ll just need the Genesis Framework itself and the “Genesis Sample” child theme. The Genesis Framework provides the functionality of the theme, whereas the “Genesis Sample” is the child theme we’re going to add WooCommerce to.
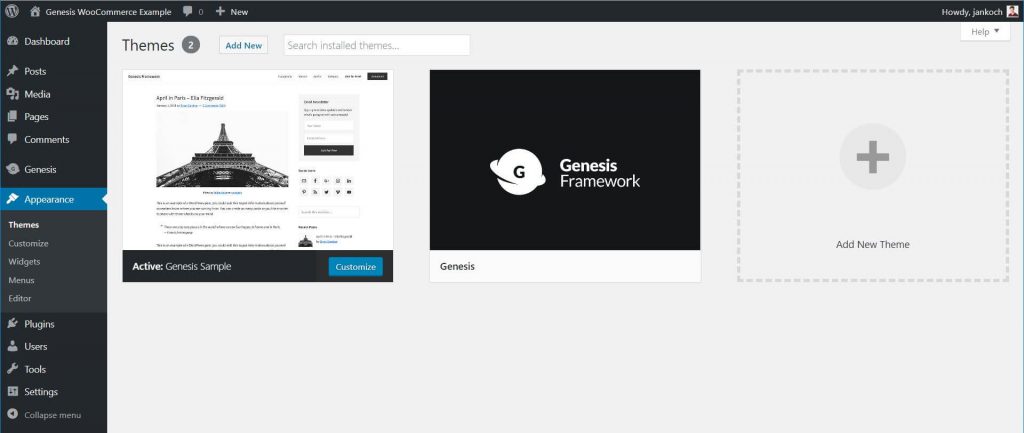
After you downloaded those two themes, head over to your WordPress site and install them. Activate the child theme, so that your theme area should look similar to this:
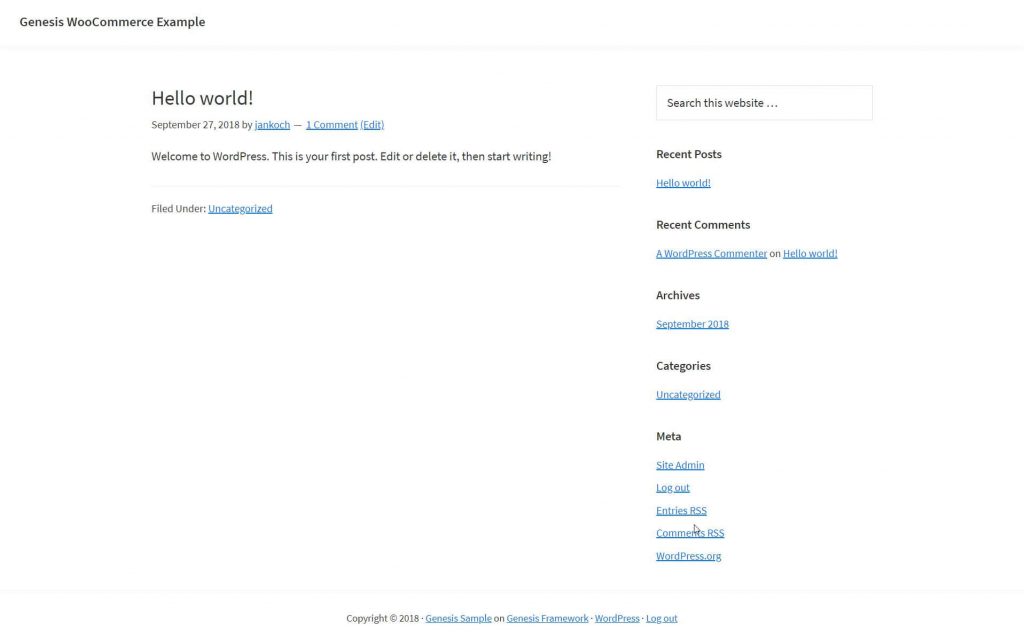
Depending on your setup, you might see other themes installed. In my example website (running on my local Docker environment), I removed all other themes to avoid cluttering up this tutorial. Unsurprisingly, the front end of the website turned into something that isn’t particularly interesting.
But no worries, we’ll add WooCommerce products to a new, static front-page soon.
Installing WooCommerce
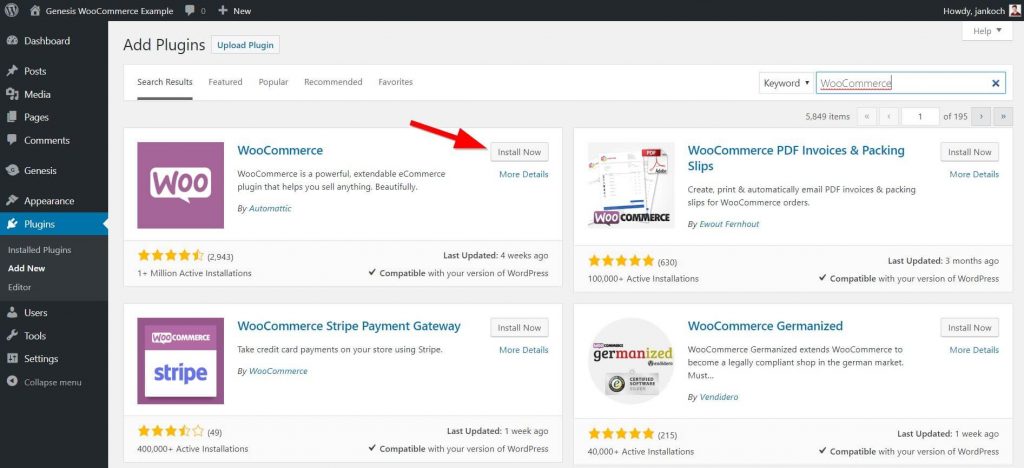
To do that, let’s get WooCommerce installed. You might already have extensions for WooCommerce in mind that you’d like to use, but please don’t jump the gun yet. Let’s first see how WooCommerce and the Genesis Framework play together. Go to the Plugins page in your WP backend and type in “WooCommerce”. You’ll see plenty of plugins coming up, but only install the official WooCommerce plugin for now. We’ll talk about extending the functionality of WooCommerce later in this tutorial.
After installing WooCommerce, you can run through their default setup wizard. That wizard will guide you through entering the information necessary to get started with selling your products or services through WooCommerce. You’ll be presented with options for the regular store information like address or currency settings, payment gateways, shipping methods, and costs, and other recommended settings like the Storefront theme (which we don’t use, we use our own Genesis Child Theme), automated taxes via Jetpack (which again, we won’t use) and MailChimp integration (which depends on your choice for your email marketing provider).
By default, WooCommerce offers the following payment options without any other extensions necessary: Direct bank transfer (take payment via BACS), check payments (take payments in person via checks), cash on delivery and PayPal standard. During the checkout process, you can additionally install Klarna, Stripe and PayPal Express Checkout. For the scope of this tutorial, we will also integrate Stripe to be able to accept credit card payments. Covering and comparing all three payment gateways would result in an article for itself.
Adding WooCommerce To The Genesis Child Theme
In order to fully integrate and customize WooCommerce with your Genesis child theme, we’ll need to add some data to the shop. Then you’ll see how products are presented and will be able to follow along customizing the child theme using the popular Genesis hooks, actions, and filters.
Usually, WooCommerce integrates nicely with most themes. The Genesis Framework is a different piece of cake though, as it is heavily relying on its own hooks and filters. While those make up the beautiful layout and customization options, WooCommerce needs to be integrated with those hooks and filters.
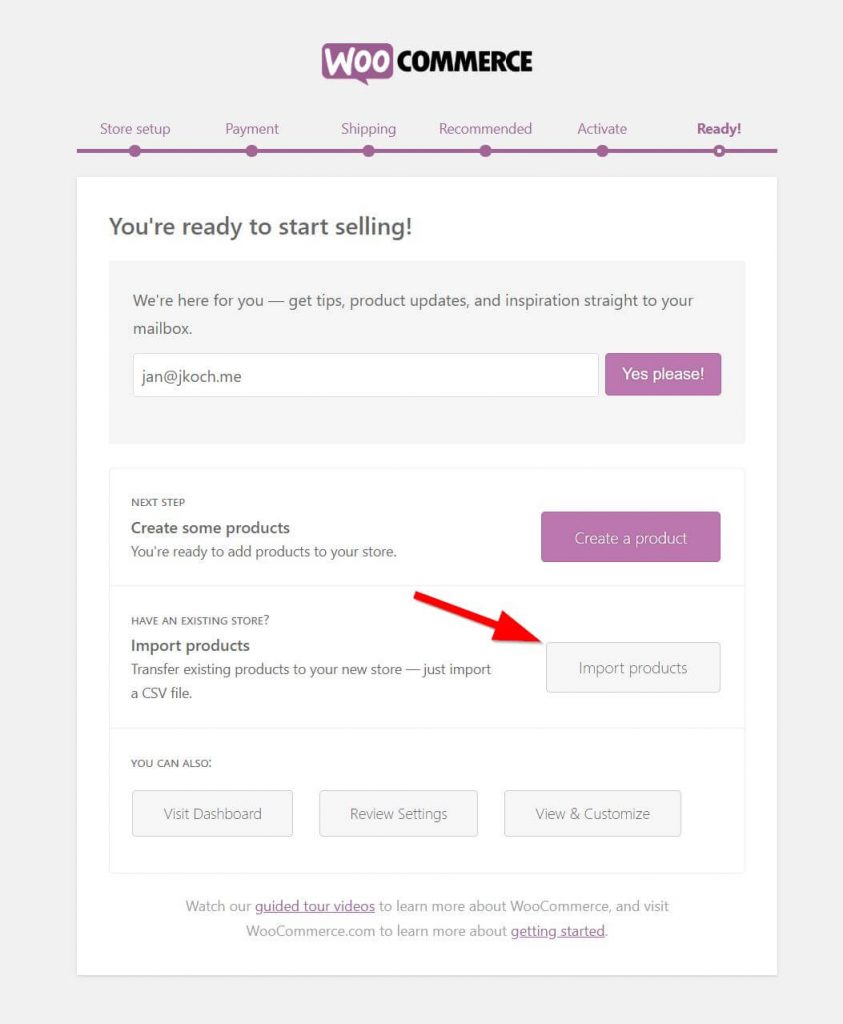
To do that and to check if our integration works, we obviously need some amount of product data. Otherwise, we wouldn’t have products in our shop to perform an optical validation of whether the products are displayed correctly. Fortunately for us, WooCommerce comes with a set of demo products right out of the box. You can use those products in case you don’t want to create your own products just yet. To install those, you can either run the regular WordPress importer or use the WooCommerce setup wizard like I’m doing in the screenshots below:
You can find the CSV file with the demo products in your plugins folder or by downloading WooCommerce again and unzipping the archive. Here’s the official documentation on importing WooCommerce sample data. After going through the import of the sample products, you should end up with 25 products in your shop – more than enough to follow along and to create a nice looking child theme. I’ll outline two solutions for integrating the shop with your theme. The first solution is your best choice if you’re not comfortable editing code files. The second solution is my preferred choice because it gives you more control and clarity about what’s going on. However, it’s more technical and will involve modifying your child theme’s function.php file.
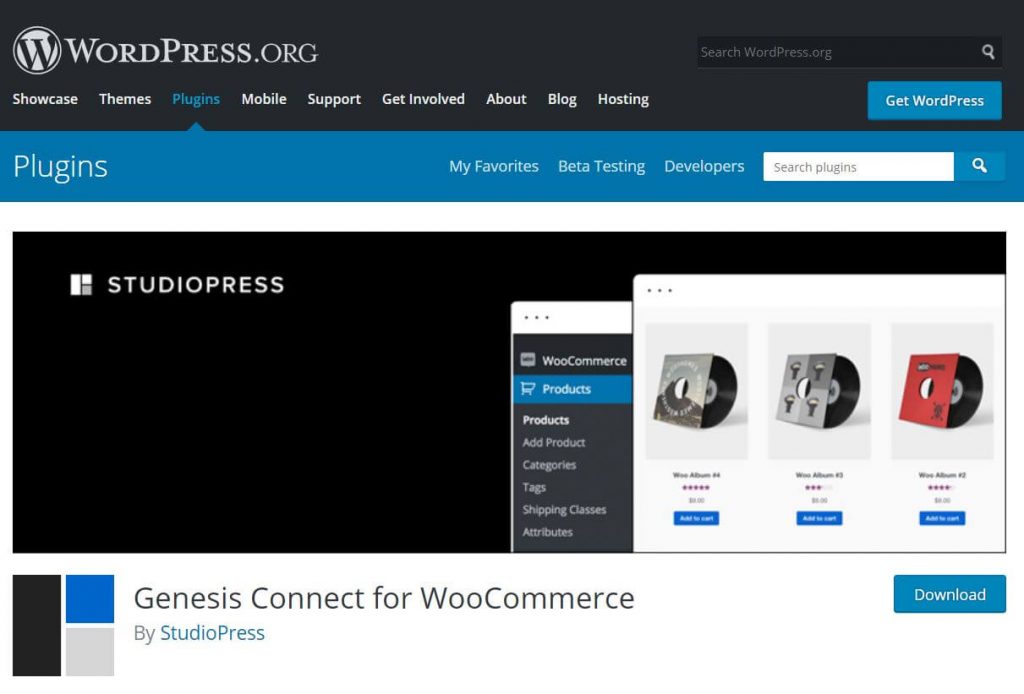
Solution 1: Installing Genesis Connect for WooCommerce
Right after going back to the WordPress admin area after installing WooCommerce, you’ll see a prompt asking you to install a plugin called “Genesis Connect for WooCommerce”. That plugin is needed and quite important for using WooCommerce with Genesis, as the theme framework introduces a number of their own hooks and filters. Out of the box, WooCommerce doesn’t know anything about those Genesis features – so simply copying the WooCommerce template files into the theme folder won’t work as expected. I highly recommend you check out the plugin description to fully understand what’s going on. To quote from the plugin description:
“This plugin replaces WooCommerce’s built-in shop templates with its own Genesis-ready versions, specifically the single-product.php, archive-product.php and taxonomy.php templates needed to display the single product page, the main shop page, and Product Category and Product Tag archive pages.”
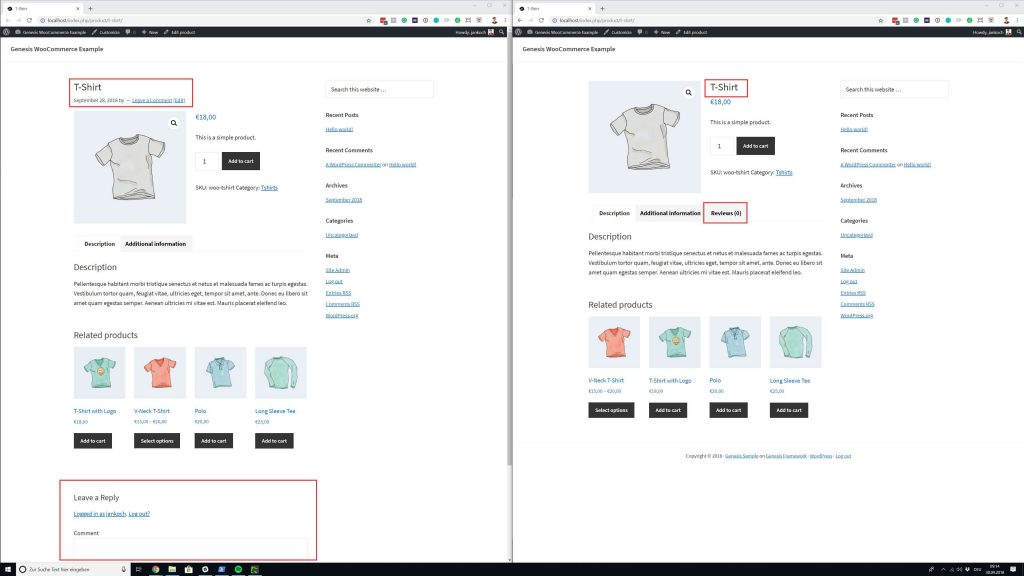
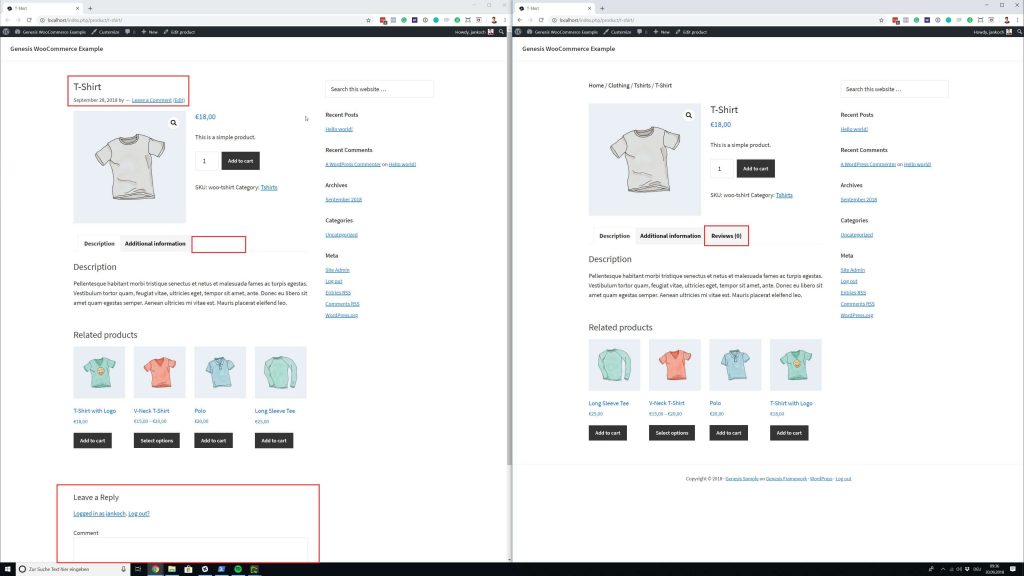
You can install the plugin right from the WP Admin area. After downloading and activating the plugin, the layout of the product detail page changes noticeably. Here’s a side-by-side comparison. The left side shows the product detail layout without the Genesis Connect for WooCommerce plugin being active. On the right side, the plugin is installed and activated.
As you can tell from the highlighted areas, four big changes have been made:
The title is now positioned beside the image instead of on top of it.
The metadata for publish date and author are gone for good.
The “Reviews” tab has been missing on the left side, it’s now added (the “Reviews” are activated in WooCommerce settings).
“Edit files in an upgrade-safe way using overrides. Copy the template into a directory within your theme named /Woocommerce keeping the same file structure but removing the /templates/ subdirectory.”
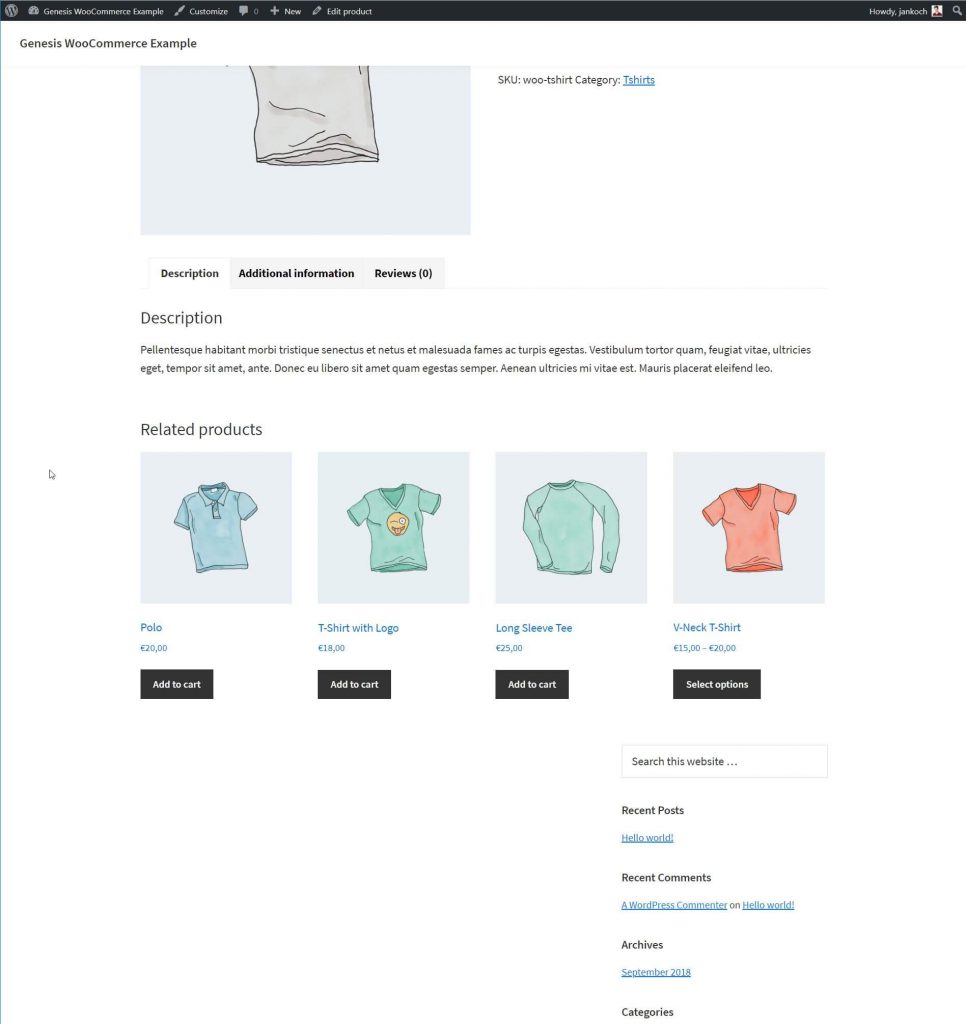
You’ll also want to declare theme support for WooCommerce in your theme’s functions.php file by using the “add_theme_support” function. Check this Github wiki entry for more details. Be aware though that this step will change the layout of the product’s detail page again:
You can tell that the sidebar is moved below the product and the
containing the product information is now at full width. That’s due to a major disadvantage of using the Genesis Connect plugin: the plugin can be using outdated WooCommerce template files.
As long as you don’t plan on coding your own WooCommerce template files or just want to use custom template files for emails and other non-frontend-related layouts, you should be fine with using the Genesis Connect for WooCommerce plugin. However, as soon as you want to customize the WooCommerce templates, you might want to look into solution 2 for integrating WooCommerce with the Genesis Framework.
Solution 2: The AlphaBlossom Method
I first came across this method on Tony Eppright on his AlphaBlossom blog. He outlines a method that removes certain WooCommerce actions for building the markup of WooCommerce pages and that replaces those actions with Genesis-based markup. I much prefer this approach to using the above-mentioned plugin, because it gives much more clarity about what’s going on.
You’ll want to be comfortable editing your theme’s function.php file to follow along. If you’re not, you can easily break the child theme and your site.
These are the code snippets that go into your functions.php file:
The beauty of Tony’s approach is that he leaves Genesis hooks in place. So if other plugins rely on those, they’ll still work as expected on the WooCommerce pages. And – other than the plugin above – the code will work with customized WooCommerce template files. In this tutorial, I’ve copied all WooCommerce templates to the Genesis Sample theme folder, so that the child theme is loading them. While the plugin broke the layout and moved the sidebar below the product content (as shown above), the next screenshot shows that Tony’s code is not doing any of that:
We see that the same four changes have been applied, but that the overall layout still works beautifully. The same is true if you were to check the Shop page.
Everything looks as expected and now you’re ready to further customize your Genesis-based child theme. Changing it’s name from “Genesis Sample” to your brand’s name or the client’s brand name probably is a good idea.
Chris Lema, our VP of Products and Innovation at Hostdedi, was recently interviewed by Christine Preusler from HostingAdvice.com to discuss our new Managed WooCommerce Hosting solution. The HostingAdvice.com article reviews the platform in depth, breaking down many facets of the plan, including the integrations with Jilt for cart abandonment, the types of stores this platform is made for, and the features it provides.
With new research supporting that many store owners are considering launching a store as a new sales channel in 2019 as a growth tactic, Lema decided it was time to launch some new Basic Plans that would help jump start stores to success more quickly. “It’s primarily for really small stores or owners with new ideas they want to try out,” Lema said. The new Beginner Plan starts at $28/month (after a 28% discount for the first two months).
You can automate your eCommerce or WooCommerce store and save a lot of time and sanity.
Let the bots do it.
Rather than being impersonal or expensive, simple automations can be personalized and easy. It’s well within reach of the average eCommerce shop.
In the recent How to Use eCommerce Automations for Your Store webinar Beka Rice, Head of Product for Jilt, and Chris Lema, Vice President of Products and Innovation for Hostdedi, explored automation.
What Is Automation?
Let’s be clear what we mean when we talk about “automation” for eCommerce.
Too often people have an adverse reaction to automation. Beyond the fictional fears of robot apocalypse or the genuine issue of automation replacing manufacturing jobs, when it comes to eCommerce automation, people still think negative with impersonal call centers or expensive factory undertakings.
Like this content? Subscribe now and have more just like it sent straight to your inbox.
But eCommerce automation is none of those things.
Context and data can make automation very personal and customized to each shopper.
Far from being expensive, some automations can happen with pre-built plugins that cost less than $100.
Automation may sound like something for factories, but most online stores are operations with one to five people, and that’s an ideal scale for automation.
The reality is people often think of larger and grander automations, and overlook the simple ways we already use automation every day:
Calendar alerts: Automatic reminders for events or meetings.
Email list opt-in: Automated subscriptions based on form entries.
Transactional emails: Emails triggered automatically by order activity.
No one would think of these automations as too expensive or impersonal. They’re perfectly normal.
Most online stores are already using automation without even realizing it. Adding more automation will only help.
Why Use Automation?
Automation is suitable for both customers and merchants. For merchants, automation frees them up to focus on other things.
Most merchants are overwhelmed. They’re responsible for a lot, and any time you can take something off their plate or make a task faster, it’s a big win. A lot of store owners spend their time updating their store when they could be focused on marketing tasks that would bring in more income.
Automation allows merchants to:
Purchase focus for their entire team: Automation frees up mental energy enabling merchants to focus on more important things. It’s a way to buy focus.
Reduce or remove low-impact tasks: Sometimes we don’t even realize how much time teammates are spending on repetitive tasks.
Focus on high-impact actions: What’s going to have the most significant impact on the bottom line?
It would be ridiculous to send out every receipt manually. That’s what automation is for. Likewise, other tasks don’t need to be done by hand.
So how is automation good for customers? Automations can streamline and speed up processes, which means customers get better and faster service. Also, when merchants are freed up to focus on other things, that means store improvements that will ultimately benefit customers.
Everybody wins with automation.
What Can be Automated?
These are some areas where you can focus your eCommerce automation efforts:
Product setup & management
Customer browsing & shopping
Purchasing & fulfillment
Post-purchase communication
Marketing & other customer messaging
We’ll explore each of these areas in more detail:
1. Product Setup & Management
This is the best place to start for automations. Once you have a workflow, you can automate it.
Adding inventory:WP All Import can automate product updates.
Stock notifications: WooCommerce has notifications for low and out-of-stock items.
Sales: WooCommerce can schedule the start and end of sales.
Brick and mortar stores have the option of welcoming customers as they enter a store. You can’t do that online, but there are ways you can analyze what shoppers are doing and give them contextually helpful messages.
Welcome emails:Jilt or Mailchimp can be used to send welcome emails to new customers.
See what people are doing: You can use behavioral analytics with Google Analytics or Mixpanel to help gain insight into customer behavior.
Start work on messaging:HelloBar or Cart Notices can inform customers of sales or fees.
Abandonment recovery: Jilt also sends emails to recover abandoned carts.
3. Product Fulfillment
You can streamline the order management and package fulfillment process. After products, this is the second-best place to start automating your online store.
4. Post-Purchase Communication
It’s important to follow up with customers promptly after they’ve made a purchase. This is an excellent way to build loyalty.
5. Marketing & Other Customer Messaging
You can also automate customer service messages, advertisements, and more.
Behavioral emails:Follow-Ups can email customers based on review, booking, or points activity.
Paid advertising:AdRoll can create and manage retargeting ads.
Customer service:Help Scout has helpful workflows to automate processes and answers to email.
Segment customers: You can add customers to a Facebook audience with Zapier.
How to Find Things to Automate
The best way to figure out what to automate is to look at what you’re already doing and see how it can be done more efficiently. If someone is doing the same thing over and over again, that can probably be automated. If you’ve already made the decision, then the hard part is done, and the work of implementing that decision can be done automatically.
Here’s where to look:
Work log: What are the top five management tasks you spend your time each week?
Workflow: What steps are taken for every order or new product? Follow the lifecycle.
Optimize impact: What are the three most and least impactful things you spend time on? What do you love or hate to do?
Just watch: For developers working with merchants, ask your clients if you can watch them manage their store. Have them share their screen and see what they do. You’ll likely see things they do every day that can be automated.
Is It Worth It?
It’s important to consider the cost of implementing automation. More often than not it’s going to be worth it. So just do it. There’s a danger that you can spend more time evaluating whether or not it’s worth doing than it would take to implement.
But if you’re unsure about automation, calculating the value can help you see the benefits. Too often merchants think some repetitive task isn’t taking up too much time, but the reality of a daily task adds up over time.
Add up that cost and compare it to what automation would cost. If automation will save frustration or mental energy, work that into the equation as well. There’s also an opportunity cost where you’re missing out on doing something else because you’re spending time on these repetitive tasks.
eCommerce Automation
Automation can take care of menial tasks that would sap your energy and focus. Rather than replacing people, automation frees you up to do something else. That means your eCommerce store can get better and better, thanks to automation.
With our Managed WooCommerce Hosting solution, your store will be lightning fast, leading to more conversions and revenue while we take care of the heavy lifting with hosting. That way, you can focus on creating automations.
Have you ever had a current or past client come to you asking for help with something just outside of your “wheelhouse?” Maybe they want to incorporate digital product sales, courses, or a community platform.
How to improve conversion rates is every marketer’s top concern.
After focusing on various business strategies like content marketing, SEO, paid marketing campaigns, and social media, most ecommerce entrepreneurs expect the conversion rate of their stores to skyrocket.
However, if you’re still driving non-converting traffic after applying these strategies, you may be missing out on other helpful ecommerce conversion optimization approaches.
After all, some often-neglected ecommerce conversion hacks work for most businesses, whether your website goal is more orders, link clicks, or sign-ups. If you want to know more about them, keep reading.
Ecommerce conversion rate is the percentage of conversions from an online store. Ecommerce conversion rate optimization (CRO) happens when you achieve a higher conversion rate through website improvements.
Ecommerce conversion optimization helps you earn from traffic way more than you spend. It reduces customer acquisition costs and increases the average order value and customer lifetime value (CLV).
For example, if a website has monthly traffic of 2,000 visitors, and the website conversion rate goes from 10% to 25%, the total number of conversions will go from 200 to 500.
Learning how to improve conversion rates is vital for ecommerce businesses because the average conversion rate for online store owners is roughly 2%.
To grow your business with effective ecommerce conversion hacks, you have to:
Identify and track your conversion metrics
Highlight areas you need to optimize
Take steps for ecommerce conversion optimization
Ecommerce Conversion Rate Optimization
1. Do A/B testing
2. Create an excellent value proposition
3. Build customer trust
4. Make your website mobile-responsive
5. Offer incentives
6. Improve your website performance
7. Provide an outstanding user experience
You’ll find a ton of tactics on how to improve conversion rates online. But we’ve compiled the seven most effective ecommerce conversion optimization techniques for your website.
Here are the seven best ecommerce conversion hacks.
1. Do A/B Testing
You can use A/B testing, also called split testing, to identify which ecommerce conversion hacks you need for your online store. A/B testing lets you run different instances of your website to see which one draws more conversions.
Through this method, you can quickly learn about your ecommerce conversion optimization needs and find out what interests your website’s visitors when they browse your website.
We recommend A/B testing your:
Webpage designs
Headlines
Landing pages
Content
A/B testing is essential to improving conversion rates because it helps differentiate between your working business strategies and the areas you need to improve.
You should ideally pair your A/B testing with a heat map. That way, you’ll know which webpages on your website attract more visitors and which webpages need improvement.
2. Create an Excellent Value Proposition
Writing an excellent value proposition is a superb way to improve conversion rates. You should be able to communicate your unique selling proposition (USP) right from your homepage.
Your value proposition should tell potential customers:
How your brand stands out from competitors.
How your offer will improve their lives.
Why they should buy from you.
You can A/B test your USP to see which one resonates the most with your target audience.
3. Build Customer Trust
Customer trust is crucial to improve conversion rates on ecommerce websites.
According to HubSpot, 55% of consumers now have reduced brand trust. Meaning that if you want to increase conversion rates, you need to build trust by getting past their threshold with:
4. Make Your Website Mobile-Responsive
Mobile responsiveness is an ecommerce conversion hack you need to implement right now. It’s an easy way to improve conversion rates of online stores.
In the U.S. alone, mobile ecommerce accounts for $47.8 billion in revenue.
That means you could be losing an influx of conversions if your ecommerce website is not mobile-friendly.
5. Offer Incentives
One of the easiest ways to improve conversion rates is incentivization. When you offer incentives to new and existing buyers, such as:
You give way to more ecommerce sales. Incentivization is an ecommerce conversion hack that encourages customer loyalty and conversions.
6. Improve Your Website Performance
Slow ecommerce website loading and crashes will lead to a drastic reduction in ecommerce conversion rates. According to Neil Patel, 47% of consumers expect your website to load within two seconds.
If you have a slow-loading ecommerce store, you will:
To boost website speed and improve conversion rates, you can use the following plugins and tools:
Traffic surge control tools to improve page speed when there’s high website traffic.
Caching plugins to boost website speed.
File compression tools for codes and media files.
7. Provide an Outstanding User Experience
Providing a good user experience is another results-driven way to improve conversion rates.
Outdated or old-fashioned website designs lead to reduced conversions. Use reliable website setup solutions to create an ecommerce store with page elements like:
Unique, industry-specific design.
Easy-to-use UX design.
Navigation bar.
Menu bar and footer.
Clear call to action (CTA buttons).
Simplified checkout process.
Multiple payment methods.
Proactive support tools — live chat, help desks.
Final Thoughts: 7 Ways To Improve Ecommerce Conversion Optimization
As you can see, there are no secrets about how to improve conversion rates for your ecommerce store. The process is straightforward, and you can start it by applying the seven ecommerce conversion hacks we gave you.
Strategies like incentivization, providing a better user experience, and testing instances of your website are practical and efficient tweaks to achieve ecommerce conversion optimization.
If you’re having trouble with optimizing your ecommerce store for conversions, don’t fret. Let us help you. Try fully optimized WooCommerce hosting by Hostdedi today.
At the beginning of 2017, Matt Mullenweg announced an ambitious project to replace the WordPress editor with a modern block-based editor. Named Gutenberg after the inventor of movable-type printing, the new editor was developed as a feature plugin and then released as the Gutenberg plugin. If all goes according to plan, Gutenberg will be merged into WordPress later this year with the release of WordPress 5.0.Read More »


