CAll Us: +1 888-999-8231 Submit Ticket

What’s a Tracking Pixel and How Can I Install and Use It on My WooCommerce Store?

Tracking pixels. Retargeting pixels. Conversion pixels. Regardless of what you call it, a pixel can help you increase sales and better measure your own marketing efforts. But what is a tracking pixel and how does it work? How do you install it, and what are some real-world examples of how to use it?

Keep reading to learn more about how to use tracking pixels, pixel based tracking, and adding a tracking pixel to a website.

What Is a Tracking Pixel and How Does It Work?

A tracking pixel is a 1×1 pixel graphic that tracks web traffic, site conversions, user behavior, and more on at a site’s server level. This enables ecommerce store owners to gain a deep understanding of how users interact and respond to their ads, their email campaigns, and their site as a whole.

Even though a pixel is very small (and often completely hidden by developers with CSS), its benefit on marketing is huge.

Functionally, cookies and pixels are similar. Both track user behavior across web sites, and both can be used to serve ads to people.

Cookies can also be used to make sure the website remembers certain user settings, like your Facebook username, so you don’t have to type it in every time.

The difference is where the information is served and kept. Pixels are made to send information to servers, whereas cookies are saved in your browser. So, a pixel can follow a user across devices, but a cookie cannot. That means that someone can visit your site with its pixel on their desktop, and you can serve them retargeting ads later on their mobile device.

Additionally, users can block cookies on their browser. Some users have big concerns about cookies and privacy, so they disable cookies. Pixels, as of now, cannot be disabled in this way.

Adding a Tracking Pixel to a Website

There are a few ways for adding a tracking pixel to a website. But first, you need to create a pixel.

To create a pixel, you need to go to the advertising platform you’re using and have them generate one for you. We’ll use Facebook as our example here, since it’s one of the most popular tracking pixels. Your Facebook pixel can be generated within Ads Manager, under their “Pixels” tab. Simply click “Create a Pixel,” and Facebook will generate your pixel.
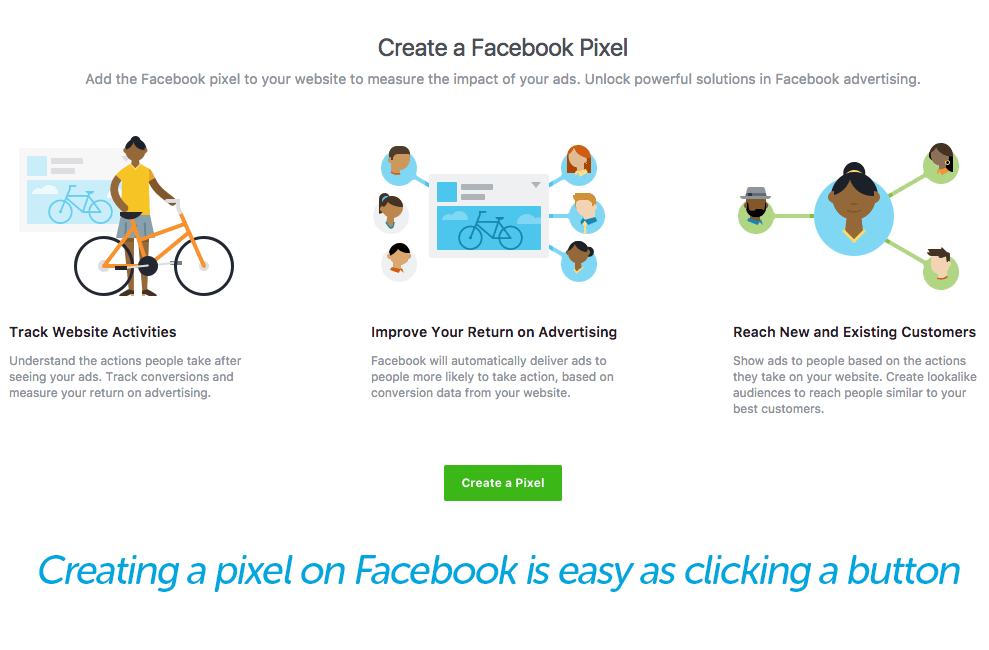
Creating-a-pixel

Keep in mind, this pixel is unique to you and your brand. As Facebook put it, it’s “one pixel to rule them all.” If you run more than one brand, you’ll need to create different pixels for different ad accounts. Next, you are ready for adding the pixel to your website.
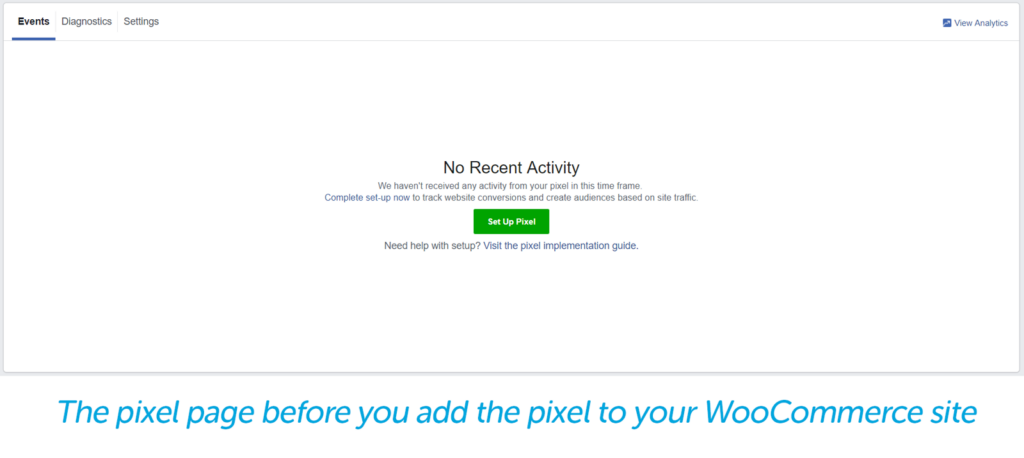
No recent activity, setup a pixel
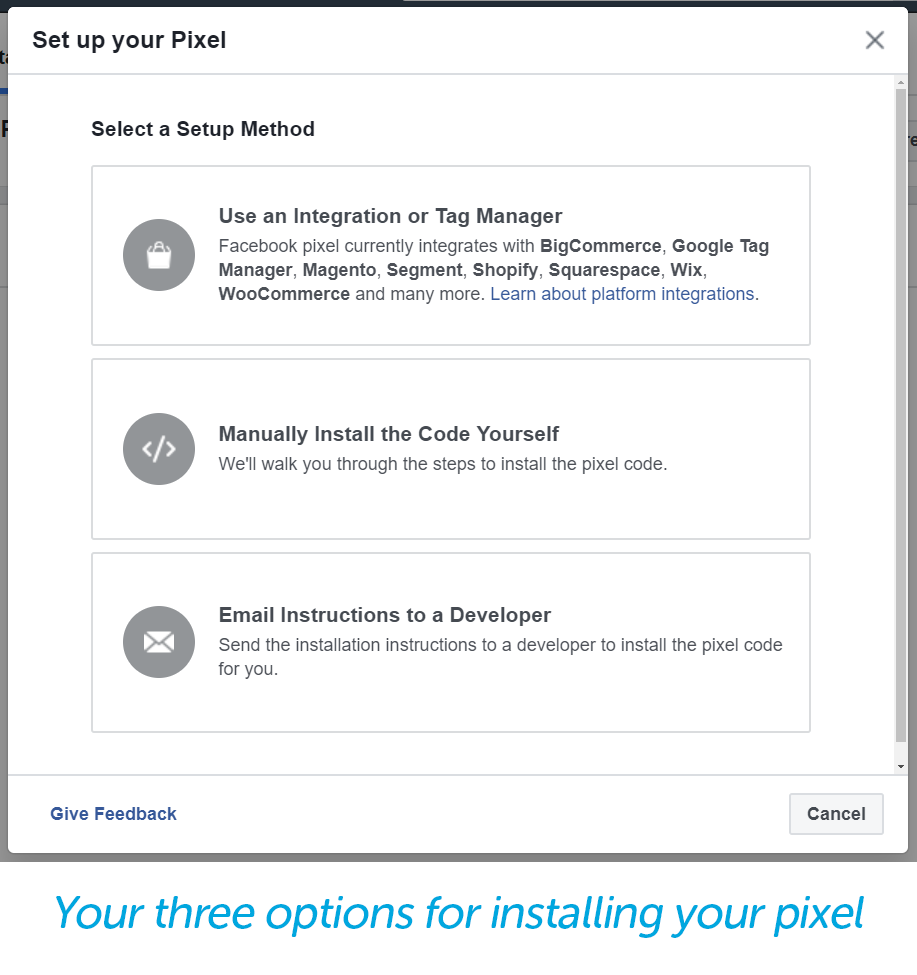
Install pixel options

Email Code to Your Developer

If you have someone who typically makes all site updates for you, Facebook has an easy way to just email them detailed instructions. If you’re the one who makes site updates, they have a set of walk-through instructions that will explain to you exactly how to install the code.
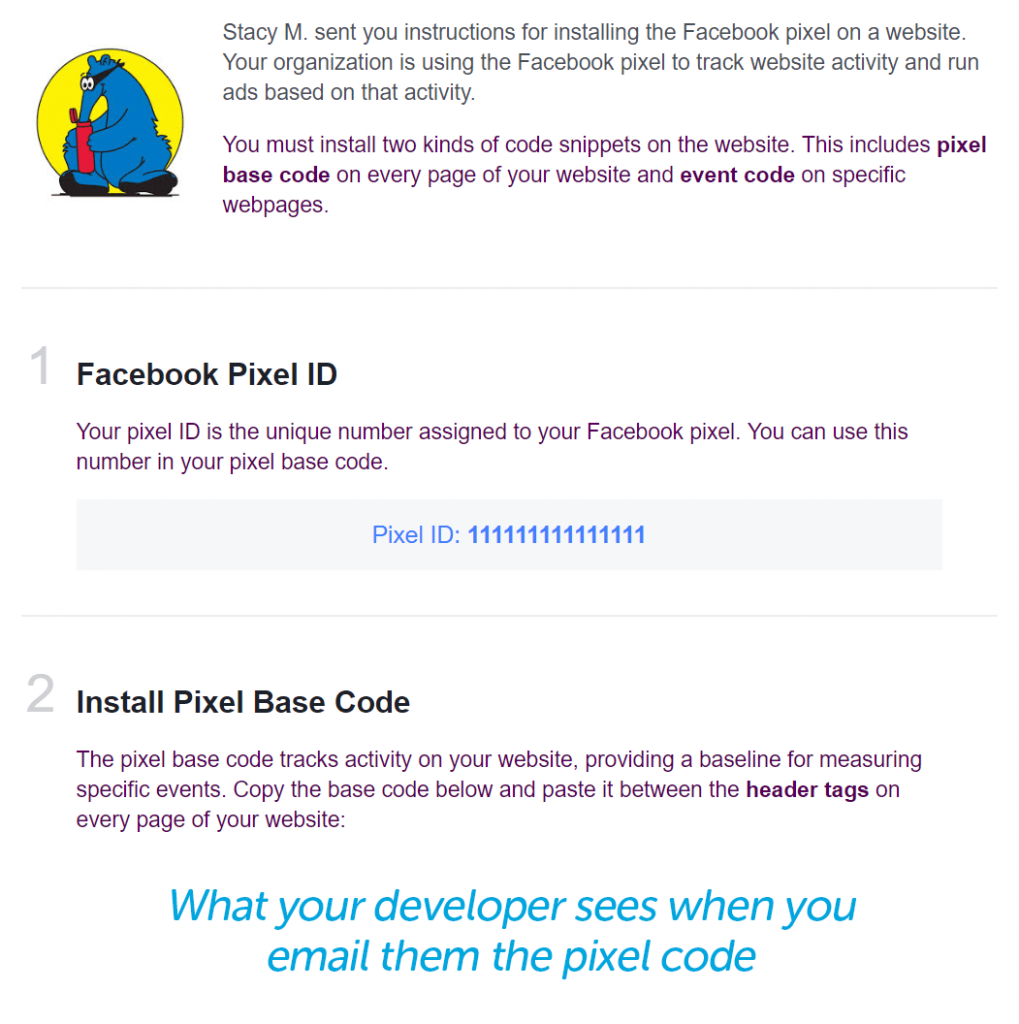
what the developer sees when you email the code

This email will contain four items for your developer:

  1. The Facebook pixel ID itself. This number is unique to your advertising account in Facebook.
  2. The base code that the developer will be installing. The email details exactly where your developer should place the code and the exact code itself. It’ll be copy and paste from there! There will also be a note for your developer about data matching, which we’ll explain more below.
  3. A link to details about how to use the pixel to track events, such as “add to cart,” “contact,” “find location,” “purchase,” and more. This is as simple as copying and pasting a small additional snippet of code into the base code included in the email.
  4. Instructions on how to check to see if the pixel is working. If your developer doesn’t have access to your Facebook advertising account, you may have to do this. It could take up to 20 minutes, but you check pixel status on the same page where you sent your developer the code in the first place.

Now, about data matching (mentioned in point two above). Data matching is how Facebook matches actions taken on your website with Facebook users. According to Facebook, this helps to increase the effectiveness of conversion reporting, ad optimization, and targeting.

Developers used to have to manually insert code provided by Facebook to use this feature. This can still be done, but Facebook updated their code to allow advertisers to automatically use data matching with the click of a toggle. This can be turned on for new pixel users under pixel settings.
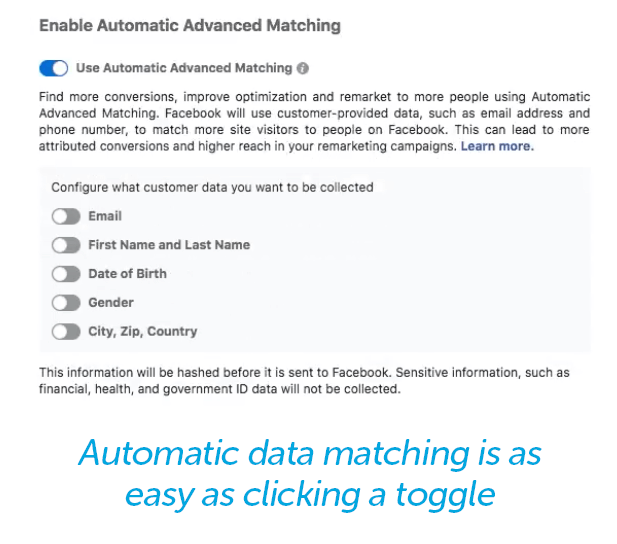
Auto data matching toggle

Add the Code Yourself

It might sound difficult, but this is usually very easy to do if you have any experience with HTML. If you don’t have HTML experience and don’t have someone who can help you, skip ahead to the next section for an even easier installation method.

You just have to paste the entire section of code they give you into your site header, between the  tags.
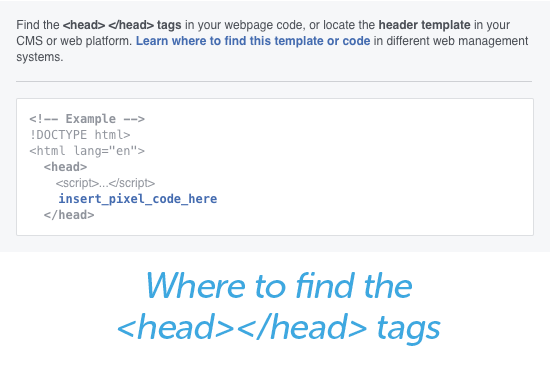
where to find head tags

You’ll want to install the code in the header vs. any other place on your site both because your header should be on every page of your site, and because it loads before anything else. If your pixel was in your footer, which loads last, users might take several actions that your code is unable to track.

The location of your head tags varies by website platform, but in WordPress and WooCommerce, it’s found in your Appearance settings.

As an example, we will use a WooCommerce-enabled site from our friends over at Secret Aardvark Trading Co., a hot sauce company based out of Portland, OR. who were kind enough to share their site.

First, we open up their WordPress Dashboard. On the left-hand side of the page, hover over the menu item that says “Appearance” and select “Editor.” At this point, you may get a warning message that lets you know that this area is for advanced users.

Dismiss it if you feel confident. If not, hit the back button and move on to the next section for futher directions.

Under “Theme Files,” select “header.php.”
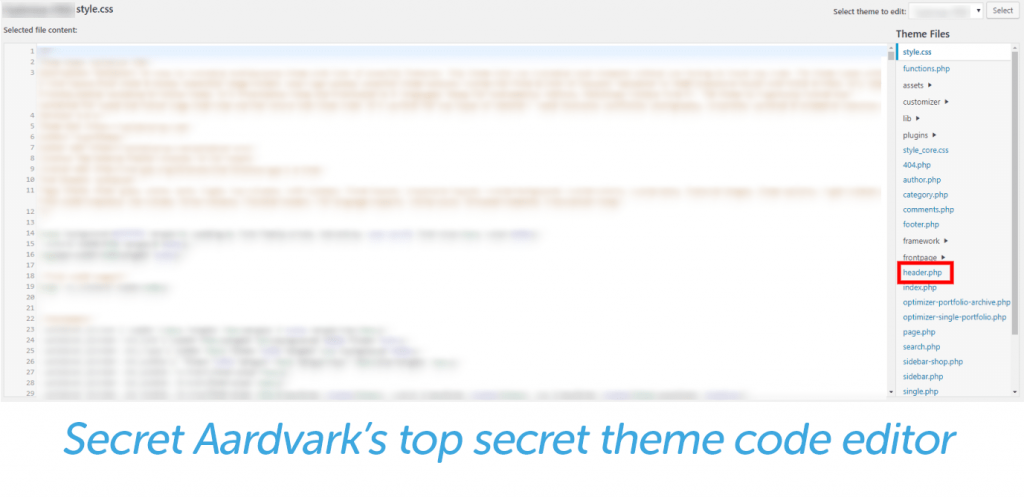
secret aardvark theme code editor

In Secret Aardvark’s theme, the  tag starts on line 19 and ends on line 32. You can insert the code anywhere in that area.
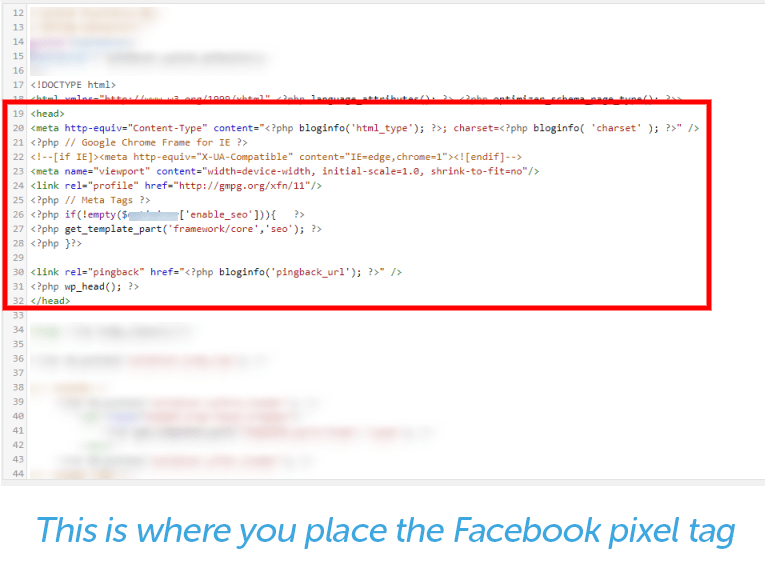
Place pixel in the head tag

Voila, you’ve added your pixel!

Quick note: When you edit a  tag, you’re editing the theme that’s installed on your site. If you change themes, you’ll need to add the pixel again. When you click on the “Editor,” the default view is for your site’s active theme, but you can edit any theme you choose. This is helpful if you’re in the process of moving to a new theme and want to make sure everything is set up correctly before you launch.

Add the Code With an Integration Manager

Since pixels have become so popular over the past few years, numerous popular website platforms (including WooCommerce) have made it even easier to install tracking pixels.

Instead of having to find header tags within your theme, with WooCommerce and other popular platforms, all you have to do is add a plugin, which you can download straight from Facebook and then upload to your WooCommerce store.
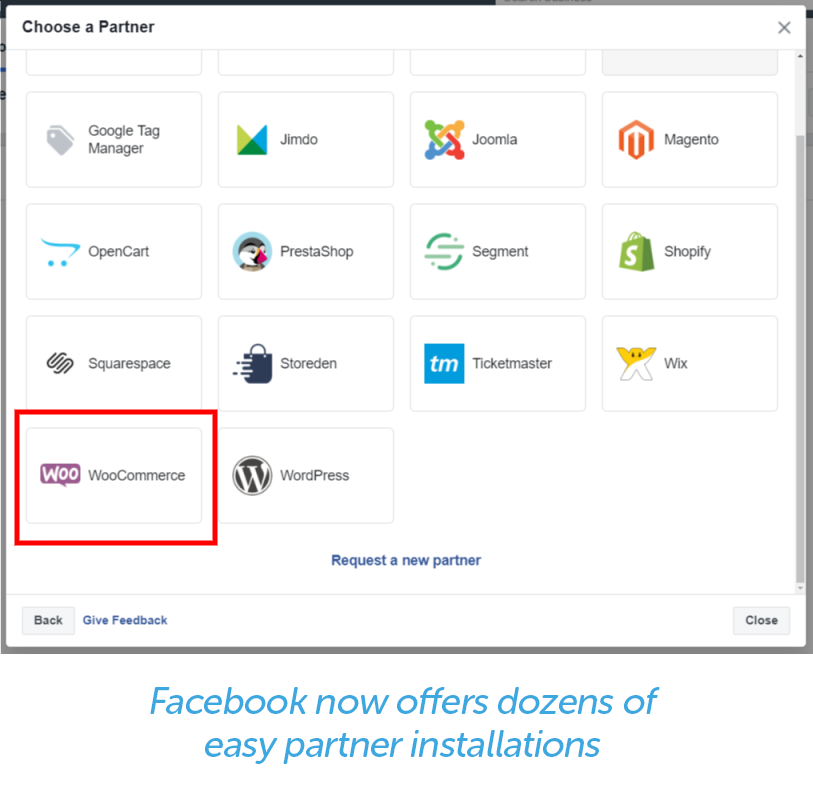
Easy partner installations with integration manager

After you select your partner (WooCommerce, in Secret Aardvark’s case), you download the Facebook Pixel Extension.
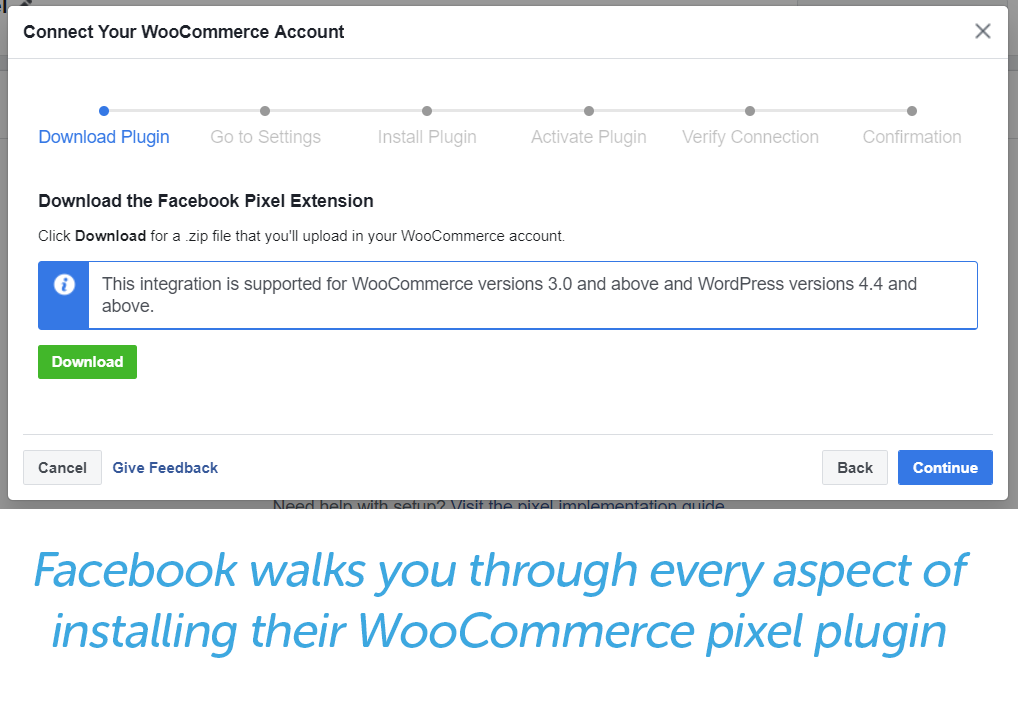
facebook prompts for connecting your woocommerce account to the Facebook pixel extension

After the file downloads, go back to your WordPress dashboard, hover over “Plugins” on the left sidebar navigation, and select “Add New.”
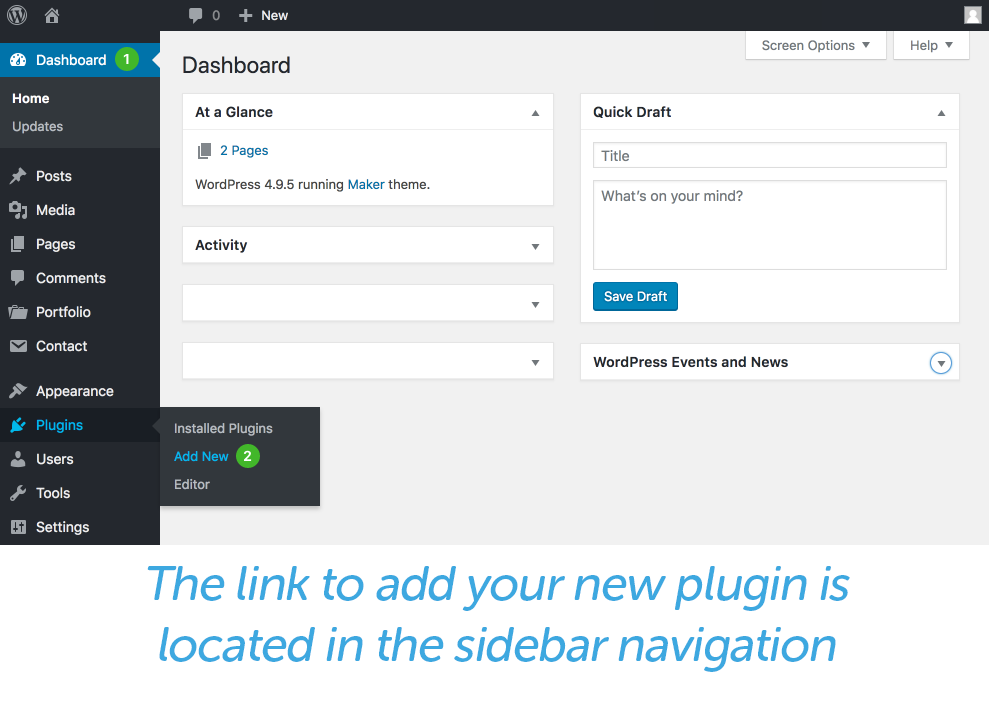
new plugin link in sidebar navigation WordPress

At the top of the Add Plugins page, right next to the header, you’ll see a button that says “Upload Plugin.” Click it! An area will pop up on the page that says, “If you have a plugin in a .zip format, you may install it by uploading it here.” Upload and click “Install Now.”
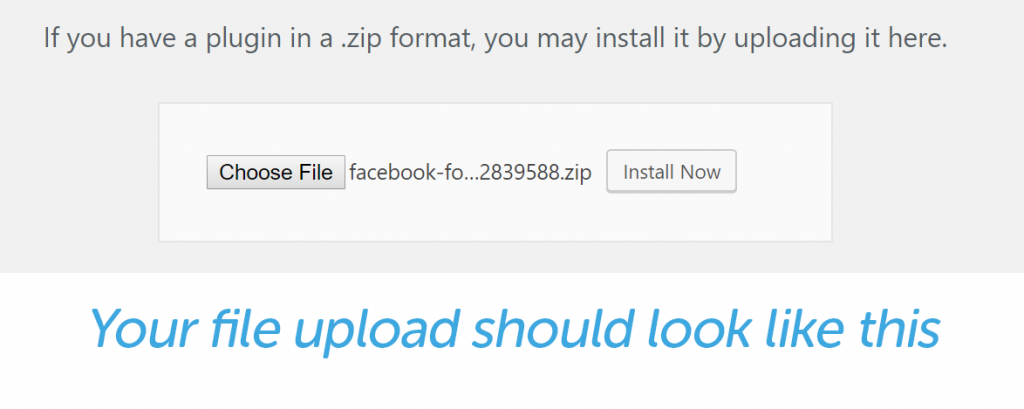
file upload prompt

When that finishes uploading, go ahead and select the blue “Activate Plugin” button.

Next, go to view all your plugins and select “Settings” on the Facebook plugin. From there, you’ll select what page you want to set up the pixel for.
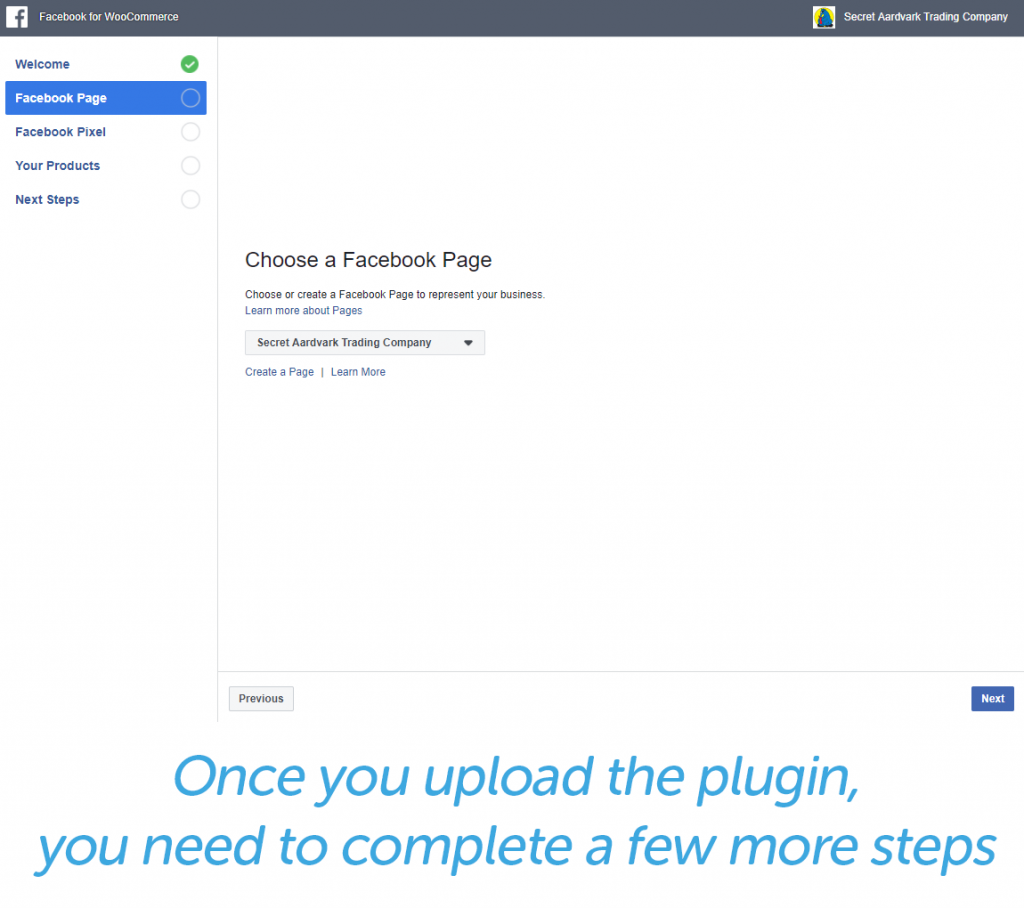
choose a facebook page

The next page will be dedicated to the Facebook pixel. As you can see from the Secret Aardvark example, their pixel of choice is already installed, and advanced matching is selected. This is how the plugin installs by default.
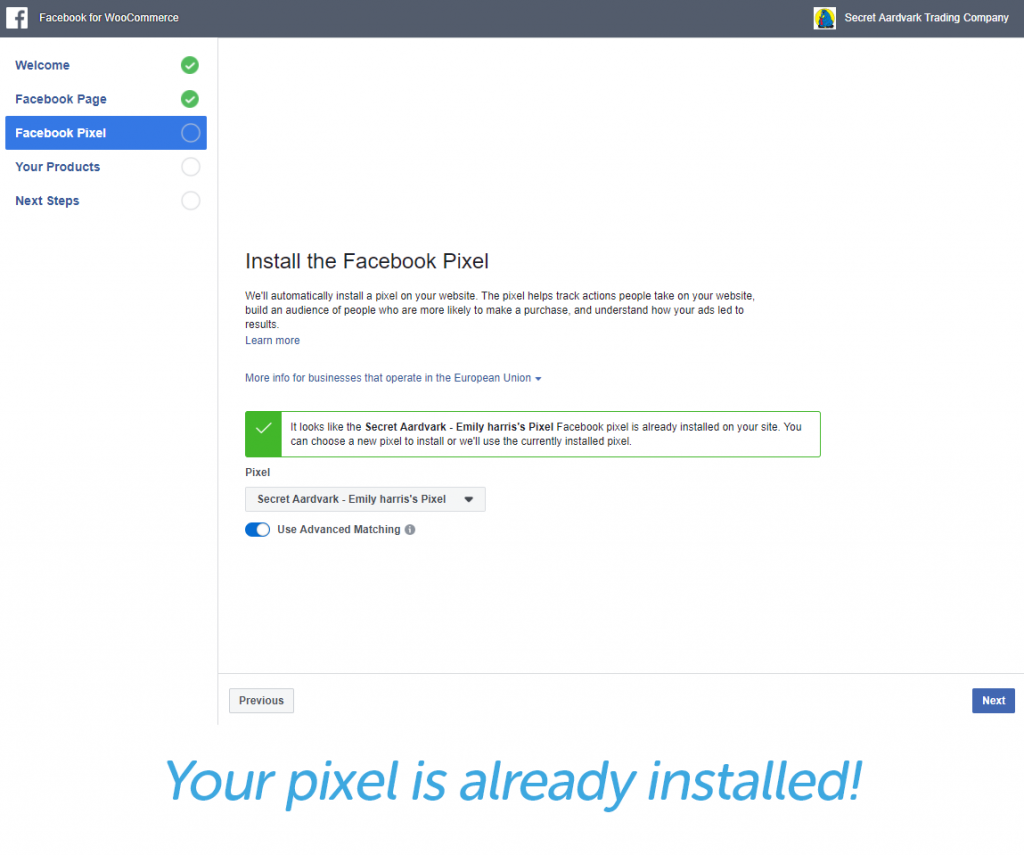
Facebook pixel already installed

Next, you can automatically import your catalog of products to Facebook, which makes selling on Facebook even easier.

After you finish running through those settings, you’ll need to keep your browser open so that Facebook can sync with your WooCommerce account.

Go back to Facebook and click the green “Verify” button in the plugin installation tutorial.
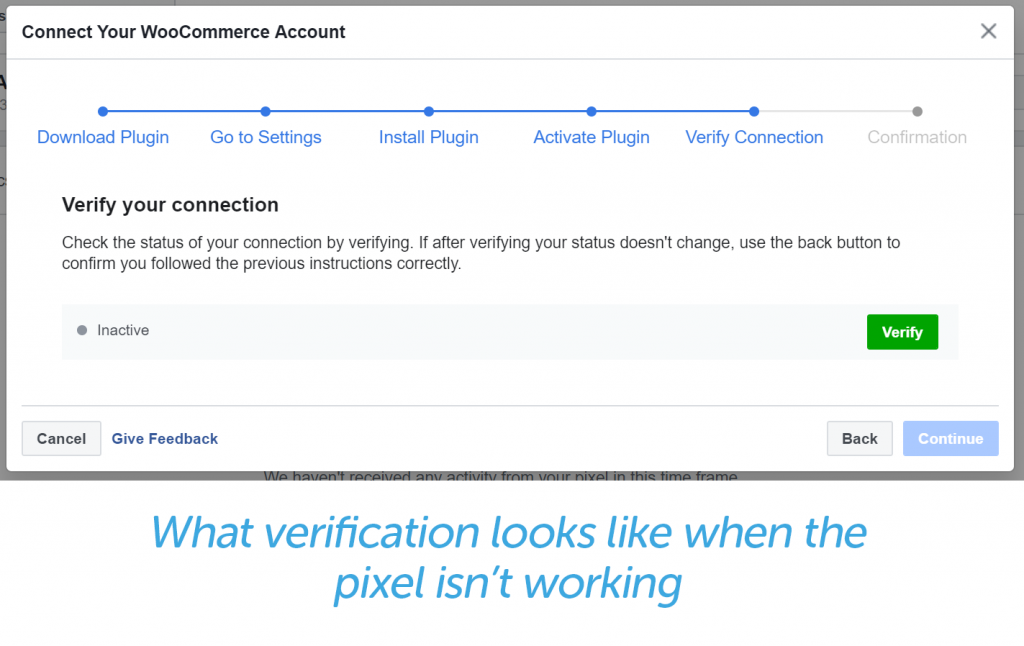
Inactive verification

If all goes well, you should have an active pixel!
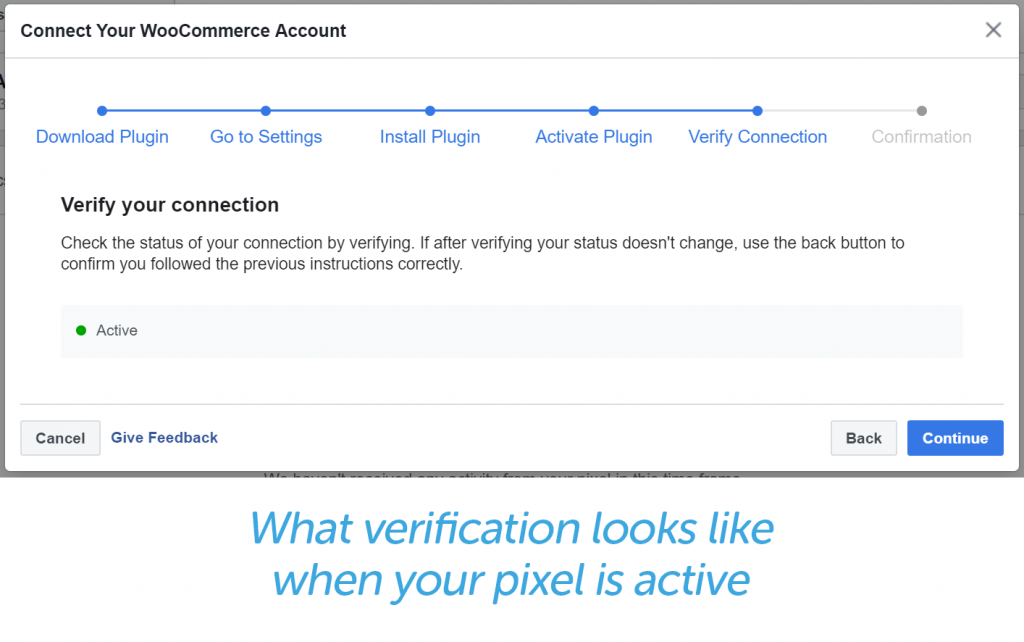
Active Pixel verification

If it doesn’t look like your pixel is verifying, wait 20 minutes and then try again. Sometimes it can take awhile for the pixel to update.

Using a Tracking Pixel

A number of advertising platforms have tracking pixels, including Twitter, LinkedIn, and Facebook. All tracking pixels are installed similarly, and serve similar functions. The Facebook tracking pixel is most popular pixel associated with advertising, so we’ll focus on that one.

The Facebook tracking pixel has four main purposes. It can:

  • Measure cross-device conversions
  • Allow you to show ads to those most likely to convert
  • Create retarget visitors to your website across devices
  • Teach you about how people use your site once they click on an ad

Facebook’s tracking pixel is most commonly used to:

  • Boost a post (either an organic page post or an ad)
  • Send people to your website
  • Increase conversions on your website

Increasing Conversions

Increasing website conversions is easily the most popular use of tracking pixels. This most often means a purchase, but when you set up a conversion-oriented campaign in Facebook ads, it will track all available conversions, like adding a product to a cart, initiating checkout, filling out a lead form, or viewing a specific page.

That means you’ll be able to see how many full purchase conversions you have, but you’ll also see how many people viewed your page, how many people have added items to their cart, and more.

To build an ad that utilizes pixel conversion tracking, go to your Facebook Ads Manager homepage and select the “Create Ad” button.
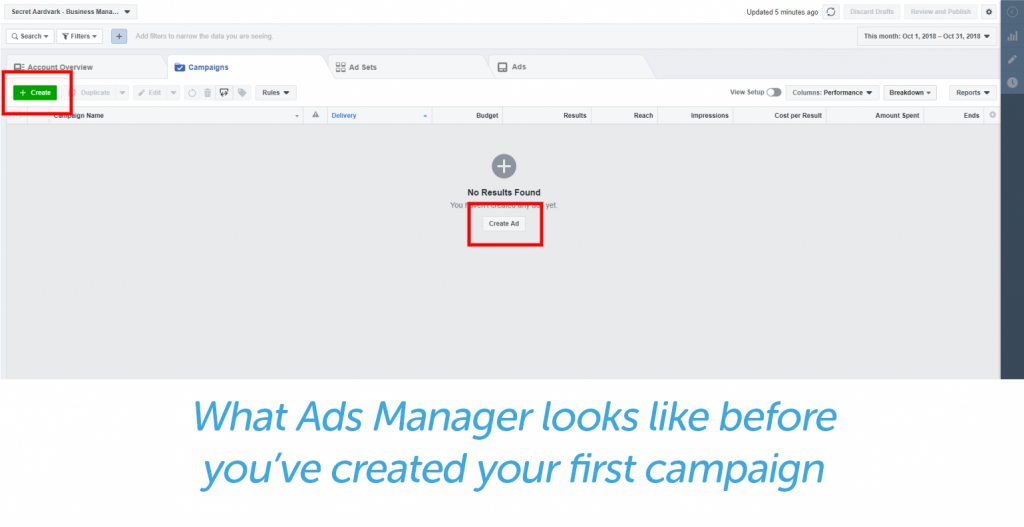
Ads manager before first campaign

The first thing you need to do is create a new campaign with a conversions campaign objective. For this example, Secret Aardvark is going to create a campaign encouraging Ohioans near a Meijer grocery store to purchase Secret Aardvark in Meijer.
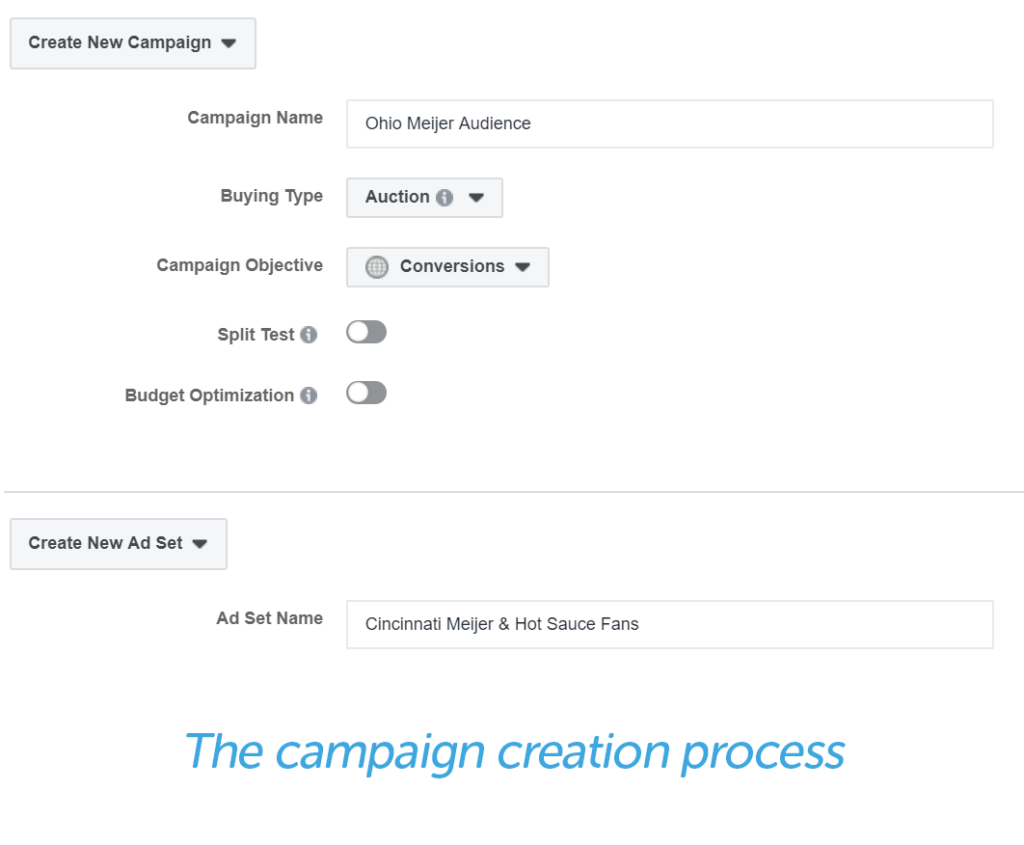
Campaign creation process

Since this relationship with Meijer is new, Secret Aardvark wants to promote in-store purchase over online purchases. Then, they’ll create an ad set. In this case, they’re going to create an ad set geared toward those in the Cincinnati area of southwestern Ohio.

The conversion they’re looking for here is people who view their “Sauce Locator” page from Facebook ads.

To do that, they’re going to open up the ad set (highlighted blue). Ignore the red warnings for now. Facebook creates those warning whenever something necessary is missing from an ad campaign, set, or unit, regardless of whether you’ve tried to upload it.
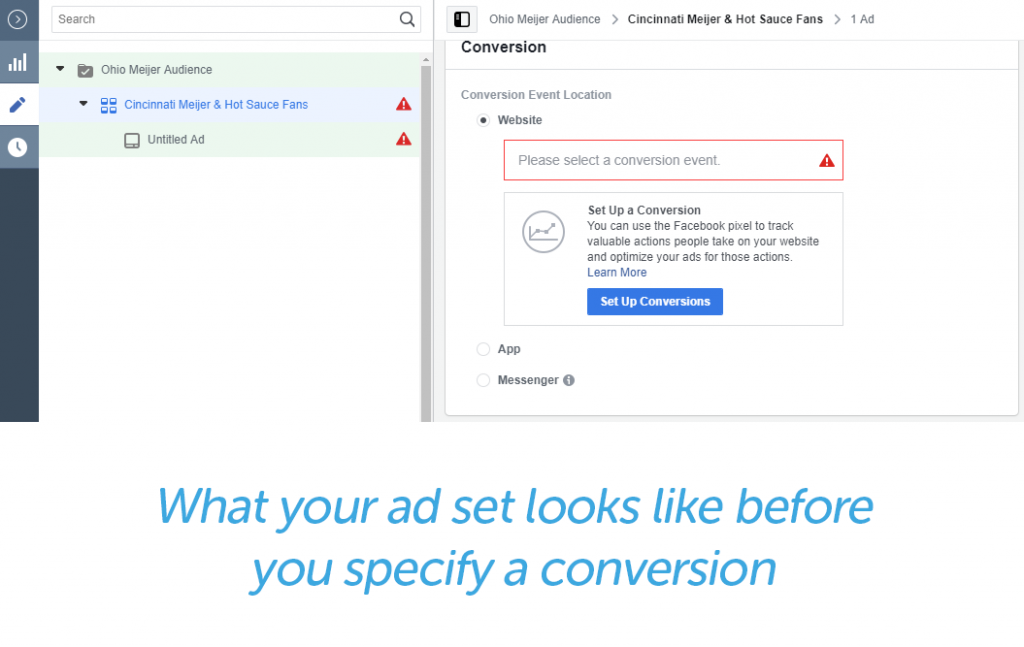
specified conversion event

Next, they’re going to select “Track Custom Events.” Standard events are things like adding to the cart, adding payment information, and purchasing. The custom event they’ll be tracking are visits to their Sauce Locator page.
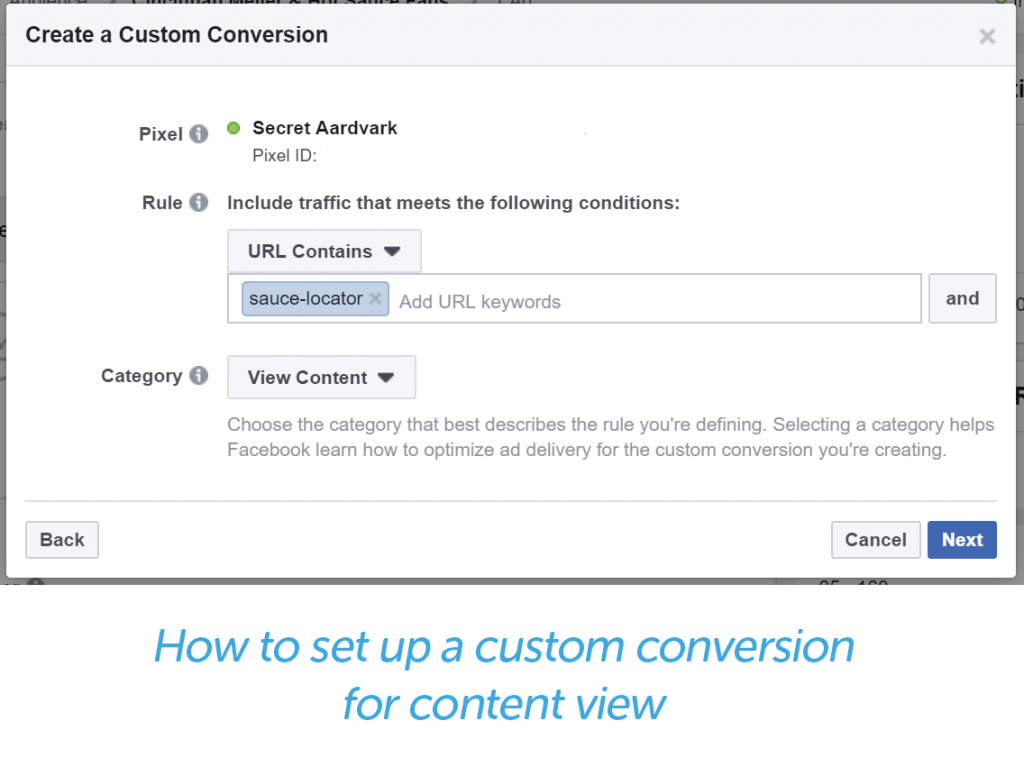
create a custom conversion - select the rules

With that in mind, we set the custom conversion to track only urls that contain the phrase “sauce-locator.” From there, you’ll be directed to name your custom conversion, and you’ll be given an opportunity to assign a dollar value to it.

You can even choose the length of time you want to track the pixel after it’s first fired (i.e., the pixel loaded and sent information back to Facebook), up to seven days. That means that Facebook can count a conversion toward an ad up to seven days after it’s viewed.

If Secret Aardvark decides to send users who click on their ads directly to their Sauce Locator page, there isn’t much of a need to track conversions over a period of seven days.

However, if Secret Aardvark sends users to one of their recipe page, it might behoove them to set a longer conversion window. That way, they can see how many users looked at a recipe and then went to see where they could buy Secret Aardvark near them.

You’ll be able to see how many conversions your ad campaign had right in your ads manager dashboard reporting. Whatever conversion you chose, in the case below, purchases will show in the “Results” column. You’ll also be able to see your cost per result, which will help you understand which campaigns, ad sets, and ad units were most successful.
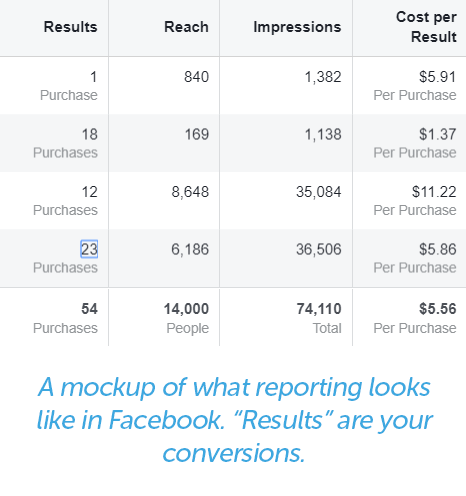
report of conversions - labeled results

Above you’ll see results from an example from a different Facebook ad campaign that was geared toward purchases. The first three rows relate to ad sets, and the final row is the summary row. The cost per purchase varied quite a bit between these ad sets—there’s almost a $10 difference between some of them!

Retargeting Users

Tracking direct conversions isn’t the only beneficial thing about the Facebook tracking pixel. We love the pixel for its ability to implement retargeting to users across devices.

You can use the pixel to retarget users who went to specific pages or completed specific actions on your page. You can take those who viewed your awareness content (in Secret Aardvark’s case, their recipes) but haven’t purchased yet and show them consideration content (like their sauce locator or product page). It’s a natural way to lead users through your funnel from awareness to conversion.

To build a retargeting group, go to the Audience tab in Facebook. Click on the button that says “Create a Custom Audience.”
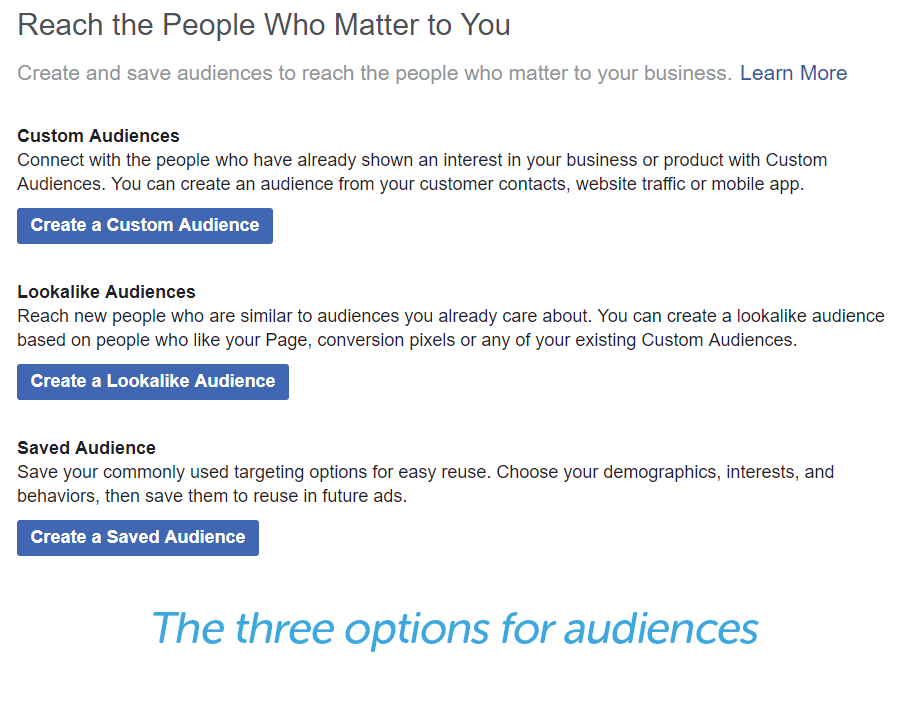
custom, lookalike, and saved audience options

There are several types of custom audiences you can build. In the case of Secret Aardvark, they’re looking to build a custom audience based on Website Traffic.
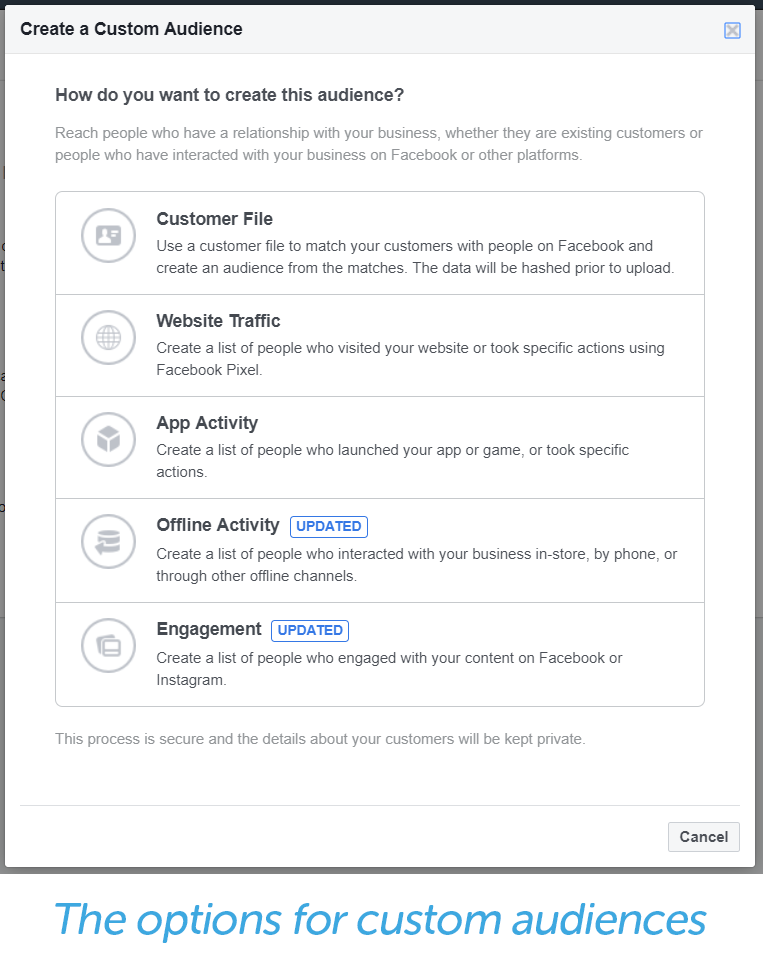
create Custom audiences

From there, you can select customers who completed certain events (e.g., viewed a recipe page). You can also exclude those who did or did not complete other actions (e.g., viewed the sauce locator or store).
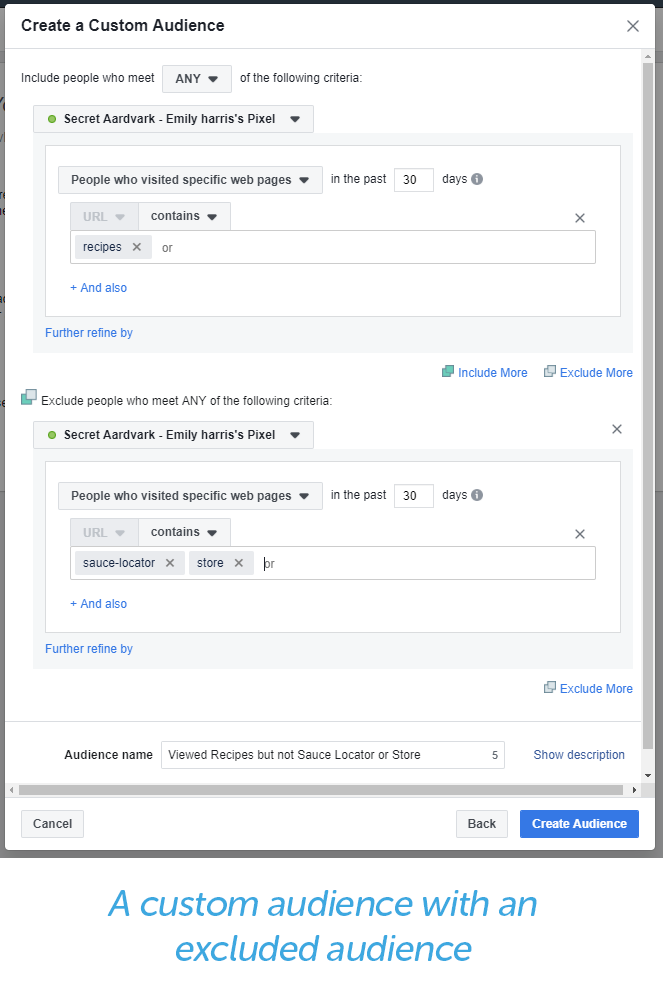
included and excluded audiences

What you’re left with in this example is people who did engage with Secret Aardvark’s awareness content, but did not engage with their consideration or conversion content. With that information, Secret Aardvark can build new ads to folks who are already familiar with their brand and encourage them to try out their product.

Retargeting is also used for closing sales that almost got away. You can go through the same process as above to make a custom audience of people who added a product to their cart but didn’t complete the purchase. You can then show those users an ad for the product they almost purchased along with an extra incentive to buy, like free shipping or a discount.

The Benefits of Pixels

Over the past few years, pixels have become one of the top tools for anyone who runs a website, especially anyone who runs an eCommerce website.

One little pixel can make your reporting more accurate, your advertising smarter, and can help you close the sales that almost got away. You’ll no longer have to guess if your ads converted any sales. You’ll be able to see that right in your Facebook reporting!

And you can customize pixels to work for you. Not all brands have the same goals, and the builders of pixel tracking understand that. That’s why they give brands such a wide range of uses for their pixels, from retargeting those who didn’t complete a purchase, to creating audiences that look like those who make a purchase or join your email list, to optimizing your ads for exactly what you want them to accomplish.

A Managed Ecommerce Platform Can Help

Built on a platform trusted by experts, StoreBuilder by Hostdedi allows you to reap all the benefits of our Managed WordPress and WooCommerce without the complexity.

No coding experience? No problem. There’s no reason to start from scratch or feel overwhelmed by a blank screen.

Just answer a few questions, and in minutes, you’ll have your own online store with an intuitive, easy-to-navigate homepage that’s optimized to convert your visitors to customers. Check it out!

Source link

How Do I Design An Effective Homepage For My WordPress Blog?

While many visitors may enter your site for the first time through a blog post, your homepage is the virtual front door of your WordPress blog. When someone visits your site directly through your main URL, it is the first page of your website they will see.

Your homepage represents the first opportunity to make an impression. In mere seconds, visitors need to be able to quickly figure out if they are in the right place and whether or not your blog is what they have been looking for.

Defining the purpose of your website and homepage is the first step in creating a blog strategy that will attract new readers and future clients, customers, and partners.

Your Website And Homepage May Have Different Goals

While the overall goal of your website is to persuade visitors to hire you, buy from you, or learn from you, the goal of your homepage may be to simply get visitors to realize they are in the right place and click past the homepage to click through your blog posts, increase ad views, or visit your core sales and conversion pages.

Trying to make a sale right on your homepage is like asking someone to marry you on the first date! It’s probably not going to happen because they don’t know you yet, they haven’t decided if they like you yet, and they haven’t built any trust in you yet. As a result, they aren’t ready to take action.

Set Aside Time To Focus On Your Homepage

Set aside time to focus on the homepage as a whole and decide what you need to communicate on it. We recommend at least a few hours to first get your ideas and messages out on paper and get a rough idea of what your homepage may look like.

work with your team to mock up your homepage design

Then walk away and come back to it in a day or two with a fresh perspective. The goal is to refine the page organization and ensure each element, image, block of content, and call to action button has a clear purpose to move a new visitor past the homepage into your site.

Check Mark Subscribe to the Hostdedi blog to get more WordPress content like this sent straight to your inbox.

How To Create An Effective Website Homepage

Here are a few blog homepage design tips to help you get started:

Keep It Simple And Clear

Don’t try to tell your entire story and communicate everything you think someone needs to know in one giant homepage. Keep your content simple and focused while you drive them further into your website to explore and learn more.

Use Basic Language

Don’t try to be too creative, clever, or cutesy. Instead, focus on making sure a new visitor can get a quick snapshot of what you do in 5 seconds or less.

Make It About Your Client

Your homepage needs to answer the questions:

  1. Is this what I am looking for?
  2. Am I in the right place?
  3. What are my options?

Remember, you want to get them interested enough to click to the next page

Treat It Like The First Step

A date is the first step, not marriage. Getting people to your homepage and interested in learning more is the first step, not a sale or opt-in! Be sure to create clear paths (funnels) through the site to your conversion pages and tell them exactly what to do next with crystal clear calls to action.

Make Content Easy To Access

Give visitors more than one way to reach your most valuable content. Include links in your website navigation menu, in the page content, and in the footer or sidebar. Don’t forget social media links.

responsive design

Use A Lot Of Visuals

No one wants to read an essay online. Photos grab attention faster than text, so use strategic visuals that reinforce your message to add interest to the page.

Prioritize Information

Everything on your Home page can’t be big and bold and crammed at the top of the page — if you tried that, nothing would stand out. Instead, once you have decided exactly what your home page must communicate, prioritize the information so you know what needs the most attention, and what needs the least. Make sure your content marketing plan echoes your priorities set for your homepage.

Tell A Story With Your Homepage

Ticking with the idea that your homepage is the virtual front door of your WordPress blog, one of the easiest approaches to creating an effective homepage design that encourages visitors to stay longer and look around is to tell a story.

tell your story on your blog homepage

Hopefully, you’ve already carefully planned your blog’s navigation menu that includes links to the most important content on your website. If this is true, you’ve already got the outline for your homepage story done.

  • An effective homepage design begins with a brief statement or headline and sub-headline that clearly communicate who the blog is for and what the blog is about. This is meant to introduce new visitors to your site and help them quickly figure out if they’re in the right place.
  • After that, as the visitor moves down the homepage from top to bottom, the content blocks or sections should tell the same story the navigation tells, but in a more descriptive, compelling, inviting way—and each block/section should include a link. This way, visitors can access your most important content in the navigation menu or in the content when they feel compelled to do so.

Take A Look At Your Homepage

Now, what about your blog’s homepage? Does it tell your story? Is it simple, clear, and all about your readers? Is it visually interesting? Is it easy to access your most important content?

If you answered no to any of these questions, maybe it’s time for you to revisit your homepage and set aside time to rethink your new visitor introduction strategy.

Need a Better Website?

Built on a platform trusted by experts, StoreBuilder by Hostdedi allows you to reap all the benefits of our Managed WordPress and WooCommerce without the complexity. No coding experience? No problem. There’s no reason to start from scratch or feel overwhelmed by a blank screen. Just answer a few questions, and in minutes, you’ll have your own online store with an intuitive, easy-to-navigate homepage that’s optimized to convert your visitors to customers. Check it out!

Source link

What Does PHP 5.6’s End-of-Life Mean For WordPress Users?

PHP 5.6 is the most widely used minor version of a programming language on the web. The PHP language is used on 79% of websites where the server-side language is known. PHP 5 is used on 58% of the web, and PHP 5.6 is used on around a quarter of all websites. It would not be an exaggeration to say there are millions of websites running PHP 5.6 — and also millions using older versions of PHP. Read More »

How Do You Add Custom Fields to WooCommerce Products?

Depending on your business model, you might need to add custom fields to your WooCommerce products.

Those could be text fields, select boxes, radio buttons, or any other type of input you can think of. You can add them so that they only show in the backend when managing your orders, or you can display them on your website and in emails. Our custom fields will not be added in a custom meta box as usual. They’ll show in the “Product Data” area, just beside the regular product fields.

In this article, I’ll walk you through adding a custom field to a WooCommerce product — for a custom SKU. I will explain how you can add that field to your admin email notifications for new orders. In this example, you’re running a dropshipping business.

Why You’d Want to Add Custom Fields to WooCommerce Products

Having WooCommerce custom fields will allow you to enter the SKUs of your vendor while showing your own SKUs to your customers. This way, you can process new orders faster and can also search the WooCommerce backend for your custom SKUs.

WooCommerce is one of the easiest plugins to extend and since it was acquired by Automattic in 2015, it’s not going anywhere. So it’s a safe bet to say that the hooks and functions we’ll use in this article will be around in the future.

What is a Hook?

WordPress provides hooks as a way to add custom functionality or custom designs to your site on predefined places (e.g. in the header or footer) or on predefined actions (e.g. adding a product to the cart). They allow developers to easily implement new features without having to rewrite the entire theme or plugin code.

Hooks can be used as Actions (these hooks do something) or Filters (these hooks manipulate data). We’ll use some Action hooks today.

How to Add WooCommerce Custom Product Meta

Here’s how to add a custom meta box in a WooCommerce product. We’ll dive into the code first. The WooCommerce API allows us to leverage built-in functions that add all sorts of input fields into the product area. Specifically, you can add six different types of inputs:

  • Text fields
  • Select boxes
  • Checkboxes
  • Radio buttons
  • Textareas
  • Hidden fields

Each of those fields can be added to the regular product tabs of WooCommerce multiple times or in any combination you choose. Those tabs are:

  • General
  • Inventory
  • Shipping
  • Linked Products
  • Attributes
  • Variations
  • Advanced

Any of these tabs come with specific hooks we can use to add our custom fields to that tab. I’ll outline those hooks in more detail soon, but first I want to point out that not all tabs show for each type of product. For example, the “Variations” tab is not showing for “Simple” product types, and the “Shipping” tab is missing if your product is “External”.

You can use a number of hooks to add your fields to any of these tabs:

General Tab
woocommerce_product_options_pricing
woocommerce_product_options_downloads
woocommerce_product_options_tax
woocommerce_product_options_general_product_page

Inventory Tab
woocommerce_product_options_sku
woocommerce_product_options_stock
woocommerce_product_options_stock_fields
woocommerce_product_options_stock_status
woocommerce_product_options_sold_individually
woocommerce_product_options_inventory_product_data

Shipping Tab
woocommerce_product_options_dimensions
woocommerce_product_options_shipping

Linked Products Tab
woocommerce_product_options_related

Attributes Tab
woocommerce_product_options_attributes

Variations Tab
woocommerce_variable_product_bulk_edit_actions

Advanced Tab
woocommerce_product_options_reviews
woocommerce_product_options_advanced

You can find the appropriate hook to use by browsing through the HTML files inside the woocommerce/includes/admin/views folder. Those files make up the meta boxes you’re seeing in the admin interface when editing your products.

Try Hostdedi Managed WooCommerce Hosting Free for 14 days >>

In our example, we’ll use the woocommerce_product_options_sku hook to add a field for a second SKU right below the existing SKU field. To do that, we’ll implement functions provided by the WooCommerce API.

Each function takes an array of arguments, which I outlined in the following gists. You can copy and paste each of these directly to your theme’s functions.php file (be sure to use a child theme).

Adding a text field:
https://gist.github.com/jan-koch/cfa2731ff5755fe297990269dd816e2b

Adding a textarea:
https://gist.github.com/jan-koch/7fbec8d1a0b89fd6761343a9245e77e0

Adding a select box:
https://gist.github.com/jan-koch/5dd8897b974969ed66204e92f6a05ef4

Adding radio buttons:
https://gist.github.com/jan-koch/c0efab4f2ec7222eab50e4646be01971

Adding a checkbox:
https://gist.github.com/jan-koch/312cfc891e7118f29a2fc99f13af7612

Adding a hidden field:
https://gist.github.com/jan-koch/d28d02ed4885eb096642501ddcc20235

You can probably guess by now that we’ll use the text field to store our custom SKU. To do that, we’ll implement the following function into the child theme’s functions.php:

function jk_add_custom_sku() {
$args = array(
'label' => __( 'Custom SKU', 'woocommerce' ),
'placeholder' => __( 'Enter custom SKU here', 'woocommerce' ),
'id' => 'jk_sku',
'desc_tip' => true,
'description' => __( 'This SKU is for internal use only.', 'woocommerce' ),
);
woocommerce_wp_text_input( $args );
}
add_action( 'woocommerce_product_options_sku', 'jk_add_custom_sku' );

By using this code snippet, you’ll see the custom SKU field in the “Inventory” tab right below the original SKU field. Feel free to adapt the label and description as needed.

Be careful when editing the ‘jk_sku‘ ID though, as the saving and display functions depend on that ID and would also need to be adjusted.

Saving the WooCommerce Custom Product Meta

After we add the field for the custom SKU, we need to tell WooCommerce what to do with it when the product is saved. By itself, the above code will do nothing and won’t save the value. That’s obviously not what we want, so let us extend that code and add the saving function.

How to Duplicate a WordPress Page or Post >>

To do that, we’ll leverage the woocommerce_process_product_meta hook. With the following function, your WooCommerce store will save the new custom SKU field when you save the product:

function jk_save_custom_sku( $post_id ) {
// grab the custom SKU from $_POST
$custom_sku = isset( $_POST[ 'jk_sku' ] ) ? sanitize_text_field( $_POST[ 'jk_sku' ] ) : '';

// grab the product
$product = wc_get_product( $post_id );

// save the custom SKU using WooCommerce built-in functions
$product->update_meta_data( 'jk_sku', $custom_sku );
$product->save();
}

add_action( 'woocommerce_process_product_meta', 'jk_save_custom_sku' );

Here’s a gist containing both code snippets. You can add the code to your functions.php file directly.

Let me explain the function starting with its trigger point, the hook woocommerce_process_product_meta. It hooks into the WC_Meta_Box_Product_Data::save function, which lets us update product meta fields without calling the regular “add_post_meta” or “update_post_meta” functions.

I prefer this approach over using the regular functions to manipulate WooCommerce meta fields, as we ensure that all product data gets processed properly when saving our WooCommerce custom fields.”

Secure Data Processing and Data Sanitization

Since we, as the developers, cannot expect to know how the user will use this new field, or how good the website will be managed in the future (e.g. keeping a site updated or enforcing strong passwords), we need to be careful about what we store in this field.

To ensure that our function only stores valid data, we’re running the field’s value through sanitize_text_field before adding it to the database.”

Accessing Custom WooCommerce Product Meta Fields in the Frontend or in Mails

Now that we’ve successfully implemented the backend functionality of the custom SKU field, let’s make use of it in the daily business of running the eCommerce shop.

In our example, we’ll use the custom SKU and display it in the “new order” notification emails that are sent to the admin of the shop. This will help the shop owner forward orders to the dropshipping vendor and will save a massive amount of time, compared to managing some sort of spreadsheet, mapping product names to the SKU of the vendor.

Customize WooCommerce Product Pages to Boost Your Sales >>

To add the custom SKU in the frontend, we’ll leverage WooCommerce’s powerful templating system. First, we copy the file email-order-items.php from wp-content/plugins/woocommerce/emails/ to wp-content/themes/your-child-theme/woocommerce/emails. If that folder does not exist in your child theme, you have to create it through FTP/SFTP.

The ability to override email templates (as well as other templates like the product detail page) is one of the big benefits of using WooCommerce.

By simply copying the file containing the template for the order item list in emails to the themes folder, you can use your own styling and contents. Just be aware that future WooCommerce updates might require you to update your custom templates, too.

After copying the template file, open it in an editor of your choice (I’m just making the move from PHPStorm to VS Code). You’ll see the template showing a table structure with the body

elements representing each order position. It’s in that context we need to load the custom SKU for each product in order to display it.

Luckily for us, WooCommerce shows the SKU only in admin emails by default, so we don’t need to handle that ourselves.

To display the custom field, we’ll use the regular get_post_meta function:

// load the custom SKU
$custom_sku = get_post_meta( $product->get_id(), 'jk_sku', true );

if ( is_string( $custom_sku ) ) { // only show the custom SKU
// if it's set
// change this line if needed
echo "
" . wp_kses_post( "Custom SKU: $custom_sku" );
}

Here is a Github gist containing the full email template, which you can directly download and add to your theme’s folder.

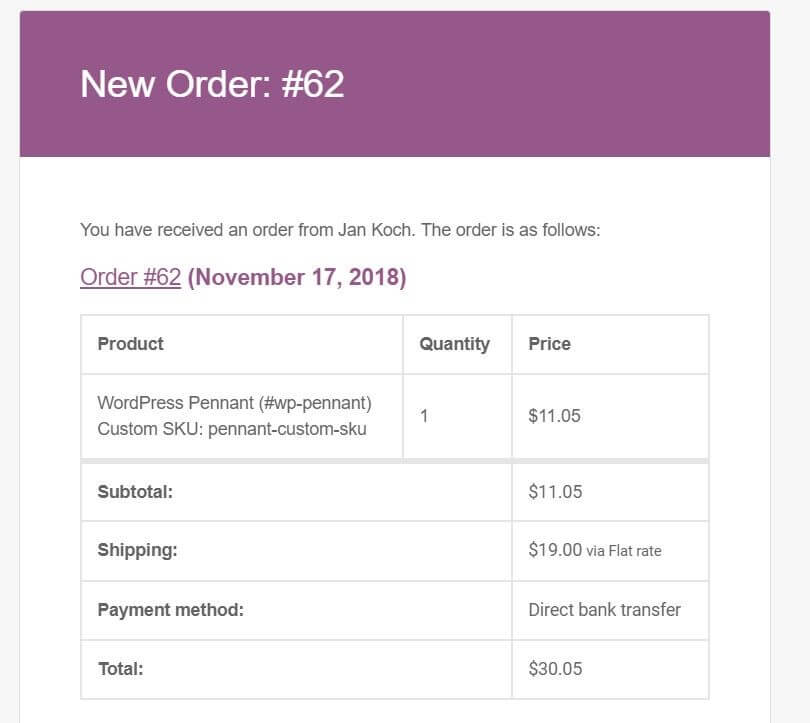
Once the file has been added, you’ll see this format in admin emails:

Order Completed after custom data added

The custom SKU is now added right below the product name. You can, of course, change the position and also the label by tweaking the email template above to your preferred layout.

Get Started Adding Custom Fields

In this article, we explored just a little bit of the flexibility WooCommerce brings to the table. Being able to add custom fields this easily is one reason why you might consider WooCommerce over Shopify.

The acquisition through Automattic will only increase the importance WooCommerce has in the WordPress space. And the efforts of companies like Hostdedi to support WooCommerce users with custom hosting plans just confirms this trend.

If you want to learn more about extending WooCommerce, check out the WP Mastery Code Snippets page and start experimenting with the examples I provide on that page.

Try Fully Managed WooCommerce From Hostdedi

With Hostdedi, better is built in.

With a dedicated solution for WooCommerce hosting, you get:

  • Automated scaling to keep your site fast during traffic surges.
  • Automatically optimized images for fast loading times.
  • Lightning fast load times thanks for our built-in CDN.
  • And more!

See why users gave us a 4.6 out of 5 star rating on Trustpilot. Experience optimized hosting for your store.

Give Fully Managed WooCommerce a try. Start your free two-week trial today.

Avatar for Jan Koch

Source link

An Introduction to Using Gutenberg with WooCommerce

On December 6th, 2018 the controversial new editor experience for WordPress dropped and it’s called Gutenberg. While many are concerned about how it was rolled out I don’t think that anyone can deny that Gutenberg is the future of WordPress. That also means that Gutenberg is the future of WooCommerce, so let’s dive in and see what Gutenberg has to offer WooCommerce currently.

What Gutenberg Blocks are Available for WooCommerce?

By default there are no blocks bundled with WooCommerce as of WooCommerce 3.5.1 so you’ll need to head over to the WooCommerce site to get WooCommerce Product Blocks. WooCommerce Product Blocks is a free add-on to WooCommerce. To continue along with me you’ll need to get the plugin, add it to your site and then activate it. From there, navigate to a page to start adding products to the site.

Adding a WooCommerce Product with Gutenberg

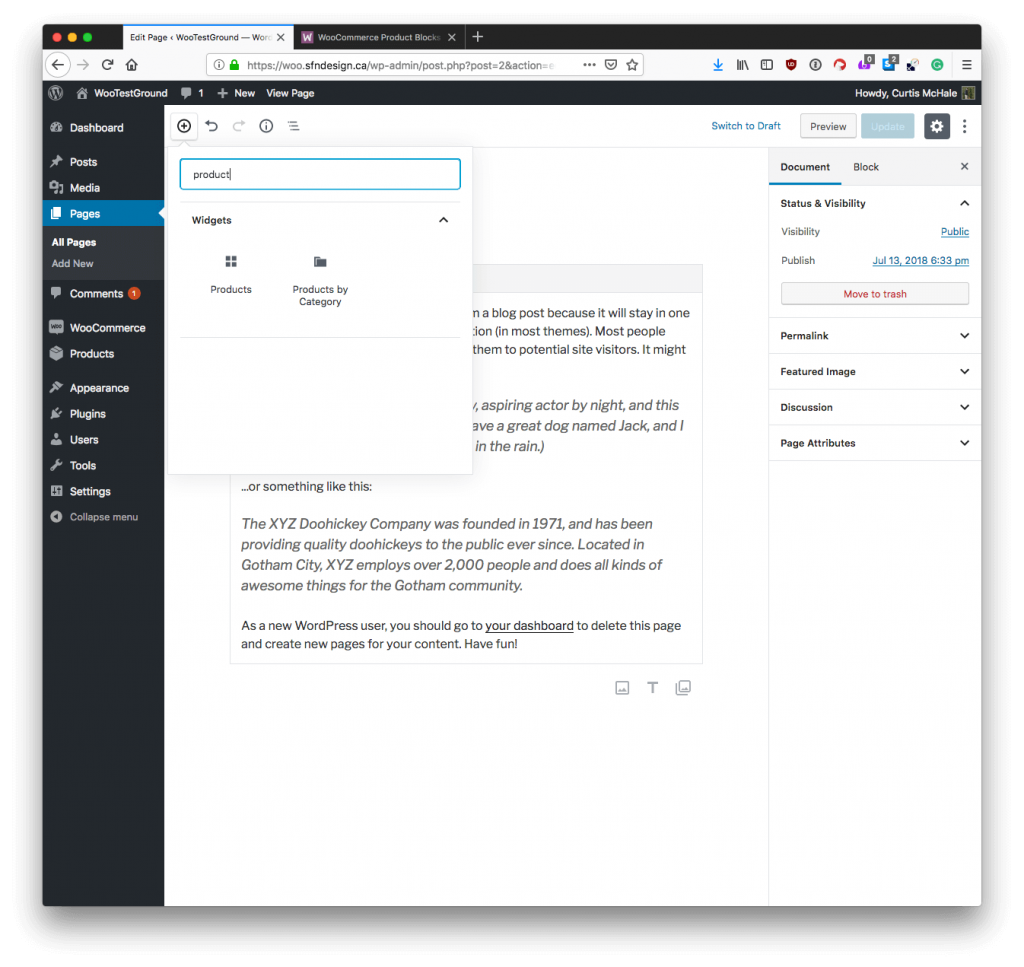
To get started adding products, start by clicking on the plus in the top left corner of your Gutenberg-powered site. Now type “products” to filter the block options down to the blocks that deal with the products in the store. Then click on the “Products” block.

add a product block

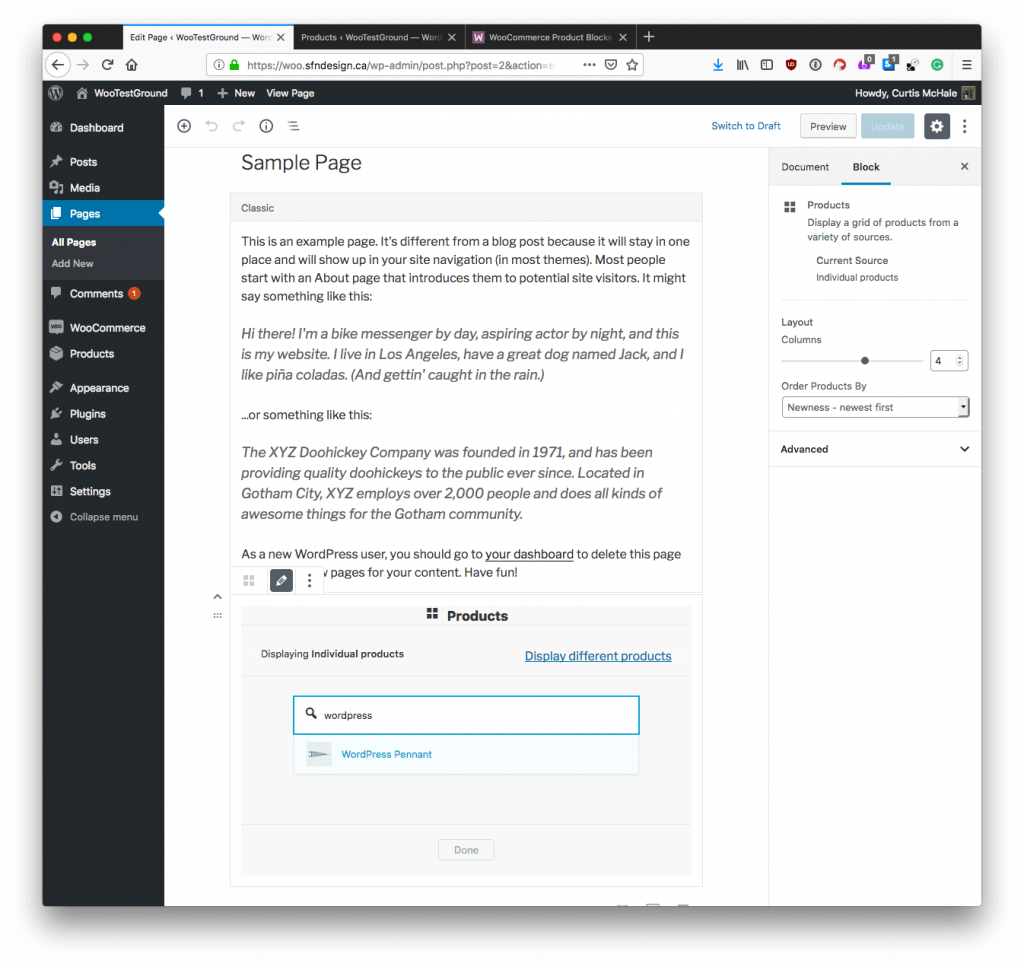
This block should appear below any content on your page. Now you can choose to show products in a number of different ways. Let’s choose to add an individual product to our page to get started. Click “Individual products”, which should bring up a search box for you to start searching your products by their names. Once you find the product you want, click on it to add it to the block.

search for individual products

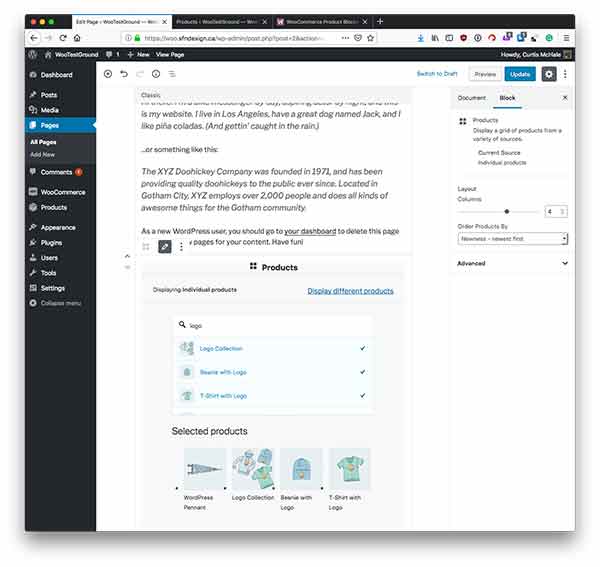
You’re not limited to a single product though, you can even add multiple products from a single search. They’ll display listed across in a grid fashion by default.

search for multiple products

Once you have the products you want to show selected, click done and then make sure you save your page.

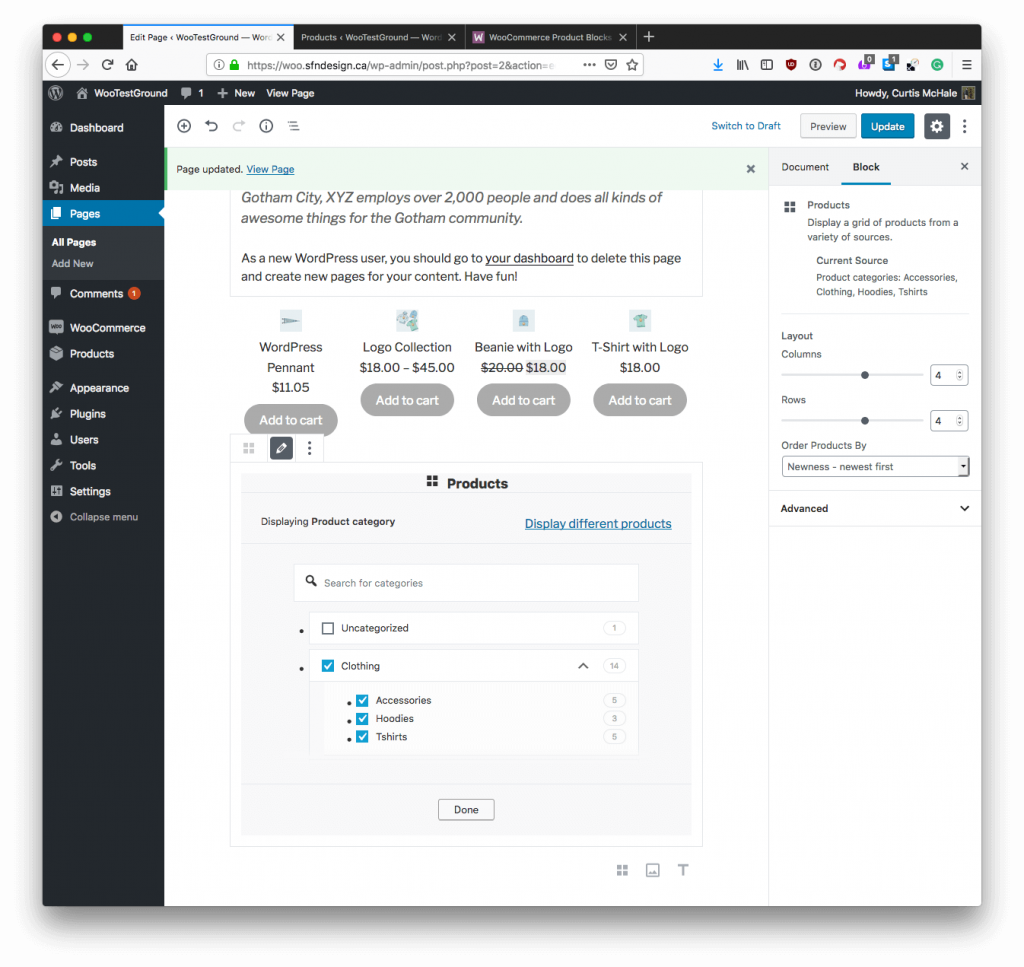
In addition to hand-picking products, you can add products from a specific category to a page. If there are sub-categories you can choose which ones you want to display.

add products from specific categories

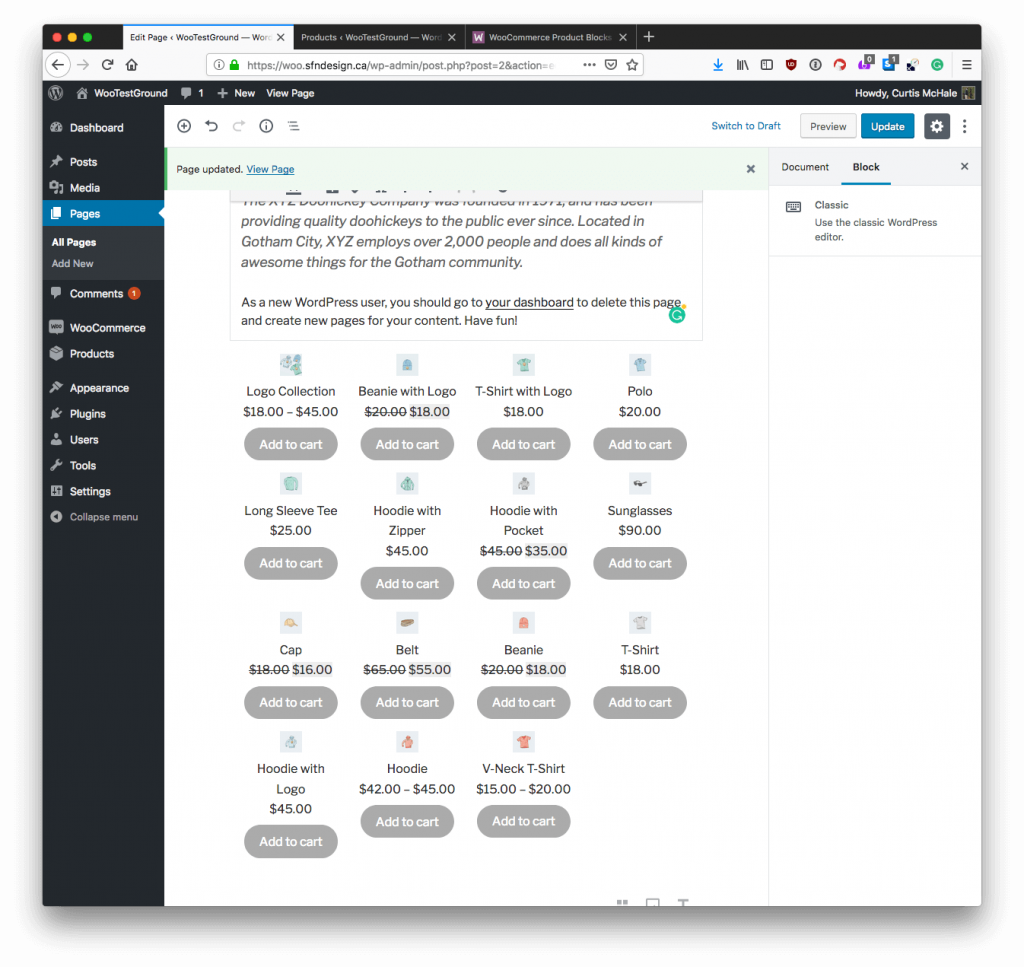
Selecting a category will add every product inside that category to the page.

selecting a product will add every category to that page

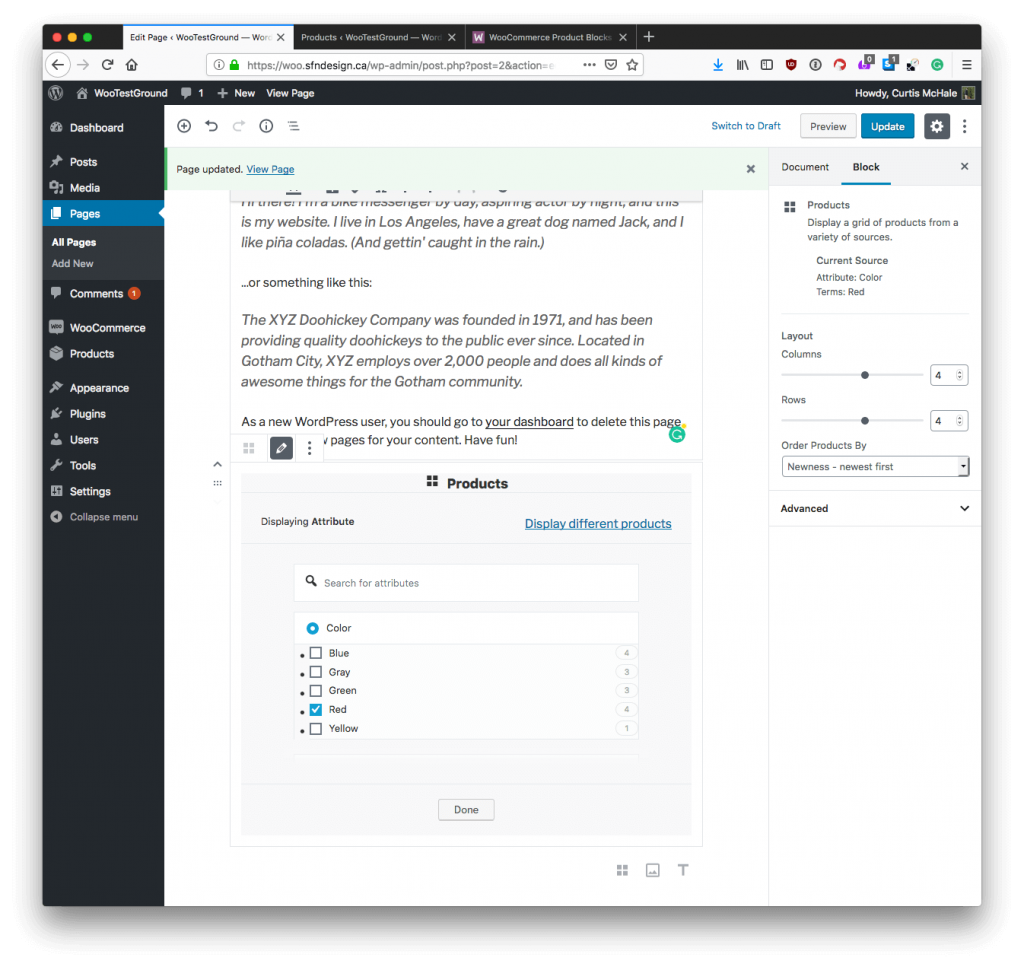
You can also use a Product Block to show products by a specific product attribute. As Valentine’s Day approaches, you could use your color product attribute to build a custom page with all the red products you have in the store to suit the season.

show products by a specific product attribute

Just like the other ways we’ve looked at showing products, this will add all of the products that match the attribute to your page. You can use a number of attributes like:

  • Products on Sale
  • Best Sellers
  • Featured Products
  • Top-Rated Products

The other block that is available with the WooCommerce Product Blocks plugin allows you to show products by category, which duplicates the functionality of adding products by category with the products block.

Customizing Your WooCommerce Gutenberg Product Block

While we’ve toured some of the basics of adding product blocks to your content, we haven’t taken a look at what the customization options are to maximize how your page looks.

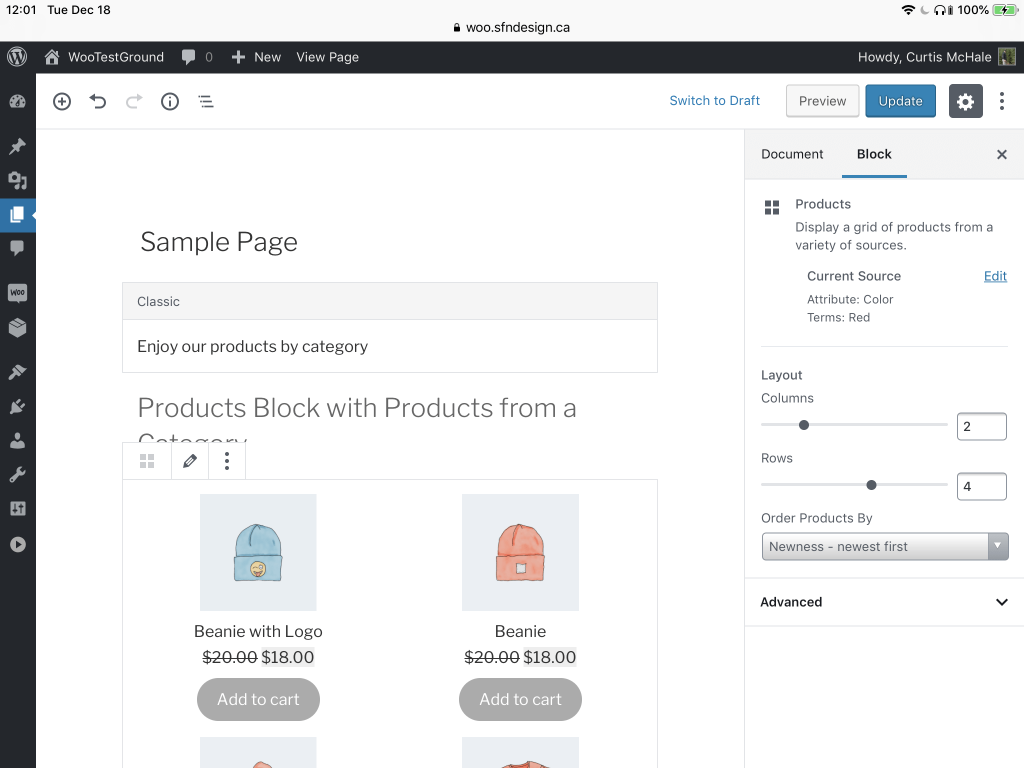
To start, WooCommerce Product Blocks lets you customize the number of products that are shown in both columns and rows.

customize the number of products shown in columns and rows

You could leverage this to show a single product on a long form sales page by making your product block only display one item per column. Then you would choose a single product to add to the block.

You can also use the block settings to change the order of your products with the following options available now:

  • Newest – newest first
  • Price – low to high
  • Price – high to low
  • Rating – highest first
  • Sales – most first
  • Title – alphabetical

Finally, under the advanced options, you can add a custom CSS class if you want to do further styling to your block to help it suit your theme. Given the right CSS rules, you could change the layout.

Building a Custom Product Landing Page with WooCommerce and Gutenberg

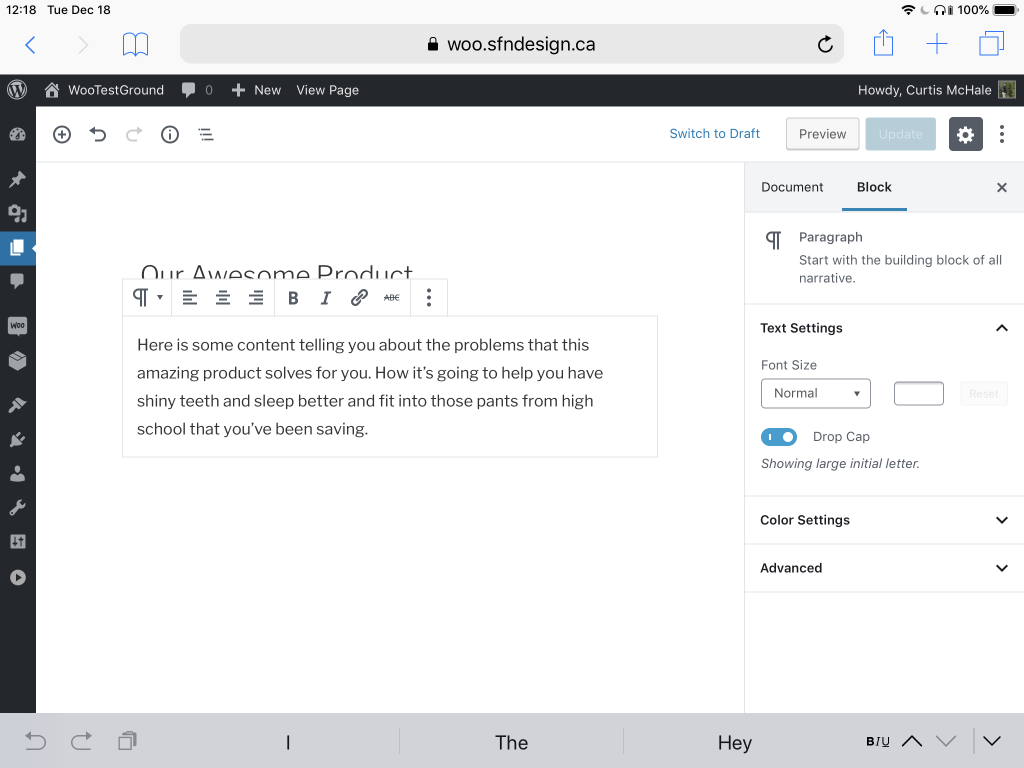
Now let’s take some of the knowledge we’ve gained about WooCommerce and Gutenberg to build ourselves a long form sales page for a product. You can start by creating a new page giving it a title. I’ve also added a bit of text to a paragraph block and used the drop cap option found on the right side of our block settings.

create a new long form sales page

With many long-form sales pages, we’ll end up adding the product to the page a few times. You do this to give people the opportunity to purchase your product as soon as they are convinced that it’s a good buy for them.

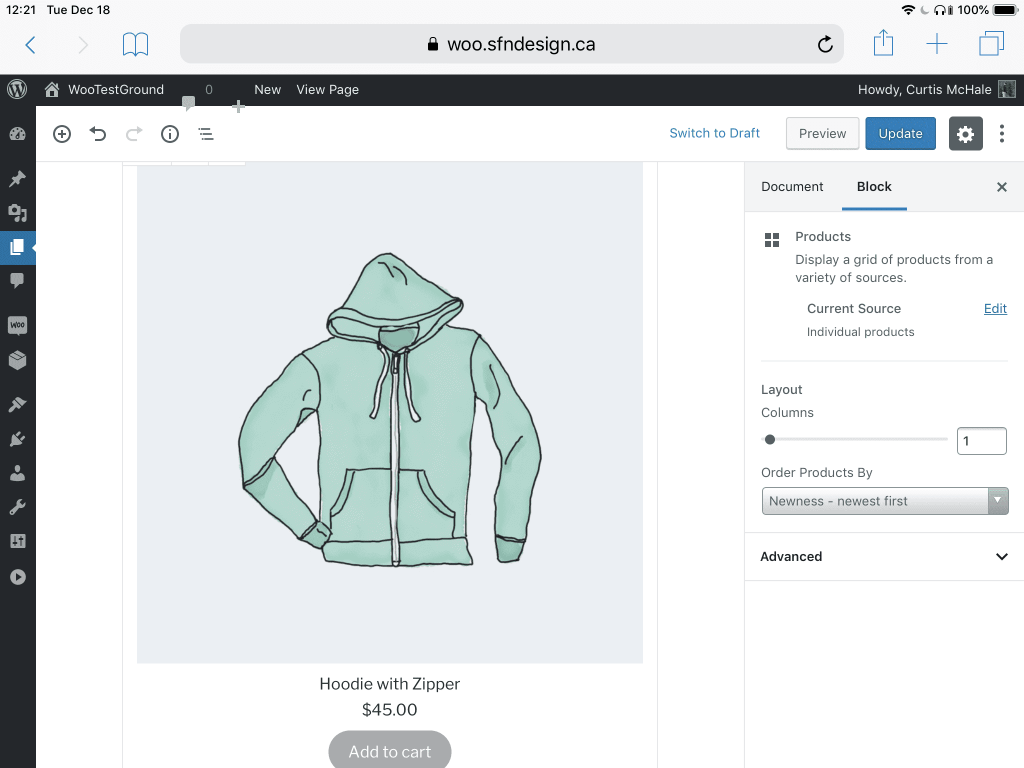
Next, add a product block and choose a single product to add to your page. Then move over to the right side and change the column display to a single product per column. This should give you a large version of the product displayed on the page with an add to cart button just below it.

add a product block and add a single product

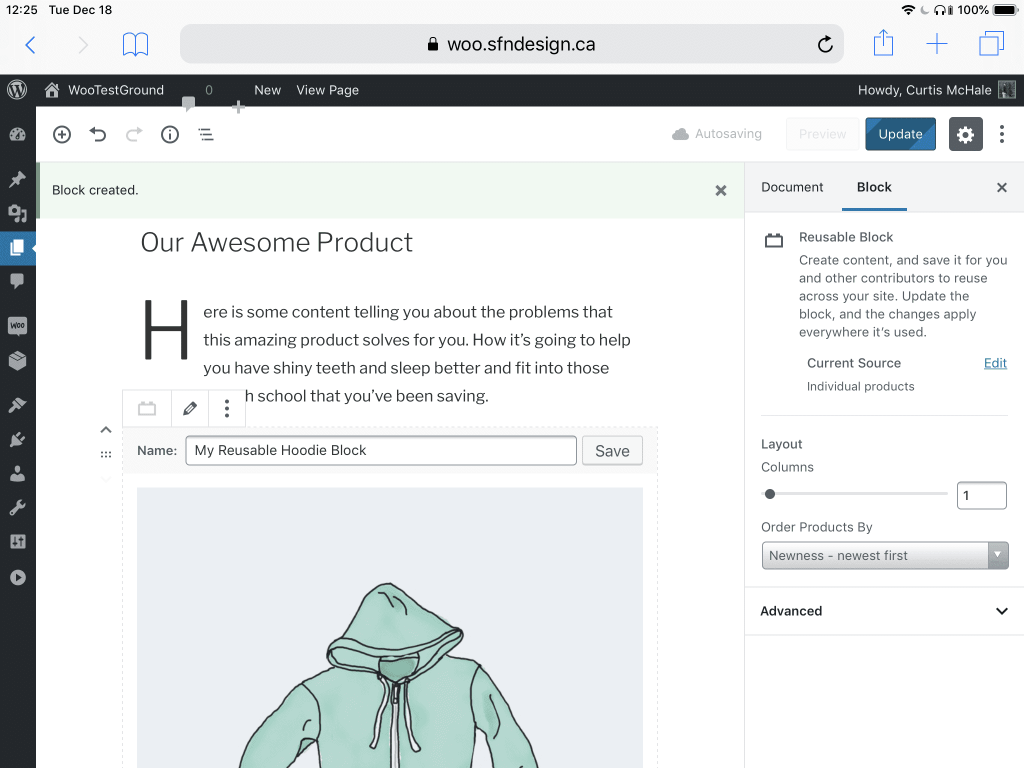
Next, click on the three vertical dots at the top of your product block and choose to “Add to Reusable Blocks.” This will let us take the block we’ve created for ourselves and easily get to the exact settings we already have without needing to go through the hassle of finding the product and changing our column settings again later. Title this block whatever you want and then save the reusable block.

add to reusable blocks

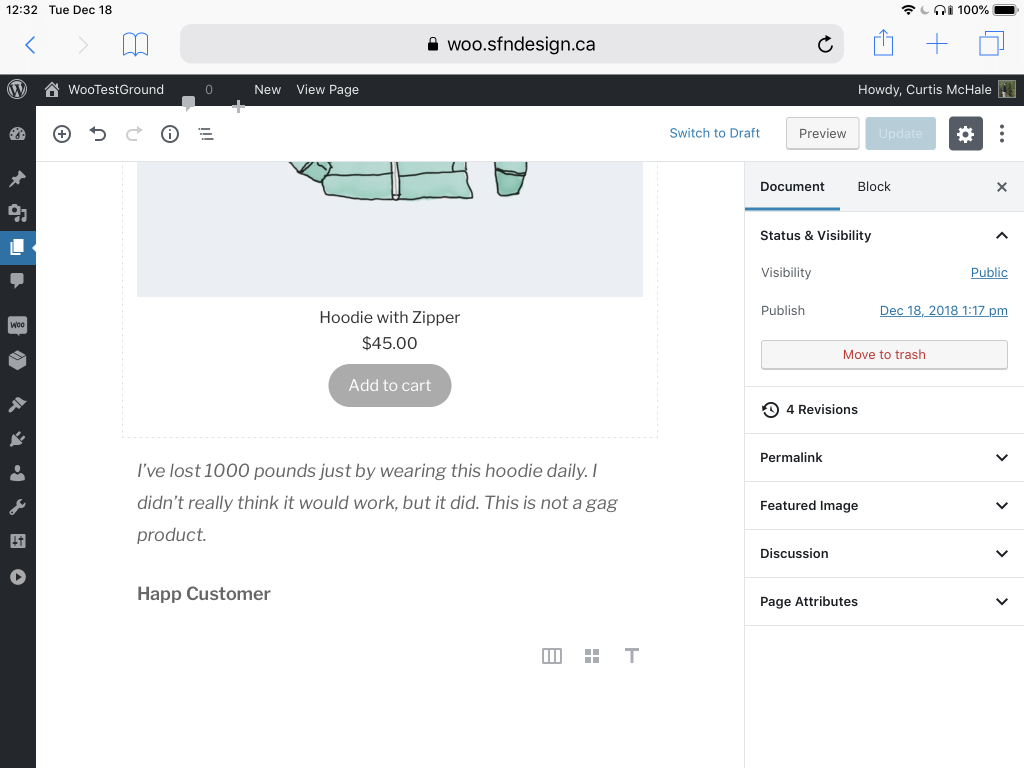
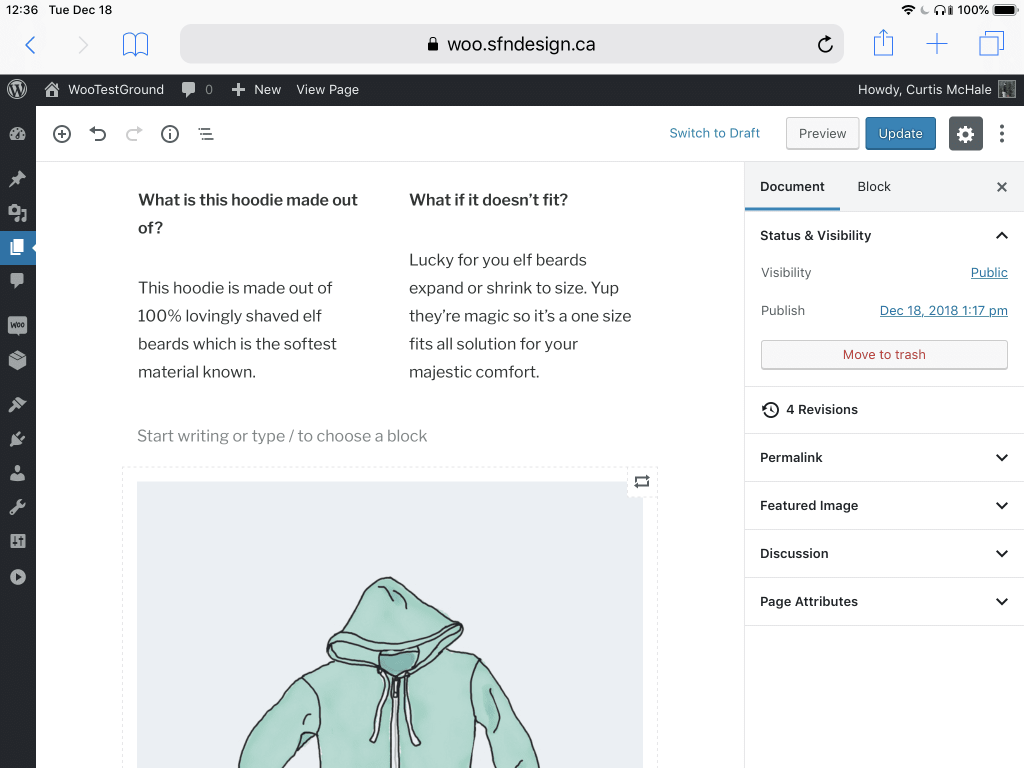
Now we can add some more text to the page which would be used to show the users the benefits of our amazing hoodie. Let’s even use the quote block to provide a testimonial from one of the happy hoodie clients.

add more text to entice user

Then you’d normally add some more text showing off the benefits of your product for the users or answering any questions they may have about the product. We can use a column block to do this and answer two questions for our user. We can finish off this page by using our reusable hoodie block to invite the user to purchase our amazing hoodie again.

add benefits of product or Q&A

Previously when clients wanted a custom product landing page like this they would have to use some page building plugin. Some of these are decent, but a vast majority are less than desirable on your site. When I compare the experience of Gutenberg to these other page building options, Gutenberg is far more intuitive for my customers to use on their own without needing me to build anything custom for them.

Other Gutenberg Resources

If you’re getting ready to really wrap your head around Gutenberg now that WordPress 5.0 has dropped, here is a list of solid training resources you can use to get yourself up to speed.

Combining WooCommerce and Gutenberg

This short tutorial on Gutenberg helps you start thinking in blocks as you layout your content. Patrick provides another reason you’d want to use a longer sales page to sell different types of products.

iThemes Training

iThemes provides us with two great resources for Gutenberg. First is a webinar on WooCommerce and Gutenberg. This is an hour of talk on Gutenberg and WooCommerce.
The second resource is a short video talking about how you can use Gutenberg in your site. They mention the fact that you can add widgets to your blocks which opens up many more possibilities for page layout than I’ve provided above.

Gutenberg and WooCommerce: Working with Product Blocks

At Robot Ninja, they provide a tutorial on the product block options that we’ve covered here. They add to it by talking through how to make sure your site is ready for Gutenberg. If you run any site, you should have a staging version setup but especially for an eCommerce site. Make sure you take the advice here and test your site with Gutenberg before going live.

Building your Own Gutenberg Block

Bill Erickson provides us with a walkthrough on what it was like for him building a block for Gutenberg. He also mentions the great course by Zac Gordon on Gutenberg Development.

Gutenberg is Here

Love or hate the idea, Gutenberg is here so it’s time to dive into what this means for your site. Specifically, you should be familiar with how Gutenberg works and what options are out there for your WooCommerce site.

Today I’ve given you a bit of a look at how you can use Gutenberg with your site to create a long form sales page for your products. There is so much power in Gutenberg for store owners. All you need to do is dive in and start testing it out with your content.

Build a High-Performing WooCommerce Store

Create a store that converts traffic with Hostdedi’ Managed WooCommerce Hosting solution. It comes standard with Jilt to help you recover abandoned carts, performance tests whenever you need them, and the platform reduces query loads by 95%, leading to a faster store.

Source link

The Hottest Trends from WordPress in 2018

The new year is here and thus we should take a minute or two to reflect on WordPress in 2018. What new features were released? What WordPress trends evolved? Which trends disappeared?

2018 has been an exciting year in the WordPress community with plenty of discussions going on, especially toward the end of the year. WordPress developers spent the year learning new frameworks and adapting their WordPress plugins to a new editor called Gutenberg, users had to learn this new editor too, and the look and feel of WordPress themes changed quite a bit.

For this yearly review, I’ve selected the following topics to talk about:

  1. WordPress design trends in 2018
  2. The new Gutenberg editor
  3. Page builder plugins for your own layouts
  4. The evolution of security plugins
  5. The better user experience on WordPress sites
Check Mark Subscribe to the Hostdedi blog to get more WordPress content like this sent straight to your inbox.

WordPress Design Trends in 2018

There always have been a gazillion different WordPress themes but in 2018 there were a few design trends that became common among websites.

Component Design Systems

By breaking up your entire website into reusable components and setting guidelines for each component, your corporate identity can become much easier to manage. Those components can be headlines which need to have the same sizes and spacing, image positioning, color palettes, and so on.

Jerry Cao defines design systems as:

A design system includes design standards, documentation, and — one of its central advantages — a UI toolkit with patterns and codes.

Bold Fonts and Shapes

It’s nothing new that designers love bold and big fonts as well as using shaped backgrounds to break up layouts or add a bit of asymmetry to a website.

In 2018, WordPress themes took this trend to a new level. Page builders added functions to easily add curved, triangled or wave-patterned section dividers, and Google Fonts allow for using outstanding typography.

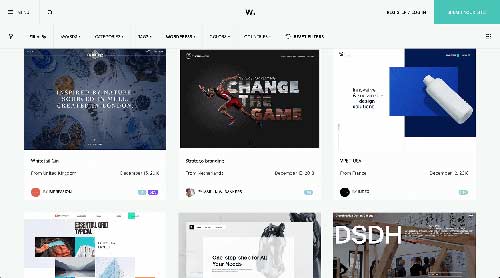
Just from looking at the sites featured on Awwwards for December 2018, we can see this common theme being implemented across all sorts of websites:

awwwards for December 2018

The same holds true when you browse across the themes on platforms like Themeforest or TemplateMonster. It’s likely that, if you got a new site in 2018 yourself, your designer will have suggested some pretty bold fonts and beautifully crafted shapes.

And it makes sense. Big fonts help capture the attention of your website visitors and ensure that your message comes across. Clever use of shapes and dividers also benefit the user experience of your website and support your visitors in dissecting your content.

The New Gutenberg Editor

Gutenberg is the new default WordPress editor and has caused all sort of #wpdrama in 2018. It was meant to entirely renew the way we create content by using the new Blocks in WordPress. I believe that Gutenberg will be highly beneficial to WordPress. Even though the reviews on the Gutenberg plugin say different, I think it was actually a good move (the timing of the release in December 2018 could have been more developer friendly).

Ahmad Awais, a WP core contributor, recently got applause from Matt Mullenweg (creator of WordPress) on his create-guten-block framework. I reached out to him for his opinion on Gutenberg and this was his response:

WordPress has taken a step forward to modernize the core with JavaScript. Gutenberg presents an opportunity of serious growth for WordPress both in general and with the large scale and Enterprise sector. The best parts of Gutenberg are yet to be explored. Don’t be too quick to write it off. I am all too excited about it. I have built create-guten-block and launching https://writy.io this year. More to come.

Page Builder Plugins For Your Own Layouts

Page builder plugins such as Beaver Builder have been all over the place in 2018, with many of them making plenty of progress in ease of use and functionality. This evolution has been to the advantage of the vast majority of WordPress users, as they help cut out the coding in building your website.

While there have been page builders for a couple of years now, they only became easy to use in late 2017. With Elementor recently acquiring Layers WP, there doesn’t seem to be an end in the growth of WordPress page builder plugins any time soon.

If you have ever tried building your own Contact Us page without using a page builder, you know how much time can go into this process. And a Contact Us page is a very simple layout. Usually, it only consists of a few headlines, a bit of text, a map, a contact form and maybe some social icons linking to your profiles.

Imagine building an eCommerce landing page, displaying your featured products, best-selling products, call to action elements like buttons, headlines, texts, and other elements – and all of that being responsive.

Page builder plugins come to the rescue in cases like that, giving you plenty of predefined blocks to use and configure. You can place each element via drag and drop directly where you’d like them to display and the page builder also makes the elements responsive by default.

Personally, I’m super happy to see this trend continue in 2019. Users still struggle with many bulky themes that come with much more functionality and bloat than necessary.

With Gutenberg and these drag and drop page builders becoming more and more refined, theme developers can focus on performance once again.

The Evolution of Security Plugins

With WordPress being the most used content management system in 2018, it’s also by far the most popular target for hackers. According to WordFence, “Hackers attack WordPress sites both big and small, with over 90,978 attacks happening per minute.” With that being said, it should be clear how important protecting your WordPress site from hackers is, and that your hosting company should treat security as seriously as Hostdedi does.

In 2018, security plugins made quite a shift in how they work. In previous years, security plugins ran scans using hardware of your own web host, thus potentially slowing down your website loading times. In 2018, many plugins shifted to offloading the scan processes to their own data centers.

With tools like Webarx or Malcare giving importance not just to the highest security possible but also to loading WordPress websites quickly while offering their services at super affordable prices, WordPress security became attainable for any user in 2018.

To quote Malcare founder Akshat Choudhary:

MalCare scans the website on its own servers and hence, there is no load on your server resources. Your website will always run at peak speeds and you will not lose any visitors.

A Better User Experience on WordPress Sites

In general, the user experience on WordPress sites overall has been one of the strongest WordPress trends in 2018. As fast mobile Internet access became more and more distributed and mobile traffic on websites increased by over 2% to 52.2% overall, a good user interface and user experience became even more important in 2018.

Challenging Existing Design Concepts With a Buttonless UI

One of the best examples of this trend is that more and more WordPress sites show buttonless designs by using actions like sliding or scrolling for confirming actions on mobile devices. This approach saves the precious screen real estate for the most important elements.

According to Marina Yalanska:

This approach saves the precious space on the screen for more information and it is even believed to be the initial step to the virtual interfaces based on gestures only.

Being More Consistent With Font Sizes and Font Faces

It’s easy for non-designers to build WordPress sites that get totally out of control in terms of how many fonts and font sizes they use. It’s good to see that page builders introduced libraries of elements for copying headline elements or text elements (to keep consistent styles). Themes like BeDecor limit the number of fonts and sizes used as well.

Pro Tip: A good rule of thumb here is to stick with no more than 3 fonts and no more than 4 different font sizes. Anything more than that will likely overwhelm your visitors.

Preparing Your Site For Voice Search

Daniel Kaempf states that:

The latest user statistics show 71% of smart speaker owners use their voice assistant daily which can be attributed to a better user experience.

When you look around your house, you’ll almost certainly see either a device using Siri, Google Assistant, Alexa, Cortana or Bixby somewhere in your room.

That indicates how important preparing your website for voice search has become in 2018 and that trend will continue in 2019. We already talked about quick loading times, but there are more factors that contribute to a good ranking in voice search results.

According to Backlinko:

36.4% of voice search result pages used Schema markup (vs. 31.3% for the average page on the Internet).

You definitely want to include Schema markup in your website now if you didn’t already add it in 2018. That Backlinko guide will provide useful tips for optimizing your site for voice search. I linked it here because this topic is one of the most important trends in WordPress 2018.

Need a WordPress Host?

Let us help your site grow alongside your business in 2019 with our Managed WordPress Hosting solution. It comes standard with automatic plugin and core WordPress updates, Stencils for cloning new client projects, iThemes Sync Pro for monitoring and analytics data, and no overage charges as your page views go up.

Source link