CAll Us: +1 888-999-8231 Submit Ticket

Hostdedi WAF Update Protects Against Magento Core SQLi PRODSECBUG-2198

On March 28th, a set of vulnerabilities for Magento Core were disclosed, one of which can allow an unauthenticated visitor to execute a SQL injection attack. These vulnerabilities are addressed in the most recent Magento security update and affect the following versions:

  • 1.9 (fixed in 1.9.4.1)
  • 1.14 (fixed in 1.14.4.1)
  • 2.1 (fixed in 2.1.17)
  • 2.2 (fixed in 2.2.8)
  • 2.3 (fixed in 2.3.1)

What Does This Mean?

A SQL injection attack can allow malicious actors to make requests against your website which execute queries on the Magento database. These requests can potentially read or write to the Magento database, allowing unauthorized access or changes such as adding an administrative user or reading hashed passwords, encryption keys and encrypted credit card data.
This particular vulnerability is troubling due to the fact that it requires no authentication and any website visitor can potentially execute a malicious SQL injection request against your web store.

How Is Hostdedi Handling This Disclosure?

Soon after receiving notification about this vulnerability, our System Operations team immediately started investigating mitigation strategies.
We found that our existing Web Application Firewall (WAF) rules were successfully mitigating a proof of concept of this vulnerability. However, there was room for improvement and possible conditions under which the vulnerability could still be taken advantage of.
Our System Operations team created an improved set of WAF rules for this vulnerability and successfully deployed them across our managed platform on the morning of March 29th.
To be clear, this mitigation only filters the currently known attack strategies for this vulnerability. It still remains critically important that you patch your Magento installation as soon as possible.

What Should I Be Doing?

While we’ve implemented the mitigation strategy, we would highly recommend still ensuring that you update your Magento installation to the newest version or that you patch (via the patch “PRODSECBUG-2198”, which is available here) your site to ensure that you’re completely protected.

Additionally, we’d recommend that you or your development team review your existing codebase to ensure that no malicious code was injected into your site prior to this vulnerability is disclosed.
As always, if you have any issues with doing so on your own or run into any problems there, please reach out to our Support team directly and we’ll do our best to help.

Source link

How To Add A Portfolio To Your WordPress Site With Great Photos Of Your Work

If you offer freelance creative services or run a client services agency, you’re going to need a portfolio.

A portfolio is the foundation of a creative business. It showcases your work, demonstrates your skill and style, and shows prospective clients what you’re capable of.

If you want to create a gorgeous online portfolio that will persuade clients to hire you or that dream agency to hire you, Managed WordPress should be your platform of choice. With beautiful portfolio-style themes you can customize and a variety of image gallery and slider plugins available, WordPress gives creative professionals the ability to build a unique portfolio that reflects their personality and represents the work they are most proud of.

Image Gallery and Portfolio Plugins

Recently we shared a list of the five best WordPress photo gallery plugins. All five plugins give you the ability to add stunning image galleries to your WordPress portfolio and customize the display options. By adding a gallery to an individual portfolio entry, you can showcase a collection of work samples, background context, and project images that tell the story of the project.

If galleries aren’t your thing, you prefer to limit scrolling, or you’d rather have visitors experience one image of your work at a time, you could use a slider plugin like Soliloquy. Soliloquy Lite is the free version available in the WordPress plugin repository and Soliloquy Pro is the premium version with even more features. It is responsive and mobile-friendly by default, optimized to ensure maximum speed, easy to use and update, and easy to customize with tons of hooks and filters — and with slider blocks, it is Gutenberg compatible.

Another option to display your work and create a portfolio with WordPress is to use an actual portfolio management plugin like Custom Content Portfolio. With Custom Content Portfolio, you can:

  • Create individual projects for your portfolio and customize the permalinks
  • Categorize and tag portfolio projects
  • Add custom project details such as a project image, URL, client, location, start/end dates, and a description
  • Create sticky projects

tips for displaying your wordpress portfolio

Tips For Displaying Your Work

How you represent yourself in your portfolio — it’s design, organization, style, attention to detail, presentation, content, and imagery — is a reflection of who you are and how you work.

How you do anything is how you do everything.”

Once you have your portfolio designed and the plugins you’re going to use to display your work chosen and configured, it’s time to select the projects to include, write the project description and story, and create the imagery.

Here are five tips to ensure your portfolio is filled with eye-catching images that will impress prospective clients or employers.

1. Curate Your Work Carefully

Your portfolio isn’t the place to store samples of every project you have ever completed. It is the place to curate and showcase your very best work, your style, and your experience — it is your opportunity to tell the story of who you are as a creative professional.

2. Show Your Work

When creating the collection of project images that will be included in a portfolio entry, mix it up and include both samples of the finished project and behind the scenes snapshots of your work in progress and creative thought process. This will give your portfolio entries more depth and visual interest.

3. Move Past The Screenshot

Anyone can take a screenshot, and when a portfolio consists of nothing but screenshots of completed projects, it becomes boring and monotonous. While screenshots are an important part of documenting your work, you also need to go beyond the screenshot to show your projects in context. Show the responsive website on multiple devices; photograph someone using the hiking app on a smartphone screen out on a trail; share a picture of someone using the restaurant website you just finished on a phone in their car.

cut and paste images into stock images to make great wordpress porfolio additions

Tip: Not ready to take your own photos for your portfolio? Grab photos of computers, tablets, and phones in a variety of contexts from places like Unsplash, Shutterstock, and Creative Market, cut out the screens and drop in your screenshots.

4. Get Creative With Cropping

While you need to present the project as a whole when creating a collection of portfolio images to display in a gallery or slider, consider adding in some beautiful close-ups of specific design elements or interesting pieces. Close up images create extra visual interest and drama and elevate the perception of your work.

5. Use A Consistent Style

If your portfolio is all over the place, it tells people that you’re all over the place. It’s important that the entirety of your portfolio tells a consistent story of who you are, what you’re great at, what work you want to do, and how you work. This means all imagery included in your portfolio — whether it’s a screenshot, photograph, or close up feature — needs to use a consistent style in the presentation so it creates a better user experience.

Final Details to Consider For Your WordPress Portfolio

Remember, when setting up your WordPress portfolio site, remember your audience and your ideal clients. Be sure to organize your portfolio in a way that helps them quickly find what they are looking for, and along with captivating images, include the critical details of each project so visitors have context for the work they are reviewing.

Also, set yourself up for success by placing your best projects at the beginning and the end of your portfolio. It can be tempting to put all of your best projects first in your portfolio, but with that approach, you risk visitors abandoning your portfolio and moving on when they see projects that aren’t as impressive. When reviewing portfolios, people typically look at the first few entries, scan over the middle, and look at the last few, then if they’re still interested, they click through the middle of the portfolio.

Always put your best projects first and last and mix up everything else in the middle.

Finally, add an annual recurring reminder to your calendar to review your portfolio. Add any new projects that are missing and remove the older projects that are no longer relevant or have become too old. Ideally, your portfolio should be updated as you complete new projects or write new case studies and it should feature the most current work that you’re most proud of.

Try Managed WordPress

Hostdedi’ Managed WordPress automatically handles image compression, core WordPress and plugin update, backups and more.

Source link

The Best WooCommerce Plugins to Increase Sales

Sales are the name of the game for any business. Especially eCommerce.

Today we’re going to look at the top 6 plugins I recommend to clients to help them increase the sales of their WooCommerce stores.

Email with Jilt

One of the best converting mediums you have is email. If you’re not collecting email addresses and then doing something useful with them, you’re leaving money on the table. This is where Jilt comes in.

Standout Features

While other email options for your WooCommerce site have eCommerce features, they’ve almost always been added on to an email marketing platform. This is not the case with Jilt. Jilt was built out of the gate to address the needs of eCommerce stores. Right away they planned to make it easy for store owners with little technical background to get set up and start earning more with their stores via email marketing.

To that end, Jilt has most of the email campaigns you’ll need built right in out of the gate. You don’t have to search through blog posts for links to workflows and automations, they’re ready to go within minutes of installing it on your site.

Why You Need It

You have better things to do than spend hours figuring out what email marketing works. Jilt makes it so easy to start sending lifecycle emails, deal with the segmentation of your purchasers, and have automation setup. Then you can get back to bring more marketing material to bear to increase the number of customers that know who you are.

Finally, Jilt is a product of the team at Sky Verge, which has been a well respected WooCommerce plugin provider pretty much from the beginning. You can know that Jilt is backed up by top-notch knowledgeable support and solid code.

WooCommerce Points and Rewards

WooCommerce Points and Rewards can help bring customers back for more sales.

How many of us have a coffee card in our pocket or on our phone? You know the type where you earn your way to a free coffee. You can provide a similar feature to your users with WooCommerce Points and Rewards.

Standout Features

WooCommerce Points and Rewards allows you to define different points levels for many different purchase types, but it’s not restricted to only purchases. You can reward customers for leaving a product review or for signing up to your email list. You can even manually adjust the points that a customer has so you could recognize them for something extra that isn’t on the usual list of rewards.

Once customers have points, you can set the discount based on a conversion rate you choose. You can configure different discounts per product, or per category and even set a maximum discount and points that someone can use for a specific purchase.

Why You Need It

Points cards will help bring customers back to your store to see if they can earn more points. I go to the same coffee shop pretty much every time because I have already got a points card and earn based on it.

According to Marketing Metrics, the probability of selling to an existing customer is up to 14 times higher than selling to a new customer. At the same time, some studies show that 60 – 80% of customers that describe themselves as satisfied don’t make a second purchase from a store even if they need a product sold there. These customers are happy to shop around again and show little loyalty to your store. You can help change this trend in your store by having a loyalty program and making it obvious to your customers.

Cart Notices

Cart Notices can help perform up-sells to customers that are ready to purchase.

When your customers are ready to purchase they have already demonstrated that they trust you. This can be a good time to try and perform an up-sell with a custom Cart Notice. You do need to be careful you don’t make the checkout too overwhelming.

Standout Features

Cart Notices has lots of customizability so you can provide a custom message to your users based on what they have in their cart. This could take the form of a time-limited discount or an up-sell to a packaged product or better version of what they’re looking at purchasing.

Cart Notices also lets you provide a call-to-action URL for customers to click so that the desired action can be taken right away by your customers.

Why You Need It

Depending on what statistics you look at, cart abandonment can be as high as 80%. You can help customers make a decision to purchase or increase the total value of the purchase by using Cart Notices. If you choose a deadline notice, you can encourage a purchase before that sale expires. Creating urgency will help increase sales.

AffiliateWP

AffiliateWP can be a great way to leverage passive sales through influencers.

If you’ve decided to add an affiliate program to your WooCommerce site the next step is to choose which system to use to maintain your affiliate program. This is where I recommend AffiliateWP.

Standout Features

While we’re focused on WooCommerce here, many site owners have other projects going on. If you need affiliate programs on many sites, then AffiliateWP has you covered because it supports so many different platforms. You can have a secondary membership site, and still use the same affiliate program you are comfortable with.

AffiliateWP lets you change your referral rates between flat rate and percentage globally by the affiliate or by product. That means you can offer a lower rate for some people, but for a standout affiliate, you can reward them a bit extra for their continued support of your products.

When you’re dealing with payouts and accounting, AffiliateWP has an easy to use export feature so you can get a clean CSV file to integrate into your accounting application of choice, such as Quickbooks.

It also has integrations available for all of the popular WordPress plugins out there. That means you can hook your standard contact form into AffiliateWP with little difficulty and no custom development needed.

Why You Need It

A well-run affiliate program can give you access to markets that you usually wouldn’t have access to. Working with influencers in your industry and rewarding them for their work to promote your products will bring in more sales passively.

Holler Box to Target Customers on Site

Providing the right messaging to your customers at the right time is important, and that is where Holler Box can help you as it provides easy to use banners, pop-ups, and sale notifications for your WooCommerce site.

Standout Features

With Holler Box, you can provide timely messages to your customers while they’re viewing the site. Maybe you’re running a webinar and you want to make sure that they know about it. Holler Box will let you do this easily.

Holler Box also integrates directly with your sales so you can show when users make a purchase. This provides social validation for your products that people can see as they browse your site.

HollerBox provides timely messaging to customers while they view the site.

While Holler Box provides lots of templates for you to use, they’re also fully customizable so you can turn them into exactly what you want for your site and your customers.

Why You Need It

Showing great messages to your users can help provide social validation to your products, and even a bit of FOMO as they realize that they may not be able to purchase the products they want if they don’t act fast. Social validation is one of the keys cited by Robert Cialdini that will influence people to say yes to you.

Smart Offers

Where the previously mentioned Cart Notices plugin can grab your users before they purchase, Smart Offers takes it to another level by strategically offering users a product after they’ve made the purchase decision. This can be better because you’re not adding an extra decision before the purchase.

Standout Features

Smart Offers will let you add a single product or a range of products that can be offered after the customer initial purchase. You can even set Smart Offers up so that if they have already purchased Product A, they get offered an alternative upgrade after their initial purchase.

If you want to dig a bit deeper into Smart Offers, I wrote a post about increasing your average order price with Smart Offers.

Smart Offers strategically offers users products after they've made the purchase decision.

Why You Need It

When I wrote about streamlining your WooCommerce checkout I mentioned to get as much out of the way of a purchase decision as possible. Smart Offers allows you to do this and still increase the sales of your store by engaging with the extra sell after the user has purchased. You’re most certainly leaving money on the table if you’re not using Smart Offers with your WooCommerce Store.

If you can use even a few of these plugins well, then you can increase the sales of your store.

If you’re not sure which one to start with, then I’d recommend Smart Offers. Using this plugin alone many of my clients have seen a significant increase in sales.

Learn More About How Customers Think To Increase Sales

See Chris Lema’s webinar on eCommerce Decision-Making: How Customers Decide What To Buy to access to a five-step framework on how customers make decisions and the design implications for your store, which can also increase sales.

Source link

5 Live Client Touchpoints You Need On Every WordPress Website Project

When outlining the web design and development process, almost all freelancers and agencies list the exact same steps for building a WordPress website: discovery, design, development, and deployment. It’s a great first start, but those four steps don’t cover the whole project.

When planning a new WordPress project, my outline includes more of the project:

  1. Welcome
  2. Onboarding / Discovery
  3. Design
  4. Development
  5. Website Launch
  6. Training / Follow Up

This six-step website creation process keeps the focus on the client and uses more simple terms they understand. This breakdown of the creative process also provides specific milestones that allow you to connect with the client more often, nurture the relationship, and ensure their experience is in alignment with your brand.

Each project milestone is an opportunity to take a break from email, get out of your project management system, and have a live, personal, real conversation with your client, where you not only talk about the WordPress project you’re working on together, but you banter back and forth a bit and get to know each other better.

Let’s take a look at the five client touchpoints every successful WordPress project should include to maximize client experience:

Check Mark Build better WordPress sites. Subscribe to our weekly newsletter to get content like this sent straight to your inbox.

welcome new clients

1. Project Kick Off

As soon as the client signs and returns their contract and pays their deposit, it’s time to welcome them to your business and to the project. Instead of just welcoming new clients with an email, add a quick welcome call or project kick-off video chat to your process so you can connect with your client personally, set the tone for the entire project, and prepare your client for what comes next.

2. Design Strategy

After your automated onboarding process educates your client about WordPress and your process, equips your client with the language and understanding they need, and empowers them to communicate confidently with you, it should deliver a project questionnaire. The receipt of this completed questionnaire brings the second touch point opportunity: the design strategy call.

On this phone call or video chat, clarifying answers the client provided in the questionnaire, digging deeper into their thoughts and reasons behind them, and asking questions.

You need this call or chat to gather the information and insight needed to begin the design of the WordPress project.
Your clients need this call to feel like they are part of the project and that they have a voice, and to feel listened to and heard and valued.

Even if you feel like you don’t need a design strategy call, do it anyway because the design part of the project provides the best opportunities to engage with the client and help them fall in love with you.

3. Next Steps

Official design approval creates the perfect third major client touchpoint opportunity. When the client approves the design mockups and the project moves into the design phase, schedule a phone call or video chat with the client to discuss the next steps.

The development phase of a website project is the part of the project that is most removed from the client, which also tends to mean that it’s the part of the project clients understand the least. Because development is this semi-mysterious thing that happens behind the scenes, there is typically very little client interactions during this time, and when a client doesn’t hear from you, they start to wonder what you’re doing and if you’re even working on their project.

A next steps meeting allows you to personally connect with the client, celebrate the completion of the design process and outline exactly what comes next and what will happen during development. If the client has anything they need to get done, it’s also a great time to remind them of their homework.

engage in next steps and launch prep with clients

4. Launch Preparation

At the end of the development phase, as you near the website launch, schedule the fourth live touchpoint, a launch preparation meeting—and again, this can be a phone call, video chat, or even an in-person meeting.

Many clients aren’t aware of all the work that goes into a website launch and think it’s like flipping a switch, so the launch preparation call provides an opportunity to explain what goes into a website launch (all the work you’re doing). On this call, you can also schedule the actual launch, the post-launch training, and let the client know what you need them to do.

5. Training / Follow Up

The fifth and final major client touchpoint is the website training session, ideally done through video chat and screen sharing or live in-person. During the website training, in addition to walking the client through their new WordPress website, this is the perfect opportunity to continue any conversations you may have had with the client about additional services, seal the deal for ongoing support, or upsell future work.

live interactions elevate relationships

Live Client Touchpoints Elevate Your Relationships

As people who work behind a computer every day, it can be easy to fall into a rut of only communicating by email because it is easy.

But here’s the thing—when you connect with your clients live in-person, on the phone, or through a video chat, they get to hear your voice, see your facial expressions, or watch your body language. They get to connect with you on a deeper level and you get the ability to banter back and forth with a casual conversation that helps everyone on the call or at the meeting get to know each other better.

The small talk that happens during these touchpoints—asking about their weekend, family, weather, sports, etc.—helps strengthen the relationship and the stronger your relationship is, the longer the engagement will last, the more work they will send your way, and the more money you will make.

14 Strategies for Your Next WordPress Post Launch Plan - eBook Download

Source link

Build a Custom Store Frontpage with the new WooCommerce Blocks

While we covered the blocks that WooCommerce has available in Gutenberg not that long ago, much has changed in a short amount of time. My initial look at the WooCommerce blocks only covered two, and one of them duplicated a specific feature of the main useful block. Today we’re going to look at the new Gutenberg blocks that WooCommerce provides for your WordPress site.

In the past, I’ve built shortcodes that would accomplish many of the functions that are found in these blocks. The thing about shortcodes is that they were never user-friendly. My clients would have to figure out category IDs or product IDs, and then put them into the shortcode to get it working without getting any of the brackets wrong. Plus they’d have to remember the parameters available or look up in my documentation.

Luckily, that is no longer the case. We now have eight wonderful blocks for Gutenberg-enabled WooCommerce stores that will help to create a much smoother user experience for a Gutenberg frontpage.

Handpicking WooCommerce Products with Gutenberg

Let’s start with the new handpicked block available for WooCommerce.

Handpicking WooCommerce Products

Once you select the block, you can start typing in the name of the product that you want to have displayed on your page. When you find the product you want, click done underneath the product selector and your chosen products will show up on your post. You could use this to build a custom clothing set on a fashion site so that users can get the exact look that you’re talking about.

Choosing your handpicked products

From the right-hand side, you can also choose what you want to display with your handpicked products. To remove ratings, simply click the toggle to turn off the display of ratings from your selected products. In fact, these display options are available for all of the blocks that WooCommerce provides in Gutenberg.

For your handpicked product block you also have the option of changing how the products are ordered on your page and how many columns are used to display the products. While the default is three columns, you could change it to four to make sure that you don’t have a straggling product when you handpick four WooCommerce products.

Choosing Products by Attribute

Another interesting block is the Products By Attribute one available by default. A camera site could use this to show all the lenses that are compatible with the new camera they’re reviewing or a fashion site could use it to show all the products of a certain color in their current inventory.

Choosing products by attribute

The only drawback currently in the product attribute block is that it doesn’t let you choose two attributes to filter your products by. In clothing, that would mean you can’t choose to filter by both size and color. You’ll have to stick with a single attribute, though you could choose to show products across many different colors in the block.

In addition to the display customization options that you have with handpicked products, this block allows you to set the number of rows that are displayed. By choosing two rows as your setting you’d display six products with the out of the box block.

A very similar block to this is the Products by Category block. It provides the same option but allows you to display products based on the category they’re in. I’d love to see a block that allows filtering by product category and by product attribute to give the user maximum control.

Feature a Single Product

The Featured Product block is one that many of my clients have asked for in the past. This block allows you to find a specific product and give it a unique visual display to highlight it.

Feature a single product

Aside from the large thumbnail, you can change the color of the overlay, and choose the alignment of the text on your featured product. You can also choose to display the price and the description if you want or remove them with the toggle on the right side of your product.

Other WooCommerce Blocks in Gutenberg

The other blocks that are available by default with WooCommerce share the same theme, they’re preset filters based on different product metadata that WooCommerce applies to products.

You can choose from:

  • Best Selling Products
  • Newest Products
  • On Sale Products
  • Top-Rated Products

All of these blocks can be changed quickly between each other.

Other woocommerce blocks in Gutenberg

To change these blocks, click the arrow beside the block icon and you’ll get a drop-down with the other options available. Each of these blocks allows you to adjust the column or row settings. Choose to display the title, price, rating, and add to cart button. Finally, you can filter the products that display by category, if you want to only display products that are on sale in a particular category.

Building Your Gutenberg WooCommerce Frontpage

While all these blocks are great, what can you do with them? For many stores, the addition of all these blocks means that to get a custom front page, you no longer have to have your template customized by a developer to achieve a good look. I’ll show you how to build a custom Gutenberg frontpage using the Twenty Nineteen theme.

Start by adding a new page to your site and titling it ‘Home’. Then we need to go to Settings->Reading and change our homepage display to a static page. Then choose our new ‘Home’ page as the Gutenberg frontpage to our site.

Building your WooCommerce Store Frontpage with Gutenberg

If you also have a blog on your site, you’ll need to have a page set aside for your blog. Under the setting for your homepage, you’ll see a similar setting to set the location of your blog.

Now, we can head back to our new custom home page and start adding content. Let’s start by adding a section for the most popular products in our store. Use the heading block to add a heading to the page. Next, choose the Best Selling block and use it’s display settings to make the block full width. See the arrow below for which setting to use.

Add content to new twenty nineteen theme

You should end up with something like this.

Most popular products

Now let’s get a bit fancier and add some text and an email opt-in form to entice our site users to join our email list. Start by choosing the Column Block, which can be found by searching or inside the layout block types.

Adding an opt-in form

This block will give you two different columns by default, but you can adjust the number of columns to suit your needs. Each of these columns can have a different block inside if that’s what your site design calls for. Today we’ll put our email opt-in form on the right side and our text on the left side. I’m using WP Forms Lite, which includes a widget that works inside a block.

Featuring a single product

As you can see above, I made the text a dark background so that it draws the eye towards the content on our mostly white default page. This will increase the chance that your users will notice your form and then join your email list. Make sure you set your column block to be full width on your page to keep the look consistent.

Next, let’s feature another single product. We’ll use the Featured Products block and put it inside a column block again so that we can write some custom sales text for the product we want to feature. I’ve also used the settings inside the Featured Product block to remove the description so that it doesn’t distract from my custom sales text. Remember to set it to full width so our blocks match up.

WP forms lite works within a block

With Twenty Nineteen, our last two blocks feel like they’re crowded together, so let’s take a moment to break them up with a quote from a happy customer. Go to our email block and use the Insert After option to add a block after our email opt-in.

Uncrowding blocks with a quote

Now choose a Pullquote block and add our text from the happy user. Make sure you choose the display option to make the quote full width on your page.

Choose a pullquote block and add the quote

With that done, we’ve got a fairly respectable custom home page for our WooCommerce site. We didn’t need to talk to a developer or figure out specific product IDs that would then need to be copied and pasted into a shortcode. We didn’t have to hunt for a special plugin that would let us build a custom page, or invest in a theme with a page builder built in.

With only the available blocks in WooCommerce and the Twenty Nineteen theme, we were able to achieve this look.

Your new WooCommerce frontpage with Gutenberg

Clearly, there is some styling to clean up the page. Specifically, our featured product is on sale and in this design, you can’t really read the sale price of the product due to the yellow color overlay. Twenty Nineteen also leaves our products just a bit close to the left edge of the screen by default, so we’d need to fix that before launch.

The point is that these changes are minor items that we could use a service like Fiverr or Upwork to fix, instead of hiring a developer to build us a custom homepage from scratch. The addition of these awesome WooCommerce blocks to Gutenberg has put much more power in the hands of store owners and lets developers spend their time on other parts of a store build, instead of typing out lots of PHP code to produce the same result with less flexibility for the end user.

Build a High-Performing WooCommerce Store

Create a store that converts traffic with Hostdedi’ Managed WooCommerce Hosting solution. It comes standard with Jilt to help you recover abandoned carts, performance tests whenever you need them, and the platform reduces query loads by 95%, leading to a faster store.

Source link

Hostdedi and BigCommerce Announce eCommerce Partnership

May 2, 2019 – We’re proud to announce the addition of a new hosting solution to our lineup for merchants: BigCommerce. This new addition allows us to provide merchants with multiple options for creating, customizing, and delivering their online stores.
As a powerful, headless eCommerce solution, BigCommerce allows merchants to employ a powerful product catalog while maintaining the simple front-end capabilities of WordPress. To this end, BigCommerce accounts with Hostdedi will include a WordPress environment with the BigCommerce plugin pre-installed and pre-configured. Read More »

How Customers Decide to Buy: Purchase Decision Making Explained

The human brain is pretty incredible. But it doesn’t work the way we think it does.

We’re not as rational as we like to think we are, especially when making a purchase decision. Understanding how the brain works has a profound impact on ecommerce decision making.

Making buying decisions is not a rational process.

To learn how customers decide to buy, it all goes back to how the brain works.

WooCommerce Tutorial [2021] >>

Our brains actually jump to conclusions to keep us safe. It’s like the old trick when a kid throws a fake snake at someone. People jump in reaction because the amygdala spends less time on perfect detection and more time on keeping us safe:

That looks like a snake, step back!

Our brains react before we have a complete picture. It’s why those practical jokes work, but it’s also how we can react instinctively and avoid danger.

That’s also how we make purchase decisions before getting all the information.

A Purchase Decision is All About Anticipation

Another example of how strangely brains work can be seen in rats.

Researchers have long thought that dopamine was the neurotransmitter for pleasure. But it’s actually more than that—it’s about anticipation and eagerness for pleasure.

A scientific study looked at the dopamine levels in rats’ brains as they were put through a process of getting a signal, waiting, then being able to flip a lever and get a treat.

The highest dopamine levels came not when the rat got the treat or even did the work of flipping the lever. It came when the rat was waiting. That anticipation released a flood of dopamine that far surpassed the reward the rat was waiting for.

How to Design and Run A Customer Loyalty Program on WooCommerce >>

The flood of dopamine only increased when the rat didn’t get a treat every time. In fact, the maximum dopamine levels came when the rat only got a treat half the time. Brains react to that anticipation.

So how does this apply to ecommerce?

Ecommerce sites can leverage this anticipation dynamic for the purchase decision. Most sites do very little communication between purchase and delivery. But this might be a missed opportunity.

Check out Zappos. They’ll randomly upgrade orders and fast track the shipping. But it’s not just a happy surprise for customers—they send an email saying they did it, ramping up the anticipation and making the customer happy at the same time. It’s a good way to boost their brand (and that anticipation as well).

How Brains Work for Purchase Decisions

So your customers aren’t rats, but our brains do work in similar ways. Making a decision isn’t always a rational process.

You might think typical ecommerce decision-making is about evaluating options, weighing the pros and cons, and coming to a rational conclusion. But that’s not how it works.

Our brains are not computers. Our selection process isn’t managed by a spreadsheet.

The typical thought process is often in reverse—we make a gut decision, then work to justify that decision.

How Customers Decide to Buy: The Purchase Decision-Making Process

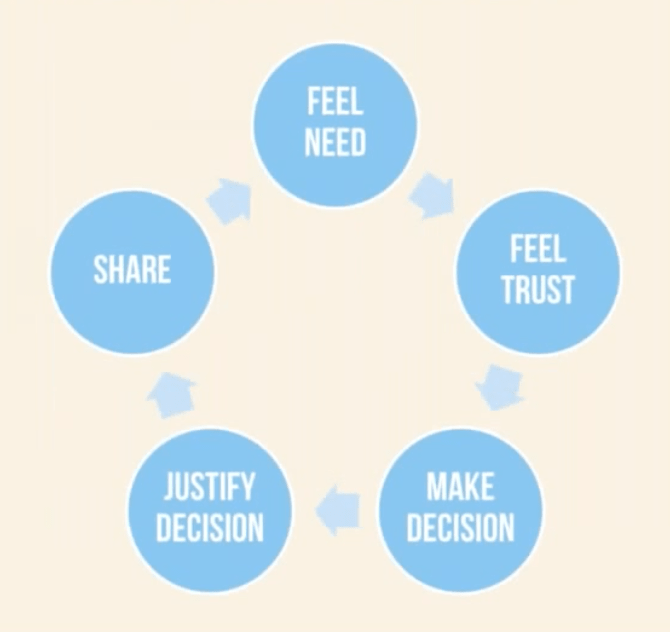
Here’s a practical way to think about purchase decision making:

  1. Feel Need
  2. Feel Trust
  3. Make Decision
  4. Justify Decision
  5. Share
5 stages of ecommerce decision making

Feel Need

It starts by seeing something and suddenly deciding we need it. It’s often a picture on social media. It’s not about weighing the benefits or seeing a list of features. It’s all about an emotional connection.

So to make people feel a need and influence their ecommerce decision-making, use lots of photos and tell stories.

Lots of large photos that show close-ups and details can create that emotional connection. Show people using the product.

Leverage Emotional Brand Triggers To Increase Website Conversion Rates >>

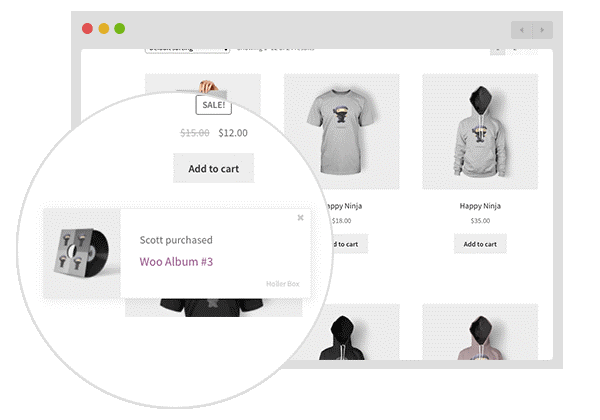
Another approach is to leverage testimonials and reviews. These tell stories that we can connect to, creating that emotional attachment.

Getting people to feel the need is not about price, shipping, features, or any other detail. It’s simply that emotional connection—yes, I want this.

Feel Trust

The next step is a snap judgment about whether or not the product is trustworthy. They say don’t judge a book by its cover, but we totally do.

That sense of trust is either felt or not felt almost immediately. People don’t spend time reading to get that sense, it’s usually based on the design.

This is why aesthetics and professionalism matter a lot.

It’s why you dress up for an interview, even if the job itself doesn’t require dressing up.

An ecommerce site needs to immediately appear professional. It should follow fairly recent design conventions and convey that sense of trust. Shoppers should be able to glance at the site and think—yeah, this is legit. This helps encourage the purchase decision.

Make the Decision to Purchase

So people see something they like and want it, they get a vague sense of trust, and then they make a purchase decision. That decision comes quick. Notice we haven’t discussed features or prices or shipping options.

The decision comes first.

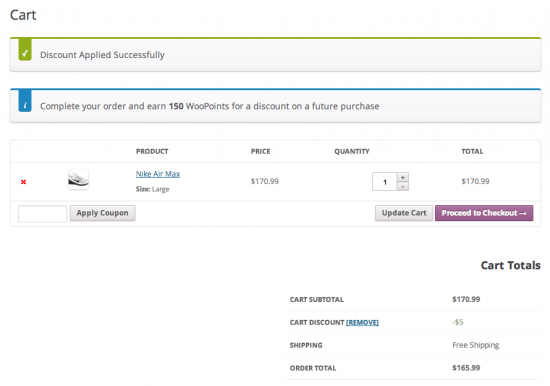
This is part of why so many online shoppers abandon their carts. They already made the decision to buy and started checking out when some kind of red flag pops up. Maybe the shipping is too expensive or too slow or their preferred payment method isn’t accepted.

7 Ways To Get Ahead of Shopping Cart Abandonment >>

When stores stopped accepting PayPal, they generally saw a 30% drop in sales. Why? People who use PayPal see it as a pile of money separate from their bank account, and it feels like extra cash. So they’re more willing to spend it. But if you don’t let them use PayPal, they’re less likely to buy.

So there are a few things you can do to help grease that decision:

  1. Accept multiple forms of payment.
  2. Keep the checkout process simple and free of roadblocks that might kill a decision.
  3. Reviews can be a super simple method of social proof and way to answer questions. Though it helps to know if a reviewer’s perspective is relevant, so metadata on reviewers are helpful (this is available in the Better Reviews for WooCommerce plugin by Hostdedi).
  4. Product comparisons can also be a way to help shoppers make that decision. Allowing shoppers to filter different features and find exactly what they’re looking for is going to make it easier to make that decision. The WooCommerce Product Table plugin can help with that.

Justify the Purchase Decision

Once people have made that decision to purchase, they’re eager to justify it. They want to know they made the right choice.

Imagine having to explain a purchasing decision to your boss or spouse.

This is where post-purchase and onboarding emails are critical. Don’t just send receipts and shipping info; send something that helps justify the decision. Send case studies of how people used (and loved) the product. Tell them everything they can get out of the purchase. Buyer’s remorse is real, so you want to underline that they made the right decision.

Emphasize how great it is and help them justify the purchase and feel good about it.

Share

The final step of the process is sharing. It helps justify the decision and make us feel better about it when other people buy the same thing. So we share our purchase.

This starts the cycle all over again as more people see something they want. And it’s effective:

  • 70% of millennial consumers are influenced by the recommendations of their peers when it comes to buying decisions.
  • 30% of consumers are more likely to buy a product recommended by a non-celebrity blogger.

Make Brains Work for You

So to influence the decision to purchase, you need to motivate people’s brains and feed into the cycle.

That doesn’t happen with a rational and text-heavy case for your product. It happens with photos, videos, good design, reviews, testimonials, and more.

Make that emotional connection with your customers quickly.

Sell More With Managed WooCommerce

Check out our Managed WooCommerce platform which can help reclaim abandoned carts and build beautiful product pages out of the box.

Or give it a try for free. Start your free two-week trial of fully managed WooCommerce today.

Source link