When the conversion rates for an eCommerce store start dropping, it’s all too easy to blame the store builder. Likewise, it’s all too easy for store builders to say conversion rates aren’t their problem if the tech is working.
SOUTHFIELD, MI. (Feb 23, 2021) — Hostdedi, a leader in Open Source Digital Commerce, today announced the launch of StoreBuilder – an intelligent, no-code eCommerce solution that quickly delivers compelling and customized online stores that stand out from the crowd. The product was launched in response to skyrocketing ecommerce trends, fueled by new businesses moving online and requiring easy, smart store building solutions without the need for technical expertise or coding budget.
StoreBuilder leverages the power of WooCommerce, the fastest growing eCommerce platform for store owners today. It is open source technology and sits on top of WordPress which is well known and free. People choose WooCommerce because it’s free and offers unlimited flexibility. With StoreBuilder, it’s never been easier to get online with this first of its kind, easy store building application that can build a differentiated homepage in minutes.
Unique websites. Designed to sell. No coding required.
Most eCommerce platforms offer overused starter templates that give online stores an identical look and layout. StoreBuilder’s proprietary intelligence engine uses insights from more than a thousand stores across 10 sectors including clothing, jewelry, home goods, and electronics to make smart decisions for setting up your ecommerce site. Pages, menu items, what’s placed on the homepage and the order elements should appear – are all optimized. With just a few inputs of data, users can quickly turn around a customized online store ready for content.
StoreBuilder users don’t need years of coding or design experience to build a beautiful store. There’s no reason to start from scratch or get frustrated by a blank screen. Using an AI-driven Wizard built on best practices, StoreBuilder does all the work delivering an intuitive, easy to navigate homepage in minutes, ready for customization & content, and optimized to convert site visitors into loyal customers.
“Templates on ecommerce platforms are everywhere, often making one store look like another. In a growing field of ecommerce competitors where your store has to stand out to succeed, StoreBuilder creates a one-of-a-kind storefront faster than any other solution in the market,” says Chris Lema, Vice President of Products, at Hostdedi. “StoreBuilder helps anyone and everyone start selling online in a sophisticated way, without frustration, and at an affordable price”.
StoreBuilder has also been added as a free feature for customers of Hostdedi’s Managed WooCommerce hosting, a high-performance ecommerce platform with extensive functionality to get the most from your site.
To celebrate the launch, StoreBuilder is offering one month free to new users. To learn more or get started, visit www.nexcess.net/storebuilder .
About Hostdedi
As the trusted leader in open source eCommerce for over 20 years, Hostdedi has been helping merchants and digital agencies of all sizes start, manage, and expand their online businesses. The company delivers eCommerce solutions across the spectrum from just starting out to major multinational online brands.
From the first managed WooCommerce offering to a market leadership position in Magento Cloud solutions, Hostdedi is a leader in store building. Our proven infrastructure, outstanding performance and unparalleled eCommerce expertise powers over 45,000 global sites and stores across The Liquid Web Family of Brands.
To learn more visit www.nexcess.net / www.liquidweb.com .
At this point, I think it’s safe to say that everyone knows how much ecommerce has boomed just in the past year. With more people online than ever, now’s the time to boost your social media marketing and take it to the next level. Whether your social media presence is good, eh, or no bueno, brand awareness is important if you want your business to be successful, and social media is the best place to start. Let’s look at a few ways to grow your small business using social media.
1. Know your audience
I’m telling you, your audience will not be the same on every platform. Without knowing who your target audience is, you could be spitting out content that doesn’t even interest them. It’s wasted time on your hard work and wasted time for your followers, which could lead to an unfollow. Think about your brand and products – who do you cater to? Pulling these demographics together will help you identify who your audience is and which social networks they interact with most (more on this later). If you’re trying to grow your business, you need to grow your audience – start by getting to know your followers so they’ll want to get to know you.
2. Find your brand’s voice
Probably one of the most challenging things to learn and might take some time, but I promise you’ll figure it out! Personally, this was one of the hardest tasks for me. It seems so easy, but you have to learn how to consistently speak (or type) in your brand’s tone on every one of your social channels. Figure out what your brand is like – fun? Hip? Serious? What are your company values? How do you want to come across to followers and prospects?
Also, be prepared to change up your messaging when posting on different social platforms. Just think of how different Twitter and LinkedIn are, as an example, even their character count is completely different. The same content could definitely work for multiple channels but that doesn’t mean the messaging will too.
Just remember that you’re a human (I hope) and not a robot, so make sure to sound like one when posting on your social media.
3. Create an editorial calendar
Staying organized and planning ahead is a MUST to keep your social media platforms consistently interactive. Start by researching blog posts, webinars, and courses on how to create a social media strategy. You’ll need to have a plan because this is more than just writing 280 characters on Twitter. Next, set aside time to focus on creating shareable, high-quality branded types of content, such as videos, articles, case studies, weekly posts, (ex. #TestimonialTuesday, #ICYMI, #EmployeeAppreciation) and more.
After creating a calendar full of content, strategically add it to your social media scheduling platform so you’re not relying on publishing posts manually. You’ll always want to be prepared for ad-hoc posts, but don’t plan on creating your social post content the day-of or before it’s scheduled deployment. That could lead to mistakes, lack of engagement, and poor results.
4. Run paid ads
Paid ads are your new best friend. Start out by tracking your top performing social media posts to see which one can get a little “boost.” They’ll help increase brand awareness, generate more engagement, and drive more traffic to your site.
Story time: I actually fell victim to a paid ad recently, which was a date box company subscription that I’ve never heard of. I was intrigued because it was perfect timing for Valentine’s day, the continuous indoor dates, and as always, the great marketing (I’m truly a sucker for some GREAT marketing and branding).
If it weren’t for their paid ad popping up on my Instagram feed at that moment, I would’ve never purchased from them. You just never know when someone’s going to see your ad, especially at the right time. But this also doesn’t mean that you should start paying for boosted ads on every platform you’re on. Review your analytics and see where you’re thriving most. Maybe you have more of an audience on Instagram over Facebook – you can try paying more for Instagram stories/reels/ads and bring down the quantity of paid campaigns you have for Facebook. Experiment, review, learn, then run it back!
5. Use metrics to measure effectiveness
This can be so time-consuming, especially when you want answers right away. Studying your social media analytics could take weeks and sometimes months to fully understand how your content is resonating with your followers. I’m someone that once I have ideas about something, I want to execute those plans ASAP because I get so giddy thinking about the outcome, especially when it comes to social media. What if my idea that I’m so proud of doesn’t get the love I’d hoped for? Why didn’t it? What if it eventually skyrocketed our engagement rate as time goes on? Why would it? That’s the power of social media analytics – reports that show you all the goodness, as well as where you’ll need to make improvements. Checking your metrics can tell you a lot, just make sure you’re using the ones that matter most to your brand. The proof is in the puddin’!
6. Invest in the right channels
I’ll let you in on a secret. I’m not sure if you already knew this…but…not all social media channels are the same.
*MIC DROP*
But really, this means you shouldn’t plan to post the same thing on every single channel, which also means your company might not belong on every single social media site. Remember when I mentioned knowing your audience? Now that you’ve met them, where do they live on social media? Did you create content curated to them? How are the existing traffic and engagement reports coming along? I know it seems overwhelming, but there’s a lot to consider when choosing the right channels for your brand. Once you’re ready, pick your channels.
7. Leverage influencers
We now live in a time where influencers can literally take your brand from 0 to 100. How many of you have been influenced by some sort of celebrity to purchase something? I’m guilty, I admit it! To be fair, consumers find it way more personal to get feedback about a product from an influencer who engages with their followers. It’s someone they trust. They want an honest opinion over a traditional ad that always says how amazing that brand’s product is. Start researching top influencers in your brand’s niche and try partnering with them. If you want to boost your reach, engagements, or even your brand in general, there’s probably no better way than this.
8. Monitor your accounts daily
Last but definitely not least, always monitor your social media accounts. It’s always a great feeling to see praise from your followers but unfortunately, that won’t always be the case. Sometimes you’ll receive negative feedback on your channels. It’s important to publicly reply with the best customer service so that your followers (who could also be potential customers) are aware of how quickly you’re able to handle the situation.
Hot take: Create a plan and process for handling these types of situations ahead of time and always make sure to be communicative with your team. Is there specific messaging in place for how to respond? Do you know your next step for getting this resolved? Are your team members aware of this process too, so they know what to do/prepare for? Also try putting yourself in the customer’s shoes – how would you want an issue to get handled?
Conclusion
Social media plays a huge role in every company’s marketing strategy – whether it’s big companies that are maintaining their brand or small businesses who are trying to grow theirs. Investing in social media marketing for your brand is crucial. Trust me. Now, I may not be an expert since I’m still learning the do’s and don’ts, but isn’t that what a social media marketer is all about? Constantly learning new trends, figuring out which metrics actually matter, and forever researching how you can improve your social media strategy. Start from the top – create a social media account (or a few) for your brand, try out these 8 tips, and I’m sure you’ll see improvements for your business.
If you asked any web developer which ecommerce platform has the most built in features – they’d tell you it’s Magento. And if you asked that same web developer which platform makes it easy to edit long-form blog content, they’d tell you it’s WordPress.
There’s a reason WordPress powers 40% of the top internet sites & Magento powers some of the largest and most complex online retailers.
So, it should come as no surprise that someone wanted to combine these platforms and take the best parts from each.
Last year, our partner agency Bytes.co started a new ecommerce project for their client Swan Island Dahlias. The client wanted to have full control over content. They wanted to add content to the blog and they also wanted to edit standalone pages like the About Us page.
This is possible within the Magento content management solution and one of Bytes’ developers could easily add all of the content for the client. But it isn’t fool-proof, and a non-tech savvy user could break a page. That’s where WordPress comes in.
If you’ve ever tried to use multiple applications for your business, the age old wisdom was to use subdomains:
Blog.yourwebsite.com – this would run WordPress and handle all of the content marketing for your store
Store.yourwebsite.com – this would run Magento
Having multiple subdomains is certainly a solution. It lets you run multiple applications for a single business. But it isn’t perfect. For one – the client wants to control all of the content. And while WordPress contains the blog for content marketing, the About Us page and other critical pages will still be in the Magento editor.
**Image of a simplified Dahlias sitemap and show which pages are controlled by WP or Magento**
Secondly, as soon as you add multiple subdomains you have to worry about two new problems:
Analytics – making sure you know who is purchasing and why
Search Engine Optimization (SEO) – making sure Google ranks your website highly and shows users the right page for their search
Analytics
I’m a huge data snob. I’d rather collect twice as much information as I’ll ever need than miss out on important data. And one of the most important aspects of analytics is knowing where users are coming from & what pieces of content are driving conversions.
Both these metrics become more challenging to uncover when you use multiple subdomains that are tracked using different Google Analytics implementations.
SEO
If someone searches for “dahlias” should Google send them to the blog or the store? When you bifurcate your website, you make search engines like Google decide which they recommend as the top link.
Both pages offer very different options for users and while for Google it may be a toss-up which subdomain they give the top spot – it’s really important for your bottom line. One page might have a 0.5% conversion rate and the other a 1% conversion rate.
And while there are solutions & linking strategies, when you have a single site that can tell Google which pages should have preference, you’ll have a lot more control.
Between these two new problems, many store owners don’t think it’s worth the hassle of combining different platforms and they’d rather use a single platform with whatever weaknesses they have.
Luckily both of these platforms are open-source and open-source projects have lots of unique & specialist features that closed-source projects just don’t have because they’re locked down.
Ben Tideswall created a piece of technology called FishPig that combines WordPress & Magento to work on a single domain.
That means that WordPress could control the home page, the blog, and any stand-alone pages like the About Us page. Magento controls the shop page, product pages, and the checkout flow. And both of these coexist on https://www.dahlias.com/.
I built the module to allow seamless integration of Magento and WordPress. To customers and search engines it should look and feel like one application. It’s great to see Netalico/Hostdedi taking advantage of this and building a great site.
-Ben Tideswall, creator of FishPig module
What Functionality Should Each App Control
FishPig gives developers a lot of control into what you want each app to do. Our partner Bytes used the following on their client site:
The core module let’s you combine WordPress & Magento
The Root module let’s you use WordPress on the home page for your site
The Shortcodes & Widgets module lets you use regular WordPress shortcodes as well as provides a new shortcode to show products from your Magento store in any WordPress page or post
The Yoast SEO module lets you control your sites SEO with the Yoast plugin instead of through magento
In addition to the above there’s plenty of other features you can use on your site:
Single Sign-on – synchronizes your customers & users between both applications
Related products – lets you add recommended content or products to either WordPress or Magento
Integrated search – when someone searches your site they’ll receive a combination of WordPress posts & Magento products in their search results
And many more
FishPig provides web developers a plethora of options & choices. You can choose which application controls what and under what circumstances. And since your analytics & SEO weren’t distorted by having separate subdomains it’s going to be much easier for the client to create & manage content, see the results of their marketing, and adjust course. Ultimately making them more nimble & profitable.
Selecting and purchasing your domain name is a really fun part of starting your online store or business. There are many domain registrars out there, but buying your domain from the host you intend to use makes things a bit simpler. We think it’s best to buy your domain from Hostdedi, but it’s not necessary to do this – it just takes a few steps out of pointing your DNS (domain name servers) in the right direction once the time comes for your site to go live.
Follow the steps below for a quick overview on purchasing your domain name from Hostdedi.
Search for a domain name that fits your business. When you find a name you like, that is also available, you’ll see the screen below where you can add your new domain name and the number of years you’d like to register it for to the cart and checkout.
Step 3
Once you’ve selected the perfect domain name, just click the green “Add to Cart” button seen in the previous step. You’ll see this:
Step 4
Once you click the green “Checkout” button, you’ll either need to sign in or sign up to complete your purchase.
Step 5
Either sign in or sign up and you’ll be taken to the Hostdedi portal to complete your purchase.
Conclusion
Blam! You’re done! Purchasing your domain name is that easy. If you run into any trouble, please contact support. You can also find tons of helpful information in our Knowledge Base.
Having your website show as “Not Secure” is not the best way toward gaining visitors’ trust. Web browsers and search engines have as common practice punishing non-secure sites either by warning the user about the lack of a trusted certificate or diminishing the said site’s visibility. To avoid this, it’s in our best interest to ensure our sites have a proper SSL certificate and are using the HTTPS protocol for the secured data exchange between the server and the clients.
Getting an SSL Certificate
The first thing we need is the certificate itself. We should point out that having the certificate does not mean that your site offers a secure connection because the certificate also needs to be installed on the hosting server. That said, to generate an SSL certificate, we need to issue a Certificate Signing Request (CSR) for our domain, and that needs to be signed by a Certificate Authority (CA). On Linux servers, we can create a CSR along with our private key by using the following command:
Note: Substitute /location/mysite.csr and /location/mysite.csr with the actual location of the file. You can change the name “mysite” for your domain name. If you don’t specify the location, the system will create the files in the current directory.
Once we generate the files, we then proceed to purchase the SSL certificate. The process might differ depending on your hosting provider; you can get one for free in some instances, as we will show later on. You can visit our portal and order an SSL certificate. Here is a handy guide on how to do so. If you wish to install an SSL certificate onto an active Hostdedi service, see How to install SSL certificates in your Hostdedi Cloud (if you are a Cloud client), or How to install SSL certificates in SiteWorx (if you are a non-Cloud client on a physical server). After the validation process, you will be able to install your certificate.
Install an SSL Certificate on cPanel
There are two methods for installing an SSL certificate in cPanel. The first method is via the Web Hosting Manager (WHM), and the second is through the accounts cPanel.
1. WHM installation
If we don’t have access to a Linux terminal, we have the option to create a CSR from WHM by going to Home »SSL/TLS »Generate an SSL Certificate and Signing Request.
After filling the form, we hit “Create” to finish the process:
The system will generate the CSR and private key for “nexcess.stardustziggy.com.” And also a self-signed certificate that you can temporarily use until you get a signed certificate.
Once we have the SSL certificate, we need to go to Home »SSL/TLS »Install an SSL Certificate on a Domain. From there, we can paste the domain into the text box and click “Autofill by Domain.” We can do the same if we have the certificate file, in which case the button “Autofill by Certificate” will appear.
We verify that the information is correct and install the certificate:
2. cPanel Installation
The installation through cPanel is relatively similar to that of WHM. We need to verify that the option “SSL/TLS” is active for the account (WHM’s feature manager handles this). To generate a CSR, we go to SSL/TLS > SSL Certificate Signing Request.
With the SSL certificate at hand, we then proceed to the installation by going to SSL/TLS > Install an SSL Website.
Similar to WHM, we conclude by hitting the installation button:
3. Getting a Free SSL Certificate with cPanel
We can take advantage of cPanel’s “AutoSSL” feature to set up our SSL certificate for free. The only requirement is that the server controls the domain’s DNS or that it resolves to the server. If any of these prerequisites are met, in WHM, we just need to go to:
Home »SSL/TLS »Manage AutoSSL and run the AutoSSL for the domain:
Install an SSL Certificate on Interworx
The process to install the SSL certificate on Interworx is pretty straightforward. We need to access Siteworx > Domains > SSL. From there, we should be able to add all the required files:
Note that you can also generate each one of the required files. In the above image, we have the option to “Generate” a new key.
After all the files are set up, we are all set. Notice that we can also issue a free SSL certificate with Let’s Encrypt by clicking on Generate All With Let’s Encrypt:
Install an SSL Certificate on Plesk
Similar to Interworx and cPanel, we can easily install an SSL certificate on Plesk by going to: Websites & Domains > SSL/TLS Certificates > Add SSL/TLS Certificate:
Notice that we can directly upload the files in their original format or paste the text directly. Similar to other control panels, you can also generate a CSR within that same section:
Install an SSL Certificate: General Procedure
If we have a custom control panel or an unmanaged server, we can follow this general procedure: upload the files to the server and specify them in Apache’s configuration file.
For CentOS servers, the files are usually located in in one of the following locations:
/etc/httpd/httpd.conf
or
/etc/httpd/sites-enabled/name-of-virtualhost.conf
For Ubuntu servers, the location is usually:
/etc/httpd/httpd.conf
You will need to locate the virtual host for the site in the httpd.conf file and update the locations to point to the actual files (the certificate, the private key, and the intermediate certificate). This is the usual syntax:
The files are usually placed in /etc/httpd/ssl. However, feel free to use the location of your choosing. Now we need to test Apache’s configuration by running apachectl configtest. This command will tell if there are any errors with the configuration files or any mismatch between the private and public keys. If everything is correct, we just need to restart the service, and the installation will be complete:
Hostdedi# apachectl configtest
Syntax OK
Hostdedi# systemctl restart httpd.service
Hostdedi# systemctl status httpd.service ● httpd.service – Loaded: loaded (/usr/lib/systemd/system/httpd.service; enabled; vendor preset: disabled) Active: active (running)
Tips and Tricks: Force HTTPS Connections
Even if we have the SSL certificate properly installed, if clients access our site using port 80, they can still get an insecure connection. To correct this, we need to map all requests to secure port 443. Adding this rule at the top of the site’s .htaccess file will do the trick:
RewriteEngine On
RewriteCond %{SERVER_PORT} !^443$
RewriteRule ^(.*)$ https://%{HTTP_HOST}%{REQUEST_URI} [L,R=301]
Note: Please be sure to first check for potentially conflicting rules to avoid redirection loops and similar issues when modifying the .htaccess file.
Conclusion
As we can see, it’s relatively easy to get and install an SSL certificate on our websites. We can even get them for free without compromising the certificate’s level of security, which is a considerable advance, and something to consider given how crucial trust is for the digital environment.
We Can Help! If you need additional or more specific information about this topic, contact our support team by email or through your Client Portalfor 24-hour assistance any day of the year.
As a developer, or a web dev agency owner, you know that time you’re not using to stand up websites is time wasted. And wasted time means wasted money! Now you can skip the tedious first steps of site creation with StoreBuilder by Hostdedi.
Meet StoreBuilder
StoreBuilder is an intelligent website assistant that helps you start and launch a WooCommerce store faster than any other solution in the market. Getting started is simple. By answering a few questions about your products, industry, assets, and whether or not you’ve already started an online business, we’ll use industry insights to build a storefront for you, in minutes.
Not hours. Minutes.
Do I have to be a Developer or know one to use StoreBuilder?
One of the best aspects of StoreBuilder is that anyone can use it, regardless of technical ability. You don’t need to be a developer or need to know how to code to use StoreBuilder but if you are a developer, using StoreBuilder will drastically increase the speed with which you can produce a new WooCommerce site.
How does it work?
When you create your account we’ll ask you a few questions about products, industry, which (if any) assets you have. From there, we’ll use industry insights to build your storefront for you. We researched over 1,000 popular online stores and analyzed exactly what’s on their homepages and in what order. We believe your client’s website should be as unique as their business.
Does StoreBuilder have everything I need to get started?
StoreBuilder includes all of the functionality you need to get products online, add products to carts, and seamlessly checkout with shipping costs & tax calculations. The only thing you have to do outside of StoreBuilder is buy your domain name.
This is a fully managed product. Hostdedi manages the updates & backups on our side, but you still call the shots. We also offer superior security from the pros at iThemes which only takes a few minutes to set up and is the virtual lock for your new online business.
StoreBuilder uses the Kadence theme with Kadence blocks (both are free and installed automatically) to build your storefront. We recommend Kadence but you can use any theme you like.
What makes StoreBuilder smarter than other website creation services?
With StoreBuilder, you reap the benefits of lessons learned from research of over 1,000 ecommerce merchants. StoreBuilder creates a custom homepage optimized for your client’s industry. Just tweak a few headlines, add a couple of product photos, and you’re ready to launch!
What if I need help?
Whether you’re a total n00b or a WordPress and WooCommerce professional, we’ve got experts ready to help you 24/7/365.
I’m ready. How do I get started?
Ideally, you’ll have your logo and brand colors ready, some information about your product(s), product photography, and any assets (like videos) you’d like to feature on your site. Once you have those elements – get ready – get set – and go build your store!
We usually move around areas that we think of as safe, buy food and medicine in places that we know are reputable, and do financial transactions through trusted institutions. As the Internet grows and evolves, so do our lives around it. We are increasingly spending more time online, and just like in the real world, we want to make our estancia as safe as possible. Secure Socket Layer certificates (SSL) are a great help to achieve this goal. We will be diving in about what is an SSL certificate, why it is important, and how we can get one.
What Is an SSL Certificate?
SSL certificates are part of our everyday online experience. When we access an SSL-secured site, one of the first things we can notice is that the site’s URL begins with “HTTPS” instead of “HTTP” in the address bar; This is indicative that our web browser was able to validate the authenticity of the certificate.
Secure Socket Layer (SSL) is a standard security protocol that enables servers (websites) and clients to create an encrypted connection. On the other hand, an SSL certificate is a digital certificate that uses the SSL/TLS protocol to authenticate the source (server) and establish a secure communication session.
Note: After SSLv3.0, the protocol was renamed to TLSv1.0, referencing “Transport Layer Security.” We are currently on TLSv1.3; however, since SSL is still widely used, most certificate authorities continue referring to the protocol as SSL/TLS. We will be using SSL to refer to the protocol moving forward.
SSL allows sending sensitive information securely. The encryption is vital because usually, the data exchange between browsers and servers happens in plain text, which is especially problematic since it leaves the door open to malicious actors that can intercept the communication and steal your information. With an encrypted communication session, even if someone intercepts your connection, it will be almost impossible for the attacker to decrypt the data, making these attacks ineffective.
An SSL certificate helps secure critical information or data exchanges, such as the following:
Login credentials
Financial transactions
Personal information (name, address, ID number, cell phone number, etc.)
Medical records
Proprietary information
Legal documents
In the image below, we can visualize how a trusted certificate looks like:
How Is The Secure Connection Created?
The exact mechanics of how this protocol works are relatively easy and all the process is developed without the user even being aware. We can break it down into four steps:
When we try to access an SSL-secured site, both the client (our browser) and the server establish a connection called “SSL Handshake”. This is the initial attempt to create a secure session.
The server sends the certificate along with the public key.
The browser verifies 3 things:
If the certificate was issued by a trusted entity (Certificate Authority).
If the certificate is not expired.
If the certificate was issued to the website we are trying to access (the domain name matches).
If all of the above is verified correctly (if not, we will get an error message about the site not being secured), the browser sends a session key to create a secure communication channel effectively. The server’s private key can only decrypt that session key. If the server can decrypt the key and send back an acknowledgment, then the secure session is started, and the session key is used to encrypt all the data exchange.
We can see a visual representation of the process here:
If during this process something goes wrong, we will see a screen like the following:
Types of SSL Certificates
Before ordering an SSL certificate, we need to ask ourselves: which level of protection is necessary for our website? That is critical in determining what type of SSL suits best for us. We will take a look at the existing categories and their uses.
1. Domain Validated SSL (DV)
This is the most simple of all, and it’s obtained only by verifying the ownership of the domain. It does not require information about the company. Several web hosting plans offer this type of SSL for free, but depending on the Certificate Authority (CA), it can go up to US$50.00 or US$100.00. The verification method can be by sending an email to the site’s associated address, doing a DNS verification, or a Domain Control Validation (which involves uploading a text file for validation over port 80). The last two methods are common to control panels such as cPanel.
These types of certificates are good for sites that don’t need the highest level of security, and will usually be enough for most eCommerce sites.
2. Organizationally Validated (OV)
OV SSLs add another layer of verification, as organizational details must be included within the certificate. The CA must validate this information (usually organization name, physical address, and domain ownership) and can take a few days. As such, these offer a considerable level of trust. One of the drawbacks of these certificates is cost. If the organization has several domain names, those are added as “addons” to the primary certificate to cover them and any related IP addresses. This can pose a considerable increase in the certificate’s final price.
3. Extended validation (EV)
EV certificates offer the highest level of security among SSL certificates. Usually, when visiting sites with this certificate, users can see the padlock and company name highlighted in green. These are the hardest to obtain as they require the following information to be verified:
Legal Existence and Identity of the company.
Assumed Name.
Verification of Operational Existence.
Verification of Physical Existence.
Verification of Domain Ownership.
Verification of the name, title, authority, and signature of the person requesting the certificate.
Of course, the main advantage is that you will have a widely recognized and trusted certificate, which in turn gives your clients the highest level of confidence.
Multi-Domain/Wildcard SSL
We can find Multi-Domain SSL certificates on each of the aforementioned categories; with one significant distinction, we can pack several domains within one certificate. For instance, if we have “mysite.com,” “mysite.do,” and “mysite.net,” it would be tedious and potentially costly to issue a certificate for each of them when we can include them into the same certificate.
The same goes for the wildcards SSL certificates. Instead of listing specific domains, we have the option to include a domain and all subdomains. Let’s take “mysite.com” as an example. If I set up a wildcard certificate for “*.mysite.com,” every subdomain (even the ones that don’t exist yet) of mysite.com will be included in the certificate, and thus it will have SSL coverage.
How Do I Get an SSL Certificate?
The procedure to obtain an SSL certificate might differ depending on your hosting company, the hosting plan, or the Certificate Authority we chose. Still, generally speaking, we need to follow two steps:
1- Generate a Certificate Signing Request (CSR).
2- Purchase the certificate, which is done by the CA signing the CSR.
Let’s take a typical example. We want to order an SSL from www.nexcess.net for a domain hosted on a Linux server. We need to generate the CSR and the private key (and the public key, although this is optional). The private key must be kept safe, as anyone with this file would be able to install the SSL certificate on another server and potentially cause damage.
Note that you can set up the CSR from within Siteworx’s control panel. Otherwise, to generate the CSR along with the private key from terminal, we can run the following command:
Note: Substitute /location/mysite.csr and /location/mysite.csr with the actual location of the file. You can change the name “mysite” for your domain name. If you don’t specify the location, the files will be created in the current working directory.
After filling the form, we will be good to go. This is a sample of the required information to create the CSR:
Hostdedi# openssl req -new -newkey rsa:2048 -nodes -keyout /etc/ssl/nexcess.key -out /etc/ssl/nexcess.csr Generating a 2048 bit RSA private key ….+++ ………..+++ writing new private key to ‘/etc/ssl/nexcess.key’ —– You are about to be asked to enter information that will be incorporated into your certificate request. What you are about to enter is what is called a Distinguished Name or a DN. There are quite a few fields but you can leave some blank For some fields there will be a default value, If you enter ‘.’, the field will be left blank. —– Country Name (2 letter code) [XX]:US State or Province Name (full name) []:Michigan Locality Name (eg, city) [Default City]:Southfield Organization Name (eg, company) [Default Company Ltd]:Hostdedi Organizational Unit Name (eg, section) []:Linux Common Name (eg, your name or your server’s hostname) []:nexcess.net Email Address []:[email protected]
Please enter the following ‘extra’ attributes to be sent with your certificate request A challenge password []: An optional company name []:
Once the files are generated, we will see that the CSR has the following format: —–BEGIN CERTIFICATE REQUEST—–
—–END CERTIFICATE REQUEST—–
Whereas the private key:
—–BEGIN PRIVATE KEY—–
—–END PRIVATE KEY—–
Upon confirming that the files are good, we can now order a new SSL certificate from within our portal:
We then have to paste the CSR in the textbox:
Lastly, we just need to wait for the verification, which for a DV certificate should be no more than a few minutes. The SSL certificate’s installation process is beyond the scope of this article, but no worries, we have you covered. Please note that OV and EV certificates can take days to be verified.
Conclusion
SSL certificates play a significant role in maintaining our client’s trust and privacy, as well as our site’s reputation. Most web browsers and search engines are punishing sites that don’t have an SSL certificate set up, using the narrative that these certificates help the Internet become a safer environment. We should always aim to put our client’s integrity and security above all, and this is one of the ways to do it.
We Can Help! If you need additional or more specific information about this topic, contact our support team by email or through your Client Portal for 24-hour assistance any day of the year.
No one was expecting the year 2020 to be what it was. As we look ahead to a new year, we’re asking what does it mean to go back to normal? How much of what we see now is here to stay?
Online shopping has increased quite a bit over the last decade, and it grew more exponentially through the COVID-19 pandemic. Approximately 25% of Americans shop online at least once a month. While online shopping is becoming more popular that doesn’t mean that physical retail is dying – or that there aren’t lessons to be learned from it. A recent study by First Insight showed a number of interesting trends around how people view in-store shopping.
According to the survey, both men and women spend more in-store than they do online. They are also both more likely to make impulse purchases in-store. People are more likely to shop in-store if they need a product right away. It’s simply easier and faster to walk in and get the needed item and walk out. Online shopping involves shipping which means people won’t get their purchase for at least a day. While habits developed during Covid are likely to remain, people still love in-store shopping. So let’s talk about how we can bring that experience online and capture some of the benefits of a retail experience.
Access to Salespeople or Support
One of the things that’s awesome about my local outdoor store is the knowledgeable staff that use the gear regularly and can point me in the right direction with my purchases. I choose to shop there even when their prices are a bit higher because of the staff.
While you can’t greet every single online shopper like a retail establishment can, there are ways to bring some of this human experience online.
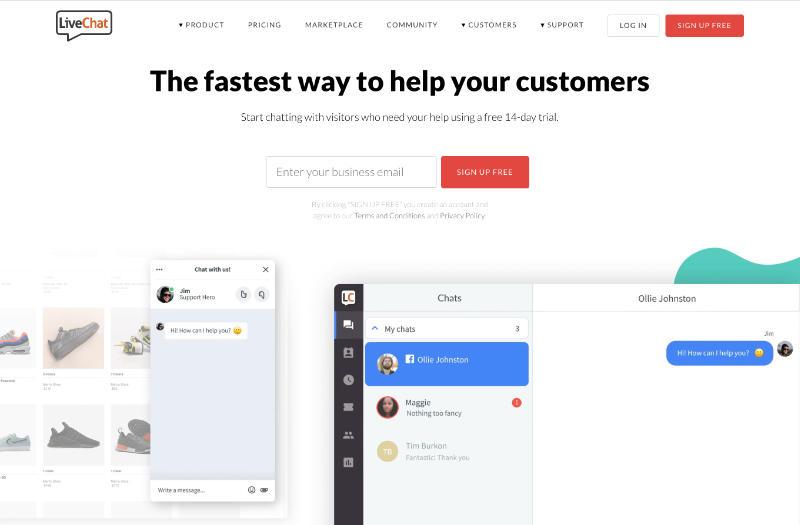
Online Chat
One of the first ways you can give customers great advice is with online chat. LiveChat has a free WooCommerce plugin to integrate with their paid service. Using online chat you can have customers directly ask you questions about their purchase as they encounter the questions.
There are some common pitfalls with any online chat system though. First, don’t make your customer wait for 20 minutes to get access to an agent. While people may see a busy retail store and forgive a wait, you don’t get that grace period online. You need to be able to serve your customer promptly.
The second issue with any live chat system is an extension of the first – staffing it properly. I used to work at a non-profit that had live chat, which was always offline. Worse yet, when they were offline, it offered you the option to leave a text based message and someone would get back to you. Unfortunately those messages would be left unanswered for weeks at a time as other things on-site continued to be higher priority.
I’ve encountered this myself recently with a WordPress plugin. I used the live chat to ask a question and they were offline so I left a message. Three weeks later I got an apologetic answer to my question. We had already gone with their competitor though so the sale was lost even though they were my initial top choice. I only found their competitor after another hour of searching and it was more risky because they had fewer reviews and other social confirmation. But their chat was staffed and got back to me right away.
They got the sale – a recurring sale – from my client because they had someone ready to answer my questions in real-time.
If you’re going to introduce live chat to your site, make sure you address the staffing needs up front. Never assume that your staff will easily make the time to answer chat.
Pick up the Phone
When I worked at Western Canoeing and Kayaking, it was not uncommon for sales staff to have long phone conversations with potential customers. These often hour-long conversations sometimes resulted in them saying they’d call back to purchase. Most of the time, we did make an immediate sale though and I remember one sale in particular that was over $20k for an hour on the phone.
Adding your phone number to your store can bring in customers, but just like online chat, you need to remember to staff it properly. You also need to remember that call quotas can kill any chance at a sale.
If we had a time limit on phone calls at the boat store, I would have been pushing to get off the phone with that $20k sale so I could meet my numbers. In fact, most of the calls that resulted in sales would have ended long before staff fully understood the customer’s needs.
Having a real voice to talk with helps make a connection with your customers. Don’t discount phone calls and face-to-face time because it might be time intensive but it pays off in sales.
Digital Assistants
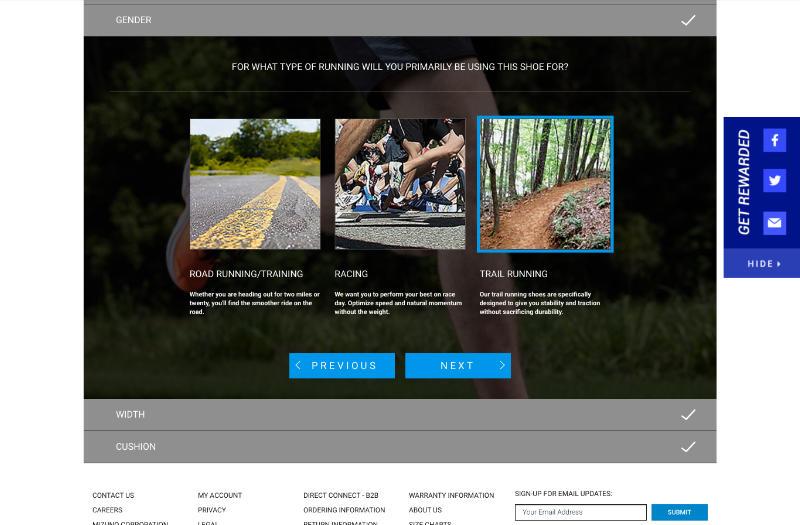
Personalized recommendations based on a customer’s needs is one of the reasons that shopping in-store can be beneficial. You get to talk to someone that learns more about your requirements and can recommend a product to fit your needs. Sometimes you’ve never even heard of the option before, and it ends up being perfect.
You can achieve this with digital assistants, like we can see at Mizuno, where their shoe picker can help you choose the right running shoes for your needs.
By following the steps for their shoe picker, you can narrow down a wide choice of shoes to the one or two pairs that are the best possible fit for you. By leveraging a plugin like FacetWP and a custom UI, you can bring customization like this to your online store. By adding the proper metadata to your products, users can filter their options down to the one or two best options for their current needs.
If you have live chat on your site, customers can even use that as the final step to help them make a choice based on the narrow set of options they’re presented with after using your assistant.
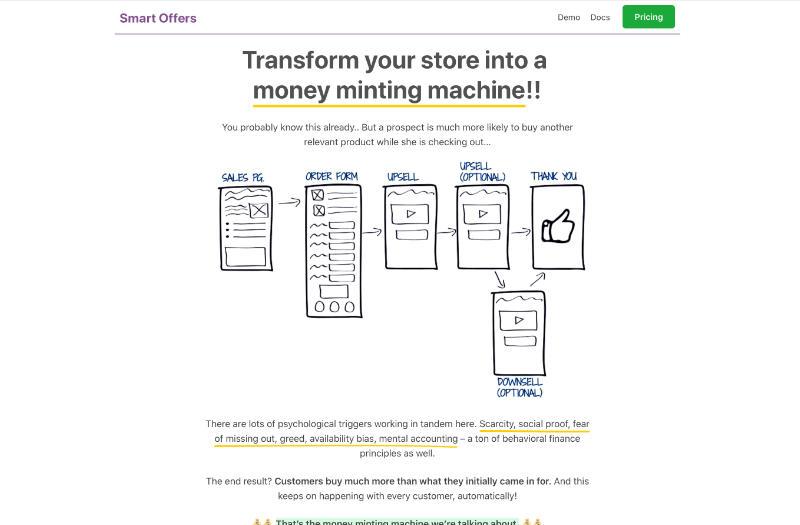
Impulse Add-ons
How many times have you walked up to the counter at a store and found some small item that you toss in the cart and leave with? If my kids had their way, it would be every shopping trip as they add candy to the cart as soon as I’m not looking. My local outdoor store leverages this impulse purchase with a set of beautiful cards with pictures of local outdoor locations on them. More than once I’ve grabbed one just because it looks so nice, figuring I’ll find a use for it later.
Using a tool like Smart Offers you can achieve a similar outcome. Instead of cluttering up your checkout with things that might distract your users, Smart Offers lets them checkout and then shows them other offers that they may be interested in. They can add these to their order even after they’ve made it without checking out again.
Real-Time Customization
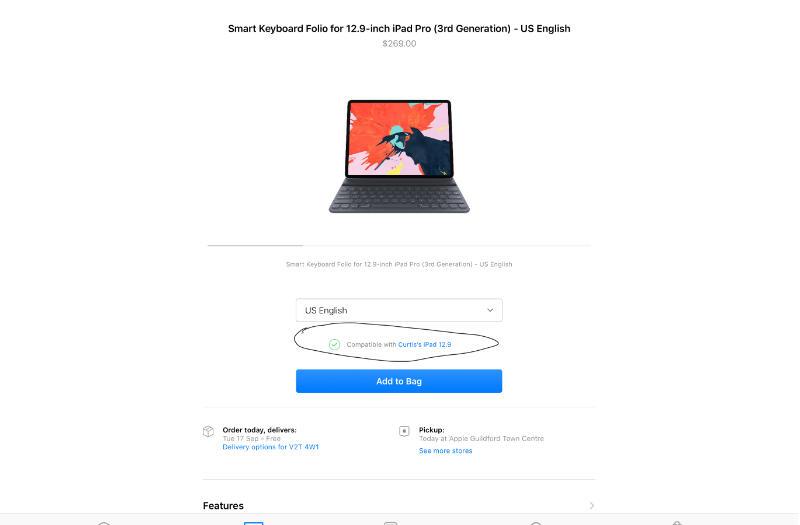
I’ve already talked about leveraging FacetWP as a digital assistant, but that takes interaction by your user every time they come to your site. Apple does a bit better by showing me whether a product is compatible with the devices I own – but even they could take it further.
By asking your customers which products they currently own, or looking at their order history, you can show users new items that work with their current products. Apple could show me all the new products that have debuted since I last visited that will fit with my 12.9″ iPad Pro. Even offering a quick filter option to show only the devices I have registered with them would make finding products specific to what I own faster.
If you’re going to provide benefits to your users, they will be willing to trade a bit of information. I’d be willing to tell B&H Photo which camera I own so that it was easy to find lenses that are compatible without needing to go through the filtering process every time. Since my camera is old, I wouldn’t complain if they took the time to tell me when a new version was released and offer me the option to upgrade with them.
Free Fast Shipping
The report I mentioned at the beginning of this post said that shoppers are more likely to shop in-store if they need something right away. While not every store can provide free shipping, there are steps you can take to increase the speed that your customers can get your products.
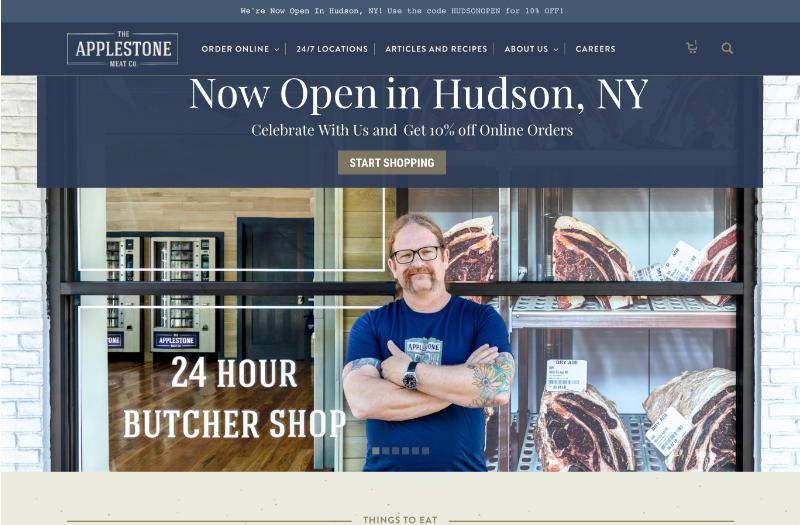
Best Buy does a decent job of this by offering in-store pickup with an online order. I can order something and then they’ll email me when it’s ready at my local store. I’ve used this on many busy days. It saves me time and the headache of trying to wrangle three kids through the store. They could take it one step further by offering free local delivery, like Applestone Meats does.
At Applestone meats, you can place an online order and they’ll give you a pickup location. They deliver even outside of their direct region with their refrigerated truck by scheduling the longer trips on certain days of the week. They also have meat vending machines so you can get what you need even if the walk-in location is closed.
One of my favorite things about my local used bookstore is the staff curated selections. Every few weeks I head in to see what’s on the shelf and I almost always walk out with something.
You can easily bring this to your online store as well, and not just for staff picks. By leveraging YITH Wishlists, you can allow users to build a custom wish list and then share it with others. I could use it to show the products my family has tested for backpacking with three kids. That would give any family doing backpacking research a leg up in their product choice since they’d be purchasing products that have already been tested by someone in their position.
You can take this even further by leveraging an affiliate plugin for your WooCommerce site and allowing users to create curated lists that they can earn affiliate income from.
With so much of what we do day-to-day going online, it’s easy to discount the old ways of doing things. But that’s often tossing away ideas and processes that have worked for years. By using some of the techniques above, you can keep some of the great experiences that come with in-person retail while also leveraging the advantages of having an online store.
Build a High-Performing WooCommerce Store
Create a store that converts traffic with Hostdedi’ Managed WooCommerce hosting solution. It comes standard with Jilt to help you recover abandoned carts, performance tests whenever you need them, and the platform reduces query loads by 95%, leading to a faster store.