CAll Us: +1 888-999-8231 Submit Ticket

Author Archives: admin

The Hidden Costs of Cheap Hosting

Getting something cheaper always sounds like a great idea. Who doesn’t like the thought of saving a few bucks on something you expect to be expensive?

If you’re a bargain hunter, you’ve likely already experienced a bait-and-switch situation. What starts out as a great deal can end up costing more and more.

The same goes for web hosting. Cheap hosting can be appealing at first, but it can come back to bite you in the most unexpected ways.

Keep reading to learn more about the hidden costs within cheap hosting solutions.

What is Cheap Hosting?

Cheap hosting refers to web hosting services that cost less than expected, especially when compared to the cost of similar hosting plans.

It is easy to assume that cheap hosting is synonymous with bad hosting. Some people have had experiences that could back this up, but it isn’t always the case. Sometimes these bad experiences result from customers misunderstanding the tradeoffs made by hosting service providers that enable the company to keep costs low.

Related reading: Shared Hosting vs. WordPress Hosting: What’s the Difference? >>

In other cases, it is a matter of articulating hidden costs. While it is unfortunate, the customer may simply overlook them because they are buried in fine print. The customer signs up expecting a buffet of features. They end up with a one-course meal and the option to pay more for extra items they thought they were already getting.

Depending on your needs, cheap hosting may work for you. The key to figuring out which side of this divide you stand lies in understanding the hidden costs associated with cheap hosting. So let’s take a look at some of them.

What are Some of the Hidden Costs of Cheap Hosting?

Renewal Pricing

Trying to compete with similar price points can be tricky when your offerings are significantly better than the competition. The easiest way to sway customers is to appeal to the customer’s need to save money.

They reduce the initial subscription price, usually for the first year, only to jack it up the following year. It can be more than double your original costs. Many customers fail to notice the low price is only for a limited time, or forget after a year with the service.

When you’re paying $5 or so a month for your hosting, and suddenly you get an annual bill of $180 or more, you’re probably not going to be very happy.

Related reading: What is Web Hosting? A Beginners Guide to Hosting >>

No Managed Hosting Services

Another way web hosts can afford to offer cheaper hosting is by limiting the add-ons that would usually come with their hosting service. These extras convert a regular hosting plan to a managed hosting service, something that’s become fairly standard for most hosting providers in recent years.

Managed hosting services are provided by hosts that handle the day-to-day infrastructure needs with your account. This includes ensuring both system hardware and software are updated regularly and protected against intrusion attempts, as well as regular backups.

For a small business with limited in-house IT capacity, a hosting plan with all this included is a great choice. However, if saving money in the short term is more feasible, cheaper plans are still an option. Just be sure that you have a team capable of handling management and maintenance tasks, so you can avoid problems that can affect your business continuity.

Limited Features

Another thing to pay attention to when it comes to cheap hosting is what features and add-ons you will be missing out on. There are a surprising number of things that fall under this category.

The performance of your hosting infrastructure is one of the more common hidden costs when it comes to cheap hosting. Whatever you save on the subscription costs is bound to affect the infrastructure hosting your applications.

This can mean being put on a shared hosting plan with several customers sharing the same limited server resources. The downsides of this kind of arrangement include slow load times for websites, increased site outages, greater exposure to security risks, and space and bandwidth limitations.

These restrictions may not be a source of concern for a small business with a website that’s not expecting much traffic. However, if you’re looking to get online with the intent of growing your website traffic, this can be a big deal. A dedicated server may be a better option in this case.

In other cases, the hosting provider will choose to omit some value-added services that, while not extremely necessary to your hosting in the grand scheme of things, are nice to have. These add-ons will vary from host to host and include features like daily backups, unlimited email accounts, free SSL certificates, content delivery networks (CDNs), system alerts, virus and spam protection, to name a few.

These add-ons usually are not included by default with a cheap hosting plan, but the hosting service provider will give you the option to add them for a bit of extra cash. By the time you add a few of these choice extras to your hosting service, you will end up with a bill that’s not as cheap as you initially thought.

Support Limitations

The support (or the lack thereof) that comes with cheap hosting can be a dealbreaker in many instances. The choice of a more affordable hosting plan usually means losing out on premium support offerings.

If you encounter an issue, you won’t be able to contact your host’s trained support staff who are available 24/7 to higher paying customers. Instead, you’ll probably have to rely on their knowledge base articles in hopes that your issue is one that’s been covered before.

Related reading: Why Hosting Support Is Important >>

Some hosts do offer access to customer support on their cheaper plans, just not the instant variety. That’s not so great when your website has an outage, and you have to wait twelve hours before you get a response from the support team.

If your business is heavily dependent on your online presence and maintaining maximum uptime, choosing a cheap hosting option that lacks decent support is not a great idea. Access to on-demand technical support will ensure you get the help you need when you need it, keeping your site online and accessible to customers.

Migration Costs

Migration costs are an example of a hidden cost that rarely comes back to bite you, especially if you’ve chosen an excellent hosting company.

However, if you ever do decide that you need to move your website to another hosting service, it would come as a surprise to you that it can cost more than you pay for a yearly hosting plan to do so.

  1. Read the fine print! Don’t get carried away by how affordable the hosting plan is. Web hosting involves more than just having a place to store your web files and run your website. Pay attention to what features the host offers as a part of the plan.

  2. Compare plans and pricing. There are dozens of web hosts out there, so when you spot what looks like a great deal, look for other hosting providers with similar offerings. Compare them to see what features the hosting company dropped to get to that attractive low price.

  3. Ask some questions. You know your needs best when it comes to hosting, so don’t hesitate to reach out to the sales team about any concerns you may have. If you’ve done your research, then you will know what features are a must-have and the ones you can’t live without.

  4. Be on the lookout for reviews from real-life customers. This will help you cut through all the marketing jargon from the service provider. The more you understand what real customers experience, the better you will understand whether the cheap hosting plan will meet your needs.

  5. Pay more for better hosting with no hidden costs because sometimes it’s not worth the hassle in the long run. If you can afford to spend more money on a hosting plan with more features and less of the risk that comes with a cheaper plan, then the wise choice is to do just that.

Looking for a Host That Does it All?

The process of choosing what kind of hosting plan you want first requires identifying what type of site you want to build. This will determine your hosting requirements and serve as a guide for picking an optimized service for your needs. If you need help with figuring all of this out, we can help you select the right plan for your website.

Hostdedi provides fully managed WordPress, WooCommerce, Magento, and lots more. Want to try a host that is upfront on pricing and has all the features you need? Check out our plans to get started today.

Related Resources

Source link

How to Create a WordPress Website for Beginners

You’ve been building your brand behind the scenes. Now it’s time. You know you need a website to launch your brand, but you aren’t sure how to start. The entire idea of the site gives you anxiety. We get it! Building and launching a website can be intimidating. This post will cover step-by-step how to create a WordPress site for beginners.

Believe it or not, it doesn’t take a lot to launch a WordPress website. First, of course, you need an excellent understanding of your brand, its visual identity, and the site’s goals. But from a tech standpoint, the things you need to launch are minimal when you use WordPress.

Keep reading to learn how to create a WordPress website for beginners.

Step 1: Setup

Why WordPress? Many people decide to use WordPress because it has a reputation for being easy to use and free. But even though WordPress is free, where does the cost come from?

Two things you need to launch a WordPress website:

  1. Domain Name. The domain name is the URL for your website. It’s what people type to go to your site. Your brand’s name probably is best, assuming it’s available.
  2. WordPress Hosting. Choosing a company to host your website is one of the most critical decisions for your site. You should select a company that provides fully managed WordPress hosting. Don’t just go with the cheapest option. Instead, read reviews and ask those you know with successful, fully operational websites to make recommendations.

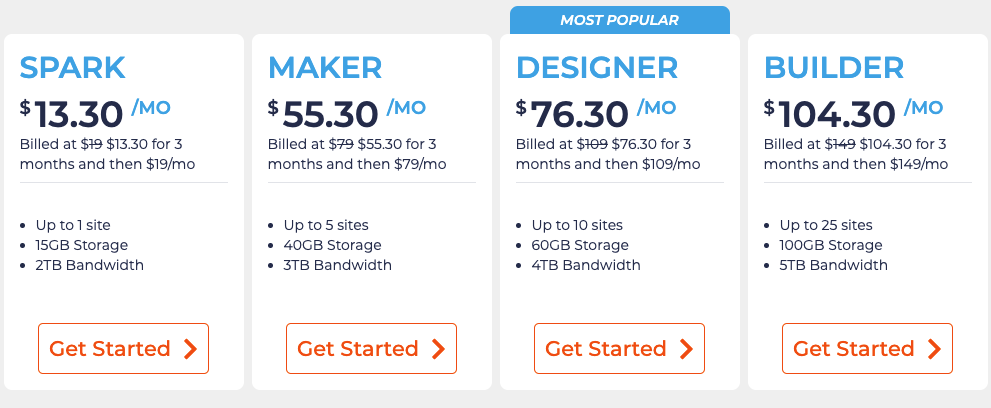
At Hostdedi, we have the perfect plan for beginners to get started with a WordPress site. We call it our Spark plan, and right now, you can start for only $13.30 a month.

No matter where you start, we have plans that meet all of your needs and budgets.

Once you choose your hosting plan and WordPress installs automatically, then you get to start the fun of selecting a WordPress theme and customizing your website.

Step 2: How to Install a Theme

The next step in setting up your WordPress website might be the most fun. It’s choosing a WordPress theme. The theme is a template that controls the appearance of your site. Your WordPress site comes with the WordPress 2021 theme.

Many people find this starting place useful, but you may want to select the theme that most suits your brand image.

Switching between themes and installing new themes is easy. And especially for beginner WordPress users, trying on new themes can be a great way to start.

To choose and install a WordPress theme:

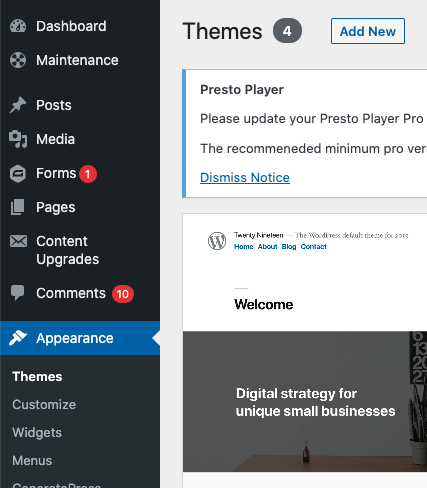
  • Log into your WordPress dashboard
  • Select “Appearance”
  • Choose “Themes”
  • Click “Add New”

Next, search through the thousands of free themes to find one you like. You can even use the filter function to narrow your options.

Once you’ve decided on and installed the theme you want, you can start to customize the WordPress theme.

Step 3: How to Add Posts and Pages to Your Site

Most WordPress tutorials direct you to customize your theme right after installation. But, it’s easier to customize your theme and design if you publish content first.

You can add content to your WordPress site in two ways — posts and pages. Posts are blog entries. They have a publish date, and typically all use the same template. Pages are static parts of your site, like your about or contact information. Pages can use different templates and design elements.

Related reading: The Essential Guide to WordPress Plugins >>

Most websites use a combination of posts and pages. For example, if you’re running a food blog, you would create pages for home, about, contact, and recipes. You would publish each recipe as a post.

To add pages to your WordPress website:

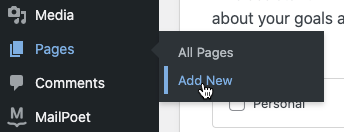
  • Log into your WordPress dashboard
  • Choose “Pages” and select “Add New”
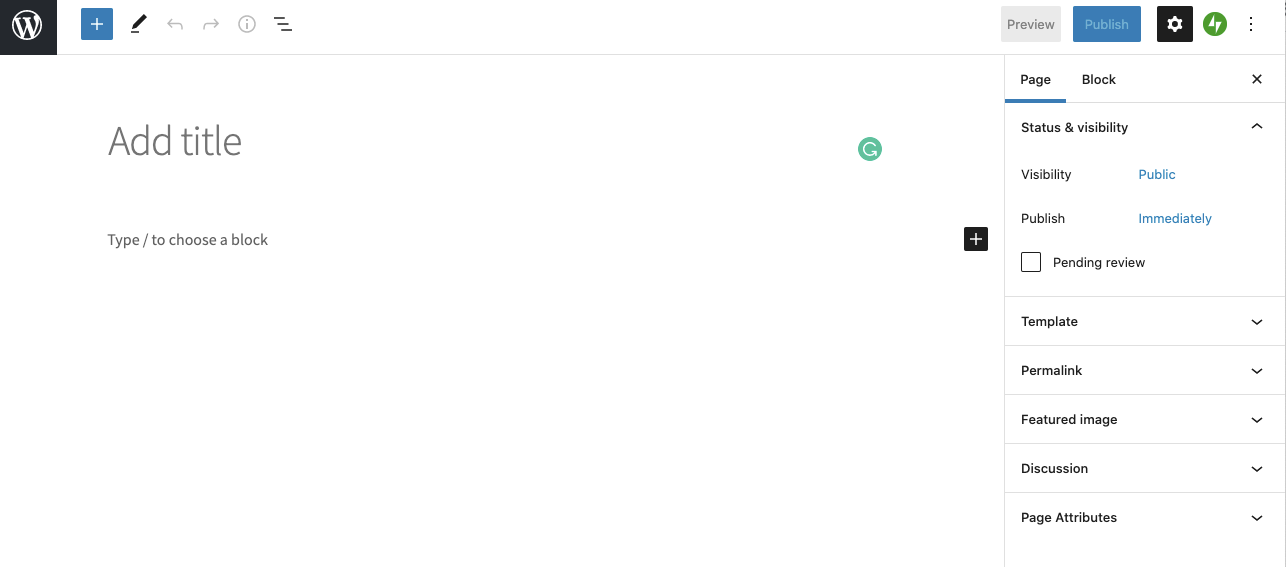
  • You will see the page editor screen.
  • Provide a title for your page
  • Add content, which may include text, links, images, etc.
  • After you have the page as you want it, click “Publish.”

You can repeat this process to add as many pages as you want to your website. And, of course, you can add pages as you recognize the need for them. Before you begin customizing your theme, create two blank pages. One titled “Homepage” and the other titled “Blog.” We’ll use those pages in the next step.

To add posts to your WordPress website:

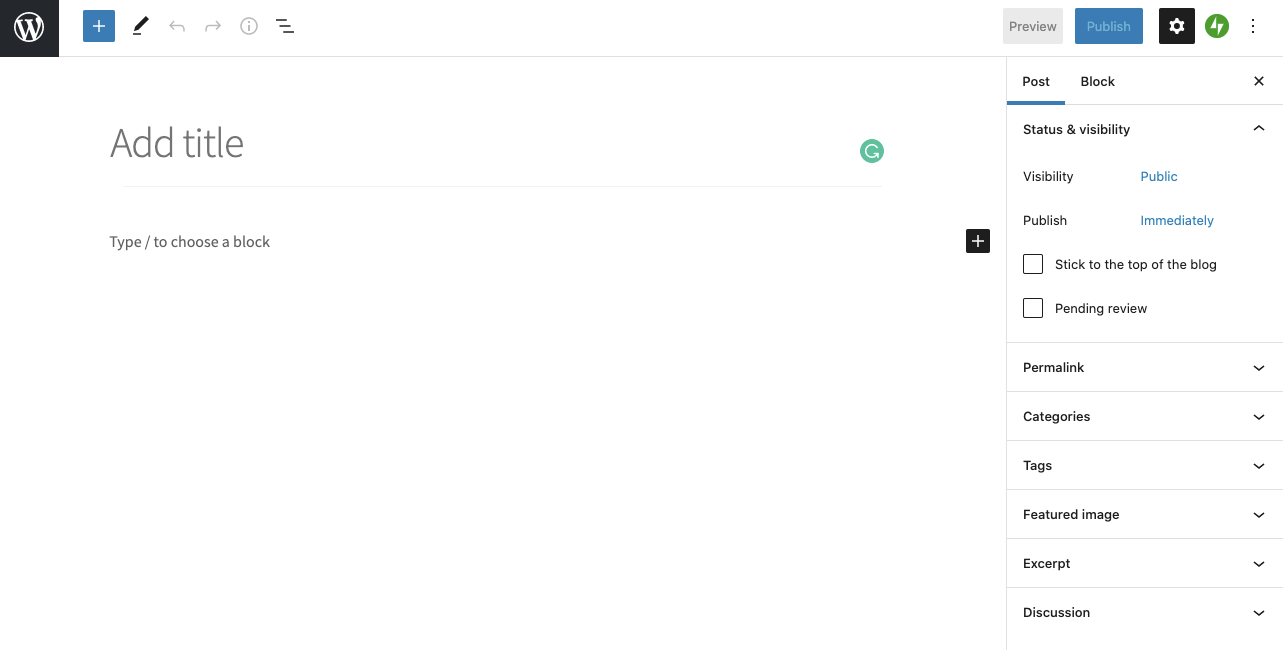
  • You will see the post editor screen.
  • Provide a title for your post
  • Add content, which may include text, links, images, etc.
  • Select the categories and tags you want for your post.
  • After you have the post as you want it, click “Publish.”

You repeat this process every time you add a post to your site.

Step 4: Configure Your WordPress Theme

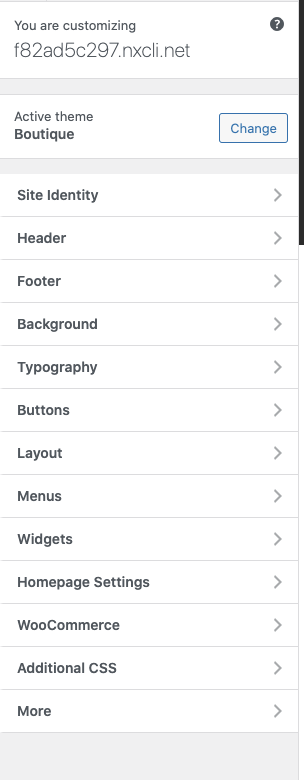
Now that you selected a theme and made at least a couple of pages, it’s time to customize the look of your site. Go to “Appearance” and choose “Customize.”

You’ll now see all the options for how to customize your WordPress theme:

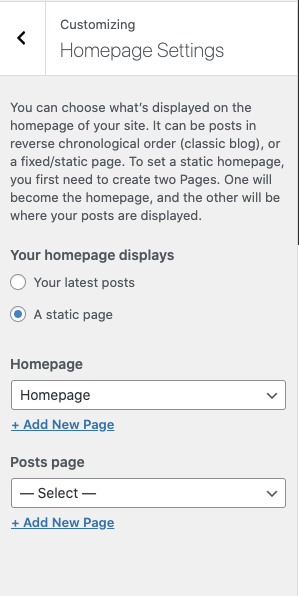
Start by clicking “Homepage Settings.”

You can select to use a static page for your homepage or a blog listing that shows all your latest blog posts. If you installed a theme with a cool-looking homepage, but you can’t see it when you preview your site, this is the setting you need to change. Select “A Static Page” under “Homepage Displays.”

Related reading: Beginner’s Guide to WordPress Performance Optimization >>

Remember those blank pages we created in the last step? You can use the dropdown to select “Homepage” under the Homepage and “Blog” for the posts page.

As you make changes, you’ll see a preview of the new homepage to your right. Click through the remaining options to customize your website’s colors, fonts, headers, and footers.

How to Edit a Header and Menu

The header of your website is the top part with your logo and navigation. You’ll want to check out a few sections of the customizer to edit your header:

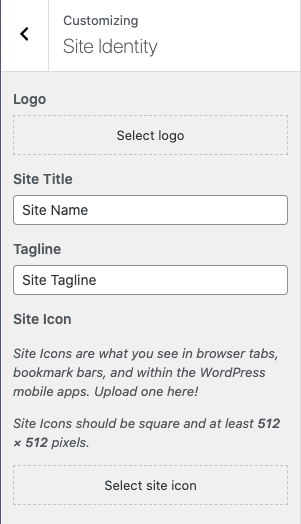
  • Click on “Site Identity.” Most themes will pull the header logo or site name from this section.
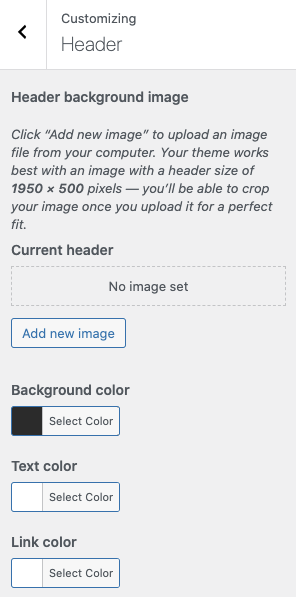
  • Click on “Header.” Themes often include settings for customizing the color and background of the header here.
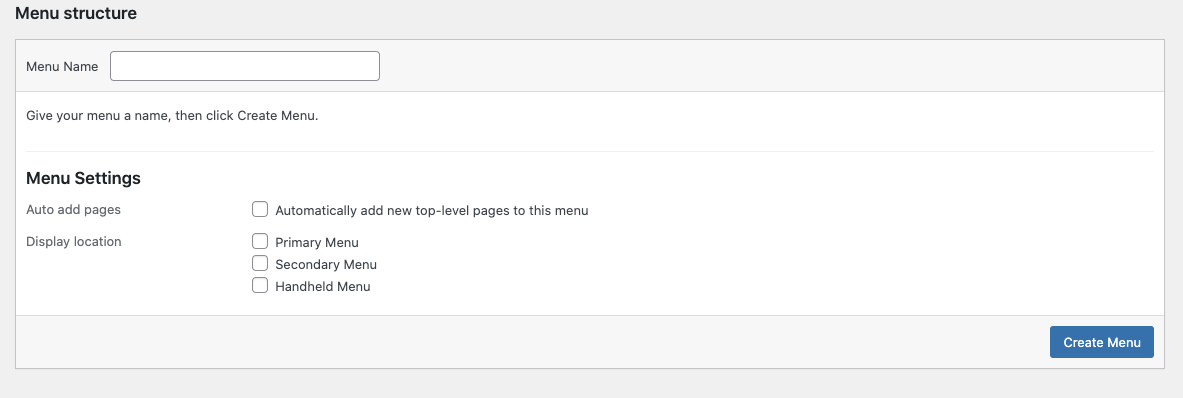
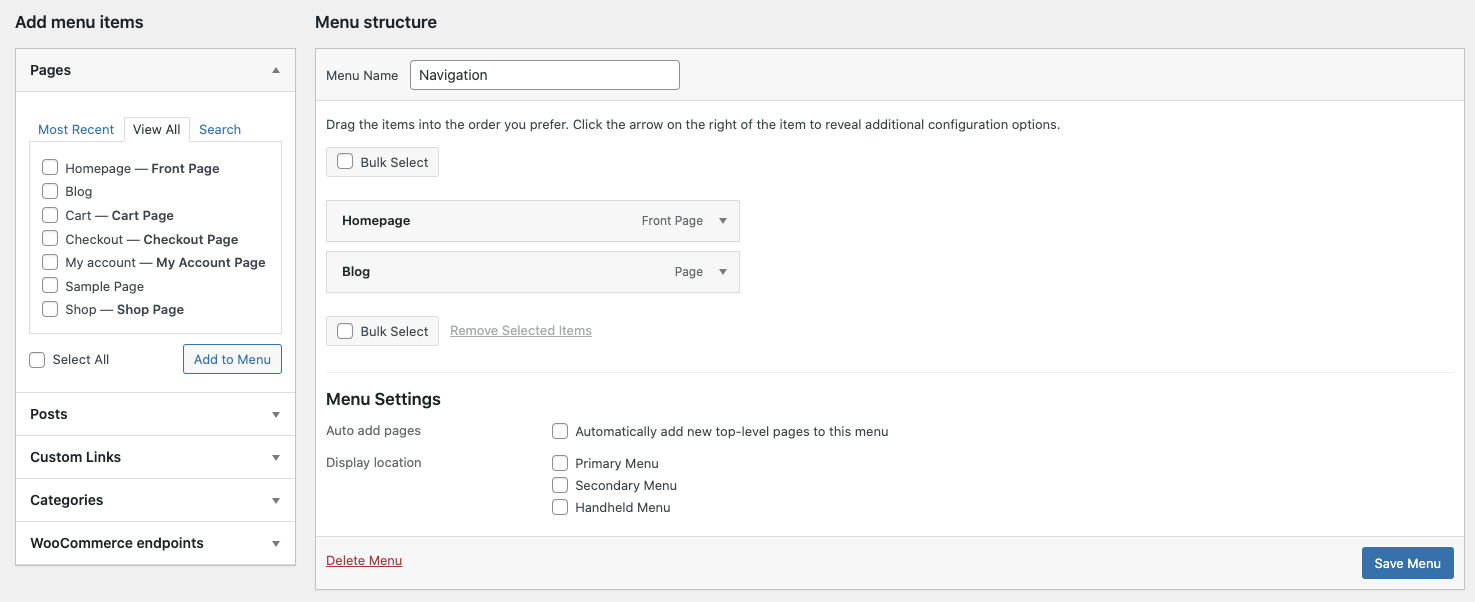
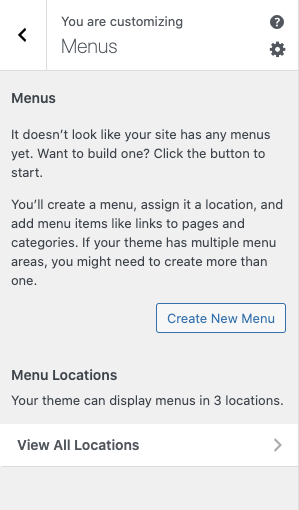
  • Click on “Menu.” This menu area is where you tell WordPress what links to include in your site’s navigation. To create a menu, click the “Create New Menu” button.

You can also edit menus from the main Dashboard navigation by clicking “Appearance” and “Menu.”

On the “Create Menu” screen, give your menu a name and hit the “Create Menu” button.

Use the box on the left to add pages, posts, or other links to your site’s navigation, and then click the “Save Menu” button.

How to Edit a Footer

When setting up your site, you’ll probably want to edit the footer. The footer in WordPress is the bottom part of your website that appears after the content area. It appears on all pages of your website. You may want to add specific elements to your footer. But, at the least, you’ll want to change the copyright date and perhaps remove the “powered by WordPress” branding. Look for the area labeled “footer.” Once you select the footer area, you should quickly see where and how to edit the footer text.

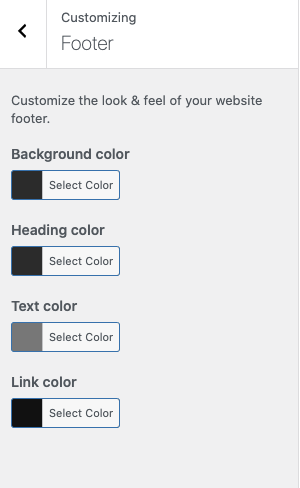
Some themes will not include the content in the footer section of the customizer. You’ll only see color options:

In that case, you’ll want to head to the “Widgets” section on the customizer menu. You’ll see options to update the content for each section of the footer.

Step 5: How to Add WordPress Plugins to Your Site

The customization options you see under the Customize tab vary by theme. Most people need to install WordPress plugins to complete all the customizations they want for their site.

WordPress plugins are like apps for your WordPress website. You can choose from thousands of plugins to add features and functionality to your site. But before you start going plugin wild, remember that each plugin you install potentially slows down your site. So only use what you need to make your site operate well.

To install a WordPress plugin on your site:

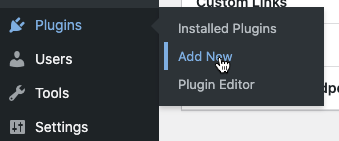
  • Log into your WordPress dashboard
  • Choose “Plugins”
  • Select “Add New”
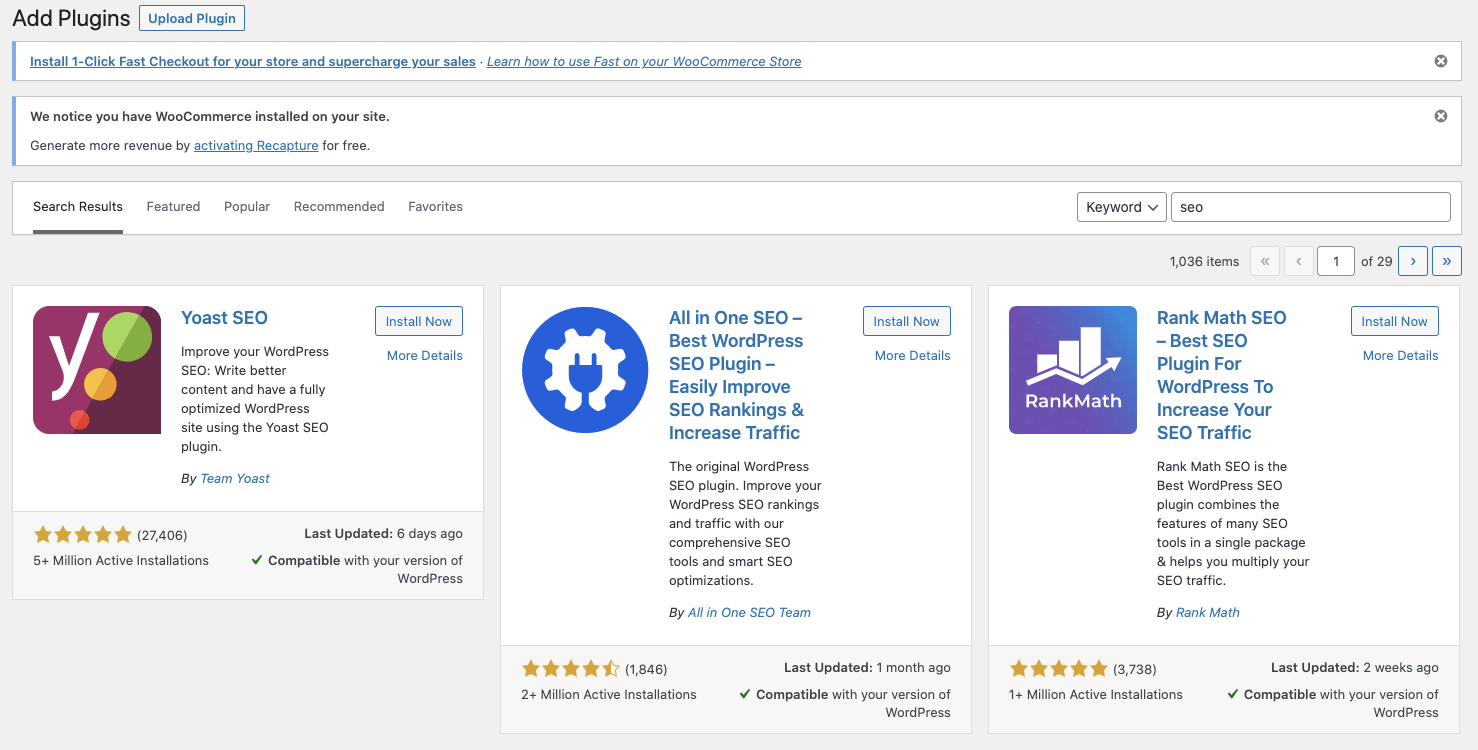
  • From there, you can search through all of the WordPress plugins to find what you’re looking for.
  • When you find the plugin you want to use, click “Install Now.”
  • Select “Activate”
  • You’ll automatically redirect to the tab containing all of your site’s installed plugins. You also will see a message at the top of the screen confirming the plugin’s activation.
  • Go to “Settings”
  • Select the plugin you installed
  • Fill in any blanks you need to so the plugin is fully functioning.

Remember to uninstall any plugins you aren’t using to ensure that they don’t slow down your site. Also, update plugins as updates become available to keep them fully functioning.

Typical uses of plugins include:

  • Adding fonts to your site
  • Adding meta tags
  • Backing up your site

How to Add Fonts

You don’t have to install custom fonts on your site. Instead, you may choose to use the fonts that are part of your theme. But if you want to add them, custom fonts can improve the typography and user experience. They also can make your site stand out from others using the same theme.

There are various places online to get free fonts for your site, including Google Fonts. Google Fonts is the largest, most popular, free font library for websites. You can add Google Fonts to your website manually or using a WordPress plugin.

To install Google Fonts to your site with a plugin:

  • Log into your WordPress dashboard
  • Click “Plugins”
  • Choose “Add New”
  • Search for “Easy Google Fonts”
  • When you find the plugin, click “Install Now”
  • Select “Activate”
  • Select “Appearance”
  • Select “Customizer”
  • Click “Typography” to see font choices
  • Choose from the drop-down menu and select “Edit Font” to change the fonts on specific sections of your site
  • Save your changes

Remember that loading a lot of fonts onto your website can slow it down. It’s best to choose one or two fonts and use them across your site.

How to Add Meta Tags

Search engines try to gather as much information about your site as possible, including meta tags. Meta tags are data that isn’t visible to users. They’re another way to tell Google about your site.

Meta tags tell Google things like:

  • the meta description
  • author
  • type of document
  • language
  • copyright

You don’t need to include keywords in your meta tags. Those haven’t ranked since 2009.

Related reading: Top 5 Tips for Website Speed Optimization >>

The default installation of WordPress doesn’t contain meta-tag data, so you have to add them yourself. You can add meta tags to your site manually or through a WordPress plugin.

To add meta tags with a WordPress plugin:

  • Log into your WordPress dashboard
  • Click “Plugins”
  • Choose “Add New”
  • Search for “Meta Tag Manager”
  • When you find the plugin you want to use, click “Install Now.”
  • Select “Activate”
  • You’ll automatically go to the tab containing all of your site’s installed plugins. You also will see a message at the top of the screen confirming the plugin’s activation.
  • Go to “Settings”
  • Select “Meta Tag Manager”
  • Create tags and assign them to different areas of your site, as directed by the plugin.

Step 6: How to Back Up Your WordPress Website

It may seem silly as you launch your site to think about a backup, but you want to protect your work right from the beginning. A backup is a copy of your site that you can restore if something goes wrong and your site disappears. You don’t want to lose your content, so a backup of your site protects your time and resources.

A full WordPress backup includes:

  1. Website Files. The files include your theme, plugins, scripts, media, etc. They’re anything dealing with the structure and functioning of your site.
  2. Database. The MySQL database stores your blog posts, comments, and any options you set in the admin area.

You want to back up both to protect your entire site.

3 ways you can choose to back up your site:

  1. Host. The first way to backup your website is the easiest, especially when you choose a host you trust. If you choose a host who does a daily backup of your site, you always have it. You can log on and download a zip file of the backup from time to time for double protection if you choose.
  2. Manually. The second way to backup your site is manually. This method requires you to log into your host server and download your WordPress directory. It’s a little more complicated, but you get used to the process after you’ve done it once or twice.
  3. Plugins. The third method to backup your website is through a plugin. WordPress offers a variety of plugins that automatically backup your site on a chosen schedule.

It doesn’t matter how you choose to back up your site. The most important thing is that you do it to protect your work.

Creating a WordPress Website

Use this post to guide you when setting up a WordPress website for your brand. There are many details to consider when setting up your site, but fortunately you only have to make most decisions once.

Consider Hosting Your WordPress Website With Hostdedi

Now that you know how to create a WordPress website, where will you host it? Consider hosting with Hostdedi fully managed WordPress hosting.

Benefits managed WordPress hosting with Hostdedi include:

  • Faster Websites. All managed WordPress plans include premium image compression, automatic CDN, and advanced caching to deliver the quickest WordPress sites.
  • Automatic Updates. Never worry about updates again with our automatic plugin updates with visual comparisons.
  • Security Monitoring and Support. Our WordPress experts are available around the clock to keep your site running securely.
  • Plugin Performance Monitor. Our exclusive Plugin Performance Monitor tracks your site speed and alerts you when a new or updated plugin starts to slow down your site.

Start building a better WordPress site. Check out our WordPress hosting plans today.

Related WordPress Resources

Source link

How to Launch a WordPress Site: A 7-Step Guide

When it comes to launching a website, WordPress is the most popular platform to use across the globe. Currently, 42.6% of all websites on the internet use WordPress — and it’s no surprise why.

Powerful, flexible, and extremely versatile, WordPress allows its users to quickly create modern websites that are both aesthetically pleasing and fully functional.

WordPress is built on an open-source platform, allowing a diverse range of programmers to contribute to its library of themes and plugins. This means anyone can use this content management system (CMS) without needing advanced coding or web design knowledge.

If you’re unsure how to launch a WordPress site — no matter if you’re a small business owner, a large-scale organization, or an individual — this guide will help you break down all the steps, which include:

  1. Define your purpose
  2. Choose your domain name
  3. Select your web hosting provider
  4. Install WordPress
  5. Pick out your WordPress theme
  6. Install WordPress plugins
  7. Customize your WordPress site

7 Steps to Launch a WordPress Site

1. Define Your Purpose

Before you even get started building a WordPress site, it’s important to define your purpose.

Knowing what type of website you want to run — whether it’s for a personal passion project, an ecommerce business, or a travel blog — is a critical step in uncovering your niche and your site goals. This is also a good time to decide who your target audience is, and how it will affect the style, tone, layout, and imagery or design work you choose to include.

2. Choose Your Domain Name

Once you have defined your WordPress site’s purpose, it’s time to choose your unique domain name. Your domain name should be clear and concise while representing your overall brand or site’s purpose. Try to come up with a name that is easy for users to spell, type into a search bar, or recall, as there are billions of websites currently online.

For example, if you are creating a WordPress site for a business, be sure to use the business name as the domain name. If you intend to brand yourself through your site, you should choose your own name (if available) as the domain name. If you’re having a difficult time coming up with a creative domain name, there are several domain name generators you can use to spark ideas.

Once you have your name chosen, it’s time to see if the domain is available. Not only should it be available on the web, but it should also be available on social media sites (you can manually search for your chosen domain name on these sites) in case you would like to create supporting social media accounts. Additionally, your chosen domain name should not be trademarked with the United States Patent and Trademark Office.

If the domain name you’d like to use is taken, you might still be able to use it by selecting a different top-level domain name extension. This means that, rather than using “.com” after your domain name, you could use top-level domain names like:

● .co

● .biz

● .inc

● .net

It’s important to note that while you can purchase a domain name from several hosting providers, it’s better to do so with the one that is hosting your website. This makes it easy to manage all the details of your site from one centralized platform. Plus, many hosting providers offer domain registration deals when you sign up for a hosting package.

Now that you’ve landed on your official domain name and confirmed its availability, it’s time to select your preferred web hosting provider.

3. Select Your Web Hosting Provider

Successfully launching your WordPress site means selecting the right web hosting provider. A web hosting provider gives you access to a server — or a portion of a server — where your website will run from. These providers typically offer multiple types of servers you can choose from, including:

Shared servers: Several websites are hosted on a single shared server. In this model, server access and configuration are more limited, and performance is based on the load each website is putting on the server.

Virtual private servers (VPSs): A VPS allows multiple websites to run on a single shared server while remaining isolated from one another. Typically, a VPS offers more control and performance than a standard shared server, however, they may require familiarity with server management.

Dedicated servers: A dedicated server is a completely isolated server dedicated to a single website. This type of server offers higher levels of performance and customization, but it does require more advanced knowledge of server management and maintenance. Typically, larger organizations utilize dedicated servers to meet intense traffic demands.

Cloud servers: Similar to a dedicated server, a cloud server provides ultimate control and flexibility when it comes to performance and server customization. However, cloud servers provide more scalability, as they do not require changes in hardware to scale up or down.

If you’re launching your first WordPress site, chances are a shared server or a VPS will provide you with enough processing power and customization for your site’s needs. Just be sure to choose a web hosting provider that provides:

● WordPress compatibility and easy installation

● Affordable, scalable hosting plans

● Automatic SSL certificates

● Automatic WordPress and plugin updates

● Malware monitoring

● Instant backups

● Expert customer support

3. Fully Managed Hosting Plans

On top of these server options, many hosting providers also offer fully managed hosting plans. When it comes to WordPress hosting vs. shared hosting, WordPress hosting allows you to take a hands-off approach when it comes to managing your website and server configuration.

For example, robust web hosting providers like Hostdedi ensure your site stays fast, secure, and updated with a fully managed WordPress hosting plan.

4. Install WordPress

Once you have chosen your domain name and web hosting provider, it’s time to install WordPress. Many hosting providers allow you to install WordPress directly into your account within your control panel (cPanel).

If you’re unsure how to do this, be sure to refer to your web host’s WordPress installation documentation or reach out to customer support for assistance. In addition, you can reference the WordPress Codex for more information about the website installation process.

5. Pick Out your WordPress Theme

With WordPress successfully installed within your web hosting account, you can now focus on choosing your site’s theme and activating it. WordPress offers several themes for all types of websites that require minimal knowledge of coding or web design, including both free and premium themes.

To browse through WordPress’s library of themes for your site, hover your cursor over the “Appearance” tab in your WordPress dashboard and click on “Themes.” Here, click “Add New” and you can search for a theme that fits your site’s aesthetic and goals. When you’ve chosen a theme, navigate to the “Activate” button and click it.

Note: Before committing to a theme, WordPress gives you the option to see a preview of what your site would look like with any theme offered. Simply hover your cursor over a theme and select “Live Preview.”

Because WordPress offers so many theme options, it can be overwhelming to choose the best one for your site’s needs. Be sure to list out all the features and functionalities you want your site to have before browsing the theme library, and double-check what widgets come with the themes you like. Also, it’s important to select a mobile-friendly WordPress theme that automatically optimizes your site for mobile devices.

6. Install WordPress Plugins

When launching a WordPress site, you’ll have the option to select and install WordPress plugins. These plugins add extended functionality to your site, such as enhanced security features, ecommerce tools, and search engine optimization (SEO) tools. Currently, some of the most popular WordPress plugins include:

● Contact Form 7

● Yoast SEO

● WooCommerce

● Jetpack

● Elementor Website Builder

To install a WordPress plugin, simply navigate to the “Plugins” tab of your WordPress dashboard and click on it. Here, select “Add New” at the top of the page. Once you have searched for and selected a plugin you would like to use, click “Install Now” and then “Activate.” After you’ve activated your plugin, WordPress will walk you through the setup and configuration process.

Note: You can download third-party plugins from sites other than WordPress and upload them to your WordPress dashboard. To do this, simply click “Add New” and choose the option that says, “Upload Plugin.”

7. Customize Your WordPress Site

Before officially launching your WordPress site, it’s important to customize it based on what information you would like to include and how you want your site to look. This includes making changes to the theme you’ve chosen, adding product pages, or writing a handful of blog posts prior to publishing your site. A few of the most important pages you should add and customize before launch include:

● Home

● Contact Us

● About

● Products or services

● Service areas

● Pricing

If you’re having a difficult time coming up with pages your website should feature, be sure to take a closer look at businesses or individuals in your niche and the websites they run. These sites can provide you with inspiration for creating your own unique WordPress content.

5 Tips to Try Before Launching Your WordPress Website

Once you are satisfied with your theme design and content, it’s important to review these five tips to clean up your WordPress site before you click the “Publish” button.

1. Download a Backup Solution

If your hosting provider doesn’t offer an automatic WordPress site backup solution, it’s important to download your own prior to launch. There are several WordPress backup plugins you can utilize, with some of the most popular being UpdraftPlus, BackupBuddy, and Duplicator. Just be sure your backups are automatically scheduled and are saved on a cloud storage service provider for ultimate assurance.

2. Secure Your Site

WordPress offers several security plugins that work to protect your site from cybercriminals. Prior to launch, be sure to select a security plugin — such as Sucuri or iThemes Security Pro — to safeguard your site from cyber-attacks and keep it secure. This is also when you can establish WordPress user permissions to ensure you or other designated users can access the backend of your site.

3. Check for 404 Errors

404 errors can easily interrupt the user experience, so be sure to comb through your site and eliminate any that exist. The easiest way to check your site for 404 errors is to add it to Google Search Console (GSC) and run a crawl report. If your site hasn’t been added to GSC, you can manually look through your site and ensure that all links are working as expected and pages are loading properly.

4. Inspect All Forms and Media

Just like you need to look through your site for 404 errors, you must inspect all web forms and media prior to publishing. Manually test all your contact forms to ensure they are working properly, and be sure your images, videos, or sliders/carousels are loading correctly.

5. Review Social Integrations

If your WordPress site features a social sharing plugin or other social media integrations, it’s important to check them to ensure they are linking to the appropriate social media accounts.

Once you have completed this checklist, your new WordPress website is ready to publish.

Partner with Hostdedi for Managed WordPress Hosting

WordPress is one of the most user-friendly CMS platforms out there, which makes it a great choice for individuals or businesses who are looking to launch their first site. Featuring a wide range of themes, plugins, and an easy setup process, WordPress makes it possible for anyone to create and run a functioning website without needing advancing coding or web design skills.

Interested in getting even more out of your new WordPress site? With fully managed WordPress hosting plans from Hostdedi, you gain access to a scalable, secure, and fast hosting solution. With Hostdedi, you receive 24/7 WordPress support from a team of experts, always-on security monitoring, and no overage fees, traffic limits, or metered pageviews.

Explore how you can build and run a better WordPress site with Hostdedi today.

Check out our fully managed WordPress hosting plans to get started.

Related WordPress Resources

· What is the WP-Admin Dashboard? Top 11 Features

· How to Customize a WordPress Theme

· Website Builders vs. WordPress: Which One Works Best?

· Shared Hosting vs. WordPress Hosting: What’s the Difference?

· Is WordPress Secure?

Source link

How to Use WordPress Gutenberg Blocks

WordPress is the most popular Content Management System (CMS) in the world. Simply put, a CMS is an interface you use to control the layers of your website.

Each website consists of the front and backend. The frontend is the visual layer, which visitors see when they enter your site, and it is made up of various pages. The backend is the layer you work on to control how your website functions.

Plugins are a good example of backend components that help you add functionality to your website, whether it be security, design, media, and more.

One of the most important types of plugins is page builders. Page builders have drag and drop features that let users see changes in real time. Unfortunately, page builders can add weight to your website because they still use code even if you cannot see it. Weight slows down your website, and that sabotages your search engine ranking.

Having a website that uses clean code, is lightweight, and loads super fast is really important and is now a ranking factor for search engines. If you want to rank at the top of search results, you need to have a site that makes it easy for you to do these things.

The Gutenberg Block Editor

In November 2018, WordPress introduced a new block editor called Gutenberg.

Gutenberg helps you build your websites visually, dragging and dropping, just like page builder plugins. However, it’s not a third-party add-on. It is inbuilt in the core of WordPress itself. It uses clean code, is lightweight, and is super fast. This way, Gutenberg allows you to be search engine friendly. Gutenberg makes it very easy for complete beginners and experts alike to make super-fast websites so they can rank higher organically.

The compositor is called a “block editor” because the content is categorized into “blocks.” Blocks are a handy tool to help you build your site. They help you insert, edit, design, and rearrange multimedia content without having to write custom code. This way, you can focus on creating engaging and quality content without having to worry about code.

Blocks are very flexible, and they allow you to be creative and build your own brand design. One of the best features is the “custom blocks” option which you can use to create unique features that go with your brand aesthetic. Not having to be limited to pre-designed themes and features is creatively liberating.

Gutenberg is More Than an Editor

Gutenberg is revolutionizing the way pages, posts, and products are created, giving WordPress a significant advantage over other CMS options.

Despite this, Gutenberg is a controversial change. Some people think that it is a necessary change, while others prefer the way they have always done things. However, it is beyond doubt that Gutenberg is not simply a new editor. It opens up many possibilities for exciting developments in WordPress.

How to Use the Gutenberg Block Editor

Now that you understand the difference between the Gutenberg block editor and classic WordPress page builders, let’s learn more about how to use Gutenberg. This way, you can see firsthand if the Gutenberg block editor is the right thing for you.

Related reading: A Real-World Guide to Using Gutenberg

How to Add Content in Gutenberg

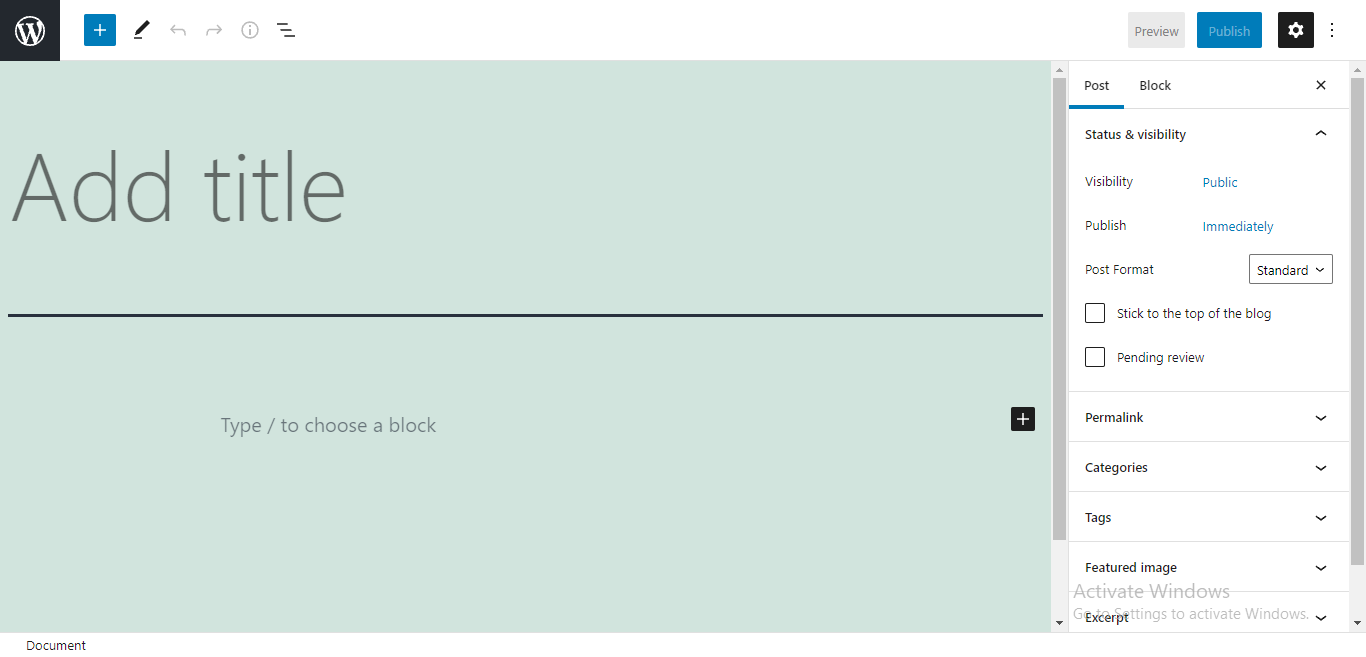
If you want to add a page title, you can simply type in the “add title” section. After that, you can start adding content to your page by typing in the white space below or by adding a block. We have put together a Gutenberg block tutorial to help you do just that.

After you have done that, you have officially started to design your post or page. Editing and moving the content you add is super easy if you use Gutenberg blocks.

Adding Blocks in Gutenberg

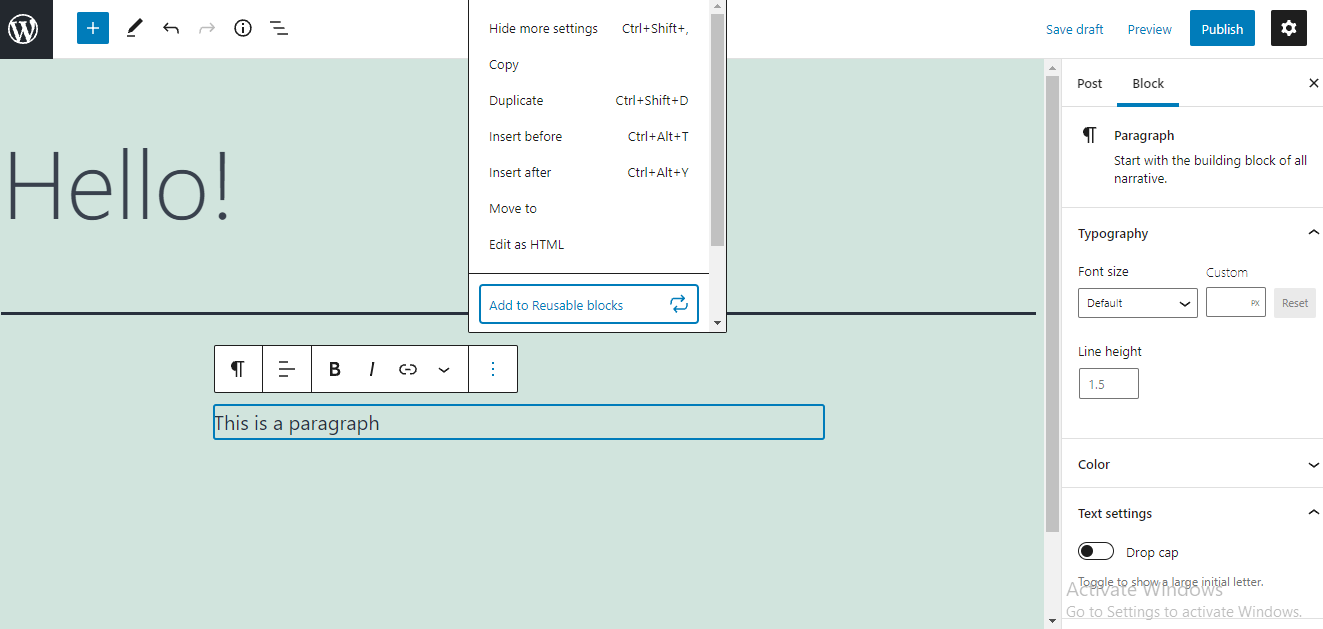
As we mentioned before, the new WordPress editor is called a “block editor” because all content here is divided into blocks. Gutenberg has many types of blocks for whatever kind of content or multimedia you want to use.

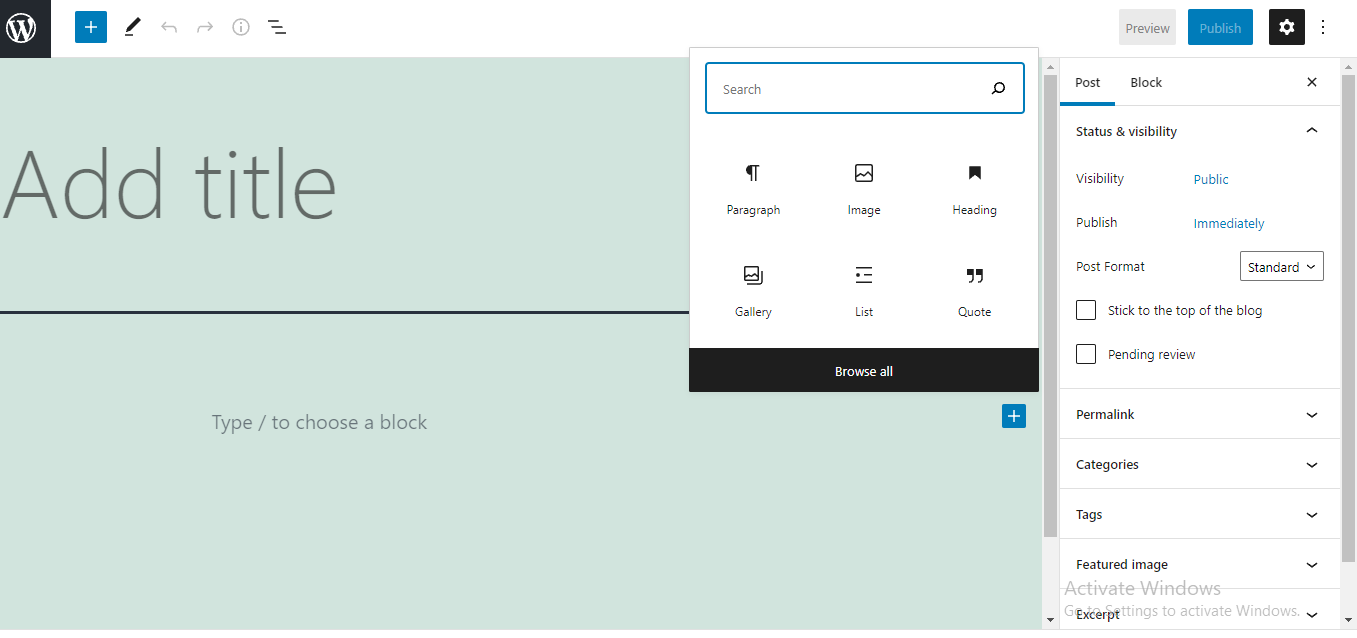
You can add a block simply by clicking on the plus sign in the white space or in the top left corner. When you click on it, Gutenberg will offer you a few types of blocks you can add.

There are more than 50 types of blocks from which you can choose. By clicking “browse all,” you can look at all the different types of blocks and choose the best one for the task at hand. There are particular types of Gutenberg blocks for any kind of content, including text, media, design, themes, and embeds.

Editing Blocks in Gutenberg

After you pick your ideal block, follow its instructions to create your content in that block. You can repeat this process many times and add as many blocks as you need.

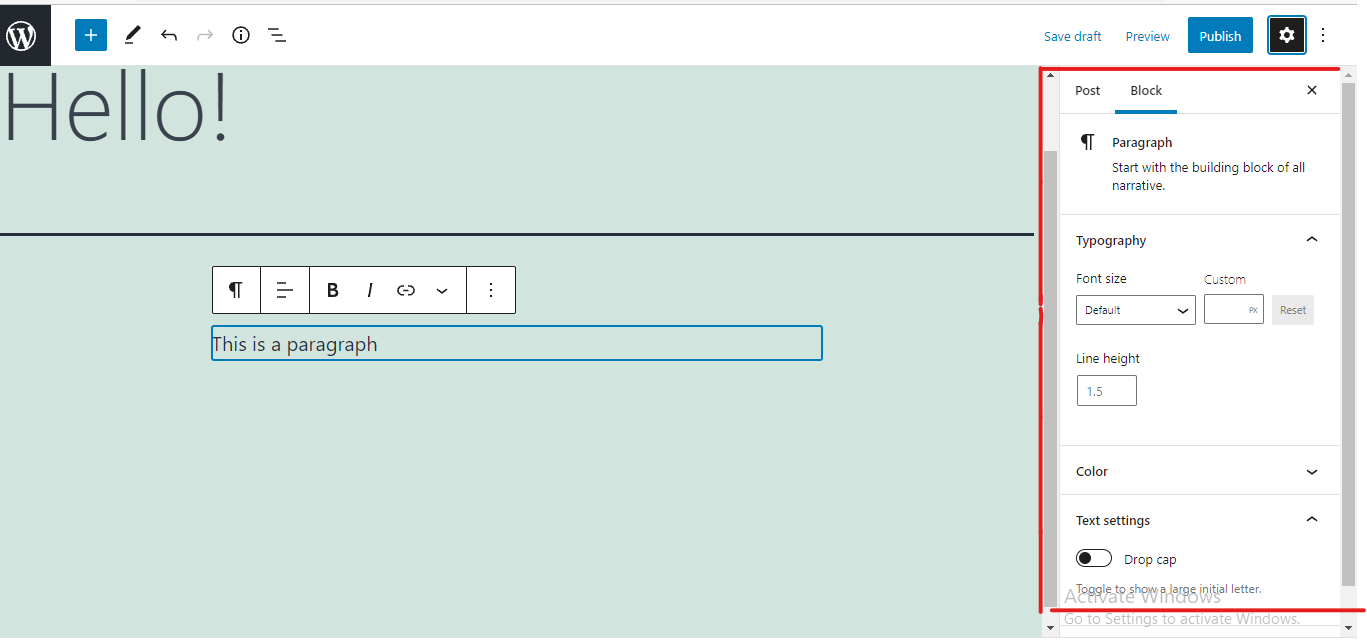
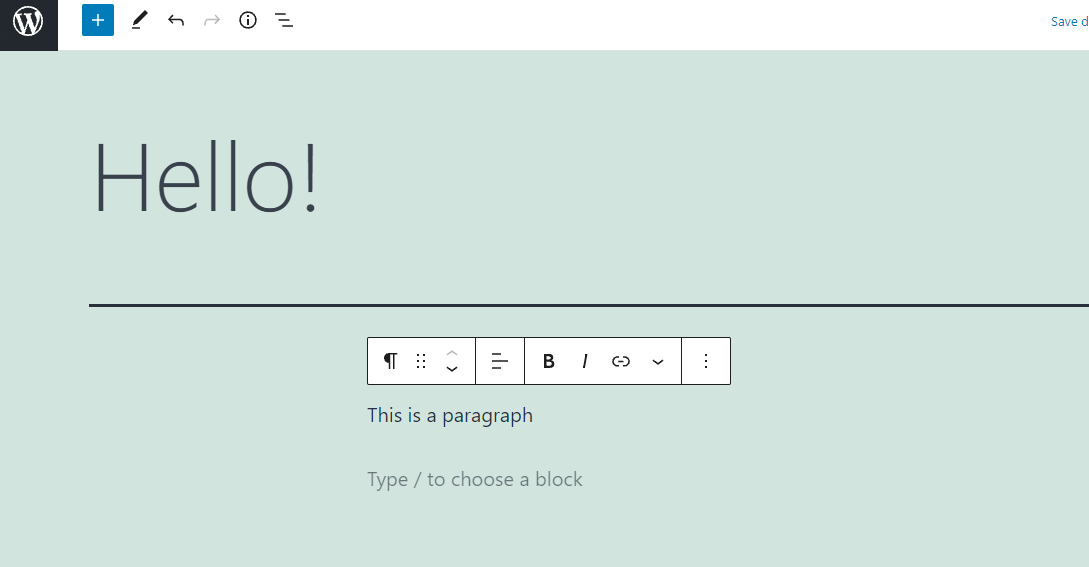
You can edit any block by selecting it and then viewing the settings for that block. When you choose a block, some settings will appear right above it. You can use the arrows to rearrange the blocks, or press and hold the dots to drag the block to your desired location.

Gutenberg also allows you to save a block as a “reusable block.” By using the Advanced Custom Fields plugin, you can build reusable blocks, which can be used through Gutenberg. This is important if you create designs that you will reuse again because you won’t have to redesign things from scratch, and it will save you time. You can also use different plugins to add section blocks.

A WordPress Gutenberg section block is a valuable feature that allows you to organize multiple blocks inside one section. Any standard or custom Gutenberg blocks can be added to a section, which can then be utilized as a whole block.

How to Publish a Post on WordPress with Gutenberg

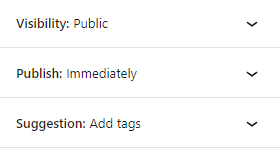
Once you are done editing, you have to publish or make your post go live on your website. You can start with the publishing process by clicking on the “publish” button at the top right corner of your Gutenberg page. After clicking on the publish button, there will appear a few options you can alter to your liking.

Visibility settings help you control and restrict who can view your content. You can also schedule posts to go live at a specific date or time. This way, you don’t have to manually push the publish button whenever you want your post to go live. Adding tags is also recommended because they can help viewers find your content.

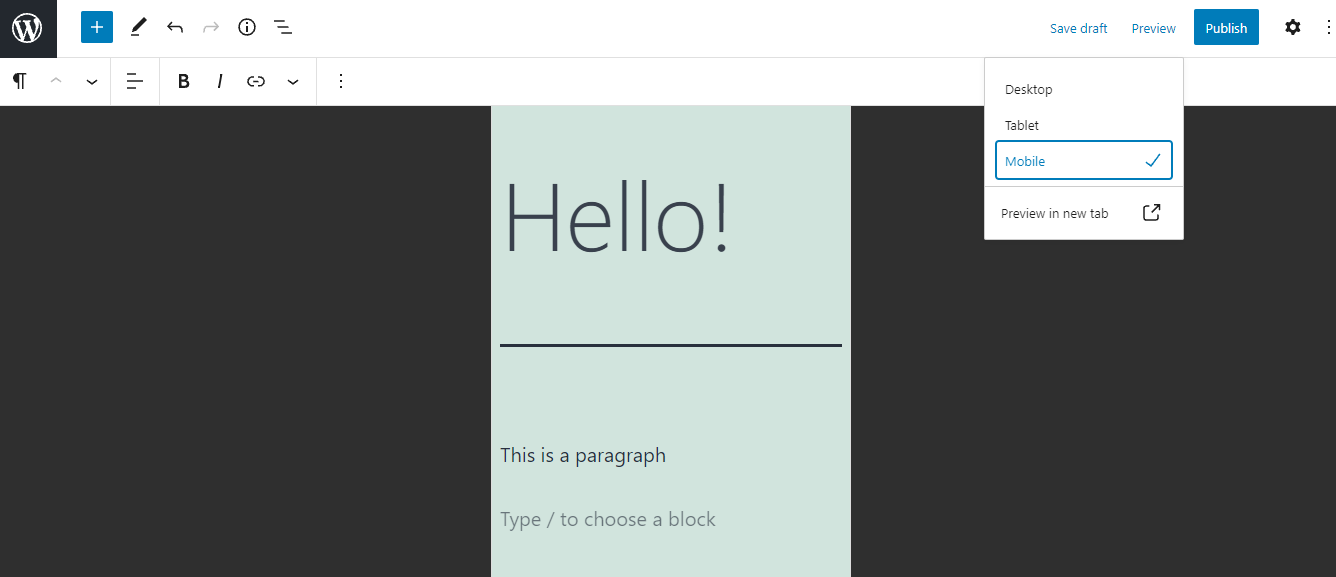
Before you go ahead and publish your post, Gutenberg allows you to preview how it will look on different screens like desktop, tablet, and mobile.

When you make sure that everything looks great, you are ready to publish your content.

Now You Know

The new WordPress Gutenberg block editor is revolutionizing the way pages, posts, and products are created. With Gutenberg, you can visually design your website without knowing how to code. Now you know the basics of Gutenberg, how to make a post, and how to publish it.

Want to try to use the Gutenberg block editor? Power your website with a professional web host designed for WordPress.

Check out our fully managed WordPress hosting plans to get started today.
Related Resources

Source link

Ecommerce Site Security: 10 Step Audit for Ecommerce Stores

Brick and mortar stores have security cameras, alarms, anti-theft devices, and even guards. When you’re in the ecommerce space, there’s another layer of protection you need to think about: ecommerce site security.

Customers are expected to give a significant amount of their data to you so they can make purchases — names, addresses, credit card numbers, and sometimes passwords. With all this sensitive data, it is important to learn how to protect your online store, and it’s not just about your customers’ information.

In this article, we’ll ask you ten questions that you’ll want to answer if you’re interested in keeping your online store protected. Keep reading to learn how to secure your ecommerce website.

What’s The Worst That Can Happen?

Ecommerce security measures need to be in place for a variety of reasons. Whether it’s staying in compliance or dealing with hackers, there’s a lot to keep in your sights. Especially with the growing shift to ecommerce following the pandemic, retail is a primary target for cyber attacks.

Data breaches can entail stealing information, password guessing, phishing, or even malware infections. Experiencing a breach not only costs you time, money, and reputation, but it chips away at consumer trust as well.

Another common ecommerce security issue is a ransomware attack. Malicious actors can effectively stop your store’s ability to run unless you shell out a hefty sum. Due to the potential revenue that could be lost, especially during a holiday rush, many businesses wind up paying.

It can be a nightmare to deal with, but this could all be avoided by following ecommerce security best practices.

10 Considerations for Ecommerce Site Security

There are plenty of things you can do to lock your site down like Fort Knox. Going through these ten questions will help you safeguard your site and get you on the way to being an expert on ecommerce site security.

First Looks Need Second Glances

1. How Often Do You Look at Your Home Page?

It seems like a no-brainer, but when was the last time you looked at your home page? We generally log into the backend unless we’re looking for something specific. That oversight can lead to missing red flags. There are three major ones: small changes, pop-ups, and redirects.

Small Changes

Small changes like changing a logo or text to display a hacker’s calling card is surprisingly common. Some hackers want to plant their flag and gain notoriety.

Pop-Ups

Pop-ups advertising products you don’t sell are another warning sign. You can certainly add pop-ups to your site to upsell your own products, but keeping an eye on them to make sure they’re actually yours is always a good idea. Don’t forget to disable your ad-blockers when you’re checking: you can easily miss a malicious pop-up!

Redirects

Unexpected redirects to other sites that are likely malicious are another reason to take warning. You want traffic to stay on your site and increase your chances of converting visitors. Leading customers away not only affects you, it can put their information at risk and damage your reputation in their eyes.

Being diligent about checking takes time now, but saves a headache later.

Securing Your Customer Base

2. How Much Customer Data Do You Really Need?

Breaches happen even to the best of us. What is really at risk when that happens? Your customer data gets exposed. Storing data like names, addresses, or passwords is unnecessary when you use payment gateways like Stripe.

Keeping that data on file, however, is more than enough to create fraudulent loans in the event of a breach. What’s more, using a payment gateway like Stripe helps you become PCI DSS compliant.

An easy way to mitigate risks if it ever happens at all is not collecting more data than you need. Keep as little data as possible to ensure your customers aren’t at risk. You can’t compromise data you never had in the first place.

3. How Secure are Your Customers’ Accounts?

You can do everything right … and still have customer accounts compromised. Remember the 1995 movie Hackers? Their computer security officer points out that someone didn’t bother reading their carefully-prepared memo on commonly used passwords. Turns out, over 20 years later that’s still actually true.

A common way customer accounts get hacked is through brute force attacks, where a hacker will use easily-available password crackers (yes, you can Google these) and keep guessing until they get the right one.

Nobody likes complicated passwords with special characters they’ll never remember, but it’s certainly safer, especially when your hard-earned money is at risk. Two-factor authentication is another big help, but surprise, surprise: that requires getting people to take the time to do it.

Granted, it’s the user that ultimately opts to be lazy about password security. And if you as a store owner do not enforce it, they won’t have to do it. Look at what happened with Ring security. Even if it was user error, the court of public opinion blames Amazon and not bad password hygiene.

Getting your customers to use strong passwords is the responsibility of the store owner — and not doing it can cost customers a lot of money. It can also cost you reputation points because upset customers can take to social media to talk about their poor experiences.

The Technical Meat and Potatoes

4. Are You On the Right Platform?

The most well-known ecommerce platforms are Shopify, Magento, and WordPress/WooCommerce. One of the reasons they are so popular is that they are very secure solutions.

*Related reading: 10 Reasons to Choose WooCommerce >>*

You’ll want to build your store on a platform that manages to stay ahead of the game. Regular updates that address security vulnerabilities are a must-have in the platform you choose. Has your top choice had data breaches? Is it known for vulnerabilities left open? Make sure to look into this before committing.

There are other considerations involved too beyond just ecommerce site security, but that’s another conversation.

Looking for one of the most secure ecommerce platforms? Hostdedi answers the call.

5. Are You Using the Right Host?

We know hosts aren’t all made the same. Price isn’t the only factor you should be worried about. Some hosting options can affect ecommerce site security. Making the right choice for your store is crucial.

Related reading: Top 10 Questions to Ask a Cloud Hosting Provider >>

When you utilize shared hosting, you’re paying less but potentially risking more. If user accounts aren’t properly separated — and one becomes compromised — that puts everyone on that server at risk. Ensuring your host regularly applies security patches and follows critical security protocols helps you prevent a headache later.

You’ll also want to ask, how do they monitor their networks? What is their protocol for notifying customers about security breaches? Do they provide automatic backups?

Physical security of data centers and where their servers operate is just as important as ecommerce site security. Ask about their plans for servers in case of power outages.

You can certainly opt for cheaper hosting where you handle all of these things yourself. You could also opt for managed hosting services that handle updates and backups while providing you with hosting support, suggestions, and top notch security.

6. Is Your Store’s Software Up to Date?

Updates and patches are released pretty frequently, and with good reason. Exploitative vulnerabilities that can leave you open to attack are coming out faster and faster — leaving you with the task of making sure you’re protected. When you don’t, you open your site up to hackers walking by the all you can eat buffet of access to data.

What needs to be updated? Content management systems, themes, plugins, extensions — and of course your server. Beyond just keeping your ecommerce site secure and protected against vulnerabilities, it can also prevent your site from losing functionality.

A great way to keep tabs on everything is utilizing a hosting provider that provides automatic updates. It’s an easy solution that ensures your site is always at the ready.

Security isn’t a one-and-done deal — all your efforts add up. You can’t rely solely on automated updating to keep you secure, but it does help a lot. However, even the most-secure sites can fall victim to a cyber attack. That’s why there are ten points in this security audit, not just one.

Making A Great Connection

7. Is Your Host PCI DSS Compliant?

If you accept credit card payments — which virtually all online stores do — you have to adhere to the standards set by the payment card industry. An overview of compliance can be found here, but there are over 300 security requirements involved.

PCI DSS Compliance can mean the difference between a sale and a bounce. You can also be fined for noncompliance — and the costs often are the responsibility of the merchants. Being a compliant host saves you money and ensures your customers are using a secure payment gateway.

Here are some basics that you’ll need to include:

  • You need a secure network, which means installing a firewall.
  • Ensure you change your passwords — vendor defaults are not secure.
  • Encrypt the transmission of data.
  • Ensure vulnerability management by updating antivirus programs and versions regularly.
  • Institute strict access control measures and restrict access to cardholder data.
  • Utilize unique IDs for everyone with access to data to monitor usage.
  • Regularly monitor and test networks.

PCI compliance is one of the most important ways to protect your online store because if you want to make sales, your customers need to feel secure typing in their payment information. Ensuring you meet all of the various requirements is a great reason to utilize managed hosting: it’s one less thing for you to spend time and energy on.

8. Are You Using SSL Encryption?

Let’s be clear. A whopping 85% of consumers will avoid an unsecure website. If you’re like us, you notice that little lock in browsers like Chrome that confirm the site you’re browsing is secure and has a valid certificate. What certificate are they talking about? It’s your Secure Sockets Layer certificate.

Why does that make a difference? Because if you’re going to give up data in this century, you don’t want to become the victim of identity theft, find your debit cards have been hot carded, or any number of issues surrounding your personal data being used without your consent.

What’s more, it’s actually harder to find unsecure websites. Google, for one, penalizes unsecure sites and that means they rank lower in the SERPs. Combine being harder to find in the first place with customers noticing your site is insecure and that can translate to fewer conversions.

9. Are You Using a CDN?

If you’re new to the ecommerce space, you might be wondering why this is on the list. Isn’t a CDN what you use to get images and content to load faster? Well, yes. But it also can add security functionality to your site.

CDN providers usually provide additional security features such as malware scanning, blocking spam bots, and more. While a CDN doesn’t outright prevent a DDoS attack, it can certainly help mitigate one. Think of it as a security guard — one of its features is that it monitors and identifies unusual traffic. Once it identifies IP addresses they recognize as malicious, it will block requests.

Another bonus? These processes aren’t hosted on your server — they’re hosted through the CDN server, meaning your site speed doesn’t tank while it’s happening.

There are both free and paid CDNs available. Many hosts also provide access to theirs. Make sure you’re using one that updates and patches often — there’s no sense in doing all the work just to use a CDN with lackluster security.

10. Do You Protect Your Connection in Public Spaces?

A lot of the good work you are doing to protect your online store can be undone with one rookie mistake: using an unsecure connection. In this day and age, you can work from anywhere. Free Wi-Fi is the norm in brick and mortar spaces. People like the freedom of getting out of the office (even the home office) and getting their favorite cup of coffee or in a quiet library.

You may be tempted to just log on and take advantage of the free access, but don’t forget — free isn’t always better. If you’re using an encrypted connection, through a VPN, you can access the net without worrying about who has access to your data.

Finding a secure VPN is easy with a little research, and there are plenty of hosts that offer them as well.

Hostdedi Makes Ecommerce Site Security Easy

When it comes to ecommerce site security, you’ve got a lot to think about. Unless you’re a huge business with the ability to pay a team to keep a watchful eye, chances are you’re going to be doing a lot of this monitoring yourself.

You absolutely can handle all of this — but if you’re looking to focus your time on more important things like selling and updating the content that drives people to your site, there’s a better option.

Hostdedi Fully Managed WooCommerce Hosting “locks up” for you with automatic updates and backups, an ultrafast CDN, and maintaining compliance and certificates. We make it fast, easy, and secure so you can do what you do best: sell.

Related Resources

Source link

22 WordPress Trends & Predictions for 2022

WordPress is almost 20 years old. And through its long and storied history, it has changed quite a bit, with each WordPress version introducing new and improved features. That’s not changing anytime soon.

With WordPress running over 40 percent of all websites on the internet today, the WordPress ecosystem is massive — and its future is looking bright.

To better understand where WordPress is headed, we spoke to WordPress experts and users from all over the world.

Without further ado, let’s take a look at some WordPress trends expected to emerge in 2022. Keep reading to learn about the future of WordPress.

22 Emerging WordPress Trends

Below are a few of the trends related to page building, tooling, and more.

  1. No-Code & Low-Code Tools

“WordPress used to be ‘easy to get started’ a decade ago, but it no longer feels that way,” says Lesley Sim, co-founder of Newsletter Glue. Sim predicts an increase of no-code and low-code tools that will help newcomers get started with WordPress in 2022 and the coming years.

  1. Drag & Drop Builders Are Here to Stay

Drag and drop page builders are the easiest way to develop a whole website without the help of a developer. They are extremely easy to use and very affordable. A good example of this trend is the addition of the new WordPress Gutenberg block editor,” says Leandro Santorsola, entrepreneur, digital consultant, and WordPress user.

  1. Automatic Updates for WordPress

“Automated theme and plugin updates were introduced by WordPress last year. While we generally recommend disabling this feature, we are intrigued by it,” says Darsh Somashekar, co-founder of drop.io and CEO of Solitaired.

“For enhanced functionality, many of our customers turn to third-party plugins and custom code. Without a close eye on WordPress theme and plugin updates, these customizations may become inoperable when the theme or plugin is updated. Updates, on the other hand, are critical for maintaining a secure, functional website. Automatic updates may be beneficial for website owners who maintain simple websites and frequently overlook plugin updates.”

At Hostdedi, we agree that automatic updates can be incredibly convenient and useful for WordPress users. It’s why automatic updates are supported in all of our fully managed WordPress and WooCommerce plans.

To prevent any problematic updates, we provide a visual comparison tool, which automatically creates a copy, updates your plugins, and gives you the ability to see what changes (if any) the plugin update made to your site before it goes into production.

  1. Full Site Editing & Collaborative Editing

“We’re going to see a lot of activity in themes and page builders with full site editing (FSE) finally being merged into WordPress core,” says Tiffany Bridge, Product Manager of WordPress and Ecommerce at Hostdedi.

“The market has adapted to the block editor, but it will have more adapting to do as the WordPress editing experience continues to support the legacy Classic Editor, the Block Editor, and page builders in classic PHP-based themes. It will now also have to support block-based themes.”

Related reading: Beginner’s Guide to WordPress Performance Optimization >>

“Also related to the editing experience, a great deal of 2022 is going to be spent refining and enhancing the FSE experience, but I expect the core team’s attention to start turning toward the next phase, which is collaborative editing. I’d expect those features to start rolling out in the Gutenberg plugin as early as late 2022,” adds Bridge.

  1. Reduced Learning Curve for WordPress Beginners

“I think the main trend you’ll see in the near future for WordPress is full site block editing. Using the Gutenberg editor, you’re already able to use blocks to easily redesign pages and posts. However, that functionality is going to be rolled out soon to all aspects of entire sites. This will cut down tremendously on the WordPress learning curve for newbies. However, the challenge here will be achieving optimal site speed while using these full site block editors, as they tend to slow sites down, which Google doesn’t like,” says Scott Winstead, founder of My Elearning World.

Related reading: Why is My WordPress Site So Slow?

  1. Full Site Editing Knowledge Gaps

“As block-based themes and full site editing take over the WordPress landscape, they may create a knowledge gap among WordPress users,” predicts designer, developer, and strategist Daniel Schutzsmith.

“As WordPress core moves to have full site editing and block based themes, a learning gap and technical debt is emerging. Web developers and designers will be clamoring to understand the best way to work with these new technologies quickly,” says Schutzsmith. “Page builders will continue to be used in 2022, but there will be a much larger increase in new websites being built with Gutenberg and utilizing add-ons that make it more usable like Kadence Blocks.”

  1. Fewer Third-Party Page Builders

“I’ve been using WordPress for over 11 years. Based on the latest big changes, I predict there’ll be less reliance on third-party page builders and design plugins for full site editing. The main reason behind this prediction is the roadmap released by WordPress regarding the Gutenberg project,” says Ankit Singla of Master Blogging.

“And, according to the roadmap, full site editing using only Gutenberg blocks is definitely on the table. Not to mention the rise of ‘block themes,’ which are designed to accommodate a wide range of customization options through Gutenberg.”

WordPress Design Trends

  1. Video Headers

“Despite the fact that video headers and backgrounds have been around for a while, they have yet to take off on WordPress websites. Each year, WordPress releases a new default theme that is automatically available to all WordPress users. It incorporates several of the theme’s most powerful features, as well as a few custom elements that add interest,” says Brian Dean, founder of Backlinko and Co-Founder of Exploding Topics.

“The advent of video headers heralds the start of a new trend. We’ll have to keep an eye out for WordPress video headers, as the platform is rapidly gaining popularity worldwide.”

  1. Parallax Effect

“Although parallax is not new, it continues to be a dominant design element in WordPress,” says Steve Scott, CTO at Spreadsheet Planet.

Parallax scrolling, also known as parallax effect, is the effect that occurs when you scroll down a page and the background content moves slower than the foreground content. It’s commonly used on one-page websites, where scrolling is an unavoidable part of the experience, and can be effective if the page contains broken sections of content.

“To implement the parallax effect in WordPress, you can utilize any of the popular parallax plugins or themes. Because this effect has a direct impact on the site’s accessibility and user experience, be careful when choosing a background image,” says Scott.

Related reading: 14 Modern Website Design Trends for 2022 >>

  1. Dark Mode

“Dark mode is an imposing ultra-modern design that creates a vibrant impression while maintaining exceptional clarity and visibility. Additionally, dark mode helps the audience focus more on the content you’re showcasing because it alleviates eye strain,” says Marc Stitt, Chief Marketing Officer at GoFMX.

  1. Chatbots Plugins

“Chatbots are extremely useful when used well. They can help you automate many repetitive tasks, such as answering the same question over and over again. It takes some time to get your business up to speed with this new technology. However, it is worth it for the cost-benefit ratio,” says Santorsola.

  1. Microinteractions

“Microinteractions enable you to breathe life into your website. They create the illusion that the visitor is interacting with the content rather than simply reading it. These minor details contribute significantly to your website’s charm,” says Stitt.

“For instance, when the cursor hovers over an image, it will automatically pop up. Additionally, you can highlight the text and share it directly on social media.”

WordPress Theme Trends

  1. Theme Marketplaces

“Theme marketplaces are a new trend affecting the WordPress ecosystem. Developers of theme customizers are now creating various customizer frameworks in order to enhance and provide a unique editing experience for WordPress users. Post-type templates can now be registered by developers.” — says Stephen Curry, CEO of CocoSign.

  1. Themes Will Be Easier to Change

“In recent years, we’ve seen the growth of theme-based ecosystems, where your theme and related add-ons control much of your site experience. With full site editing and theme.json, WordPress themes will go back to defining the styling elements of a site. This will bring massive benefits to users who will be able to switch themes more easily as they won’t be locked in to a single theme that controls much of their site,” says Chris Lubkert, co-founder of Extendify.

  1. Enhanced Customization Via Multipurpose Themes

“WordPress themes have impacted and styled the layout of your website since the platform’s inception. However, multi-purpose themes include customizations and integrated plugins in addition to their web design features — and their growing popularity makes them a top 2022 WordPress trend,” says Kathryn Smithson, CMO at PathSocial.

Related reading: The 7 Fastest WordPress Themes >>

“Additionally, there are numerous diverse and versatile multipurpose themes available, each with its own unique website templates and features. Whether an organization needs a fully functional company website, an online store, a business portfolio site, or simply a blogging platform, multipurpose themes optimized for those roles are available and ready to go,” says Smithson.

  1. Mobile-Friendly Themes

“Mobile users have surpassed desktop users, and the gap is widening. As WordPress has shifted to mobile, the emphasis has shifted entirely to improving and enhancing the mobile user experience,” says Girish Redekar, co-founder of Sprinto.

“Due to the billions of people who own smartphones, we will see mobile-friendly WordPress themes as a leading WordPress trend in 2022.”

WordPress Trends for Developers

  1. Supporting Modern Workflows for Devs

“I think that solutions and applications that enable modern workflows and approaches on WordPress will become increasingly sought after, and will also play an important role in making WordPress attractive to devs again, and continue to ensure the future of WordPress as a viable, relevant CMS,” says Miriam Schwab, CEO of Strattic.

“This includes better ways of managing version control and staging sites, headless implementations, embracing the Jamstack, and static site generation for WordPress.”

  1. Loss of Some WordPress Devs

With the growth of easy to use solutions to create brochure websites — which include a homepage, about us, pricing, and contact us page — some developers may turn away from WordPress, predicts Patrick Rauland, Brand Manager at Paid Memberships Pro.

“The WordPress community will likely lose a lot of developers who build simple brochure websites. The developers and agencies who customize sites, who write plugins, who want to control every line of HTML and CSS will stick with WordPress. And the site owners who know how valuable it is to customize their site will also stick with WordPress.”

WordPress Trends: The WordPress Business

  1. More Curated Offerings

“I see more focus on curated hosting and moving towards more of a SaaS offering. Pretty much exactly what GoDaddy and Pagely have announced, but across the entire space. There will also be a bigger focus on decoupled frontends, allowing for better scaling and performance enhancements,” says Jamie Madden, Founder of WC Vendors & License Server for WooCommerce.

  1. Expansion Into Enterprise

“In terms of technology, I believe WordPress will grow significantly in the coming years. It appears to be tailored to personal bloggers, but I can see WordPress introducing more enterprise-like features and functionality,” says Curry.

“In the future, we’ll also see more synergies between WordPress.com and WordPress.org, as well as more premium plugin developers delivering top-tier products to the WordPress platform.”

  1. Open Source Over Proprietary Solutions

“As an agency that works daily within WordPress, we’re always staying on top of what’s happening. Prediction: while website builders like Squarespace and Shopify work for many use cases, WordPress will continue to be one of the most popular and heavily used tools to power websites,” says John Rodgers, Principal & Co-Founder of The 215 Guys.

Chris Lubkert, Co-founder of Extendify, agrees and predicts that the WordPress core site creation experience will surpass that of other closed source platforms.

Related reading: WooCommerce vs Shopify: Key Differences and How to Choose >>

“Closed source platforms like Wix, Squarespace, and Shopify excel at providing a seamless way for users to quickly build a site. Historically, most WordPress users have had to find a legacy page builder or spend many hours piecing together different components to create their site. With full-site editing and continued enhancements to the Gutenberg block editor, it will be easier than ever for users to create a WordPress site in minutes using patterns, layouts, and full site kits,” says Lubkert.

“WordPress hosts will be able to leverage these enhancements to give their users a modern onboarding experience, while still maintaining the power and flexibility of an open source platform like WordPress.”

  1. The Rise of Bundles

“Right now, it seems like users want to be able to ‘start a membership site’ or ‘start an ecommerce store’ or ‘start a newsletter and blog’ and click a button to do just that. They don’t want to find hosting, pick a theme, and figure out which plugins to use. As hosts continue to buy plugin and theme shops, I foresee them further simplifying their offerings and positioning them in this manner.”

“I think long-time WordPress pros won’t like this as they like the unbundled state and they’ve spent a decade learning which plugins work best for the kinds of sites they want to build. But I think it’ll be welcomed by people new to WordPress who ‘just want an online store’ and don’t even know or care what WooCommerce is,” says Sim.

Take 2022 By Storm With Fully Managed WordPress Hosting

Level up in 2022 with Hostdedi’ fully managed WordPress hosting plans. Our WordPress experts are ready to help you, whether you’re a beginner or advanced.

WordPress hosting by Hostdedi includes:

Advanced Features for Faster Sites

We include premium image compression, a built-in CDN, and advanced caching so your site loads fast every time.

Automatic Updates

All plans include worry-free automatic plugin updates with visual comparisons.

No Hidden Fees

You don’t have to worry about overage fees, traffic limits, or metered pageviews.

Free Migrations

Sit back and let us take care of it. Move your existing site to our hosting plans with our free migration service.

Premium Support and Security

Always-on security monitoring and 24/7/365 support from our WordPress experts ensure your site always runs smoothly.

Check out our fully managed WordPress hosting plans to get started today.
Related WordPress Resources

Source link

WordPress Updates: How To Install an Update Safely

Remind me again tomorrow. And again. And yet again, the day after that.

When you’re busy running your own freelance business, you rarely want to take the time to update your computer’s operating system. But when it comes to a WordPress update, you’ll want to think twice about hitting snooze.

WordPress updates keep sites running smoothly and protected from security threats. This post explains the types of updates and methods for updating a WordPress website.

What is a WordPress Update?

A WordPress update ensures that the systems running a website operate with the latest WordPress version. Just like you need to update your computer and phone’s operating systems, you should keep your WordPress system updated.

WordPress updates include:

  • System Updates
    These updates apply to the core WordPress software running a website.
  • Plugin Updates
    In addition to keeping your core system updated, you need to run updates on any active plugins.
  • Theme Updates
    Theme developers also release updates to ensure the WordPress themes remain compatible with newer versions of WordPress.

Why Is It Important to Update Your WordPress Site?

Keeping a WordPress site updated improves the site’s performance and security. Website speed determines a lot about the site’s success. Sites with slow loading times tend to rank lower in search results and experience decreased conversion rates. Outdated versions of WordPress and any plugins can slow down a site. Newer versions of WordPress also include updated features designed to improve your site’s performance.

Not updating WordPress also creates a security risk. WordPress ranks as the most popular content management system in the world. Unfortunately, the widespread use of the system makes it a frequent target for hackers. As WordPress developers learn security vulnerabilities, they provide security patches in the next version of WordPress. If you’re not updating your WordPress system, you’ll miss out on vital security improvements.

The same is true of plugins. Plugins represent some of the easiest ways for someone to attack your site. Keeping your system and plugins updated eliminates some of your security vulnerabilities.

What to Do Before a WordPress Update

Before updating a WordPress website, make a complete backup of your site. Back up all core system files, media files, themes, plugins, and databases. You can use a plugin designed for making backups or check with your hosting provider. Many hosting plans, especially managed WordPress hosting, include a backup service.

Auto Update WordPress vs. Manual Update WordPress

As a part of your preparation to update WordPress, you need to decide between automated and manual updates. For most site owners, an automatic update works best. Auto-updates happen in the background, so your site is always running on the latest version of WordPress without you having to remember to run updates.

But, automatic updates can create problems for some websites. Major releases of WordPress often include new features without backward compatibility. If your site runs on a theme or plugins that could break if you updated to the most recent major release of WordPress, you should disable automatic updates.

How to Auto Update WordPress

Most web hosts enable auto-updates by default. Check with your host to see the settings for your account. If your site isn’t at risk of breaking by upgrading, you can stick with automatic updates. As an added safety measure, consider an automated backup schedule so you can restore your site to a previous version if a WordPress update did break something on your site.

How to Manually Update WordPress

If you’ve disabled automatic updates, you’ll need to run a manual update. You can pick between a one-click update or a full manual update.

Steps to complete a one-click update:

  1. Login to your WordPress admin.

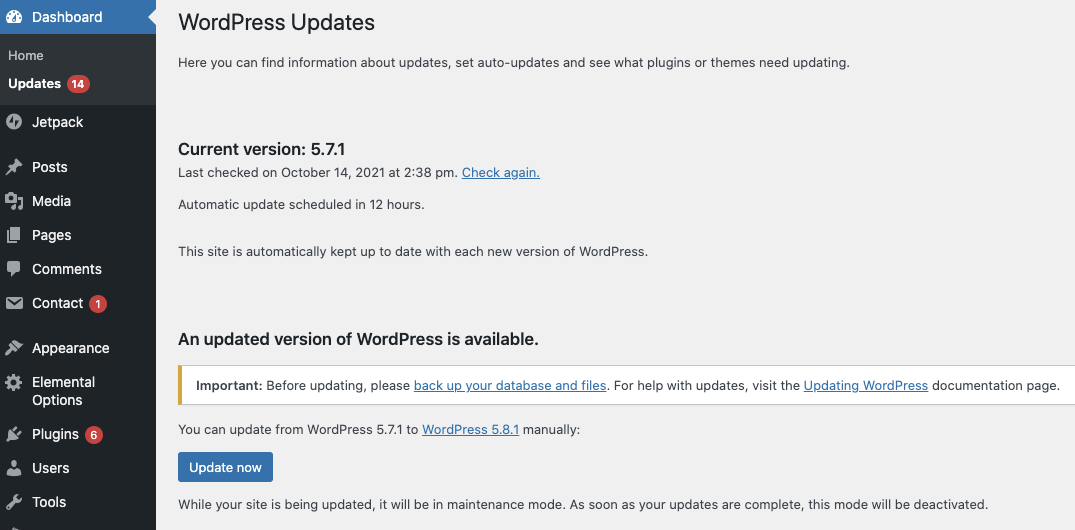
  2. Navigate to the Updates section under the Dashboard.

  3. If you’re not running the latest version of WordPress, you’ll see an option to “Update Now.” Click that button.

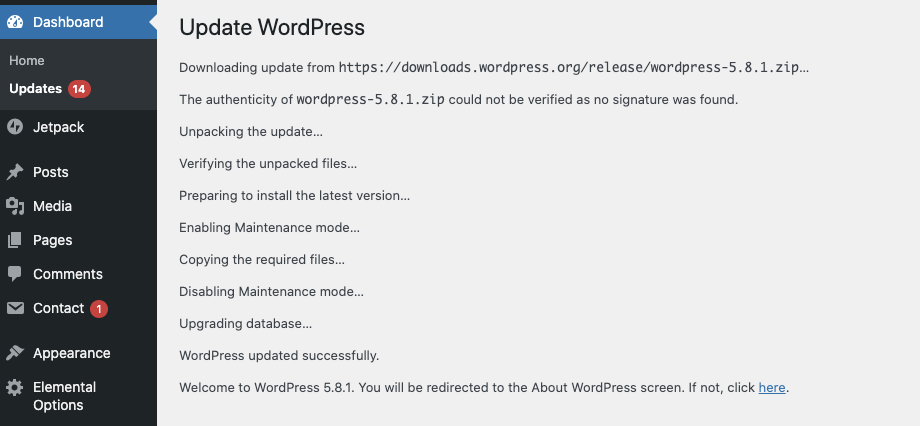
  4. WordPress will automatically fetch the latest version and put your site in maintenance mode during the installation process. You can track the progress on your screen.

Once complete, it will redirect you to a screen with information on the new features in the upgraded version.

Steps to complete a full manual update:

  1. Download the latest version of WordPress to your computer.
  2. Unzip the file.
  3. Login to your WordPress admin and deactivate any plugins.
  4. Use FTP or shell access to delete the wp-includes and wp-admin directories from your web host. Then, upload the new wp-includes and wp-admin directories to your web host.
  5. Navigate to your wp-content folder and upload the individual files from the wp-content folder of the update. You want to overwrite existing files, but do not delete any other files or folders.
  6. Upload all loose files from the root directory of the update to your host WordPress root directory, such as wp-login.php.
  7. Go to your WordPress admin page from a browser. You’ll probably have to log in again. If needed, it will guide you through updating your database.
  8. Activate your plugins.
  9. Clear your cache.

For more detailed step-by-step instructions on manually updating WordPress, check the WordPress documentation.

What If My Update Fails?

If your WordPress update fails, you can restore your site from a backup and try again. If you attempted an automatic update or a one-click update that failed, you could try a full manual update instead. To complete a manual update after a failed update, you’ll need to delete the file maintenance from your WordPress directory between steps 6 and 7.

What to Do After a WordPress Update

After finishing a WordPress update, check your site to ensure everything looks good and functions properly. Remember, you may need to update your theme and any plugins to be compatible with your new version of WordPress.

Simplify WordPress Updates with Hostdedi

Managed WordPress hosting from Hostdedi takes the hassle out of updating a WordPress site. All plans include automatic updates for core system files and plugins. Plugin updates also include Visual Inspector to detect any impacts of a plugin update on your site’s layout.

Try managed hosting today and stop worrying about WordPress updates.

Check out our fully managed WordPress hosting plans to get started today.
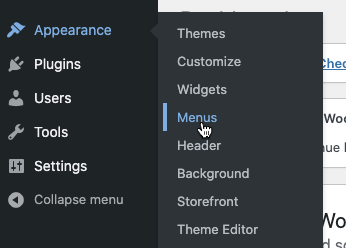
Related WordPress Resources

Source link

Website Design Client Checklist: How To Set Realistic Expectations

It’s not easy to work on a web development project when clients do not understand the deliverables. For that reason, setting client expectations for website development is essential for the success of your projects.

The website design process is quite demanding. To stay on top of things, you need to have some mechanism for managing client expectations. It’ll help you create long-lasting professional relationships and avoid unexpected additional costs.

Getting started with freelancing website design projects

Source: 99designs

Read on to discover the value of setting clear expectations and the art of creating web development client questionnaires.

Why Do You Need To Set Client Expectations

Setting Realistic Expectations in Web Design

Web Design Questions for Clients

Creating a Website Design Client Checklist

Final Thoughts: How To Set Client Expectations for Website Development

Why Do You Need To Set Client Expectations?

When working as a freelance web developer, you will interact with clients who are not well-versed in web development.

Therefore, it is crucial to help clients understand what you can deliver before working on a project.

If you can set clear client expectations during the onboarding process, it’ll help you run the project smoothly. Moreover, letting clients know what to expect early on helps you:

Define the Scope of Work

When expectations are communicated before the project starts, it becomes easier to understand the client’s business and what they are looking for. In the beginning, you should spend some time familiarizing yourself with the client’s needs, mission, and values.

That will help you define the scope of work and manage the project efficiently. You’ll find it hard to say no to the client’s demands after you’ve agreed to work on the project.

Understanding project deliverables for website development

Source: Pexels

Manage Your Workload With Ease

For a freelancer, meeting deadlines can sometimes be challenging. Something as simple as having spontaneous project revisions can make things last longer than expected.

As a result, your other clients and projects may suffer, hurting you both emotionally and financially. Setting your expectations right away will help you with project management, thus improving your freelancing business.

Create Long-Term Relationships With Clients

One aspect of setting clear expectations is to convey them unambiguously. When your clients are aware of the deliverables and your timeline, it’ll increase your credibility. Good communication is key to building trust in professional relationships.

Setting Realistic Expectations in Web Design

It can be a little overwhelming to start with the process of setting expectations. The requirements and nature of each project may vary, thus impacting your approach. It is, however, helpful to have a structure that you can follow.

To set clear expectations, practice the following:

  • Set up meetings before starting the project. These meetings will help you understand the needs of the client and clarify project goals.
  • Define project deliverables and workflow. Provide specific information so that your client can understand the scope of the project.
  • Create a detailed project plan and share it with the client. Make sure that you address your limitations, resources, timeline, and budget carefully.
  • Clarify your concerns regarding the expectations during and immediately after the project is completed.

Website development project plan

Source: Asana

Useful Tips To Manage Client’s Expectations

When working with web development clients, some of the tips to keep in mind are as follows:

  • Be transparent in sharing your concerns and expectations so the clients do not push you to overdeliver.
  • Keep the communication channels open at all times.
  • Do not set strict deadlines for yourself. Give yourself some cushion for unexpected events.
  • Ensure regular check-ins to keep up with the milestones and project status.
  • Keep a record of your agreement with the client. Documentation can save you from a lot of trouble.

An excellent way to gather the information you need to implement the practices and tips listed above is by asking the following questions:

Web Design Questions for Clients

  • What is your mission and vision for the business?
  • What are your requirements for this website?
  • What do you want to achieve at the end of this web design project?
  • What are the personas for your target audience groups?
  • How strong is your current online presence?
  • What is your timeline for the website to be fully functional?
  • Do you have any design expectations and restrictions that I should be aware of?
  • Who will I be in contact with during the web development project?

The importance of website development client questionnaire

Source: SEOReseller

Try having a website development client questionnaire to consult every time you bid for a freelancing project. All you have to do is go through a series of web design questions for clients before you kick off a project.

Creating a Website Design Client Checklist

In addition, create a web design client checklist to stay on top of things. This list will save you time and ensure you don’t miss important things while discussing a project.

Here is an example of things you can tick off to ensure you’re on the right track:

  • Define the goals and objectives of the website development project.
  • Set clear deliverables for the web development project.
  • Make sure to have a point of contact before, during, and after the project.
  • Set an expected launch date for the website with revisions in mind.
  • Establish an agreed budget and mode of payment.
  • Create a contract to be signed by the client.

The list is not exhaustive, and you can add more things to it based on the nature of the freelancing project. You may also have to create some documents, such as an onboarding form, for clients. These documents can help you keep track of multiple projects with different clients.

Final Thoughts: How To Set Client Expectations for Website Development

According to HubSpot, the employment of web developers is going to increase by 8% in the next few years. That means there will be more projects to do and strict deadlines to adhere to in the future.

And that is just one of the reasons why setting client expectations for website development projects is extremely important.

With expectations set upfront, you can use minimum effort to manage your relationships with existing and new clients. Succeed in your freelancing web development business by managing client expectations.

If you want to carry out your projects more efficiently and boost client relationships, check out Hostdedi’ StoreBuilder. By helping you expedite processes, this tool will ensure your client’s expectations are met.

Related Resources

Source link

A Faster Way of Building Websites for Clients

Freelance web design and development is a bit of a balancing act. When building websites for clients, you need to deliver something unique, but not so special that it requires countless development hours.

Even the most experienced developer can use help reducing the time it takes to take a site live. The more sites you finish, the more money you make. Decreasing the time it takes to build a site, gives you more time to find your next freelance web development project.

To help you increase your output as a freelancer, this post explores faster ways of building websites for clients.

How to Create Websites for Clients Quickly

Developers often assume they need to build every website from scratch, carefully crafting each line of code. Unfortunately, most clients won’t pay for that level of customization. Successful freelancers use time-saving hacks to deliver customized sites for clients.

Time-saving website building hacks include:

  • Modifying an Existing WordPress or WooCommerce Theme. Customizing an existing theme saves considerable time compared to building a new theme. Most website projects don’t warrant the effort to create an entirely new theme when you can easily modify an existing one.
  • Using a Page-Building Tool. Drag-and-drop page builders can cut down on development time as well. Popular page builders for WordPress include WPAstra, Elementor, Beaver Builder, and Gutenberg.
  • Starting From a Template. If you are using a page-building tool, many include templates. Use the template to set the basic structure and layout for a page, so you can start fine-tuning the design sooner.

How to Create Online Stores for Clients Quickly

With the right hack, you can quickly create a website. But a fully-functional online store takes more time. If you’re using WordPress, you’ll need to install and configure several plugins to get the right combination of design and functionality.

Many developers opt to go with a solution requiring less setup. SaaS ecommerce platforms and website builders like Shopify, BigCommerce, Squarespace, or Wix eliminate some of the hassles of setting up an online store.

But the convenience comes with a price. These platforms are less flexible, making customizing your client’s store to their exact specifications difficult if not impossible. Plus, each platform uses proprietary systems, meaning you cannot export the store and install it on a different host. If you build a store in Shopify, you have to keep paying Shopify or invest in rebuilding the store on another platform.

Developers prefer the open source nature of WordPress and WooCommerce. Given that WordPress powers about 40% of websites online, it boasts a robust and active community of users and developers.

Because of the open source nature of the platform, just about any functionality or feature you’d want can be found — or created. With over 50,000 WordPress plugins available, and 11,000 themes to choose from, the options can be overwhelming.

Fortunately, a new product from Hostdedi makes building online stores in WordPress easier and faster.

How StoreBuilder by Hostdedi Works

StoreBuilder by Hostdedi automates the more tedious aspects of building an ecommerce website with WordPress and WooCommerce, so you can spend more time customizing the design and adding products.

All you have to do is answer a few questions, and StoreBuilder does the rest. The guided setup wizard uses your answers about your comfort level with website building, the store, products, and content types to build an optimized WooCommerce-powered store. You can even load in demo products as a part of the setup.

Benefits of Using StoreBuilder

StoreBuilder gives you the power of WooCommerce without the complexity of setting it up.

Here’s why freelancers like building websites for clients using Storebuilder:

Preconfigured WordPress and WooCommerce Plugins

The Hostdedi team tested, validated, and deployed the best set of plugins. You can get a perfect ecommerce set up within minutes without having to research, download, and install plugins. StoreBuilder also makes page building easier with the innovative Kadence blocks plugin. Unlike other page builders, Kadence doesn’t add a bunch of bloat to a site and slow it down.

Unique and Fast Next-Gen Themes

StoreBuilder includes premium themes designed for maximum speed. Each theme works with StoreBuilder’s easy-to-use interface, so that you can customize the appearance of your store with just a few clicks.

Set and Forget Plugin Updates with Visual Checks

Plugin updates keep your client’s online store running smoothly and securely. If you host clients’ websites or sell maintenance plans, automatic updates save you considerable time.

Premium Hosting and Auto Scaling Included

Yet another benefit for freelancers hosting their clients’ sites, each StoreBuilder plan includes Hostdedi top-of-the-line ecommerce hosting. With our auto scaling feature, you also won’t have to worry about your sites crashing during a Black Friday or Cyber Monday shopping spree. StoreBuilder boosts PHP resources above the base levels to scale with your site’s increased traffic.

Simplified WordPress Admin For Easy Handoff

Every freelancer dreads the “where can I find” or “how do I…” phone call from clients. StoreBuilder makes client handoff a breeze by simplifying the traditional WordPress navigation. When clients log in, they’ll only see the relevant sections in the navigation. The simplified navigation should also prevent unwanted client tampering with critical settings.

Performance-Boosting Features

StoreBuilder helps freelancers deliver more value for their clients with built-in plugin and sales performance monitoring. It monitors each store’s sales to measure them against a predicted model based on historical performance. StoreBuilder gives your clients a heads up when sales go down so they can take action to recover revenue.

StoreBuilder also monitors the technical performance of your site. While other solutions alert you of performance problems, StoreBuilder tells you why. Our advanced plugin performance monitor detects when a change in a plugin begins impacting your site performance, so you can solve it before a client notices.

To sum up, StoreBuilder makes you a hero to your clients.

Get Started Building Websites for Clients

WordPress and WooCommerce provide the most flexible and advanced features for your clients’ ecommerce stores. When you combine them with StoreBuilder, you can start building websites for clients in no time.

Plus, you’ll have full support from Hostdedi’ team of hosting and ecommerce experts. StoreBuilder comes backed with fully managed WooCommerce hosting to keep your store high performing behind the scenes.

Sign up today and get your first month for free.

Related WordPress Resources

Source link

What is Magento Commerce Cloud?

Magento Commerce Cloud has become extremely popular the past couple of years. You may be wondering about this enterprise ecommerce platform. What benefits does it provide users? Which features have been added after being acquired by Adobe?

Let’s delve deeper into these and other Magento Commerce Cloud questions that might interest you. Keep reading to learn what Magento Cloud Commerce is, what the platform offers, and more.

What is Magento Commerce Cloud?

“Cloud” is a concept mostly used in terms of online services. Its purpose is to provide users with stable and safe online hosting services, whether you want to store documents, images, or some other types of files such as websites.

When it comes to online stores, we can distinguish two kinds of web hosting: on-premises and cloud.

With on-premise hosting, you can install the site on any server you’d prefer as well as maintain and control its overall infrastructure. This is a solution plenty of entrepreneurs choose because it’s safer. However, good quality often comes with a higher price, which can be an issue for those who have small and relatively new businesses.

On the other hand, with cloud hosting, you can install your site on a network of physical and virtual servers — and it will cost you less.

Magento discovered that more users, especially less technical users, needed full service solutions, which included cloud hosting too. This led to a new service they launched in 2016: Magento Commerce Cloud.

Magento Commerce Cloud is amongst the most used PaaS (Platform-as-a-Service) solutions, widely recognized for its great advantages and capabilities. It’s a managed hosting platform for Magento Commerce that runs on Amazon Web Services servers.

Background on Magento’s Acquisition

In 2018, Adobe revealed their plans to acquire Magento Commerce. With Magento Commerce Cloud, Adobe added another excellent solution to their portfolio, enabling them to provide a global platform serving both B2C and B2B clients across the world.

This way, the Adobe Experience Cloud got some new features, including:

  • Pre-built extensions where you can find logistics, shipping, tax, and payment.
  • A chance to enable digital store and order orchestration for digital and physical items across various industries. This includes retail, the public sector, consumer packaged goods, and manufacturing too.
  • A rather active community with approximately 300,000 developers that work for Magento.

What’s Been Going on With Magento The Past Few Years?

The past few years, Magento has constantly been trying to improve the quality of its services as well as provide its clients with the best end-user experience possible.

One major step included replacing Magento 1 with Magento 2. Magento 2 offers users better speed, increased SEO, and a more user-friendly platform. It also supports the latest PHP, which boosts the speed of the entire website.

Magento 1 was sunsetted in 2020, which means it’s still useable by clients, but it no longer has official support from Adobe or Magento. Solutions, such as Hostdedi Safe Harbor, provide security and threat protection to teams still using Magento 1.

Adobe Commerce vs. Magento

In 2019, Adobe revealed they were starting an Adobe ecommerce platform. The Adobe Commerce Cloud is a fully-managed service and a cloud-based variation built on the Magento platform.

It brings the enterprise solution of Magento Commerce to the next level by allowing users to integrate it with Adobe Experience Manager. It’s also entirely synchronized with Adobe’s tools such as Marketing Cloud, Advertising Cloud, and Analytics Cloud.

So, what can we say about Adobe Commerce vs. Magento then? Both of them operate with an identical model.

With this service, Adobe extended its platform by including some additional features such as dashboards that help keep track of ecommerce strategies. It also integrated with the Amazon marketplace.

This is great for direct-to-consumer brands and small and mid-sized companies because Magento merchants can now sync their ecommerce channels with Amazon storefronts. Magento itself doesn’t cover logistics, but collaboration helps sellers to leverage Amazon’s resources, data, and supply chain.

Open Source Edition vs. Magento Commerce vs. Magento Commerce Cloud

Once you decide to use Magento 2 as a base for your online store, you get to pick the edition that suits you the most — Magento Open Source, Adobe Commerce Cloud, or Commerce. Each option comes with specific features adjusted to different needs.

Magento 2 Open Source Edition

This platform is available for anyone to download, install, and maintain. You can adjust the configuration to the software in order to meet the specific requirements of your business.

Adobe Commerce

This version provides users with numerous out-of-the-box elements, together with unlimited customizing, and flawless third-party integrations. It provides features for customer support, corporate account management, and customized catalogs, with many other useful tools.

With this edition, you also get an excellent feature called “content staging.” It helps you create, preview, and schedule all your content updates from the Admin panel of your website.

Adobe Commerce Cloud Edition

This is a managed hosting platform that includes all Magento Commerce on-premise elements, together with improved cloud infrastructure hosting. In other words, users are able to code, test, and deploy to maximize the performance of their online businesses.

Strengths of Magento As An Ecommerce Platform

Magento is a well-known ecommerce platform widely used across the globe. Here are some benefits you get by using it.

It’s SEO-Friendly

Magento Enterprise Edition helps you easily optimize Magento and the content you have. One of its primary purposes is to boost your Magento SEO, which is why it will generate SEO-friendly URLs as well.

Coupled with this, when you develop your site using Magento, you build a store that’s going to be compatible across different browsers and devices. There’s also enough room to both customize and manage SEO for ecommerce if you have the advanced skills to do so.

Excellent Platform with Various Features

No matter how many orders or products you have in your online store, Magento is a very powerful platform that can both store and manage hundreds and hundreds of different products — and all while running smoothly.

If you’ve been on Magento ever since you first started with your online store, there’s no need for you to worry when the traffic grows. Magento is a scalable solution perfectly adjusted to improve the performance and development of your shop as it gets bigger.

Magento also provides numerous features such as product and inventory management. This way, you have a site that’s quite simple to organize and easy to maintain. You also have a chance to set up navigation and filters in the way to help you maximize your website’s performance.

Fast Loading

The speed of your website is definitely one of the greatest advantages of Magento 2. If your online store takes too long to load, people will leave. Fortunately, Magento will keep your load times low even though you may have a heavy load on your website.

You Can Fully Customize Your Website

You can customize everything with Magento, starting from the look and general vibe of your site to the way you decide to set the product categories. You also get to choose from a variety of language, payment, and shipment options. Magento also provides numerous plugins that will help you enhance the performance and functionality of your website.

Bottom Line

To sum up, Magento is an open source ecommerce platform for enterprise-grade online stores.

Magento Commerce Cloud is one of its services launched in 2016. It’s amongst the most popular and widely used PaaS (Platform-as-a-Service) solutions and it runs on Amazon Web Services servers.

Adobe acquired Magento Commerce in 2018 which means they got a global platform where they serve both B2C and B2B clients across the world. In 2019, Adobe launched Adobe Commerce Cloud, which is a fully managed and cloud-based service built on the Magento platform.

Magento has been generally improving its offer over the past couple of years, which is best seen by Magento 1 to 2 migration. When on Magento 2, you get to choose the edition that meets your needs the best — Magento Open Source, Commerce Cloud, or Commerce. Each, of course, comes with its own unique features.

Consider Hosting With Hostdedi

Hostdedi and Magento have a long history — in fact, Magento was originally developed on Hostdedi servers.

Hostdedi offers a fully managed Magento hosting service for speed, security, and scale. It’s suitable for both small and large businesses, with different sized plans to suit your needs.

Hostdedi fully managed hosting means you’re in good hands — the entire technical part of your website is covered, enabling you to focus on the core of your business. Hostdedi also offers 24/7/365 customer and technical support for all your questions or issues.

Check out the fully managed hosting plans from Hostdedi to get started today.
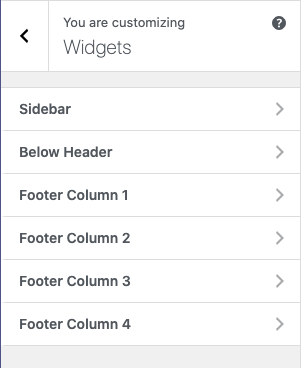
Related Magento Resources

Source link