CAll Us: +1 888-999-8231 Submit Ticket

The Hidden Costs of Cheap Hosting

Getting something cheaper always sounds like a great idea. Who doesn’t like the thought of saving a few bucks on something you expect to be expensive?

If you’re a bargain hunter, you’ve likely already experienced a bait-and-switch situation. What starts out as a great deal can end up costing more and more.

The same goes for web hosting. Cheap hosting can be appealing at first, but it can come back to bite you in the most unexpected ways.

Keep reading to learn more about the hidden costs within cheap hosting solutions.

What is Cheap Hosting?

Cheap hosting refers to web hosting services that cost less than expected, especially when compared to the cost of similar hosting plans.

It is easy to assume that cheap hosting is synonymous with bad hosting. Some people have had experiences that could back this up, but it isn’t always the case. Sometimes these bad experiences result from customers misunderstanding the tradeoffs made by hosting service providers that enable the company to keep costs low.

Related reading: Shared Hosting vs. WordPress Hosting: What’s the Difference? >>

In other cases, it is a matter of articulating hidden costs. While it is unfortunate, the customer may simply overlook them because they are buried in fine print. The customer signs up expecting a buffet of features. They end up with a one-course meal and the option to pay more for extra items they thought they were already getting.

Depending on your needs, cheap hosting may work for you. The key to figuring out which side of this divide you stand lies in understanding the hidden costs associated with cheap hosting. So let’s take a look at some of them.

What are Some of the Hidden Costs of Cheap Hosting?

Renewal Pricing

Trying to compete with similar price points can be tricky when your offerings are significantly better than the competition. The easiest way to sway customers is to appeal to the customer’s need to save money.

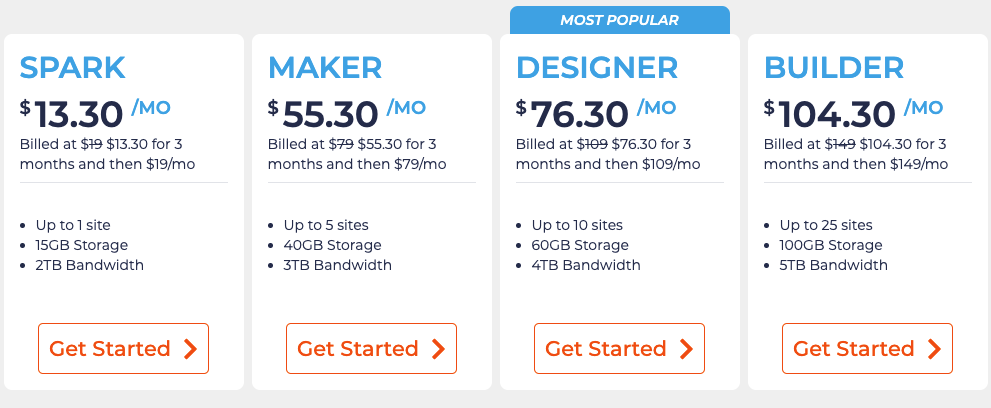
They reduce the initial subscription price, usually for the first year, only to jack it up the following year. It can be more than double your original costs. Many customers fail to notice the low price is only for a limited time, or forget after a year with the service.

When you’re paying $5 or so a month for your hosting, and suddenly you get an annual bill of $180 or more, you’re probably not going to be very happy.

Related reading: What is Web Hosting? A Beginners Guide to Hosting >>

No Managed Hosting Services

Another way web hosts can afford to offer cheaper hosting is by limiting the add-ons that would usually come with their hosting service. These extras convert a regular hosting plan to a managed hosting service, something that’s become fairly standard for most hosting providers in recent years.

Managed hosting services are provided by hosts that handle the day-to-day infrastructure needs with your account. This includes ensuring both system hardware and software are updated regularly and protected against intrusion attempts, as well as regular backups.

For a small business with limited in-house IT capacity, a hosting plan with all this included is a great choice. However, if saving money in the short term is more feasible, cheaper plans are still an option. Just be sure that you have a team capable of handling management and maintenance tasks, so you can avoid problems that can affect your business continuity.

Limited Features

Another thing to pay attention to when it comes to cheap hosting is what features and add-ons you will be missing out on. There are a surprising number of things that fall under this category.

The performance of your hosting infrastructure is one of the more common hidden costs when it comes to cheap hosting. Whatever you save on the subscription costs is bound to affect the infrastructure hosting your applications.

This can mean being put on a shared hosting plan with several customers sharing the same limited server resources. The downsides of this kind of arrangement include slow load times for websites, increased site outages, greater exposure to security risks, and space and bandwidth limitations.

These restrictions may not be a source of concern for a small business with a website that’s not expecting much traffic. However, if you’re looking to get online with the intent of growing your website traffic, this can be a big deal. A dedicated server may be a better option in this case.

In other cases, the hosting provider will choose to omit some value-added services that, while not extremely necessary to your hosting in the grand scheme of things, are nice to have. These add-ons will vary from host to host and include features like daily backups, unlimited email accounts, free SSL certificates, content delivery networks (CDNs), system alerts, virus and spam protection, to name a few.

These add-ons usually are not included by default with a cheap hosting plan, but the hosting service provider will give you the option to add them for a bit of extra cash. By the time you add a few of these choice extras to your hosting service, you will end up with a bill that’s not as cheap as you initially thought.

Support Limitations

The support (or the lack thereof) that comes with cheap hosting can be a dealbreaker in many instances. The choice of a more affordable hosting plan usually means losing out on premium support offerings.

If you encounter an issue, you won’t be able to contact your host’s trained support staff who are available 24/7 to higher paying customers. Instead, you’ll probably have to rely on their knowledge base articles in hopes that your issue is one that’s been covered before.

Related reading: Why Hosting Support Is Important >>

Some hosts do offer access to customer support on their cheaper plans, just not the instant variety. That’s not so great when your website has an outage, and you have to wait twelve hours before you get a response from the support team.

If your business is heavily dependent on your online presence and maintaining maximum uptime, choosing a cheap hosting option that lacks decent support is not a great idea. Access to on-demand technical support will ensure you get the help you need when you need it, keeping your site online and accessible to customers.

Migration Costs

Migration costs are an example of a hidden cost that rarely comes back to bite you, especially if you’ve chosen an excellent hosting company.

However, if you ever do decide that you need to move your website to another hosting service, it would come as a surprise to you that it can cost more than you pay for a yearly hosting plan to do so.

  1. Read the fine print! Don’t get carried away by how affordable the hosting plan is. Web hosting involves more than just having a place to store your web files and run your website. Pay attention to what features the host offers as a part of the plan.

  2. Compare plans and pricing. There are dozens of web hosts out there, so when you spot what looks like a great deal, look for other hosting providers with similar offerings. Compare them to see what features the hosting company dropped to get to that attractive low price.

  3. Ask some questions. You know your needs best when it comes to hosting, so don’t hesitate to reach out to the sales team about any concerns you may have. If you’ve done your research, then you will know what features are a must-have and the ones you can’t live without.

  4. Be on the lookout for reviews from real-life customers. This will help you cut through all the marketing jargon from the service provider. The more you understand what real customers experience, the better you will understand whether the cheap hosting plan will meet your needs.

  5. Pay more for better hosting with no hidden costs because sometimes it’s not worth the hassle in the long run. If you can afford to spend more money on a hosting plan with more features and less of the risk that comes with a cheaper plan, then the wise choice is to do just that.

Looking for a Host That Does it All?

The process of choosing what kind of hosting plan you want first requires identifying what type of site you want to build. This will determine your hosting requirements and serve as a guide for picking an optimized service for your needs. If you need help with figuring all of this out, we can help you select the right plan for your website.

Hostdedi provides fully managed WordPress, WooCommerce, Magento, and lots more. Want to try a host that is upfront on pricing and has all the features you need? Check out our plans to get started today.

Related Resources

Source link

How to Create a WordPress Website for Beginners

You’ve been building your brand behind the scenes. Now it’s time. You know you need a website to launch your brand, but you aren’t sure how to start. The entire idea of the site gives you anxiety. We get it! Building and launching a website can be intimidating. This post will cover step-by-step how to create a WordPress site for beginners.

Believe it or not, it doesn’t take a lot to launch a WordPress website. First, of course, you need an excellent understanding of your brand, its visual identity, and the site’s goals. But from a tech standpoint, the things you need to launch are minimal when you use WordPress.

Keep reading to learn how to create a WordPress website for beginners.

Step 1: Setup

Why WordPress? Many people decide to use WordPress because it has a reputation for being easy to use and free. But even though WordPress is free, where does the cost come from?

Two things you need to launch a WordPress website:

  1. Domain Name. The domain name is the URL for your website. It’s what people type to go to your site. Your brand’s name probably is best, assuming it’s available.
  2. WordPress Hosting. Choosing a company to host your website is one of the most critical decisions for your site. You should select a company that provides fully managed WordPress hosting. Don’t just go with the cheapest option. Instead, read reviews and ask those you know with successful, fully operational websites to make recommendations.

At Hostdedi, we have the perfect plan for beginners to get started with a WordPress site. We call it our Spark plan, and right now, you can start for only $13.30 a month.

No matter where you start, we have plans that meet all of your needs and budgets.

Once you choose your hosting plan and WordPress installs automatically, then you get to start the fun of selecting a WordPress theme and customizing your website.

Step 2: How to Install a Theme

The next step in setting up your WordPress website might be the most fun. It’s choosing a WordPress theme. The theme is a template that controls the appearance of your site. Your WordPress site comes with the WordPress 2021 theme.

Many people find this starting place useful, but you may want to select the theme that most suits your brand image.

Switching between themes and installing new themes is easy. And especially for beginner WordPress users, trying on new themes can be a great way to start.

To choose and install a WordPress theme:

  • Log into your WordPress dashboard
  • Select “Appearance”
  • Choose “Themes”
  • Click “Add New”

Next, search through the thousands of free themes to find one you like. You can even use the filter function to narrow your options.

Once you’ve decided on and installed the theme you want, you can start to customize the WordPress theme.

Step 3: How to Add Posts and Pages to Your Site

Most WordPress tutorials direct you to customize your theme right after installation. But, it’s easier to customize your theme and design if you publish content first.

You can add content to your WordPress site in two ways — posts and pages. Posts are blog entries. They have a publish date, and typically all use the same template. Pages are static parts of your site, like your about or contact information. Pages can use different templates and design elements.

Related reading: The Essential Guide to WordPress Plugins >>

Most websites use a combination of posts and pages. For example, if you’re running a food blog, you would create pages for home, about, contact, and recipes. You would publish each recipe as a post.

To add pages to your WordPress website:

  • Log into your WordPress dashboard
  • Choose “Pages” and select “Add New”
  • You will see the page editor screen.
  • Provide a title for your page
  • Add content, which may include text, links, images, etc.
  • After you have the page as you want it, click “Publish.”

You can repeat this process to add as many pages as you want to your website. And, of course, you can add pages as you recognize the need for them. Before you begin customizing your theme, create two blank pages. One titled “Homepage” and the other titled “Blog.” We’ll use those pages in the next step.

To add posts to your WordPress website:

  • You will see the post editor screen.
  • Provide a title for your post
  • Add content, which may include text, links, images, etc.
  • Select the categories and tags you want for your post.
  • After you have the post as you want it, click “Publish.”

You repeat this process every time you add a post to your site.

Step 4: Configure Your WordPress Theme

Now that you selected a theme and made at least a couple of pages, it’s time to customize the look of your site. Go to “Appearance” and choose “Customize.”

You’ll now see all the options for how to customize your WordPress theme:

Start by clicking “Homepage Settings.”

You can select to use a static page for your homepage or a blog listing that shows all your latest blog posts. If you installed a theme with a cool-looking homepage, but you can’t see it when you preview your site, this is the setting you need to change. Select “A Static Page” under “Homepage Displays.”

Related reading: Beginner’s Guide to WordPress Performance Optimization >>

Remember those blank pages we created in the last step? You can use the dropdown to select “Homepage” under the Homepage and “Blog” for the posts page.

As you make changes, you’ll see a preview of the new homepage to your right. Click through the remaining options to customize your website’s colors, fonts, headers, and footers.

How to Edit a Header and Menu

The header of your website is the top part with your logo and navigation. You’ll want to check out a few sections of the customizer to edit your header:

  • Click on “Site Identity.” Most themes will pull the header logo or site name from this section.
  • Click on “Header.” Themes often include settings for customizing the color and background of the header here.
  • Click on “Menu.” This menu area is where you tell WordPress what links to include in your site’s navigation. To create a menu, click the “Create New Menu” button.

You can also edit menus from the main Dashboard navigation by clicking “Appearance” and “Menu.”

On the “Create Menu” screen, give your menu a name and hit the “Create Menu” button.

Use the box on the left to add pages, posts, or other links to your site’s navigation, and then click the “Save Menu” button.

How to Edit a Footer

When setting up your site, you’ll probably want to edit the footer. The footer in WordPress is the bottom part of your website that appears after the content area. It appears on all pages of your website. You may want to add specific elements to your footer. But, at the least, you’ll want to change the copyright date and perhaps remove the “powered by WordPress” branding. Look for the area labeled “footer.” Once you select the footer area, you should quickly see where and how to edit the footer text.

Some themes will not include the content in the footer section of the customizer. You’ll only see color options:

In that case, you’ll want to head to the “Widgets” section on the customizer menu. You’ll see options to update the content for each section of the footer.

Step 5: How to Add WordPress Plugins to Your Site

The customization options you see under the Customize tab vary by theme. Most people need to install WordPress plugins to complete all the customizations they want for their site.

WordPress plugins are like apps for your WordPress website. You can choose from thousands of plugins to add features and functionality to your site. But before you start going plugin wild, remember that each plugin you install potentially slows down your site. So only use what you need to make your site operate well.

To install a WordPress plugin on your site:

  • Log into your WordPress dashboard
  • Choose “Plugins”
  • Select “Add New”
  • From there, you can search through all of the WordPress plugins to find what you’re looking for.
  • When you find the plugin you want to use, click “Install Now.”
  • Select “Activate”
  • You’ll automatically redirect to the tab containing all of your site’s installed plugins. You also will see a message at the top of the screen confirming the plugin’s activation.
  • Go to “Settings”
  • Select the plugin you installed
  • Fill in any blanks you need to so the plugin is fully functioning.

Remember to uninstall any plugins you aren’t using to ensure that they don’t slow down your site. Also, update plugins as updates become available to keep them fully functioning.

Typical uses of plugins include:

  • Adding fonts to your site
  • Adding meta tags
  • Backing up your site

How to Add Fonts

You don’t have to install custom fonts on your site. Instead, you may choose to use the fonts that are part of your theme. But if you want to add them, custom fonts can improve the typography and user experience. They also can make your site stand out from others using the same theme.

There are various places online to get free fonts for your site, including Google Fonts. Google Fonts is the largest, most popular, free font library for websites. You can add Google Fonts to your website manually or using a WordPress plugin.

To install Google Fonts to your site with a plugin:

  • Log into your WordPress dashboard
  • Click “Plugins”
  • Choose “Add New”
  • Search for “Easy Google Fonts”
  • When you find the plugin, click “Install Now”
  • Select “Activate”
  • Select “Appearance”
  • Select “Customizer”
  • Click “Typography” to see font choices
  • Choose from the drop-down menu and select “Edit Font” to change the fonts on specific sections of your site
  • Save your changes

Remember that loading a lot of fonts onto your website can slow it down. It’s best to choose one or two fonts and use them across your site.

How to Add Meta Tags

Search engines try to gather as much information about your site as possible, including meta tags. Meta tags are data that isn’t visible to users. They’re another way to tell Google about your site.

Meta tags tell Google things like:

  • the meta description
  • author
  • type of document
  • language
  • copyright

You don’t need to include keywords in your meta tags. Those haven’t ranked since 2009.

Related reading: Top 5 Tips for Website Speed Optimization >>

The default installation of WordPress doesn’t contain meta-tag data, so you have to add them yourself. You can add meta tags to your site manually or through a WordPress plugin.

To add meta tags with a WordPress plugin:

  • Log into your WordPress dashboard
  • Click “Plugins”
  • Choose “Add New”
  • Search for “Meta Tag Manager”
  • When you find the plugin you want to use, click “Install Now.”
  • Select “Activate”
  • You’ll automatically go to the tab containing all of your site’s installed plugins. You also will see a message at the top of the screen confirming the plugin’s activation.
  • Go to “Settings”
  • Select “Meta Tag Manager”
  • Create tags and assign them to different areas of your site, as directed by the plugin.

Step 6: How to Back Up Your WordPress Website

It may seem silly as you launch your site to think about a backup, but you want to protect your work right from the beginning. A backup is a copy of your site that you can restore if something goes wrong and your site disappears. You don’t want to lose your content, so a backup of your site protects your time and resources.

A full WordPress backup includes:

  1. Website Files. The files include your theme, plugins, scripts, media, etc. They’re anything dealing with the structure and functioning of your site.
  2. Database. The MySQL database stores your blog posts, comments, and any options you set in the admin area.

You want to back up both to protect your entire site.

3 ways you can choose to back up your site:

  1. Host. The first way to backup your website is the easiest, especially when you choose a host you trust. If you choose a host who does a daily backup of your site, you always have it. You can log on and download a zip file of the backup from time to time for double protection if you choose.
  2. Manually. The second way to backup your site is manually. This method requires you to log into your host server and download your WordPress directory. It’s a little more complicated, but you get used to the process after you’ve done it once or twice.
  3. Plugins. The third method to backup your website is through a plugin. WordPress offers a variety of plugins that automatically backup your site on a chosen schedule.

It doesn’t matter how you choose to back up your site. The most important thing is that you do it to protect your work.

Creating a WordPress Website

Use this post to guide you when setting up a WordPress website for your brand. There are many details to consider when setting up your site, but fortunately you only have to make most decisions once.

Consider Hosting Your WordPress Website With Hostdedi

Now that you know how to create a WordPress website, where will you host it? Consider hosting with Hostdedi fully managed WordPress hosting.

Benefits managed WordPress hosting with Hostdedi include:

  • Faster Websites. All managed WordPress plans include premium image compression, automatic CDN, and advanced caching to deliver the quickest WordPress sites.
  • Automatic Updates. Never worry about updates again with our automatic plugin updates with visual comparisons.
  • Security Monitoring and Support. Our WordPress experts are available around the clock to keep your site running securely.
  • Plugin Performance Monitor. Our exclusive Plugin Performance Monitor tracks your site speed and alerts you when a new or updated plugin starts to slow down your site.

Start building a better WordPress site. Check out our WordPress hosting plans today.

Related WordPress Resources

Source link

How to Launch a WordPress Site: A 7-Step Guide

When it comes to launching a website, WordPress is the most popular platform to use across the globe. Currently, 42.6% of all websites on the internet use WordPress — and it’s no surprise why.

Powerful, flexible, and extremely versatile, WordPress allows its users to quickly create modern websites that are both aesthetically pleasing and fully functional.

WordPress is built on an open-source platform, allowing a diverse range of programmers to contribute to its library of themes and plugins. This means anyone can use this content management system (CMS) without needing advanced coding or web design knowledge.

If you’re unsure how to launch a WordPress site — no matter if you’re a small business owner, a large-scale organization, or an individual — this guide will help you break down all the steps, which include:

  1. Define your purpose
  2. Choose your domain name
  3. Select your web hosting provider
  4. Install WordPress
  5. Pick out your WordPress theme
  6. Install WordPress plugins
  7. Customize your WordPress site

7 Steps to Launch a WordPress Site

1. Define Your Purpose

Before you even get started building a WordPress site, it’s important to define your purpose.

Knowing what type of website you want to run — whether it’s for a personal passion project, an ecommerce business, or a travel blog — is a critical step in uncovering your niche and your site goals. This is also a good time to decide who your target audience is, and how it will affect the style, tone, layout, and imagery or design work you choose to include.

2. Choose Your Domain Name

Once you have defined your WordPress site’s purpose, it’s time to choose your unique domain name. Your domain name should be clear and concise while representing your overall brand or site’s purpose. Try to come up with a name that is easy for users to spell, type into a search bar, or recall, as there are billions of websites currently online.

For example, if you are creating a WordPress site for a business, be sure to use the business name as the domain name. If you intend to brand yourself through your site, you should choose your own name (if available) as the domain name. If you’re having a difficult time coming up with a creative domain name, there are several domain name generators you can use to spark ideas.

Once you have your name chosen, it’s time to see if the domain is available. Not only should it be available on the web, but it should also be available on social media sites (you can manually search for your chosen domain name on these sites) in case you would like to create supporting social media accounts. Additionally, your chosen domain name should not be trademarked with the United States Patent and Trademark Office.

If the domain name you’d like to use is taken, you might still be able to use it by selecting a different top-level domain name extension. This means that, rather than using “.com” after your domain name, you could use top-level domain names like:

● .co

● .biz

● .inc

● .net

It’s important to note that while you can purchase a domain name from several hosting providers, it’s better to do so with the one that is hosting your website. This makes it easy to manage all the details of your site from one centralized platform. Plus, many hosting providers offer domain registration deals when you sign up for a hosting package.

Now that you’ve landed on your official domain name and confirmed its availability, it’s time to select your preferred web hosting provider.

3. Select Your Web Hosting Provider

Successfully launching your WordPress site means selecting the right web hosting provider. A web hosting provider gives you access to a server — or a portion of a server — where your website will run from. These providers typically offer multiple types of servers you can choose from, including:

Shared servers: Several websites are hosted on a single shared server. In this model, server access and configuration are more limited, and performance is based on the load each website is putting on the server.

Virtual private servers (VPSs): A VPS allows multiple websites to run on a single shared server while remaining isolated from one another. Typically, a VPS offers more control and performance than a standard shared server, however, they may require familiarity with server management.

Dedicated servers: A dedicated server is a completely isolated server dedicated to a single website. This type of server offers higher levels of performance and customization, but it does require more advanced knowledge of server management and maintenance. Typically, larger organizations utilize dedicated servers to meet intense traffic demands.

Cloud servers: Similar to a dedicated server, a cloud server provides ultimate control and flexibility when it comes to performance and server customization. However, cloud servers provide more scalability, as they do not require changes in hardware to scale up or down.

If you’re launching your first WordPress site, chances are a shared server or a VPS will provide you with enough processing power and customization for your site’s needs. Just be sure to choose a web hosting provider that provides:

● WordPress compatibility and easy installation

● Affordable, scalable hosting plans

● Automatic SSL certificates

● Automatic WordPress and plugin updates

● Malware monitoring

● Instant backups

● Expert customer support

3. Fully Managed Hosting Plans

On top of these server options, many hosting providers also offer fully managed hosting plans. When it comes to WordPress hosting vs. shared hosting, WordPress hosting allows you to take a hands-off approach when it comes to managing your website and server configuration.

For example, robust web hosting providers like Hostdedi ensure your site stays fast, secure, and updated with a fully managed WordPress hosting plan.

4. Install WordPress

Once you have chosen your domain name and web hosting provider, it’s time to install WordPress. Many hosting providers allow you to install WordPress directly into your account within your control panel (cPanel).

If you’re unsure how to do this, be sure to refer to your web host’s WordPress installation documentation or reach out to customer support for assistance. In addition, you can reference the WordPress Codex for more information about the website installation process.

5. Pick Out your WordPress Theme

With WordPress successfully installed within your web hosting account, you can now focus on choosing your site’s theme and activating it. WordPress offers several themes for all types of websites that require minimal knowledge of coding or web design, including both free and premium themes.

To browse through WordPress’s library of themes for your site, hover your cursor over the “Appearance” tab in your WordPress dashboard and click on “Themes.” Here, click “Add New” and you can search for a theme that fits your site’s aesthetic and goals. When you’ve chosen a theme, navigate to the “Activate” button and click it.

Note: Before committing to a theme, WordPress gives you the option to see a preview of what your site would look like with any theme offered. Simply hover your cursor over a theme and select “Live Preview.”

Because WordPress offers so many theme options, it can be overwhelming to choose the best one for your site’s needs. Be sure to list out all the features and functionalities you want your site to have before browsing the theme library, and double-check what widgets come with the themes you like. Also, it’s important to select a mobile-friendly WordPress theme that automatically optimizes your site for mobile devices.

6. Install WordPress Plugins

When launching a WordPress site, you’ll have the option to select and install WordPress plugins. These plugins add extended functionality to your site, such as enhanced security features, ecommerce tools, and search engine optimization (SEO) tools. Currently, some of the most popular WordPress plugins include:

● Contact Form 7

● Yoast SEO

● WooCommerce

● Jetpack

● Elementor Website Builder

To install a WordPress plugin, simply navigate to the “Plugins” tab of your WordPress dashboard and click on it. Here, select “Add New” at the top of the page. Once you have searched for and selected a plugin you would like to use, click “Install Now” and then “Activate.” After you’ve activated your plugin, WordPress will walk you through the setup and configuration process.

Note: You can download third-party plugins from sites other than WordPress and upload them to your WordPress dashboard. To do this, simply click “Add New” and choose the option that says, “Upload Plugin.”

7. Customize Your WordPress Site

Before officially launching your WordPress site, it’s important to customize it based on what information you would like to include and how you want your site to look. This includes making changes to the theme you’ve chosen, adding product pages, or writing a handful of blog posts prior to publishing your site. A few of the most important pages you should add and customize before launch include:

● Home

● Contact Us

● About

● Products or services

● Service areas

● Pricing

If you’re having a difficult time coming up with pages your website should feature, be sure to take a closer look at businesses or individuals in your niche and the websites they run. These sites can provide you with inspiration for creating your own unique WordPress content.

5 Tips to Try Before Launching Your WordPress Website

Once you are satisfied with your theme design and content, it’s important to review these five tips to clean up your WordPress site before you click the “Publish” button.

1. Download a Backup Solution

If your hosting provider doesn’t offer an automatic WordPress site backup solution, it’s important to download your own prior to launch. There are several WordPress backup plugins you can utilize, with some of the most popular being UpdraftPlus, BackupBuddy, and Duplicator. Just be sure your backups are automatically scheduled and are saved on a cloud storage service provider for ultimate assurance.

2. Secure Your Site

WordPress offers several security plugins that work to protect your site from cybercriminals. Prior to launch, be sure to select a security plugin — such as Sucuri or iThemes Security Pro — to safeguard your site from cyber-attacks and keep it secure. This is also when you can establish WordPress user permissions to ensure you or other designated users can access the backend of your site.

3. Check for 404 Errors

404 errors can easily interrupt the user experience, so be sure to comb through your site and eliminate any that exist. The easiest way to check your site for 404 errors is to add it to Google Search Console (GSC) and run a crawl report. If your site hasn’t been added to GSC, you can manually look through your site and ensure that all links are working as expected and pages are loading properly.

4. Inspect All Forms and Media

Just like you need to look through your site for 404 errors, you must inspect all web forms and media prior to publishing. Manually test all your contact forms to ensure they are working properly, and be sure your images, videos, or sliders/carousels are loading correctly.

5. Review Social Integrations

If your WordPress site features a social sharing plugin or other social media integrations, it’s important to check them to ensure they are linking to the appropriate social media accounts.

Once you have completed this checklist, your new WordPress website is ready to publish.

Partner with Hostdedi for Managed WordPress Hosting

WordPress is one of the most user-friendly CMS platforms out there, which makes it a great choice for individuals or businesses who are looking to launch their first site. Featuring a wide range of themes, plugins, and an easy setup process, WordPress makes it possible for anyone to create and run a functioning website without needing advancing coding or web design skills.

Interested in getting even more out of your new WordPress site? With fully managed WordPress hosting plans from Hostdedi, you gain access to a scalable, secure, and fast hosting solution. With Hostdedi, you receive 24/7 WordPress support from a team of experts, always-on security monitoring, and no overage fees, traffic limits, or metered pageviews.

Explore how you can build and run a better WordPress site with Hostdedi today.

Check out our fully managed WordPress hosting plans to get started.

Related WordPress Resources

· What is the WP-Admin Dashboard? Top 11 Features

· How to Customize a WordPress Theme

· Website Builders vs. WordPress: Which One Works Best?

· Shared Hosting vs. WordPress Hosting: What’s the Difference?

· Is WordPress Secure?

Source link

How to Use WordPress Gutenberg Blocks

WordPress is the most popular Content Management System (CMS) in the world. Simply put, a CMS is an interface you use to control the layers of your website.

Each website consists of the front and backend. The frontend is the visual layer, which visitors see when they enter your site, and it is made up of various pages. The backend is the layer you work on to control how your website functions.

Plugins are a good example of backend components that help you add functionality to your website, whether it be security, design, media, and more.

One of the most important types of plugins is page builders. Page builders have drag and drop features that let users see changes in real time. Unfortunately, page builders can add weight to your website because they still use code even if you cannot see it. Weight slows down your website, and that sabotages your search engine ranking.

Having a website that uses clean code, is lightweight, and loads super fast is really important and is now a ranking factor for search engines. If you want to rank at the top of search results, you need to have a site that makes it easy for you to do these things.

The Gutenberg Block Editor

In November 2018, WordPress introduced a new block editor called Gutenberg.

Gutenberg helps you build your websites visually, dragging and dropping, just like page builder plugins. However, it’s not a third-party add-on. It is inbuilt in the core of WordPress itself. It uses clean code, is lightweight, and is super fast. This way, Gutenberg allows you to be search engine friendly. Gutenberg makes it very easy for complete beginners and experts alike to make super-fast websites so they can rank higher organically.

The compositor is called a “block editor” because the content is categorized into “blocks.” Blocks are a handy tool to help you build your site. They help you insert, edit, design, and rearrange multimedia content without having to write custom code. This way, you can focus on creating engaging and quality content without having to worry about code.

Blocks are very flexible, and they allow you to be creative and build your own brand design. One of the best features is the “custom blocks” option which you can use to create unique features that go with your brand aesthetic. Not having to be limited to pre-designed themes and features is creatively liberating.

Gutenberg is More Than an Editor

Gutenberg is revolutionizing the way pages, posts, and products are created, giving WordPress a significant advantage over other CMS options.

Despite this, Gutenberg is a controversial change. Some people think that it is a necessary change, while others prefer the way they have always done things. However, it is beyond doubt that Gutenberg is not simply a new editor. It opens up many possibilities for exciting developments in WordPress.

How to Use the Gutenberg Block Editor

Now that you understand the difference between the Gutenberg block editor and classic WordPress page builders, let’s learn more about how to use Gutenberg. This way, you can see firsthand if the Gutenberg block editor is the right thing for you.

Related reading: A Real-World Guide to Using Gutenberg

How to Add Content in Gutenberg

If you want to add a page title, you can simply type in the “add title” section. After that, you can start adding content to your page by typing in the white space below or by adding a block. We have put together a Gutenberg block tutorial to help you do just that.

After you have done that, you have officially started to design your post or page. Editing and moving the content you add is super easy if you use Gutenberg blocks.

Adding Blocks in Gutenberg

As we mentioned before, the new WordPress editor is called a “block editor” because all content here is divided into blocks. Gutenberg has many types of blocks for whatever kind of content or multimedia you want to use.

You can add a block simply by clicking on the plus sign in the white space or in the top left corner. When you click on it, Gutenberg will offer you a few types of blocks you can add.

There are more than 50 types of blocks from which you can choose. By clicking “browse all,” you can look at all the different types of blocks and choose the best one for the task at hand. There are particular types of Gutenberg blocks for any kind of content, including text, media, design, themes, and embeds.

Editing Blocks in Gutenberg

After you pick your ideal block, follow its instructions to create your content in that block. You can repeat this process many times and add as many blocks as you need.

You can edit any block by selecting it and then viewing the settings for that block. When you choose a block, some settings will appear right above it. You can use the arrows to rearrange the blocks, or press and hold the dots to drag the block to your desired location.

Gutenberg also allows you to save a block as a “reusable block.” By using the Advanced Custom Fields plugin, you can build reusable blocks, which can be used through Gutenberg. This is important if you create designs that you will reuse again because you won’t have to redesign things from scratch, and it will save you time. You can also use different plugins to add section blocks.

A WordPress Gutenberg section block is a valuable feature that allows you to organize multiple blocks inside one section. Any standard or custom Gutenberg blocks can be added to a section, which can then be utilized as a whole block.

How to Publish a Post on WordPress with Gutenberg

Once you are done editing, you have to publish or make your post go live on your website. You can start with the publishing process by clicking on the “publish” button at the top right corner of your Gutenberg page. After clicking on the publish button, there will appear a few options you can alter to your liking.

Visibility settings help you control and restrict who can view your content. You can also schedule posts to go live at a specific date or time. This way, you don’t have to manually push the publish button whenever you want your post to go live. Adding tags is also recommended because they can help viewers find your content.

Before you go ahead and publish your post, Gutenberg allows you to preview how it will look on different screens like desktop, tablet, and mobile.

When you make sure that everything looks great, you are ready to publish your content.

Now You Know

The new WordPress Gutenberg block editor is revolutionizing the way pages, posts, and products are created. With Gutenberg, you can visually design your website without knowing how to code. Now you know the basics of Gutenberg, how to make a post, and how to publish it.

Want to try to use the Gutenberg block editor? Power your website with a professional web host designed for WordPress.

Check out our fully managed WordPress hosting plans to get started today.

Related Resources

Source link