CAll Us: +1 888-999-8231 Submit Ticket

How to Design and Run A Customer Loyalty Program on WooCommerce

In today’s competitive ecommerce marketplace, every business is competing on a global scale for the same customers. Acquiring new customers tends to be 5 – 10 times more expensive than simply retaining existing customers. In a highly competitive ecommerce environment, improving your customer retention percentage can have a big impact on your business. In fact, according to HubSpot, a 5% increase in customer retention can increase revenues by 25% to over 95%!

There are many ways to address retention, but one of the best opportunities that’s proven to work is to implement a customer loyalty program. When you reward your customers for coming back, you’ll create habit and brand loyalty that will serve your business in the long run.

9 Ecommerce Optimization Tips for Fast & Effective Sites >>

What is a Customer Loyalty Program?

A customer loyalty program is a reward-based system that companies design and run to retain their existing customers. They can be rewarded with points, discounts, and/or exclusive offers only for them.This is a great way to engage customers in your business and encourage them to spend more money by giving them discounts after placing their first order. It is a win-win situation – your customers get extra discounts and develop a closer relationship with your brand, and your business makes sales that perhaps would not have happened otherwise. There are many types of loyalty programs used in ecommerce -here are some that have proven out:

Point-Based Loyalty Programs

The customer loyalty program consumers are the most familiar is the point-based loyalty program. For each purchase, customers are awarded points. After they earn a certain number points, they can redeem these points for a wide variety of rewards, from discounts to free gifts or access to special sales. One of the most well-known point-based loyalty programs is Starbucks’ Stars program which integrates points,sales, and a membership card to generate ongoing revenue from existing customers.

Customer loyalty programs don’t have to be used alone. In fact, they are often the most successful when used together. For example, the Starbucks Gold Card program provides users with an even stronger elite status as it works in-tandem with the Starbucks Stars which is a tiered loyalty program.

Tiered Loyalty Programs

A tiered loyalty program is a status-based reward system in which you will get rewarded for moving up among tiers after spending a cumulative amount associated with it. The rewards will get better and better with each tier. Tiered loyalty programs grab your customer’s attention and motivates them to associate recurring business with you in order to gain rewards and accomplishment. The tiered loyalty program that most people are familiar with are travel rewards: hotel points, airline points, and more.These programs work to retain brand loyalty in a competitive industry by making it worthwhile to pick a brand and stick with it.

Subscription-Based Loyalty Programs

In this type of loyalty program, companies actually sell a low-cost subscription to their customers. These subscriptions can be monthly or yearly with an upfront fee to enjoy additional perks – usually discounts -as a subscriber. This type of loyalty program banks on customers signing up with the intention of saving money in the long run. While customers reap the rewards of saving dollars, the subscription supports all the work you’ve done to acquire them, keeping them coming back more frequently and longer, as well as spending more over their entire duration of being your customer.

Creating a Customer Loyalty Program On WooCommerce

One of the most well-known benefits of WooCommerce is its extendability. Creating customer loyalty programs is no exception — designing a unique loyalty program for your business is easy and affordable thanks to the flexibility of WooCommerce.

To start, you’ll need to pick a reward program plugin. There are many plugins available. For this example, I’ll walk you through setting up a loyalty program using WooCommerce’s official extension called Points and Rewards.

Note that you can always try a different plugin. Other options on the market include:

No matter which plugin you use, the steps to stand up your loyalty program will be similar. Here are the basic steps for implementation:

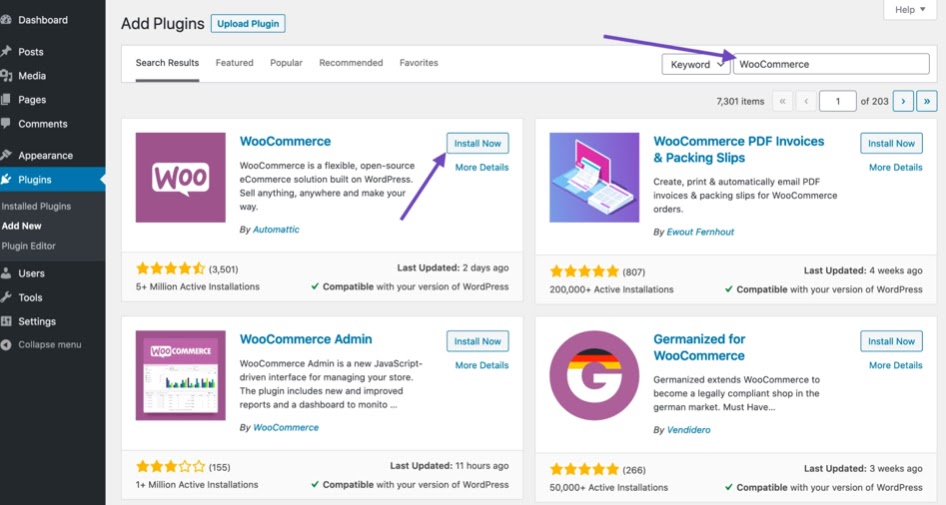
Step 1 – Download the Plugin You’ve Selected

First, visit the official website of the plugin you’ve chosen. Select your desired plan according to your business requirements and follow along to complete the signup process. After downloading the plugin successfully, you have to install the plugin on your WooCommerce website. For this, open your WordPress dashboard and click on Plugins from the left menu bar. Click on Add New Plugin. In the Add Plugins section, search for your selected plugin by using the search bar on your WordPress dashboard screen’s right top side. Click on Install Now to install that plugin. After installing the plugin successfully. Click on the Activate button. Put your purchased license key in there to activate the plugin.

Step 2 – Enable the Loyalty Program Feature

After activating the plugin successfully, the next step is to enable the loyalty program feature in WooCommerce. If you choose to use the official WooCommerce extension, you can navigate to WooCommerce > Points & Rewards > Settings from the WordPress dashboard.

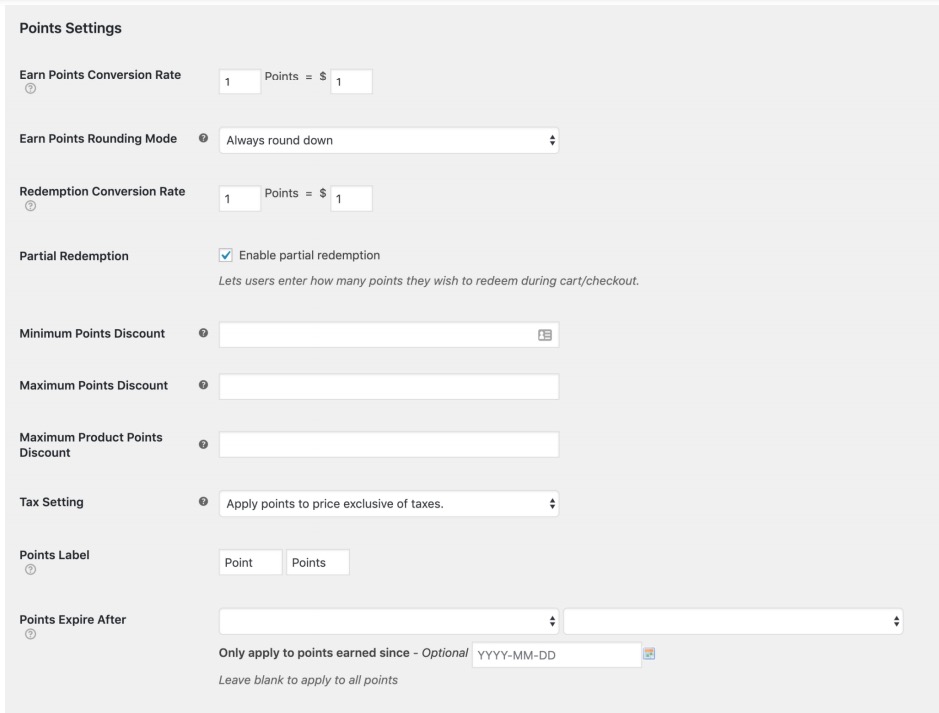
Step 3 – Set the Point Values and Thresholds

Once you have found your screen, it’s time to do the most important part: actually designing your program.

This step is a bit tricky and important as you will have to determine how your point system will work to give rewards to customers. There are two important concepts to understand: (1) the price to point earned ratio and; (2) points to price redeemed ratio. In the price to points earned ratio, you will have to set a value of points that customers will get after spending each dollar on your website. For example, if you set the value to one, then whenever a customer spends 1 dollar on your website, he/she will get rewarded with 1 point. And the points to price redeemed ratio means how much each point will be worth in terms of money. For example, if you set this value to 1, then each point will be equal to one dollar.

You can see the full breakdown of what every form item on this settings page will do by looking at the WooCommerce Points and Rewards documentation. Set these values and points, and keep an eye on them. You may need to tweak if you’re not seeing the results you were planning for.

Step 4 – Customize Your Loyalty Program Messages

After setting up the loyalty program features, the next step is to customize your product, checkout and cart messages. You can edit the messages and change them as needed on these screens:

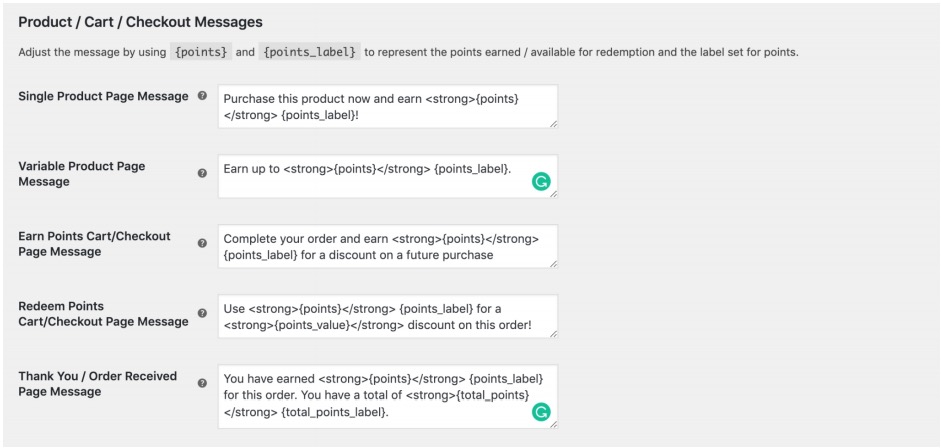
Don’t forget to customize your thank you message. A personalized thank you goes a long way in making customers feel special which helps with the goal of retention.

Step 5 – Decide What Else Customers Can Earn Points For

In this step, you’ll need to decide what actions will allow your customers to earn points. They can earn points for more than purchases – for example, you can also reward your customers with points for commenting on your website or even for logging in.

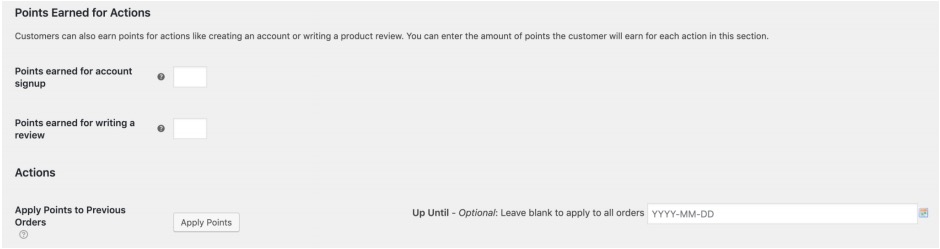
These types of actions and settings can be configured on the same screen. You will have multiple options for actions that earn points. Select the options that make sense for your business, and finally, save your changes.

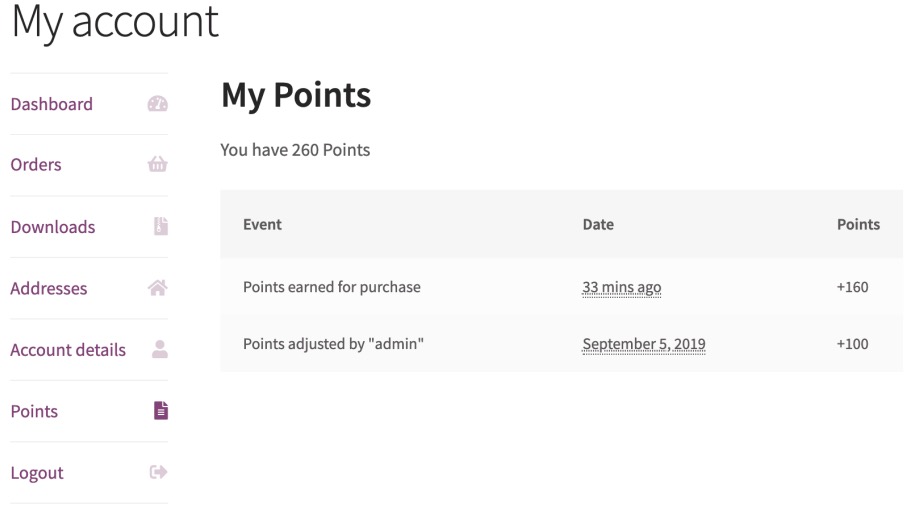
Step 6 – Test Your WooCommerce Automated Customer Accounts with Loyalty Programs

Naturally, you will want your customers to have a dashboard in which they can view how many points they have, and what they can get for those points. Thankfully, the Points and Rewards program does that for you automatically. Your customers will see their loyalty points when they log into My Account on your WooCommerce store.

And that’s all there is to it! With WooCommerce, a plugin, and no code required, you can design and run a successful customer loyalty program for your brand. And when you’re a Managed WooCommerce customer with Hostdedi, if you have questions about how to make WooCommerce work, or how to implement business-forward strategies like this, our WooCommerce experts are here to help any day, any hour.

Source link

How to Find Out Where Your Server is Located

When a website is hosted, it’s actually being stored on a server. Your hosting provider will likely have servers spread across the globe, but which server your website is located on is something you should be aware of. 

No matter who your hosting provider is, the location of the server that your site is physically hosted on can have an effect on the delivery of your website. In turn, that can have an effect on your visitors and ranking.

In this article, we’ll talk you through why your server location matters and how you can find out where your server is located.

Why Does It Matter Where My Server Is Located?

The location of your server can have an effect on your website in a couple of ways. We’ll go over each of those ways now.

1. Server Location Can Have an Impact on Website Speed and Latency

No matter what type of website you have, it’s important to ensure that it loads fast. In short, if your server is far away, your website will be slower. The more distance there is between a domain visitor and the domain’s server, the longer it will take for data to be returned to the browser. That in itself can be detrimental to success.

Studies show that people will only wait for a couple of seconds for a website to load. Any longer than that and you’re likely to lose visitors — and potentially money. 

For that reason, it’s important to ensure that your server is located close to your target audience. Doing that alone will ensure that your website loads faster, but there are other ways you can optimize your website to increase page speed, too.

2. The Location of the Server Can Affect SEO

You may think of SEO as just keywords and great titles, but there’s more to it than that. Your hosting server location can have an effect on SEO, too. 

Hosting your website in the same location as your target audience can improve your SEO ranking tremendously. For example, you should have a U.S. IP address for a U.S. business. 

Richard Baxter, the founder of Builtvisible.com, conducted his own test back in 2015 by changing his hosting server from his location, the UK, to a U.S server. By doing so, he noted a significant change in SEO ranking, with a drop in search results provided for the UK audience, but improving in the U.S.

So, by ensuring that your website is delivered from a server geographically close to your target audience, you can ensure that your customers are served as quickly as possible.

How Do I Find the Location of My Website’s Server?

Before you can find out where your server is located, you first need to find out what your website’s IP address is. The easiest way to do that is by using the command prompt (CMD), but there are also apps that can help you. Alternatively, you can simply find the IP address in the Hostdedi customer portal for your site. 

We’ll show you how to find your website’s IP address using the command prompt.

How to Find Your Website’s IP Address

1. Open the Command Prompt

Press the Windows Key and “R” to open the Run box. Now type “cmd” into the Run box and press Enter.

2. Type “Tracert” and the Website’s Address into the Command Prompt

Now type “tracert” followed by the website’s URL into the Command Prompt box and press Enter.

3. Note the IP Address Next to the Website’s URL

You will see an IP address next to the website’s URL on the line that says “Tracing route to.” That is the website’s IP address, and you can use it in the next section to find your server location.

A more simple method is searching your website URL on whatsmydns.net.

How to Find the Location of the Website’s IP Address

Now that you have your website’s IP address, you can use an IP tracer, such as the one at ip-address.com, to find out the location of the IP address.

Simply paste the IP address into the search bar, and press Enter.

2. Find the Country Location on the Information Page

Your search will return information on the IP address. Look for the country location.

How Can I Find My Visitors’ Location?

Now you know that hosting your website in the same location as your visitors will help performance greatly. But how can you find out where your audience is if you’re not a local business and don’t have a particular audience?
Thankfully, with the aid of tools like Google Analytics, you can easily track the geolocation of your visitors.

You should note where the majority of your traffic is coming from and ensure that your website is hosted there. It may cost you more to host in certain areas, but you shouldn’t cheap out on customer satisfaction as it will cost you in the long run anyway.

But what if you have visitors from multiple locations? How can you ensure your website performs at its best for everybody? That’s where a content delivery network (CDN) comes in.

What Is a Content Delivery Network (CDN)?

Content delivery networks, or CDNs, are an excellent service to invest in if you are targeting a global audience or your audience falls into many different locations. 

A CDN basically has a large number of data centers that are distributed around the globe. Those data centers work together and ensure that the content requested is delivered fast. 

When you use a CDN, it stores a copy of your website on its servers. When someone visits your website, it can then load from their nearest data center, thus reducing load times but maintaining quality throughout.

So, if you have multiple visitor locations, using a CDN, can help you cater to all of them equally.

Conclusion

We hope this article has helped you understand how to find your website’s IP address and where your server is located, as well as what impact the server location can have on your website.

Building and hosting a website is one thing, but making sure it loads fast is another. To do that, your web hosting server should be in the same location as your target audience. Doing so will reduce the distance between your audience and the server it needs to load from. 

Your audience is the key to a successful business, so putting them first is a no-brainer. On top of that, hosting your website in the correct location can boost your website’s SEO ranking.

Using tools like Google Analytics can help you narrow down your target audience, and if you need to serve multiple locations, a content delivery network (CDN) can work wonders.

If you still find that your website is slow, there may be other things slowing down your website.

What’s your experience with your website’s server location? Has it impacted your website’s success? Have you used a content delivery network? Let us know in the comment section, and thank you for reading.

Source link

WooCommerce Tutorial [2021]: How to Set Up Your WooCommerce Store in 5 Steps

There are over 2.3 million ecommerce stores hosted on the WooCommerce platform, and for good reason. WooCommerce is a free WordPress plugin that makes creating your own store quick and easy. WooCommerce currently powers over 7% of all ecommerce on the web and over 22% of the top 1 million online stores. With numbers like these, it’s hard to ignore the impact WooCommerce can have on your business.

What is WooCommerce? How It Works and 10 Reasons to Choose WooCommerce

With Hostdedi, WooCommerce solutions combine great functionality, an intuitive interface, and a powerful managed hosting platform to provide merchants with an ecommerce foundation that drives growth.

In previous posts, we’ve explored the top reasons for choosing WooCommerce for your online store, highlighting the flexibility, compatibility, and easy access of this plugin. However, the question remains: How can you set up your WooCommerce store to start selling quickly and effectively?

In this WooCommerce tutorial we’ll take you through the entire process of getting your store set up: from ordering your managed WooCommerce solution with Hostdedi to creating your first product and customizing your storefront’s look and feel. By the end, you’ll have a fully operational storefront that’s bringing in revenue and attracting customers.

9 Ecommerce Optimization Tips for Fast & Effective Sites >>

What You Need:

  • A hosted WordPress or WooCommerce solution
  • An active internet connection (unless you’re going to be testing on a local account)
  • Around 20 minutes of your time
  • A fiery passion for ecommerce (optional)

Step 1: Ordering a Managed WooCommerce Solution

What’s a WooCommerce store without a hosting platform? To get started you’ll need a strong foundation to build your WooCommerce store on as your hosting provider will help dictate the speed, security, and scalability of your store, and have a direct impact on the support you can receive.

There are a number of different hosting solutions available to merchants and freelancers. However, we recommend opting for a WooCommerce cloud solution. Start by visiting our WooCommerce managed hosting page, and selecting the right size solution for your needs.

When selecting a managed WooCommerce solution, there are a number of factors to consider to select the right size for you. The most important of these factors is the number of users that visit your store at any one time. As a hosting provider, we can let you in on a little secret: hosts often grade cloud solutions based on the number of PHP workers they can support, which refers to the number of concurrent users who can perform an action on your site at any one time. Learn more about what PHP workers are and how they affect your site’s performance. It’s important to note that the information in this WooCommerce Tutorial will apply to your setup process, regardless of the solution size you choose.

Not sure what size is right for your store? Talk it over with a member of the Hostdedi team. We’ll provide advice on sizing, integrations, and anything else you need to know.

If this is your first storefront then we recommend opting for a smaller plan. A smaller plan will help you to get started and once you start to see more traffic, you can instantly upgrade your plan in your Client Portal with just a click.

Once you’ve completed this stage, you’ll be able to log into your Client Portal and access your WooCommerce admin panel. From there, the first thing you’ll need to do is set up your store’s main properties with the WooCommerce setup wizard.

For WooCommerce setup documentation regarding site migration, visit our Knowledge Base to learn more.

Step 2: The WooCommerce Setup Wizard

How to start the WooCommerce Setup Wizard

Once you’ve installed and activated WooCommerce, you’ll need to complete a short WooCommerce setup wizard. To do this, locate the left hand panel and find WooCommerce. Click it. If WooCommerce isn’t present then refresh the page and it should appear.

After you’ve navigated to the WooCommerce page, you’ll find a button under the page title called Run the Setup Wizard. Click this and prepare to let WooCommerce know everything you want your store to be (almost).

Remember, everything you set throughout this WooCommerce setup process can be changed at a later date. WooCommerce is an incredibly flexible solution for merchants and it’s almost impossible to get locked into any one particular solution.

Begin Your WooCommerce Store Setup

WooCommerce Setup Wizard basic info

The first group of information we need to let WooCommerce know is where we are, who we are, what type of product we’re selling, and what type of currency we’ll be primarily using for transactions. Don’t worry if you have multiple currencies you’ll be able to update that with a plugin, which we’ll cover later. For now, opt for your local currency.

The information entered at this stage in the setup process doesn’t have to be entirely accurate, although it will prevent revisiting setup at a later date if it is. Once you’re finished, click Continue to be taken to the Payment page (for configuring how people will be paying you).

Set up WooCommerce Payments

WooCommerce Payment Setup

Payment gateways are the third-party processors that allow you to accept payments online. These are essential to your online store, and you’ll need to set them up right away. WooCommerce offers some powerful and flexible payment gateway options by default. Both Stripe and PayPal allow you to accept credit cards and PayPal orders. They also sync well with your external accounts.

However, Stripe and PayPal aren’t the right solutions for everyone. Depending on whether you’re already used to an alternate payment gateway or you don’t like the transaction fees of the default, there are several alternatives available.

Cost is going to be an important consideration with regard to your payment gateway. Some SaaS platforms, which attract merchants with low monthly subscriptions, quickly become much more expensive once you add costly transaction fees to the mix.

WooCommerce does not, by default, charge transaction fees. From a WooCommerce pricing perspective, this often makes it more cost-effective than SaaS alternatives.

If you decide to change from the default payment gateways, ensure that you research transaction fees, security, and support. There are 100+ payment gateway options available as WooCommerce extensions each with its own set of conditions and features.

IIf you’re unsure on which payment gateway option to choose, then we recommend first-time store owners use Stripe and PayPal. Both are industry-leading businesses that guarantee payment security for your customers.

It’s important to remember that while payment gateways will collect some useful data, you may want to consider adding sales plugins to really dive into your store’s analytics. But we’ll talk more on how to set up WooCommerce sales plugins a bit later. For now, let’s talk shipping.

Setting up Shipping

WooCommerce Shipping Setup Options

In addition to payment gateways, another essential step in our WooCommerce tutorial is shipping. Once you’ve chosen your payment gateway, it’s now time to set up your shipping information. Here, you’re going to need to input your shipping zones to help calculate shipping rates. If you’re a beginner, we advise leaving these as their default options.

Remember, WooCommerce shipping options can all be edited at a later date or expanded upon with additional plugins if you need.

You’ll also need to input the weight and dimension units you’re using. We recommend going with the most frequently used unit in your primary geographic location. For instance, if you are running a store in the US, oz and inches are likely the best fit. If, however, you’re running a store in the UK, it’s better to opt for kg and cm. Metric or Imperial, you decide.

Once you’ve finished with this screen, again, click Continue.

Optional Plugins and Additional Resources

WooCommerce Recommended extensions
The final stage of the WooCommerce setup includes installing some optional plugins to install if you think they may fit your store. We’ll leave this up to your better judgment on whether you think they are suitable. If you’re unsure, we recommend getting in touch with a developer to see how these plugins will benefit you.

Once you’ve finished, you can then activate your WooCommerce install at the next screen and you’re ready to move on to Step 3 of our WooCommerce Tutorial.

Step 3: Creating Your First Product

What use is an ecommerce store without products? While you may have your products ready to go, whether they’re digital or tangible, you’ve yet to upload them to your online store.

This step will help you to create your first product on your WooCommerce store so that it’s ready to go live.

We’ll be covering the areas of:

  • Name
  • Description
  • Pictures
  • SKU
  • Inventory
  • Shipping costs

Remember, WooCommerce has a lot of added functionality over just plain WordPress. This functionality has been designed specifically for the purposes of ecommerce. In order to master how to use WooCommerce, we’re going to want to use as much of this as possible.

Before you get started with this step, there are a few things you’re going to need:

  • Some product photography – WooCommerce has a great blog post on how to create inexpensive product photography. Alternatively, you can use photos of products from suppliers.
  • Content and copy for product descriptions and names.
  • An idea of what SKUs you’re going to use (if you’re running a big store).

Now that you’ve gotten all of that sorted, head to WooCommerce down the left sidebar => Products => New Product.

Adding a New Product setup
This top section of the page will be very familiar to WordPress users as it’s essentially the WordPress WYSIWYG editor.

Entering Information

You can enter your product name at the top and a product description at the bottom. Note that the product description here will be the long product description located below the product — not the short description located next to the image.
WooCommerce Product Page Example Layout
Once you’ve finished entering in your content, you’re ready to move onto some of WooCommerce’s finer product setup features.
WooCommerce Product Setup, product data
Advanced product data gives you a chance to select the price for your item, set inventory, organize its SKU, and more.

Along the top, you’ll notice two tick boxes for Virtual and Downloadable. If you are selling items that don’t require shipping, you can tick these and WooCommerce will ignore shipping rates.
WooCommerce short product description
The “Product short description” box is where you can set the short description as shown above. It’s advisable to keep this section short as it will act as one of the first things a prospective buyer will see. Keep it catchy and fun – product specifics are better suited for the long description section.

Now that you’ve established the basics of your first product in your online store, let’s move on to Step 4 of our WooCommerce Tutorial.

The next step for adding your first WooCommerce product to your catalog is including images and categories. To do this, you just need to head to the right side of your WYSIWYG-like WooCommerce editor.
Product Categories and Tags in WooCommerce
Here you’ll find your existing category options and have the opportunity to add new ones if you wish. Using categories is incredibly helpful for aiding customers in their conversion journey and making sure they enjoy an easy and intuitive user experience, as they allow you to group similar items together. Including common tags on your products can also help with your customers find similar groupings of products. Tags can also help boost your site’s SEO performance and add another layer of navigation for your customers. We highly recommend you use both — especially if you’re running a large store.
Adding product images in WooCommerce
Once you’ve added applicable categories and tags, you’re ready to upload images of your product. As one of the most significant page elements involved in affecting conversions, your product photography should be high quality. WooCommerce has put together a great guide on how to go about improving product photography for your ecommerce store.

To add your primary product image, scroll to where it says Product Image and upload and select your image. Below this, you can add additional images to be featured in the product gallery. The ability to add multiple photos is great, as you can exhibit different aspects of your item. In creating a page for the incredible Hostdedi swag notebook, we’ve shown what it looks like from the front in the product image, and then a look at the inside in the product gallery.

Step 5: Exploring WooCommerce Themes

So, you’ve set up WooCommerce, you’ve created your first products, and you’re ready to really take your online store to the next level. The final step in our WooCommerce tutorial takes a look at using themes to your advantage.

It’s important to customize the look and feel of your site so it stands out before taking your WooCommerce store live. To do this, you’re going to want to explore the best WooCommerce themes already available — or possibly customize your own.

This guide will not go into how to create your own WooCommerce themes – that’s for another article – but we will direct you to where you can go to change your theme settings and choose from a selection of pre-built themes.

The Hostdedi WooCommerce Site
To do this, head to Appearance down the left side of your WooCommerce dashboard. From here, you can select Themes to look at a range of different pre-built WooCommerce themes, or you can select customize to change elements on your site easily. These customizations include repeat elements like site titles, logos, and more. You can also take a look at Plugins, below Appearance, for a list of extensions you can add to your WooCommerce store to expand functionality.

Complete Your WooCommerce Setup With the Right Hosting Foundation

When setting up your WooCommerce store, the last thing you want is to experience site slowdowns and configuration issues. While there are several ways to speed up your WooCommerce store, the most reliable solution is choosing the right hosting foundation.

Built on a platform trusted by experts, StoreBuilder by Hostdedi allows you to reap all the benefit of our Managed WordPress and WooCommerce without the complexity.

No coding experience? No problem.

There’s no reason to start from scratch or feel overwhelmed by a blank screen. Just answer a few questions, and in minutes, you’ll have your own online store with an intuitive, easy-to-navigate homepage that’s optimized to convert your visitors to customers. Check it out!

Source link

Convert to WebP images on WordPress

One of the easiest ways to improve your site loading time is to serve smaller images using an image format that handles image compression better. One of the newer image formats for dealing with site optimization is WebP. The WebP image format typically will produce an image that is 30% smaller than the JPG version.

There are a number of plugins that will handle WebP image conversion for your site.

Jetpack for WordPress

JetPack

Jetpack is a plugin with a service that will handle WebP image conversion on the fly for all images on your site for users on your website using browsers that support the WebP image format.

EWWW WordPress image optimizer

EWWW Image Optimizer

EWWW Image Optimizer is a plugin that has a large number of features and optimizes all site images to WebP using the bulk optimizer. If you are using the Cache Enabler plugin for a full-page cache you can use the serve WebP feature that it includes.

WebP image conversion

Imagify

The Imagify plugin includes a service that deals with WebP image conversion. Imagify includes the option to keep your original images before being optimized as well as keeping a separate image optimized version of the WebP image version.

WordPress WebP Image optimizer

ShortPixel

The ShortPixel plugin includes a service that will optimize site images and WebP image conversion. ShortPixel also has on-the-fly image conversion using their CDN. ShortPixel also includes integration in the Autoptimize plugin for the ShortPixel CDN supporting on-the-fly image conversion for WebP and AVIF image formats.

WordPress bulk image conversion

WebP Express

The last plugin that is going to be covered is Webp Express. The WebP Express plugin will allow you to bulk convert site images to the WebP image format and then serve those out on the site without much setup.

If you care about having a fast site for your site users then being able to serve out a WebP image version will improve your site load time.

Source link

SEO Trends in 2021: The Future of SEO, What Matters Most and Why

SEO, or search engine optimization, is a common practice by website designers and owners to help boost a website’s ranking in Google’s search engine results pages (SERPs). 

Common SEO trends include keyword optimization, writing compelling titles, and building backlinks. However, Google’s algorithm is constantly changing and evolving — so your SEO practices need to change, too.

In 2021, intelligent website optimization will likely involve a few new techniques. Today, we’ll be discussing the future of SEO so you can optimize your website the smart way.

What we’ll discuss:

  • An overview of SEO trends in 2021.
  • Four SEO trends to watch.

The Future of SEO in 2021: An Overview

SEO best practices are constantly shifting to keep up with Google’s changing algorithms. When Google changes how it analyzes websites for its SERPs, your website’s ranking can change, too.

That’s why it’s important to stay up to date with the latest SEO trends to make sure you don’t get left behind when it comes to website optimization. 

According to SEO experts at Moz, the future of SEO will consist of fine-tuning old-school SEO best practices — like featured snippets, meta descriptions, and title tags — with an additional focus on technical SEO

In particular, Core Web Vitals, voice search, and mobile-first indexing will play a big part in the SEO landscape in 2021 — but we’ll get into that later on.

In general, SEO best practices remain the same as ever, but you can never do too much of a good thing. Marketers should focus on producing high-quality digital marketing content backed up with smart, SEO-friendly titles and descriptions to increase clicks per Google search.

Let’s get into a little more detail. 

Looking to improve your SEO strategy by getting a little more specific? Here are four of the biggest SEO trends of 2021.

Mobile SEO

Mobile SEO

Mobile SEO is the practice of optimizing your website for mobile devices. More people now use their mobile devices to browse the web. In fact,  as of 2021, mobile internet traffic accounts for 54.18% of all internet traffic around the world.

Spend some time perfecting your website’s mobile-friendliness by ensuring your website offers an exceptional user experience on mobile.

As Shelly Fagin, SEO Director of Highly Searched, told Search Engine Journal, 2021 will see a shift in how Google analyzes your website. “Google will essentially be ignoring your desktop site,” she said. “Your mobile site will determine your rankings.” 

This shift is known as mobile-first indexing. If your website optimization has been primarily desktop-focused, this is the year to prioritize your mobile version. 

User Experience and Core Web Vitals 

Core Web Vitals will become ranking signals, which Google announced will launch in June 2021. As the future of SEO, these signals are designed to improve the user experience of browsing the internet. Core Web Vitals will improve how Google crawlers analyze your website’s page experience.

Google’s guidelines explain how it will rank websites based on their speed, responsiveness, and visual stability. Google will measure:

  • Largest Contentful Paint. This ranking factor measures loading time. A page speed of 2.5 seconds or faster will be given priority. 
  • First Input Delay. This measures how fast a webpage takes to start interacting with the user. This should take less than 100 milliseconds.
  • Cumulative Layout Shift. This measures the visual stability of your webpage. In other words, it measures whether elements on your webpage shift around unexpectedly.

Spend some time testing your Core Web Vitals to find out how you can improve your user experience to better suit Google’s new algorithm change.

Voice Search Optimization

Ok Google SEO

Voice search is quickly becoming the future of SEO. As of 2019, a third of Americans used voice search. Another study estimates that by 2025, 75% of homes in the U.S. will use smart speakers, which offer the voice search feature. 

Because voice search is increasingly common, digital marketers need to focus on website optimization for voice search queries. One major change that comes from voice search is the increasing popularity of longer keyword phrases.

Most people type short keywords into the Google search bar but prefer to ask Google long-form questions. 

According to SEMrush, FAQ pages are more commonly ranked in voice searches. This is because people often use voice search technology to ask questions. 

Start incorporating FAQs sections into your webpages and blog posts to improve your chances of appearing in voice search results pages.

Artificial Intelligence and RankBrain

Google announced the RankBrain algorithm in 2015. The machine learning AI algorithm helps make SERPs more relevant. It weeds out low-quality content and reduces bad user experiences.

To be competitive with your SEO in 2021, you’ll need to optimize for this AI algorithm to keep attracting organic traffic. As Knowmad explains, the RankBrain algorithm only impacted 15% of searches in 2015.

But as of 2021, it impacts every single search.

RankBrain is able to self-adjust in response to how users interact with results pages. For instance, RankBrain might test out an algorithm alteration that favors a certain type of keyword. If users respond positively, the change stays.

In other words, AI is constantly adjusting the RankBrain algorithm to ensure the best possible user experience. 

The main job of RankBrain is to understand a user’s search intent. Instead of simply looking at a webpage to see if it contains matching keywords to the user’s search term, it can understand what the user is trying to find with each organic search. 

For marketers, this means that content marketing with keyword stuffing is no longer sufficient. 

To succeed in website optimization for RankBrain in 2021, you’ll need high-quality content — including both short-form and long-form content with intelligent keyword research. This way, Google will understand what your content is all about and can accurately match it to what the user meant when they made their search.

Final Thoughts: The Future of SEO and Website Optimization in 2021

Great SEO begins with a great website. Hostdedi can help you build an optimized WordPress, WooCommerce, or Magento website complete.

We offer pre-installed plugins, expert support, and unlimited email accounts so your website can support your growing business.
Find out about our hosting plans and our various features to get started.

Source link

Making the Leap From WordPress to Ecommerce

WordPress can be an excellent platform for building a professional website, even if you’re someone without much experience. While on its own, WordPress doesn’t offer an ecommerce option, the WooCommerce plugin makes it easy to transform your WordPress website into an online store that’s intuitive and extremely flexible to work with.

Today, we’ll be taking you through a guide to transforming from a WordPress content site to a WooCommerce store so you can monetize your online presence without creating an entirely new website. We’ll also explain how to add WooCommerce to WordPress so you can get started.

Here’s what we’ll cover:

  • WordPress & WooCommerce: The Basics.  
  • The benefits of Starting Your Online Store on WooCommerce.
  • How to add WooCommerce to WordPress.

WordPress and WooCommerce: The Basics

WordPress is the most popular website builder in the world. In fact, it currently powers 41.1% of all websites, according to W3Techs

WordPress makes it straightforward to build a professional-looking content website with landing pages and a user-friendly blog. It’s simple to use whether you’re a beginner or an expert and is an open-source platform that offers a lot of free and innovative software to make your site whatever you want it to be.

And if/when you’re ready to grow, WooCommerce is an ecommerce plugin for WordPress. It makes creating and managing an online store simple, with reasonable levels of flexibility and several vital features such as inventory and tax management, secure payments, and shipping integration.

WooCommerce is the most popular and arguably best ecommerce plugin for WordPress, and its integration allows for you to include both great SEO value and ecommerce ability. For a business website run on WordPress, there’s no simpler way to start selling products quickly and easily.

How Does WooCommerce Work?

WooCommerce is a free WordPress plugin If you have a WordPress website, WooCommerce is easy to install — once it’s set up, you can start building web pages to sell your products.

WooCommerce has complete ecommerce functionality. It empowers you to add new products, product images, and product pages with short descriptions. 

It also lets you build shop pages with product galleries organized by product categories that you choose yourself. 

Finally, WooCommerce can help you build a secure, professional checkout page where you can take payments and arrange shipping.

9 Ecommerce Optimization Tips for Fast & Effective Sites >>

The Benefits of Starting Your Online Store on WooCommerce

While there are other options out there, WooCommerce is a great ecommerce solution for just about every business. That’s because…

  • It’s easy to build a professional WooCommerce store. 
  • Organizing and updating your products on the user dashboard is intuitive.
  • You can customize your online store with a WooCommerce theme — or when you host with Hostdedi, you can create a customized, unique storefront using our StoreBuilder feature.
  • WooCommerce can improve your website’s SEO.
  • You can use WooCommerce analytics to better understand your customers.
  • You can take advantage of a plethora of plugins to customize your store and bring your vision to life.

Intuitive User Experience

WooCommerce is easy to manage, even if it’s your first time using it. The plugin will create additional options in the side panel of your WordPress dashboard, where you can:

  • Manage your products.
  • Build product pages.
  • Manage pricing.
  • Edit shipping options.
  • Build your checkout pages.
  • Manage your payment gateways.
  • Track your online store’s success.

Because everything can be done within the intuitive dashboard, you don’t need to worry about coding or website building when using WordPress or WooCommerce.

Seamless WooCommerce and WordPress Themes

If you already have a WordPress site, you won’t need to make any dramatic changes to how your website looks. WooCommerce is designed to work with your WordPress theme and fit seamlessly into your current design.

Add woocommerce to wordpress

The default WooCommerce theme is the Storefront theme. This option can work for most businesses as it’s professional and clean. And while there are plenty of other free WooCommerce themes and templates to choose from, Managed WooCommerce from Hostdedi offers an Intelligence Engine in StoreBuilder. The Intelligence Engine uses your inputs to create a designed homepage that is specific to you and your industry. The benefit of designing a store with StoreBuilder is that your store won’t look like everyone else’s. 

Improved SEO

SEO makes a website more likely to rank in Google searches, which draws in organic traffic. 

With WooCommerce, your search rankings are likely to improve because the plugin is built with code that is SEO optimized. Plus, WordPress offers excellent plugins designed to help you with more advanced SEO optimization, such as Yoast and Jetpack

WooCommerce Analytics

Building your online store is only the first step on your road to success. Once you’ve listed and advertised your products, you’ll want to track your ecommerce analytics, product data, conversions, and leads. Analytics can help you determine what’s working on your website and what needs improvement. One of the best analytics tools for WooCommerce is Glew.io, which is automatically included in WooCommerce Managed Hosting from Hostdedi. 

WooCommerce Extensions and Plugins

WooCommerce can be as simple or as complicated as you want it to be. The basic version is straightforward and easy to use. But, if you want more add-ons and customization, the free plugin can be enhanced with a series of downloadable extensions. 

Here are just a few examples of useful WooCommerce add-ons:

  • OptinMonster helps you build popups and banners to guide customers through the sales journey on your website, which can increase your conversion rate.
  • Constant Contact empowers you to create automated email campaigns to turn leads into sales.
  • A range of payment extensions let you add new payment methods to your checkout page, including PayPal and Stripe.

How To Add WooCommerce to WordPress

Ready to set up WooCommerce? Here is a step-by-step tutorial on how to add WooCommerce to WordPress by installing the WooCommerce plugin

WordPress Ecommerce Plugin
  1. In your WordPress admin dashboard sidebar, head to Plugins > Add New
  2. You’ll arrive at the plugin page. Search for the WooCommerce plugin and click Install Now
  3. Click Activate Now, and the WooCommerce Setup Wizard will launch. 
  4. The WooCommerce Setup Wizard will take you through the rest of the plugin setup. 
  5. Once the plugin is fully installed, you should see new WooCommerce options in your WordPress dashboard

For an even more straightforward process to add WooCommerce to WordPress, check out Hostdedi’s new StoreBuilder, a WooCommerce solution to get your ecommerce site up and running in no time.

When You’re Ready to Make the Leap

WordPress and WooCommerce are designed to make the transition from content to commerce easy and rewarding. WooCommerce is an incredibly flexible platform that can get your online store up and running quickly while providing plenty of scalability for your store to grow with you as your online business evolves. 

To get your online store up and running even quicker, consider using StoreBuilder. Built on WooCommerce, StoreBuilder’s Intelligence Engine creates custom homepages that are optimized for your industry. It’s quick, simple, and there’s no coding required.

Get the best WooCommerce experience with fully managed hosting from Hostdedi. See why we have a 4.6 out of 5-star rating on Trustpilot.

Source link