CAll Us: +1 888-999-8231 Submit Ticket

Optimizing Your WooCommerce And Magento Product Pages

What’s the most important part of your Magento or WooCommerce eCommerce store? For my money, nothing is more important than product pages and the content on them. Product pages sell, and everything else on an eCommerce store except the cart is there to get people to the right product pages.

I’ve never done the experiment, but I think no one would argue that it would be possible to build a pair of identical eCommerce stores with identical products and make one much more successful than the other.

How? By building incredible product pages.

Too many eCommerce merchants take a “good enough” approach to their product pages, pulling copy and images from their suppliers without even checking to make sure the formatting is right. If you have thousands of products, automating product pages is understandable, but it’s a missed opportunity. If you want your product pages to sell, take the time to make them compelling.

What does an effective eCommerce product page look like?

Title

With most eCommerce applications, the product title appears in the blue text of Google search results and in the most prominent position of social media posts. Just like a headline in an article, the title of a product page can make all the difference to whether a shopper clicks or not.

Make product page titles concise, descriptive, and easily understood.

  • Concise means short and sweet: don’t try to cram the full product description into the title.
  • Descriptive means that the title conveys the essence of the product accurately: don’t use empty meaningless “creative” descriptions.
  • Easily understood means written in good English (or the appropriate language for your market). Don’t use stock numbers or technical product descriptions in the title.

Put on your SEO hat and include relevant keywords, but don’t go overboard.

Images / Video

Words can’t convey the essence of a product as powerfully as images or videos. Provide a range of images that look good and that accurately represent the product. By all means, include creative art shots, but also include well-lit closeups of the product on its own.

Optimized Product Descriptions

Product descriptions are where every store can afford to be original and unique. The descriptions are a canvas on which each store can paint a word picture of the product that will appeal to their specific market segment.

Address product descriptions to the people who buy the products. As a writer, I keep the mantra “know your audience” in mind whenever I write. Each sentence is written to convey a message to that audience. Product descriptions are the same.

Once again, pay attention to search engine optimization and keywords.

Reviews And Testimonials

Social proof works. People are more likely to make a purchase when they know other people have had positive experiences.

Branding

Titles, images, descriptions, reviews — these are concrete things. Branding is more ephemeral and difficult to pin down. What feeling do you want your store to create in its users? Do you want shoppers to think you’re edgy and convention defying, technical and geeky, lighthearted and playful, serious and thoughtful?

The brand you want to cultivate should guide every decision you make about product pages, from the design to the copy and the images.

A/B Testing

Without testing, there’s no way to know whether changes you make to product pages are effective. Nothing I’ve said so far matters more than testing. When you are considering a change, use a split testing solution like Magento’s or Nelio AB Testing For WooCommerce to make sure it’s as effective as you hope.

Most important of all, take the time to look at your product pages and ask yourself these questions.

  • Would I be influenced to make a purchase by this page?
  • Does this page reflect the values and image of the brand I am trying to build?
  • Does this page have all the information a shopper needs to make an informed decision?

If the answer to any of these questions is no, then it’s time to give your product pages some attention.

Posted in:
Magento, WooCommerce

Source link

What Is The Difference Between A Web Hosting Provider And A Domain Name Registrar?

New web hosting clients often find the distinction between a web hosting provider and a domain name registrar confusing. After all, a website has a name and it’s not much use without one. Shouldn’t paying for a website be the same as paying for its name? Why would giving a website a name be complicated at all?

In fact, although some web hosting providers do offer domain name registration services, they’re actually quite different and the organizations that manage each service are separate.


The TL;DR:

Web hosting providers connect your site to the internet and provide the server it runs on.
Domain name registrars reserve a domain name for use by your site.


What Is Web Hosting?

Web hosting provides a server (or part of a server) for a website’s files and database to be stored on. A server is just a powerful computer. Web hosting also provides the bandwidth that connects a site to the internet. Every computer that is connected to the Internet has an address — an IP number — that looks like this: “198.51.100.23”. It’s more or less like a phone number.

It wouldn’t be convenient for everyone who wants to visit your website to type in an IP number. They’re hard to remember, they’re in limited supply, and “nexcess.net” is nicer to look at than “208.69.120.21”.

So, we have domain names: a name that is easy for humans to understand. When you type a domain name into your browser, a Domain Name Server converts it into the associated IP address so that the servers and the routers on the internet know where to send your request.

The domain names are managed by a set of organizations that are not connected directly to web hosting providers.

Domain Name Registrars

When you need a domain name to use with your site, you go to a domain name registrar. These companies (which are sometimes web hosting providers too) will, for a small fee, reserve a domain name for you to use for a limited time.

The registrars don’t actually own the domain name registry, which has ultimate control over the domain names under a top-level domain like “.com”, or “.net” but we needn’t concern ourselves with that wrinkle here.

So what exactly do you get when you pay a domain name registrar? In a nutshell, you get an entry in the name servers of the top-level domain. Those entries mean only you can use the domain name. The records also point to a Domain Name Server, a server that holds all the domain name records for your domain.

That sounds complex, but the domain name records are really just like the contacts app on your phone, which has a list of names associated with a list of numbers. To find a person’s number, you look up a name.

In simplified terms, when someone puts your domain name in their browser, the browser asks the name server of the root domain (the .com bit) where to find the Domain Name Servers for that domain. The root name server tells the browser where to find your DNS server, which is often part of your web hosting. The browser then goes to your name server, which tells it the IP address of your website.

In reality, it’s more complicated than that, with layers of caching and hierarchies of name servers, but hopefully, you now have a better understanding of what happens when someone uses your site’s domain name and how domain name registrars are different to web hosting companies like Hostdedi.

Posted in:
Web Hosting Basics

Source link

Does A WordPress Site Need A Content Distribution Network?

does-a-wordpress-site-need-a-content-distribution-networkA content distribution network (CDN) can reduce the amount of work your WordPress server has to do and improve the performance of your site for visitors across the world.

Most of the resources on your WordPress hosting account’s server are used to respond to requests and generate dynamic content. But most of your server’s bandwidth is consumed by the delivery of static resources: resources that don’t change between users. Static resources include images, videos, JavaScript files, and CSS files, among others. Static resources are the biggest bandwidth hog for most sites; a single high-definition image can consume as much bandwidth as hundreds of pages of text, dynamically generated or otherwise.

Fortunately, static assets are the perfect candidate for caching. Once static assets are loaded by the browsers of your WordPress site’s visitors, they’re saved so that they don’t have to be loaded again the next time they’re included in a page. That makes the page faster the next time it loads, but it does nothing for the first load or for any page load after the static files have changed.

A content distribution network is a type of cache that sits somewhere between the browser’s cache and the on-server caches provided by plugins like WP Rocket or W3 Total Cache. A content distribution network is composed of servers in data centers around the world. The servers comprising a CDN are called edge nodes because they’re at the “edge” of the network.

When your WordPress site is hooked up to a CDN, its static assets are uploaded to the edge nodes. Most content distribution networks have edge nodes located near major population centers. The Hostdedi CDN has edge nodes right across the US, Europe, and Asia. When a user requests a page from your site, the static content is loaded from the nearest edge node, not from your WordPress site’s server.

Let’s say your WordPress site is based in our Southfield, Michigan, data center. A visitor from Sydney, Australia, requests a page from your site. Without the CDN, the images and scripts would have to take a 9000 mile trip from Southfield to Sydney. In a perfect world, data could make that trip in less than a tenth of a second, but we don’t live in a perfect world.

The data may pass through lots of routers, switches, and copper cables before it arrives at its destination. And it’s a two way trip: the request has to travel from Sydney to your server and the response from your server to Sydney. In many cases, the round trip time will be multiple seconds, which doesn’t lead to a positive web experience.

But if the static assets don’t have to come from your WordPress server in Southfield, the trip could be much shorter and faster. A CDN caches the static assets in a data center close to the user in Australia, perhaps just down the road in Sydney. The request is diverted to the nearest edge node, and the data delivered in fractions of a second.

A content distribution is essential if you want to offer international users and even users on the other side of the US a great experience on your WordPress site.

Many of Hostdedi’ WordPress hosting plans include a generous data allocation on our global content distribution network.

Posted in:
WooCommerce, WordPress

Source link

Manage WordPress Plugins For Optimal Security and Performance

Manage WordPress Plugins For Optimal Security And PerformanceThe plugin ecosystem is one of WordPress’s greatest strengths. Thousands of developers build and maintain a bewildering array of plugins with features that range from minor graphical tweaks to full-blown eCommerce stores. But the variety of plugins can introduce problems, especially if they aren’t managed properly. Plugins are of varying quality and usefulness.

Experienced WordPress site owners keep a close eye on the number of plugins they use, where they come from, and how well they’re developed. In my years as a WordPress user, I’ve discovered a few rules for dealing with plugins that help keep site secure, fast, and uncluttered.

Less Code Is Better

My first rule: use as many plugins as you need, but no more. There’s nothing wrong with using plugins to give a site the functionality it needs. Installing a lot of plugins doesn’t necessarily cause a problem, but leaving too many unnecessary plugins installed might.

Every plugin introduces code into your site, and, in general, the less code you can get away with the better.

The code needs to be executed, and that takes time. If a plugin collects data from the database, it runs queries. Many plugins introduce front-end elements that cause latency as they load and run on the user’s browser. The cumulative effect of these latencies can result in a sluggish experience for users. You shouldn’t be scared to incur a performance penalty if a plugin is genuinely useful, but if you’ve decided you don’t need the functionality, there’s no reason to keep the plugin installed.

Secondly, adding extra code to a site increases the likelihood of bugs and security vulnerabilities. Any plugin might introduce a security vulnerability. The risk is small if the plugins are kept up-to-date, but if you aren’t using the plugin, there’s no benefit to taking that risk.

In short, if your site doesn’t depend on a plugin, uninstall it. You lose nothing and may see security and performance benefits.

Take Care What You Install

As I’ve already said, installing plugins introduces new code into your site. That code has access to the database and to your users. You should think about the security implications of every plugin you install. Additionally, poorly coded plugins can introduce performance problems and break parts of a site.

Before installing a plugin, satisfy yourself that it is actively maintained, frequently updated, that a reliable developer created it, and that it is compatible with recent versions of WordPress. You should be able to find all of that information on the plugin repository or the developer’s site.

Update Your Plugins!

Finally, make sure you regularly update plugins. WordPress users who neglect to update WordPress are a major cause of hacked sites. Updates include security patches, so you should update even if you aren’t interested in new features.

In summary: take full advantage of the richness of the WordPress plugin ecosystem, but be careful what you install, remove plugins you aren’t using, and update plugins whenever a new version is released.

Posted in:
WordPress

Source link

Five Automation Tools Every Blogger Needs

Automation Tools, Blogger ToolsEvery writer I have ever met is a procrastinator. There’s something about sitting down in front of a blank screen and creating a piece of writing from nothing that sends the best of us running for the cat videos or cleaning supplies.

I like writing, but I’m not fond of dealing with all the little tasks that come along with being a blogger, so I automate anything remotely repetitive.

Over the years, I have built up a handy collection of automation tools, some of which I use dozens of times a day. They take care of small tasks like scheduling social media posts and filling in web forms so that I can focus on the work that really matters.

I’m a Mac user, so some of these tools are only available on the Mac, but the rest are web applications that anyone can use.

Keyboard Maestro 8

It’s hard to explain what Keyboard Maestro (KM) does because it does just about everything. If you can think of something you want to automate on your Mac, I’ll bet my dinner that Keyboard Maestro can do it.

At its most basic, KM carries out actions in response to triggers. Triggers can be hotkeys, typed strings of text, the time of day, joining a WiFi network, and many others. Actions — referred to as macros by KM — can be anything from inserting a text snippet to full GUI automation.

To get an idea of what KM can do, check out this video. I use it to fill in spreadsheets, set up my workspace, build invoices, convert files and upload them to Google Drive, automatically send various emails, and lots more.

Text ExpanderTextExpander is a snippet manager: it inserts snippets of text when you enter abbreviations. A simple example is inserting WordPress when I type “wwp” (which stops me getting the CamelCase wrong).

But TextExpander goes much further. Snippets can include custom fill-in fields, pop-up menus, dates, and times. Snippets can even be JavaScript or shell scripts, which gives advanced users unlimited snippet power.

TextExpander and Keyboard Maestro have some cross-over, and KM is a fine snippet tool, but TextExpander is slick enough to justify the extra expense.


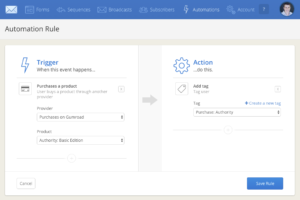
IFTTT and Zapier tie together web applications via their APIs. Both work on a “trigger” then “action” system. For example, I use Zapier to connect WordPress and (spoiler warning) Buffer. When I post to WordPress, Zapier receives the information about the article and uses it to schedule social media posts in Buffer.

Both Zapier and IFTTT are capable of connecting hundreds of applications, but I find that Zapier offers a more reliable experience.


BufferBuffer really needs no introduction: it’s been around long enough that every blogger I know uses it religiously. But, if you’re new to the game, Buffer is an excellent service for queuing social media posts. I typically queue up the day’s posts in advance, so I don’t have to risk opening Twitter and being sucked into its irresistible time sink.


ConvertKITFinally, ConvertKIT is a powerful email automation system built especially for bloggers. It provides forms for collecting emails, automated email sending with drag-and-drop sequencing, and solid subscriber segmenting.

Automation makes your computer work for you, rather than the other way around. If you spend any time engaged in repetitive tasks, use automation tools to get your computer to do them for you — that’s what it’s for.

Posted in:
Content

Source link

Do eCommerce Stores Need An SSL Certificate?

SSL, SecurityWhen you see the address bar of your browser turn green, you know it’s safe to send sensitive data over the internet to that site. All eCommerce stores need an SSL certificate to keep shoppers safe, but what exactly does an SSL certificate do?

An SSL certificate has two jobs: to prove that a web page is controlled by the people who are supposed to control it and to encrypt all of the information sent from the shopper to the store and back again.

Identify Validation

When a shopper visits an eCommerce store and the address bar of their browser turns green or displays a lock, that means the browser trusts the site and its SSL certificate and that the data the shopper sends is protected. How does the browser know that it should trust the site? After all, anyone can make up a certificate.

SSL certificates are part of a system that includes certificate authorities, browsers, and websites.

SSL certificates are issued by certificate authorities, whose job it is to make sure that the person applying for a certificate is who they claim to be and that they really do own the website they want a certificate for. Certificate authorities have a root certificate that they use to sign the certificates that eCommerce retailers put in their stores.

The language might be a bit confusing here: how does one certificate sign another certificate? It’s because they aren’t physical certificates; they’re digital certificates made of numbers, and the act of “signing” uses some clever math to make a different number that could only come from the certificate authority’s root certificate.

There are hundreds of certificate authorities and they all have a root certificate, which they keep in a very secure place — it would be a disaster if a root certificate was leaked because criminals could use it to sign certificates for any website in the world.

Now we get to the browsers. Browsers know how to recognize SSL certificates that have been signed by one of the certificate authority’s root certificates. They trust that the certificate authority did its job and verified that the organization that applied for the certificate really is who they said they were.

If the browser sees that a store has a certificate signed by a certificate authority, it assumes that everything is copacetic. The shopper is connected to the right store: it is managed by decent folks who have proven their identity and not by some shady phishing operation that wants to steal credit card numbers. The browser turns its address bar green or shows a lock icon to let the shopper know it’s safe to proceed.

Encryption

The second job of an SSL certificate is encryption. Once again, this involves some pretty fancy math, but the result is that all the information sent by the user and the store — including credit card numbers and identifying data — is unreadable to anyone except the shopper and the store.

Without encryption, it would be easy for anyone to intercept sensitive data as it travels over Wifi networks and the internet. Because of SSL encryption, even if a nosy person could intercept the data, they wouldn’t be able to read what it says.

And that’s why eCommerce stores need an SSL certificate. SSL certificates help to keep shoppers and their information out of the hands of criminals.

Posted in:
Security

Source link

Be a Shark in Today’s Phishing Pond

Would you do business with somebody you don’t trust? Neither would your customers. Phishing attacks are at an all-time high, with 1.4 million new phishing sites being created each month so they have good reason to be suspicious of any website—including yours.

When it comes to gaining your visitors’ confidence, the rules have changed. On today’s fraud-filled web—it’s no longer who you think you are, it’s who a globally trusted third-party Certificate Authority (CA) says you are.

You Can’t Earn a Premium Reputation with Standard SSL

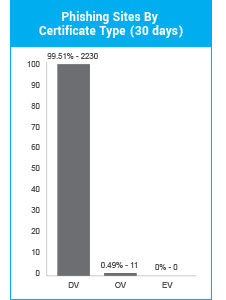
According to a PhishLabs report, within a 30-day window, 99.5% of HTTPS phishing sites had Standard Domain Validated or DV, certificates which offer only the basic level of encryption.

Thanks to browsers labeling websites with Standard and even Premium SSL certificates as “Secure”, online customers are drawing dangerous assumptions that even phishing sites are legitimate businesses—like you. So, why would you want to display to online visitors that you have the same level of security as phishing sites?                                               

Beyond the Basics

One of our earlier blog posts summarized the important industry changes that have made basic encryption a must for all web pages. All SSL Certificates offer encryption so even blogs and personal sites can meet this new global requirement. They also all provide basic trust features—including displaying HTTPS and the padlock icon in the browser bar. But, where they really differ is in the level of validation and visual trust indicators they offer.

This is huge. Why? Because, with online customers being mistakenly led to believe that secure and safe are the same thing (which they aren’t), you need to clearly set yourself apart from hackers. That means going the extra mile to prove—based on what a respected third-party has determined—that you’re a legitimate business. The best way to do that is with an Extended Validation, or EV, SSL Certificate.

EV Isn’t an Expense—It’s an Investment

Trust can make or break you online, even if your site isn’t built for e-commerce. Here are five reasons to invest in EV SSL:


  • Boost Confidence—EV enables the Green Address Bar, which is impossible to fake, making it the ultimate trust-builder. You’ll be giving your customers absolute assurance that you are who you say you are.


  • Operate with Complete Authenticity—CAs only issue EV SSL Certificates after they’ve validated your legal, physical and operational existence. Their comprehensive process even includes manual steps to ensure legitimacy.
  • Gain a Competitive Edge—With shopping cart abandonment rates soaring as high as 75%, you need to give visitors every reason to click your “Buy Now” versus your competitors. According to an article by monetizepros.com, 61% of shoppers said they decided not to purchase a product because it was missing a trust seal. Don’t be that guy.
  • Increase Conversion—EV SSL Certificates are statistically proven to increase sales. In a Tec-ED survey, 100% of participants noticed the Green Address Bar, with 97% being comfortable enough to enter their credit card information. In fact, 77% said they’d be hesitant to shop on a website without an EV SSL Certificate.
  • Promote Your Commitment to Their Safety—By putting EV’s visible trust indicators front and center, you’re showing visitors that protecting them is your top priority.

No matter what type of site you have, it’s time to stop appearing to online visitors like you’re on par with hackers. Trust us, if you hook them with truly authentic credentials, they’ll bite.

Posted in:
Security

Source link

How To Harden WordPress Sites Against Brute Force Attacks

how-to-harden-wordpress-sites-against-brute-force-attacksWhen logging in to a WordPress site, users supply a username and password that WordPress associates with their account. If an attacker can guess the right username and password, they can authenticate in the same way. The process of guessing is called a brute force attack: the attacker tries different combinations of usernames and passwords until they discover one that works.

Brute force attacks are effective when WordPress users choose usernames and passwords that are easy to guess. Criminals use automated botnets — which are usually made up of compromised WordPress sites — to make thousands of login attempts with different credentials.

Towards the end of December, WordFence wrote about the largest brute force campaign they had ever seen. An attacker was attempting to brute force access to thousands of WordPress sites. Once they had access to the site, the attacker installed malware which had two tasks: to compromise more WordPress sites and to run the crypto mining software.

Cryptomining software hijacks the resources of a server to mine cryptocurrency. Cryptocurrencies like Bitcoin and Litecoin are generated by carrying out the computationally intensive math. Cryptomalware uses the resources of compromised machines to do the work of generating coins. In this case, Monero, a cryptocurrency that can be mined with CPUs rather than GPUs, is being generated. According to WordFence, the campaign has created well over $100,000 for the attacker.

Victims of the campaign have their sites compromised and their server resources used to generate coins rather than serving the site. Because the malware also carries out attacks on other sites, there’s a strong chance of infected sites being blacklisted by security companies and browser developers.

Protecting WordPress sites against brute force attacks is straightforward. It’s only possible to guess usernames and passwords if they are simple and if the WordPress site lets an attacker make lots of login attempts.

Use Complex Passwords

The obvious solution is to insist on complex passwords that are difficult to guess. A long, random password takes much longer to guess than a short dictionary word. A random password of 16 or more characters might take millions of years to guess. A short dictionary password like “password” can be guessed in less than a second.

Use Two-Factor Authentication

I advise WordPress site owners not to rely on users to create secure passwords: people tend to choose convenience over security. Installing a two-factor authentication plugin on your WordPress site removes the risk of brute force attacks without relying on users to do the right thing.

There are many TFA plugins available for WordPress. Two Factor Authentication is among the most popular.

Limit Login Attempts

To find the right username and password combinations, attackers have to make a lot of guesses. By limiting the number of login attempts that can be made from an IP address, site owners reduce the likelihood that the attacker will ever guess the right combination.

WP Limit Login Attempts can temporarily block IPs if they make too many login attempts and display CAPTCHA tests to suspected bots.

In 2018, we expect to see more attackers taking advantage of crypto mining malware as cryptocurrencies rise in value. By following the steps we outline here, WordPress site owners can prevent their sites from being used to make money for criminals.

Posted in:
WooCommerce, WordPress

Source link

Hostdedi.net Meet Magento 2018 Recap

After an amazing week of Yoga and meditation in the holy city of Rishikesh right beside Ganga river, it’s time for a Meet Magento India recap!

The day started early setting up the booth with all our swag in the amazing venue Wagento choose for the event.

Brent and Vijay opened the first Meet Magento event in India talking about the local community and how important is India in the Magento ecosystem. Right after them, Mark Lenhard, SVP of Strategy & Growth outlined Magento’s roadmap and announced, among other things, the Magento certification program with new exams to come.

Right now, there are 31 Magento 2 Trained Solution Partners, 1092 Magento Certifications, 1004 Individual Certified Developers and 1025 Magento 2 Trained Individuals. The Indian community is growing extremely fast and quite a few events are planned for this year. The full presentation can be found here.

Right after PayPal keynote presented by Narsi Subramanian breakfast was served and networking started, with lots of selfies included (probably the best of the event). Magento 2 was the most discussed topic of the day and how to make it faster the question I heard the most.

Once the rooms were divided and ready, 3 simultaneous tracks fired up with lots of informative presentations. It was now my turn to present “Making your life easier with the CLI” outlining the new bin/Magento feature included in Magento 2. The audience was quite interested in the available command line tools available out of the box and the possibilities to extend it and add new functionality.

Right after me, David Manners explained what the Community Engineering is doing and how you can contribute to the core. Coming from times where contributing was hard, David explained his role and what OSS meant in the eyes of Magento. More about this topic can be found in Magento’s DevBlog.

After that, I moved to the Shalimar room to hear our own Jeries talk about Understanding Cloud Application Management and our new sister company, https://thermo.io

After a delicious of traditional Indian cuisine and some very warm interactions with the community, Vinai Kopp restarted the conversation with his presentation about Test Driven Development Magento Katas followed by Eugene Shakhsuvarov talking about Magento 2 technical guidelines.

After a long day with lots of new friends, the conference came to an end with Ben Marks remarks and Brent taking the largest selfie ever. I can’t confirm or deny Brent tried to make jokes without much success 😀

It was a long day, but the event didn’t end there. After some sleep, another Contribution day started early in the morning sponsored by Hostdedi where 25 pull requests were submitted to Magento 2 and some more to other Magento repos. Overall, it was an amazing event were we connected with a lot of happy customers who shared with us their success stories using Hostdedi as their hosting provider.

Thanks a lot to all the attendants and sponsors, see you again next year!


Posted in:
Magento

Source link

The Internet’s Best Website Content from December 2017

Happy New Year! As we roll into 2018, clean up your databases and get your site ready for this new year. Need some help? Check out this month’s roundup! If you’re looking for the same great articles the rest of the year, follow us on Twitter, Facebook, and Google+.>Enjoy and let us know if we missed anything important in the comment section.

WordPress and WooCommerce

Content Management Systems & Blogging

Design and Development

Magento and eCommerce

3 Things Improv Comedy Taught Me About Starting a Business – Discover the relation between improv comedy and starting, and running a company.

Posted in:
Craft CMS, CraftCommerce, ExpressionEngine, Magento, WooCommerce, WordPress

Source link