CAll Us: +1 888-999-8231 Submit Ticket

The eCommerce Guide to International Shipping Costs

If a product in your ecommerce store has global appeal, start thinking about a plan for shipping internationally. Shipping overseas isn’t the same as shipping within the country. 

Here’s a primer on the customs issues, international shipping costs, and other logistics you’ll manage as you begin shipping around the globe. Keep in mind that there’s rarely universal truth in international shipping. Get individualized quotes for your own products so you know how much it’ll really cost. 

What is international freight and what is the cheapest international shipping? 

Since shipping overseas is usually more complicated than domestic shipping, international freight logistics can present some unique challenges for eCommerce businesses. Some companies specialize in international freight and handle the logistical challenges for you. 

For small orders sent to your customers, you probably won’t have to think too much about customs issues. Even if you do outsource this process entirely, however, it’s worthwhile to learn more about how international shipping works for your products. You’ll be more adept at troubleshooting and improving your shipping processes. 

Shipping domestically can be very straightforward. You pay a single amount and your package gets delivered. But costs associated with international shipping may include the following: 

  • Customs charges 
  • Customs brokerage costs
  • Ground transportation
  • Maritime transportation
  • Air transportation 

When you ship, you’ll need to choose a carrier to transport your package for you. There are three different types of carriers, and they all work a bit differently. They also frequently work together. Even if you choose one of these, it’s possible that your carrier will contract out part or all of the shipping to another one on this list. 

International Carrier 

If you choose an international shipping carrier such as FedEx or DHL for the entire route, some or all of your shipping costs may be rolled into your postage. International carriers are responsible end-to-end for shipments and generally permit more visibility across the entire process than a national carrier working with a shipping partner would. 

This option may be more expensive than the other two and doesn’t necessarily allow you as much flexibility, but it’s likely a simpler and less time-consuming choice. 

National Carrier

A national carrier handles your packages within a specific country. They may not provide service outside that nation’s borders, or they may contract with local carriers to transport packages through other countries. You can work directly with a national carrier, but you’ll need to ensure that someone is still transporting the packages once they leave national borders. 

One example of a national carrier is the United States Postal Service (USPS). USPS has international reach by working with local partners to transport your packages. When a partner is delivering a package, USPS may not allow as much visibility into the shipping process which means you may not have access to much information when you ship internationally. 

For a small package that only weighs a few pounds, choosing a national carrier might be cheaper than your other options. Larger or heavier packages may be better off with an international carrier or freight forwarder. 

International Freight Forwarder

A third party can organize the handoff between USPS and the final carrier while also handling any customs issues. This is what an international freight forwarder does. They have permission from you to take on freight and have their own agents handle the customs and shipping logistics along the way. 

You could use multiple carriers and arrange the logistics yourself but in practice, this may be too complicated and time-consuming. That’s where outsourcing can make sense. For example, you may decide to ship a package from within the U.S. to the Canadian border through USPS, then have another carrier take it from there. 

Cheapest Way to Ship Internationally

Shipping to other countries is not just one process. There’s so much that depends on the country. To send your products overseas, consider the end country destination and plan accordingly. 

Consider these country-specific sections for more information. This is just a starting point, so be sure to do your own research just to be safe. 

Cheapest Way to Ship to Canada

Shipping to Canadian consumers can be complex. Although you generally shouldn’t have a problem shipping to most Canadians, Canada is a diverse country with a variety of different shipping arrangements and options. Some Canadians live in very isolated, rural areas that may make shipping a more expensive process while others are in urban areas with an abundance of affordable shipping options. 

Retailers must be prepared to work hard in order to win Canadian customers. Having convenient shipping is a good start. Whatever you can do to make purchasing from you easier is probably worthwhile. 

Online purchases made by Canadians do incur customs duties and other taxes, and paying these is the responsibility of the buyer. Although these costs are not coming out of your own pocket, you should know that these expenses do directly impact how much your shoppers can spend with your business. By keeping costs for your customers low, you could even offset some of these expenses and make it more likely that you’ll win their business. 

Besides import costs, Canadians also pay sales taxes for their province and a Goods and Services Tax (GST) to their federal government. GST represents 5%  of the total. Local sales taxes bring this amount higher. 

If your products are relatively cheap, you probably won’t lose business because of import duties. Recent updates to customs processes and costs mean that Canadian customers ordering from American businesses are exempt from paying customs costs on purchases up to $150 CAD, with some exceptions. This is up from the previous $20 CAD limit set in 1985. The old $20 rules still apply with items shipped through Canada Post, so keep in mind the larger limit only applies to private carriers such as FedEx. 

When you ship to Canadians, you have a lot of options. 

Shipping Options for Sending Items to Canadian Buyers

Canada Post, the national postal service, is one great option for retailers. You can also use FedEx, UPS, DHL or Purolator. Here’s where you may also want to consider Canadian geography when you’re shipping. Some of your customers may live in isolated communities and you may need to account for longer shipping times. As a result, some carriers such as FedEx, have different policies within Canada. FedEx Ground ships in four days or less within the US, but in Canada, takes up to seven days for shipments. 

You can use an individual carrier or use a multi-carrier shipping option that hands off packages to a new carrier at the border. Although the usual U.S. carriers you’re probably familiar with are available, the additional choices you gain within the Canadian border may be worth it. Purolator, for example, is known for reliable next-day shipping by 9 a.m. and 10:30 a.m. to Canadian addresses. When shipping packages, having this option available to customers may be a helpful selling point. 

Cheapest Way to Ship to the U.K.

In the U.K., eCommerce businesses have several options for shipping within the country such as the Royal Mail and DHL. You also have UPS international, FedEx, and even USPS international shipping. Shipping to the U.K. can be an expensive venture with a USPS Small Priority Mail Flat Rate box costing $36 and a Large Flat Rate box costing $94. Your costs will certainly be higher than shipping domestically, but that doesn’t mean shipping to the U.K. is completely cost-prohibitive for retailers. 

Imported goods need to follow the U.K. guidelines. Some of this may involve more work and recordkeeping on your part unless you outsource part or all of this process. 

You should find out if you’ll owe Value Added Tax (VAT) and have to collect it for your customers. Many eCommerce sellers are required to create their own VAT registration and request information from customers to help with location verification and tax reporting — even if you’re not based in the U.K. 

These rules may change. At time of writing, the U.K. was planning to leave the European Union which could result in different policies. 

Cheapest Way to Ship to Australia

When you’re shipping to Australia, you have several options. You can use an international carrier such as UPS, FedEx, or DHL. You could also use USPS. With Flat Rate International options available, you can reduce your costs for shipping a package to Australia. 

Customs costs may not be as much of an issue for you if your products are valued at less than $700 — which is about the minimum taxable amount for Australians who are buying products online and having their purchases shipped. GST imposed by the Australian government applies for more expensive purchases. 

If you use a freight forwarder or shipper, they’ll provide a Self-Assessed Clearance (SAC) Declaration for the Australian government when your package arrives at the border. Otherwise, you’ll be responsible for providing the SAC. 

Cheapest Options for International Shipping

You can streamline your international shipping and save money by creating a process. If you want a game plan for how you’ll ship internationally when orders arrive, take the time to decide in advance which countries you’ll be selling to, and create a system for taking care of shipping. As your business operations grow, you may need a more formal internal process for packaging and shipping including designated job descriptions for team members you have in charge of the process. For automated or outsourced shipping, plan how you’ll transport packages to the carrier, or sign up for a pick-up service. 

Your cheapest overall option may be outsourcing your shipping to a service such as Parcel Monkey or Easyship. These services can take advantage of volume discounts on international shipping and pass the savings along to you. In some instances, this can cut half of your shipping costs. 

Before you make any shipping decisions, carefully consider your options and find out what every shipping service has to offer for your business and your customers. 

Choosing the Best International Shipping Service

Business owners should shop around and consider several important factors when looking for the right shipping service. Start with an example order and calculate the cost and options offered by several different carriers. 

Before you make a list of carriers to compare, you may want to consider what you’ll need in a package shipping service. Specifically: 

  • Product categories you ship
  • Countries you ship to 
  • Countries you plan to ship to later as your business grows 
  • How much of the regulations and customs process you need to outsource 

See how every option stacks up against the others and note any questions or concerns you have for further research. Of course, you’ll also want to compare: 

  • Price
  • Arrival time 
  • Convenience for your customers
  • Shipping experience for you 

Every time you ship internationally, you have the option of using one single carrier or using a multi-carrier shipping option. 

Automating Your Shipping with the WooCommerce Shipping Plugin 

If you’re using WooCommerce, a shipping plugin can help you ship more efficiently. Balance multiple carriers along with a busy array of incoming orders and have costs calculated for you. A variety of different plugins are available with various features designed to make shipping calculations easier and enable quick comparisons among carriers. 

With a plugin, your site can calculate shipping rates accurately and provide customers with multiple choices. This feature allows you to provide different price points and shipping times so buyers can make their own decisions. 

Once you’ve automated your shipping, your online store can run with less guesswork and greater simplicity for both you and your customers. 

Source link

A Beginners Guide to WordPress CSS

You want your WordPress website to look great on every device and for every visitor but your out-of-the-box WordPress theme only gets you about 90% of the way there.

There are still a few things you’re concerned about — things that CSS could help you fix.

This beginner’s guide to WordPress CSS will give you a walk-through on how to edit CSS in WordPress to help you build a more beautiful, intuitive, and better-performing website. Most CSS classes for WordPress would take you through these same steps.

An Introduction to WordPress Editing

When using WordPress, you can customize CSS using one of three different editors that the service provides. 

Visual Editor

The visual editor is a post and page edit feature of the platform. It has been described as WYSIWYG (what you see is what you get). That means everything on the page, as you can see it, is exactly the way it will look to a website visitor.

This is an editor that will allow you to create content without coding. There is a toolbar at the top of the page that is similar to familiar programs like Microsoft Word. You can use the tools found there to alter your text and the appearance of the site. 

There is also an Add Media button which enables you to include images or videos in your post. WordPress plugin developers can also add buttons on your visual editor toolbar to help you create more features and styles for your live site. 

Drag-and-Drop Editor

A Drag-and-Drop Editor is one of the simplest ways to edit your site. It uses an elementary concept as the basis of its platform. You grab something, you pick it up, and you place it somewhere else. 

While drag-and-drop is not a standard WordPress feature, there are several editors that can be installed that will give you this easy-to-use editing platform. 

When using the Drag-and-Drop Editor, you can select an element of your site and drag it to a new location. You effectively drop the element in the desired location. If you’re unhappy with how that looks, you can start over again and move it somewhere else. 

Theme Editing

Theme editing refers to your ability to edit the theme or template of your WordPress website. 

There are two different kinds of themes that you would edit: Parent Theme and Child Theme. The Parent Theme is a full and complete WordPress theme, with all of the proper elements in place. A Child Theme has the look and feel of its Parent Theme, but it can be modified. 

The way you will edit your CSS WordPress theme differs based on which theme you’re using. Visual themes use the Visual Editor while drag-and-drop themes use the Drag-and-Drop Editor. 

For more on editing your WordPress theme, check out “Understanding the WordPress Theme Editor.”

What Does CSS Mean in WordPress?

Your WordPress website is built with a variety of languages including HTML, PHP, CSS, and MySQL. 

For now, we’re going to focus on HTML/CSS.

HTML acts as the content structure for your website (text, images and other media, hyperlinks, etc.) and CSS dictates how that content looks (e.g., colors, fonts, positioning of elements, margin, and padding). 

Let’s use a quick example. 

A simple line of text in HTML might use a <span> tag. But to change the visual characteristics you must use CSS. The <span> only defines the content, not how it should look. 

Here are some examples of visual properties we could change with CSS.

  • Font color
  • Font size
  • Font family
  • Background colors

Imagine it like a house. HTML represents the rooms, layout, and architecture. CSS represents the paint, choice of trim, and flooring. 

CSS gives the house its “look.” Every house has floors, rooms, and walls, but how you paint and arrange those floors, rooms, and walls is what makes the house uniquely yours. CSS can be used to add elements or take others away. You can hide page titles on WordPress with CSS.

Where Do I Find CSS in WordPress?

To find the CSS files for your WordPress theme, look under Appearance then select Editor and select the file marked style.css. 

From this window, you can edit the files directly and then Save

An Introduction to CSS Syntax and Selectors

CSS is comprised of style rules that are interpreted by the browser, and then applied to the elements of your document. 

The Parts of a Style Rule

  • Selector − A selector is an HTML tag at which a style will be applied. This could be any tag like <h1> or <table>.
  • Property − A property is a particular characteristic of an HTML tag that can be changed. An example of this might be “color” for text elements. 
  • Value − Values are assigned to properties. For example, color property can have value either red or #F1F1F1. View the complete Mozilla CSS reference to view all properties and possible values for each property.

Syntax

The syntax of CSS is a series of rules consisting of a selector and a declaration block. 

The selector block points the code toward an HTML element. The declaration block changes the property of that selector based on a series of values. 

selector { property: value }

To add more rules (as many as you want), it is standard practice to give each property, value, and declaration its own line. That would look something like

selector {
  property1: value;
  property2: value;
}

Selectors

There are many different selectors you can identify through syntax in order to change the properties of an HTML element. 

Some of them include:

  • Type selectors
  • Universal selectors
  • Descendant selectors
  • Class selectors
  • ID selectors
  • Child selectors
  • Attribute selectors

How Do I Use CSS in WordPress?

You can use CSS in WordPress to control

  • Color, size, and style of text,
  • Spacing between paragraphs and headers,
  • How images and other media look,
  • How your site looks on different screen sizes, and more. 

1. Control the Color, Size and Style of Text

First, you would want to decide on a HEX or an RGB color value that matches the color you want. You can use a free tool like Canva to see a number of different values for colors on the spectrum.

To target all paragraph tags (<p>) we need to write the CSS rule so that the selector targets those <p> elements.

p {
  color: value-will-go-here;
}

Let’s pick a nice red out from a color wheel. We’ll use #ea1520. 

That would mean the rule is

p {
  color: #ea1520;
}

And we’re good to go! 

Add that to your theme stylesheet (style.css) and all the <p> tags should be red once you reload the page.

Now, what if we also want to change the size and the font style adding elements like bold or italics? We just need to write rules for all of those properties on their own lines in the same target above. 

p {
  color: #ea1520;
  font-size: 26px;
  font-style: bold;
}

The documentation for the font-size and font-style CSS rules can be found on their appropriate documentation pages at developer.mozilla.org

2. Control Spacing Between Paragraphs, Headers, and More

The colors and sizes all look great — but what about the spacing? 

Is everything too cluttered? Or worse, is everything way too far apart and making the website hard for people to navigate?

This is where you want to embrace the use of the margin property. 

The margin is the space around an element, including the top, bottom, left and right. 

If you want more space between headings and the paragraph that comes after them, you would want to increase the bottom margin on that heading tag.

The Mozilla documentation for the margin property has an interactive example that lets you test several margin rules on a particular element to see how it reacts on the page. 

Once you understand the margin property well, let’s write a rule that adds margin-bottoms to every heading.

h3 {
  margin-bottom: 25px;
}

Now our H3 headings should have at least 25 pixels (px) of empty space below them for all screen sizes.

3. Control How Your Images Look

Through CSS you can affect the placement of your images along with the borders around them, how tall and wide they are, and more. 

Here are some examples of coding that you can use for the borders, scaling, and centering of your images.  

Border:
img {
  border: 1px solid #ddd;
  border-radius: 4px;
  padding: 5px;
  width: 150px;
}

<img src="http://blog.nexcess.net/paris.jpg" alt="Paris">

Image scaling:
img {
  max-width: 100%;
  height: auto;
}

Image centering:
img {
  display: block;
  margin-left: auto;
  margin-right: auto;
  width: 50%;
}

4. Control How Your Site Looks on Different Devices and Screen Sizes

You’re able to control the look of your site across various devices. That’s important in today’s climate with users accessing web content through their computers, cell phones, and tablets. 

Below is an example of CSS code that can rearrange your page for a device with a maximum page width of 480 pixels. 

@media only screen and (max-device-width: 480px) {
        div#wrapper {
            width: 400px;
        }

        div#header {
            background-image: url(media-queries-phone.jpg);
            height: 93px;
            position: relative;
        }

        div#header h1 {
            font-size: 140%;
        }

        #content {
            float: none;
            width: 100%;
        }

        #navigation {
            float:none;
            width: auto;
        }
    }

How Do I Edit CSS in WordPress?

You can edit CSS in WordPress manually via an FTP client or with the assistance of a plugin.

Adding CSS to WordPress Manually

In order to manually add CSS to WordPress, you’d have to be using a Child Theme which is more malleable than a Parent Theme and can be changed easily. Custom CSS that you add to a Child Theme will override the styles set down by the parent. 

Here’s how to add custom CSS to a Child Theme:

  • Use an FTP client like FileZilla to connect to the site. 
  • Locate the root folder. Usually, it’s called “www” or features your site’s name
  • Once there, navigate to the wp-content/themes directory where you’ll find folders for all of your themes. Select the Child Theme you set up. 
  • Right-click on the file and select View/Edit. The file will open with your text editor. 
  • Add your WordPress custom CSS directly to the theme. 
  • Save the changes and close the editor.

Adding CSS to WordPress With a Plugin

There are a number of plugins that you can use to add additional CSS to your WordPress site or defer unused CSS from WordPress. 

The Top 5 CSS Plugins for WordPress

  1. Yellow Pencil
  2. SiteOrigin CSS
  3. Simple CSS
  4. Theme Junkie Custom CSS
  5. Custom CSS Pro

Using any of these options, you’ll be able to gain access to the backend of your site and add your custom CSS WordPress code. Other plugins are able to complete advanced functions like optimize CSS delivery on WordPress using style.css files. 

In Conclusion

This walk-through to CSS for WordPress provides a simple guide for beginners much like early WordPress CSS classes would. 

With CSS, there’s always more to learn and more exciting ways you can use it. Our recommendation is to start small. For instance, make a simple change to your WordPress theme which defines the color of your footer’s background. If you find your WordPress CSS not updating, go back and re-read these sections to get a better handle on what went wrong. 

If you have any questions along the way, feel free to reach out to our CSS experts!

Source link

Hostdedi Magento Cloud vs. Magento Commerce

One of the misconceptions about Magento is that you have to use Magento Commerce for hosting. Or that they are one and the same thing. Magento Commerce hosting for your Magento store is built by Adobe and includes powerful features (modules) like page building progressive web applications (PWAs). Hostdedi Magento Cloud is hosting for your Magento store with features for professionals like high scalability, staging websites, and PCI compliance.

In this post we’re going to clear up the misconceptions between these two very different platforms.

Magento Commerce was created about two years ago after Magento was sold to Adobe. It’s their official solution for hosting Magento and it has a lot of good things going for it:

  • Magento Commerce includes common functionality for your Magento store
  • They allow progressive web apps (PWA)
  • They have a cloud based infrastructure for scalability

But it’s important to remember that Adobe, even though they own Magento, is the new kid on the block. They’re still learning how to build & optimize the infrastructure needed to power a Magento site.

Building a Solid Infrastructure

Magento Commerce is great at including product features. But they’re still building their entire stack on someone else’s infrastructure. What does that mean?

It means, if you have a problem you first have to bring it to Magento Commerce. And they have their standard Service Level Agreement (SLA) to respond to you. If in that time, they discover a problem with the underlying infrastructure, they’ll submit a ticket to the company that maintains their infrastructure.

So your SLA is built on top of the SLA from another company. That means solving any potential problems could take twice as long. Not great if you have a problem that negatively impacts your store and you lose money every minute it’s not fixed.

Hostdedi Magento Cloud is built on our own infrastructure. Hostdedi has one SLA, and because we own the infrastructure, we can solve all of the problems ourselves and we don’t need to rely on any other companies. This means less finger pointing, more informed support, and faster resolution.

Experience

The other big difference between Hostdedi Magento Cloud and Magento Commerce is that we aren’t brand new to this space. Magento was literally built on our servers back in 2007 – before Magento v1 was even released (Magento v1 was officially released March 2008). 

We saw the opportunity of Magento back in 2008 when brick & mortar stores first started moving online to avoid the worst of the Great Recession. We helped brand new stores get started with Magento and we learned a lot about it in the process, like exactly how many PHP workers were needed, what caching systems were most effective, and which Magento settings are worth enabling. We distilled everything we knew to create the very first Magento specific hosting solution. 

We also wrote the book on Magento Best Practices and shaped the Magento community by recommending Nginx instead of Apache (which for a company specializing in LAMP stack is pretty radical). We’ve improved and continued optimizing and put out a new book for Optimizing Magento 2.

Contributing Open Source Libraries

Besides optimizing hosting for lightning fast websites, Hostdedi also created Turpentine which was the first varnish cache for Magento. You can take advantage of this on any hosting that uses varnish. 

We also created security extensions and continue to contribute to Magento core.

Plan for Exploding Growth 

Most hosts, including Magento Commerce, give you a certain number of resources that you must remain within. If you go over a bandwidth threshold you might have to pay more – or if you have too many people on your site at a time, it slows down to a crawl. 

Hostdedi created our first Magento plan during a time when everyone was getting online and then immediately started outgrowing their small plans. We’ve also been around for over a dozen Black Fridays so we’re used to seeing retailers needing extra resources on demand. That’s why we built auto scaling into all of our plans.

If you have a post that goes viral or your Black Friday sales really take off, we have you covered with additional PHP workers which keep your website snappy and your visitors happy.

Conclusion

Adobe Magento Commerce includes a lot of nice product features and it can be easily managed in the cloud. But Hostdedi Magento Cloud is both more established and leads the way with the most efficient & affordable infrastructure you can find.

Source link

Magento 1 End of Life: It’s July. Is your store safe?

We made it to July. Congratulations.

I’m guessing your online store, if you’re running Magento 1, is still standing – even if companies large and small were telling you that the “end of life” situation with Magento 1 was dire. If you’ve been reading things we’ve written already about it, you know we were big fans of being honest without creating alarm and stress.

But now we’re here – past Magento 1’s end of life, and we
need to ask the question, the one you’re likely asking yourself already. Is your store
safe?

I think there are four ways to answer that question.

Is your store’s code safe?

The good news is that nothing about the code that was
running on your site last month has changed this month. What worked last
quarter will work this quarter. Files didn’t suddenly go bad or corrupt. And
there weren’t any special protections on your files or code that expired.

The End of Life declaration for Magento 1 code from
Adobe/Magento means that if some new bug were found, they wouldn’t be creating
patches any longer. But that is a statement about the future, not about the
code that has been running your store up until now.

So the answer to this version of the question, is yes, as of
right now, your code is safe.

Is your store safe to handle financial transactions?

Another way to ask the question is whether the code itself
is good to handle financial transactions. In other words, will your store
remain PCI compliant? And the good news again is that there hasn’t been any
sudden change that would make your store out of compliance simply because Adobe
has said they want you to move to Magento 2 now.

That said, we’re not answering this question flippantly. The
reality is that PCI compliance is a constant and ongoing dynamic that requires
that everyone stay vigilant with compliance scans. If a scan comes back with a
gap or issue, the only way to stay compliant is to address the issues.

But if Adobe / Magento aren’t publishing patches and your
scan comes back with a vulnerability, how do you handle it? It’s a great
question and the driver behind our creation of the Hostdedi Safe Harbor
program
. We have your back.

Nevertheless, at this point, shy of something changing,
you’re good to go with handling transactions unless your payment gateway
decides to stop supporting their Magento 1 module.

If that happens, we
strongly suggest you check out Stripe
, who has a commitment to keeping
their Magento 1 module going for their customers.

Is your store safe from external attack?

Another way to ask the safety question is to wonder about
external attacks – malicious players who know that we’ve reach the end of life
for Magento 1 and they want to take advantage of the situation.

Most hosts have some level of protection against bad actors.
This kind of question is something you should ask them directly about.

What I can tell you about Hostdedi is that we’ve been hosting and supporting Magento 1 merchants since Magento was created. We know the codebase and we’ve created dedicated hosting solutions for stores of every size. Along with that, we’ve created a best-in-class security infrastructure that supports Magento 1 stores.

But if your current host doesn’t give you some great
answers, or if they tell you that your only answer is to migrate your store to
Magento 2, then I’d love to introduce you to our Safe Harbor
program
, which provides malware detection, firewalls and IP protection, and
so much more.

Will your store continue to stay safe?

The last way I think about this question of safety is about
the condition of your store as things continue to evolve and change.

One of the things we talk about here a lot is the evaluation
and transition that many merchants have been considering to other platforms –
like Magento 2, WooCommerce, Shopify and
BigCommerce.

Every one of those transitions, if they happen, take time.
So what do you do if you want to start that kind of transition but still want
to keep your Magento 1 store safe? Some of these migrations take months, others
can take quarters.

The good news, and you’ve seen me reference it multiple
times already, is our Hostdedi Safe Harbor
product
that isn’t a long-term contract. It’s a month-to-month solution
that provides protection even as you consider and potentially begin a migration
of your store.

No matter what, there’s a way to keep your store safe

As you can see, any way you ask the question, the answer
remains the same. With Hostdedi as your hosting partner, we’re here to help you
feel confident about running your Magento 1 store. No matter what, there’s a
way to keep your store safe.

Source link

Financial Health for Your eCommerce Business

So you’ve got a great product, and a great website to sell it, but does your eCommerce business have the right financial processes in place to survive? 

According to a recent survey by Small Business Trends, about 90% of eCommerce businesses fail in their first 4 months. Process-related issues like “running out of cash,” and/or “price and costing issues” were cited by at least a third of their respondents – circumstances that are often preventable by developing & sticking with business procedures.

These processes and procedures are often collectively referred to as “financial hygiene.” Just like our personal hygiene keeps us healthy, we need to maintain good financial habits to preserve our financial health. 

  • Hire a CPA When Launching Your Business
  • Open Your Mail 
  • Maintain Accounting Controls
  • Reconcile All Financial Accounts
  • Anticipate Expenses
  • Keep an Eye on Debt

Hire a CPA When Launching Your Business

A Certified Public Accountant (CPA) can help you set your business up correctly. If you’ve already launched, he or she can still get your bookkeeping going in the right direction before costly problems arise. 

It’s true that software like Sage and Quickbooks make it easy to do your own bookkeeping. In fact, most CPAs are happy to help you learn how to work with accounting software. But failing to properly set up your chart of accounts can leave you in the dark, with a setup that’s poorly designed for your particular industry or situation.

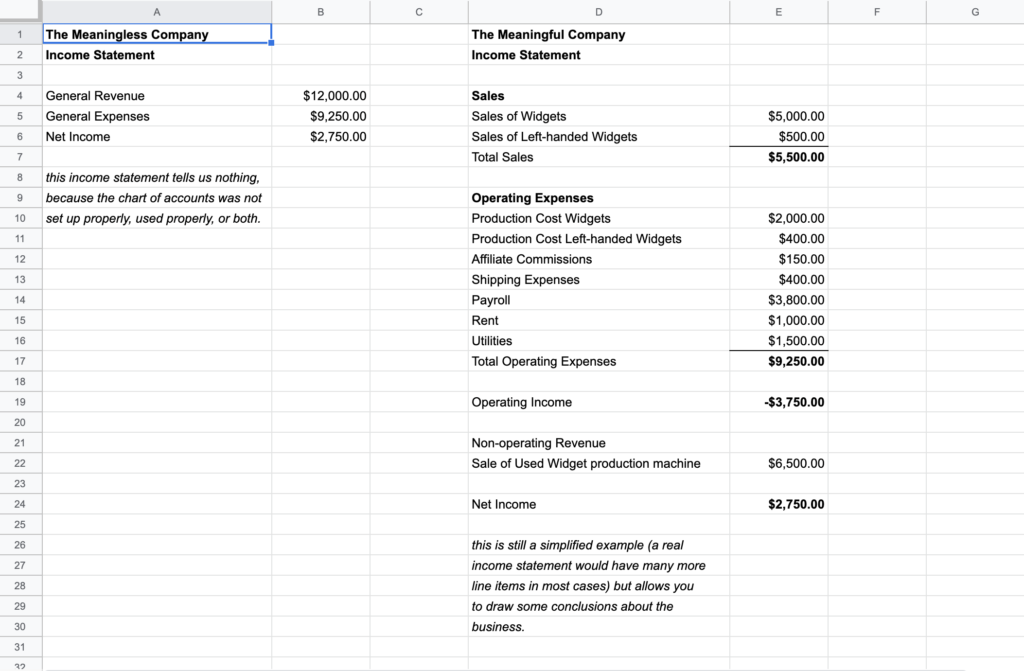
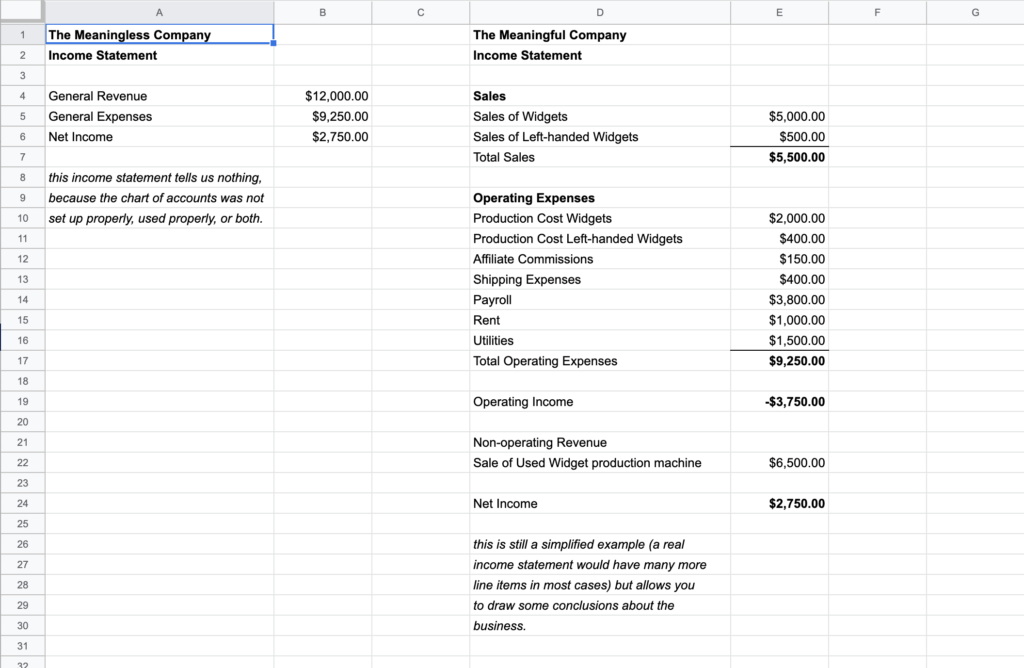
As an example, I once served on a board where the accounting software wasn’t telling us anything about our financial position. All of our revenue went into one account called “general revenue,” and all of our expenses came out of one account called “general expenses.” Sure enough, our reports were pretty meaningless. 

The Meaningless Company’s income statement only shows general revenue and general expense. It tells you nothing.

Establishing a few accounts that captured how our funds were coming in and going out made our finances come alive.

The Meaningful Company’s chart of accounts allows much more information to flow to the income statement.

Same bottom line, but just a few minutes spent looking at it could tell you:

  • Left handed widgets are far less profitable than the regular ones (compare sales and the cost of making them)
  • Even though you took in more money than you spent, you lost money selling widgets. Selling a piece of equipment masked a serious shortfall.

Proper bookkeeping throughout the year allows you and your CPA to anticipate your tax liabilities and plan ahead. It also makes the process of creating your tax return relatively simple, because your business expenses are already properly allocated to the right categories, like automotive expense, travel expenses, meals, and so on. 

Without proper bookkeeping, your expenses must be figured out after the fact (if you still can). Many deductions are lost because a business owner did not keep adequate records and receipts to attest to them.

A CPA or a qualified business consultant should also help you develop realistic budgets and goals for your business, so that you can develop forecasts and know how much capital you need to launch your business.

Open Your Mail

You might be surprised how many business owners neglect to open their mail (whether electronic or postal) and take care of it. Sure, much of it will be junk, But taking care of your bank statements, government notices, and customer correspondence will keep your business on track and keep small problems from turning into bigger ones. 

For example, a government notice that your sales tax payment is missing generally comes with a small penalty and interest charge – if you catch it the first time – but these costs soar if you ignore the initial notices.

Set aside a time at least once a week (preferably more often) to go through everything and process it:

  • Pay bills
  • Deposit checks 
  • Respond to customer complaints or concerns (even the difficult ones)
  • Respond to vendor, bank and government notifications

You may think the advice to “deposit checks” above is unnecessary. But I was once asked to shred a number of old documents for a client, and found almost a dozen unopened envelopes with checks in them totaling over a thousand dollars – checks that were now long out of date.

If something comes in that you simply don’t understand how to handle, talk to your CPA or another trusted advisor. One of my college instructors gave my class simple advice that has always stuck with me: 

“Bad news doesn’t get better with time”

Maintain Accounting Controls

As your business grows, the items mentioned above are often the first things a business owner wants to delegate. However, maintaining good accounting controls dictate that you, the business owner, personally perform certain tasks whenever possible. 

If you have someone else writing your paper checks, you should still sign them. You may have someone else reconciling your bank statements, but you should still read them. The mundane task of checking the PO box has saved more than one business owner from continued fraud or theft within their organization, because they noticed an invoice or other document that didn’t make sense and tracked it down.

Reconcile All Financial Accounts

Reconciling bank and credit card statements should be performed monthly. Reconciling statements means comparing them to your records to ensure the totals are the same. Online banking and the daily transaction download to your accounting software is a good thing, but reconciling keeps your records accurate and provides a check on whether the amounts being stated are going where you believe they’re going. 

For example, Quickbooks may assume that a downloaded transaction for $100 matches a transaction you’ve already entered for $100. But those amounts may just happen to match, and in fact the transaction you entered may still be outstanding. 

Reconciling accounts forces you to track down all of these transactions, and is also a second chance to notice where payments have been made. For example, you may have thought you put Google AdWords on hold, but find that it’s still being charged to a credit card.

Taking inventory of your finished goods, work in progress, and raw materials periodically also helps you to keep your business records on point – and can help you discover it if things are going missing.

Anticipate Expenses

Some expenses, like ordering inventory and paying shipping bills, are predictable. Others, like payroll, taxes, and loan payments, come in at different times (weekly, bi-weekly, monthly, quarterly, or even annually). 

It may be tough to keep track of how much you will owe at different times. To make it even more tricky, payroll expenses are often automatically deducted from your account, ready or not!

One solution for this is to maintain a cash flow forecast that accounts for all anticipated future expenses in the next few months. Another approach that many business owners use, especially for payroll expenses, is to maintain a separate bank account. By transferring the gross (i.e. total) amount of payroll expense to it each pay period, the business owner can effectively save up for monthly and quarterly payroll taxes as they come due. 

Dedicated checking accounts are also sometimes used for significant business expenses like inventory. Depositing a portion of the money from all sales into an inventory checking account means you are always financially ready to order more inventory.

For expenses that are predictable, but that will be realized at somewhat unpredictable intervals (like the payroll and inventory examples), the additional bank accounts are preferred by many business owners because they provide a clearer picture of where they stand, without having to make calculations on the fly. 

For example, if you need a new $2,000 computer in a hurry, you have $6,000 in the main bank account, and you know that your next payroll is already transferred to the payroll account, you know you’re able to buy the computer. 

You’ll still need to do cash flow forecasting, but having a few dedicated checking accounts for those critical functions described above will help you stay organized, and your business should have money for your priorities.

Keep an Eye on Debt

A certain amount of debt may be inevitable in a business, especially when it’s starting up and/or growing. But unless you carefully monitor debt, your access to credit may mask serious issues with cash flow and profitability in your business. You may simply wake up one day and find that your credit cards and/or business line of credit are tapped out. 

To avoid this, you should monitor your debt – check your balances at least once a month to make sure they’re heading down, not up. Keep a spreadsheet so that you see how these balances are changing over time. Creeping debt is much easier to correct before it gets completely out of hand than it will be later when you’re running out of credit and paying a lot of interest.

Financial Hygiene – It’s Good for You!

You went into business because you had a great idea, not because you love accounting. Bookkeeping chores, reading emails, and other administrative tasks may feel like nothing but distractions from reaching your goals. But staying on top of them is the best way to control the risks you run in business!

Source link

Second Half of the Year Day

It’s July.  Wait, Whaaaat?

Although March and April seemed to crawl along as we all learned to navigate brand new economic and personal landscapes, it’s somehow suddenly summer. 

The goals we set for ourselves and our businesses back in January seem a distant memory now. Wednesday, July 1st is precisely half-way through the year 2020. 

The 182nd day of the year, it is the perfect time to take stock of the past six months.

In so many ways, the first half of this year has been challenging for businesses and organizations. There’s a reason that nearly every email we exchange lately contains words like “unprecedented” and “uncertainty.” But we know that times of upheaval can also be times of tremendous positive change—if we are intentional about the ways we engage with our business, with our employees, and with ourselves.

2020 thus far has been tumultuous. And in six months, it will be behind us. 

It’s never been more important to take the time to pause, reflect, reevaluate, and recognize how to move forward in ways that recognize that the current state of the world may be the norm for some time. 

So, how can we advance our businesses, given the circumstances in which we find ourselves?

Take stock.  Reassess how the year has gone so far.

Look back on your goals for the year.  When originally setting objectives and targets to measure the success of ongoing projects at the start of 2020, no organizations could foresee what our lives and companies and work would look like in a few short months.

Now is a great time to examine those objectives and targets and re-prioritize.  What should you start doing, stop doing, and keep doing?  What goals have been reached and which ones just aren’t realistic anymore?  Which projects need attention, what new opportunities have presented themselves, and which efforts are simply not adding value anymore?  Be ruthless.  

If understandable delays have occurred in your business, think of July 1st as a time to get back on track. Consider July 1st as a restart – a New Mid-Year’s day, if you will. It’s a clean slate on which to adjust goals and come up with cohesive action plans that take our new “normal” into account.

Make an action plan for forward movement.

Do you need to take a different approach?

Recognize the ways you can continue to make progress in the midst of uncertain times. If there are aspects of your business that need attention or adjustment, think about trying a different approach if you’re falling short of some of the goalposts you’ve set. Think about new methods and actionable steps that could help you and your team find new and positive ways of working for the latter half of the year. Try setting SMART goals—ones that are specific, measurable, attainable, relevant, and time-based.

Keeping security up to date.

Take some time at the beginning of July to ensure that your online security is up to par. As most companies continue working remotely, cybersecurity protection is more important than ever. Make sure that your cybersecurity is up-to-date and that any necessary updates have been installed. Prevent security issues and make sure the second half of the year is as smooth as possible.  Security is complex and can be viewed as “just another thing to worry about.”  But mitigating risk is a critical component of any successful business and you owe it to your customers to protect them – and to yourself to protect what you’ve worked so hard to achieve.  Don’t make a hard year worse by succumbing to a security breach that could have been prevented.  If you need help, here’s a few good resources.

Holidays! Think ahead.

Planning ahead for the holiday season will be essential for eCommerce stores. From your website optimization to products, July is the perfect time to plan out what your strategy should be for the 2020 holiday season. It is also a good time to get in touch with suppliers and distributors to understand about any potential delays and restrictions due to the pandemic. Online business will be the order of the day.  Is your digital commerce strategy and site ready to go?  No? Let’s get on it.  Here’s how we can help.

  1.  Prepare Your Site for Potential Spikes in Traffic: Hostdedi offers infrastructure that can scale quickly, ensuring server resources can meet demands. Don’t leave customers unable to check out with your products due to slow load times, or worse, a crashing site.
  2. Mitigating a Malicious Attack on Your Server: Handling legitimate traffic can be quite enough without adding on a DDoS attack or code injection. Hostdedi offers basic and advanced DDoS protection to help, along with other add-ons such as firewalls, load balancing, or ServerSecurePlus™ for server hardening.

Get creative about “events.”  

At the beginning of 2020, I approved a Marketing plan that invested heavily in events, in-person Partner Summits, and travel to clients.  Well, that’s not our world anymore. As conferences, face to face meetings, and business-related travel continues to stay motionless, getting creative about ways to connect with your customers and employees is important. We’ve all had to make adjustments to our event planning for this year. While we are unable to come together for in-person conferences, consider using this time to completely rethink the way your business approaches these gatherings. Using a webinar format is a great option for the time being, give thought to how you can make them fun and interesting.  But also consider brainstorming about how best to revamp in-person events when the time comes.

Connect with employees.

It is vital to find ways to connect with employees who are working remotely. Outside of whatever sort of mid-year performance review you may do, consider reaching out to remote employees to have separate, open discussions about their professional goals. Though many things in our businesses have shifted and changed, our employees still have ambitions. Ask them about their hopes and think about ways you can support them.

Many people are using this time to think about personal development. Perhaps there are training resources or seminars that you can offer remotely to help employees build skill sets or try new things.

Celebrate success.

Finally, be sure to celebrate your successes. What have you done well in these challenging times? How have you shown up for your employees and reminded them of their value? It is essential to look back at all you have accomplished during the first half of the year. 

Be sure to celebrate and congratulate yourselves and your colleagues as we continue working through this pandemic. 

Source link

WordCamps Are Going Virtual – Here’s What Happened at WordCamp Denver

If you’ve never been to a WordCamp before you’re missing the best part of the WordPress world. While the software is great – it’s the size and giving nature of the community that makes it special.

I sat down with my friend Nathan Ingram – who has been to 50-60 WordCamps – to discuss what virtual WordCamps are like, some of the advantages of WordCamps going virtual, some of the things to watch out for, and our best advice to get the most out of attending a WordCamp.

Maximize Your Screen Size

Virtual WordCamps are great but there’s a few things you might not expect. One of the first is what they actually look like. For WordCamp Denver, we tried to show the speaker, their title, and their slides. 

{{Droplr Link}}

All of this is great as long as you have a big enough screen to make sure their slides are legible.

Tip: make sure you watch virtual WordCamps on a laptop or desktop.

Attend the “Soft” Sessions

For WordCamp Denver we added a few “soft” sessions like yoga on Friday and How to Brew the Perfect Cup of Coffee Saturday morning.

While these aren’t strictly WordPress related, they’re a great way to connect with your community. The chat was very active during both sessions and people happily shared non-WordPress things with each other.

Tip: You’ll always have another email to answer. Instead, take the opportunity to connect with your community both before, after, and during the event.

Bookmark Your Favorite Sessions

For WordCamp Denver we had three tracks going on both days. There is always a ton of great content and you won’t be able to watch it all.

I’ll admit it – I’m lazy and if I don’t have to prepare for an event I won’t. But if you can spend even 10 minutes reviewing the schedule & speakers ahead of time, you should be able to find the sessions most relevant to you.

And since this is a virtual event you don’t have to go all day. You can conserve your energy and pop in for the sessions most relevant for you and then go back to regular work or life.

Tip: Bookmark your favorite sessions and schedule your day around them.

Ask Your Questions As They Come Up

One thing you might not realize is that there’s a 20-30 second delay between the speaker talking and you seeing the video on your end. That means it can be really hard to come up with good questions when the speaker asks.

Instead you can ask questions throughout the talk by dropping them in the chat. A moderator will collect them, prioritize them, and ask them at the end. This makes asking questions really efficient and you won’t forget a great question if you drop it in the chat immediately.

As a side benefit sometimes the attendees will answer your questions or help you elaborate. 

Tip: Ask questions as soon as they come up. It helps the dialogue in the chat & will make sure those questions won’t be forgotten.

Feel Free to Check Different Tracks

One thing that’s hard to do at a physical event is to switch tracks. I don’t want to step over someone, open doors, or maybe even step in front of the camera.

I kept three tabs open almost all day and had all three live streams running and I flipped back and forth muting & unmuting the different tracks. It let me hear a little bit from each speaker and then join the session that made the most sense for me.

Tip: You’re allowed to watch all of the tracks and pick your favorite. You won’t hurt any speakers’ feelings by switching tracks and you won’t disturb anyone – so do it!

Focus on One Or Two Changes

There’s a lot of really good sessions at a WordCamp and I think Nathan sums it up perfectly:

“WordCamps are like a firehose…”

People often leave WordCamps with notebooks full of ideas. But those exciting ideas can easily turn into procrastination because you don’t know where to start.

Tip: After you’ve finished watching a WordCamp, focus on implementing just 1 or 2 things. If you focus on 1 or 2 things you’ll be able to get them done.

Getting The Most out of a Virtual WordCamp

Virtual WordCamps are still sorting themselves out and the format will likely change as we move forward. While some things aren’t as easy to do as they were before – there are also a ton of benefits for virtual events.

With these tips we hope you can get the most out of the WordCamp near you!

Source link

How Your WordPress Blog Can Benefit From Custom Taxonomies

When you think about blogging, it’s easy to pick a theme and immediately focus on creating content. Unfortunately, because the newest content is typically displayed first, as a blog post gets older, it slowly disappears into the archives—and very few people think about their blog archives.

Here’s the problem: Most of those older blog posts still have value! They are evergreen content that visitors would find helpful, it’s just hard to find them.

Lucky for us, WordPress has default taxonomies—categories and tags—that are used to classify and organize blog posts with relevant terms. Each category and tag creates an archive of all content assigned to it. This is how many websites organize their blog posts.

What is a taxonomy?

“Taxonomy” is just a fancy way of describing whichever system you use to organize and classify information. 

While categories and tags work great for most sites, if you’re a content creator, chances are, you can do better. You can create custom taxonomies in WordPress that use terms relevant to what your blog is about. For example, if you have a podcast, instead of using categories and tags to sort episodes, you might want to use taxonomies like guest, topic, industry, or type.

How does it work?

Clear taxonomies sort your content, create high-value archives, and improve site search results, especially when paired with solutions like Search WP or ElasticPress.

Here are a few examples to show you how it works:

Example 1: Recipe Blogs And Food Blogs

Food bloggers are a perfect use case for custom taxonomies, as they write about and share recipes for specific meal types, diet types, and ingredients. With custom taxonomies, instead of generic categories and tags, you can use classifications relevant to food-related content.

Three sample custom taxonomies for food bloggers would be:

  • Meals: breakfast, lunch, dinner, snacks, dessert, drinks
  • Diets: vegetarian, vegan, pescatarian, dairy-free, gluten-free, soy-free, egg-free, keto, Whole30
  • Ingredients: eggs, tomatoes, bell peppers, onions, sausage, cheddar cheese

Example 2: Travel Blogs

Travel sites can also benefit from custom taxonomies by using them to classify content with travel-specific terms. From city, state, county, and country, to types of trips like road trips or resort vacations, there are a plethora of classifications to choose from.

Three sample custom taxonomies for travel bloggers would be:

  • Activities: hiking, biking, camping, fishing, rock climbing, dining, beach combing
  • Places: restaurant, museum, national park, state park, beach, hotel, amusement park
  • Type: road trip, day trip, resort vacation, weekend getaway, week-long vacation

Example 3: Fashion Blogs

Like food blogs and travel blogs, another type of blog that should be using custom taxonomies are fashion blogs. From brands and retail stores, to pieces of clothing and accessories, fashion bloggers are already classifying their content. Custom taxonomies just make it even easier.

Four sample custom taxonomies for fashion bloggers would be:

  • Clothing: pants, blouse, tank top, maxi skirt, shorts, skirt, cocktail dress, sundress
  • Accessories: necklace, earrings, bracelet, handbag, hat, sunglasses
  • Brands: Prada, Old Navy, Forever 21, H&M, Nordstrom, Macy’s, Gucci, Express
  • Occasion: business, casual, cocktail, formal, on the town, athleisure, workout

Custom Taxonomies Classify Content With Relevant Terms

As you can see, categories and tags are perfectly fine general form of content classification, but when you leverage custom taxonomies, you can sort and organize your blog content with relevant tags that are specific to the content you are creating, which will in turn, improve your visitors’ on site experience and help them find the content they are looking for quickly.

If you publish new blog posts regularly and you have a good amount of traffic, you know that site speed and performance are critical to your long-term success and search engine rankings. With Hostdedi Managed WordPress hosting, your blog will run lightning fast so users & search robots can access your content quickly.

Source link

Using Google Shopping with WooCommerce

In the last 8 weeks, the world has been turned upside down. Major sports seasons were cancelled, summer concerts were cancelled, you can’t see or hug your friends, and business as we know it has been put on hold.

Many industries are completely shut down, but if you’re in ecommerce you can still do the vast majority of your job from home. The opportunity is massive.

US Bank released the percent of all retail transactions that happen online and ecommerce sales jumped from 16% in 2019 to 27% in April 2020. That’s an incredibly steep incline. There’s a massive demand for online shopping.

The trick is getting users to your site before they go to Amazon or Walmart. Luckily, a new service makes it easy to attract a whole new audience. A few weeks ago Google Shopping announced that they’re now allowing merchants on their platform even if you don’t pay for ads. In this post, we’re going to show you how to connect your WooCommerce Store to Google Shopping and list products on their marketplace.

What is Google Shopping?

If you’ve ever typed in the name of a product or type of product into Google, you’ve likely seen Google Shopping even if you weren’t familiar with the name. Let’s say you’re stuck at home and you’re looking for a 2 player board game on Google. You’ll see Google Shopping in two places:

The first is right beneath the organic search results. You’ll see:

  • A product image
  • Product title
  • Price
  • Star rating
  • Description
  • The online store where you can buy this product

And sometimes you’ll see even more. If you’re looking for clothes or paint you might see a filter for color and extra contextual tools.

The second place you’ll see Google Shopping is on the “Shopping” link at the top of the page.

If you click this shopping link, you’ll see the full Google Shopping view.

This view shows us Google Shopping ads at the top followed by a list of products. You can click on any of these products to get more information and then visit the store who sells the product to checkout.

Google Shopping is Now Free

As mentioned earlier, Google Shopping is now free. That means if you have any type of online store you can upload your products and have them show up in the shopping results.

What’s great about Google Shopping is it’s still wide open. A few big retailers with a Google ads strategy are already on their platform but many small retailers are not, which means yours could be one of the few products in a search making it more likely you’ll be able to make the sale.

Connecting WooCommerce to Google Shopping

Google Shopping works with any online store if you manually upload a CSV file or create an XML feed for your product information. Which is great but I’m lazy… and I’m guessing you are too. 🙂 

We’re going to use a direct integration between WooCommerce and Google Shopping. You can choose the official Google Product Feed ($79/yr) on WooCommerce.com or use one of the free plugins on WordPress.org

Since we’re in the middle of a pandemic let’s go with one of the free plugins, Product Feed Pro, so you can get the most bang for your buck – of course, if you need help setting up the plugin or have advanced needs the official plugin is likely a better choice for you.

Create a Google Merchant Account

The first step is to create a Google Merchant account. This will let you configure settings related to your store such as shipping, taxes, and a target country.

Once you create this account, add your store’s website and verify it using one of the methods Google suggests. If you already have Google Analytics installed and configured it only takes a few button clicks to verify your store in Google Merchant.

Get a Feed URL

In your WordPress admin you should be able to find your feed URL. Each plugin will do this a little differently. I had to create a feed, assign it as a Google Shopping feed, and map WooCommerce fields to Google Shopping fields. It took less than 5 minutes and even if you don’t know what you’re doing it will probably only take 10 minutes.

Once you’re done you should see your feed URL.

Add Product Feed to Google Merchant

Now we can add this feed to Google Merchant.

  1. Choose Products from the admin menu
  2. Click on “Create Product Feed” 

Then you’ll see a page where you can configure your feed.

  1. Select your target country and language
  2. Click continue
  3. Name your feed – I recommend the name of your store
  4. Configure a “Scheduled Fetch” so Google checks your store for product updates periodically
  5. Enter the name & URL of your file

Continue filling out the details for your product feed (we won’t show all of them here). Once you’re done you should see your feed under Primary feeds.

And if you click “View products” after waiting a few minutes you should see your products.

Note: this took maybe 10 minutes and I only uploaded two products. If you uploaded hundreds or thousands it could take much longer.

Enable Free Display

You might assume that any products you upload are automatically going to be displayed in Google Shopping. You actually have to enable this.

  1. Begin by clicking Get Started
  2. Fill out tax & shipping information
  3. Add a link to your refund policy
  4. Add a link to your shipping policy

The tax information is pretty easy since Google can determine that for you. Filling out the shipping information will take a few minutes.

Google Merchant has to process your feed and verify that your products have the correct information, so you may want to come back and do this step the next day.

And now if you search for your product it should show up in Google Shopping. Pay day! 

Strategies for Google Shopping

Getting listed in Google Shopping is now relatively simple. From here you can do some keyword research and optimize your listings so that you show up before your competitor.

But before you dive down the SEO rabbit hole, let me give you a simple piece of advice. Google Shopping is a very visual service. Make sure you have great product photography. If your competitors have clear, clean, and appealing photography it doesn’t matter if you rank slightly above them. Your audience is going to click on your competitors listing. 

Now is a great time to reshoot some products and touch up the primary image for each product. With a huge population stuck at home all day, every day, now is the time to get in front of those people. If you don’t make it easy for them to find you they’ll turn to Amazon or Walmart. So get out there with your products and grab a slice of all that brand new online shopping activity.

—-

Getting traffic from Google Shopping is great. You can also get more traffic through organic search by speeding up your store. See how much Hostdedi can improve your store with our 15-day performance challenge.

Source link

What is PWA? Using Progressive Web Apps for your Magento Store

What are Progressive Web Apps (PWAs)?

Let’s begin by answering the question – what is PWA? PWA stands for Progressive Web Apps. Progressive Web Apps are a pattern for building web applications using HTML, CSS, JS and modern web browser APIs to bring a native-like experience. PWAs combine the best of 2 worlds: web and native apps. Like other mobile applications, PWAs are easily installable and make development work simpler for any merchant trying to reach as many customers as possible.

While the feature parity between Progressive Web Apps and native apps is not 1:1 just yet, PWAs have come a long way since inception. Features like instant loading, push notifications and offline navigation/purchase are now widely available no matter which PWA implementation you choose. 

They won’t be the right approach in every case – for example, if you need a feature that’s not available on a Web browser or through an API, you will likely need to go the native route. But PWA capabilities are continuing to expand and what may require a native app today, might be PWA-worthy tomorrow. Project Fugu is a good place to see what’s coming and what’s being worked on right now.

Why are PWAs such a big deal?

PWAs come with an incredible set of features that were once reserved for native mobile apps alone. While regular web apps have tremendous reach in every device with a browser, at the end of the day these apps are just a webpage in a browser. 

Native apps are another way to reach mobile users but they must be developed for one platform / operating system at a time. PWAs enable development of a single app for multiple platforms. This streamlined approach is something mobile developers have been anxiously waiting for – easily reaching every potential customer no matter what operating system they are using. 

They also solve one of the most challenging issues developers face: distribution. Since you don’t need to publish these apps in a marketplace, you can just add a few lines to your manifest and make PWAs easily installable with a couple of clicks. Results drive a consistent customer experience that they expect through a native application but with PWA, they get a standalone experience, completely separated from the Web browser. 

This means a full-screen experience with no URL bar, the ability to install the PWA and dock it to your device home screen instead of visiting a regular webpage plus everything a Service Worker has to offer. 

Instead of the legacy way of updating via form submission and waiting for approval and publishing of the new version to the App Marketplace, changes made into any PWA are immediately available the next time you are connected to the Internet and open the app. PWA installation is now a standard feature available in all major mobile browsers, as well as Chrome and Edge on desktop.

How does PWA help Magento merchants?

Let’s face it: the Magento 2 frontend was already old when it was released and we’ve seen how that plays with frameworks like Prototype.js and Knockout.js. 

The JavaScript ecosystem evolves quickly and constantly following the hottest frameworks, developer trends, and updated best practices. This makes it challenging to keep up when having to maintain separated codebases. 

PWAs are particularly attractive to merchants using Magento 2 because it reduces front-end development complexity, giving you flexibility, extensibility, and opportunity to deploy resources to develop new features. Developers can implement almost everything in the regular Magento 2 frontend at a fraction of the cost and time by using any of the available APIs.

How can customers run a PWA on Hostdedi?

We’ve made it easy to run PWA on the Hostdedi platform. We’ve created a step-by-step guide for how to install Magento’s official PWA PoC, Venia storefront. This resource outlines how to build, compile and transfer this PoC to one of our servers without the need to start and maintain middleware services.

Source link