Data is one of your eCommerce business’s most valuable assets. But it’s not only valuable to your business. It’s also valuable to criminals, who use personal data for identity theft and credit card numbers to commit fraud. Over the last few months, several major eCommerce retailers and many smaller stores were targeted by Magecart, a criminal group primarily focused on scraping credit card numbers.
Magecart is the most prominent victimizer of eCommerce stores, but they are far from the only one. eCommerce store owners should be alert to the risk of data theft and know how to fight it.
Attackers like Magecart rely on malware injected into an eCommerce store’s pages. Malicious JavaScript code grabs credit card numbers as they are entered into forms, sending them to servers owned by the attacker, a typical cross-site scripting attack (XSS). Cross-site scripting attacks only work if attackers can execute JavaScript in the context of a store’s pages. They use several strategies to inject JavaScript, all of which depend on flaws in the store’s security.
Store owners fighting this type of data leak should focus on preventing the attacker from injecting malicious code in the first place.
Keep software up-to-date. Attackers frequently exploit vulnerabilities in older software. If an attacker can compromise an eCommerce store via a known vulnerability in the operating system, utility software, or the store itself, they will inject malicious code, which will run in shoppers’ browsers. Updating fixes known vulnerabilities.
Ensure the database is only accessible via the web store. Database misconfiguration is a common source of data leaks. An eCommerce store’s database should only respond to requests from the application, not to requests from the internet. It should be password protected to prevent any access from unauthorized individuals.
Use a web application firewall such as ModSecurity. A web application firewall can mitigate the risk of attacks against a store’s front-end, including SQL injection attacks and cross-site scripting attacks. Hostdedi uses the advanced ModSecurity WAF on Magento and WooCommerce hosting accounts. To learn more, check out our post on Why ModSecurity Should Be Your Web Application Firewall.
Use two-factor authentication on your Magento or WooCommerce store. The easiest way for an attacker to breach a store’s defenses is to guess the right password. Simple passwords, popular passwords, and passwords based on dictionary words are easy to guess. Long and complex passwords are difficult to guess, and the longer they are, the more difficult it becomes. However, we can’t always trust users (or even developers) to choose a long and random password. Two-factor authentication, as provided by Hostdedi’ Sentry extension for Magento, helps to protect stores from poor password practices.
Disable unused store and server passwords. Unused accounts serve no purpose and increase the surface area of a store that can be attacked. Audit the user accounts on your store and server, deleting those you no longer need. On a related matter, when giving an employee or third-party access to your store, use a unique account created for the purpose. Once they no longer need access, delete the account.
Be aware of supply-chain attacks. The Magecart malware often finds its way onto eCommerce stores via a supply-chain attack. Instead of attacking stores directly, criminals target software used by stores: JavaScript libraries, extensions, themes, and so on. When the eCommerce store is updated, the compromised software is installed and the malicious code injected. Supply-chain attacks are difficult to defend against, but store owners should exercise caution when sourcing software. Use extensions from official repositories or trusted developers. Keep an eye on vulnerability reports for software downloaded from third-party sources, such as CDNs or GitHub. Consider implementing Content Security Policy and Subresource Integrity on your store.
If attackers can’t infect your store with malicious code, they can’t steal your shopper’s details or credit card numbers. By following a few security best practices, you substantially reduce the risk of data theft.
April 10, 2019 – Drupal 5.7 is just three weeks away, and with it will come the Drupal layout builder.
Drupal has always been about accessibility, and the last several years have only seen that commitment ramp up as the teams behind the open source platform have begun to invest more in matching the true ideals of open source.
The layout builder marks a new stage in the CMS’s life; one in which content creators and managers no longer have to rely on developers for the minutiae of complex Drupal builds. Instead, content updates can be deployed quickly and effectively through a WYSIWYG editing interface.
The New Layout Builder: What to Expect
The new layout builder is essentially a WYSIWYG, with default theme previews, per entity customization, and connection between entity display, and views and other blocks.
A powerful design tool, Drupal’s layout tool goes beyond standard layout builders by allowing sitewide edits to templated content. This incredibly powerful feature means that site builders and content managers can add content to pages throughout a site with minimal effort and time commitments.
Another strong feature is the ability for content creators to easily create and push custom pages with unique designs and layouts. By adding blocks to a blank page, creators can easily push videos, maps, text, or custom-built widgets. As adoption increases for the layout builder, we expect more modules to appear that will add increasingly diverse functionality to the builder.
The Layout Builder: When Can I Get It?
If you’re looking to stay ahead of the crowd, you can actually download and install the beta module for the layout builder now. This will give you access and time to explore the new feature’s functionality before going live with it.
The full release will be with Drupal 8.7 in three weeks. Keep an eye on the layout initiative page for more up-to-date information.
Hostdedi and the New Layout Builder
If you’re looking to start adopting Drupal and the new layout builder with Hostdedi, you can currently install the module on your Drupal instance and begin working with it. Alternatively, when Drupal 8.7 is released, you can either update your instance yourself, or you can get in touch with our support team and they will update your Drupal site for you.
As always, we recommend testing any new updates on a development site before going live. We especially suggest doing so with the layout builder, to see how and if it will affect your existing site.
After a week in Las Vegas as a Summit Insider for the Adobe Summit, I’ve learned quite a few things about Adobe and their plans for Magento 2.
Adobe invited all of the Magento Masters to assist their annual event as Summit Insiders, a program that includes top executives, industry experts, major media correspondents, and pioneers in technology from around the globe.
Disclaimer: As a Magento Master, I attended the event for free, but these opinions are my own.
Day 1
The week started with an Insider’s presentation, reviewing previous years and also showcasing some of the new Adobe tools we should be using already, like Adobe Rush and Adobe Sign with its Office 365 integration. One of my favorite takeaways of going to this non-Magento event was getting to know the rest of the influencers and how they apply their different backgrounds to eCommerce.
After the introductory session, we headed to The Mirage for the Experience Maker Awards, an incredible private event including a reception and acts from The Beatles Love theatrical production by Cirque du Soleil. Several companies walked away with awards, with Platypus Shoes, a Magento 2 site, winning Best Commerce Experience.
Day 2
Day 2 started with the opening keynote, where Shantanu Narayen explained how Adobe sees the market and how their analytics point to retention as “the new growth.”
Right before the keynote, a new Techcrunch blogpost dropped, highlighting Adobe Commerce and how it integrates with Magento 2. Right after Santanu, Jason Woosley jumped on stage and explained to an audience of 16,000 what this meant for Adobe and Magento. Adobe Commerce is not a rebrand or a substitute for Magento 2, but a bundle of Adobe, Magento, and Adobe Experience Manager (AEM). This new product integrates with the Amazon marketplace to try to close the last gap in Adobe’s experience offering.
Right after the keynote, the Community Pavilion opened. This pavilion was immense, with huge demos showcasing integrations between Adobe products with VR and AR. I paid extra attention to the Adobe Experience Manager and Magento2 GraphQL integration, an interesting proof-of-concept that creates product pages using drag-and-drop predefined blocks with the Venia theme.
The day continued with sessions about different technologies. I assisted one with Magento Cloud, but my favorite was from Dr. John Grotzinger, chief scientist for the NASA Curiosity rover mission to Mars.
After a long day, we moved to the Influencers and Media reception at CHAYO for some beers, tacos, and enchiladas. We met several Adobe enthusiasts and chatted about the future of Magento, with everyone agreeing we had much to be excited about!
Day 3
Day 3 started with more sessions, with Shantanu Narayen and Microsoft CEO Satya Nadella taking the stage stage to talk about how Adobe and Microsoft work together to integrate their offerings.
Right after them, Reese Witherspoon and Adobe CMO Ann Lewnes took the stage to discuss how Reese launched her own production company and self-funded it for 5 years, making it possible to make her own decisions without shareholder interference.
After the keynotes, we headed back to the community pavilion to visit sponsors and take part in a Magento Masters Mixup meeting with Adobe employees. In this meeting, we met David Nuescheler, one of Adobe’s open source advocates and a key figure to follow if you’re interested in the future of Magento 2 open source.
The day wasn’t over yet and we headed to Sneaks, where Adobe showcases what’s to come in the near future. Hosted by actress, writer, and producer, Mindy Kaling, and Steve Hammond, Adobe’s Sr. Director of Experience Business in APAC, much of the focus was on AI and VR technologies.
After Sneaks, we gathered up some more Magento peeps and headed to the T-Mobile arena for Adobe Bash, the closing party featuring The Killers. There is not much to say about this, other than it was by far the coolest closing party I’ve ever attended! The Killers played all their hits in an arena just for Adobe, with plenty of food and drinks to go around.
After the party was over, I headed back to the hotel to rest up and start packing, but we had one day to go!
Day 4
Day 4 was all about Marketo and their Marketing Nation Summit, which is now part of Adobe Summit. I assisted with a couple of sessions, but took most of the day to get to know more Adobe integrators and developers and their ecosystem. One the day ended, I headed back home to Argentina to rest up and get ready for Magento Imagine in May.
The biggest takeaway was how Adobe wants to include and integrate Magento into their offerings, and how we can work with other platforms to create a unique experience for our customers. Witnessing this first-hand helped me understand the size of Adobe (it’s HUGE), its potential for customers, and how those customers differ from the customer base we’re used to.. I’d say our builds will now become bigger and more complex, but with the correct developers and integrators, we can continue to consider Magento the leading eCommerce platform worldwide.
See you in Las Vegas next month for Magento Imagine!
Whether you’re new to eCommerce or looking to see if there’s a better option for your growing store, choosing the right web application is important. There are several different options out there for merchants. This article looks specifically at Magento and Prestashop.
Both of these applications are open source platforms that allow merchants to start, maintain, and manage their online store. Both offer unique customization features, and both have been adopted by large audiences of both developers and merchants.
Yet the online eCommerce landscape changed in 2018. Multiple applications adapted to evolving merchant demands, as existing and new users moved to platforms that better suited their requirements. Moreover, with continued development of headless in mainstream eCommerce circles, merchants found they were no longer restricted by the eCommerce API they selected.
Internally, we’ve seen continued success and growth by Magento stores. According to our research, Magento cloud solutions grew by an average of 18% per month in 2018. Prestashop, on the other hand, boasts that over 270,000 stores run on it worldwide. However, looking a little deeper shows that this number may not be what it at first seems.
Before taking a deeper look at the differences between Magento and Prestashop, we’re going to see how they rank in terms of numbers.
In a comparison of all sites that use Magento and Prestashop, 76% of sites use Magento. While this tells us about the number of sites that use each eCommerce CMS, it doesn’t say anything about the quality of those sites.
When we only consider the top 1 million websites worldwide, we see a similar pattern emerge. 1.5% of the top 1 million sites worldwide run Magento, compared with just 0.4% that run Prestashop. Let’s take a look at some more specific numbers.
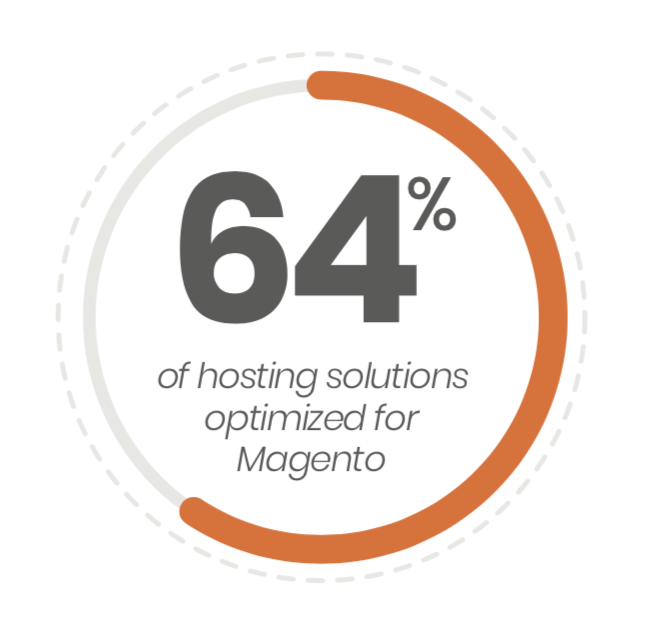
Internally, we’ve seen Magento dominate the eCommerce web applications market. 64% of our hosting solutions run optimized Magento environments. Asking clients why they have made this choice, frequent responses include functionality and the ability to implement development processes easily.
Now we’ve taken a look at the numbers, let’s look at some specifics.
Designs and Templates
A good looking eCommerce store is important. According to Blue Corona, 38% of visitors will stop engaging with a site if they don’t think its design is attractive, and 48% of visitors believe that a website’s design is the number 1 factor involved in determining credibility. For these reasons, design and template functionality have made it to the top of our list.
Prestashop does have a large number of free and paid templates available. In addition to those available through Prestashop, there are numerous development agencies that also offer templates for a fee. In general, these templates are able to provide most merchants with an attractive, fast site design that can easily be adjusted to fit their unique business. Merchants can also make simple adjustments to the color scheme, responsiveness features, and more through the Prestashop’s UI.
Magento, on the other hand, offers merchants the opportunity to create something unique and individual. While there are numerous themes available through the Magento Marketplace, they are limited and will cost money.
For this reason, most Magento merchants opt to either hire a developer or learn how to design their site for themselves. This allows them complete freedom in regards to how their site looks and performs. Everything can be customized, from responsive design delivery to core layout options. Advanced Magento developers are also able to take their store headless and implement PWA, whereby Magento serves as the back-end for a separate front-end.
Winner: Magento
Ease of Use
Ease of use is where Prestashop and Magento differentiate themselves. Prestashop is aimed at beginners and less technical users. While this is great for getting started with eCommerce and simplifying daily management and maintenance of a store, it does have its drawbacks.
At the time of writing, Magento is one of the most flexible eCommerce web applications available. Merchants are able to implement a near-infinite number of capabilities. Moreover, with the continued development and integration by Adobe, we’ll likely see this functionality only increase.
Regardless, if you’re looking for ease of use, Prestashop beats Magento. If, however, you’re looking to create an online store with unrivaled functionality, Magento’s learning curve is probably worth it.
Winner: Prestashop
eCommerce Functionality
Magento’s main strength is its functionality, and while Prestashop does an admirable job of trying to keep up with a number of optional modules, it just can’t compete.
Prestashop does include integration with other popular eCommerce platforms such as eBay and Amazon. It also offers its own internal analytics system for gaining insights into your audience.
Magento, on the other hand, offers an extensive list of functionality. This includes, but isn’t limited to:
Dynamic rule-based product relations
Visual merchandising page optimization
Customer segmentation and personalization
A powerful admin experience
B2B integration through custom catalogs, price lists, and more
Powerful search integration
One of Magento’s biggest strengths is its Elasticsearch integration. Elasticsearch is a powerful search engine capable of providing customers with results they’re looking for quickly and effectively. According to Moz, on-site searchers are 200% more likely to convert than non-searchers.
While Elasticsearch can be implemented with Prestashop installations (there is a connector module), it doesn’t run as efficiently. With Magento increasing focus on user experience, search has taken a dominant position within the eCommerce application’s ecosystem. The same can’t be said for Prestashop.
If you’re looking for functionality, without a doubt, the winner is Magento.
Winner: Magento
Modules and Extensions
Magento offers over 4,700 extensions, about 25% more than Prestashop’s 3,900 modules.
Some of Prestashop’s most popular modules includes Amazon Market Place, SEO Expert, PayPal & Braintree, the Google Merchant Center, Advanced Search, and Abandoned Cart Reminder. These modules add a lot of functionality to stock Prestashop, allowing merchants to improve conversion rates and customers experiences.
Magento’s most popular extensions include Yotpo, Add free product to cart, AJAX Catalog, Improved Sorting, and Advanced search. Immediately, a difference can be seen between what merchants are adding to their stores. Magento merchants are looking for added features, where Prestashop merchants are more interested in integrations.
It’s a tough choice here, as both have their advantages. Prestashop is great for beginners and the add-ons allow for site owners to easily integrate other eCommerce products into their store. However, Magento offers even more functionality (on top of already impressive functionality).
Winner: Draw
Inventory Size
Both Magento and Prestashop theoretically come with the ability to host an unlimited number of products. However, if not properly optimized, stores with more than 100,000 products can start to slow down.
With Magento, a number of hosting providers and developers have developed and released information on optimizing the Magento environment to ensure that large stores do not slow down. We should know, we wrote the book on it for Magento 2. Prestashop hasn’t managed to attract as many large stores (as indicated above), so isn’t quite on par in terms of optimization.
If you’re looking to run a large eCommerce store that can maintain good performance, we recommend Magento. Even for smaller stores, Magento environments can be optimized to be blazing fast.
Winner: Magento
Performance
Magento is a known resource hog and requires a powerful environment to run. Users often complain that Magento’s back-end can cause slow downs. For these users, the applications functionality is much more of a draw than its performance.
However, Magento doesn’t have to be slow. Often, slow sites are a result of either poor development or unoptimized hosting. See if your environment is optimized before migrating to another application. Optimization is a lot faster than a site redesign… and less costly.
Prestashop is much more lightweight, so there are usually no issues with site speed. Despite this, as we mentioned above, the eCommerce platform does experience slowdowns when too many SKUs are added.
We’re going to call this one a draw. Prestashop is more lightweight, but it also suffers from slowdowns when too many products exist.
Winner: Draw
SEO
In terms of SEO, Magento and Prestashop are in two different leagues. In research conducted by eCommerce Platforms, the stock SEO capabilities of Magento outrank Prestashop in almost every area. In fact, Magento came 4th in a list of the top 16 eCommerce applications available, in terms of SEO value, with a score of 95. Prestashop only scored 40.
Reasons for this disparity include Prestashop’s need for additional modules to serve simple SEO requirements. For example, you cannot add alt tags to images without installing a module first. Magento, on the other hand, comes with a powerful suite of SEO tools from the outset; including dedicated SEO content sections for products.
Magento wins in this category hands down.
Winner: Magento
Security
Security is vital for eCommerce stores. Customers only shop with merchants that they trust.
So it’s unsurprising that both platforms offer great security features and have a history of reliability. Both have also been the victim of security breaches.
However, as with any website and its security, infrastructure is as important as the application itself. Important features to note are a web application firewall (WAF), whether the hosting provider is PCI compliant, and what else the provider proactively does to keep a site secure.
Magento is often optimized for its environment and so comes with a level of security you don’t see with Prestashop. Moreover, with a large number of dedicated providers offering platforms to develop on and great public documentation, most providers have more knowledge of how to secure and maintain the application itself.
While there is a self-hosted version of Prestashop available for download. A large number of users host their site with Prestashop. If you want your eCommerce store to remain secure, it’s usually better to have control over the environment and access to a support team. For this reason, we recommend a self-hosted solution regardless of which application you pick.
Winner: Magento
Pricing
Both Prestashop and Magento offer free, open source options for merchants. However, to support these you will need to pay for hosting. Hosting costs vary by provider. We offer optimized Magento hosting solutions that enable merchants to create scalable and powerful eCommerce stores on a secure platform.
As a result of the incredible functionality that comes with it, Magento can be resource hungry. For this reason, we recommend only opting for a hosting provider that optimizes specifically for Magento. Prices for a stable provider start at around $20 a month and scale to several thousands for a dedicated cluster environment.
Prestashop, on the other hand, is not as resource intensive, and can be installed on a flexible environment without any needed optimizations. Flexible solutions can start from less than $20 a month, but they usually limit the number of monthly visitors substantially. The lower your monthly visitor capacity, the lower your likely revenue.
If you’re looking for a cheaper solution, Prestashop is likely the right choice. However, if you believe your store is going to grow and want to invest in a scalable solution now instead of later, Magento should be your eCommerce application of choice.
Winner: Draw
Magento vs Prestashop: The Winner
Both web applications provide merchants with a secure eCommerce environment. However, at their core, they are aimed at different types of merchants. Prestashop is aimed at merchants with smaller eCommerce stores and that require much less functionality. Magento, on the other hand, is aimed at merchants that require more advanced eCommerce functionality and are looking to optimize their conversion rate.
From a merchant perspective, if you’re able to invest enough time into a proper Magento implementation, then it offers much more than Prestashop and you’ll like see higher ROI. If, however, you’re looking for an easy WYSIWYG and don’t necessarily require some of the basic functionality that comes with Magento (such as advanced customer connection tools or SEO tools at the core) then Prestashop may suit your business model more.
Browsing antique stores is one of our favorite pastimes, especially stores that make no effort to organize their wares, chaotic jumbles of products grouped according to whim or chance. We enjoy the prospect of serendipitous discovery. However, when we’re shopping online, a lack of organization is not enjoyable. A positive eCommerce experience depends on the thoughtful organization of products into groups that create meaningful connections between them.
WooCommerce is, at heart, an application for creating order and connectedness in large catalogs of products. WooCommerce store owners have three different organization tools at their disposal: categories, tags, and product attributes, each of which adds information to a product listing. WooCommerce’s interface uses that information to group products in the interface and to help shoppers navigate the catalog.
Categories
Categories are WooCommerce’s primary organizational tool, and the one that has the biggest impact on the user interface. Most WooCommerce themes use categories to form the main navigation menu.
Every product on a WooCommerce store must be in a category. If you don’t assign a category to a product, it will be put in the “uncategorized” category. Each product can only be in one category, and categories are hierarchical — you can create categories that contain other categories.
For example, an online pet store might put a scratching post in the “Cat Toys” category, which is itself part of the “Cats” category. WooCommerce will use that categorization to group and filter products in the interface.
Categories are created in the Products > Categories interface, and products can be added to categories via product pages.
Tags
Tags differ from categories in a couple of important ways: each product can have many tags, and tags are not hierarchical. Tags are used to group products across categories.
A store selling pop memorabilia might put a signed poster of David Bowie in the “Posters” category, but tag it with “David Bowie”, “Glam Rock”, and “English”. Shoppers can then filter for products that are related along different dimensions.
The free-form nature of tags is useful, but without careful management a store’s tags can become chaotic. It takes discipline and forethought to build a coherent system of tags that group products in meaningful ways. We have seen WooCommerce stores with dozens of tags, many near duplicates, a large number of which were only applied to one product.
It is worth taking the time to sketch out a “canonical” set of tags. The set should evolve over time, but new tags should be introduced systematically.
Product Attributes
Product attributes contain additional information about products. Each product attribute has a predefined set of terms, which can be thought of as labels that indicate a quality of the product. A coat might have a size attribute, which has small, medium, and large terms. Product attributes are useful for variable products with multiple SKUs.
Attributes and their terms can be added to WooCommerce via the Products -> Attributes menu. Once product attributes have been added, they become available to you when adding and editing a store’s products.
The combination of categories, tags, and product attributes allows WooCommerce retailers to organize, filter, and group products so that shoppers can easily find what they are looking for.
Welcome to Part 2 of our series, Getting Started with Drupal 8. Go here for Part 1.
You’ve installed Drupal, updated it to the most current version, and know how to back it up. Next up is learning the basics of how to navigate the interface and manage your content. Let’s jump in!
When you visit your site, you must first log in to your admin panel to make any changes. Once you do, it’ll look something like:
Drupal Terminology: Nodes and Blocks
Most information in Drupal is presented either in nodes or blocks. Node content is essentially the core content of the page, like an article, blog entry, forum post, and so on. Blocks are smaller units that usually add some basic element of utility to the page, like search bars, login buttons, navigation tabs, and other at-a-click functions featured on most websites.
You may view all editable blocks on your current page by clicking on the upper right. You may now edit any block by clicking , followed by Configure Block. As you can see in the image below, almost any block can be configured to your exact specifications. We’ll dive more into this later.
Your Drupal Admin Panel
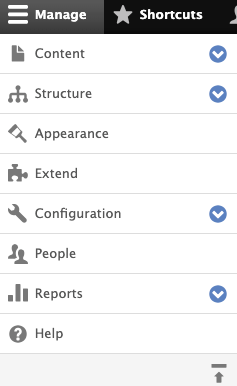
The admin panel on the top of the page has everything you need to create content, manage users, and perform other critical functions. It has three options: Manage, Shortcuts, and admin.
Shortcuts gives you a quicker way to access your favored site functions. For now, it shows only two: Addcontent and Allcontent, though it is possible to customize this later. admin allows you to adjust your contact information and login credentials.
For now, let’s focus on Manage, where you will find the bulk of actions necessary to administer your Drupal site.
Click Manage open your admin panel.
Tip: To alternate between vertical and horizontal menus, click or , as appropriate.
Content
This lists all of your site’s content, comments, and files, and also allows you to create new content.
You currently have no content. We’ll circle back around to this later in the Creating Content section.
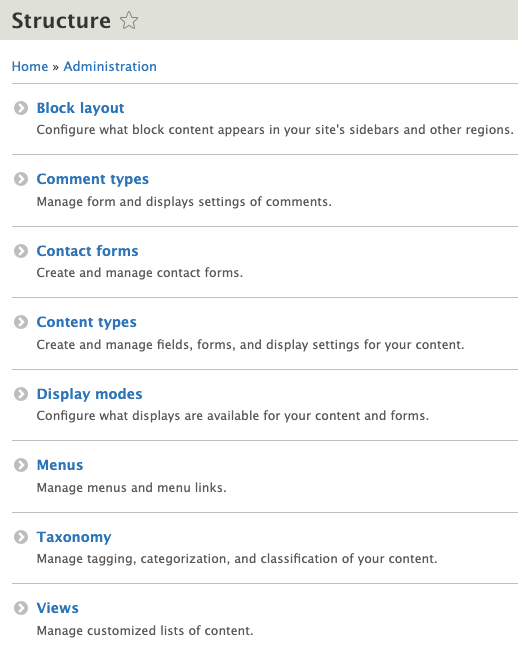
Structure
This is a powerful tool that gives you many ways to configure your content. Just note its location for now, we’ll explore this more in a later entry.
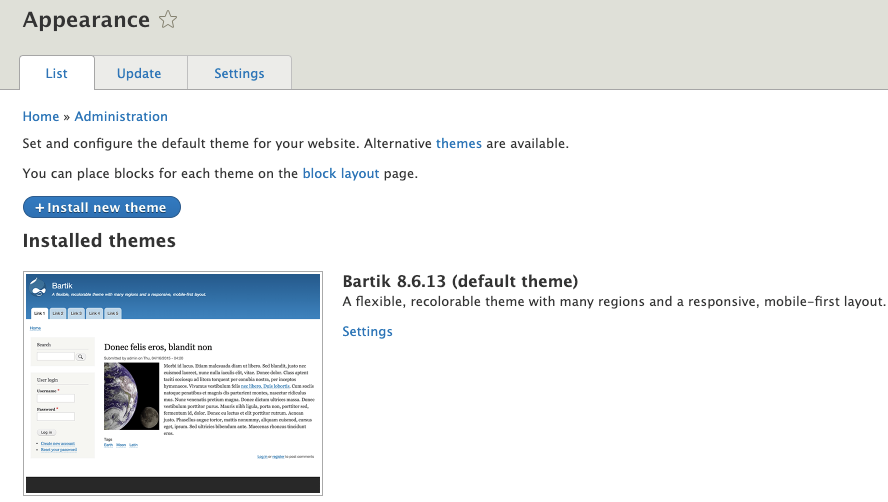
Appearance
This is where you add themes and view ones already installed. Themes change the appearance of your site. We’ll explore this further in the Installing Your First Theme section.
Extend
This page allows to install, view, and uninstall modules, Drupal’s version of plug-ins, which add new functions to your site. Modules can be somewhat tricky to deploy, so leave this alone for now.
Configuration
From here, you will execute most of your administration tasks, like content authoring, automation, basic site settings, and many other essential functions. We will spend more time in this area in a later entry.
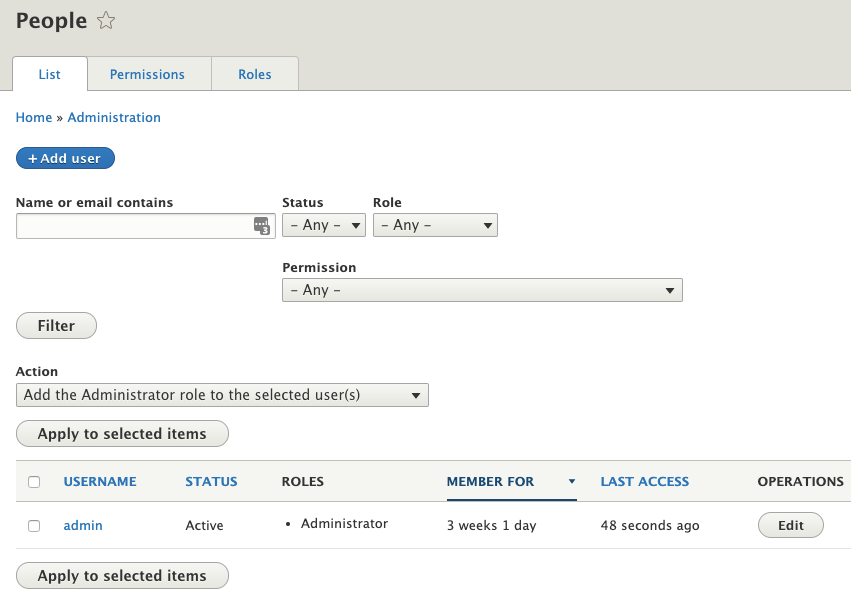
People
Here, you manage users, permissions, and roles. Drupal is known for deep default functionality for user administration, and can be particularly useful for managing the efforts of larger teams with specific roles. We will user administration further in a later entry in this series.
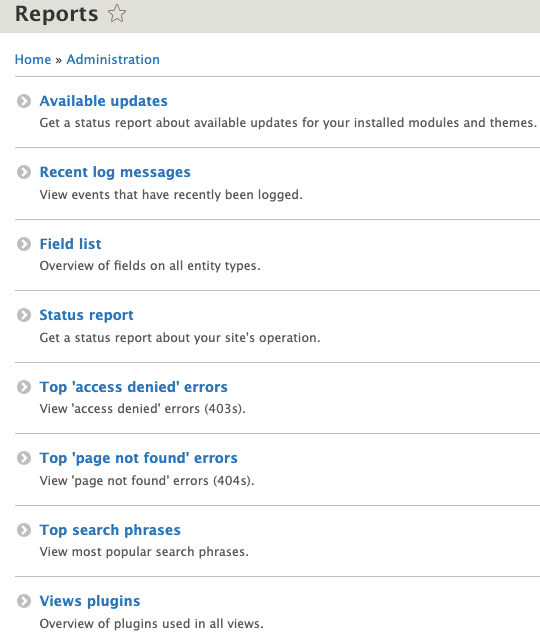
Reports
This provides various tools for assessing the health of your site. Here, you can check for updates, read your logs, and run status reports, among other useful information.
Creating Content
To get started, either select Manage > Content, or select AddContent from the Shortcuts tab.
Click .
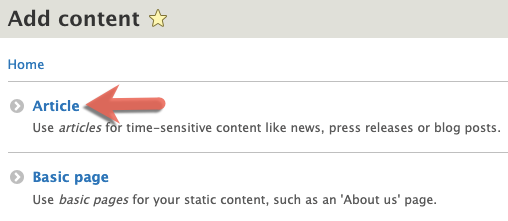
You now see two possible content types: Article and Basicpage. Select Article.
Fill the Title and Body fields with something simple.
At the bottom of the page, note the Published check box. If you clear the Published check box before clicking , it will appear as an unpublished draft on your Content page. For now, leave the Published check box selected and click .
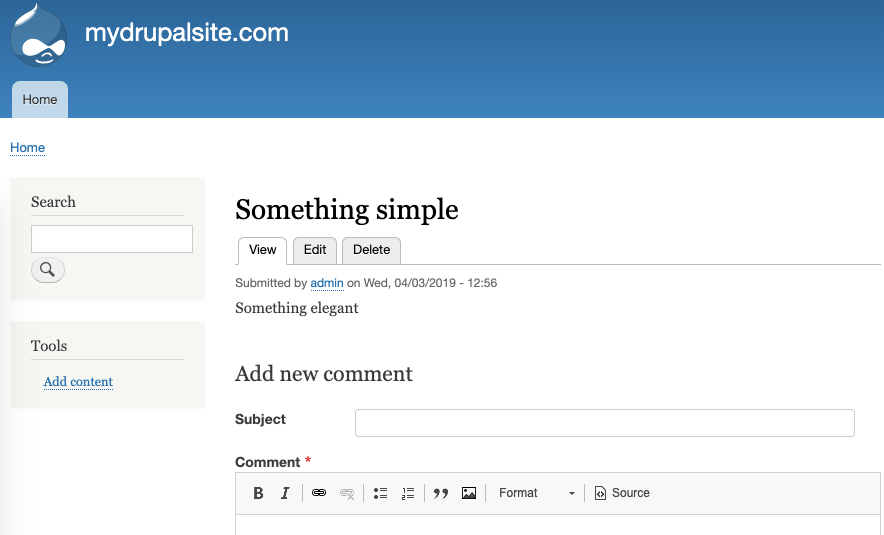
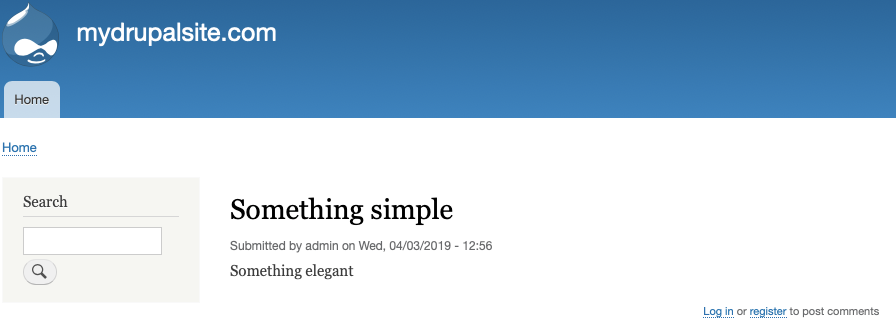
You will now see your newly published content, otherwise in Drupal as a node. Note the web address, or URL, which ends in “node/” followed by a number. For example, https://8ac818c39-731.hostcli.net/node/4. Although it is possible to customize this URL, for now just note the terminology and the numbering system.
If you scroll down on the page, you will see an area to add comments because you’re viewing your post as a site admin.
Admin view with ability to comment.
It is often informative to view your website as a casual visitor by accessing it from another browser, one where you are not logged in as a site admin. By default, your visitors can view comments, but are unable to create them. It is possible to adjust your site permissions to tweak these settings, but leave them as is for now.
Visitor view without option to comment.
Editing, Tags, and Images
Return to your admin panel, then click Shortcuts > All content.
Find the article you just published, then click .
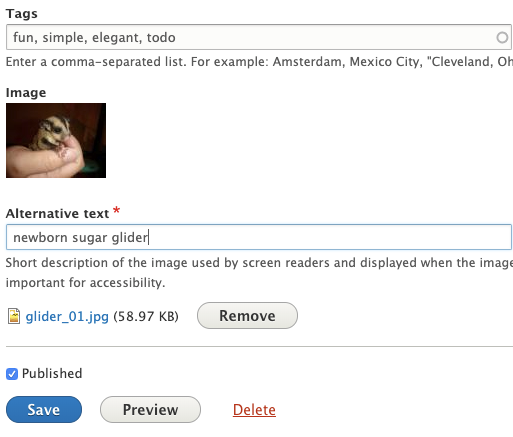
In the Tags field, enter a few tags, separating each with a comma.
Attach an image to your post. In the Image section, click . Select any image from your local device, then click Open.
In the Alternative text field, enter a short description of you image to assist screen readers and enhance accessibility.
Click when ready.
Visit your page from another browser to see it as a visitor will. It should look something like:
Installing Your First Theme
If this were an established site, this is where you would back up your site as an insurance policy against a misbehaving theme. Because this is your first install, you may skip this step.
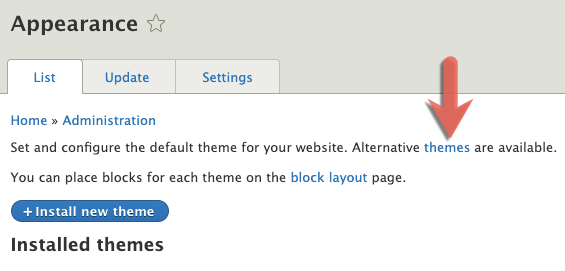
From your admin panel, select Manage > Appearance.
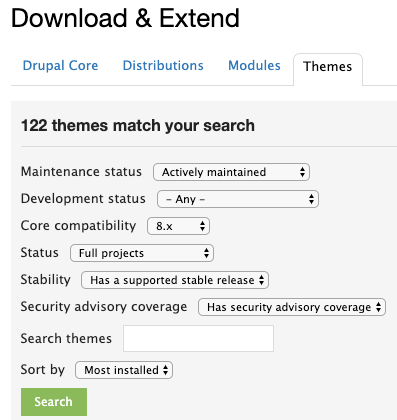
On the Drupal Download & Extend page, refine your search as follows: Maintenance status: Actively maintained Development status: Any Core compatibility: 8.x Status: Full projects Stability: Has a supported stable release Security advisory coverage: Has security advisory coverage
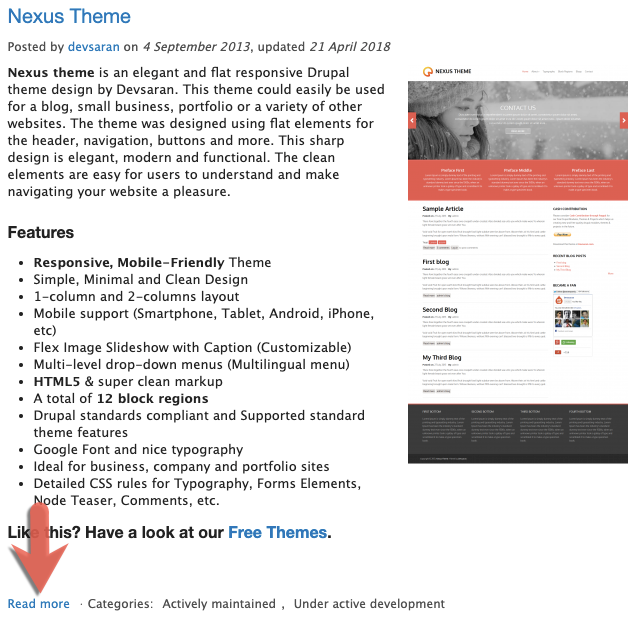
Click . Scroll down until you see the Nexus theme, which is a relatively simple and versatile option for those new to Drupal. Click Readmore.
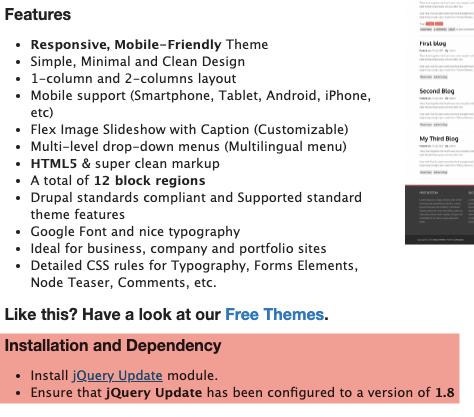
Whenever researching themes and their features, take time to read the Installation and Dependency notes. As noted in the description, the Nexus theme requires e jQuery Update module. Click the jQueryUpdate link to learn more.
Good news! The Downloads section contains below note, so we’re good to install the Nexus theme:
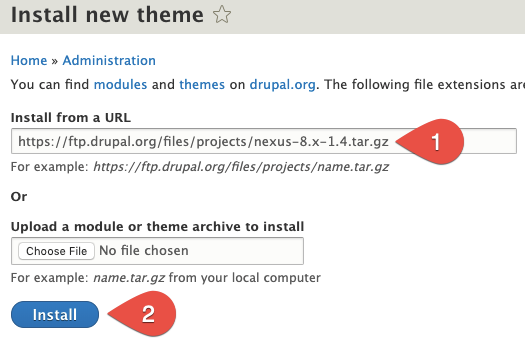
Return to the Nexus theme page. Scroll down until you see the green box containing version 8.x (it may read later than 8.x-1.4). Right-click on the tar.gz download link and copy it to your clipboard.
Return to your site’s appearance page (Manage > Appearance). Click .
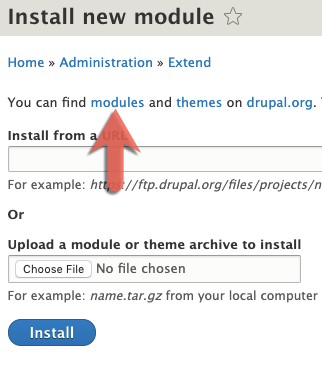
In the Install from a URL field, enter the link you copied in Step 7. Click .
Tip: It is also possible to download a module to your local device, then upload it using the Upload a module or theme archive to install option.
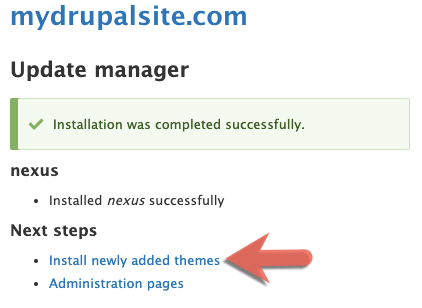
Drupal will notify you of the result. To install the Nexus theme, click Install newly added themes.
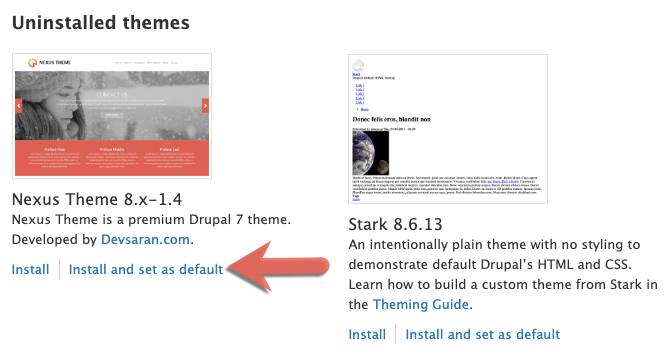
On your Appearance page, scroll to the Uninstalled themes section, find the Nexus Theme, and click Install and set as default.
Once installed, click Back to site on the upper left. Enjoy your new theme! To revert to your default theme (Bartik), return to your Appearance page, find Bartik, and click Set as Default.
Installing Modules
Use caution when adding modules. Although adding modules is much like adding themes, it involves a little more risk because they can sometimes affect your site in unwelcome ways. Before adding any module, make sure you have a backup.
If this were an established site, this is where you would back up your site as an insurance policy against a misbehaving modules. Because this is an early install, you may skip this step.
To start the process, click Manage > Extend, then click .
Repeat Steps 4 – 6 from the Installing Your First Theme section, but for your desired module instead of the Nexus theme.
Repeat Steps 8 – 13 from the Installing Your First Theme section, but do so from your admin panel, using Manage > Extend admin panel instead of from Manage > Appearance.
Next Steps
Watch this space for Part 3 of our Getting Started with Drupal 8 series, where we’ll explore more ways to customize your site, keep it secure, manage comments, and more!
When WooCommerce is first installed, it includes everything you need to start selling. But you can also take advantage of hundreds of extensions to add new features and customize your store — modularity is a strength of both WordPress and WooCommerce. Once you have finished setting up your new WooCommerce store, it’s worth taking a few moments to browse the extension directory to familiarize yourself with what is available.
To help you get started, I’m going to talk about six extensions. I’ve chosen these extensions because they add features that are useful to any WooCommerce retailer. In addition to WooCommerce extensions, retailers can also use WordPress plugins that aren’t built for WooCommerce, but I will stick to eCommerce-related plugins and extensions designed to work with WooCommerce.
Before I start, a word about names: WordPress refers to software packages that add extra features as plugins. In the WooCommerce world, they’re called extensions. So, WooCommerce is a WordPress plugin, and add-ons to WooCommerce itself are extensions.
WooCommerce Checkout Manager adds a host of features for configuring how the checkout looks and behaves. You can use it to add new fields, reorder fields, make some fields optional, and add conditional fields.
It’s a mixed bag of different checkout tweaks that you’ll almost certainly find a use for at some point in the life of your store.
Advanced Dynamic Pricing is used to create discounts and other pricing rules based on custom conditions. For example, Black Friday is coming up, and you might use this plugin to add discounts that only apply on that day.
WooCommerce is well-optimized for search, but Yoast’s plugin adds features that make it easier to implement SEO and social media best practices, such as Facebook and Pinterest-specific information, breadcrumb navigation, and an improved sitemap.
Product Bundles does what the name suggests. It allows WooCommerce store owners to create product bundles with custom pricing. Product bundling is an effective cross-selling and upselling strategy that encourages customers to spend more.
Wishlists are one of my favorite eCommerce features, and I miss them when I’m shopping on an eCommerce store that doesn’t have wishlist functionality. This plugin allows your customers to create wishlists, add products, and review the content of their list on a dedicated page.
Customers appreciate it when retailers reach out after a sale with useful information, discounts, or a simple “thank you.” On a small store, you can do this manually, but as your store grows, it will become a huge time sink. With the Follow-Ups extension, you can create emails and tweets, grouped into campaigns, and send them automatically according to custom triggers. For example, you might send a “Thank you” email immediately after a sale, and an email to request a review a few days after a product has been delivered.
I have barely scratched the surface of the huge ecosystem of WordPress plugins and WooCommerce extensions. As a WooCommerce hosting client, you can extend, enhance, and customize your store in many ways, both large and small. I’d encourage you to spend some time browsing the repositories for inspiration.
Drupal is a secure CMS used by almost 3% of websites worldwide. Since its creation in 2000, the web application has seen limited vulnerabilities when compared with other popular CMS platforms. For this reason, organizations around the world have decided to rely on Drupal to provide them with the site foundation they need to remain secure.
However, Drupal is not flawless. There have been vulnerabilities associated with the CMS – some of which have been severe for site owners. These vulnerabilities have often attacked outdated or unmaintained areas of Drupal Code. In many cases, these attacks would have been prevented if site owners had adhered to security best practices.
Starting with a brief history of Drupal security, this guide looks at what exploits are most commonly attributable to Drupal, how you can protect your site, and who can help you to protect your Drupal site.
We’ll cover:
What security vulnerabilities are most common with Drupal
How to prevent those vulnerabilities from causing damage
Who is responsible for specific areas of site protection
Where you can go for more information and guidance
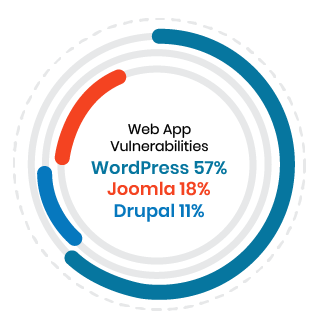
Drupal is often praised as being highly secure. At its foundation lies a stable source code with limited vulnerabilities and a sizeable support community. According to research by Imperva, Drupal is more secure than most other popular web applications, including WordPress, Magento, and Joomla. In 2018, it was found that only 11% of 2018’s identified vulnerabilities came from Drupal, far below the number attributed to WordPress.
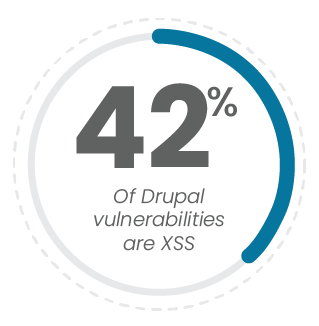
Yet Drupal still remains vulnerable and those vulnerabilities exist in varying form. CVE research identified a total of 323 recorded Drupal Vulnerabilities since 2002. Of these vulnerabilities, 42% were cross-site scripting (XSS) issues and 14% were code execution vulnerabilities. Other vulnerabilities that were statistically apparent included SQL injection and bypasses.
Drupal Security in 2018
In 2018, Drupal was the web application target of choice for many attackers. Despite having fewer vulnerabilities than counterparts, the vulnerabilities it did have were relatively easy to exploit.
Two of the worst attacks of 2018 came in the form of Drupalgeddon2 and Drupalgeddon3 (also known as CVE-2018-7600 and CVE-2018-7602). These vulnerabilities were exploited by remote attackers injecting malicious code. This code then allowed them to mine data, scan internal networks, insert trojans, and more.
Druaplgeddon2
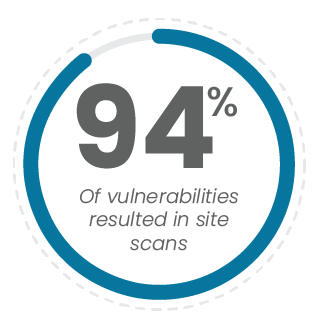
The first of these, Drupalgeddon2, struck on March 23. It worked through a code injection vulnerability associated with Drupal’s forms. A carryover from Drupal 6, the form rendering process vastly improved the way form markup was done, but ultimately led to an exploitable entry point in the email field. 94% of attackers used the vulnerability to scan sites for other vulnerabilities, while 2% attempted Crypto mining.
Once discovered, the introduction of a new WAF rule by Hostdedi meant that this exploitation was quickly stopped for our clients.
Druaplgeddon3
Drupalgeddon3 then struck in late April. Again attacking the form API, this flaw resided in the destination parameter. Again, this was a code execution vulnerability that led to site takeovers. While Drupalgeddon3 was just as severe as Drupalgeddon2, it actually resulted in fewer recorded attacks due to requiring the attacker to be authenticated on the attacked host. A properly configured WAF from a hosting provider like Hostdedi would have been able to prevent this attack from taking place.
Drupal Security in 2019
Several sources have predicted that injection vulnerabilities will continue to grow in number, largely because it’s possible to make money with these attacks. For Drupal site owners, this means that it’s important they secure their sites and ensure they have an up-to-date WAF. Learn more about the Hostdedi WAF.
Another exploit that will be taken advantage of is outdated PHP versions. 2019 has seen PHP 7.0 and 7.1 reach end of life, meaning they will no longer receive security updates. Drupal is developed in PHP, so all site owners should make it a priority to update their PHP version. PHP versions can quickly be changed by Hostdedi cloud clients in the Client Portal. We recommend testing any changes on a dev site before sending to a production site.
How To Keep Drupal Secure
Keep Modules and Core Up to Date
Keeping modules up to date is as important as keeping your site up to date. Community contributions are released constantly, with many addressing important security risks. The further you fall behind with Drupal updates, the more vulnerabilities your site will be exposed to and the more likely you are to have a security lapse.
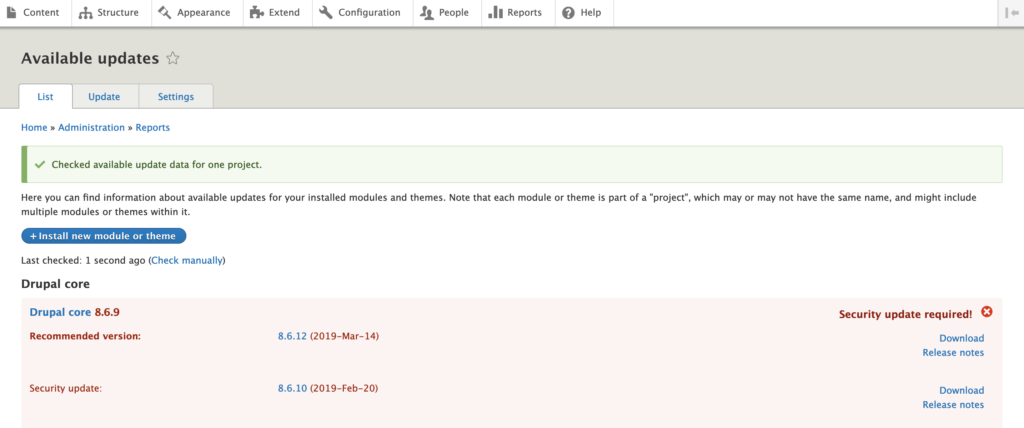
If your site is not updated, you will be reminded of this when you go to create new content. This warning message should not be ignored – especially considering that it’s a relatively quick fix.
To find and install new updates to your Drupal site, simply open Reports, then click Available Updates and Check Manually. Once you’ve found security updates, you can click download and install them by clicking the Install New Module Or Theme button.
If you’re starting a new site, it’s always a good idea to start with the latest version of Drupal. You can find the latest version of Drupal on their site: drupal.org.
Implement Better Passwords
As a PCI compliant hosting provider, this is something we come across frequently. Passwords are important and should always be chosen carefully. We’ve all heard the joke about the user whose password is “password”. But if we take a look at the top 25 passwords used globally, we begin to realize that it’s more than just a joke.
Implementing a better password may just mean using a password generator. These allow you to define parameters for what password you need and then generate it. If you’re afraid of not remembering your password, a password storage tool such a LastPass can help.
Finally, even with a better password, you should still be implementing additional security measures. We always recommend 2FA.
Add Drupal Security Modules
The first security module you should be adding is one that enables 2FA. The Two-factor Authentication (TFA) module is perfect for this. Note that at the time of writing this module is in alpha for Drupal 8.
Other security modules that will help you to lock down your site include:
Login Security: Deny login access based on IP address and number of login attempts.
Automated Logout: Log users out after a user-defined timeout period.
Session Limit: Limit the number of simultaneous sessions per user.
SpamSpan Filter: Blocks bots from finding email addresses by obfuscating them.
Prevent Indexing of the Login Page
You access your Drupal admin panel by logging into your site. An attacker can do the same. A simple and effective way to prevent unauthorized logins to your site is to prevent indexing of the login page by search engines. This makes it harder for an attacker to find your login page. You can do this by entering the following line in your Robots.txt file under Paths.
Disallow: /user/login
Check Files Permissions
File permissions play an important role in Drupal security implementation. They allow you to see which people are able to read, write, and modify content on your website. If you open permissions up to too many people, it is easy for attackers to gain access to your site. Conversely, if they’re too strict, you can end up breaking parts of your site.
Drupal themselves talk about how to secure file permissions. As a general rule, it’s important to keep permission for core files and directories such as modules and index.php locked to admin users only.
Block Important File Access Entirely
Certain files are sensitive and shouldn’t be accessed by anyone other than the site’s primary administrator. This includes upgrade.php, cron.php, install.php, and authorize.php. To do this, you can add the following to your .htaccess file.
<FilesMatch "(upgrade|cron|install|authorize).php">
    Order deny, allow
    deny from all
    Allow from 1[Insert Your IP]
Block Bad Bots
Bots, crawlers, and scrapers are a constant danger to sites. If they don’t do anything else, they can steal your bandwidth. In most cases, security extensions like SpamSpan Filter and Session Limit can help to ease the effects of bad bots. However, there are sometimes instances where it’s important to block bad bots not covered by these modules.
To block bad bots at the server level, you’ll need to limit the number of user-agent strings by adding the following to your .htaccess file.
If you host your Drupal site with a secure hosting provider, always check to see what they are doing to protect your Drupal site from bad bots. Nexess ensure bad bot protection for clients across our entire network by limiting traffic from known offenders and employing continuous site monitoring to identify new ones.
Always Keep a Backup of Your Site
It’s recommended that you always have an up-to-date backup of your site. This does not mean just relying on your hosting provider’s backups. In some cases, corruption and vulnerability exploits can damage both their backup and the original. For this reason, it’s recommended to also store a backup of your site locally.
This can be done in a variety of ways. We recommend storing a backup of your MySQL databases and your Drupal file directory. With Hostdedi it is possible to automate this process and download site backups through your control panel. We recommend making a full backup.
Install an SSL Certificate
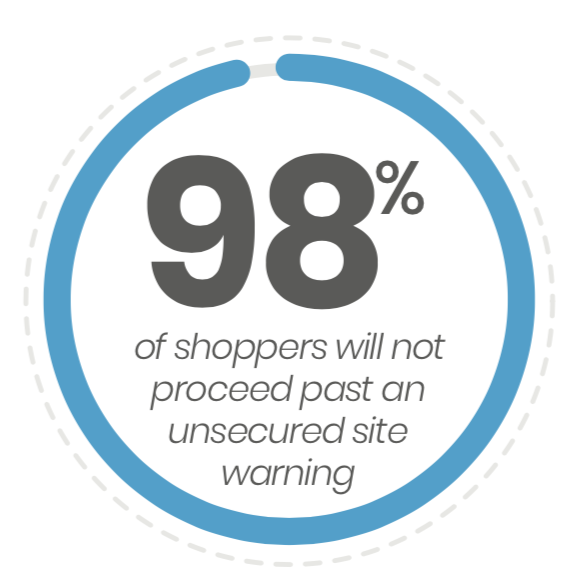
An SSL certificate is a small file that digitally adds a cryptographic key to an organization’s domain. This allows for secure connections from a web server to a browser through https. SSL certificates are particularly important for login and checkout processes. By keeping the information being transferred secure, it prevents attackers and identity thieves from accessing that information.
For eCommerce sites, an SSL certificate can make a huge difference to revenue. 61% of shoppers will not purchase from an unsecured site and 98% will not proceed past an unsecured site warning.
If you’re unsure what SSL certificate is right for you site, we recommend looking at our SSL FAQ. Note that it’s important to install an SSL certificate for more than just security. In 2014, Google announced that the presence of https will influence site ranking in search results.
Who Can Help You With Drupal Security?
The Drupal security ecosystem relies on three groups to help identify issues, fix breaches, and maintain security for site owners. Each of these groups has a vital role to play and can help in unique ways, If you’re a Drupal site owner and run into a problem, these are the four main groups who can help.
Developers
With firsthand experience navigating your Drupal site, your developers are uniquely placed to identify and fix issues that may have been missed. Often, dedicated Drupal developers will contribute to a Drupal site on a daily basis, whether that’s one or multiple. This means that they are constantly collecting information about potential vulnerabilities. Moreover, a developer may be the most immediate source of help available.
Hosting Providers
Hosting providers are your second line of defence against vulnerabilities. Often, if you are hosting with a reliable provider, their infrastructure is optimized to try and protect you against vulnerabilities and security exploits. This often includes the implementation of a WAF (Web Application Firewall). A well secured WAF can mean a quick fix for dangerous vulnerabilities such as Drupalgeddon2 and Drupalgeddon3.
Project Maintainers
Project maintainers are on the frontlines of security, finding new problems every day and implementing solutions. There are more than 15,000 active project maintainers in the Drupal community and each one contributes their own areas of expertise, from plug-in modules to core. If you’re looking for a fix, or want to report on a vulnerability you’ve found, they are a good point of contact.
The Drupal Security Team
The Drupal security team are the core force behind protecting Drupal instances. Comprised of some of the world’s leading web security experts, the Drupal security team are always on call to assess and fix any issues that arise.
Drupal Security Advisories
Drupal themselves have a detailed list of security advisories. If you’re in charge of security for a Drupal site, it’s advisable that you check these relatively frequently. To make things easier, each is marked depending on its security risk. If you see something that is highly critical, and your site meets the conditions, you should update your Drupal instance as soon as possible.
If you’re unsure about whether you are affected, or would like help from the Hostdedi team in employing a fix, you can contact support. They will help to resolve the vulnerability for you.
Conclusion
Drupal is one of the most secure web applications around, but this doesn’t mean that you can sit back and do nothing. If you want your Drupal site to remain secure, it’s important to regularly update your site and follow security best practices as outlined above.
By following the best practices outlined in this guide, your site will remain safe and secure. However, it’s important to keep in mind that a “one size fits all” approach is not always the best way to proceed. You may find that by limiting permissions or editing defaults, your site will break.
For this reason, it’s highly recommended to first try all changes on a development site and then implement on production.
If you’re still unsure on something regarding Drupal security, why not speak to a Hostdedi team member? We can walk you through how to keep you site secure and how our Drupal hosting solutions are engineered to maintain Drupal security.
 Data is one of your eCommerce business’s most valuable assets. But it’s not only valuable to your business. It’s also valuable to criminals, who use personal data for identity theft and credit card numbers to commit fraud. Over the last few months, several major eCommerce retailers and many smaller stores were targeted by Magecart, a criminal group primarily focused on scraping credit card numbers.
 April 10, 2019 – Drupal 5.7 is just three weeks away, and with it will come the Drupal layout builder.
 After a week in Las Vegas as a Summit Insider for the Adobe Summit, I’ve learned quite a few things about Adobe and their plans for Magento 2.
 Whether you’re new to eCommerce or looking to see if there’s a better option for your growing store, choosing the right web application is important. There are several different options out there for merchants. This article looks specifically at Magento and Prestashop.
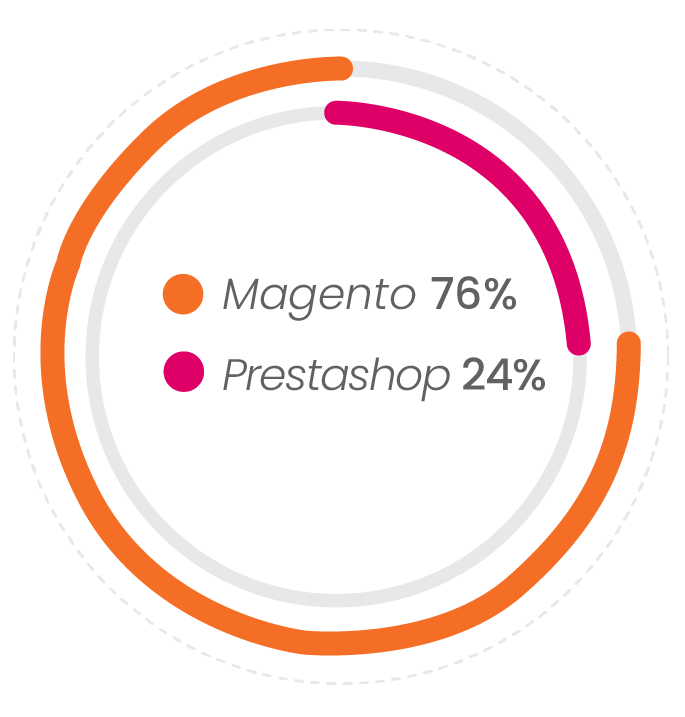


]")


 When WooCommerce is first installed, it includes everything you need to start selling. But you can also take advantage of hundreds of extensions to add new features and customize your store — modularity is a strength of both WordPress and WooCommerce. Once you have finished
  Drupal is a secure CMS used by almost