CAll Us: +1 888-999-8231 Submit Ticket

Deploy WordPress with Github Actions

A while back I showed you how to deploy your WordPress site with Deploybot. I’ve used this service for years now, but when I started, it was out of my price range, so I used nothing and made many mistakes deploying my sites which cost me many lost hours and some tears.

Today, I’m going to walk you through how to use Github Actions to deploy your site automatically for no cost. The set up is more complex than Deploybot, but it’s going to be free for most projects.

This post has a bunch of working parts so set aside some time, especially if you haven’t worked with Git or SSH keys before. We’re going to cover:

  • Creating a Hosting Account
  • Getting your code into Git
  • Creating special deploy SSH keys for Github to use
  • Configuring the Github Actions YAML file
  • Using Github repository secrets to keep private information safe
  • rsync via ssh

What Are Github Actions?

Github Actions is a feature of Github that allows you to automatically perform tasks based on the state of your code. Today, we’ll look at deployment, but you could also have an action to run your unit tests or notify a Slack chat when someone makes a new PR on your project.

While they may take a bit of time and effort to set up your first time, they return the investment by letting you get back to code instead of worrying about repeating the same work over and over. 

Getting Your Site Set up

The first thing you’ll need is to create a hosting account on Hostdedi, so head over and check out the plans available. The Maker WordPress plan is a good plan if you’re hosting a few sites.

With your site set up, go to the backups and create a backup of the site before you do anything else. Make sure you download this backup as well so you have a copy on your computer…just in case.

Unzip the backup and then copy out the public_html folder to use as our git repository. You can remove the wp-config.php file because we won’t need it today.

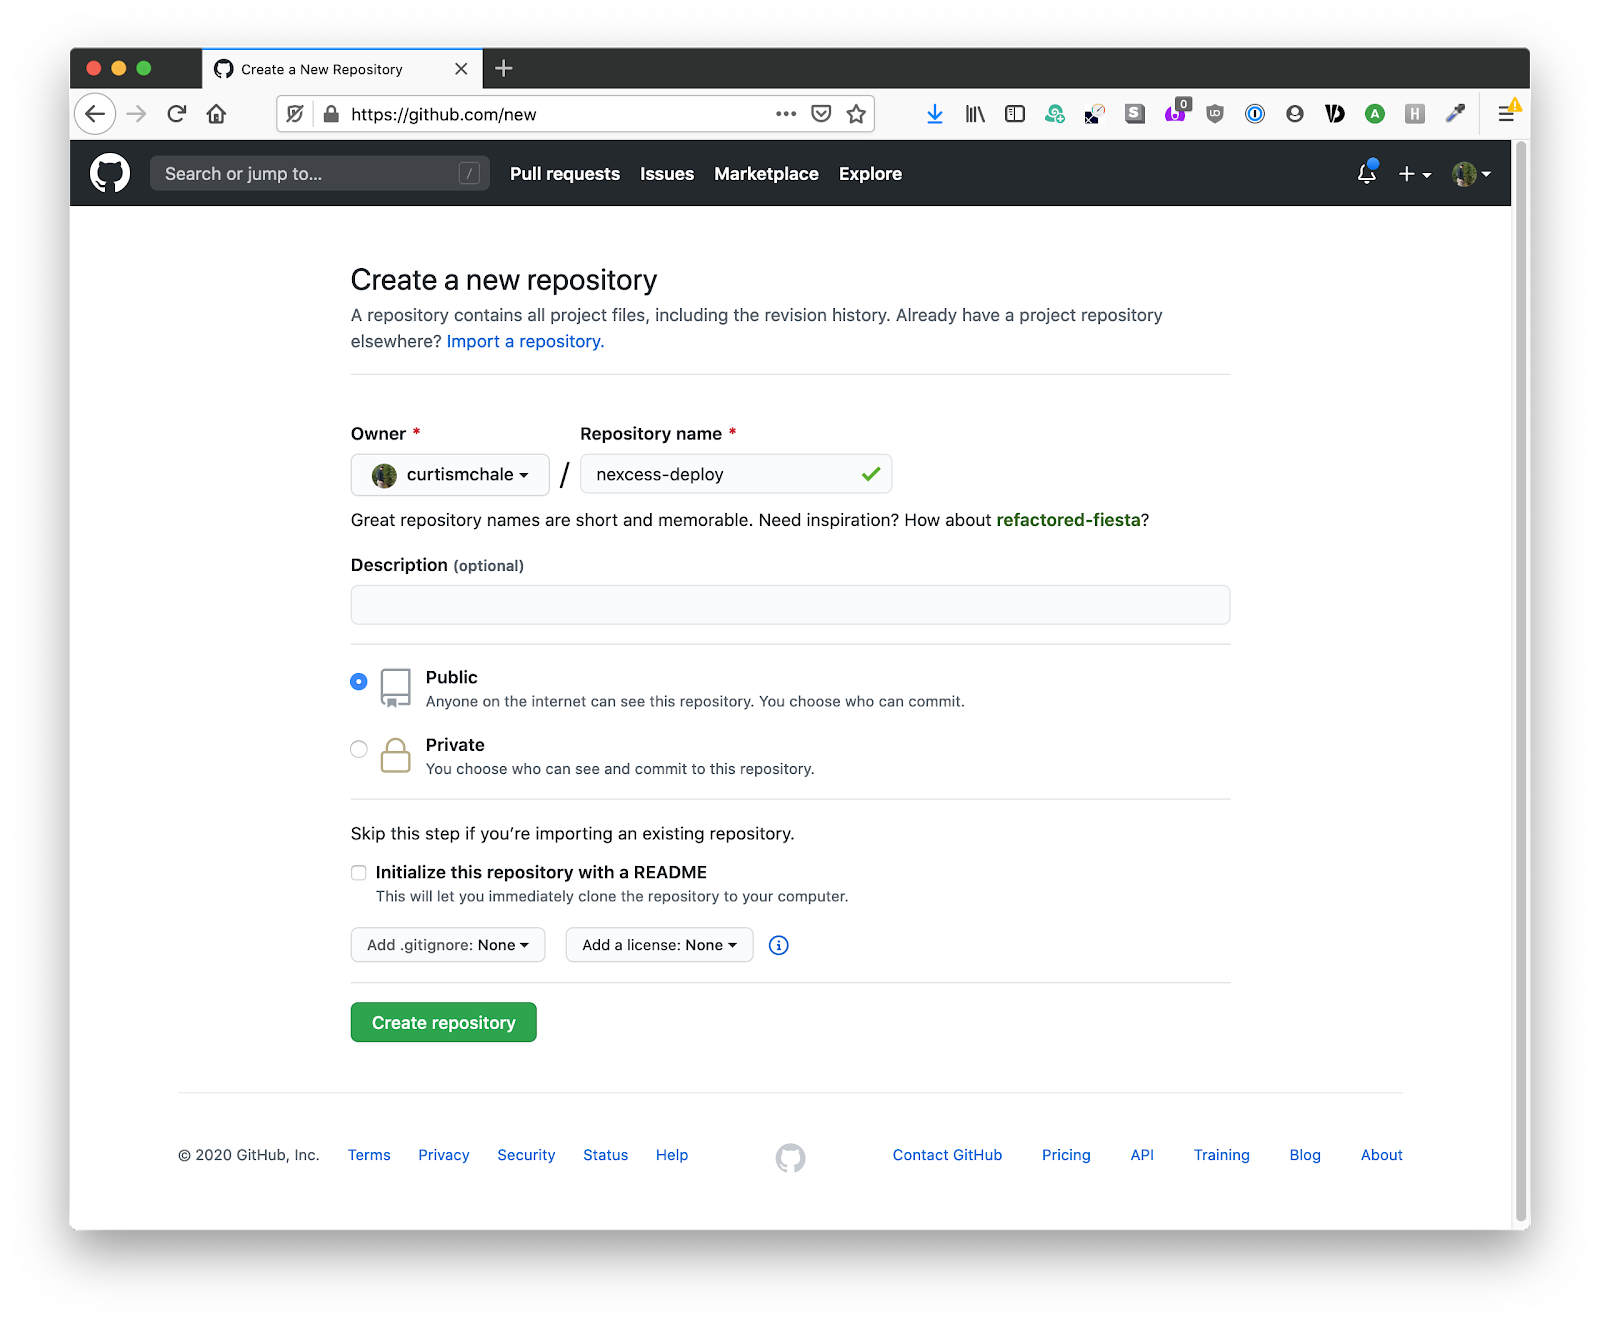
Now that we have our copy of the repository downloaded, let’s add it to Github. To start we’ll need to create a new repository in Github. Add your title and whatever description you want, I usually don’t initialize the repository with a README because I’ll provide my own with any project-specific notes and documentation for a client project.

Next, open up Terminal and cd into the downloaded copy of WordPress so you can initialize the repository with git init. The first thing we want to do is add our .gitignore file so that we don’t add any files that may overwrite what Hostdedi needs to run your site. You can use the .gitignore file provided below.

The top eight lines are specific to Hostdedi, so make sure you copy those lines if you have your own preferred ignore configuration.

If you’re not familiar with Git, check out my post on Introduction to Git.

.htaccess

wp-config.php

wp-content/uploads/*

wp-content/cache/*

wp-content/upgrade/*

wp-content/advanced-cache.php

wp-content/object-cache.php

wp-content/mu-plugins/*

config/app_config.yml

config/database.yml

config/*.sphinx.conf

config/s3_credentials.yml

*~

*.cache

*.log

*.pid

tmp/**/*

.DS_Store

db/cstore/**

db/sphinx/**

doc/api

doc/app

doc/plugins

doc/*.dot

coverage/*

db/*.sqlite3

*.tmproj

*.sw?

*.esproj

_notes*

dwsync.xml

podcast.xml

*.kpf

*uploads/*

*.swp

*.idea

*.sublime-project

*.sublime-workspace

*/node_modules/*

tags

*.bak

cache/*

managewp/*

Now that you have the ignore file ready, use git add and git commit to add the WordPress files to your repository. Then push those files to your Github repository.

Creating a Deploy SSH Key for Github

To deploy our site via Github Actions, we’ll need an SSH key for the action to use. Do not use your regular SSH key.

To generate the SSH keys needed use the command below using your email. When prompted for a passphrase, press enter and leave it blank. When you’re asked for a location, choose a location to store them temporarily. You can find Github’s documentation on SSH keys with extra details here.

ssh-keygen -t rsa -b 4096 -C "[email protected]"

Before we take the next step, make sure your new SSH keys are stored safely. I store them in my 1Password vault alongside the other server credentials. Don’t leave them sitting in some folder on your computer because if someone gets your keys they get access to any server those keys are used on.

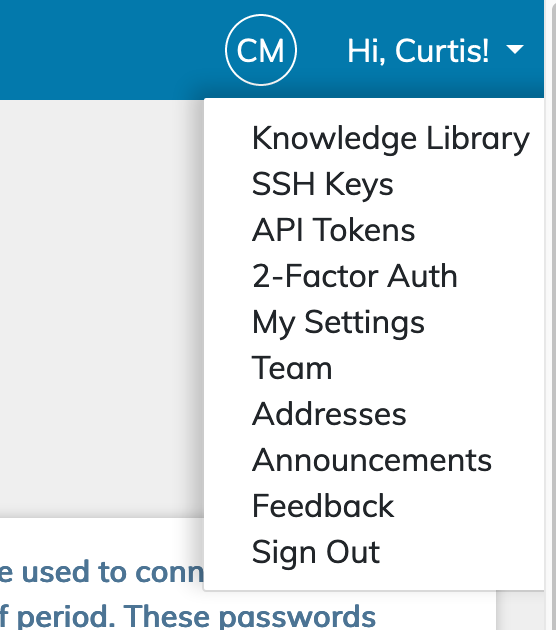
Now, open the public key (the one that ends in .pub) and open it in the text editor of your choice. In your Hostdedi account, click on your account name in the top right corner and select SSH Keys.

Next, select Add Key and copy/paste the whole key out into the main text field. Make sure to label your key properly so you can tell what the key is being used for.

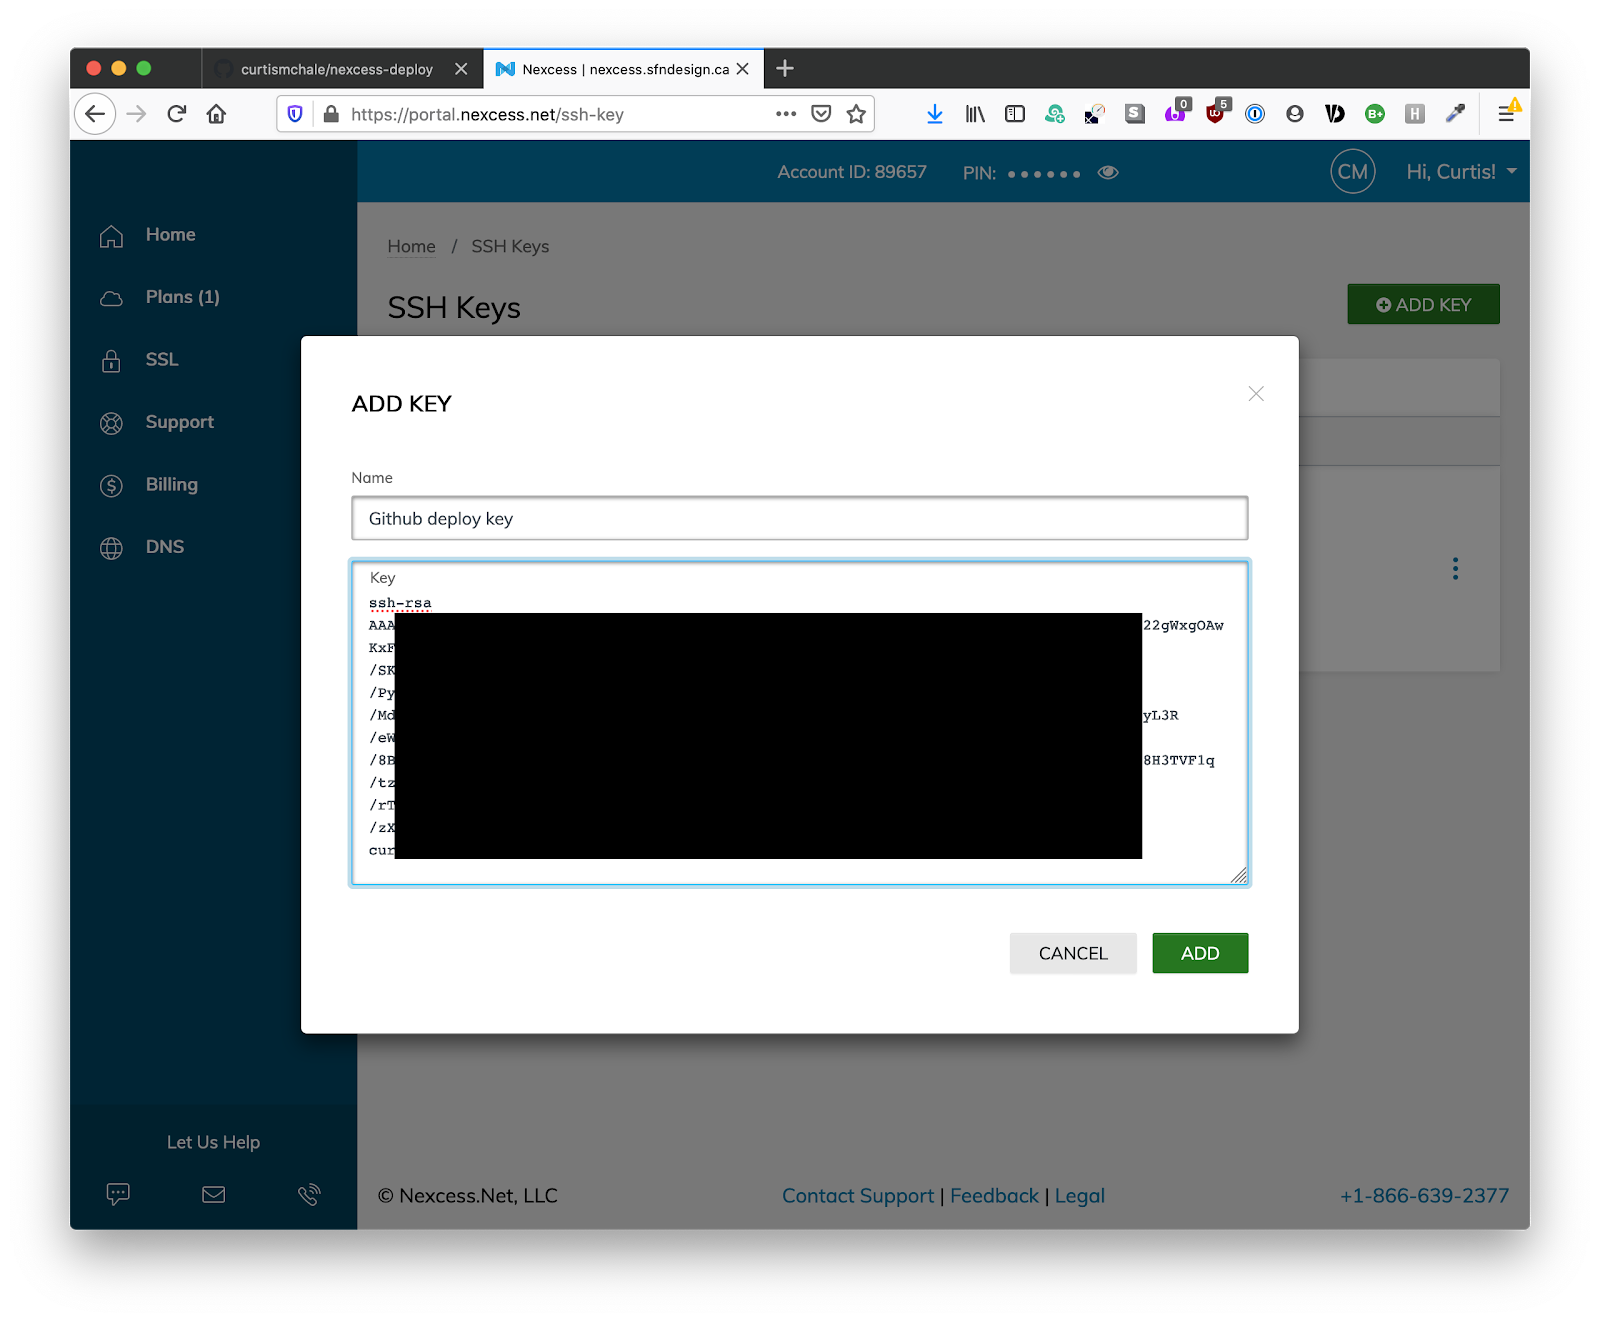
Finally, click Add to save the key to your account.

Adding and Configuring Your Github Action

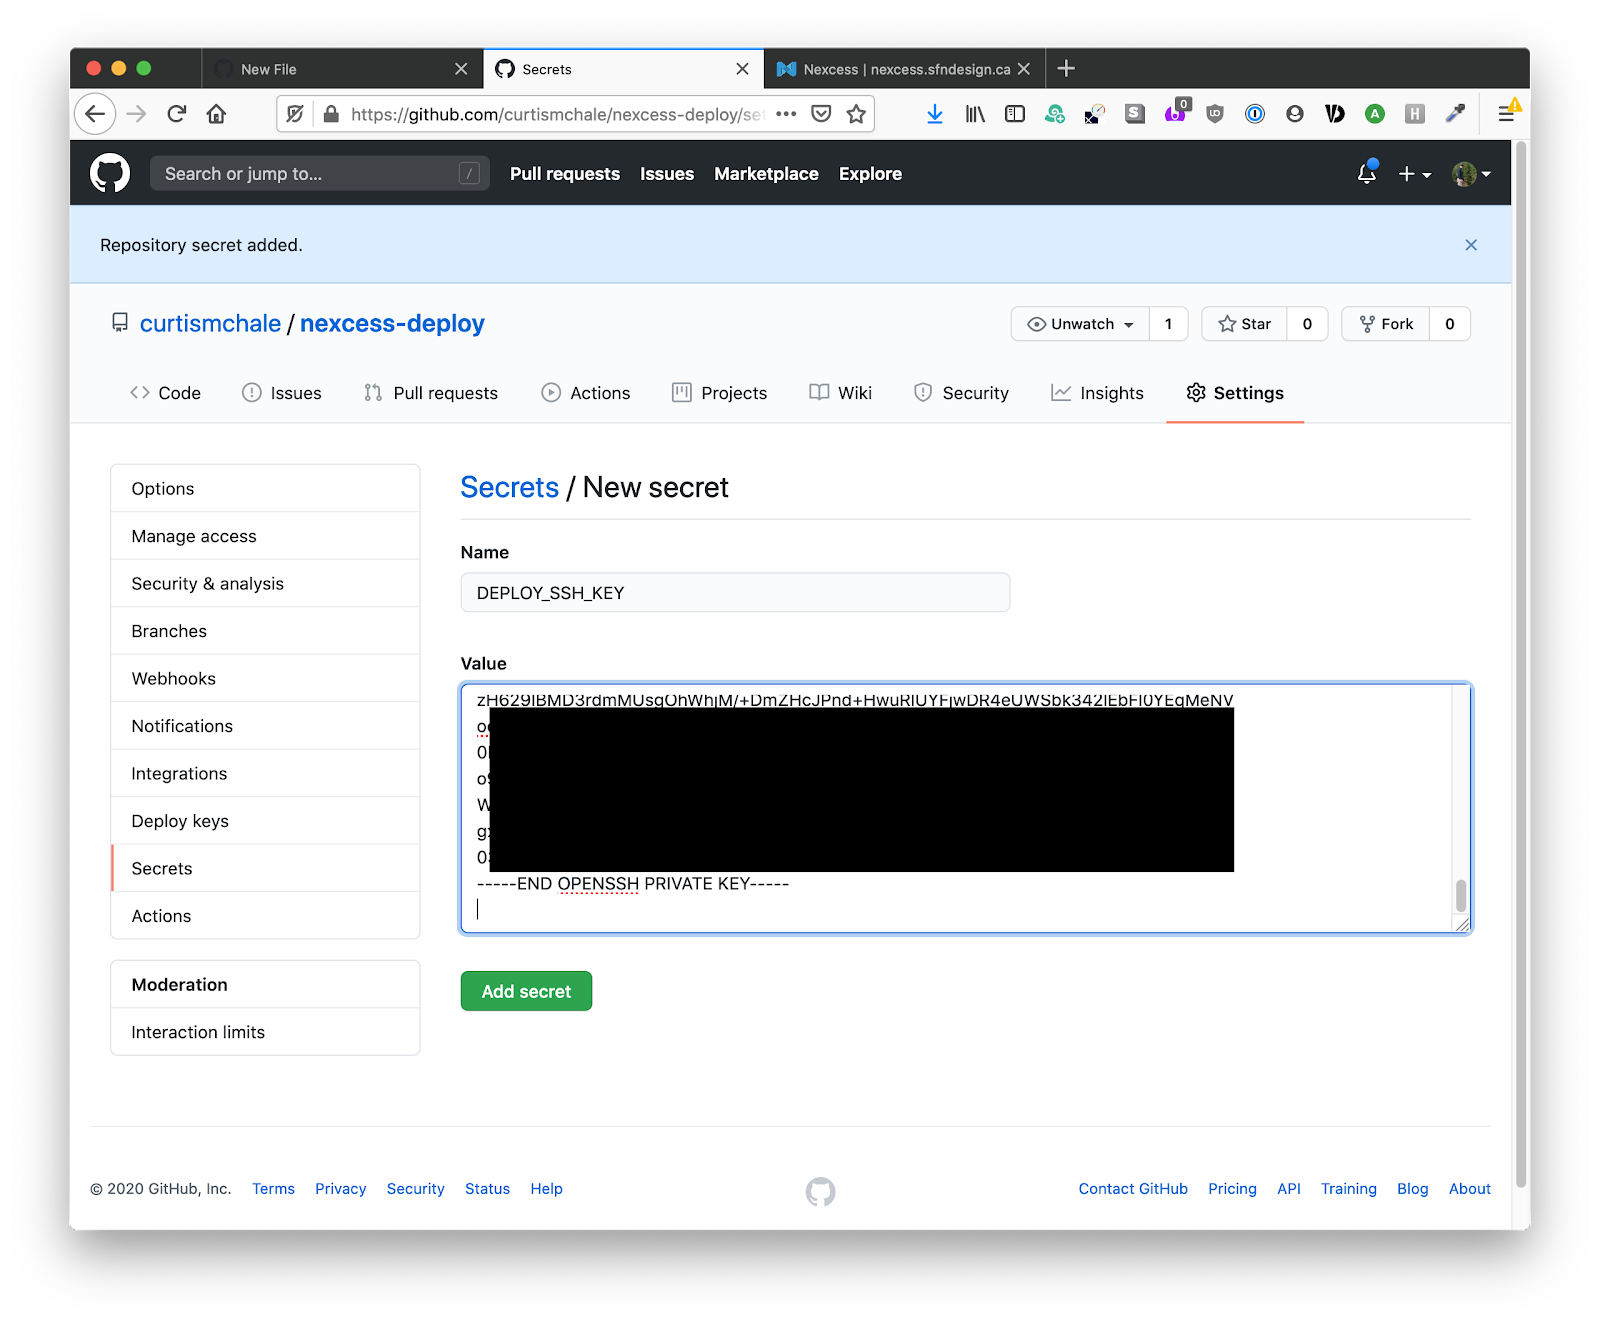
Before we start to build our action, we’ll need some secret information stored in our account. Stuff like our private key for the key pair we just created, the location of our server, and the entry for the known_hosts file.

Start this by choosing Settings from the top right of your repository. Then choose Secrets from the left column. We’re going to add 3 different values.

  1. DEPLOY_SSH_KEY: This is the private key we generated (doesn’t have .pub at the end)
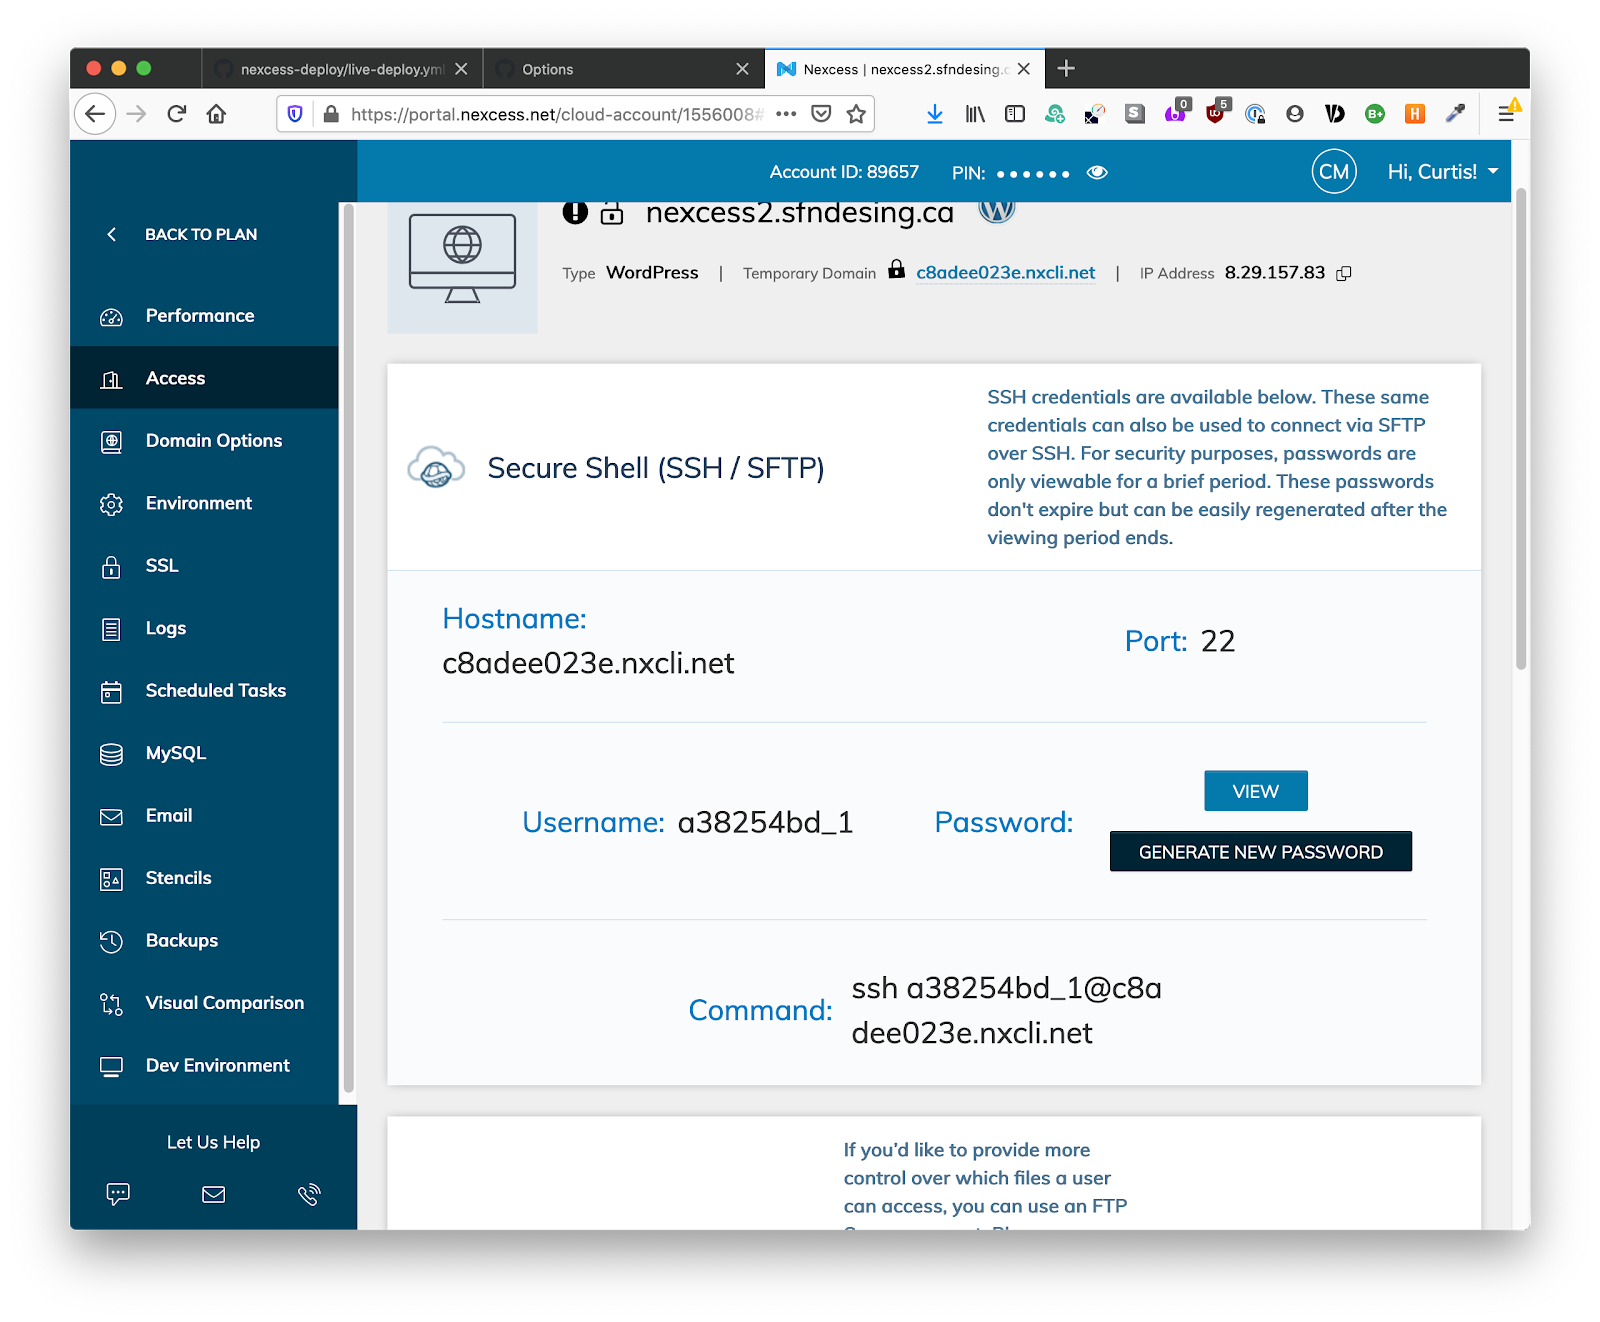
  2. NEXCESS_LOCATION: The location SSH will access on our server plus the file path to your html directory. Making a mistake here could delete your site, but this is why we took a backup.
  3. NEXCESS_HOST: The allowed host file we need from our server

You already have 1 so open your key file and copy it’s entire contents into a secret called DEPLOY_SSH_KEY.

Next, you can get the location of your server from your Hostdedi control panel for your site under the Access menu.

Finally, the easiest way to get the content for NEXCESS_HOST is to ssh into your server from your computer. This should prompt you to accept a new known server. Accept the new server and then you can head to ~/.ssh/known_hosts and get the last line in the file for the secret you need to add to your repository.

Why are we keeping this stuff secret? Each of these pieces of information has some security risk so you don’t want them in your repository. Putting them in a secret variable in Github makes sure you don’t expose information by accident.

We’re ready to head back over to our repository on Github and get our action going. Start by going to the Actions menu at the top of your repository and click on it. While there are lots of prebuilt actions, we’re going to start by creating our own action so select that from the Actions screen.

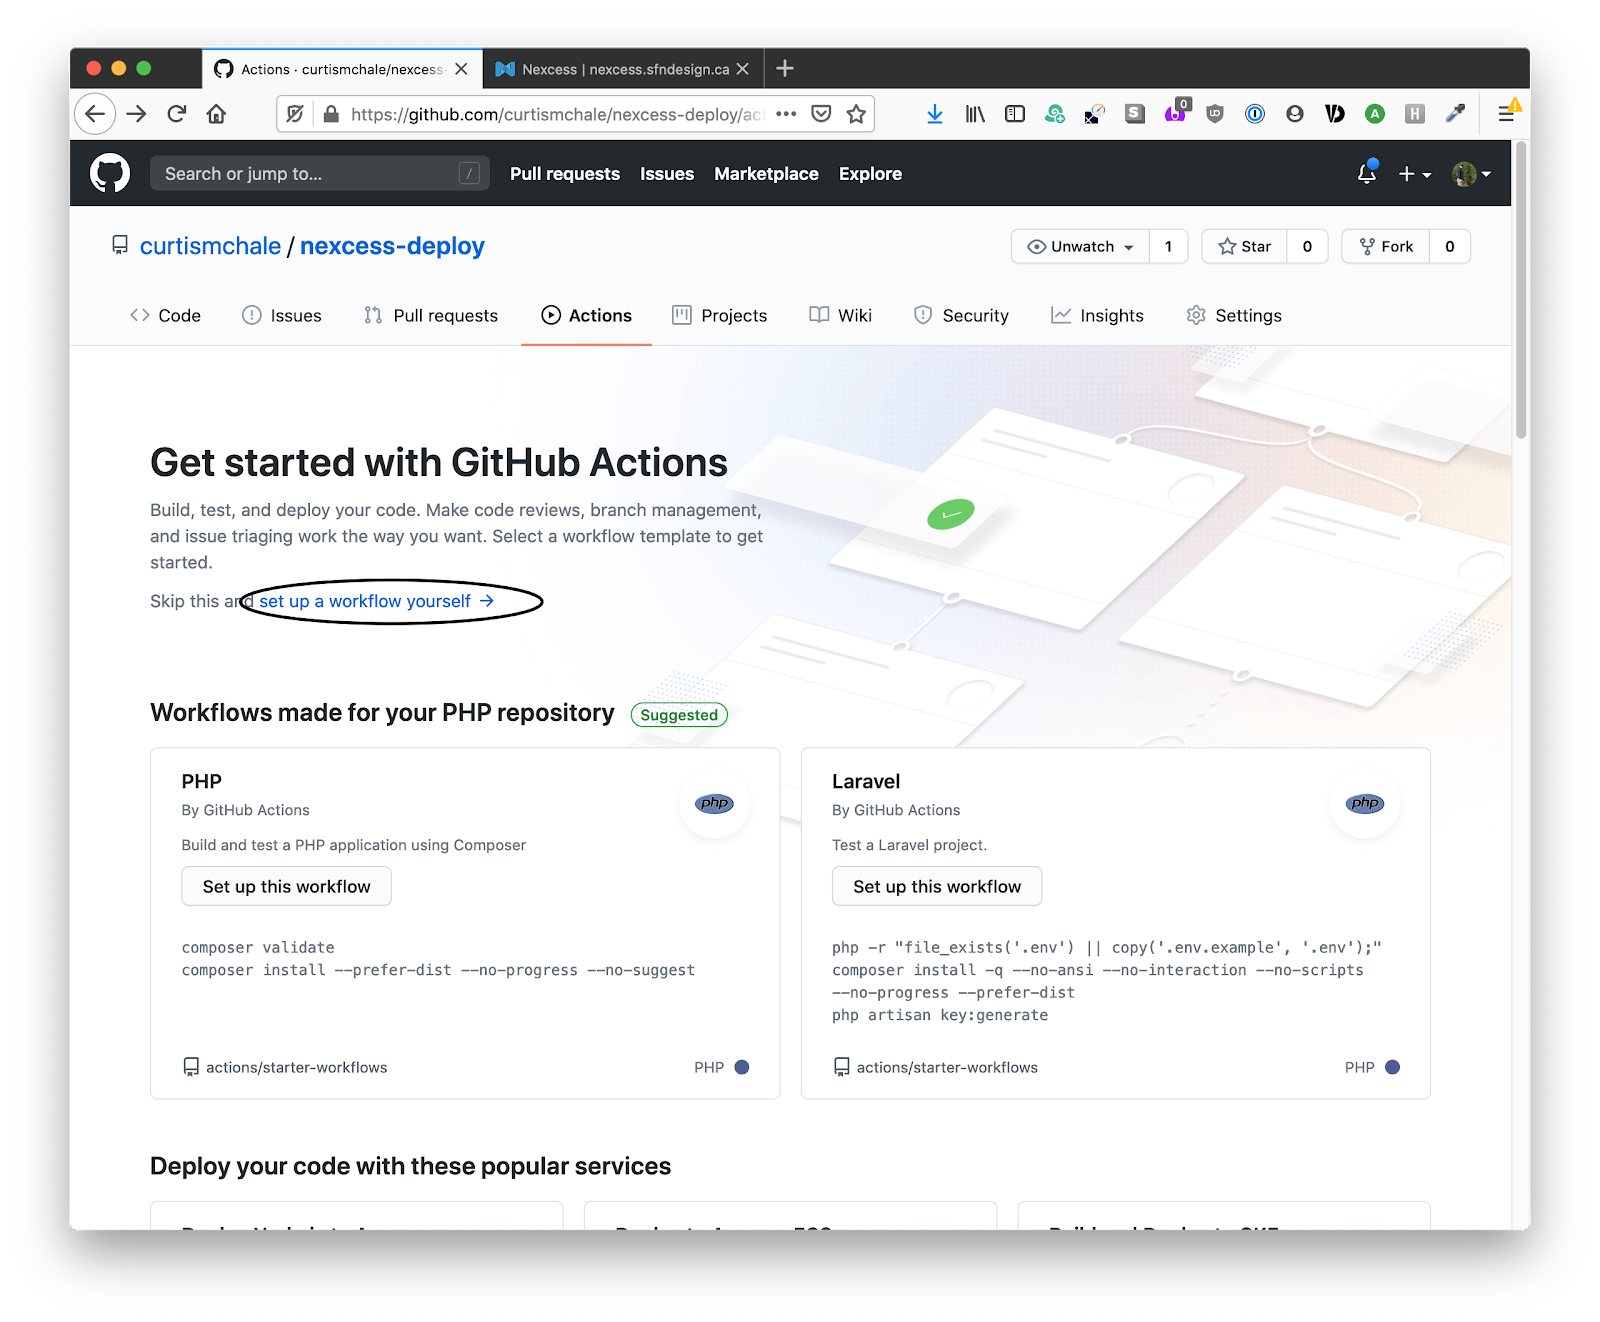
Doing this will give you a basic workflow file written in YAML. By default, it works only on your master branch, but by changing which branch is in the arguments on lines 9 & 11 you can make it work for a different branch. You may do this if you wanted to deploy from a staging branch to a staging site and from master to the live site.

Starting with the line below, delete the rest of your default workflow file.

# Runs a single command using the runners shell

    - name: Run a one-line script

      run: echo Hello, world

Now we need to get our SSH agent. On the right hand side of the workflow screen search for webfactory/ssh-agent.

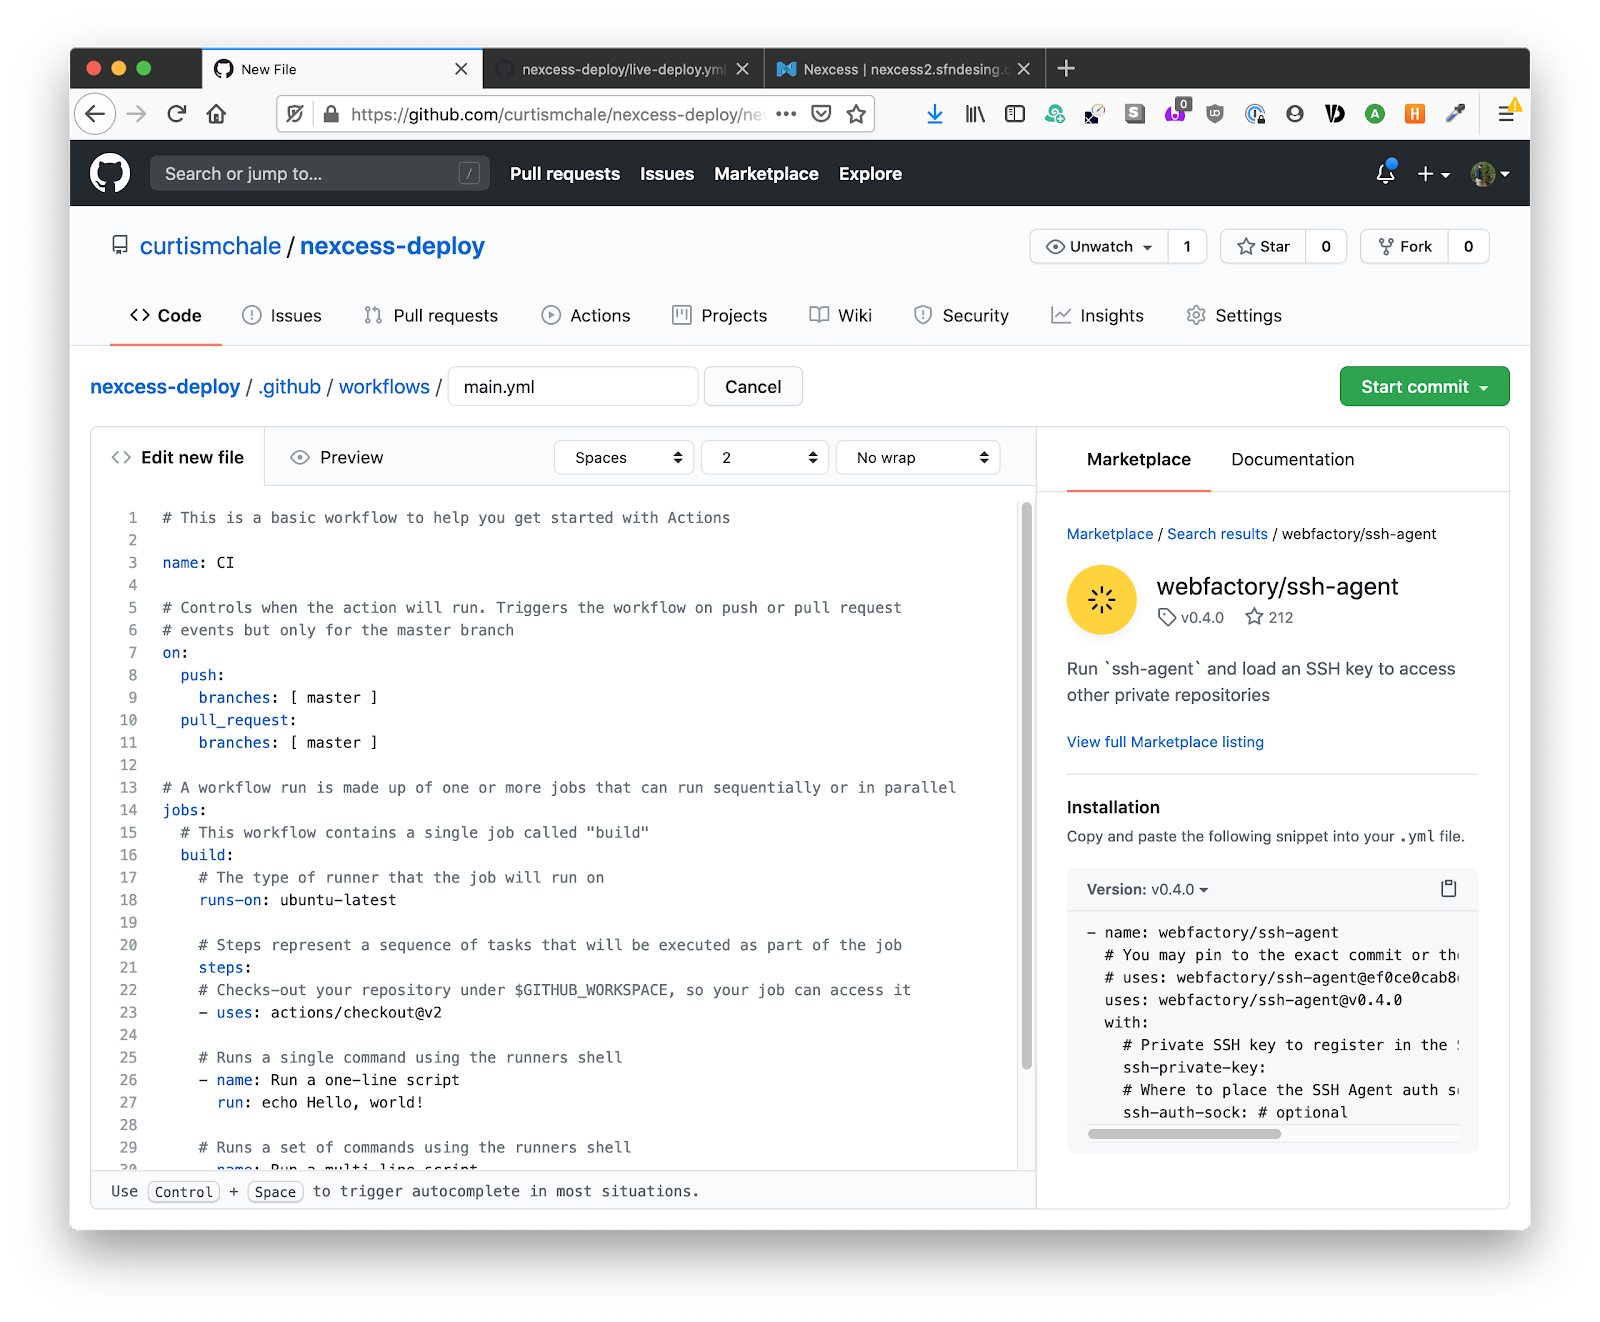
Click on this and it will provide you with some commands to copy and paste into the bottom of your file, but we’re going to use our own custom script. Copy the code below and paste it into your workflow file below the actions/checkout@v2line.

   # Setting up SSH

    - name: Setup SSH agent

      uses: webfactory/[email protected]

      with:

        ssh-private-key: ${{ secrets.DEPLOY_SSH_KEY }}

    - name: Setup known_hosts

      run: echo '${{ secrets.NEXCESS_HOST }}' >> ~/.ssh/known_hosts

    - name: Sync project files

      run: rsync -uvzr --backup --backup-dir='~/deploy-backup/' --exclude 'wp-config.php' --exclude '.gitignore' --exclude '.git/*' --exclude 'wp-content/uploads/*' --exclude '.htaccess' --exclude 'wp-content/cache/*' --exclude 'wp-content/advanced-cache.php' --exclude 'wp-content/object-cache.php' --exclude 'wp-content/mu-plugins/*' ${GITHUB_WORKSPACE}/ ${{ secrets.NEXCESS_LOCATION }}

You can see the secrets we set up earlier in this file. It starts by pulling in the ssh-agent and adds our private DEPLOY_SSH_KEY to the server it’s getting ready in the background. Next, it adds our server as a known host.

It finishes by syncing the project files over to the live server in a long rsync command. In short, it backs up the remote server into a directory called deploy-backup and then moves any new files in the Github project over to the live server. We excluded all the same location we ignored in our original .gitignore file so that rsync doesn’t touch them by accident.

If you want to read up on each rsync command there, I usually refer to this Ubuntu documentation on rsync

Now all you need to do is make some changes in your repository and then use git to add and commit them to your repository. Push those changes to Github, and the action will automatically backup your files and then push your changes over to your site.

If you’re new to automatic deployments, this does seem like a lot of work. Even my first time using Github Actions to deploy my site I spent a few days working on the script. This doesn’t feel like it saves time until I’m using the same script for weeks with a project deploying regularly.

Automating your deployment, and taking the time to get it right, means you never accidentally overwrite the wrong files, put the wrong files in the wrong directory, or make any other of the many mistakes I’ve made moving files around in the 12 years I’ve been building sites.

A day or two of time spent configuring deployment for your first time is worth saving that pain.

Source link

Introduction to Unit Testing for WordPress

While many of us have heard of unit testing, it’s not a big topic of discussion in the WordPress community. Yes, there are tests for WordPress core. Yes, many of the major plugins like WooCommerce have unit tests, but that doesn’t make it easy to jump on the unit testing train. 

While you can find lots of content about unit testing PHP applications, there aren’t many people talking about unit testing specifically for WordPress. There is precious little written about where to start for developers that are ready to increase their code quality and want to learn how to add tests to their work. Even worse, some of the tools for unit testing in WordPress don’t work as advertised, or are using older versions of PHPUnit. Problems you’ll have to discover on your own as you try to start testing.

That leaves many people who want to get started with testing on a multi-hour journey to get even the basic default tests running for their plugin.

Today we’re going to solve that problem by giving you an up-to-date look at how to start unit testing your WordPress code.

Things to Have Installed

Before we dive into unit testing, I’m going to assume you have Laravel Valet and WP CLI installed. I use these excellent directions from WP Beaches to install Valet, though I use the mysql instructions not the MariaDB ones. 

You can find the instructions to install WP CLI on the WP CLI site.

If you’re on Windows, you may have a bit of extra digging to do so you can run unit tests. The WordPress Handbook has some instructions on the extra steps you’ll need to take.

Install PHPUnit for WordPress on Laravel Valet

Our first step is to install PHPUnit. While PHPUnit is currently on the 9.x branch, WordPress only supports 7.5.x which means we’ll need to install this older version.

Open up the terminal and use these commands.

wget https://phar.phpunit.de/phpunit-7.5.9.phar

chmod +x phpunit-7.5.9.phar`

sudo mv phpunit-7.5.9.phar /usr/local/bin/phpunit

phpunit --version

The command above, download PHPUnit. Then we make the file executable so it can be run. Next, we use the sudo command to move the file to the proper location on our computer. Finally, we check for the version number, which should return 7.5.9 when we run the final command.

Now we’re ready to set up our plugin with WP CLI and take a look at our first tests.

Setting Up Our Plugin

We can make starting a plugin, and getting our unit test scaffold, easy with the WP CLI scaffold command. This command will create a plugin for us, and add all the files we need to have a foundation for our tests.

In the terminal, make sure you’re in the proper WordPress directory you want to use and then type wp scaffold nexcess-unit-tests. That should give you a folder structure that looks like this.

– bin

    – install-wp-tests.sh

– tests

    – bootstrap.php

    – test-sample.php

– .distignore

– .editorconfig

– .phpcs.xml.dist

– .travis.yml

– Gruntfile.js

– nexcess-unit-tests.php

– package.json

– phpunit.xml.dist

– readme.txt

If you want to build out the basics of a plugin but not include tests then you’d use the –skip-tests flag, which will skip the generation of test files. You can see all the options available for this command in the WP CLI documentation.

Depending on how your code editor and file system are set, you may not see the files that begin with a . because they’re considered hidden files. For our purposes today, they don’t matter so don’t worry about it if you don’t see them.

Now we need to hook our unit tests up to MySQL so that it can create dummy data for us to test against. Open up the wp-config.php file for your WordPress installation now because you’re going to need to find the db_user and db_pass for the next command.

To finish installing the tests change to your plugin directory and run the following command.

bin/install-wp-tests.sh <db-name> <db-user> <db-pass> localhost latest

Make sure you use a different db-name than your WordPress install. You don’t want your unit tests messing with your data, you want it creating its own test data in its own database. Otherwise, the db-user and db-pass will be the same as your wp-config.php file.

The final two parameters tell the testing framework to connect to localhost and to install the latest version of WordPress to test with. Unless you know better, just leave those settings as they are.

If we were to run phpunit now, we’d still have a few errors to resolve. First, for some reason WP CLI doesn’t add the name attribute to the <testsuite> block in the sample tests. Open phpunit.xml.dist and change <testsuite> to <testsuite name=”Unit Tests”> and save the file.

Also note here that inside the <testsuite> block PHPUnit is told to ignore the tests/test-sample.php file. Let’s duplicate that file and rename it to test-nexcess.php so that we have a file which will run. Then open the new file and change the class name to NexcessTest. The file should look like this now.

<?php

/**

 * Class NexcessTest

 *

 * @package Nexcess_Unit_Tests

 */

/**

 * Sample test case.

 */

class NexcessTest extends WP_UnitTestCase {

    /**

     * A single example test.

     */

    public function test_sample() {

        // Replace this with some actual testing code.

        $this->assertTrue( true );

    }

}

Now we’re ready to run phpunit from the terminal. Once you’ve done that you should see something like the image below.

Now that we’ve confirmed that PHPUnit is running our tests, let’s dive a little deeper and write a test to make sure that WordPress is adding users properly.

setUp and tearDown

Most unit tests will require specific data to be added to the testing database. Then you run your tests against this fake data. To do this you use the setUp and tearDown functions in your testing class.

Let’s create a user and then make sure that the user has the edit_posts capability. Add the following function to the top of your class.

   public function setUp(){

        // make a fake user

        $this->author = new WP_User( $this->factory->user->create( array( 'role' => 'editor' ) ) );

    }

Then add this tearDown function to the end of the class.

public function tearDown(){

        parent::tearDown();

        wp_delete_user($this->author->ID, true);

}

This adds a user with the role of editor before we run our tests, and then removes the user after we’ve run our tests.

Now let’s write a simple test to verify that the user was added properly and has the proper capabilities.

   public function testUser(){

        // make sure setUp user has the cap we want

        $user = get_user_by( 'id', $this->author->ID );

        $this->assertTrue( user_can( $user, 'edit_posts' ), 'The user does not have the edit_posts capability and they should not' );

        $this->assertFalse( user_can( $user, 'activate_plugins' ), 'The user can activate plugins and the should not be able to' );

    }

Above we start by getting the user object based on the fake user we created. We’ll need this object to test our capabilities which we do next with the assertTrue and assertFalse statements.

In this instance assertTrue is expecting that our user_can( $user, ‘edit_posts’ ) returns true. We’re testing to make sure that the user object provided is given the edit_posts capability, as an editor should have. If this were to return false, we’d see the message provided in our unit test output in the terminal.

Next, we test to make sure that the same user doesn’t have capabilities of an admin user. Here we use assertFalse while checking for the activate_plugins capability. This should return false because activate_plugins` is for the Admin role in WordPress not for Editors.

Once you have that code added after your setUp function, head to terminal and run phpunit. You should see 2 tests are okay, with 3 assertions.

PHPUnit considers our testUser function to be a test, and the assertTrue/assertFalse statements inside to be assertions.

What does that factory thing mean?

Before we finish here, let me draw your attention back to our setUp function. Specifically the factory section when we create a new user. 

When you use the WP CLI scaffold, it gives you access to the WP_UnitTest_Factory class. This class is there as a helper to create the data you’ll need to run your tests properly. You can use this factory to create posts, attachments, comments, users, terms, and some other things for WordPress Multisite.

This is not the only tool you can use to mimic WordPress for your tests though. In a future post we’ll look at WP_Mock to test parts of WordPress that the built-in factory doesn’t reach very well.

Today, we covered a fair bit of complex ground as we looked at unit testing your WordPress projects. I know when I started unit testing it looked daunting, but it’s worth it if you want code that works, and lets you know when you’ve broken something, so your customers don’t have to find the problem for you. Over the long-term, you’ll save time and headaches by writing testable code and aiming for decent test coverage in your projects.

Further Resources

Source link

The Importance of CDNs for Page Speed

Let’s talk about content delivery networks, or CDNs in the context of Managed WooCommerce hosting. A CDN is a crucial topic for a WooCommerce store owner to understand because a CDN is key to page speed, and as we know, page speed is everything right now.

First, why page speed?

Simply put, page speed is important for conversions. A conversion is when a visitor to a page — in the case of someone browsing a WooCommerce store, a shopper — takes the desired action we want them to take. In most ecommerce cases, that would be a sale. Sometimes, it can be something else such as: a lead on a contact form, adding an item to a cart, etc. But in general, it’s a sale.

We have information that tells us that slow page load times cost merchants money. Perhaps the most notable and well-known metric is the 3 second metric: 40% of people abandon a website that takes more than 3 seconds to load. Namely, people don’t like to wait. We are not patient. After 3 seconds, we tend to look at another part of our screen, and sometimes click somewhere else. 

In an ecommerce context, that is particularly worrisome because the longer a potential shopper browses, the more of a chance they’ll add something to the cart, and better yet, they will add multiple things to the cart. Then, to add to the human factor of page speed, in 2020, we also have to consider the algorithmic factor. The ranking factors today are all about usability and user-friendliness, so to Google, high page load times are considered a signal of poor experiences. So, not only will your slow sites lose the traffic you earn before the conversion, they will also increasingly be shown to new users less and less.

With these key facts, page speeds starts to look like one of the most important considerations for your WooCommerce store, or any other type of site online. In Hostdedi support, we have a saying: “our customers are addicted to speed.” And with good reason folks: slow pages create frustrating experiences and cost potential revenue. 

My perspective when it comes to the development of WooCommerce stores is that while it is always a good thing when the store is beautiful, feature-rich, or anything else, ultimately, its goal is to process transactions and earn profit. This is why I want to focus in on the page speed aspect of CDNs. CDNs can help with many other items, but when it comes to business, they matter because page speed matters. If you are interested in the nuts and bolts of how CDNs work and the Hostdedi CDN, I would recommend our knowledge base article on CDNs instead.

One last note on page speed

We’re not done talking about page speed yet. 

While this article will cover CDNs, there are many other strategies for improving your page load times and using a CDN is only one of them. The Hostdedi blog contains many resources on how to speed up your store.  A lot of the time our recommendations are simple: change hosts to a high-quality host, optimize your images, implement intelligent caching, etc. All of these components are important, and no single factor will make a page fast, but all of them together working in harmony will.

These “how to speed up your store” lists almost always inevitably include activate a CDN. It is generally well-known and accepted, but do you fully understand how it works? So, we wanted to dig into what activating a CDN actually looks like for a store owner focused on growth. That way, store owners can start to see CDNs how I see them: an excellent tool for growing revenue and retaining customers.

What is a content delivery network (CDN)?

CDN stands for content delivery network. All that it is from a technical standpoint is a way to distribute the work of delivering content to your web browser, and therefore to your eyes, as the end-user. Think about it this way in a traditional method of content delivery: everything is coming from one source. Maybe you can compare it to a single stream of water. A stream is usually only a certain width — based on the robustness of the source — and that means that you’re going to get water at the rate that that one tube can deliver water.

If you want to try to do something like fill up a tub, several factors could come into play. If the source is far away from the tub, it could take a long time for the water to begin filling up. And since you clear out your tub after every time you use it — like an incognito browser might — you have to repeat the filling process every time you want to use the tub again. And, if you’ve ever filled a pool, you know that a great way to speed up that process is to have several sources of water at once.

Through a combination of optimizations that range from increasing the number of sources, their closeness, and caching what content is delivered for easy retrieval, CDNs make the process of delivering content online more efficient. This has become even more important as our modern web has become dominated by high resolution images and video, streaming audio and beautiful animations.

In the most simple way, that is all a CDN in. There are other considerations when it comes to CDNs — due to the nature of the optimizations for content delivery, they can also be helpful with security and uptime concerns — but at its core, it’s simply an essential feature for the modern web. Most of the content you consume today is delivered via one. 

That means that most hosting providers will include a CDN with their plans. If that is not the case, a provider like Cloudflare can be helpful. At Hostdedi across our whole product catalog, but especially within the store owner-focused Managed WooCommerce platform, we specialize in reducing the number of vendors you have to wrangle. So, on our Hostdedi product, your CDN setup is a toggle away. 

Save on other costs by using a CDN

In most cases, working more efficiently for your store’s visitors also means your technology is working smarter for you. Using a CDN not only improves page speeds, but it also uses your other most valuable resource outside of time better: your money. For example, consider bandwidth costs in relationship to CDNs. If, in the tub analogy, the CDN is adding more sources and managing the fill intelligently, you also know that you have to pay for every gallon of water you put through. You usually also a bandwidth recommendation on your hosting plan, and in the case of some hosts, a cap. By managing the delivery of the content better, your CDN also manages your bandwidth expenses better.

Other best practices to consider about load times and content

Think differently about video

With a CDN and bandwidth considerations in mind, there are other content delivery-related items to consider. An important one we see frequently is video. Video files are big, and on most web hosting plans for your store, take up large percentages of storage space and bandwidth. While a CDN could handle delivering your videos, there’s probably even better ways to handle that problem to get that 3 second load time. We frequently recommend using a service like YouTube or Vimeo to host and stream your videos to maximize your efforts. For a more professional-looking option without these streaming services’ logos, something like Wistia is an excellent choice.

You still have to optimize your images

Before we were widely using CDNs on the modern web, we addressed some aspects of the process that CDNs streamlines by manually optimizing our images. This is still a good thing to do, although there’s no need to do it manually — lots of tools are out there to optimize images. On Managed WooCommerce on Hostdedi, we include the Compress JPGs and PNGs plugin that creates multiple different size images from a single upload and then handles the right size image for the browser. That’s another way to make sure your CDN is working smartest for your WooCommerce store. 

Especially within the modern web that we are creating within, there are more and more legitimate reasons to require large image file sizes. Consumers have increasingly growing expectations of how they can view and experience potential online purchases. Especially as more and more products are even available to be purchased online, potential buyers expect to be able to zoom in, view products in 360 degrees, and more. For example, clothes shopping online used to be considered high-risk and therefore online clothing retailers needed excellent return and try-on policies.

Today, an advanced product listing that clearly indicates key information and allows for a detailed view of the product’s texture is reducing that barrier. Online furniture retailers are enabling augmented reality views of their products on a photo of the potential buyer’s space. As these expectations continue rise, it’s important to keep up with the features while also keeping up with performance and security. A CDN, used intelligently among other page optimization strategies, is a great way to get there.

Source link

Scheduling Sales & Marketing For Black Friday

5 things you need to start thinking about now, so you can implement before holiday shopping starts this fall.

In February of 2019 I launched my first ever crowdfunding campaign where I was able to raise enough capital to manufacture goods in China and ship them to the US to start my board game company.

While this took a lot of planning to pull off – it actually made the launch of my first game incredibly easy. So easy, I thought I was forgetting something the entire time but it turned out I could actually just relax and let my marketing automations do the work for me.

Today I want to share how you can use the same strategies to automate your sales and marketing for the Black Friday/Holiday shopping weekend and make money without stressing yourself out.

Design Landing Pages

First things first: design any landing pages. Landing pages are a way to highlight products & content specific to a campaign, sale, or interest. Not all stores need landing pages but if you have certain products heavily discounted it’s worth putting them all on one page so visitors can view the best deals, get interested in your store, and then start adding things to their cart.

Unless you only have one or two key products, landing pages are one of the best places to send your fans. And if you plan on doing any advertising or newsletter blasts (hint – you should be thinking about both of these) then a landing page is one of the best places to send them. And it’s why you should start with this a month or so before the sale.

Create Tracking Links

I’m a big fan of tracking & measuring everything possible so that I can figure out what worked and in future years double down on the strategies that made me money and ignore the ones that didn’t work. And since each industry is so different in ecommerce what makes perfect sense for one industry may not work at all in another so you will have to try various strategies and learn and improve each year.

One of the ways to monitor this is with UTM parameters. You can create UTM parameters using a generator for any campaign you’re running and in tracking software like Google Analytics you can see where people are coming from.

As an example I created custom links for all of the influencers who made videos about my products. And while many of them sent over dozens of people who ended up purchasing the product one of the influencers only had one confirmed sale.

In future years I wouldn’t use this influencer again. Since my product is only $15 getting one sale isn’t worth all the admin time spent emailing back and forth and sending them a demo product.

Here’s a few custom links you could create for your site:

  • Links from Twitter
  • Links from Facebook
  • Links from your newsletter
  • Links from influencers
  • Links from forums / discussion groups
  • Links from your email signature
  • Etc.

Schedule Sale Prices

Once you have all of your landing pages & links set up it is time to schedule the sale prices. Whether you use WooCommerce, Magento, BigCommerce, or another online store just about all of them let you schedule both the start & end of sale prices.

Here’s what it looks like in WooCommerce.

If you’re doing a storewide discount, discount an entire category, or other more complicated setups, this isn’t typically included in the core software but there’s almost always apps, extensions, and modules that let you do this.

Plan Your Ad Strategy

Every retailer knows that Black Friday is one of the biggest sales opportunities of the year and many retailers go all out with advertising right before Black Friday. That means ad prices soar right before Black Friday so you’ll quickly find your self spending more than you make if you don’t plan in advance.

Image from AdEspresso

One of my favorite strategies is to come up with new ad concepts in spring, A/B test them throughout the summer, and wind them down in the fall. When Black Friday comes around you can retarget your existing audience which is far cheaper than targeting new people who are probably overwhelmed by the amount of ads and will be unlikely to trust a new company.

If you haven’t started ads and you’re reading this today, there’s still plenty of time. Get some ads out there next week and start building your audience so you can retarget them down the line.

Schedule Email Blasts

You have landing pages, tracking links, and all of your products are discounted. Now comes arguably the most important piece. Letting people know!

And yes, you can and should announce things on social media & on your website but today we’re going to talk about your #1 asset and that’s your email list.

These are easy to schedule in any email marketing tool. And what you want to do is setup a bunch of emails and you can send them to segments of your email list based on how active & how much they spend on your store.

  • Here’s what’s coming on Black Friday (7 days ahead)
  • Here’s what’s coming tomorrow (1 day ahead) – For people who regularly open your emails
  • Black Friday is here (Black Friday)
  • Don’t Forget Black Friday (Saturday) – For people who didn’t open yesterdays email
  • Don’t Miss the Best Sale of the Year – For people who have made multiple purchases

And you can create even more than this and if you have a large list with even more data you can continue segmenting your list and writing emails for those segments. 

Preparation is Key

At the end of the day it’s all about coming up with a plan. Almost all of the tools out there have scheduling functionality so once you make a plan, write a few emails or lines of ad copy go ahead and get it scheduled.

I planned my crowdfunding campaign for 6 months and raised $10,000 off a non-existent product. With a few months to go you have plenty of time to build your audience, come up with attractive deals, and let your audience know about those deals.

Good luck!

Source link

The Best WooCommerce Themes You Need Today

WooCommerce powers a vast number of ecommerce stores and is a very popular WordPress plugin that allows users to easily add ecommerce features and functions to a WordPress site. 

Picking the best theme for your WooCommerce store will make or break how the site looks and performs. Picking a bloated theme that will cause issues for the store is something that you really want to avoid.

The two best theme options that work very well with WooCommerce are Astra and GeneratePress.

Astra

Astra theme is free and can be installed in wp-admin on your site, but the power for Astra comes with Astra Pro. 

Astra Pro is provided at no cost on Managed WooCommerce plans on Hostdedi

Astra Pro is installed as a regular plugin which will unlock and extend the Astra theme. Astra Pro has a huge number of features and modules just for WooCommerce. 

Also, the Astra theme is designed to work with a number of solid page builders like Beaver Builder and Elementor. Being able to use a solid and easy-to-use page builder will allow your store to look exactly as you like.

Astra Pro options can be easily enabled from wp-admin by going to:

Appearance > Astra Options

Make sure that the WooCommerce Pro module is activated in the Astra options setting to be able to control WooCommerce using the Astra theme. 

You can make the WooCommerce related changes in the Astra theme using the customizer in wp-admin.

The Astra theme is designed to be a very clean starter theme which is feature rich but also one which is performance-based, and will not cause issues when using it with WooCommerce.

GeneratePress

The final theme recommended is GeneratePress, which is another very clean starter theme.

GeneratePress theme is also designed to work with most page builders and contains a page builder container setting. GeneratePress can also be extended using the premium plugin, which is installed as a regular plugin on your site in wp-admin.

GeneratePress premium includes a number of modules that will extend out the GeneratePress theme. GeneratePress will also work very well with WooCommerce which means you can use a very clean theme which is also designed to work with WooCommerce.

Astra Pro for the Win

While both of the two themes are solid choices, Astra with Astra Pro includes the most features and the most options to be able to extend the theme and control of how WooCommerce displays. Also, it works without having to use a lot of code snippets to control WooCommerce elements.

Don’t rush when choosing your store theme, as that saves time and money later with potential plugin or layout issues that may appear later as your store grows. No amount of site optimization is going to fix root issues on your store being caused by the active theme.

Managed WordPress with Hostdedi Includes Astra

Forget about researching themes and choose Managed WordPress with Hostdedi, which includes Astra out of the box along with AffiliateWP, WP 101, iThemes Security Pro and WP All Import Pro with the WooCommerce add-on.

Source link

When is it time to leave Shared Hosting & upgrade to Managed WordPress?

One of the best things about shared hosting is the low monthly price. One of the worst things about shared hosting is the low monthly price. The reality that both statements are correct presents a constant challenge to customers who are slowly outgrowing their initial decision to use shared hosting. 

Before we start talking about when it makes sense to leave shared hosting and upgrade to a Managed WordPress solution, let’s highlight why so many people start off with shared hosting.

The 3 reasons people start with shared hosting

While there may be many reasons why people choose shared hosting for their first WordPress and WooCommerce sites, there are three that rise to the surface anytime you find yourself talking about hosting.

First, the low price can’t be beat. 

Ask anyone and they’ll tell you they’re looking for lower prices. This isn’t anything new. 

In the days before wireless phones, where people paid for phone lines, there was a constant desire to look for lower prices for both local and long distance calls. That’s partly because no one understood the complexity that was hidden from them. 

Hosting is very similar. Since everything technical has been abstracted away, it all seems easy and therefore, it shouldn’t cost that much. Shared hosting offers monthly hosting at prices lower than a complicated Starbucks order. 

Second, no one knows what resources they’ll eventually need. 

Another dynamic when it comes to hosting is that few people can predict how well their site will do (in terms of traffic) and how that relates to the resources they’ll need. 

This is similar to the challenge that homeowners face when considering solar panels. They’re often asked by professionals to evaluate how many kilowatts of energy they’ll consume in a day or month. Most of us have no idea because it’s a resource that we don’t measure directly or need to keep track of.

When it comes to hosting, it’s hard to know if you’ll need a lot of CPU or a little, whether you will see consistently high RAM utilization or whether it will peak at random intervals. When you don’t know, sometimes it’s just easier to buy an inexpensive plan to start with and see how it goes.

Third, most of us underestimate the need for advanced support. 

The third and final reason most people get their start with shared hosting is that they don’t place a high value on advanced support. If you’ve never hosted anything before, it’s especially easy to hope that everything will work out and you’ll never need to make a phone call.

Most customers of shared hosting assume that support will be there when they need it and rarely test to see if that’s actually true. Then, when they really need support, it’s somewhat shocking to discover that it doesn’t perform the way we assumed it would.

Signs that it’s time to shift to Managed WordPress Hosting

As you can imagine, the signs that it’s time to shift to managed hosting are the very reasons why someone may have chosen shared hosting to begin with:

Low prices create slow performance

Those low monthly prices are available because your website was placed on a shared infrastructure that houses thousands of other sites. The assumption is that you won’t get enough traffic to create a problem, and when you have a problem you won’t notice it. Often you’ll notice your site getting slower over time. That simply means the server your site is on is getting more and more packed. That’s what high density shared hosting is all about – packing the most sites on a set of servers. Slow performance is a sure sign that it’s time to think about making a move. 

Slow performance and connection errors require more resources

Even worse than a site that gets slower and slower over time is a site that stops loading or presents 502 errors (or 503, 504, etc.). Even if you don’t see these errors, your customers will. More importantly, your website will be “down” for those customers, which can impact your brand or revenue. These errors tell you that you need more server resources and likely a different configuration of your setup, but that isn’t available for $4/month.

Poor support experiences mean you need better expertise

The third way to figure out you need to shift from shared hosting to managed WordPress hosting is potentially the easiest one to spot. If you submit a ticket and the majority of the work is put back on your plate, you know it’s potentially time to make a change. Hosting companies that offer managed WordPress plans staff their support with experts who understand what you’re going thru and can help you. Shared hosting often doesn’t want you getting on the phone at all, redirects you to their knowledge base articles, and invites you to solve your own problem.

When is it time to make the move to Managed WordPress?

The answer to the question is rather simple – the time to make the move from shared hosting to Managed WordPress is whenever you experience any of the following:

  • A site that is so slow that customers leave before the page loads
  • A site that seems to consistently get slower, month over month
  • A site that gets connection errors / becomes unavailable for others
  • When support organizations want you to do most of the work yourself

When you experience any of these situations, you may want to check out Hostdedi Managed WordPress or WooCommerce hosting.

Source link

Why DTC Ecommerce Matters More Than Ever Today

In 2020, DTC ecommerce has proven to be another sensible way to reach your customers, and many brands are looking at starting from B2B and transitioning to direct to consumer.

Those of us working in ecommerce have been seeing the shift for a while now. As more and more stores transitioned their inventory online, the ecommerce boom wasn’t just happening – it was inevitable.

Fast forward to spring of 2020 though, and NOBODY could have predicted what happened next. 

Massive store closures triggered the single largest exodus from brick and mortar the world has ever seen, with more than 100,000 small businesses in the US alone closing for good as a result of the COVID-19 shutdowns.

But small businesses weren’t the only ones to take a hit. Larger retailers like Neiman Marcus have filed for bankruptcy in the last few months, and that list continues to grow.

All things considered though, the pandemic has thrown into sharper relief the need for a stronger ecommerce presence for many of these retailers. Record-breaking numbers are rolling in for ecommerce for 2020, including a growth spurt that put the industry four to six years ahead of schedule.

The Problem With Wholesaling During COVID-19

Even in spite of many shoppers setting their sights online, manufacturers saw major hits to their B2B sales as brick and mortar stores shut down. Those relying on wholesale relationships to float their revenue took devastating hits in the midst of the shutdowns.

As consumers turned to ecommerce sites like Amazon though, the fallout continued. In mid-March, Amazon restricted their B2B purchasing of nonessential goods in the wake of unprecedented demand for household staples.

As Amazon made room in their warehouses for hand sanitizer and toilet paper, purchase orders for nonessential goods rolled to a trickle or stopped completely, and manufacturers saw B2B sales plummet.

In the scramble to recover these revenue losses and brace for a potential second wave of retail shutdowns, many manufacturers are turning to DTC ecommerce models.

What Is DTC and a DNVB?

DTC stands for direct-to-consumer. It’s an ecommerce model wherein the brand sells directly to consumers, rather than through retailers, essentially cutting out the middleman. Some DTC evangelists will tell you the goal is to handle production, sales, distribution, and marketing under one roof and never go wholesale, but in 2020, it’s proven to just be another sensible way to reach your customers, and many brands are looking at starting from B2B and transitioning to DTC.

A DNVB is a digitally native vertical brand that starts this way. Best typified by brands like Avocado Green Mattress and Allbirds, DNVBs typically start with a simple product line (typically one or two options), clear, crisp branding, and a strong mission-driven component.

With brick and mortar sales remaining unstable and manufacturers now dealing with the fallout from their Amazon backlogs, DTC ecommerce is looking more attractive all the time – and consumers are taking notice, too.

Mission-Driven Shoppers Are Fueling the Fire

Interestingly, DTC brands are creating evangelical customers and devoted fan bases centered around two things:

  1. Amazing products
  2. A unifying brand mission

Consumer data shows that millennials now make up the majority of buying power in the US, and are 63% more likely to purchase from a brand because of their mission and values. 

This data, coupled with the boom the DTC sector has seen from innovative consumer goods startups has created a replicable business model that’s looking all the more attractive to manufacturers who entered the industry through wholesaling.

Four Components of a Successful DTC Ecommerce Site

Over and over again, we see brands killing the game in DTC ecommerce, and the best of them have a few things in common:

  1. Clean branding. Visually-driven shoppers respond to powerful messaging and clean logos. Brands like Tushy and Anese are leading the pack with memorable branding that leaves a mark in a saturated market.
  1. Smooth UX. At Hostdedi, we know that an ecommerce site’s performance is directly linked to its ability to generate revenue. The best DTC ecommerce sites have an intuitive layout, load fast, and have a smooth interaction with their shoppers.
  1. Simple product lines. They say simplicity sells, and that’s certainly the name of the game in DTC ecommerce. Strong DTC brands typically have one or two flagship products they make their mark with and expand on.
  1. Strong missions. The data supports that today’s consumers are more conscious of their purchasing decisions than ever. Making your mission clear and building your brand around it (instead of as an afterthought) will literally win you more sales, and good karma.

Is It Time for You to Go DTC?

If COVID-19 has taught us anything in ecommerce, it’s that you can’t have enough backup plans. Diversifying how and where you sell your products makes all the sense in the world. Those high-volume retail POs may seem nice for a while – until they vanish, and your revenue vanishes with it.

Build resiliency, connect with your customer base, and get in on the thrill that is DTC ecommerce. Talk to one of our experts today about what it would take to get your brand online and selling DTC.

Source link

Managed WordPress vs DIY vs cPanel: Which Is Best?


BACKUPS

  • cPanel: You can connect to cPanel’s backup tools, but know that it will save the files onto the source destination by default. This might be acceptable, but it should be noted that, in the unfortunate event that your server ever crashed, your backups would go along with it. 
  • DIY: To ensure you have proper backups, you’ll need to configure what you want backed up and when. This will involve continuously testing your backups, verifying them, and manually removing them so as not to overload your space. It’s a continuous and complex process, but it’s better than losing a backup before you really need it.
  • Managed WordPress: We take care of the boring and time-consuming work for you here, backing up every site on your account and removing old backups as needed. You can set up a daily schedule that suits your needs and run one-offs in between as desired. You can also rest easy knowing your backups are saved for 30 days on a separate server, eliminating risks and increasing security overall. 

PLUGINS AND CORE UPDATES

  • cPanel: cPanel offers the ability to install WordPress onto a website. The process involves downloading it, uploading it, and verifying it. It’s work for certain, but it gets the job done. Plugins can be added through the WordPress repo, but updates must be done on a manual basis, backing up the site (as previously mentioned), confirming the details, and agreeing to the update. Once it’s live, you can check your site to make sure everything worked as expected. 
  • DIY: There are many plugins and services that can assist with general updates, but nothing can automate the process for you for all. This leaves you in the driver’s seat to confirm updates for the many plugins you use on every WordPress site you manage. You’ll also need to spend some time after the updates to make sure everything still works right on your site — it’s not something that happens often, but plugin updates can adjust all sorts of functions and features you expect to be safe.
  • Managed WordPress: Nothing is left to chance with the managed approach. We run checks before any given plugin is automatically updated using our visual comparison tool, confirming your site will still look the same after the update as it did before. 

MANAGING MORE THAN ONE SITE

  • cPanel and DIY: Everything required for regular upkeep is done on a per-site basis. Multiple third-party tools are needed to simplify the process, which often comes with additional expenses and management tasks.
  • Managed WordPress: Every Managed WordPress account comes standard with iThemes Sync, giving you the ability to manage all of your sites in one beautiful dashboard at no additional cost. You’re also able to set up reporting and notifications as needed, tailored to your portfolio’s needs. 

CACHE + PERFORMANCE

  • cPanel: If you want to keep your individual sites running fast and smooth, you’ll need to investigate what plugins are available based on your specific capabilities. The best of these will not be free, but the alternative is too expensive. The management of these will all be on you, though some automation may be included with more premium options.
  • DIY: There are many things that require configuration and this will be necessary for every site you manage. All costs associated with the services employed are added to your monthly investment and obtaining support may be challenging, as each service is separate and solely focused on their product alone. The DIY hosting approach will also require regular tests and verifications, because setting these things up wrong is worse than not using any at all! 
  • Managed WordPress: From Varnish to Memcache to Redis and more, we take care of the licenses and support for you, preconfiguring all to help you run the fastest, most stable site possible. 

OVERALL CONTROL

There’s a common misconception that Managed WordPress is really just about giving up control to the host, but that couldn’t be further from the truth… 

In reality, you’re gaining MORE control! With more free time to focus on things that matter and access to SSH, phpMyAdmin, and your database, you can do everything you could with the DIY approach and more with Managed WordPress

Source link

4 Best WordPress Page Builders for 2020

If you’re using WordPress, you already understand how important good page builders are. They allow you to take full control of page layouts, manage site elements as drag and drop modules, and even tweak the website’s header and footer. 

Without a good builder, you can only edit the rows and columns in the page body of your WordPress website and make minimal adjustments to its header and footer. 

With them, you can create great websites without any coding skills or design knowledge. Depending on your needs, this will either save you time or money. Let’s explain how. 

Normally it takes website developers hundreds of hours to learn the basics of website development, but with page builders, you can build a complete website from scratch in just a couple of hours.

Maybe you’re a small business owner and just want to hire someone to create a custom website for you? In that case, it’s good to know that great website builders can cost as low as $50. That’s quite a bargain since getting a custom small business website usually starts at $3,000, with many custom sites reaching $50k or more.

Taking all of this into account, it’s safe to conclude that WordPress page builder plugins are essential for creating custom designs and filling them with wonderfully styled content. For this article, we made sure to test and research all the popular WordPress page builders. Keep in mind, once you choose a page builder, you may want to stick with that one, since switching could cause pages to bread or slower speeds.

Read on to see our choices for the Top 4 page builders of 2020.

Beaver Builder

Features listed on the official website

Live Front End Editing, Shortcode and Widget Support, Mobile Friendly / Responsive, Developer Friendly, Translation Ready, Supports Posts, Pages, and Custom Post Types, WooCommerce Support, Hand Off Sites to Clients with Editor Mode, Tuned & Optimized for SEO, Multisite Capable, Reusable Templates, Save and Reuse Rows & Modules, Import/Export, and much more.

Pricing information

Beaver Builder comes with 3 pricing plans and they are: 

The Standard plan costs $99 one-time. It can be used on unlimited websites, and it includes all premium modules and templates.

The Pro plan costs $199 one-time and includes the same features as the Standard Plan, with the addition of the Beaver Builder Theme and multisite capability.

The Agency plan costs $399 one-time and includes all of the features of the Standard and Pro Plans, plus advanced multisite management and white labeling.

There is a free version available, and all three plans come with one year of support as well.

Embed video: https://www.youtube.com/watch?v=tCNDDQ7Jrs8

Divi Builder

Features listed on the official website

Drag & Drop Building, True Visual Editing, Custom CSS Control, Responsive Editing, Design Options Galore, Inline Text Editing, Save & Manage Your Designs, Global Elements & Styles, Undo, Redo, & Revisions, Multi-Select & Bulk Editing, Find & Replace Styles, Built-In Split-Testing, WooCommerce Modules, Global Website Styles, and much more.

Pricing information

Divi Builder, made by Elegant Themes, comes with just two pricing plans: 

  • Yearly Access
  • Lifetime Access

The Yearly Access plan costs $89/year and includes these features: Access to Divi, Extra, Bloom & Monarch, hundreds of website layouts, support, and it can be used on an unlimited number of websites. 

The Lifetime Access plan is priced at $249 one-time and includes the addition of lifetime updates and lifetime support. 

No free version is available, but there is a 30-day money-back guarantee.

Embed video here: https://www.youtube.com/watch?v=zf2ay9YyHEE

Elementor

Features listed on the official website

Drag & Drop Editor, 300+ Designer Made Templates, 90+ Widgets, Responsive Editing, Popup Builder, Theme Builder, WooCommerce Builder, In-line Editing, Full Site Editor, Global Widget, Motion Effects, Global Custom CSS, Popup Builder, TypeKit Integration, 100% Responsive, 24/7 Premium Support, and much more. 

Pricing information

Elementor Pro offers three pricing plans: 

The Personal plan, which is priced at $49/year for one site, includes 50+ widgets, 300+ templates, Theme Builder, WooCommerce Builder, and one year of support. 

The Plus plan costs $99/year, comes with the same features as the Personal Plan, and allows you to use Elementor on 3 different websites.

The Expert plan costs $199/year, comes with the same features as the Personal Plan, and it can be used on 1,000 different websites.

There is a free plugin version available as well, and all paid plans come with a 30-day money-back guarantee.

Embed video here: https://www.youtube.com/watch?v=nZlgNmbC-Cw

Thrive Architect

Features listed on the official website

Instant Drag & Drop Editing, Landing Page Templates, Pre-Built Conversion Elements, Ultra-Flexible Column Layouts, Total Font Customization, Style Every Detail, Perfect Mobile Experience, Mobile Responsive Editing, Dynamic Animations & Actions, Inline Text Editing, and much more.

Pricing information

Thrive Architect comes in three tiers:

  • Single License
  • 5 License Pack
  • Thrive Membership

The Single License plan costs $67 one-time and it’s intended for one website only. The 5 License Pack plan costs $97 one-time and, as the name says, it can be used on five websites.

The Thrive Membership plan costs $228/year for up to 25 websites and includes access to all plugins and themes from ThriveThemes.

All plans include 334 landing page templates and come with unlimited free updates and one year of support.

No free version is available, but there is a 30-day money-back guarantee.

Embed video here: https://www.youtube.com/watch?v=VeNWi8TaeO8

Feature Comparison

It takes time and practice to learn which features you need. Some will be immediately obvious and fit your current need, but it’s good to plan for the future as well. 

Using the table below, you can quickly see what may be a great fit for your needs.

Beaver Builder Divi Builder Elementor Thrive Architect
Live demo YES YES NO NO
Free version YES NO YES NO
Pricing starts from $99 one-time $89/year $49/year $67 one-time
Website usage at this price Unlimited websites Unlimited websites 1 website 1 website
User friendly YES YES YES YES
In-line editing YES YES YES YES
Number of templates Not stated 1198 300+ 334
Product support 1 year While subscribed While subscribed 1 year
Updates Not stated While subscribed While subscribed Unlimited

Understanding Important Features

Having a cursory understanding of the lingo used across the page builders will go a long way to helping decide which you need, and which you can go without.

Responsive Editing means that the website you are building will automatically adjust itself for different devices and screen sizes. It also means that the builder includes additional options for customizing each version of the website separately.

Multisite is a feature that guarantees compatibility with WordPress Multisite and allows you to make changes to several websites from a single WordPress administration panel.

Live demos and free versions are very important because they allow you to test the builder before making an investment. Especially important for tight budgets.

Pricing per website should be considered if you think there is a reasonable chance you will need to use the builder to create several websites. Some of these builders come with a license that allows you to use them without any limits. 

User friendly means that the page builder is easy and quick to learn, doesn’t require specialized knowledge, and allows for a pleasant and intuitive workflow.

In-line Editing is a feature that allows you to add content like text to the live site in real time, without opening additional windows and moving away from the full-page preview. All of our recommendations include this feature, as we believe it is an essential part of a user-friendly workflow.

Templates are pre-built page layouts made from existing page builder elements. The more the better, since this allows you to quickly access dozens of page designs and just fill them with site content or tweak them to your heart’s desire.

Product support shouldn’t be underestimated when it comes to page builders. As you get familiar with a page builder, you will want to set some advanced settings like custom CSS, which might require a developer to get involved. This is where good support comes in, and helps you avoid additional expenses whenever possible.

Other Noteworthy Page Builder Mentions

Here are some other great page builders for WordPress that didn’t make our Top Four list:

  • Brizy
  • Themify Builder
  • Oxygen
  • Visual Composer
  • WPBakery Page Builder
  • SiteOrigin Page Builder

All of the above page builders are great candidates and we highly recommend checking them out as well.

Save Time and Money Using the Right Page Builder for You

Testing Page Builders and picking the one that works best for you can take some time, but there is an enormous return on investment.

We hope that this article will serve its purpose and save you the energy and money required to test out dozens of them. We made sure to highlight the important features so that you don’t settle for the wrong one. 

It is our firm belief that if you try out these four page builders in their paid form, you will get the best experience of features and overall satisfaction of use. This is the best way to find the one that fits you and to, finally, make an informed buying decision.

Source link

Hostdedi Magento Cloud vs. Magento Commerce Cloud

One of the misconceptions about the Enterprise version of Magento 2 is that you have to use Magento Commerce Cloud for hosting. Or that Magento Commerce and the AWS-based Cloud solution are one and the same thing. Magento Commerce Cloud hosting for your Magento store is built by Adobe and includes powerful features (modules) like page building progressive web applications (PWAs). Hostdedi Magento Cloud is hosting for your Enterprise Magento Commerce store, or your Magento Open Source Store with features for professionals like high scalability, development/staging environments, and PCI compliance.

In this post we’re going to clear up the misconceptions between these two very different platforms.

Magento Commerce Cloud was created about two years ago after Magento was sold to Adobe. It’s their official solution for hosting Magento and it has a lot of good things going for it:

  • Magento Commerce Cloud includes common functionality for your Magento store
  • They allow progressive web apps (PWA)
  • They have a cloud based infrastructure for scalability

But it’s important to remember that Adobe, even though they own Magento, is the new kid on the block. They’re still learning how to build & optimize the infrastructure needed to power a Magento site.

Building a Solid Infrastructure

Magento Commerce Cloud is great at including product features. But they’re still building their entire stack on someone else’s infrastructure. What does that mean?

It means, if you have a problem with your website, you first have to bring it to Magento Commerce Cloud team. And they have their standard Service Level Agreement (SLA) to respond to you. If in that time, they discover a problem with the underlying infrastructure, they’ll submit a ticket to Platform.sh – the company that maintains their infrastructure.

So your SLA is built on top of the SLA from another company. That means solving any potential problems could take twice as long. Not great if you have a problem that negatively impacts your store and you lose money every minute it’s not fixed.

Hostdedi Magento Cloud is built on our own infrastructure. Hostdedi has one SLA, and because we own the infrastructure, we can solve all of the problems ourselves and we don’t need to rely on any other companies. This means less finger pointing, more informed support, and faster resolution.

Experience

The other big difference between Hostdedi Magento Cloud and Magento Commerce Cloud is that we aren’t brand new to this space. Magento was literally built on our servers back in 2007 – before Magento v1 was even released (Magento v1 was officially released March 2008). 

We saw the opportunity of Magento back in 2008 when brick & mortar stores first started moving online to avoid the worst of the Great Recession. We helped brand new stores get started with Magento and we learned a lot about it in the process, like exactly how many PHP workers were needed, what caching systems were most effective, and which Magento settings are worth enabling. We distilled everything we knew to create the very first Magento specific hosting solution. 

We also wrote the book on Magento Best Practices and shaped the Magento community by siege testing Nginx vs Apache and settling that debate. We’ve improved and continued optimizing and put out a new book for Optimizing Magento 2.

Contributing Open Source Libraries

Besides optimizing hosting for lightning fast websites, Hostdedi also created Turpentine which was the first varnish cache for Magento. You can take advantage of this on any hosting that uses varnish. 

We also created security extensions and continue to contribute to Magento core.

Plan for Exploding Growth 

Most hosts, including Magento Commerce Cloud, give you a certain number of resources that you must remain within. If you go over a bandwidth threshold you might have to pay more – or if you have too many people on your site at a time, it slows down to a crawl. 

Hostdedi created our first Magento plan during a time when everyone was getting online and then immediately started outgrowing their small plans. We’ve also been around for over a dozen Black Fridays so we’re used to seeing retailers needing extra resources on demand. That’s why we built auto scaling into all of our plans.

If you have a post that goes viral or your Black Friday sales really take off, we have you covered with additional PHP workers which keep your website snappy and your visitors happy.

Conclusion

Adobe Magento Commerce includes a lot of nice product features and it can be easily managed in the cloud. Hostdedi Magento Cloud is both more established and leads the way with the most efficient & affordable infrastructure you can find.

Source link