Let’s begin by answering the question – what is PWA? PWA stands for Progressive Web Apps. Progressive Web Apps are a pattern for building web applications using HTML, CSS, JS and modern web browser APIs to bring a native-like experience. PWAs combine the best of 2 worlds: web and native apps. Like other mobile applications, PWAs are easily installable and make development work simpler for any merchant trying to reach as many customers as possible.
While the feature parity between Progressive Web Apps and native apps is not 1:1 just yet, PWAs have come a long way since inception. Features like instant loading, push notifications and offline navigation/purchase are now widely available no matter which PWA implementation you choose.
They won’t be the right approach in every case – for example, if you need a feature that’s not available on a Web browser or through an API, you will likely need to go the native route. But PWA capabilities are continuing to expand and what may require a native app today, might be PWA-worthy tomorrow. Project Fugu is a good place to see what’s coming and what’s being worked on right now.
Why are PWAs such a big deal?
PWAs come with an incredible set of features that were once reserved for native mobile apps alone. While regular web apps have tremendous reach in every device with a browser, at the end of the day these apps are just a webpage in a browser.
Native apps are another way to reach mobile users but they must be developed for one platform / operating system at a time. PWAs enable development of a single app for multiple platforms. This streamlined approach is something mobile developers have been anxiously waiting for – easily reaching every potential customer no matter what operating system they are using.
They also solve one of the most challenging issues developers face: distribution. Since you don’t need to publish these apps in a marketplace, you can just add a few lines to your manifest and make PWAs easily installable with a couple of clicks. Results drive a consistent customer experience that they expect through a native application but with PWA, they get a standalone experience, completely separated from the Web browser.
This means a full-screen experience with no URL bar, the ability to install the PWA and dock it to your device home screen instead of visiting a regular webpage plus everything a Service Worker has to offer.
Instead of the legacy way of updating via form submission and waiting for approval and publishing of the new version to the App Marketplace, changes made into any PWA are immediately available the next time you are connected to the Internet and open the app. PWA installation is now a standard feature available in all major mobile browsers, as well as Chrome and Edge on desktop.
How does PWA help Magento merchants?
Let’s face it: the Magento 2 frontend was already old when it was released and we’ve seen how that plays with frameworks like Prototype.js and Knockout.js.
The JavaScript ecosystem evolves quickly and constantly following the hottest frameworks, developer trends, and updated best practices. This makes it challenging to keep up when having to maintain separated codebases.
PWAs are particularly attractive to merchants using Magento 2 because it reduces front-end development complexity, giving you flexibility, extensibility, and opportunity to deploy resources to develop new features. Developers can implement almost everything in the regular Magento 2 frontend at a fraction of the cost and time by using any of the available APIs.
How can customers run a PWA on Hostdedi?
We’ve made it easy to run PWA on the Hostdedi platform. We’ve created a step-by-step guide for how to install Magento’s official PWA PoC, Venia storefront. This resource outlines how to build, compile and transfer this PoC to one of our servers without the need to start and maintain middleware services.
Who is Miguel? If you’re part of the Magento community, chances are you already know. As a Magento Master and open source Community Maintainer, Miguel can be found traveling the world imparting his Magento wisdom at events and approving pull requests everywhere else.
These are times of authentic fear, uncertainty, and doubt. The last thing any of us – or any of our bottom lines – need is the dissemination of falsehoods or false choices intended to drive panicked business decisions. Unfortunately, shamefully, and near daily, we come across such messages relating to the Magento 1 platform (M1) end of life next month.
Some vendors would have you believe that maintaining PCI compliance is incompatible with staying on Magento 1. From multinational financial services to “solopreneurs in ecommerce,” businesses that rely on the M1 platform are NOT tethered to an expensive migration to Magento 2 at the end of June 2020. We know this because Hostdedi has been the leading hosting provider for Magento stores for more than ten years.
We also know – now more than ever – that uninterrupted sales and services are top of mind. Thus, we designed Hostdedi Safe Harbor for those who cannot afford to – or need more time to strategize – or do not wish to migrate to M2. Stay with Magento 1, and our Safe Harbor product provides security and technology updates for an extended period of time.
Hostdedi is a PCI DSS Level 1 provider across all hosting solutions. Our platform is aligned with PCI compliance requirements, offering your customers the secure buying experience they expect. Hostdedi Safe Harbor offers security procedures and safeguards that exceed compliance requirements.
You can also connect with us about alternative platforms that can meet the needs of ecommerce enterprises large and small, from high-paced to mid-level to newly launched.
As previously shared in this space by my amazing colleagues and by me (please see below), you have options. Even 60 days out. Interim or otherwise, Hostdedi Safe Harbor may be the place and the space you need as you consider the following:
The customizable flexibility, stability, and security of M1’s open source platform
Cost and time relating to re-platforming/migrating
Magento 1 is incredibly stable as it’s already been vetted by the entire Magento community.
Patches, patches, patches
Customization on the back end can mean replatforming costs upwards of 100k
Here at Hostdedi, we are a big tent provider and love helping companies of all sizes – those who use the open-source version of Magento or those who use the enterprise version. We don’t champion doomsday either/or scenarios. Nor do we believe that adversity mandates an adversarial approach. History has shown that when people work together to put forth thoughtful solutions, we can collectively meet any challenge – today or tomorrow. The same holds true for all of us at Hostdedi and in our work with customers. Side by side, site by site, store by store. Let us show you how.
Carrie Wheeler is the Executive Vice President, Managed Applications at Hostdedi with over three decades in technology leading through disruptive market events. Learn more about Carrie’s career in tech here.
When it comes to shipping, consumers definitely prefer fast & cheap (or free) — but determining how you ship your products & how you pass along or absorb that cost is tricky. And it becomes an even greater challenge if you sell large or bulky items.
In this article we’re going to provide clarity into:
How to pack boxes and calculate shipping costs
How to save money while shipping large and heavy items
What qualifies as a large item
And finally, how you can ship large item with the three major carriers in the US
How to Pack Boxes and Determine Shipping Costs
Products that are bulky (heavy or not), can be a challenge to ship. Your packaging must account for the item’s size while still allowing for packaging materials and filler. In addition there are both weight & size limits. If your package exceeds either of these limits you may need to find a different carrier or service.
Understanding Dimensional Weight
If you think about how shipping carriers move packages around they do so with trucks. And these trucks have two limitations:
If either of these are maxed out the carrier has to use more trucks & drivers which is one of their main expenses. To take both of these limitations into account carriers now use a formula combining both the dimensions & weight called Dimensional Weight.
The result is the dimensional weight of the package.
Usually, carriers have you weigh your package and check the dimensional weight. They’ll generally charge whichever is higher. Make sure to compare the pricing and recommendations of carriers before shipping.
Cheapest Way to Ship Large Packages
Depending on the shipping carrier and their specific requirements, costs can be calculated in different ways and packages can be categorized differently. You can do this in advance of customer purchases and set up your website to calculate shipping charges.
All of the major carriers offer free web tools and APIs to make this easier. For instance, USPS allows you to customize your customers’ online shipping experience with their free tools. Both WooCommerce & Magento offer software to help you calculate shipping costs with major carriers.
You can also keep your shipping costs as low as possible by:
Weigh and measure your packaging materials.
Try a variety of different packaging types.
Use the lightest, most compact and cost-effective packaging materials possible.
Customers like fast shipping, but consider offering a discount or incentive for longer shipping times since this may save you money.
Shop around and compare carrier pricing for products you frequently ship. Keep in mind that these requirements are subject to local differences. These guidelines apply to most packages shipped within the US. For other countries, check with the carrier.
Why Does Package Weight Matter? What are Heavy Packages?
If you know which shipping carrier you plan to use and the basic dimensions of the item you’re going to ship, you can develop a plan and get an accurate cost estimate. Weight and outer package dimensions are a big deciding factor in how much you’ll be paying for shipping.
Of course the packaging you use for shipping is part of the cost, too. Large and heavy products can be expensive to transport and may also require special packaging that’s durable and designed for heavy or bulky items. This may require custom-designed cushioning or reinforced box materials.
Custom materials may cost more and can also add to the weight and bulk of your shipment. The added mass ultimately means more fuel and resources used by the carrier to transport your product. Carriers pass these costs along to retailers as higher shipping charges.
Each carrier has their own definitions for a “large” package. Heavy items must be packaged appropriately before carriers can ship them, so be sure to read their requirements carefully.
USPS shipping requirements don’t allow packages heavier than 70 pounds. So, if you have an item over that threshold, you might want to consider using a private carrier such as FedEx or UPS. UPS has special packaging requirements starting at 70 pounds while FedEx starts at 75 pounds.
How to Pack Heavy Items for Shipment and Determine Shipping Costs
Each shipping carrier has different guidelines & requirements for heavy & bulky items. With this in mind, here’s how to pack those items and determine your costs.
FedEx Guidelines and Pricing for Heavy Items
Weight limits
FedEx Home Delivery ships packages up to 70 pounds. Packages that are heavier than this are considered “heavy” and may be shipped through FedEx Ground if they are under 150 pounds. For items above 150 pounds, consider using FedEx Express Freight or FedEx Freight instead — these services accept shipments that are up to 20,000 pounds.
Outer Box
Use corrugated cardboard for the outer box and package non-corrugated boxes inside instead of shipping these boxes on their own. For instance, if a guitar you’re shipping came inside a non-corrugated box, you should place the entire box inside a corrugated cardboard box for shipping. Use double-wall boxes if the item you’re shipping is heavy but under 150 pounds.
Inner Boxes
Separate items inside the box in their own sealed boxes if they may be damaged under normal handling conditions.
Safety Labels
Boxes that weigh over 70 pounds must be shipped via FedEx Ground, or FedEx Express Freight or FedEx Freight. If a box weighs over 75 pounds, you are required to attach a FedEx yellow and black heavyweight safety label. These are placed over the diagonal corners of the package. To get these labels, contact FedEx or visit a FedEx location.
Filler
If you use filler material to cushion items, center your items away from box corners and wrap items carefully with cushioning material.
Pricing
Your charges for shipping are based on weight, the FedEx services you choose, and the destination.
FedEx Home Delivery and FedEx Ground services require packages to be under 165 inches in both length and girth. For larger shipments, you may use FedEx Express Freight services or FedEx Freight. Using FedEx Freight, you can ship packages up to 21 feet long.
Large Packages That are Lightweight
Compare the true weight of the package with the calculated dimensional weight. FedEx charges the heavier of these two.
UPS Requirements and Pricing for Heavy Packages
Box Strength
Packages weighing more than 70 pounds must meet the UPS Box Strength Guidelines. Use strong packaging designed for heavy objects. Choose brand-new boxes that haven’t been exposed to humidity.
Sealing Boxes
Ideally, seams should be stapled or stitched shut. Glue may tear or break during shipping, and rip your package apart. Use heavy-duty, reinforced tape with three strips over the top and bottom seam and also seal the middle and edge seams completely.
Safety Labels
The UPS safety label program begins at 70 pounds. Above this weight, packages should have yellow and black warning labels provided by UPS. The warning should be placed directly to the right of the address label. Write down the total weight on the white portion of the safety label.
Filler
Avoid box filler that shifts or doesn’t protect heavy items. For instance, packaging peanuts and polystyrene pieces may not cushion fragile shipments enough if the items are also heavy enough to crush the filler pieces. UPS recommends that you consider alternatives that are more appropriate for shipping something heavy such as cardboard that’s custom developed for shipping.
Pricing
Your pricing depends on the UPS service you choose, your package’s final destination, and your package’s weight. A “Large Package” or “Over the Maximum” surcharge may apply.
The maximum package size for UPS is 165 inches in both length and girth. Freight Services may allow for larger maximums, so it’s worth it to find out what specific requirements apply to what you’re shipping and where you’re shipping it.
Large Packages That are Lightweight
Compare the actual weight with the dimensional weight. UPS will charge you for whichever is higher.
Large Package Surcharge
UPS applies an additional charge for packages that exceed a length plus girth that’s over 130 inches. Unless you use Ground Freight Pricing, you’ll pay for at least 90 pounds.
USPS Guidelines for heavy items.
Weight
Packages above 70 pounds aren’t allowed. So any package you ship through USPS won’t technically be a heavy package. Under this weight limit, your packages could still seem heavy, so you may need to pack accordingly and be mindful of how you fill the boxes and protect your items.
Boxes
Choose a durable box that’s large enough for the item and appropriate filler. If you reuse a box, make sure all logos and writing are completely crossed out.
Closure
Close the box with all flaps down and seal with tape. The packaging tape you use should be at least 2 inches wide.
Pricing
Generally, pricing is determined through the USPS Flat Rates or through the package weight and destination.
To get the most up-to-date information on weights and standards, view the general packaging guidelines from USPS.
USPS Guidelines for Large Packages
Size
The Postal Service will ship packages up to 130 inches length and girth combined through their Retail Ground service. Normally, their limit is 108 inches.
Large Packages That are Lightweight
Flat Rate pricing applies for packages up to 70 pounds which allows you to use size to determine pricing. If you’re unsure, check with your local post office.
By controlling costs and being smart about shipping, you can increase your profits. Don’t be afraid to experiment with shipping and look for the right shipping improvements for you.
Are You Ready to Grow Your eCommerce Business With Hostdedi Managed Hosting?
In addition to the shipping strategies we’ve listed here, a great hosting plan can be instrumental to growing your business. Fortunately, Hostdedi has you covered.
Our Managed WooCommerce hosting plan is ideal for growing businesses. Specially designed to convert more sales, Hostdedi’s managed hosting for eCommerce is packed with cutting-edge technologies to reduce query load times and cart abandonment rates. Best of all, our plans arm you with more than 20 different performance tests so you’ll know you can accommodate tons of web traffic.
Hostdedi also offers a Managed Magento plan which makes sure your site stays safe, is backed up, gives you staging sites, and auto scaling so when you get a lucky traffic spike your website stays online to accept all of those payments.
Patrick Rauland is obsessed with ecommerce. He’s built ecommerce websites for clients, worked for WooCommerce doing support, development, product management, and helped plan their yearly conference (WooConf).
If you’re a Magento developer or systems integrator you’ve likely been bombarded by emails, blog posts, and notices that end-of-life (EOL) is coming. That means no new features & no security patches which puts Magento 1 stores at risk.
While many store owners are preparing to migrate to Magento 2 or other ecommerce platforms, some will simply not be ready before Magento 1 reaches EOL to take strategic action.
If you’re still trying to figure out the right course of action for your clients or for your Magento store follow our decision tree.
Safe Harbor enables businesses to keep their sites on Magento 1 after EOL by providing security and technology updates for an extended period of time.
So, whether you’re still weighing your options, or already have plans to migrate, Safe Harbor can offer the flexibility you need until you’re ready to move off of Magento 1.
Patrick Rauland is obsessed with ecommerce. He’s built ecommerce websites for clients, worked for WooCommerce doing support, development, product management, and helped plan their yearly conference (WooConf).
Although there are many data analytics tools available, most people continue to associate ecommerce analytics with Google Analytics. While it’s the standard choice, that doesn’t mean it’s always the best choice for measuring your ecommerce business.
Many of the most powerful analytics tools are tailored for a specific facet of ecommerce including brand management, customer data, or something in-between. If you are looking to supplement Google Analytics or replace it with another analytics platform, our list of effective data analytics tools can help.
Leads and Customer Data Analytics Tools
Customer acquisition and retention ultimately drive most ecommerce business decisions. More customers mean more sales which in turn means more revenue. For this reason, data analytics tools that focus on your leads and customer data (like Kissmetrics and Leadfeeder) can be central to your technology stack for your ecommerce business.
1. Leadfeeder
At first, the features seem narrow or limited in scope, but Leadfeeder is an ideal and comprehensive tool for many businesses. While other tools track pageviews and customer data, Leadfeeder actually tracks companies that are shopping an online store. This makes it an ideal analytics tool for ecommerce businesses in the B2B space.
Leadfeeder has deep integration with Google Analytics — potentially adding a new dimension to Google Analytics data. But Leadfeeder also works with popular customer relationship management (CRM) tools including WebCRM, Pipedrive, and Salesforce.
Besides tracking the companies that visit your ecommerce site, Leadfeeder has other compelling features. For example, you can select specific companies or organizations that you would especially like to convert and have Leadfeeder notify you by email whenever someone from one of those companies visits your site. This gives you the chance to follow-up and further warm a lead, making Leadfeeder an effective selling tool.
Cost: Variable. Lite version (up to 100 leads and 7-day history) is free. Premium version starts at $53 per-month.
Web Analytics and SEO
A core metric of web analytics is tracking movements. For example, who is visiting your site, how they are interacting with your site, and what brought them there in the first place. These data points provide important direction for your ecommerce business. The data will show you which keywords drive the most traffic and the value of your backlinking strategy for conversion.
2. Gauges
Gauges is an up-and-coming web data analytics tool that is most notable for providing real-time insight into the traffic that your ecommerce store is getting. The platform is also lauded for its clean, user-friendly interface that puts the most pertinent information front and center.
Gauges was designed to be flexible and highly scalable. Businesses of all sizes can benefit from its live data tracking capabilities. Business owners who use Gauges appreciate that there’s no delay between a pageview or other engagement event, and the data being reflected in the platform. Plus, Gauges offers you a “bird’s eye view” so you can see what someone who is currently on your site is seeing.
Besides live data, Gauges offers other features that are common among web data analytics tools. These include keyword tracking, conversion tracking, referral tracking, and campaign management. The main drawback to Gauges is the thin integration support. However, even without official integration, Gauges is a very compact, non-invasive tool. It plays nicely with most other tools that you may be using simultaneously. Once you have a Gauges subscription, the platform allows you to install the tool on an unlimited number of websites that the tab-based interface keeps very organized and accessible.
Cost: Variable. Starts at $6 per-month for 100,000 pageviews. Offers a 14-day free trial.
3. SEMrush
SEMrush is a very versatile analytics tool. In fact, its ability to cover nearly your entire ecommerce technology stack has made it one of the top data analytics tools outside of Google Analytics.
At its core, SEMrush is a robust SEO platform that is also a capable web analytics tool. For small and medium-sized ecommerce businesses, SEMrush is a popular choice for keyword tracking, search monitoring, and gathering important metrics like pageviews, referrals, and the performance of paid advertising campaigns. The platform also has some unique features including the ability to monitor your competitors, analyze the content on your site, audit your backlinks, and track what people are saying about your brand on social media.
SEMrush has a breadth of data visualization options, as well as the ability to customize your reports. For instance, you can have the graphs and charts on the main dashboard showing the performance of a handful of keywords that you’re trying to rank. So instead of forcing you into a certain view, SEMrush provides a variety of tools that you can use in whichever ways are best for your ecommerce business.
The downside to SEMrush is that there can be a bit of a learning curve, particularly with its somewhat complicated user interface. However, SEMrush does integrate with all the major social networks as well as WordPress, Trello, and virtually every cloud service Google offers. It’s no surprise that companies like eBay, PayPal, Forbes, and Wells Fargo are among SEMrush’s subscribers.
Cost: Variable. Starts at $99 per-month. Offers 7-day money back guarantee instead of a free trial.
Brand Management and Social Media Analytics Tools
For an ecommerce business, social media is an incredibly important marketing channel. In the absence of physical retail, social media is often the most effective way for ecommerce businesses to strengthen relationships with customers. As a result, social media analytics tools are core to rolling out a successful sales and marketing strategy.
4. Keyhole
While many social media analytics tools track your brand, Keyhole is one of the most full featured tools in the market today. In fact, it largely makes up for the narrowness of its scope by offering impactful features like hashtag analytics and in-depth data tracking of your social media accounts.
As a brand management tool, Keyhole provides a complete picture of how your audience sees your brand. You can even track specific keywords or phrases. This is particularly useful when users don’t tag or mention your social media accounts in their posts. Keyhole also tracks your influencer marketing campaigns. You get full access to relevant engagement and conversion metrics for influencer content including estimates for your return on investment. There’s also versatility in reporting. You can filter and sort influencers based upon specific attributes like audience size and content engagement rates.
Businesses of any size can benefit from this effective social media analytics tool. Rather than choosing from the Twitter or Facebook analytics tools available, Keyhole integrates with all major social networks including YouTube, aggregating your mentions across all of these popular platforms in one central dashboard.
Cost: Variable. Starts at $26 per-month (billed annually). Offers a 7-day free trial.
5. BrandMentions
BrandMentions is unique compared to other social media analytics tools because of its holistic approach. While the service offers in-depth data tracking, the focus of BrandMentions is to track the emotional response your audience has to your brand.
This is perhaps most apparent with the “sentiment meter” which is a concise visual representation of how your audience sees your brand. Each impression from your customers affects this meter, and you can set alerts for when there’s a social media post that falls below a certain level on your sentiment meter. This allows you to have a more proactive hand in solidifying a positive reputation for your ecommerce business.
BrandMentions also lets you do “competitor spying.” In short, this means you can track your competitors on social media — almost like your competitors’ social accounts were your own. By tracking the social media presence of your competitors, you can see what they’re doing and most importantly, find ways to do it better. The idea is to help your business be more visible and garner stronger, more positive feedback.
As a social media analytics tool, BrandMentions is effective for businesses of any size. The biggest weakness of BrandMentions is the very minimal integration options. In fact, you’ll need a tool like Zapier to enable something as simple as real-time notifications.
Cost: Variable. Starts at $49 per-month with user and keyword limitations. Offers a 14-day free trial.
Ecommerce Analytics Tools
Ecommerce analytics tools help you track sales and grow your business. They give you insight into customer behavior from tracking products often left abandoned in shopping carts, to finding the most relevant products to upsell.
6. Crazy Egg
Crazy Egg is among the most popular data analytics tools for ecommerce. That’s because it has features that are useful for online retail businesses of any size.
Arguably the most notable of Crazy Egg’s features is its heatmap. It’s an invisible layer placed over your ecommerce store, offering a thermal visualization of the “warmer” parts of a page that get the most activity. A heatmap is a useful at-a-glance representation of how your customers are interacting with your ecommerce store. For instance, you can use a heatmap to find out whether your customers are seeing and responding to your call-to-action.
Aside from the heatmap, Crazy Egg offers robust A/B testing for your ecommerce store. This makes it very simple to test variants of landing or product listings so you can determine which generates the most sales. There’s even a user recording feature that does exactly what it sounds like. It creates “recordings” of each user’s experience that you can play back like a video.
Crazy Egg is an ideal choice if you’re looking for a tool to better understand how customers are interacting with your ecommerce store. In terms of integration, Crazy Egg supports WordPress, as well as Google Cloud services.
Cost: Variable. Starts at $24 per-month (billed annually) for 30,000 pageviews and 100 user recordings. Offers a 14-day free trial.
7. Glew.io
Whether you’re a multi-channel retailer or a humble online store, Glew.io is one of the best ecommerce analytics tools around. The platform has almost everything you could want: a familiar, WordPress-like interface with tons of reporting options, in-depth customer tracking, order management, and even financial data to complete the picture.
As an ecommerce analytics tool, Glew.io tracks many key product metrics and allows you to quickly distinguish top-selling products from those that generate the least profit, or products with the highest overhead from those with the lowest margins. In short, Glew.io provides tons of useful, actionable insights to strengthen your ecommerce business. Additionally, it’s designed for multi-channel retail, meaning Glew.io tracks sales from each platform you use. It can also pull data from your Facebook Ads, Instagram Ads, and Google AdWords campaigns to give you a complete picture of your ecommerce store’s performance.
With more than 30 integrations for WooCommerce and other top platforms — including marketing automation, point-of-sale, shipping management, and enterprise resource planning tools — Glew.io is useful for ecommerce businesses of any size and revenue. Plus, there are more integrations being added regularly.
Cost: Variable. Starts at $169 per-month with a 36-month agreement. Offers a 10-day free trial.
Editor’s note: If you want to save some money and get a plethora of data at your fingertips you can signup for our Growth plan which includes Glew.io.
Using Analytics Tools That Help You Make Smarter Choices
There are a ton of analytics tools for ecommerce businesses. And while Google Analytics is a great place to get started, you won’t be able to answer all of the questions your business will have using that tool alone.
We think the most robust solution is one where you use several data analytics tools simultaneously. This is one of the many reasons why we include Glew.io in our Growth plan for Managed WooCommerce hosting.
Ultimately, you should use services that help you better understand your customers, gauge the success of your advertising campaigns, and generally make smarter choices for your business.
Patrick Rauland is obsessed with ecommerce. He’s built ecommerce websites for clients, worked for WooCommerce doing support, development, product management, and helped plan their yearly conference (WooConf).
Hostdedi Safe Harbor is the Haven Magento Stores Need
The currents and undercurrents of Magento’s strategy are ever changing. One day it’s smooth sailing with technology that simply performs, propelling sales and service; the next day they are raising the anchor, and creating a wake of disruption that the entire ecosystem must brace themselves to withstand. Every ecommerce based solution relies on understanding what lies beneath the surface, so it’s vital that your platform delivers the speed, security, scalability and service demanded by today’s pace of online business. These tenets are the four points of our operational compass here at Hostdedi – relied upon and trusted by our customers as they navigate their best paths forward.
Recognizing that Magento’s (M1) platform end of life (EOL) is now just a few months away, we’re excited to offer Hostdedi Safe Harbor designed especially for those who can’t afford to – or need more time to strategize – or don’t wish to migrate to M2. As the leading hosting provider for M1 stores for more than ten years, we come to this changing tide with deep experience to accommodate whichever direction keeps you afloat and ensures your online stores remain uninterrupted. All buoyed by the expertise that is embodied in every single one of our amazing people who stand by ready to assist you today and support you tomorrow.
Hostdedi Safe Harbor is designed to align with your long-term growth plans because it’s optimized by open source efficiencies – to include costs and community-based expertise. This is a stark differentiator for us compared to closed (SaaS) platforms like Shopify which can cost you more time and money, while limiting your options and future innovation opportunities.
There are three core options to consider over the coming weeks:
Stay the course on M1 with Hostdedi Safe Harbor via a simple dev supported free migration that comes with regular updates, patches, scans, modules, and extensions;
Migrate from M1 to M2 with support from us at every turn as you implement your migration plan to a new platform that will accommodate your increase in customers and inventories.
Connect with us about alternative platforms that can meet the needs of ecommerce enterprises large and small, from high-paced to mid-level to newly launched. You are never without resources and expertise when working with the Hostdedi team.
As you explore what steps to take in the coming months, I hope you will call on our team to help answer any questions you have to make the most informed decision for your business. We can show you the pros and cons of a particular path, and help you decide which platform best meets your needs for near and long-term growth.
Your business journey is never-ending and ideally always enjoys smooth sailing. But we know that rough waters are unavoidable – so don’t settle for just any port. Your livelihood relies on keeping a vigilant eye on the horizon, and Hostdedi Safe Harbor will see you through the storm.
Carrie Wheeler is the Executive Vice President, Managed Applications at Hostdedi with over three decades in technology leading through disruptive market events. Learn more about Carrie’s career in tech here.
Choosing the right ecommerce CMS for your storefront is important. Not only does it influence what you’re able to do, but it also allows you to set expectations in terms of development costs and timeframes. But with your CMS choices now more diverse than ever before, picking the right solution out from the crowd can be difficult.
Two applications you’ll be introduced to early on are Magento and WooCommerce. Both are used by an impressive number of stores. WooCommerce is used by over 3 million stores, while Magento runs over 200,000. Both offer flexible feature sets that can be expanded easily with extensions, and both are backed by supportive communities.
So why should you choose one over the other?
As you seek to drive revenue and distinguish your store, it’s vital that you pay attention to the customer experience you’re able to provide. Now is the time to drive change within your organization and optimize the commerce experience for your customers. By selecting the right solution for your storefront, you’ll be able to optimize your speed to market and drive revenue quickly.
Let’s pit WooCommerce vs Magento and see which ecommerce platform is best for your store. If you’re a merchant that still needs to make a choice, keep reading to find out more.
Magento vs WooCommerce Summary
WooCommerce Pros and Cons
As a plugin for WordPress, WooCommerce comes armed with features that make it great for managing both content and ecommerce. Originally launched in 2011, it has grown to become the most used and versatile ecommerce platform available to merchants and agencies alike, with over 3 million active installs worldwide.
Now, with Managed WooCommerce hosting from Hostdedi, its versatility and ease of use have only improved, with up to $6,000 of integrations available for optimizing speed, security, scalability, and service.
Pros
Very easy to use and get started with
A huge range of templates and themes for merchants without any coding knowledge
Bundled integrations that provide advanced functionality for analytics, updates, site optimization, and ecommerce delivery
Cons
Doesn’t afford the same level of customization as Magento
Magento Pros and Cons
The first application we’re taking a look at, Magento, is a powerful ecommerce platform capable of empowering merchants to create storefronts unlike any other. Originally released March 2008, it has since grown and inspired the release of a new version, Magento 2, in 2015. This version has gone on to become the perfect ecommerce platform for storefronts with a global reach.
Pros
A powerful ecommerce platform capable of creating unique user experiences
Offers more customization options that WooCommerce
An incredible community that, despite being smaller than WooCommerce’s, manages to easily hold its own
True hosting optimization through an optimized Magento hosting provider
Cons
Requires a developer to create a fully functioning storefront
Questions about speed and power are usually some of the first merchants ask. Most of the time, merchants need to prioritize one. This especially holds when looking at Magento vs WooCommerce.
Speed and power are two different performance metrics and rarely go together.
While Magento may offer more in terms of power, it also requires more resources to deliver the same experience as WooCommerce. WooCommerce, on the other hand, is a very lightweight and fast platform, but it lacks a lot of the functionality you’ll find with Magento.
WooCommerce Is Lightweight
We’ll say it again: WooCommerce is lightweight. This means the same hardware and resources can serve more customers with a WooCommerce store than with a Magento one. Take a look at our SIP and SIPWOO plans to see what this means in terms of real numbers.
Magento
WooCommerce
Daily Visitors
5,000
10,000
*Based on a SIP 400 server build.
Although being lightweight means a higher customer capacity, WooCommerce has comparatively limited functionality out of the box. Without modification, WooCommerce lacks the ability to track activity through other channels and deliver a personalized experience. Magento offers these features by default, but they still require advanced configuration to get the most out of them.
Bear in mind, while WooCommerce requires additional plugins to add advanced functionality, it will almost always perform better in terms of speed. Add to this the capabilities of managed WooCommerce and you’ve got an ecommerce platform that provides the best of both worlds.
For Magento, it’s important to host with a provider that offers optimized infrastructure. While several providers state that they offer optimized hosting, the reality is that only a handful truly optimize their infrastructure for Magento. Hostdedi is known to offer a truly optimized Magento hosting foundation. Here are four reasons why.
In addition to finding the right hosting provider, the quality of the code used to create a Magento store can also have a significant impact. Poorly edited code and unoptimized extensions can cause any server-side optimizations to lose their significance. If you’ve implemented multiple speed optimizations and your store is still crawling, it may be a good idea to start a code audit.
Poorly edited Magento code and unoptimized extensions can easily cause any server-side optimizations to lose their significance.
Two Different Performance Bands
Like much of this comparison, Magento and WooCommerce fall into two different performance bands. WooCommerce is a lightweight contender, with comparatively less power behind it. However, being such a quick and nimble platform means that it requires a smaller hosting plan to support the same number of customers – even when you expand functionality with additional integrations. While Magento has much more power behind it – in terms of stock functionality – it can slow down significantly when too many customers are active on your site.
Despite the two applications falling into two different performance bands, WooCommerce is the winner here. Being lightweight means it’s capable of outperforming Magento, with fewer resources required to serve the same sized customer base.
Functionality
Magento has long been known as the ecommerce king of functionality. Not only does it allow for the creation of unique and personalized user journeys, but its integration capabilities are second to none.
With that said, a savvy developer can still get a lot out of WooCommerce. Part of the reason for this is that both applications come with REST API. This means that both platforms are capable of supporting expanded functionality through development.
The WooCommerce REST API documentation (including hooks, endpoints, filters, and more) can be found here. Similar documentation for Magento can be found here.
WooCommerce Requires WordPress
A common myth is that WooCommerce only offers limited functionality. The truth is much more complex. When combined with plugins, WooCommerce’s capabilities expand significantly. There are over 50,000 unique plugins available for WordPress, offering functionality for both the ecommerce and content sides of your site.
Beyond plugins and integrations, the REST API means that WooCommerce is also capable of being expanded to suit more advanced functionality requirements through development. This means being able to create unique customer journeys that rival Magento and that scale as your store does.
Coffeebros.com, for example, has created a storefront that includes discounts, calls to action, and a clean, easy to understand buying experience. Weber.co.za, the grill provider, has also created an easy-to-use store that integrates both the ecommerce product and content recipe sections seamlessly.
The ability to integrate both commerce and content seamlessly is one of WooCommerce’s strengths.
This is one of the biggest pros for WooCommerce: WooCommerce lets merchants integrate the content and ecommerce sections of their site seamlessly. Magento does not offer this.
Magento Powers Global Commerce
Magento powers some of the biggest ecommerce stores in the world. There’s a reason for this: the functionality it offers global retailers.
Magento allows for Global storefronts with regional differences.
Magento powers some of the biggest ecommerce stores in the world. There’s a reason for this: the functionality it offers global retailers.
HP transformed their selling experience in the Asian Pacific through Magento. They launched five different stores on a single platform, with regional differences and global similarities. This allowed them to meet local requirements for payments, fulfillment, language, and order technicalities, while also optimizing site management with global consistency.
Rubik’s also managed to create a strong global online presence quickly, using Magento to expand worldwide. Magento’s functionality made it easy for them to spin up new regional storefronts and landing pages. Something which would have been a lot more complicated with other platforms.
Not only does Magento allow for easier access to international markets, but it also enables a more in-depth customization of the buyer’s experience. Just take a look at the difference between a typical Magento site and a typical WooCommerce site.
Still the King of Functionality: Magento
It shouldn’t come as a surprise that this category goes to Magento. Its ability to customize the buyer’s experience and create unique, international storefronts is something you just can’t do in the same way with WooCommerce – unless you invest in development. Moreover, with Adobe’s integrations weaving themselves into the Magento ecosystem, its functionality is only going to improve.
WooCommerce, however, is a close second. In many cases, plugins and development work can lead to customer experiences that are just as unique and targeted as Magento’s. It’s just slightly easier to implement them with Magento.
With that being said, managed WooCommerce solutions bring with them some of the most important ecommerce functionality around, and they make them accessible out of the box. This makes WooCommerce the better option when it comes to balancing functionality and ease of use.
Security
Security for an ecommerce store is vital. Not only does it help prevent loss of customer Personally Identifiable Information (PII), but it also ensures that merchants remain in compliance with the Payment Card Industry standards (PCI Compliance) needed to sell effectively online.
While both applications offer environments backed up by security teams and vigilant communities, WooCommerce suffers from one major disadvantage: WordPress. As a plugin, it is vulnerable to the same exploits as its parent application. In 2018, 57% of web application vulnerabilities identified were from WordPress.
This doesn’t mean Magento doesn’t have problems of its own. In research conducted by Securi, 40% of Magento stores have at least one security issue. That’s much lower than the 73% of WooCommerce stores reported by EnableSecurity, but it’s still a sizable portion of live storefronts. And these are not complex vulnerabilities. Most of them could easily be detected using free automated tools.
So why such large numbers? For many sites, it’s because they are out of date. Clunky update processes or simply forgetting are two of the biggest reasons for security vulnerabilities across modern CMS.
One of the most common reasons that storefronts are vulnerable is simply forgetting to update.
For this reason, one of the best security features offered is the ability to easily update. When compared with the WooCommerce update process, Magento security patches aren’t easy to apply. With a managed WoCommerce solution, not only do updates occur automatically, but they’re set to test any changes in case they break your site, before they go live. This makes maintaining and up-to-date site easy and effective.
Despite this, Magento does have a lot of positive security features going for it, including:
Enhanced password management
Cross-site scripting (XSS) attack prevention
Flexible file ownership and permissions
Non-default Magento Admin URL
Two-Step Verification
The Magento 1 End of Life Impact on Security
Magento can be split into two versions: Magento 1 and Magento 2. Each is largely unique, in that moving from Magento 1 to Magento 2 requires replatforming. Currently, a large percentage of Magento stores are still on Magento 1.
In June 2020, official security support for the Magento 1 platform will cease. This means security will become a pressing concern for merchants still on the platform. If you’re a Magento 1 merchant looking for alternatives, we recommend reviewing your options and downloading the After M1 guide.
Security Compromises
Security is never simple. The nature of vulnerabilities means that every application’s community needs to remain vigilant. WooCommerce offers some great security features for automating the update process and keeping everything up to date. However, it also has a lot more vulnerabilities to begin with thanks to running on WordPress.
Magento has better security tools and features, despite patches being hard to implement and take full advantage of.
However, managed WooCommerce solutions have brought with them a curated selected of security tools and features. From automated updates to an entire security suite capable of managing advanced configurations, WooCommerce comes with all the security features of Magento and adds ease of use.
Design and Templates
Before a site can go live, a merchant needs to decide on a design. Without a design there is no site (at least, not an attractive one).
With WooCommerce, this is an easy process thanks to a large selection of templates and pre-designed themes. Taking these and tweaking them to individual requirements is a quick process, making the time from ideation to creation much faster than with Magento.
Magento does have a limited number of templates. However, these are relatively simple when compared with what Magento can actually do. They are also not particularly attractive. To take advantage of the platform, most merchants will need to hire a developer to design and code their site.
Headless Possibilities
Design becomes a lot more complicated when headless implementations are considered. For Magento merchants, the application’s API makes implementation a relatively simple process. There are several headless Magento sites already using headless architecture to deliver unique user experiences.
Headless architecture allows for stores to utilize an optimized ecommerce API and flexible front-end design.
For examples of live Magento sites currently using PWA, you can take a look at Alaskan Harvest or Soomzone.com. Both of these sites effectively leverage the Magento API to create unique JavaScript front-end experiences.
With WooCommerce already being a plugin, it doesn’t make a lot of sense to use it in a headless implementation. Instead, it may make more sense for merchants looking towards headless WordPress to opt for something like BigCommerce instead.
WooCommerce vs Magento: Template vs Design
WooCommerce, with its huge library of themes, is much better in terms of templates. Yet the two platforms draw when it comes to design. Both offer an expansive API, both provide you with the ability to design a unique storefront, and both offer extensive feature sets capable of integrating with your designs.
If you getting started with your first store or looking for ease of use, we recommend using WooCommerce and taking advantage of its themes and templates. If you’re a medium-sized store though, deciding between Magento and WooCommerce isn’t going to be a decision made around design.
Extensions and Plugins
While an application needs to have great out of the box functionality, it’s also important to be able to expand and customize it with plugins or extensions. Today, almost all CMS offer plugins or extensions in one form or another; WooCommerce and Magento are no exception.
In terms of numbers, WooCommerce wins due to having access to the WordPress plugin library. Here, over 50,000 unique plugins are available to you. Chances are, with a selection that large, the functionality you’re looking for is already there.
However, bear in mind that WooCommerce and WordPress are different applications, and not all of these WordPress plugins will be optimized to run on your store.
Magento, on the other hand, has over 4,700 plugins optimized specifically for its ecommerce platform. Not only that, but Magento’s extensions provide a lot of in-depth customization.
Magento extensions allow for merchants to:
Upgrade internal search functionality
Build custom checkout experiences
Improve sorting and categorization functionality
Create up-sell and cross-sell campaigns
Customize shipping and fulfillment options
Dedicated WooCommerce extensions are relatively light. They provide some useful social and payment integrations, some basic enhancements, and a few useful shipping and fulfillment extensions. Overall though, the options are not as powerful or diverse as Magento, despite growing quickly.
Managed WooCommerce Bundles up to $6,000 of Plugins
With Hostdedi managed WooCommerce, you don’t have to worry about plugins and extensions. We’ve bundled up to $6,000 worth of integrations for free with all of our managed WooCommerce solutions. These cover everything from image optimization to page building and abandoned cart emails to business analytics.
With Hostdedi, getting started with a WooCommerce store is faster and easier. The ability to easily implement the right technology solutions for every store means taking the guesswork out of platform selection.
We recommend managed WooCommerce for merchants looking to expand their store. Not only is it more cost-effective, but you’ll also have access to a team of experts to help you keep your store performing at full capacity.
Product Management
Managing an ecommerce store means managing products. That includes how, when, and where they are delivered to customers. Many ecommerce stores today deliver personalized buyer journeys, setting the bar high.
It’s Magento’s advanced functionality that shines here. In addition to offering merchants the ability to provide regional deviations in product delivery, it also allows for the creation of unique journeys within a specific area. This includes upsells and cross-sells. While this functionality can be added to with the use of extensions, the default feature is powerful in its own right.
WooCommerce doesn’t offer the same flexibility. But what it does provide by default are:
Categories
Attributes
Types
Taxonomies
Extensions can be added to provide more functionality, but in terms of user journeys, the same level of personalization can’t be reached with a WooCommerce store. For smaller stores with a limited number of SKUs, this is fine. For larger stores with a lot of SKUs, this can lead to a drastically reduced conversion rate.
Magento vs WooCommerce: A Summary
Magento Is Great for Medium-Sized Stores Looking for Great Functionality
Magento does best when a merchant wants a custom implementation. It allows for an unequaled exploration of the buyer’s journey and creates personalized sales funnels tailored right down to the individual.
Unfortunately, this level of customization and functionality has meant that it requires a development team to support its full range of capabilities. Implementing its best features needs to be planned down to specifics. So while it will likely increase your bottom line and lead to a surge in sales, it also takes an investment to get you there.
As a result, we recommend Magento if you have a larger storefront and are looking to invest in growth. If you’re interested in getting started, take a look at ourMagento cloud hosting solutions and talk to a member of the Hostdedi team today.
WooCommerce Is Great for Smaller Stores Looking For Ease of Use
Alternatively, if you’re running a small or medium-sized storefront and still haven’t decided on which platform to use, we recommend WooCommerce. Not only does it offer much quicker speed to market than Magento, it also makes store management simple and allows for merchants to take advantage of WordPress’ content management tools.
However, it doesn’t provide the same level of store customization as Magento. For that reason, we recommend WooCommerce to smaller stores. If you think that means you, see ourWooCommerce cloud hosting solutions.
Historically, consumer use of ecommerce stores has been a mystery to merchants. Traffic sources, bounce rates, and others were the metrics of educated guesses and opinions. Today, however, powerful tracking tools like Google Tag Manager for WordPress have brought data to that mystery, answering questions with a level of certainty never seen before.
These tools now allow you to build a clearer picture of the customer experience. Instead of guessing a consumer’s journey, you’re able to understand their path to purchase. Not only does this help you discover crucial touchpoints, more importantly, it also helps you drive your store’s growth by identifying conversion bottlenecks and finding new opportunities.
If you’re not sure you’re hitting the mark with Google Tag Manager, now is the right time to revisit your implementation and make sure everything is running smoothly. Here, we’ll walk through what Google Tag Manager is, how you can add it to your WordPress site, and how you can start measuring store performance where it matters.
Google Tag Manager is a free, widely-used tool that lets you create and manage the tags (more on this later) published on a website. Though it can be used on virtually any site, it’s commonly used by ecommerce business owners in conjunction with other marketing analytics platforms to manage their online stores. For example, Google Tag Manager is almost always used alongside Google Analytics for the purpose of tracking marketing campaigns, conversions, and site performance.
What Is a Tag?
When you inspect the source of a site, you see tags like <html>, <img>, <p>, <a href>, and many others. Functionally, the tags you manage with Google Tag Manager are similar to the HTML tags found in the raw code of a website. But where HTML, CSS, PHP, and other coding languages use tags as building materials for website construction, the tags in Google Tag Manager track conversions, traffic, user behavior, and a number of other important metrics.
Tags track and relay important user engagement data to another analytics platform. When a tag runs, or picks up an instance of the intended interaction, it’s called “firing” – i.e., “The tag has fired.”
Besides connecting to other platforms, tags can be created so you can track specific events — (like abandoned carts and video views) on your website. While Google Analytics can track many types of events, creating tags for certain events in Google Tag Manager can make tracking more specific, and situational events more effective.
Google Tag Manager vs. Google Analytics
Since Google Tag Manager and Analytics are used in tandem, it can be confusing as to what role each platform plays when it comes to marketing analytics.
Google Tag Manager can be used to manage many third-party tags, including the Facebook and Adobe Analytics tracking pixels. You can even customize and calibrate your tags, and decide when and why they fire. But Google Tag Manager just manages these tracking code snippets; there’s no actual analytics or in-depth reporting in Google Tag Manager.
Google Analytics doesn’t have the granular tag controls of Google Tag Manager, but it plays the very crucial role of collecting data from those tags. In other words, it collects, analyzes, and reports data from your tags. Thus, the two platforms have a symbiotic relationship.
How to Add Google Tag Manager to WordPress
If you’re one of the many ecommerce business owners using a managed hosting platform to run your online store, you need to know how to add Google Tag Manager to your WordPress site. Let’s go over the steps for setting up Google Tag Manager with WordPress.
Step 1: Create a Google Tag Manager Account
The first thing you need is a Google Tag Manager account.
Head over to Google Tag Manager. If you already have an account, then select the account you want to use to connect to your WooCommerce store. Otherwise, click “Create Account” to begin setting up a new Google Tag Manager account. This is how you get Google Tag Manager code.
After clicking “Create Account,” you’ll see some account setup options.
Name the account, name the container — basically just a folder for your tags to be kept separate from other Tag Manager accounts you may have — and select “Web” as the target platform. Then click “Create” to immediately be taken into your new Google Tag Manager account.
Once you’ve finished with the setup options, you’ll need to install the code snippets for Tag Manager to begin working with your ecommerce store on WordPress.
The first snippet needs to be added to the header of your WordPress site. This will ensure that the code appears on every single page of your site — which is important for Tag Manager to work with WordPress.
There are a couple of ways to add it to the appropriate file of your WordPress theme. However, the easiest way is to use a plugin like Yoast. Instead of editing the raw code of your site, just copy and paste the code into Yoast which will automatically add the code to every page of your site.
Then there’s the second snippet of code which must be added just after the opening <body> tag on your site. Again, Yoast and other plugins can help.
If you need additional help, Google Tag Manager offers a useful Quick Start Guide that you can use as a reference. When these code snippets are installed, you’re ready to begin setting up Google Tag Manager with WordPress.
Step 2: Install Google Analytics
Once you’ve created and set up a Google Tag Manager account, you’ll need to do the same for Google Analytics. After all, you won’t get much benefit from using Tag Manager unless Analytics is receiving data from your tags. If you’ve already installed Google Analytics, you can skip this step.
These steps might seem a bit odd as you’re completing them, but don’t worry. You can, in fact, install Google Analytics from within Tag Manager.
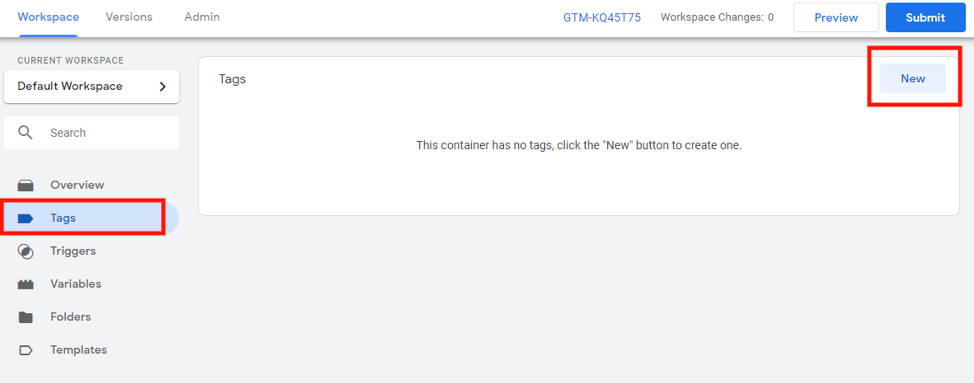
From your new Google Tag Manager account, click “Tags” from the left-hand sidebar, then click “New” in the upper right-hand corner of the window.
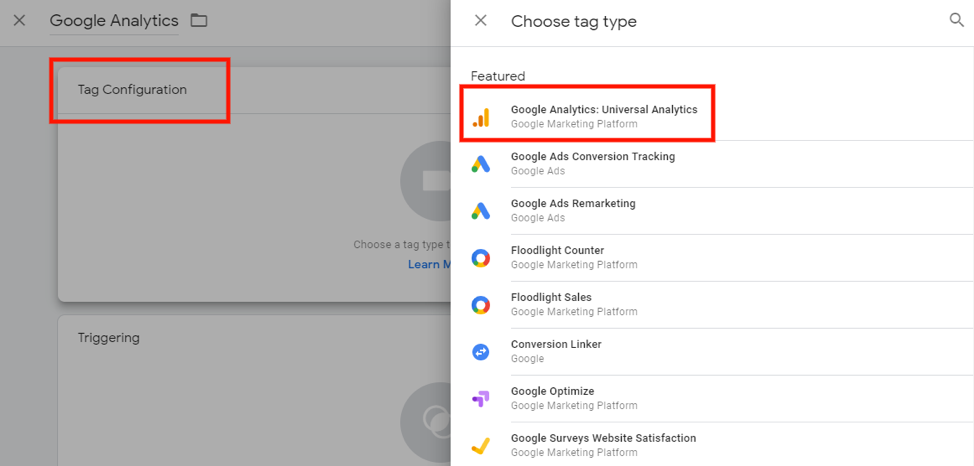
Name the tag “Google Analytics” and click “Tag Configuration” and select “Google Analytics: Universal Analytic” for tag type.
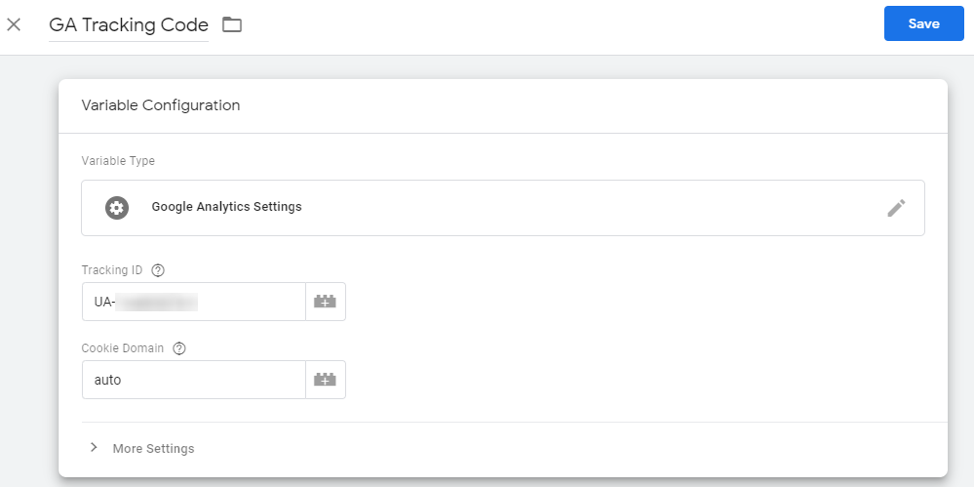
Set the track type to “Page View” then click “New Variable” under the Google Analytics Settings. Finally, name this new variable and install your Google Analytics tracking code on your WordPress site as prompted.
What Can I Do With Google Tag Manager?
Now that you have completed the installation and setup process, you need to know how to use Google Tag Manager. And, perhaps most importantly, how is Google Tag Manager used?
Google Tag Manager helps you gain insight into how people are using your ecommerce store. By setting up tags and events, you can gain valuable insights on key areas. That includes tracking form submissions, file downloads, and the effectiveness of interactions in your conversion funnel.
While there are many things you can do with Google Tag Manager, let’s go over a few of the most important (and most useful) for ecommerce businesses.
Track Goals and Events in Google Analytics
Although pageviews and referrals are important metrics, tracking how your customers and leads are using your ecommerce store provides the most accurate picture of your store’s performance. Without Google Tag Manager and Google Analytics, you’d have very little insight into how customers and leads are interacting with your store. In turn, you wouldn’t be able to identify and address variables that might, for instance, contribute to high cart abandonment.
Although we’re not going to spend too much time covering it in this Google Tag Manager overview, we’re going to give you examples of a goal and an event you can track with Tag Manager.
Goal: Added-to-Cart
With Google Tag Manager, you can set up a tracking goal for each and every time a product gets added to the shopping cart. Once you’ve completed the steps to set up an added-to-cart tracking goal, these interactions will be reported in Google Analytics. It’s important to note that this isn’t a goal that you’d be able to track in Google Analytics without using Tag Manager to create the event.
Event: Video Views
Video content is the most popular form of digital content today. So it follows that ecommerce sites that feature product reviews, launch videos, instructional videos, and other video content should be tracking how customers and leads are engaging with those videos, and most importantly, how those engagement rates affect conversion. Using Google Tag Manager, you can set up tracking events for videos and compare those events to cart abandonment, checkout abandonment, or any number of other metrics.
Install Tracking Pixels for Google Pay-per-Click Ads
One of the key uses for Google Tag Managers is to install and manage the Google Ads Remarketing and Google Ads Conversion Tracking pixels. The steps to install these tracking pixels are largely the same for both.
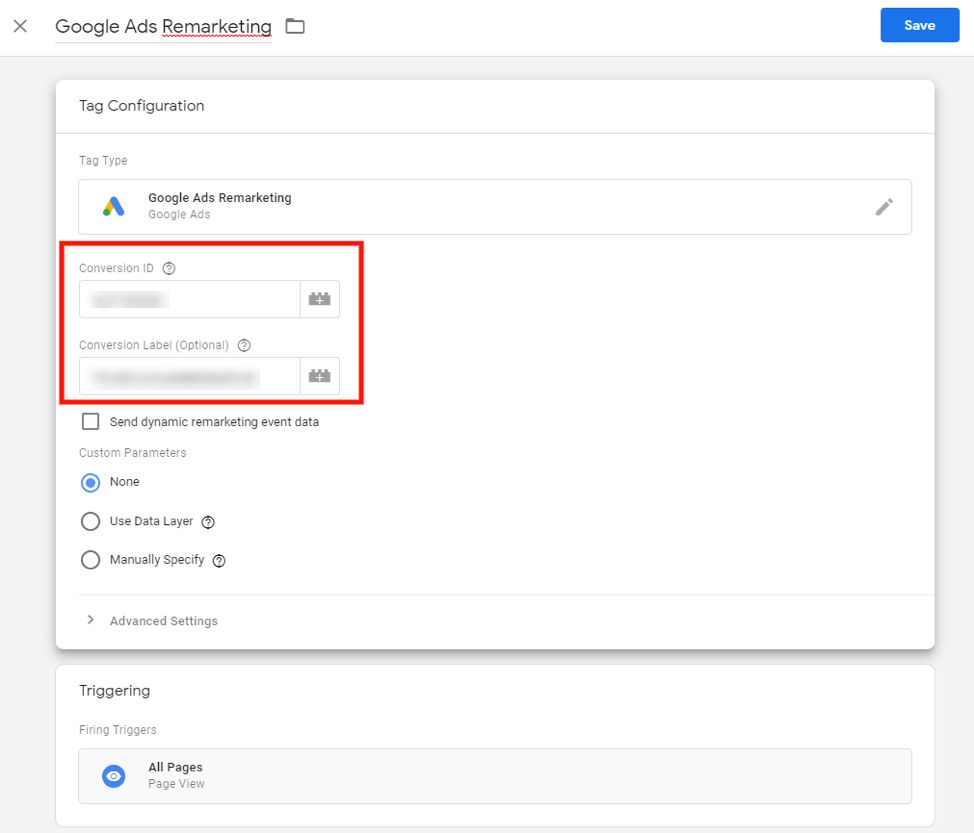
Google Ads Remarketing Pixel
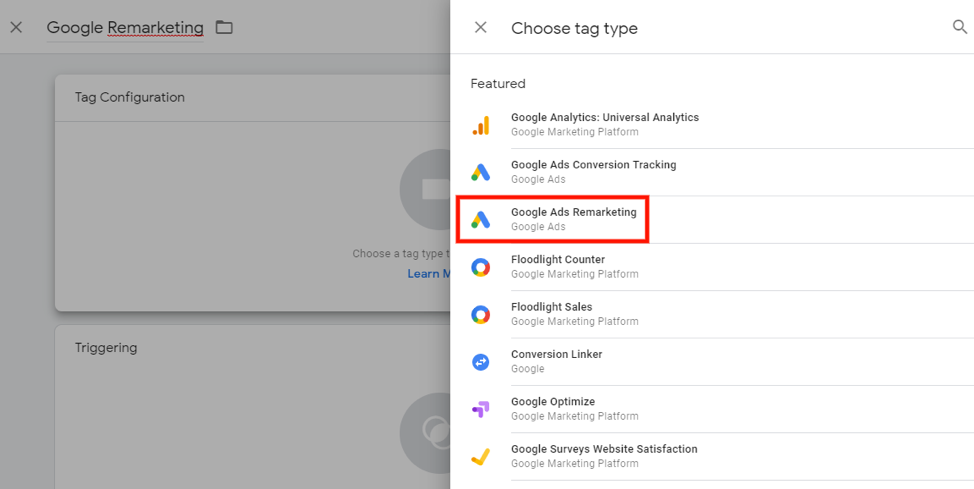
From your Google Tag Manager account, create a new tag. Name it “Google Remarketing” and select “Google Ads Remarketing” as the tag type.
In the tag configuration settings, locate your Google Ads Conversion ID. Create a label if you’d like, then set “All Pages” for triggering.
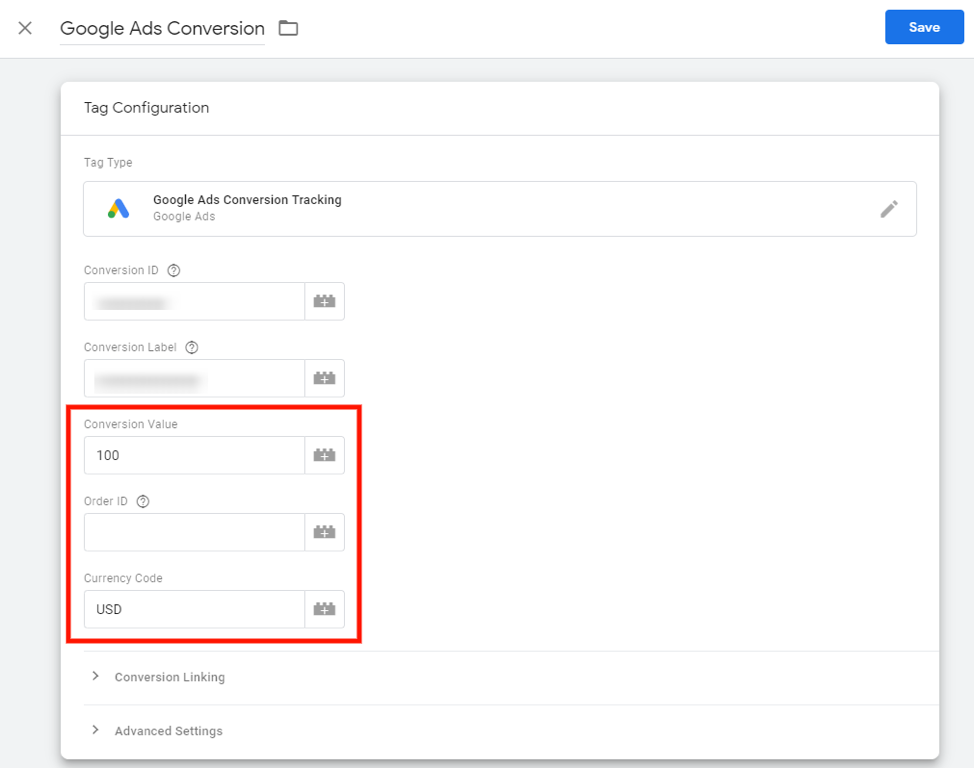
Google Ads Conversion Tracking Pixel
For the Google Ads Conversion Tracking pixel, the steps are much the same. From your Google Tag Manager account, create a new tag. Name it “Google Ads Conversion” and select “Google Ads Conversion” as the tag type.
The main difference with the Google Ads Conversion Tracking pixel is the option to set a value for the tag. In the screenshot above, the value is set at 100 USD, meaning that each conversion the tag tracks is worth $100 to the business. Use an amount makes the most sense for your business. Many ecommerce business owners set the value of a conversion as the average transaction value.
Install Third-Party Tracking Pixels
Similar to the Google Ads tracking pixels, Tag Manager is often used to install tracking codes for third-party platforms. In particular, the Facebook Pixel is often installed on a WordPress site using this method.
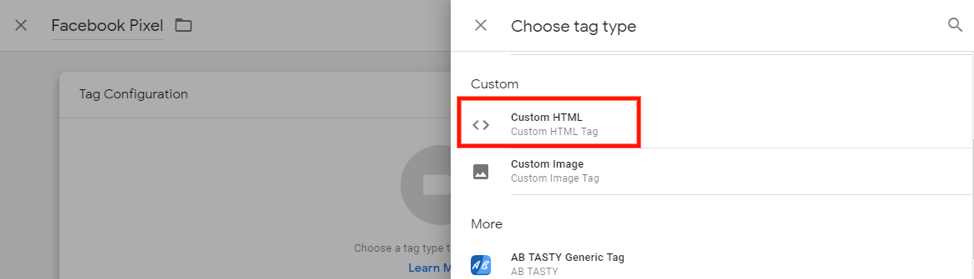
The important thing to note is that when Google Tag Manager doesn’t provide a template for the tracking code you want to install, you’ll need to use the custom HTML option. To illustrate this process, here are the steps for installing the Facebook Pixel in Google Tag Manager.
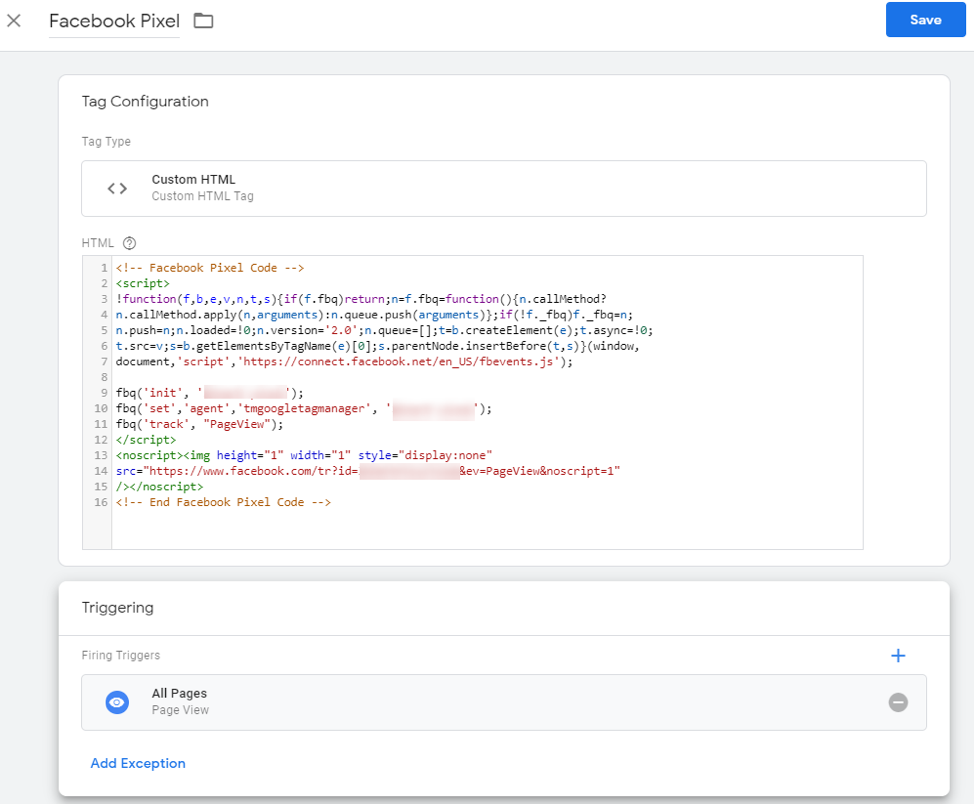
From your Google Tag Manager account, create a new pixel. Name it “Facebook Pixel” and select “Custom HTML” as the tag type.
After selecting “Custom HTML” as the tag type, you’ll be given a place where you can paste the Facebook Pixel tracking code.
As you can see in the screenshot above, the trigger is set to “All Pages” — but there are other options available, and Facebook provides some tips to help you choose the right option for your case.
Do You Need Google Tag Manager?
We’ve gone over the ins and outs of Google Tag Manager. As we bring this overview to a close, let’s tackle one last question: Should you be using it?
For the owner of an ecommerce business, there’s arguably nothing more important than learning about customer behavior. Because if you don’t know how your customers are interacting with your online store, you have no way to optimize to increase conversion. In other words, any effort made to improve the customer experience and the buying journey is just a shot in the dark.
Google Tag Manager gives you a window into your customer experience. By using Tag Manager to publish and manage tags for your ecommerce store, you can boost conversion and generate more revenue for your business.
Hostdedi is the Premiere Hosting Provider for a High-Performance ecommerce Business
What do you get when you combine 99 percent uptime, top-to-bottom SEO optimization, tons of included plugins from IconicWP, dropshipping support, and a Glew.io subscription at no additional cost? You get Hostdedi Managed WooCommerce Hosting.
Hostdedi WooCommerce hosting plans were designed with three principles in mind: reliability, scalability, and speed. Every ecommerce store running on a Managed WooCommerce Hosting plan benefits from everything Hostdedi plans have to offer from cart abandonment technology to minimize lost sales to the nearly limitless ways in which you can customize the look and feel of your online store. Best of all, Hostdedi hosting plans are competitively priced and come with outstanding round-the-clock support.
Tracking interactions between customers and your ecommerce store is essential if you want to gauge the performance of your business. However, it’s not always obvious which interactions you should be tracking. If you track too little, you’re not getting the most representative picture, and if you track too much, the important data gets buried.
In order to drive revenue effectively, it’s vital you understand the performance of each of your site’s touchpoints. By identifying key goals and events through Google Analytics, and standardizing their reporting structure, you’ll be able to leverage that data to create campaigns that promote engagement and growth.
To help, we’ve created the ecommerce business owner’s guide to Google Analytics event tracking. With this guide, you’ll know which tracking events are most important and how to create tracking goals for your ecommerce store.
Google Analytics Event Tracking vs. Goal Tracking
Google Analytics event tracking can illuminate patterns in user behaviour that you can use to make more informed decisions.
Finding out how customers and leads are interacting with your online store is crucial for optimizing your customer experience. As it happens, you can learn a lot about how customers are engaging with your store by tracking goals and events in Google Analytics.
Events
As Google defines them, events are “interactions with content that can be measured independently from a webpage or screen load.” This includes things like:
Clicks
Video views
File downloads
Code loads
Page scrolls
Account logins
Media shares
Products added to the shopping cart
In a more technical sense, events are interactions between users and your ecommerce store. This includes:
Mouse interactions
Keyboard interactions
Frame interactions
Form interactions
In Google Analytics, event tracking can illuminate patterns in user behavior that you can use to make more informed decisions and further refine your customer experience. While certain events — like abandoned carts, for instance — are often tracked by default, you can track many different customer interactions with Google Analytics custom events.
Google Analytics has four conditions for events: category, action, label, value, and non-interaction. Each type of event condition has its own application, whether it’s for organization in Google Analytics or for assigning monetary value to a trackable event.
An event category is a name assigned to a group of events. They’re used primarily for organizational purposes. For example, you might assign events like pageviews and clicks to an event category called “engagement.” Or you create an event category called “downloads” for events related to the downloading of files from your website.
An event action is a certain type of event that you want to track for a specific page element. For example, when users click play, pause, or rewind, or scrub through a video to a particular location, you can track those interactions as event actions.
An event label is an optional name assigned to a certain element on a webpage. Similar to event categories, event labels are largely for organizational purposes. For example, if there are multiple PDF files that can be downloaded from your website, you could use event labels to distinguish downloads of one PDF file from others.
An event value is an optional numerical value assigned to a trackable event. Although value is often a monetary value, meaning how much (in dollars) an event brings to your business, there are cases where value could be a length of time or raw quantity. For instance, you could make the value for a confirmation page event equal to your average transaction value since you know (on average) how much your business makes from each conversion.
The non-interaction condition is applied when an event is non-interactive. When the value for this condition is “true,” the event isconsidered non-interactive. Typically, you only classify an event as non-interactive when you don’t want it to affect your bounce rate or other metrics in Google Analytics.
Goals
Google Analytics goals are essentially events that have value and that you want to boost in order to generate more revenue. When you set a tracking goal, Google Analytics begins counting instances of that goal as a conversion. For instance, if you set a duration goal of five minutes, and then a visitor spends 5 minutes or more on your site, Google Analytics will consider that a successful conversion.
In Google Analytics, there are duration goals, destination goals, pages/views goals, and event goals. As you’d expect, a duration goal is a minimum amount of time that you want users to spend engaging with your website. Destination goals refer to when users visit a specific page on your site like a thank-you page or an order confirmation page. With pages/views goals, you want users to click onto a minimum number of pages on your site. Finally, event goals are more specific interactions including form fills, click-to-call link clicks, and file downloads.
5 Google Analytics Goals and Events You Should Track
Tracking goals and events is an effective way to gauge or boost the performance of your ecommerce business. So let’s go over some specific Google Analytics goals and events that you should be tracking.
Google Analytics makes it very easy to access and create goals. Once you’re logged into your Google Analytics account, go into the Admin menu and in the View column, then click Goals.
Goal: Confirmation Pages
A confirmation page can be used to confirm an order that’s been placed or to thank a lead for joining a mailing list. But in any context, a confirmation page is what someone sees after an interaction with your brand or company. In other words, it’s a conversion follow-up that makes confirmation pages an important goal to track.
How to Set up a Confirmation Page Goal
From the Goals menu in Google Analytics, click the “+ New Goal” button to open the new goal template.
At the top of the goal template, you’re given a list of template options. For this tutorial, we chose to set up a completed purchase confirmation page — the second option on the list.
Next, create a name for your confirmation page goal. For the tracking goal type, choose “Destination” since a confirmation page is the URL destination that marks the completion of a conversion.
In the third section of the goal template, you’ll need to provide a destination and value, and then outline the conversion funnel for the tracking goal.
The destination is similar to a label and how the goal will be shown in Google Analytics. Think of it as a URL suffix and choose something simple that’s representative of the confirmation page you’re tracking.
The value is, quite simply, a monetary value assigned to the goal you’re tracking.
The funnel refers to your conversion or sales funnel. A confirmation page will likely take the final position in the funnel. The screenshot above shows how the funnel section will look when set up properly.
Finally, click “Verify This Goal” at the bottom.
Verifying your goal will manually filter your Google Analytics data from the past seven days through your new tracking goal to tell you how many hits you would’ve gotten during that period. When you see numerical values for every step of the funnel, your confirmation page tracking goal is functional.
Goal: Form Submissions
There are a number of different uses for forms on an ecommerce site. For instance, many sites use forms for newsletter signups and as a convenient way for users to contact the company. You can also set up a form so leads can request a quote for made-to-order products and services.
Just as there are multiple uses for forms for your ecommerce site, there is more than one way to set up form submission goals in Google Analytics. First, if you use a confirmation page as a follow-up to a form submission, you would set up a form submission goal in much the same way as a confirmation page goal (outlined above). Alternatively, you can set up form submissions as Google Analytics events, and then use a form submission event as a tracking goal.
Once you have completed that setup in Google Tag Manager, return to Google Analytics, open the Admin menu, click “Goals” in the View column, and click the “+ New Goal” button.
In the screenshot above, you can see the options we chose while setting up a tracking goal for a contact form. In the first section, we chose the “Contact us” template. In the second section, we named the goal “Contact us” and selected “Event” as the goal type. Finally, we completed the details for the goal by filling in the category, action, and label. Since a form submission doesn’t equate to a sale, no value was assigned. However, you may choose to assign a value to an inquiry. It’s simply a matter of preference.
Goal: Products Added to Cart
Adding products to the shopping cart is another important goal to track and is a prerequisite for a purchase. The idea is to see how many people are adding products to the shopping cart so you can compare that to how many of those added products end with transactions. Doing this gives you an idea of how often users are abandoning their shopping carts.
There are two ways to set up Added-to-Cart goal tracking in Google Analytics, depending on how your ecommerce site is setup. If there’s some sort of confirmation page when a product is added to the shopping cart, then you’d follow the same steps as you would for a confirmation page. But if adding a product to the shopping cart isn’t followed by a confirmation, you’ll need to set it up as a triggered event with Google Tag Manager.
How to Set up an Added-to-Cart Goal
As you configure the trigger for the event in Google Tag Manager, you’ll want to select “Click – All Elements” as the trigger type. This ensures that mouse clicks will trigger the event. Next, select “Some Clicks” for what initiates the trigger and input the class and conditions for the event trigger. Use the + and – buttons to the right to add or remove triggers as needed.
You can see how these settings are reflected in the underlying code on your site by right-clicking on your “Add to Cart” button and selecting “Inspect element.”
After configuring the tracking event trigger, your Added-to-Cart goal is ready to start tracking.
Event: Abandoned Carts
When a cart is abandoned, it means the person who added the product to the shopping cart has changed his or her mind. On average, 69.57% of shopping carts are abandoned before purchases are made. With so many sales falling through the cracks, cart abandonment is a very important metric for ecommerce business owners to track.
It’s worth noting, though, that a tool like Jilt that can act on cart abandonment data can be especially useful. In addition, Glew.io can actually show which products are being left abandoned in the shopping cart most frequently and makes it easier to identify potential roadblocks in the buyer’s journey. Both Jilt and Glew.io are tools that are included with Managed WooCommerce at Hostdedi.
How to Set up an Abandoned Cart Event
Abandoned cart event tracking is most commonly done automatically when you have ecommerce enabled in Google Analytics.
To access your abandoned cart events, navigate to ecommerce > Cart Behavior. Not only does this show instances of cart abandonment, but you get to see instances of no products being added to the cart and instances of check-out abandonment. The idea is to get a concise visual representation of how many sales are lost at different points in the buyer’s journey.
Event: Video Views
Videos are the most popular, high-converting form of digital content today which is why setting up tracking for video views is important for ecommerce businesses. With Google Analytics and Google Tag Manager, you can set up video tracking for instructional/information videos, video reviews, and product launch videos that are available on your website.
Tracking video view events on your site is particularly useful when combined with an ecommerce analytics tool like Glew.io for more insightful customer analytics. When you track video views, you can compare that figure to metrics like your pageviews, unique visitors, and conversions for a clearer picture of how users are engaging with your online store.
How to Set up a Video View Event
The most effective (and easiest) way to set up video view events is to use Google Tag Manager. And if your videos are hosted on YouTube, then Google Tag Manager takes just moments to set up.
In the screenshot above, you can see a pretty standard trigger configuration for a video view event. For the trigger configuration, all four capture options are selected including progress percentages in 25-percent intervals, but you can set it to track as much or as little as is helpful for you.
Once you have finished with trigger configuration, the tag configuration for your video view event should look similar to the screenshot above.
After you’ve finished setting up your video view event in Google Tag Manager, those events will be reported in Google Analytics. You can monitor instances of video view events in Behavior Event Reporting.
Hostdedi Managed WooCommerce Hosting Comes Paired With Glew.io for Comprehensive Customer Insights
Hostdedi is your premiere hosting provider, offering high-quality, performance-focused hosting plans for ecommerce businesses of any size. However, when you choose Hostdedi Managed WooCommerce Hosting, you’re not just getting the best in speed, performance, and reliability at a great price: You’re also getting tons of extras, like Jilt for cart abandonment and Glew.io, a comprehensive ecommerce analytics program. So when you want the best for your growing ecommerce business, choose Hostdedi Managed WooCommerce Hosting.
Disruption. Not a word anyone running a mission-critical business wants to hear. And there’s no shying away from the fact that Magento has introduced disruption into the commerce market by sunsetting the Magento 1 platform and encouraging merchants to re-platform to M2.
But what about when disruption creates opportunity and innovation? When disruption brings about a transition to something bigger, better, different, and future-proof? Well, we think about it in a different frame. Turning disruption into opportunity is how we here at Hostdedi view the pending M1 End of Life in June of 2020.
Many companies like yours are having to make decisions about what happens next to Magento-based online stores. You’re likely seeing messaging that ‘the sky is falling’, wrapped around offers, tutorials, and guides on how to migrate as fast as you can before everything crashes down. But before you get worried, think strategically. This kind of shift will require a transformation – and transformation requires clear-headed thinking, planning, and solid change management.
This is a perfect opportunity to audit where you are and make good decisions about where you’re going. Planning for and executing strategically on this change is where Hostdedi can help you transform challenge into triumph.
Not every business is the same and knowing that this event was coming allowed us to expand our portfolio of solutions to meet you wherever you are. We’ve developed a brand new product called Safe Harbor for those who want to stay put for now. We also have Magento agencies ready to help you migrate to M2. And if you decide that a re-platform to M2 doesn’t align with your overarching business strategy, we’re prepared to offer extensive support for other platforms that allow you to drive growth.
Getting What You Need from Open Source
With the introduction of Magento in 2007, the commerce landscape was forever changed. What was originally called Community Edition turned into Magento Open Source a few years ago. Upon its arrival, it quickly became the de facto solution for anyone selling online. And we were there. In fact, the first instances of Magento were built on the Hostdedi platform and we have been the #1 hosting provider for Magento stores ever since.
But today’s landscape is far different than it was a decade ago. There are platforms aplenty for small and large businesses, both open and closed. And with so many options, it can be overwhelming to pare down and prioritize what features and functions are going to make your site the best it can be. Remember – easy doesn’t always mean best – especially if you’re considering a closed platform like Shopify for your foundation. As a SaaS platform, it limits customization, performance, and scalability. A lack of built-in features often requires add-ons that are costly, resource-intensive, and can slow down your site. Add to that restrictive product & SKU customization, a lack of flexibility for site design & modifications, and exorbitant subscription fees and what might seem like an easy path becomes unforgiving and expensive. Shopify’s transaction and payment gateway fees alone couldcost you more than 5% of every sale you make.
So if there’s one takeaway from this moment of transition, it’s that making open source your foundation for commerce directly aligns to achieving long-term growth. From its revolutionary beginnings to current day frameworks, open source optimizes people and technology. The value of rapid contribution from experts, the elimination of extra licensing and maintenance fees, and the ability to inherently know they can meet the needs of every customer is exactly why our industry-leading agency clients invest in open source with us. They know that they can meet the needs of every customer with confidence and without hesitation. We’re proud of our leadership in this space. And we’re committed to continuous investment here, developing the broadest possible community dedicated to open source ecommerce.
Taking Action
Ready for next steps? We’re excited to share options that will provide a smooth transition for you and your clients:
Option 1: Stay on Magento 1 with Hostdedi’ Safe Harbor:
After June 2020, Magento will stop providing core updates and security patches. Safe Harbor offers:
Updates and security patches that will keep your platform running, safely.
Malware scans with visibility into malicious attacks and blocked requests by our WAF.
A vetted list of modules we frequently update with recommend extensions that can be used without risk.
Simple integration that does not require dev support.
This is a great option available for Q120+ which can avail you more time to work on your broader strategy.
Option 2: Move from Magento 1 to Magento 2:
If you’re growing fast, have a migration plan already in place, and a high number of customers and SKUs, this option likely makes sense for you. While it requires re-platforming, we’ve made the transition to M2 as seamless as possible by serving up a stable platform with capabilities designed to elevate the consumer experience, while still ensuring your team is supported at every turn. We have a broad set of agency partners we can connect you with who are at-the-ready to help you re-platform.
Security
Apply security updates and patches
Create malware signatures and firewall rules
Look and feel and UX
Design themes
Data migration
Basic training
Product data loading
Support
Dedicated project manager
Ongoing support after migration is complete
Security and core patches
Store performance analysis and optimization
Support for most popular extensions for payments, shipping, tax, and email marketing
Option 3: Talk with Us About Alternatives:
We’re experts in open source ecommerce and we’re ready to work with you on building out your plan. Not sure if Magento is still a good fit? We have customers of all sizes on our Managed WooCommerce Hosting platform. One example is an enterprise with more than 5,000 SKU’s, processing 25,000 orders a month, and generating more than $10M in annual revenue. Marrying needs & budget with ongoing support that aligns to your long-term growth objectives is what we do best.
We’ve learned a lot in the last decade: not only about Magento and the surrounding community, but about ecommerce. Now that you know our plans, we’re ready to hear about yours. Whether you’re staying on Magento 1, moving to Magento 2 or considering alternatives, our ecommerce partners are ready to help you with your next move. Contact us today for a review of where you are now, and how options like Safe Harbor will keep you secure as you determine next steps.
Interested in Learning about Safe Harbor?
Let us know in the form below
Carrie Wheeler is the Executive Vice President, Managed Applications at Hostdedi with over three decades in technology leading through disruptive market events. Learn more about Carrie’s career in tech here.

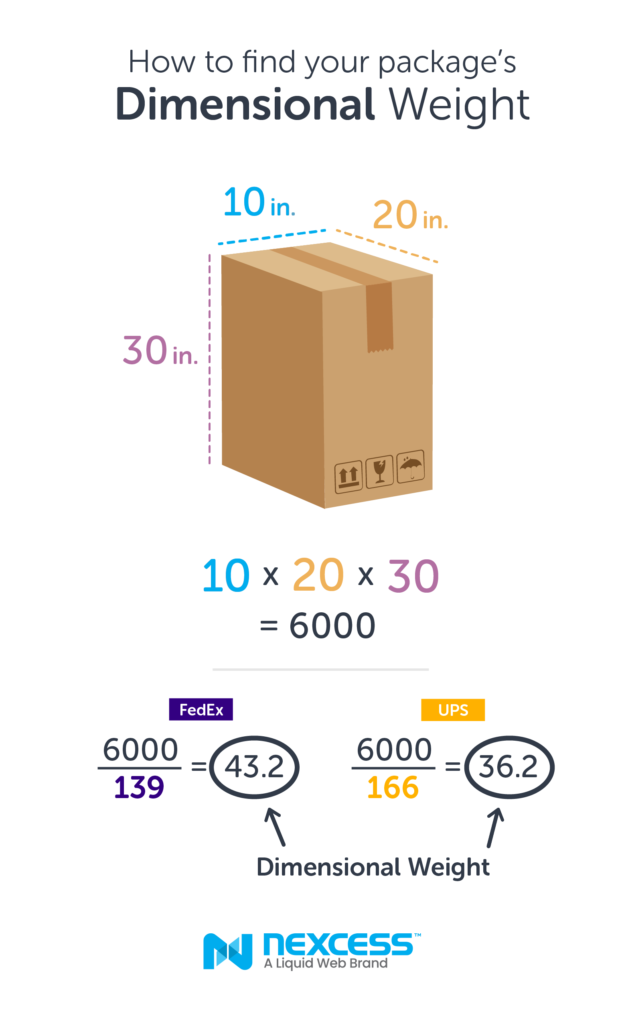
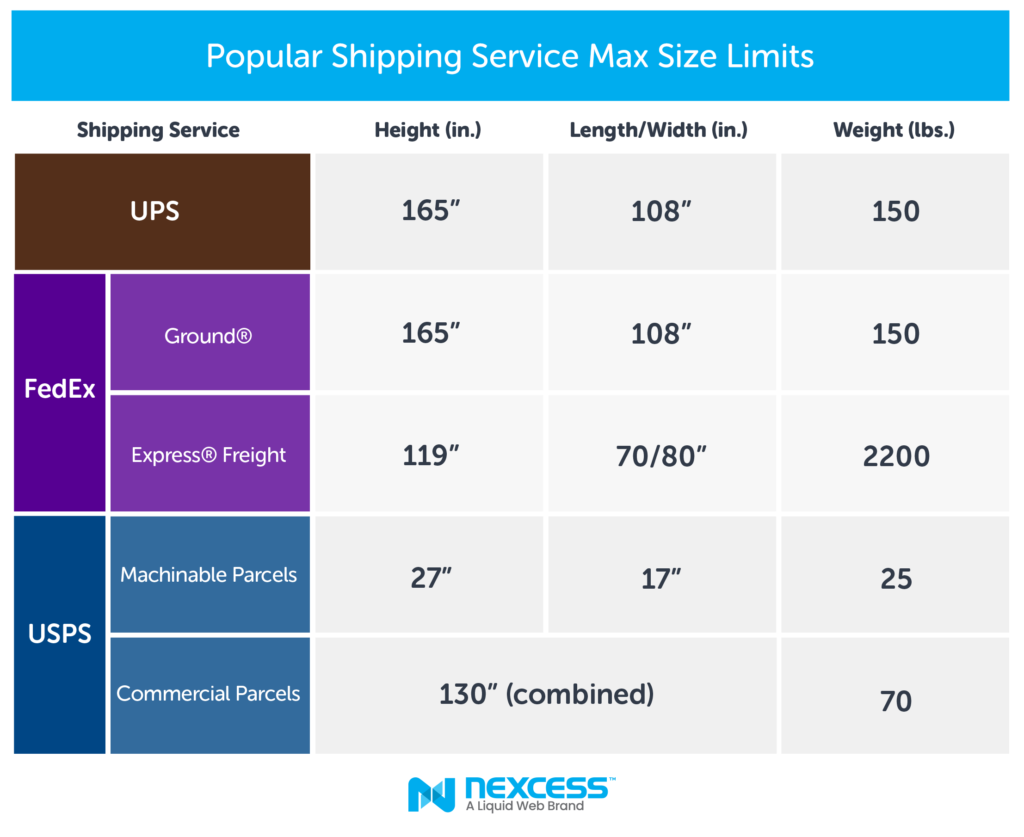
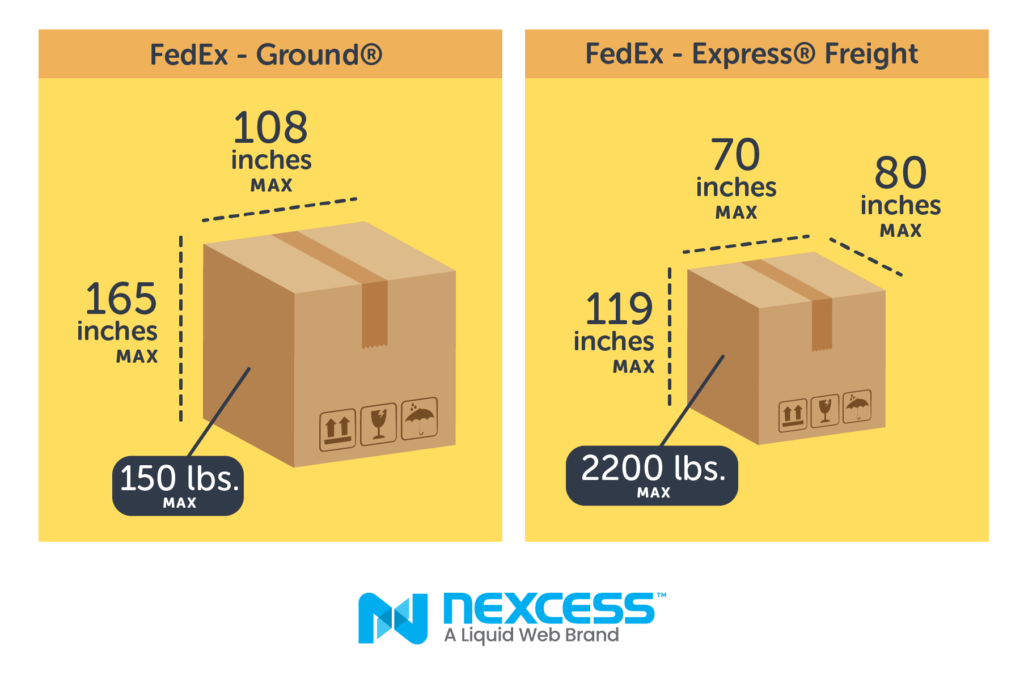
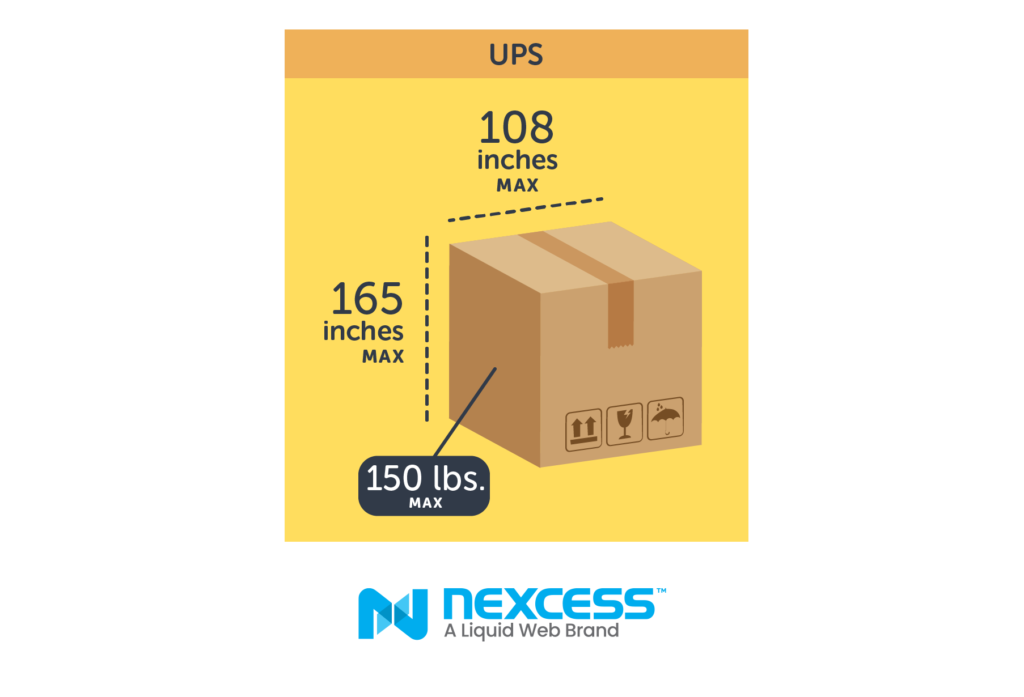
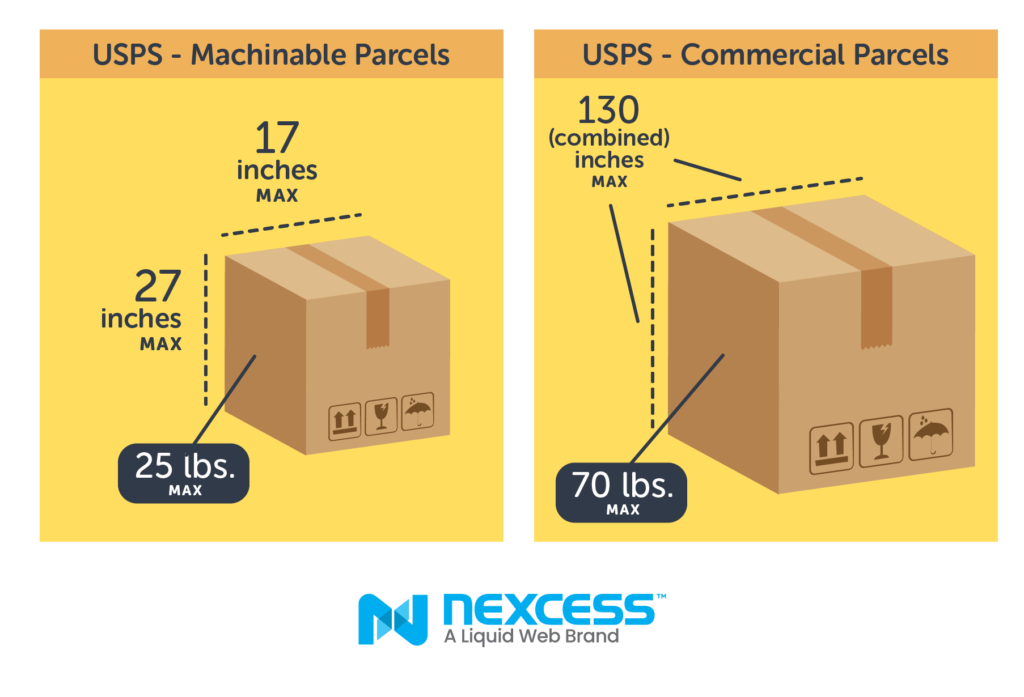

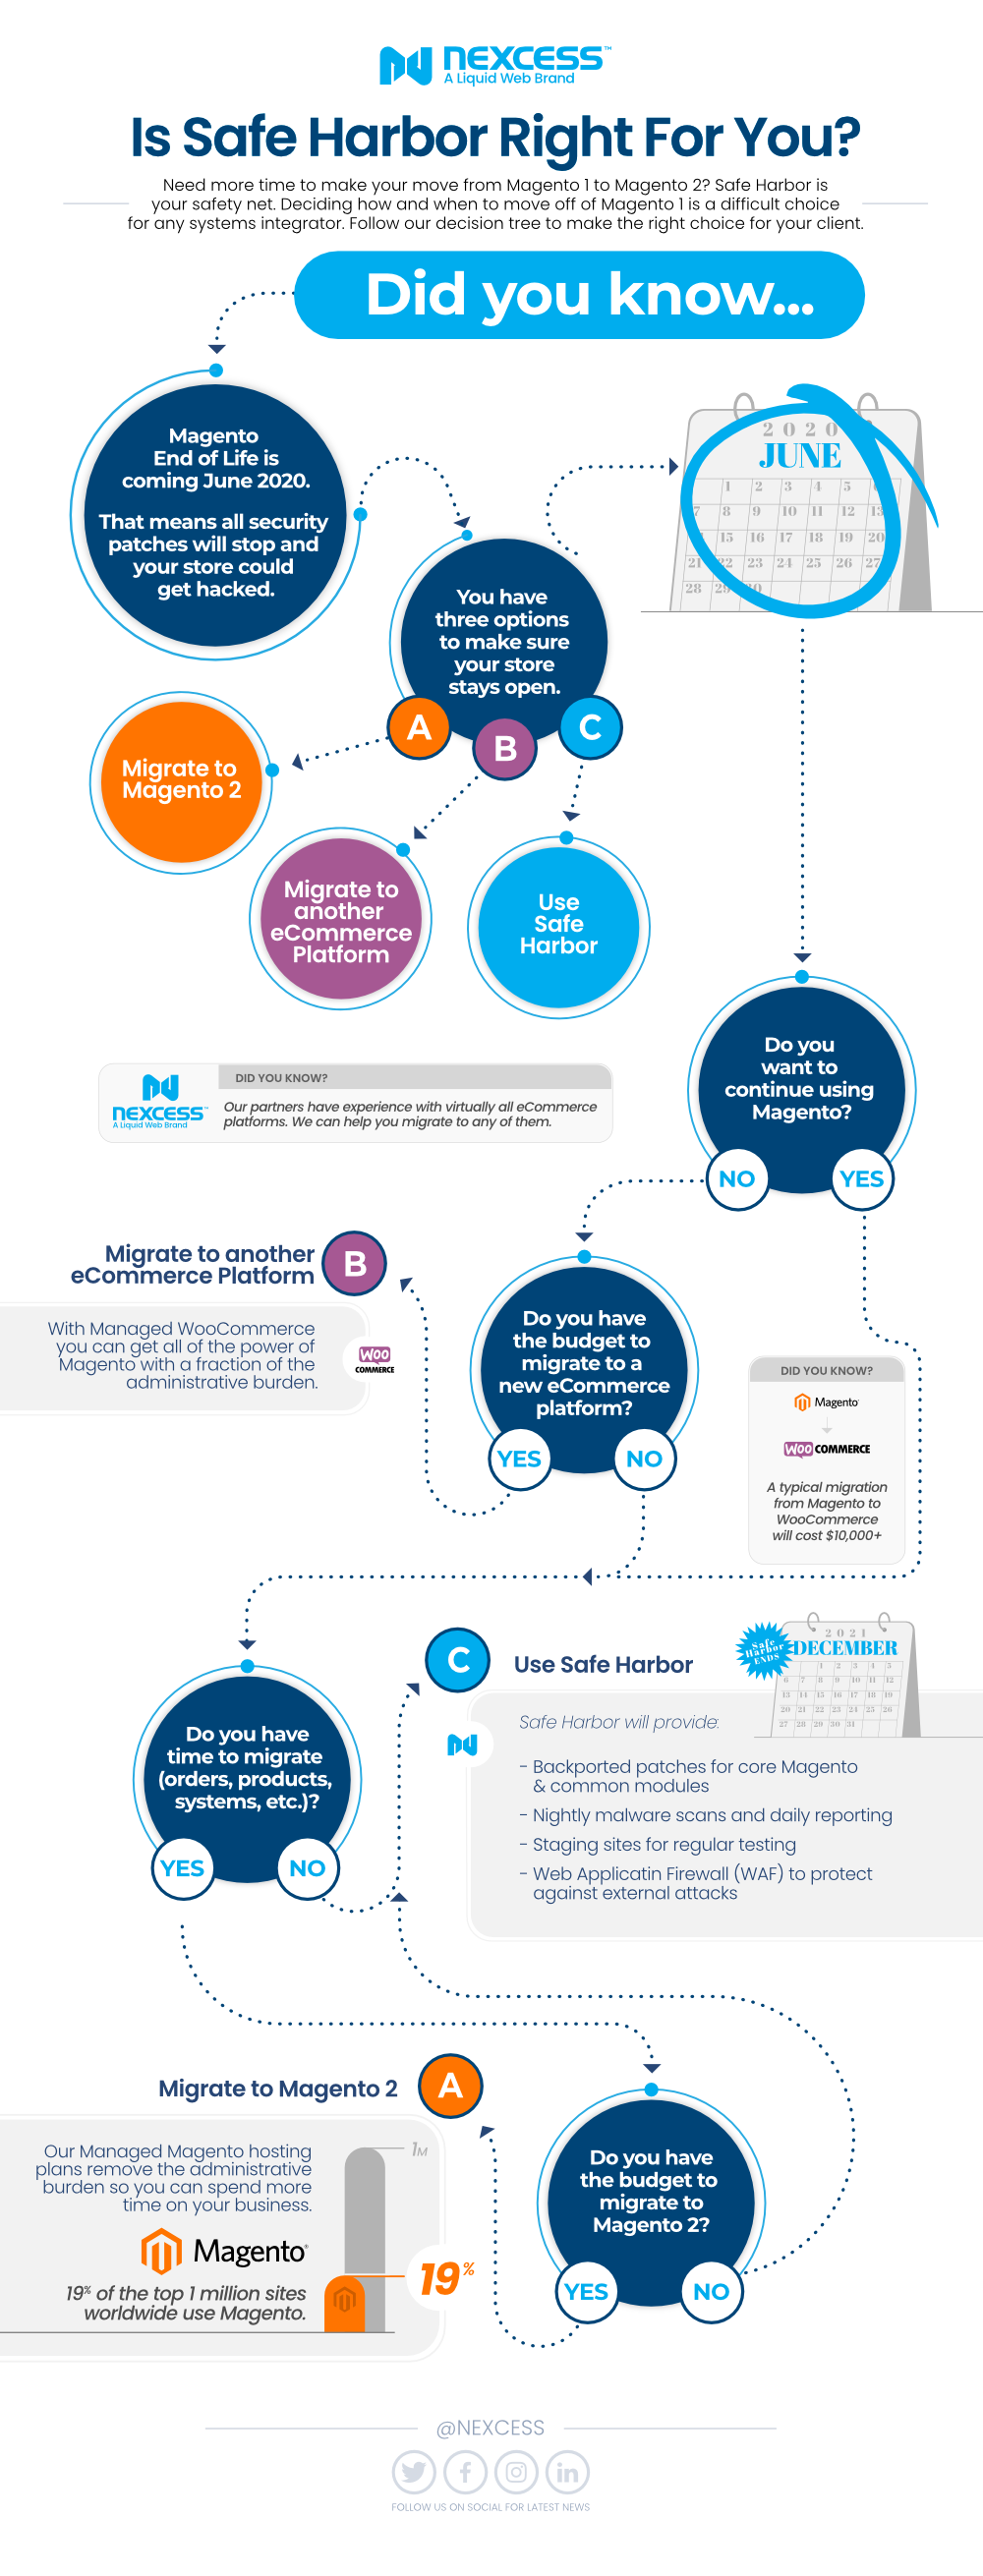
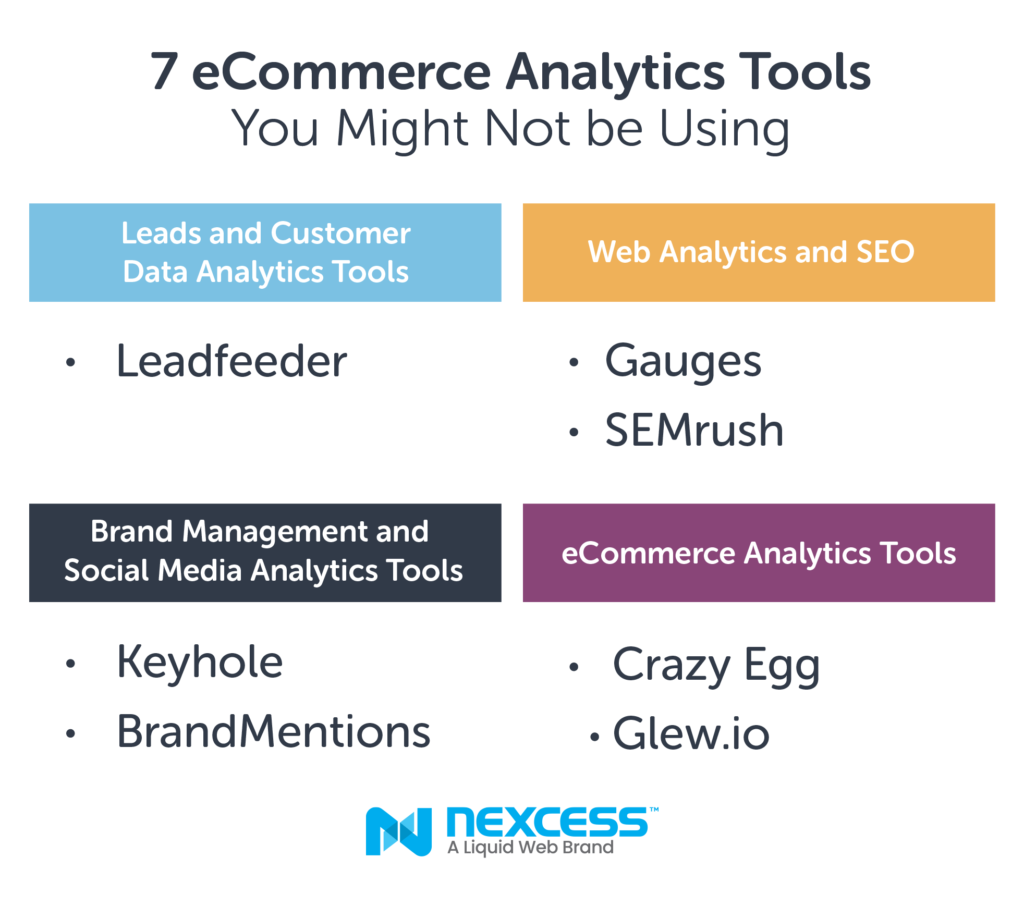
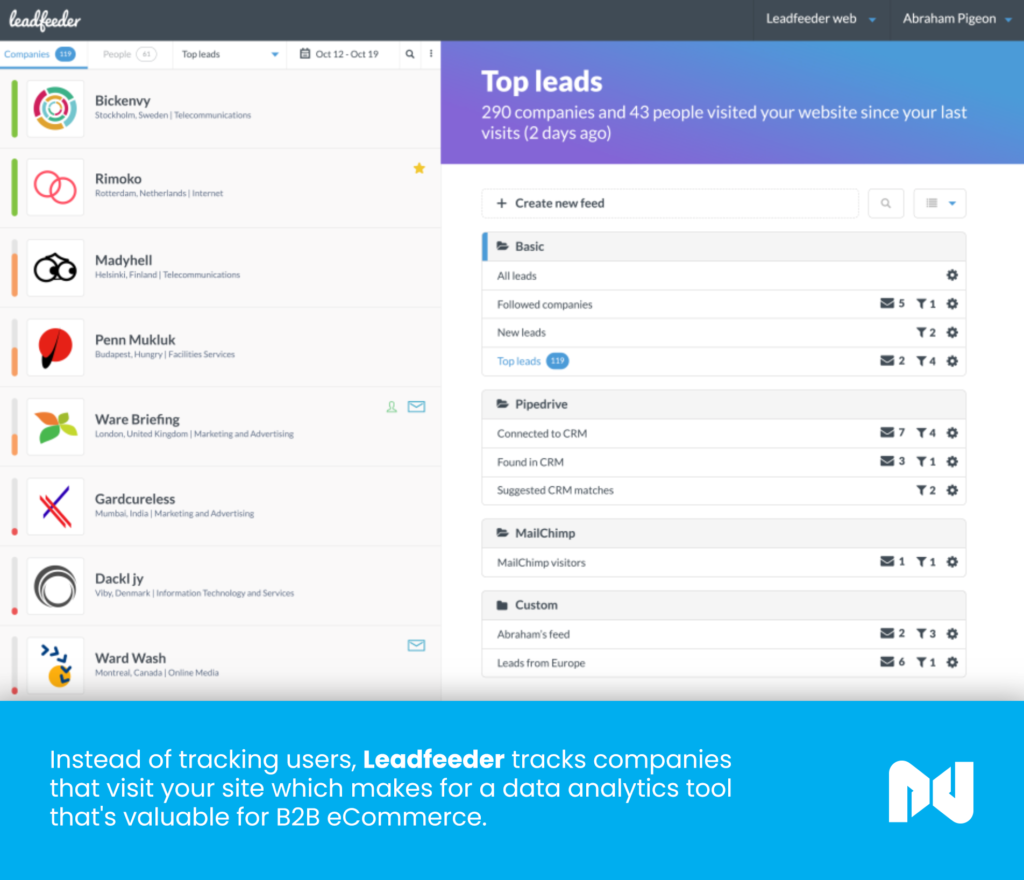
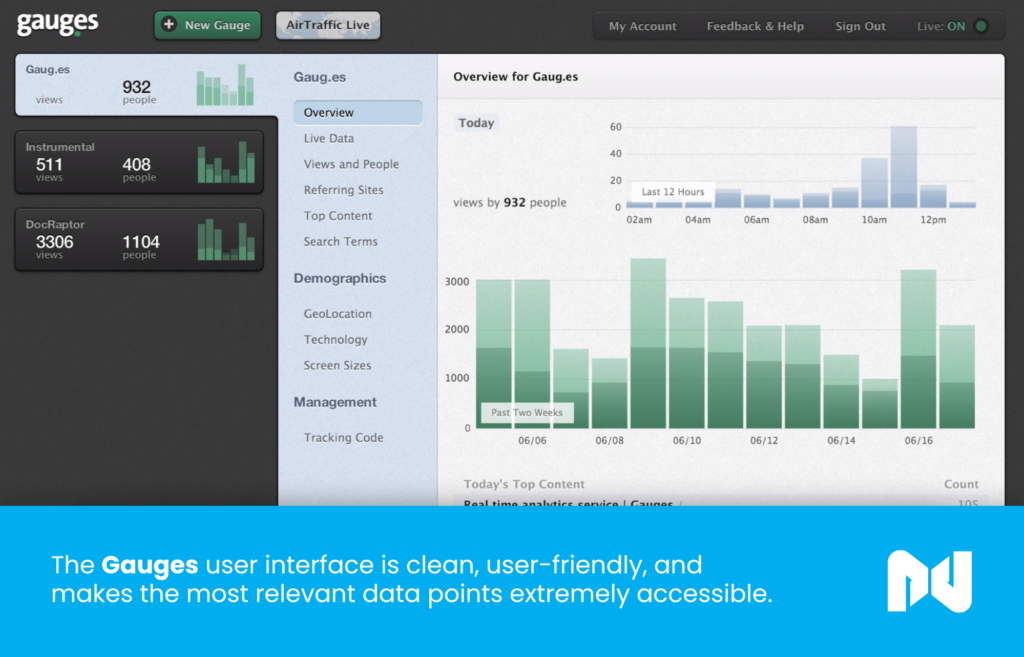
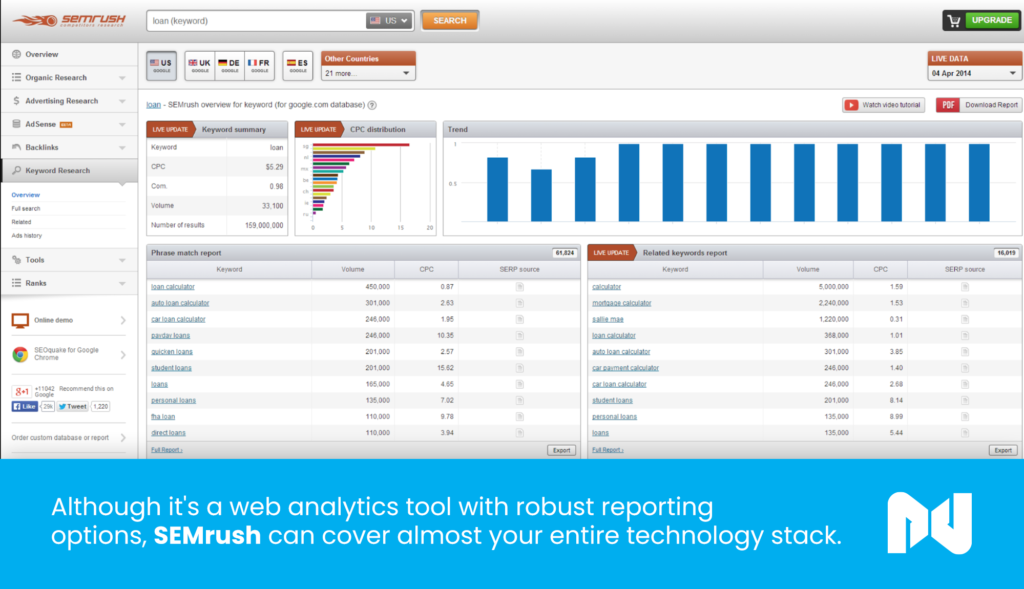
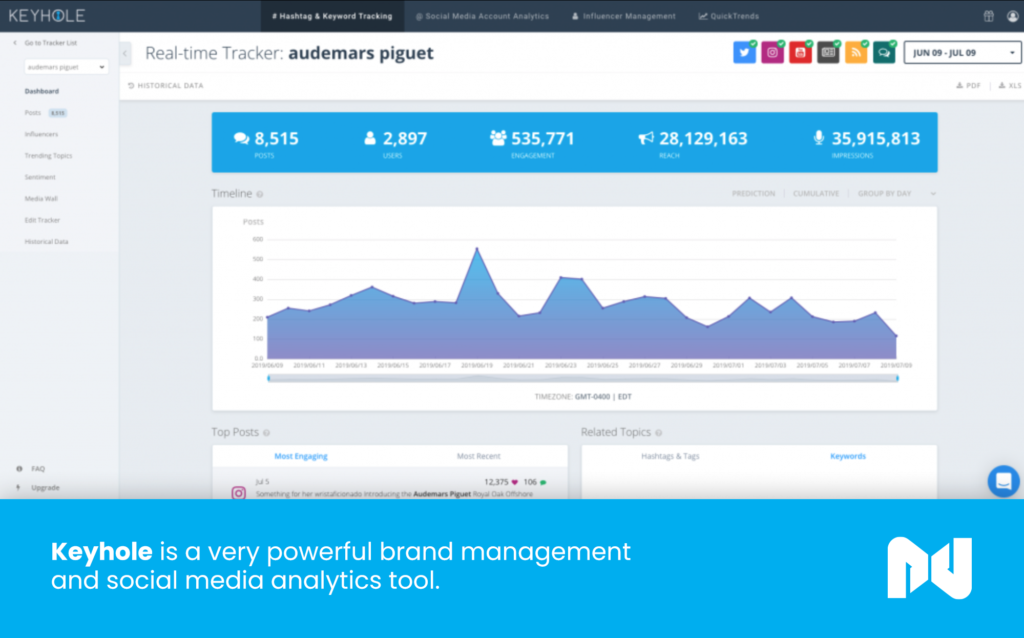
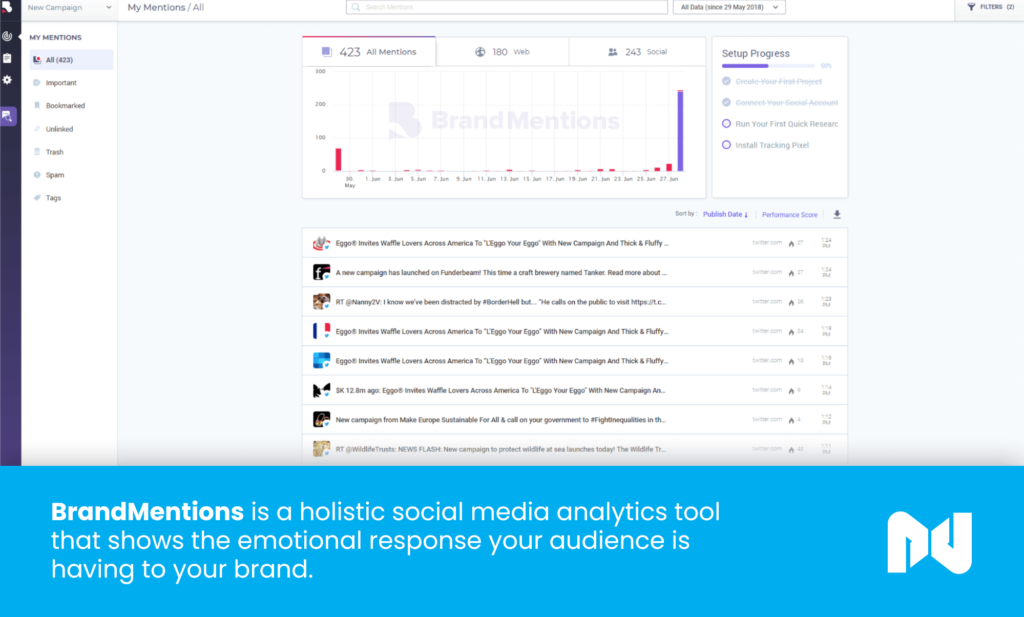
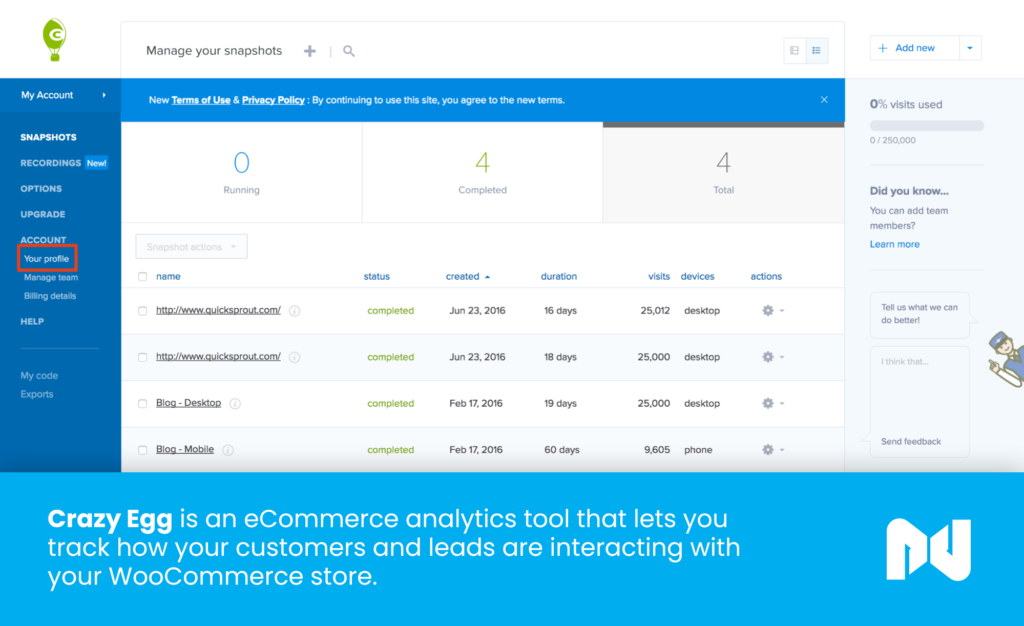
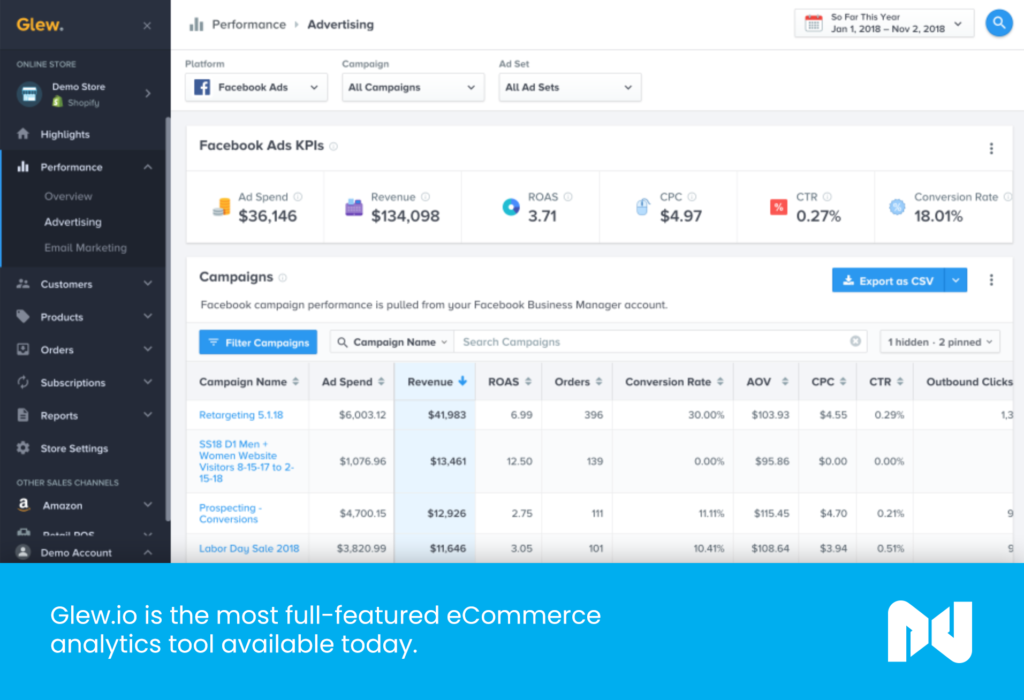


 We’ll say it again: WooCommerce is lightweight. This means the same hardware and resources can serve more customers with a WooCommerce store than with a Magento one. Take a look at our