Integrating A WordPress Blog With Your Magento Store
 Publishing audience-attracting content on an eCommerce store can be difficult. Product descriptions are essential but they aren’t the sort of content that attracts a loyal readership or brings people back time and time again. The importance of SEO value in generating organic reach means that it’s time to start integrating a WordPress blog with your Magento store. Content publishing is the present and the future of eCommerce and online retail, especially if you’re looking to attract new customers and retain existing buyers.
While it’s perfectly possible to blog within Magento using add-ons like the Aheadworks Blog extension, there are advantages to integrating a platform that has been built with content publication in mind. It’s also possible to turn WordPress into an eCommerce store, but Magento offers levels of flexibility and functionality that are difficult to replicate on a platform designed for content management.
If a retailer wants to maximize both the effectiveness of their content publishing efforts and the efficiency of their sales process, an integration that makes use of both WordPress and Magento is the optimal solution.
The best approach to WordPress/Magento integration depends on which is your primary platform. A WordPress site owner who wants to use Magento for selling products needs a solution with a different focus than a Magento user who wants to integrate a WordPress blog with an existing store. I’m going to look at how both use cases can be satisfied.
There’s some crossover here, so I’d advise you to take a look at the full range of functionality offered by the extensions I’ll be highlighting and make a decision that suits your particular needs.
Adding a WordPress Blog to a Magento Store
The best way to add a WordPress blog to an existing Magento store is with Magento WordPress Integration from FishPig.
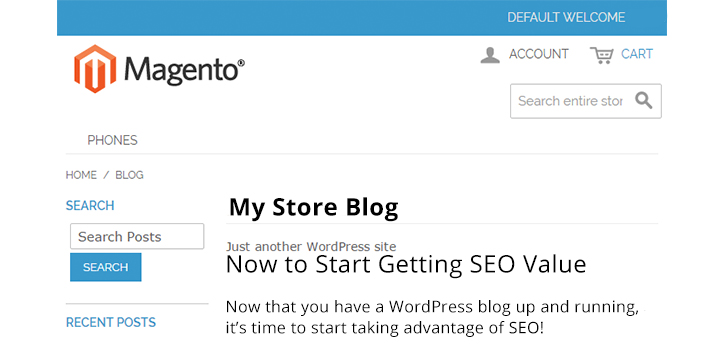
The extension helps maintain a consistent brand identity by using the Magento store’s theme for the WordPress blog without requiring any modification of files on either the WordPress installation or Magento. Users can log-in to their WordPress blog from within the Magento dashboard.
One of the most important reasons for choosing to use WordPress rather than a native Magento blogging solution is the huge amount of extensions available for WordPress. Handily, the WordPress Magento Integration extension supports many of the most popular WordPress plugins, including Yoast’s SEO plugin and Disqus comments.
Install WordPress
To begin, you’re going to need to download WordPress and extract it to the Magento root directory of your server. Once installed, the WordPress folder should be named “WordPress”, rename this to “wp”.
Note: If you’re doing this on a Hostdedi account, get in touch with the Hostdedi team and we’ll help you to manage this stage.
To check if it worked, type in your web address followed by “/wp/”. For example, http://www.mystore.com/wp/. This should take you to the WordPress installation page, which you should follow in standard WordPress fashion to get your blog set up.
When asked for database information, you have two options. You can either create a new WordPress specific database for storing your blog data, or you can link to your Magento database.
It is perfectly fine to use your existing Magento database due to WordPress and Magento data being separated by different tables. If you’re unsure about where to find your database, you can search MagentoRoot/app/etc/local.xml and find the information there.
At this point, the two applications have still not been linked. You are running a WordPress install and a Magento install at the same time.
WordPress Integration for Magento
Download Fishpig WordPress Integration.
Fishpig is 100% free and can be downloaded using the link above. You can install the module like any Magento module by using the Magento Connect Manager. Just make sure that you’ve disabled the Magento Cache and Compiler while you’re setting everything up. If you don’t errors will pop up!
Now that you’ve installed the module, head to your Magento Admin and along the top find WordPress -> Settings. Here you’ll find two sections that are going to require configuration.
Magento Database and Integration Settings
First, head to the database section. If you decided to set up Magento and WordPress using the same database, then make sure that you select yes. Below this, you’re going to need to enter the WordPress prefix. For the purposes of this guide, that is “wp_”
Next, scroll down to the Integration section. This is where the meat of your WordPress Magento connection is coming from.
First, in order to make sure that everything looks nice from a user experience perspective, you’re going to want to make sure that you’re selected yes next to “Integrated theme”.
Next, you’re going to set up the URL structure for your blog. You don’t have to type the whole URL in, just the part that directs to the WordPress blog. We’ve gone with “blog” (there’s nothing quite like tradition) but you can opt for whatever you want. Using the example above, your WordPress blog will be located at “www.mystore.com/blog/”.
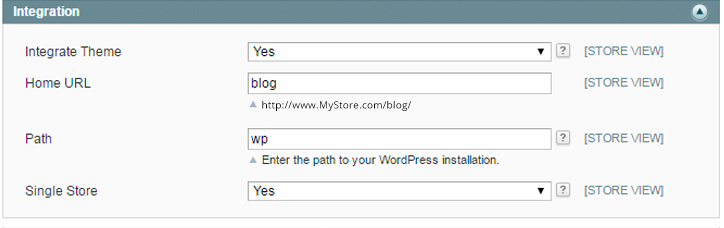
Finally, you’re going to want to enter the path for to your actual WordPress install. If you’ve been following this guide to the letter, that should just be “wp”. Once you’ve done this, click “Save Config” and click out.
Configuring WordPress for Magento
In order to configure WordPress properly, you’re going to need to head to the general settings section. Here, you will be able to make changes to the URL structure of your WordPress blog and how it links to your Magento store.
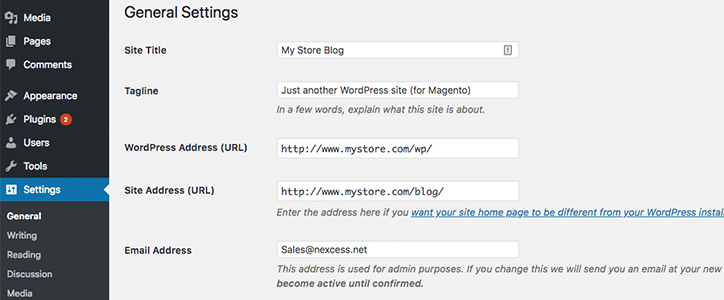
The two most important sections are WordPress Address and Site Address. For WordPress address, you want to make sure that you have linked to the location of your WordPress install. This should probably remain as is. If you’re installed WordPress to the Magento root directory as directed above, this will be your website URL followed by /wp/.
Site Address should link to the URL structure you set up while enabling WordPress on Magento above. We’ve gone with the /blog/ directory, but it’s up to you how you set it up. Remember to include your Magento base URL before.
Once you’ve made sure that these things line up, hit “Save Changes” and you’re done. You now have a fully functional WordPress blog added to your Magento store. Congrats!