Everyone wants their websites to run without a hitch. But no one is immune from accidents. Hackers, poorly coded plugins, faulty hard drives, or human error may break your site by corrupting or deleting data.
Fortunately there is a simple solution to it — backups. Simply put, a backup is a full copy of all your media files, plugins, theme files, settings, and databases. In case something goes wrong it will always be possible to restore your WordPress site to the point at which the backup was made.
Keep reading for a full overview on how to backup your WordPress website manually.
Why WordPress Backups Are Important
Having a restoration point can save you a lot of trouble, as it is not always possible to repair a site after an accident. The site can be infected so badly it would make no sense to scan and clean up all the affected files. In that case, it is easier to revert the site to its original state by using backups.
The example above is just one situation that can happen to your site so it is highly recommended to take backups at least weekly. The frequency mainly depends on what kind of website you have. While small low-activity blogs do not require numerous backups, it is a must for online stores to have daily or even hourly backups in order not to lose information related to new orders. Also, it is advantageous to make backups before updating or adding new WordPress plugins as they may potentially break your site.
The absence of backups in a critical situation can severely damage your business if not destroy it completely. Data loss is inconvenient. It also means you would need to rebuild your site from scratch. That involves extra time and lost potential revenue while your site is unavailable, not to mention credibility losses.
The golden rule is to have at least 3 off-server backups in different places. These can be any cloud storage solutions like OneDrive or Google Drive, a USB flash drive, portable SSD, and even your email account — just make sure to star it or put an important label on it. Any place you can easily access to download your backups is good to store them in.
Automatic vs. Manual Backups
Today there are a number of plugins on wordpress.org designed to make backups automatically. It is definitely a great method, but not ideal. Most of such plugins use up your disk space to store backups. It might not be a good solution if you are limited with your disk space or if your hosting company bills you for disk space usage — making weekly backups, let alone daily, very expensive.
Additionally, if the server containing local backups crashes, you will not be able to use them for restoration as they will be lost together with other data. And finally, if you decide to stick to the 3-backup rule mentioned above, it might not be possible to automate this process due to lack of integration with certain remote destinations — or in cases with SSD or USB flash drives.
On the other hand, manual backups require logging into the server each time you want to make a backup. It can be tedious but manual backups pay off with a higher degree of control — you can take a copy of specific folders or files, or make a database-only backup.
Usually, plugins help make only full site backups, however there are a few on the market like iThemes BackupBuddy that also allow making database-only backups.
Also, manual backups are a must if you just made a considerable update to your website and the next automated backup is scheduled to be made in 5 days. You cannot risk losing your progress if something happens to the website or server within these 5 days.
Ideally, automated backups should be combined with manual backups where needed. This will ensure your website is fully protected after each update.
While automated backups are typically easy to configure within the plugin’s menu or your server’s dashboard, it is important to know how to back up a WordPress site manually.
How to Backup a WordPress Website Manually Using SFTP
SFTP stands for Secure File Transfer Protocol or SSH File Transfer Protocol — it is a network protocol used to access and manage files remotely. In terms of manual backups, we can use it to access the server which hosts the website and make a copy of the entire site or certain folders.
The first step would be to download and install an SFTP client. The most widespread are WinSCP or Filezilla, but you can choose any you like since in most cases this kind of software shares similar interface and features.
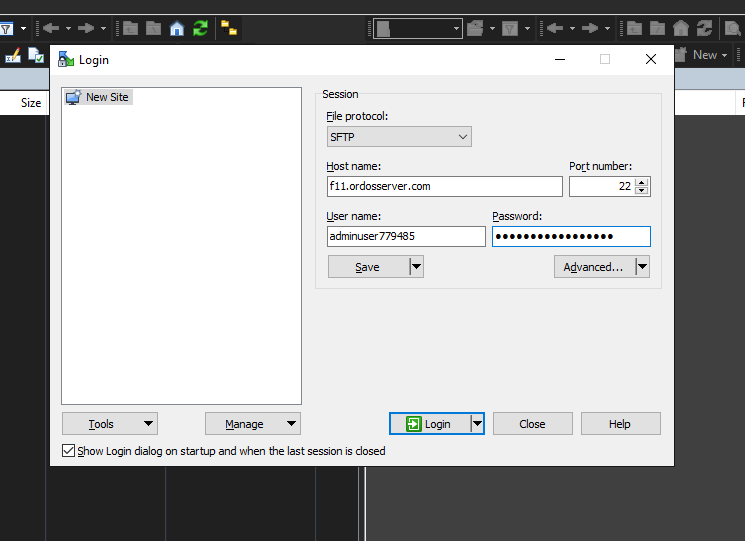
Once you have installed the SFTP client, you need to obtain credentials to connect to the server — SFTP server Hostname, Username, Password, and Port. If you do not have the credentials already, they can be obtained by contacting your hosting company’s support staff.
By default, SFTP utilizes port 22 so you can use it unless specified otherwise by your hosting company. Before you actually connect to the SFTP server, you might see something similar (WinSCP image below):
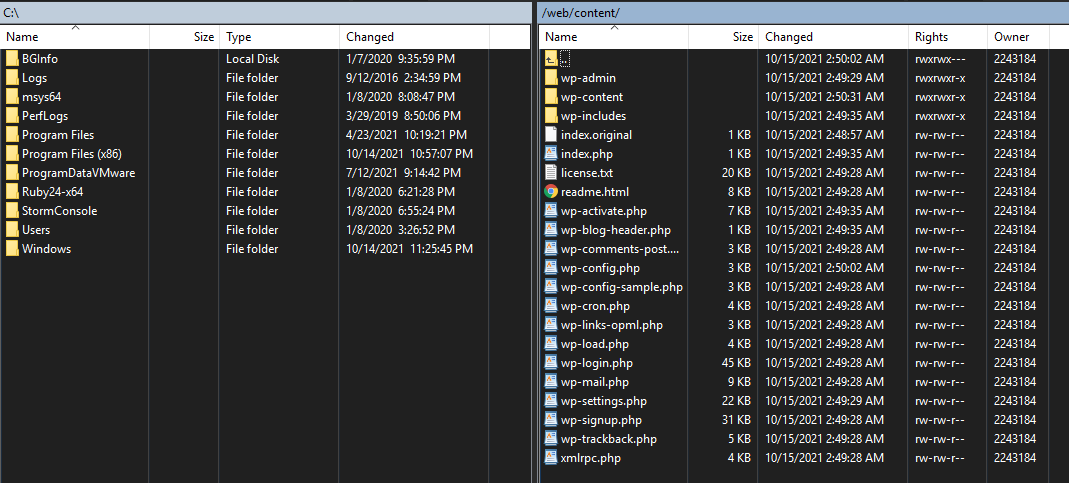
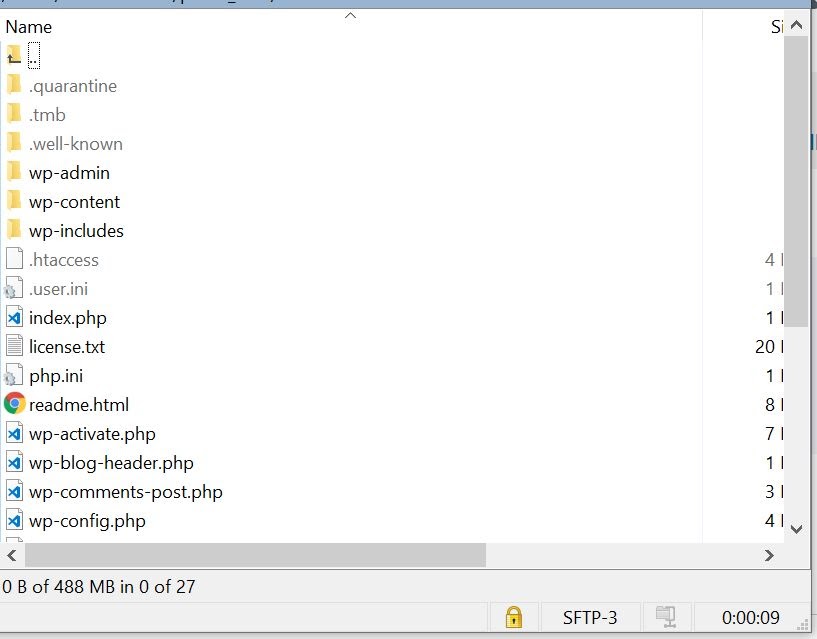
After you have connected to the server, you will see two panels representing files on your local machine (on the left) and on the remote server (on the right):
Depending on your server file structure, your WordPress installation might be located in different directories. In our example, it is /web/content, but in many cases it can be found in /public_html.
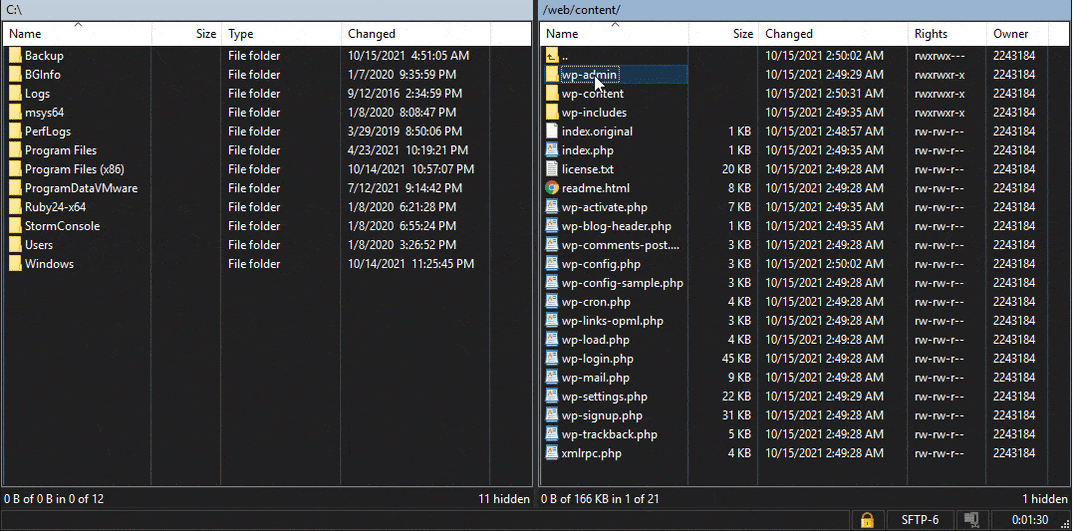
By selecting all the folders and files in this directory and dragging them to a folder on the left panel, you can backup your WordPress website manually.
Once you have copied all the files, you can rename the folder into the “website.tld – mm.dd.yyyy” format to keep track of all your backups.
Since full site backups can be large in size it is also recommended to compress them by zipping. Also, having a single file makes it easier and faster to send it to remote destinations.
How to Backup a WordPress Site Manually Using phpMyAdmin
phpMyAdmin is a web-based tool used to manage MySQL databases. This method is used to make database-only backups but they are as vital as full site backups if your website crashes — they contain various settings, posts, pages, comments, and many other things that ensure your site works and displays the information properly.
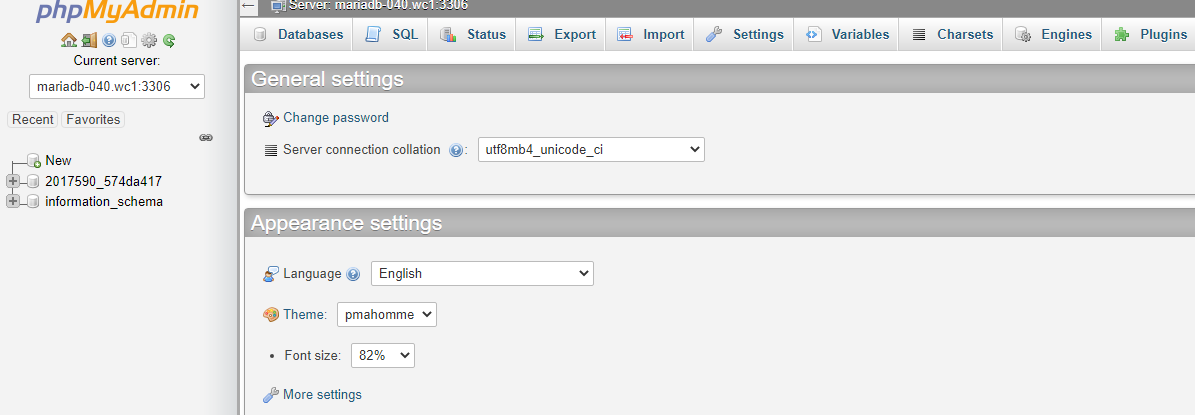
The exact ways to access it may vary depending on your hosting company or control panel, but usually it is a link or button that brings you directly to the phpMyAdmin menu.
A fragment of the main page:
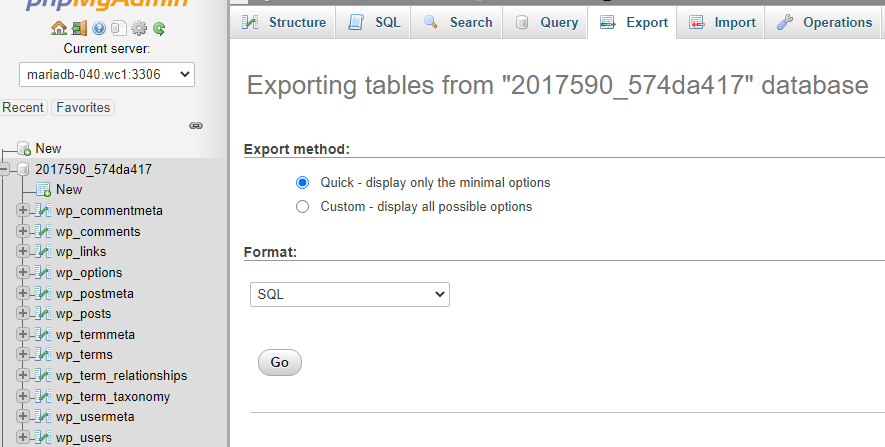
It is possible to make a backup of all the databases stored on the server — to do so just navigate to the “Export” tab on the header menu; for database-specific backup select one from the list on the left and then go to the “Export” tab.
The Quick Export method should be fine for most cases, but advanced users can have a look at the Custom method if they have some special requirements.
The format should be set to SQL and upon clicking “Go” the database will be downloaded to your local machine in .sql format. This file can later be used in the “Import” tab to restore the database.
Consider Hosting With Hostdedi
All Managed WordPress plans at Hostdedi come with automatic 30-day daily backups. Not only will they ensure the safety of your data, but also save you some time and effort.
Our expert team will assist you with restoring your site using a backup no matter what — be it a cyberattack or termination over the past-due bill — we will always be here to help. Knowing your site is always protected will give you peace of mind allowing you to focus on expanding your business.
Combined with industry-leading performance and optimization, Hostdedi brings Managed WordPress hosting on the next level.
Do you know how much time internet users spend on social media every day? 2 hours and 25 minutes.
Businesses have been capitalizing on the popularity of social networks through social media marketing. However, now there is a new way to sell products through social media platforms — social commerce.
Social commerce enables ecommerce businesses to set up product pages on social media.
eMarketer reports that social commerce revenue will cross $45.74 billion by 2022. That means social commerce can undoubtedly help you [boost sales](https://www.nexcess.net/blog/8-ways-to-use-social-media-to-grow-your-small-business/) and improve brand awareness, so let’s see how you can set up social commerce on popular social media.
First, let’s look at the major social commerce platforms for you to boost your sales.
Social Commerce Sites
Facebook
Instagram
Snapchat
Tiktok
Pinterest
Now, let’s see the step-by-step procedure to sell on these social commerce platforms.
Setting Up Social Commerce on Facebook and Instagram
Facebook and Instagram rolled out the ‘Shop’ feature to support social commerce. You can link your businesses’ Facebook page or Instagram profile to this shop.
Source – Screenshot
Here’s the step-by-step procedure for setting up Instagram and Facebook Shops.
Note: This feature is only available for businesses in the U.S.
Steps To Set Up a Facebook/ Instagram Shop
To enable social commerce, Facebook has introduced a new tool called commerce manager. Here’s how you can set up your shop on Facebook/Instagram using the commerce manager.
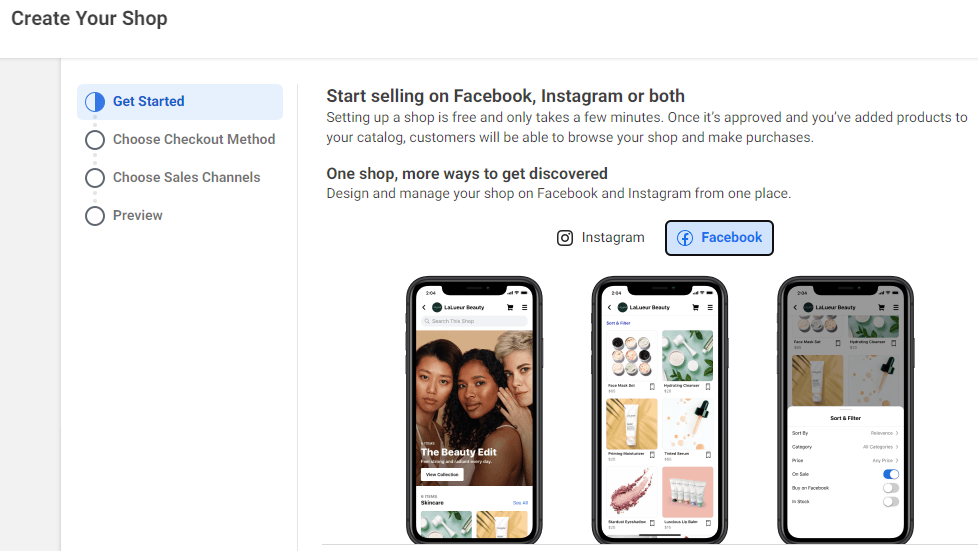
Step 1: With your Facebook account, log in to the commerce manager and click on Get Started.
Step 2: Choose where you want to set up a shop — Facebook or Instagram.
Source – Screenshot
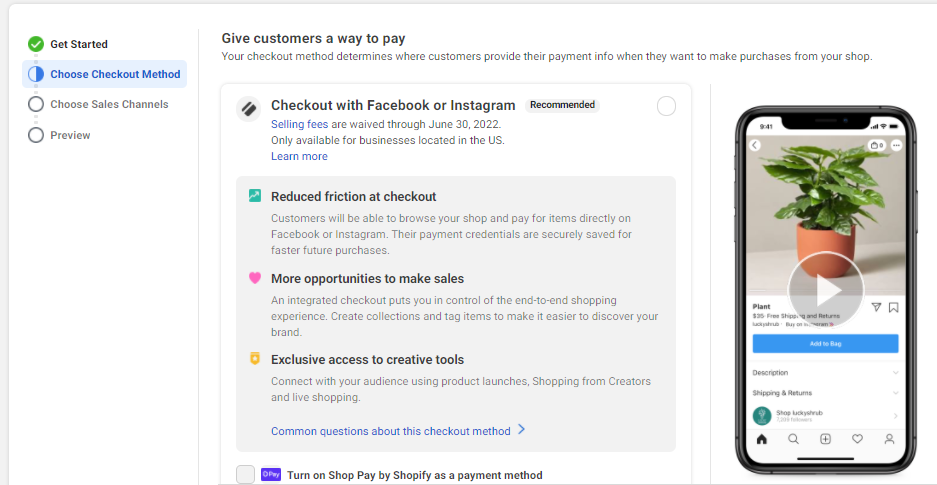
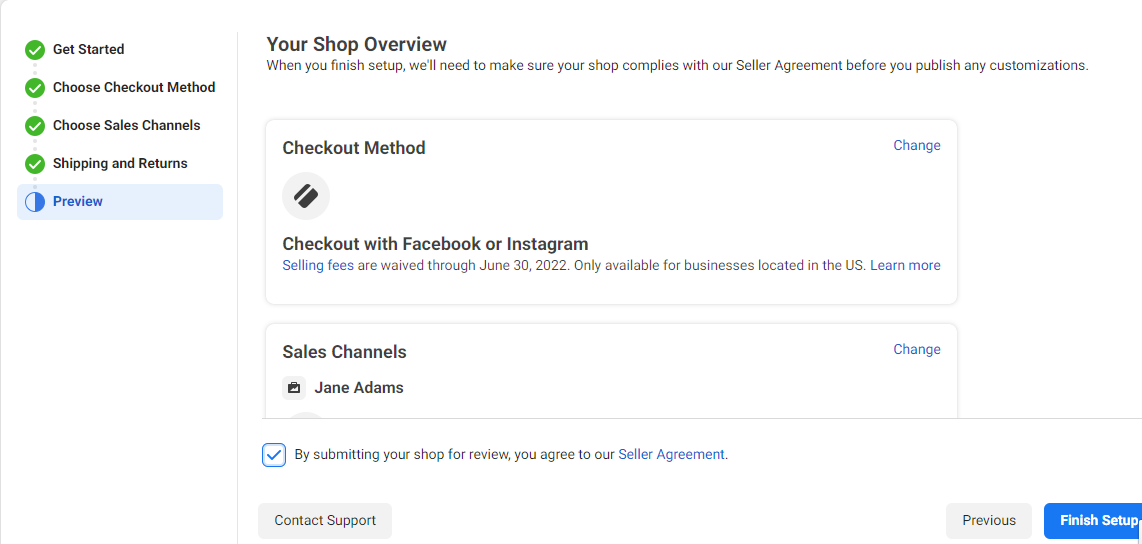
Step 3: Choose a payment method. If you want your customers to pay on Facebook/Instagram, choose the new checkout feature.
Note: After June 30, 2022, Facebook will charge a service fee for the checkout feature.
Source – Screenshot
Step 4: Provide the shipping and return details.
Source – Screenshot
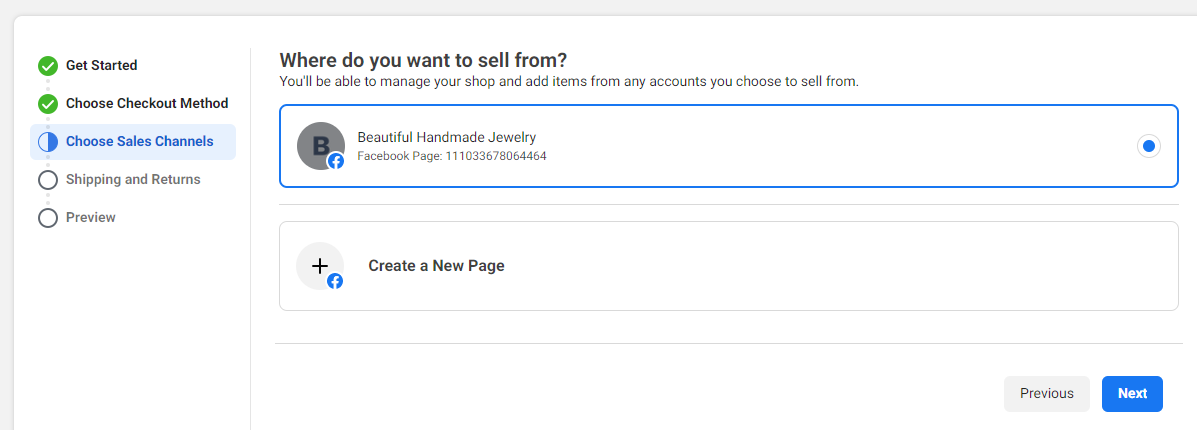
Step 5: Choose a sales channel. It means you need to connect one of your Facebook pages/Instagram profiles to your shop. If you don’t have a page, you can create it right on this step.
Source – Screenshot
Step 6: You need to provide the name and email address of your business manager. Facebook will use this to create a business account.
Step 7: Agree to Facebook’s seller terms and send your shop application for approval.
Source – Screenshot
Facebook/Instagram will review your application, and once you receive approval, the ‘shop’ tab will appear on your page. You can start adding products to your page using the commerce manager.
Note: Facebook/Instagram will verify your catalogs before they appear in your shop.
They can try out your products by applying these AR lenses to their photos. By clicking the Shop Now button on this lens, users can instantly buy the products.
Do you want to set up a cool lens like the one above? Let’s have a look at how you can set up Snapchat social commerce.
Steps to Set Up Shopping On Snapchat with Augmented Reality Lenses
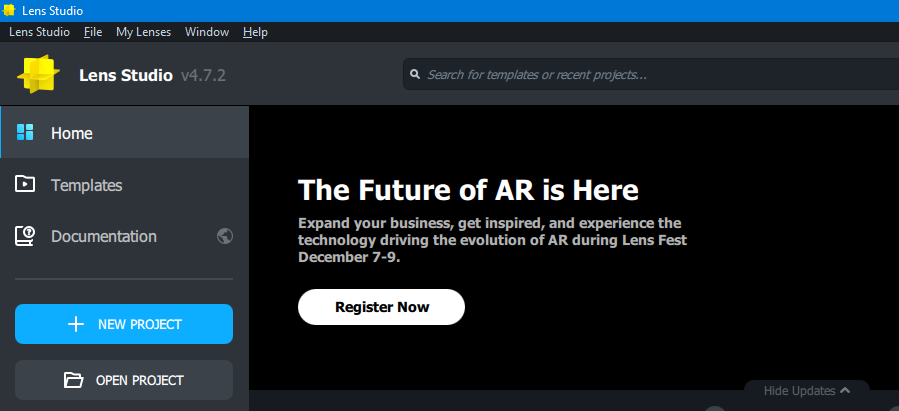
Step 1: You need to create an AR lens using the Lens studio or Snapchat’s in-app AR builder.
Source – Screenshot
Step 2: Submit your AR lens to Snapchat through the Publish Lens button, under the Sponsored Lenses category.
Step 3: Once the AR lens is approved, enter your AR lens into the lens auction.
Note: Snapchat uses AR lenses with Snap Ads to enable social selling. If your AR lens wins the ad auction, Snapchat will display it on the social feeds of your prospective customers.
Setting Up TikTok Social Commerce
TikTok started its social commerce endeavors by partnering with Shopify. Shopify store owners can create, run and monitor their TikTok marketing campaigns from the Shopify dashboard.
In 2021, TikTok took it one step further with the in-app shopping experience. Shopify store owners can now set up a mini-store on TikTok. The store will appear as a new tab on your TikTok profile.
Source – Screenshot
Steps To Set Up Shopify Mini Store on TikTok
To create a store on TikTok, you need a business account. Once you have it, follow these steps to create a storefront right on your TikTok profile.
Step 2: Verify your phone number and email address.
Step 3: Provide your business’s information — address, warehouse location, and return address.
Step 4: Scan and submit your documents. TikTok needs your business registration number and bank account details.
Once TikTok verifies your documents, a Shop tab will appear on your profile. You can start selling by adding products to your TikTok shop. You should also explore how to add product anchors to your TikTok videos.
Source – Screenshot
ALT:
Note: TikTok hasn’t integrated the in-app payment in all locations. TikTok is piloting in-app payments in Indonesia. In other locations, TikTok has partnered with Shopify to fulfill the payment process.
Setting Up Social Commerce on Pinterest
You can enable social commerce on Pinterest by creating a shop. Users can quickly make purchase decisions by browsing your shoppable pins. Pinterest also supports the complete checkout process, including payment, to provide a seamless social shopping experience.
Source – Pinterest
Steps To Set Up a Shop Pinterest
Here’s how you can set up your store on Pinterest. You’ll need a business account to do this.
Step 1: Log in to Pinterest using your business account.
Step 2: Create a data source for importing your products.
Step 4: Select a manually created product group to feature in your shop.
Once you select a product group, a shop tab will automatically appear on your Pinterest profile.
Pinterest also offers shopping ads for you to enable social commerce on Pinterest.
Final Thoughts: How To Use Social Media as a Social Commerce Platform
Social commerce presents an excellent opportunity for ecommerce sites to sell their products directly on social media. All major social networks are striving to turn themselves into social commerce platforms.
You can drive sales by setting up your shop on Facebook, Instagram, TikTok, and Pinterest. Snapchat supports social commerce through shoppable AR lenses. Social commerce is still in its infancy. If you start now, you’ll get a headstart over your competitors.
Are you ready to set up your ecommerce website and leverage the power of social commerce? Start by building your store with Hostdedi’ StoreBuilder.
Migrating a WordPress site on your own can feel like an overwhelming task, especially because there are so many factors and steps to consider.
From properly preparing a site for transfer to successfully setting it up on a new hosting platform, many people are forced to turn to expensive WordPress migration services. Or, they seek out new hosts that provide migration services as part of their package — to ensure a smooth and streamlined process. However, the act of migrating a WordPress site doesn’t have to be costly or stressful when you’re equipped with the right tools and knowledge.
In this guide, we will break down how to migrate a WordPress site without spending a premium or needing advanced programming knowledge. This includes migrating a site manually, as well as how a few WordPress plugins can help you automate the process.
Uncover how you can prepare for and complete a WordPress site migration regardless of your skill level below.
What Does It Mean to Migrate a WordPress Site?
A WordPress migration is a process of transferring a WordPress website from one server to another — or from one hosting service to another — without affecting its appearance, content, or functionality. During this process, the content of a WordPress site (i.e., its files, content, and databases) are copied and uploaded to a new server while the site content on the old server remains unaffected. We want to help you manually transfer a wordpress site with a successful outcome.
Recommended Easiest Way to Migrate a WordPress Site
If you are migrating to a Managed WordPress or a Managed WooCommerce plan then you should use the BlogVault service and plugin.
Common Reasons You Might Need to Migrate a WordPress Site
People choose to migrate a WordPress site for many different reasons, including:
Swapping hosting providers: Many people migrate their website to swap their WordPress hosting providers. This could be due to hosting performance issues or downtime caused by shared server resources, or a lack of customer support from the hosting provider. People also swap hosting providers to meet the demands of their scaling business (e.g., switching to more powerful dedicated servers or cloud servers) or to dial back server resources and cut costs.
Moving to or from a WordPress Multisite network: People sometimes need to move an existing WordPress site into a Multisite network, or remove a single WordPress site from an existing Multisite network and migrate it into a fresh WordPress installation. This process is more complicated than moving a single site to a new hosting provider, but it can be done.
Changing a domain name: Domain name changes are sometimes needed as businesses evolve (e.g., shortening a long domain name, rebranding a business, etc.), and a WordPress site migration can be required to change them. It’s important to note that domain name changes require permanent 301 redirects from the old domain to the new one to maintain search engine rankings and prevent 404 errors for users following any existing site links.
Migrate a WordPress Site Manually in 6 Steps
While there are several WordPress duplicating, cloning, and migration tools that aim to simplify the migration process, understanding how to manually transfer a WordPress site is important.
For example, if you have a large website or you’re transferring between hosting companies, many of these tools can timeout or fail — leaving you at square one.
How to Manually Migrate a WordPress Site
The steps of migrating a WordPress site from one hosting service to another manually can be broken down into six overarching steps:
Backup/Download Your Site Data
Create a New WordPress Installation with Your New Host
Upload Your Database Files into Your New Hosting Account
Upload Your Content into Your New Hosting Account
Adjust Your “wp-config.php” File
Perform Post-Migration Cleanup
1. Backup/Download Your Site Data
The first step to manually migrating your WordPress site is to backup/download all your site data — regardless of how small or large it is. The migration process could cause you to lose website data, which in turn could damage your site.
While backing up your site data should already be a security best practice, it is also a critical component of the data transfer process.
There are several plugins you can use to back up your WordPress sites — such as Duplicator or UpdraftPlus — allowing you to utilize built-in settings to control which files are backed up, backup schedules, and where your data is stored. Alternatively, you can also back up your WordPress site manually. This process can be done two ways:
Through your cPanel
Via a file transfer tool (FTP)
cPanel
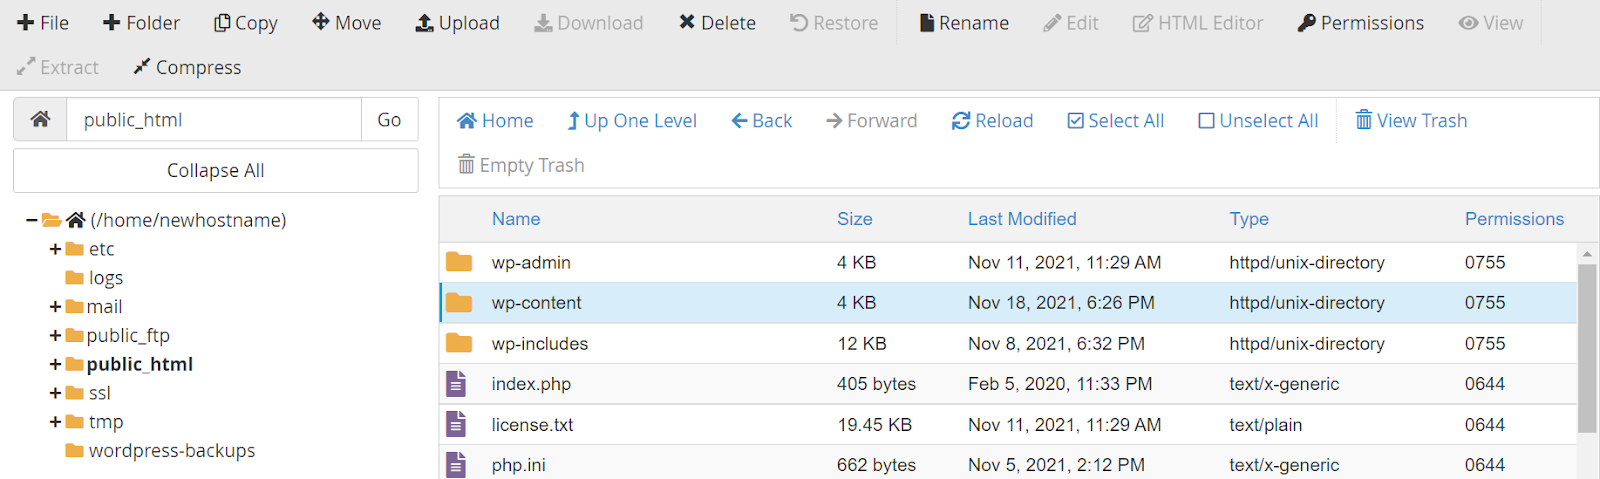
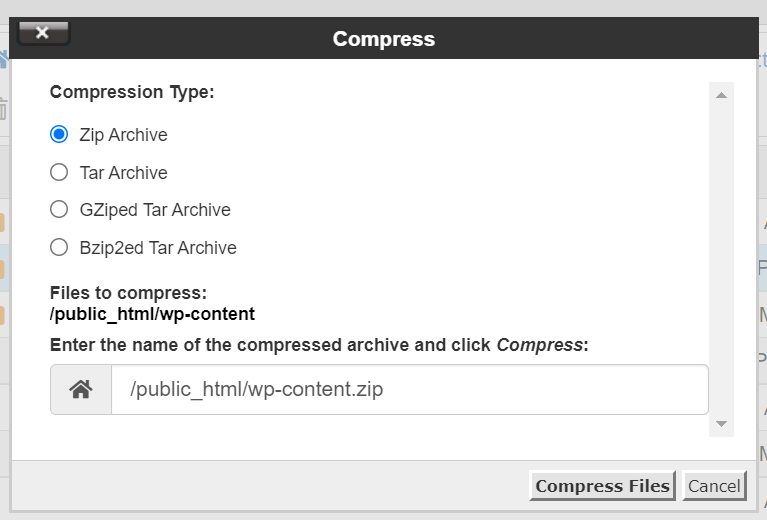
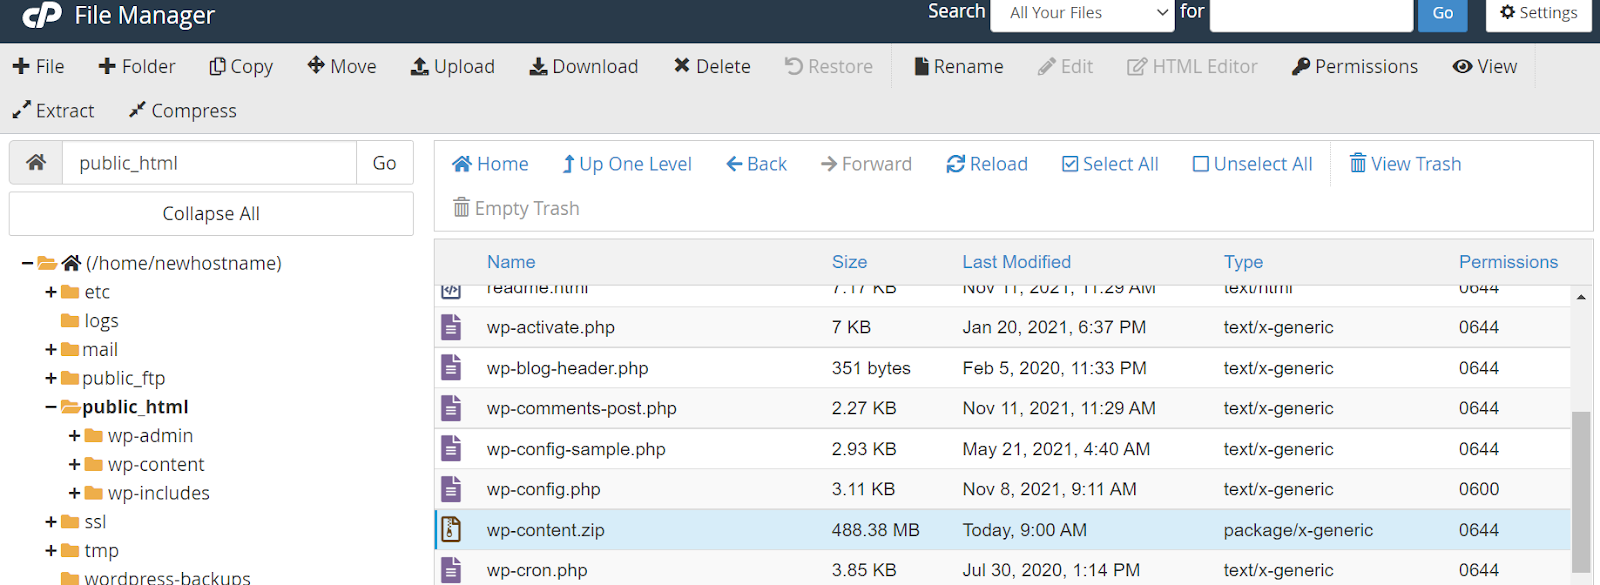
Log into your old hosting provider and navigate to your cPanel. There, open “File Manager,” select the document root for your domain, check “Show Hidden Files,” and click “Go.” Here, you need to locate two files: “wp-content” and “wp-config.” To compress your “wp-content” folder you can select the zip format and then when the zip file has been created, download it.
You will only need to download the “wp-config” file. You can also compress the wp-content to a tar gzipped file which might be smaller than a zip file. If you are familiar with the command line then you can wget over the zip or tar.gz file directly from your old host to your new host without having to download locally and upload a file.
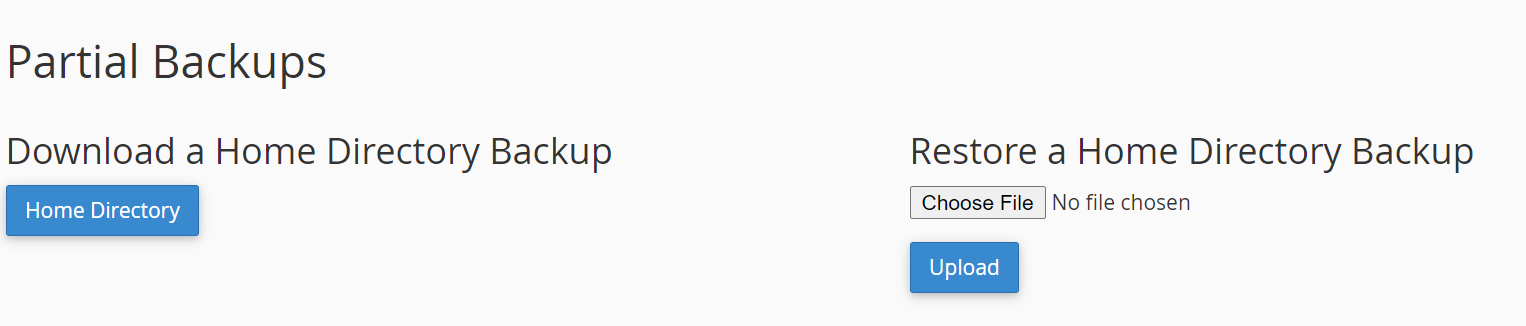
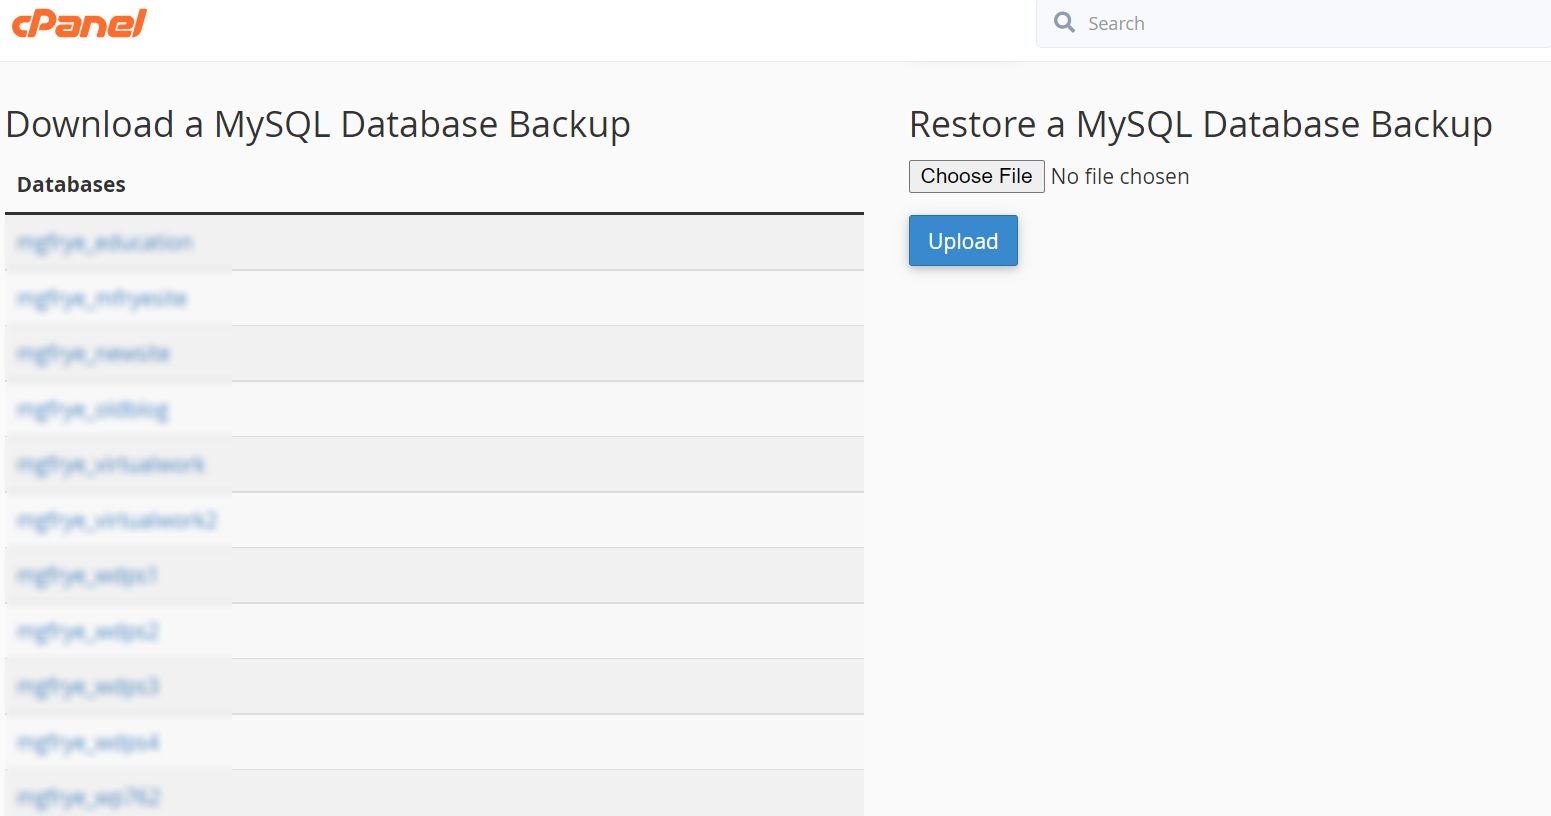
Log into your old hosting provider and navigate to your cPanel. There, open “Backup,” from backup in cPanel you can download a full backup, partial backup as well as backups of your site’s database.
Now, back out to your cPanel homepage, locate “Backup,” and click on it. Here, you will see all the databases you have on your server. Be sure to navigate to the correct one and click on it. Once you have selected the correct database backup for the site, it will allow you to download the “sql.gz” file.
At this point, you should have three separate downloads, including:
“wp-content.zip” file
“wp-config.php” file
“sql.gz” file
It’s important to note that this process is typically faster than using an FTP tool.
FTP Tool
FTP programs such as FileZilla (PC) and Transmit (Mac) are popular tools for downloading WordPress files and databases. After choosing an FTP program and installing it on your computer, use your SFTP credential (sourced from your web host account) to directly connect to your site’s server.
Here, you can select and download all files and databases in your WordPress site’s directory. But don’t forget to include hidden files such as “.htaccess,” as these might be hidden. Review your FTP program’s help file to ensure you are seeing hidden files. If you are used to using the command line then you can create both a MySQL dump of the site’s database and then gzip compress or zip up the WordPress site. The command-line method will be much faster.
2. Create a WordPress Installation with Your New Host
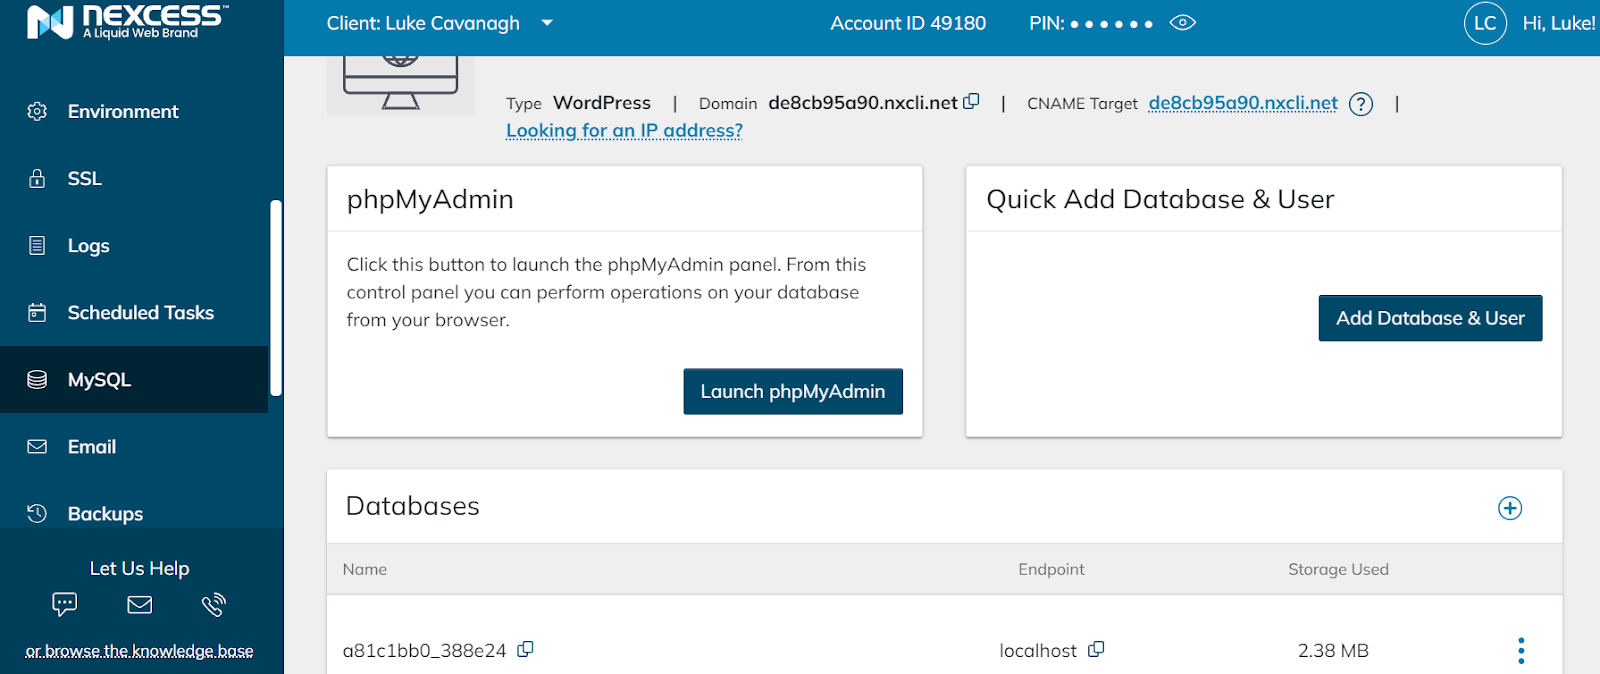
The second step to manually migrating your WordPress site is to log into the portal on Hostdedi to create a new site on an existing plan or a new install site would be created when you sign up for your new plan on Hostdedi.
When you add a site in the portal where your plan details are managed, it will install WordPress on it.
Be sure to review and/or edit these sections based on your site needs, and don’t forget to securely record your admin username and password. Additionally, you can change the automated database name and table prefix if you see fit. You can also leave them as-is, but be sure to remember/record your database name and table prefix, as you will need to reference them later.
Once the installation of WordPress is installed, head back to your portal to get the SSH credentials to prepare to upload the files and database from your old site.
3. Upload Your Database into Your New Hosting Account
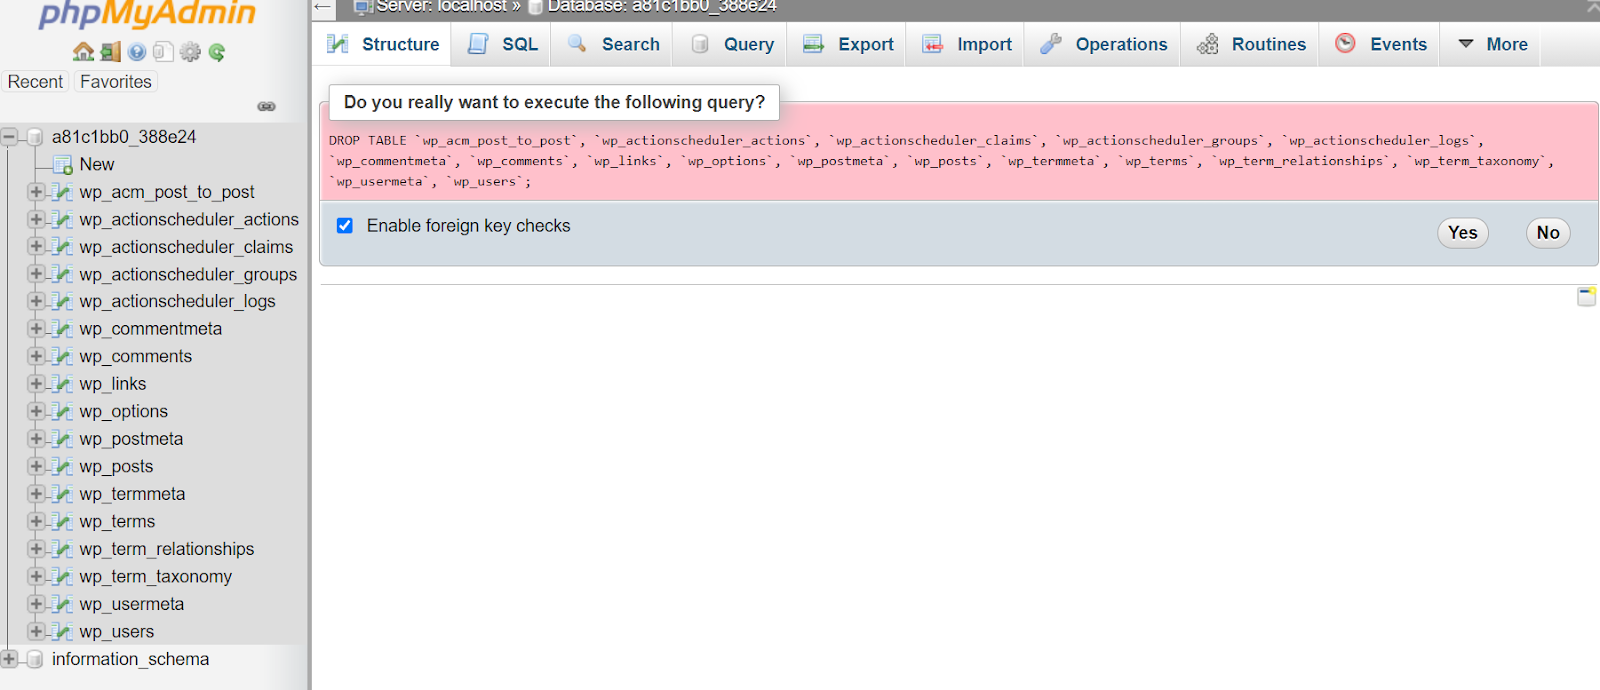
Now it’s time to import the actual pages of your current site into your new hosting account. To do this, navigate to “phpMyAdmin” under the “Databases” section and click on it. Once in, locate your database name and click on it.
Here, you will see blank database tables that were created with your blank WordPress installation. What you want to do is select the “Check all” box underneath these blank database tables, click the dropdown menu titled “With selected,” and then choose the “Drop” option. This will delete all blank tables in your database.
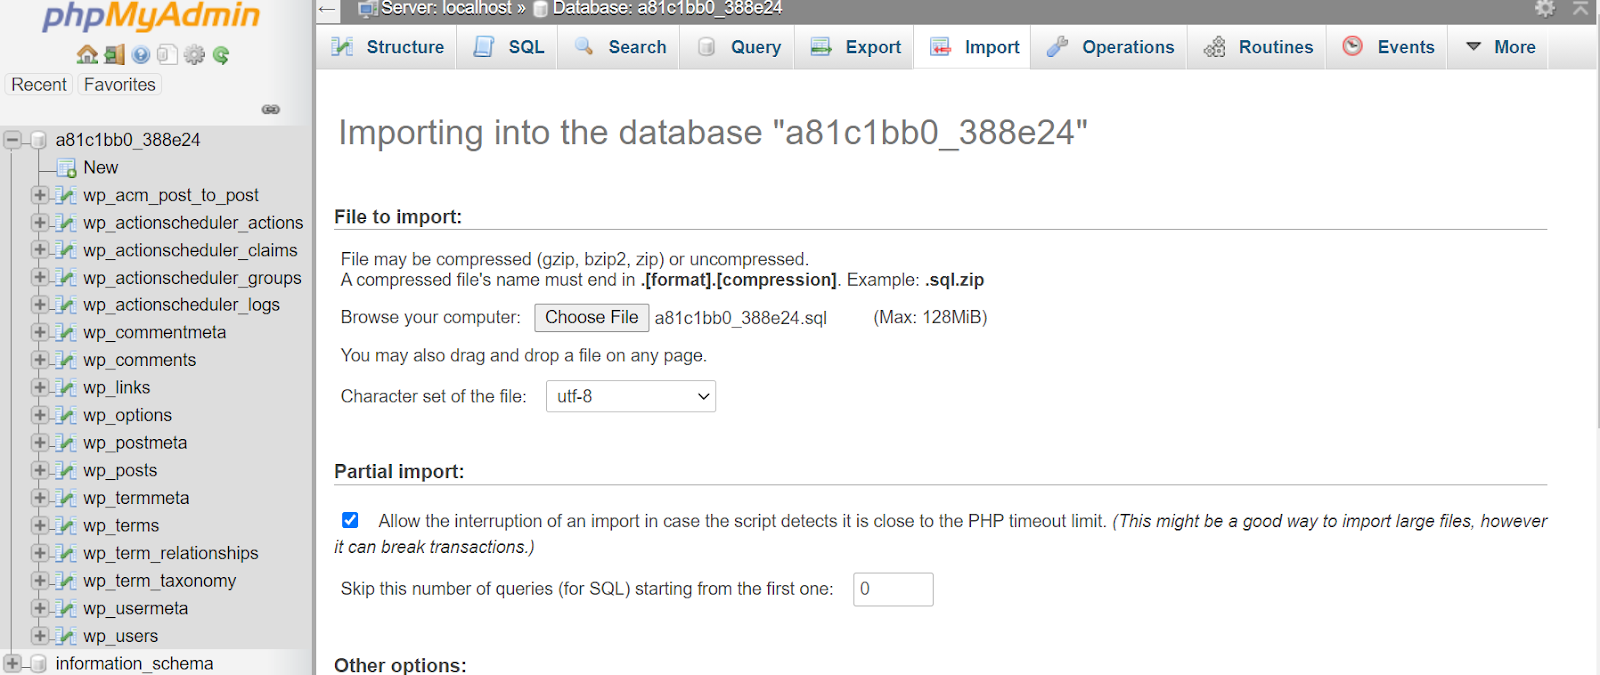
With all tables deleted, it’s time to import the database that you previously backed up. Select “Import” near the top of the page and navigate to the “File to Import” section.
Here, select the “Choose File” button next to the “Browse Your Computer” text, locate the SQL database file you downloaded earlier, and click “Open.” Then, uncheck the “Partial Import” box, scroll to the bottom of the page, and click “Go.” This will import all the tables that feature your current site’s content.
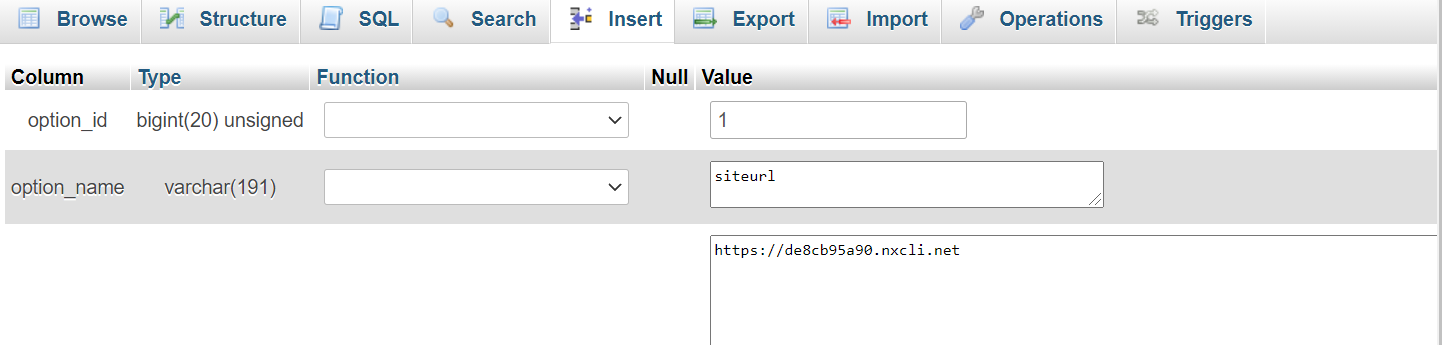
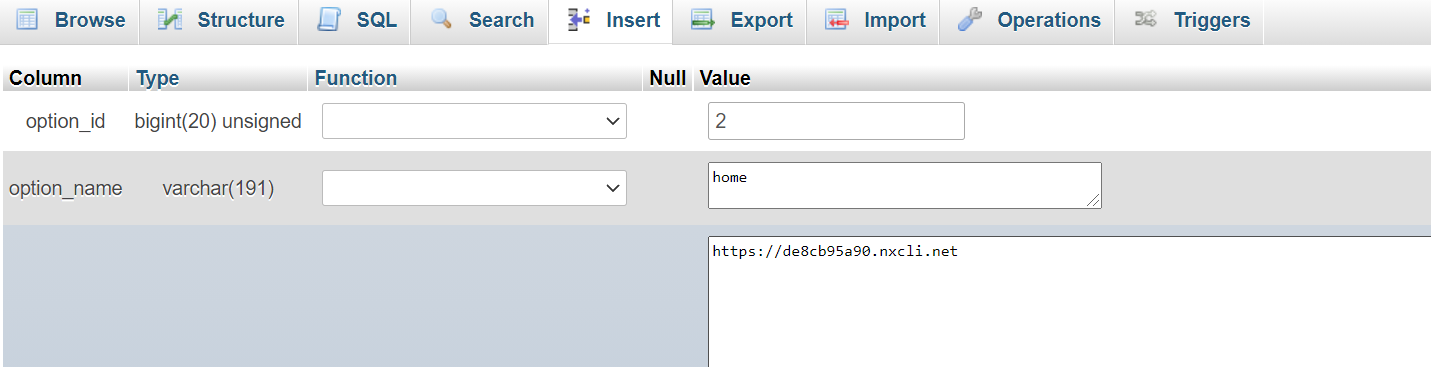
Once your new tables are imported, navigate to the table that features the word “options.” Here is where you can find and edit the URL of your site. Locate “siteurl” underneath the “option_name” column, select the “Edit” button, change the URL to your new site’s URL string, and click “Go.” Then, locate “home” underneath the “option_name” column and update it to your new URL string, as well.
Note: If you cannot find the “siteurl” or “home” paths easily in your hosting provider’s portal, you can “Google” where these paths are found or reach out to customer service for help.
4. Upload Your Content into Your New Hosting Account
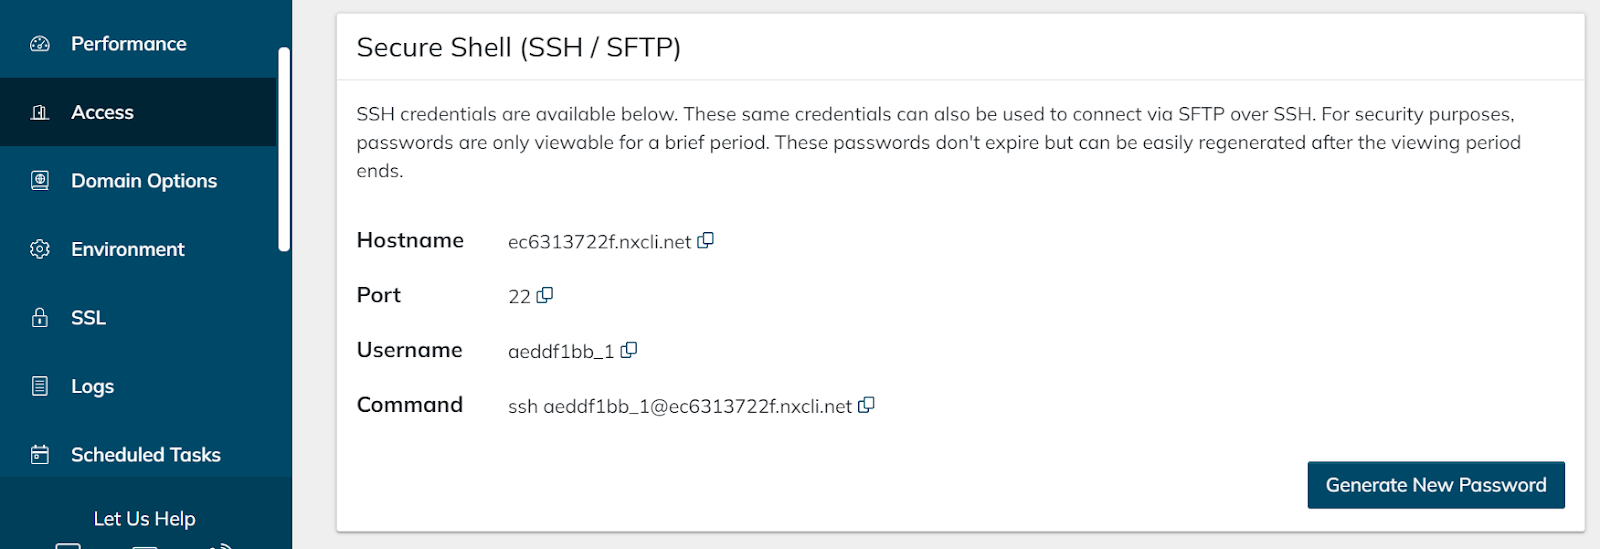
Head back to the new hosting portal and locate the “Access” tab which will be able to give you the SSH credentials.
Using your file manager application then upload the backup into the public_html folder of your site.
Now using the SSH credentials you will need to add those into your file manager application.
You will need to use a gzip decompress command to extract the backup. Once extracted, be sure to go back and delete the actual zipped folder or the original gzip compressed file. The same step will apply if you upload a backup of your site in a zip file format you can use a command such as unzip to extract out the file.
tar -xvf wp-content.tar.gz
unzip wp-content.zip
At this point, there is one more thing you need to do to ensure your content is pulling up correctly: adjust your “wp-config.php” file if needed if the database prefix is different.
5. Adjust Your “wp-config.php” File
Navigate back to your file manager application and locate the “wp-config.php” file. Rather than editing the file directly in your file manager, it’s easier to download it and edit it in a text editor. Right-click on the file, select “Download,” and open it in a text editor or code editor of your choice. At this point, you’ll need to locate two things:
“define(‘DB_HOST’, ‘localhost);” — If you are moving to a new hosting provider, you might have to adjust the local hostname in your “wp-config.php” file. Be sure to check with support to see if this needs to be changed.
“$table_prefix” — Using the table prefix you recorded earlier, locate the “$table_prefix” lines in your “wp-config.php” file and update it with the appropriate prefix.
Once these two lines are updated in your text editor, save your new “wp-config.php” file. Now, go back into your file manager and overwrite the obsolete “wp-config.php” file with the new one. You can do this by navigating to the file manager and selecting the file to upload. Depending on the file manager you are using, it will provide a warning if you want to replace the existing file or not.
At this point, all your current WordPress site’s files should be uploaded and updated, which means your site should display and function exactly as it did with your old hosting provider.
6. Post-Migration WordPress Cleanup
Once your site has been successfully migrated to your new hosting provider, it’s time to begin the WordPress cleanup process.
Replace Old URLs with New Ones
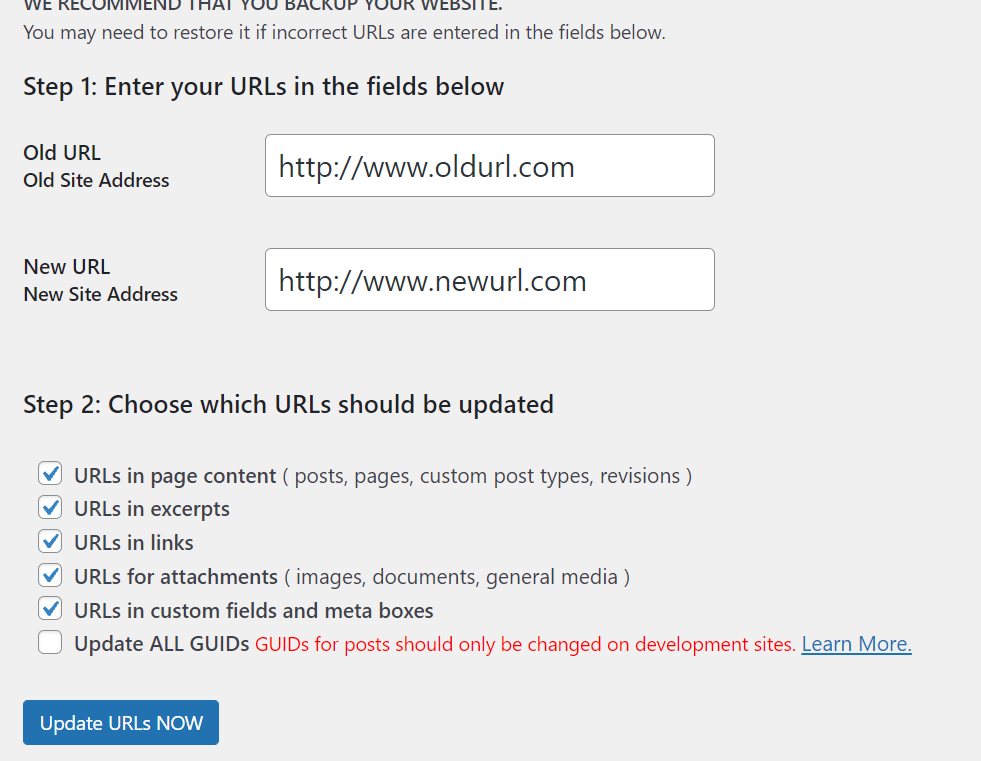
First, you will need to log into your new site and ensure that internal links to pages and references to images are updated by replacing old URLs with new ones. While you can do this manually, there are WordPress plugins you can use — such as the Better Search Replace plugin — that streamline this process.
Using the Better Search Replace plugin, navigate to “Tools” in your WordPress dashboard and select “Better Search Replace.” Here, you will input your old domain URL and your new domain URL, as well as check all the boxes listed underneath “Choose which URLs should be updated.”
Now, select “Run Search/Replace.”
Reach Out to Publishers to Reclaim Potential Lost Backlinks
If you are concerned about backlinks that point to your old domain, you will need to reach out to each individual publisher manually to have them update any featured links. It’s recommended to focus on your highest quality backlinks, as this process can be tedious.
Reconfigure Your Domain’s DNS Settings
You will also need to reconfigure your domain’s DNS settings to point to your new hosting provider. Your domain registrar will have all the details you need to make this change. It’s important to note that DNS changes can take up to 48 hours to take effect, so be sure to make these changes during a period when you expect lower levels of traffic.
Once your site migration has been completed, all URLs have been updated, and your DNS settings have been reconfigured, you can manually delete website files, databases, and content on the old server.
5 Best Plugins for Manual WordPress Migration
There are many helpful WordPress migration plugins out there, but it’s important to recognize that some of them cause conflicts with other caching plugins or themes, and they may also lead to performance issues for your hosting server.
Before you select a migration plugin to use, be sure to consult with your new hosting provider to see which ones are compatible. Currently, five of the best plugins for manual WordPress migration include:
1. Duplicator
Featuring over 25 million downloads, Duplicator is a trusted WordPress migration tool that gives users the ability to migrate, copy, or transfer a site from one host to another — bundling plugins, themes, and content files into a .zip file package. Additionally, it can also be used as a handy WordPress site backup tool.
Duplicator also claims zero downtime while migrating your site, which means visitors can still view and interact with a live version of your site in a pre-defined staging area. The pro version of Duplicator comes with even more features, such as drag-and-drop installs and cloud storage provider compatibility.
2. UpdraftPlus
With a user-friendly interface, UpdraftPlus is a popular WordPress migration tool. Featuring over 3 million active downloads, this tool allows you to schedule automatic backups and restore those backups instantly.
It also backs up a plethora of cloud options and the ability to backup multiple sites at once from a central platform with UpdraftCentral. For even more features, UpdraftPlus Premium offers multisite network compatibility, database encryption, and dedicated customer support.
3. Migrate Guru
Powered by BlogVault, Migrate Guru claims to be the fastest way to migrate a WordPress site — including with difficult WordPress migrations such as multisite networks or sites that are 200 GB or larger.
Operating on its own servers, Migrate Guru can automatically rewrite URLs, bypass import/export scripts, and manage serialized data. It also duplicates WordPress sites without any manual work or additional tools.
4. WP Migrate DB
WP Migrate DB features an easy-to-follow 3-step process that includes:
Use the WP Migrate DB interface to find and replace your site data.
Export the SQL file.
Import the SQL file into your new database.
This plugin also supports serialized data and arrays, which minimizes the chances of database corruption during the migration process. With the pro version of WP Migrate DB Pro, you also gain access to themes, plugins, and upload files.
5. All-in-One WP Migration
With over 4 million active installations and nearly 6,000 5-star reviews, All-in-One WP Migration is a highly trusted WordPress migration plugin. Much like WP Migrate DB, this tool features three simple steps that make migration easy:
Install the All-in-One WP Migration plugin.
Click the export button to package up your database, media files, plugins, and themes.
Unpack the file at your new location with the drag-and-drop feature in your WordPress dashboard.
All-in-One WP Migration syncs with top cloud storage services and is compatible with most WordPress plugins and themes. If you are using the free version of the plugin there is a 512MB size limit.
Consider a Move to Managed WordPress Hosting
While there are many steps involved with manually migrating a WordPress site from one host to another, it can be done. Just be sure to follow the steps we’ve outlined above carefully, and always ensure your site’s files, databases, and content are fully backed up prior to beginning the migration process. If something goes wrong, you will still have all your original files to refer to back to.
If you’re considering moving from shared hosting to WordPress hosting, Hostdedi is trusted by many WordPress experts. With premium image compression, a built-in content delivery network (CDN), and advanced caching, we optimize WordPress sites to be faster, better, and more intuitive. When you host your WordPress site with Hostdedi, you gain access to:
Automatic core WordPress updates
Staging and production sync
Developer tools
Instant backups
Stencils for site creation
Multi-layered caching
Malware monitoring
One-click staging
Email hosting
Full server access
Automatic plugin updates
Automate SSL
PHP optimization
Featuring several managed WordPress hosting plans, you can choose one that easily meets your needs now and scales up or down as your needs evolve. Plus, free WordPress site migrations are included with every Hostdedi WordPress Hosting Plan. This means you can avoid site downtime that’s typically associated with manually migrating a WordPress site.
Find out how Hostdedi can help you optimize your WordPress site through fully managed hosting.
We all know that speed and performance are important for our online stores. Figuring out how you’re doing can sometimes feel like another job. You have to test, notice trends, and then analyze all of it. Is your site fast? What makes it slow? Where do you start?
The plugins (or sometimes a combination of plugins) you’ve chosen can have drastic effects on your site’s performance. A store usingWooCommerce will typically need more plugins than a blog or other sites run on WordPress. This is why website performance matters and that WooCommerce site speed is key for a well-performing site.
Let’s talk about testing your site’s loading speed, how to test your store’s performance, and the best tools to accomplish that.
How To Test Website Speed & Performance
Let’s start with testing site speed.
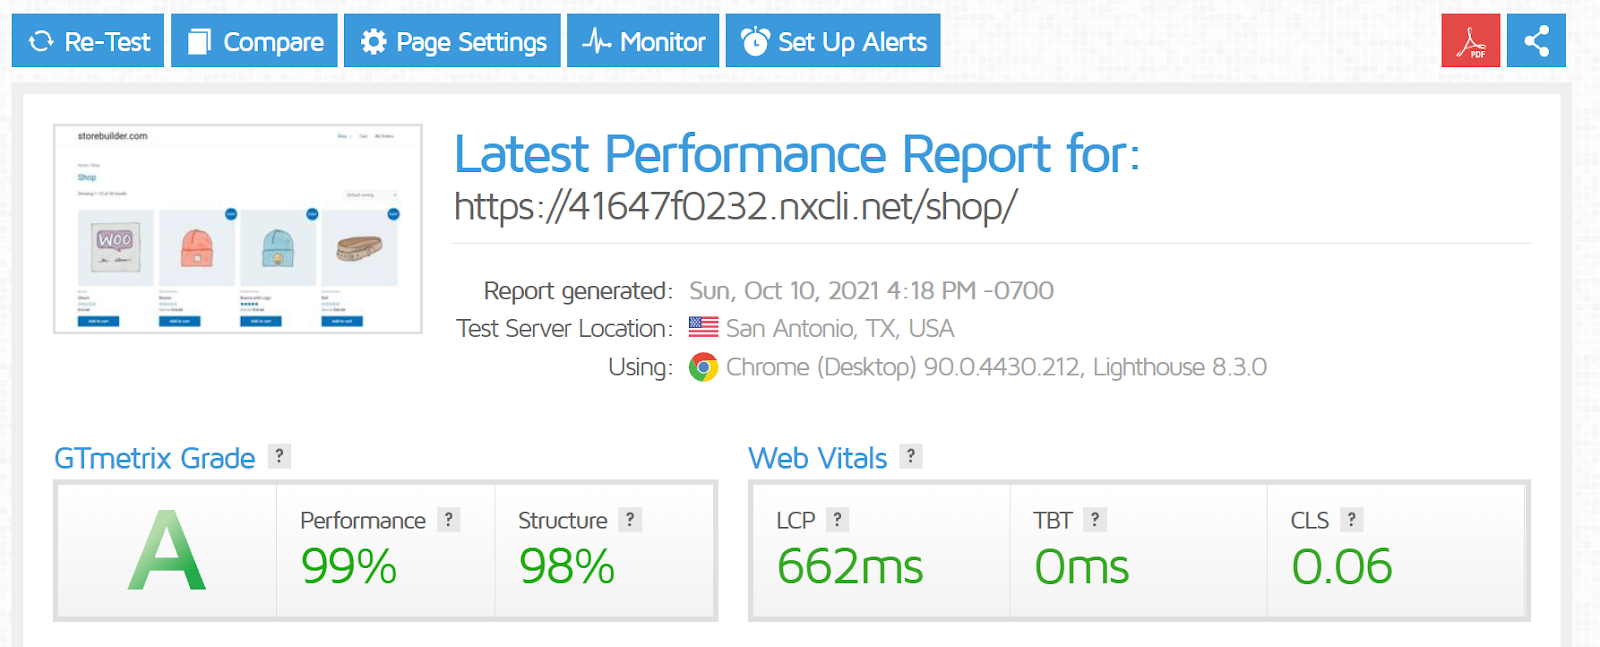
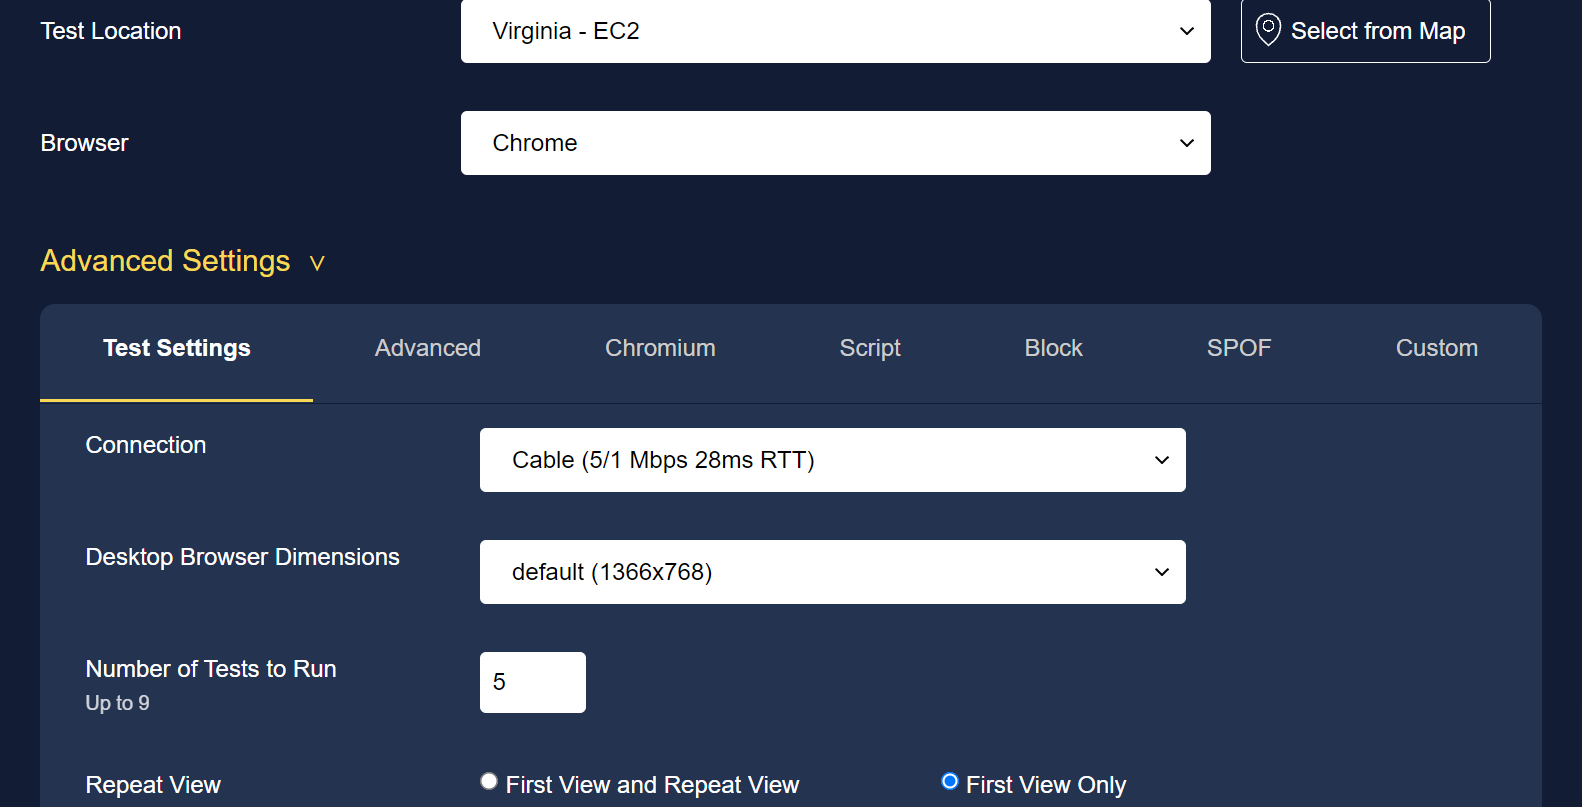
GTmetrix and WebPageTest are both great tools to test your website site speed. Both of these site speed testing tools use Google Lighthouse to find performance issues that are happening on the front-end of your site.
It is recommended that you create a free account on GTmetrix before testing since this will give your multiple testing locations to use.
Select the testing location that is nearest to your site’s visitors. Copy the site URL that you want to test.
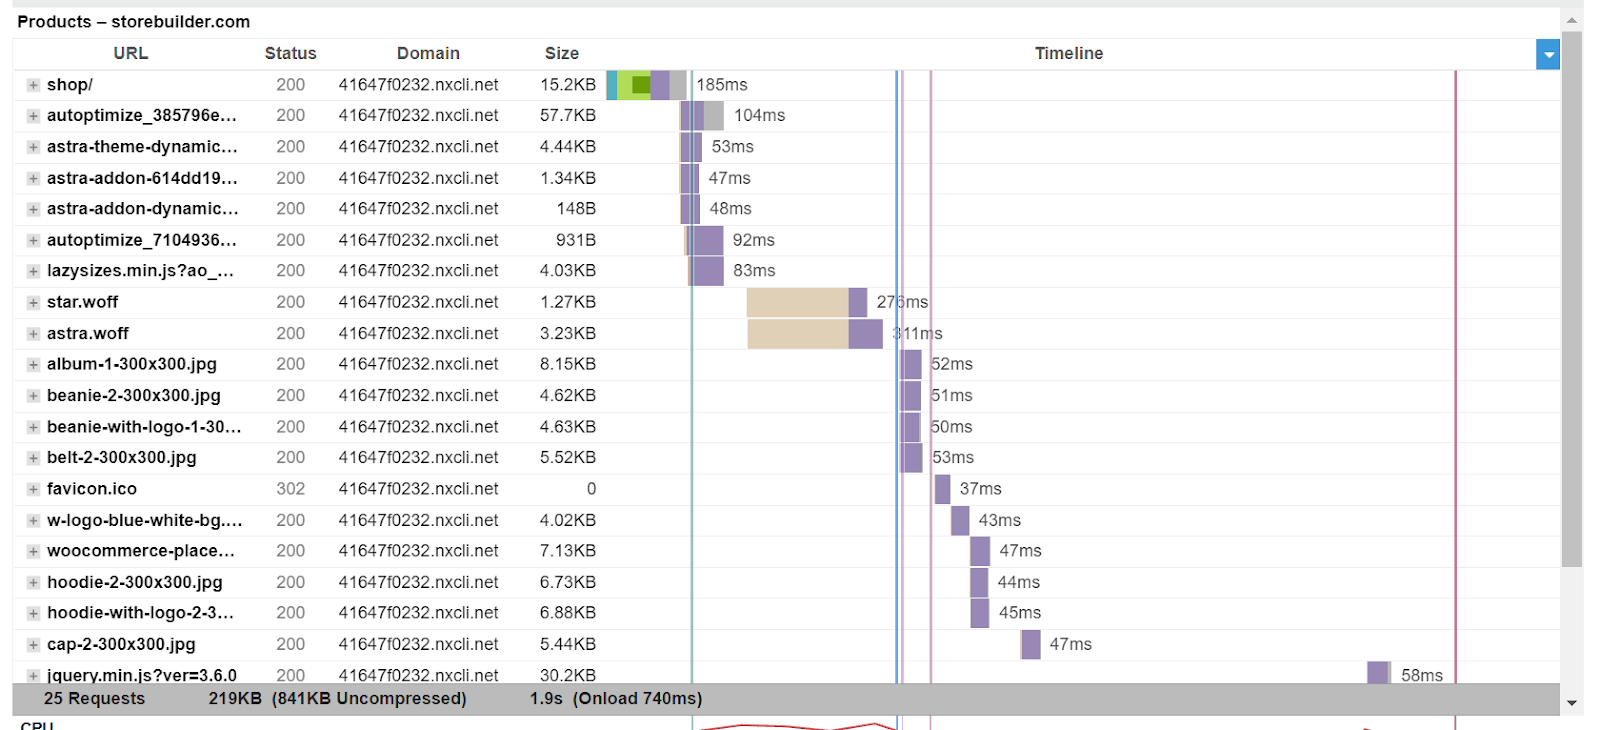
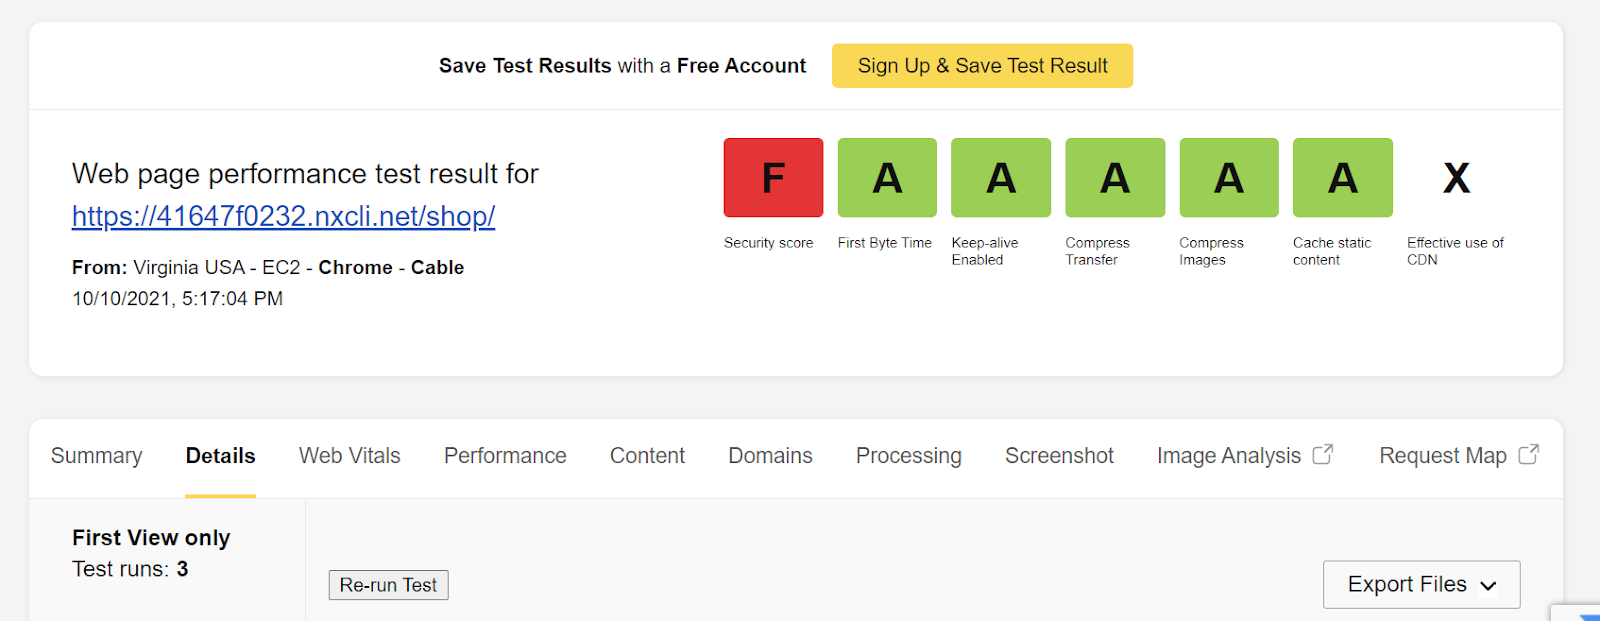
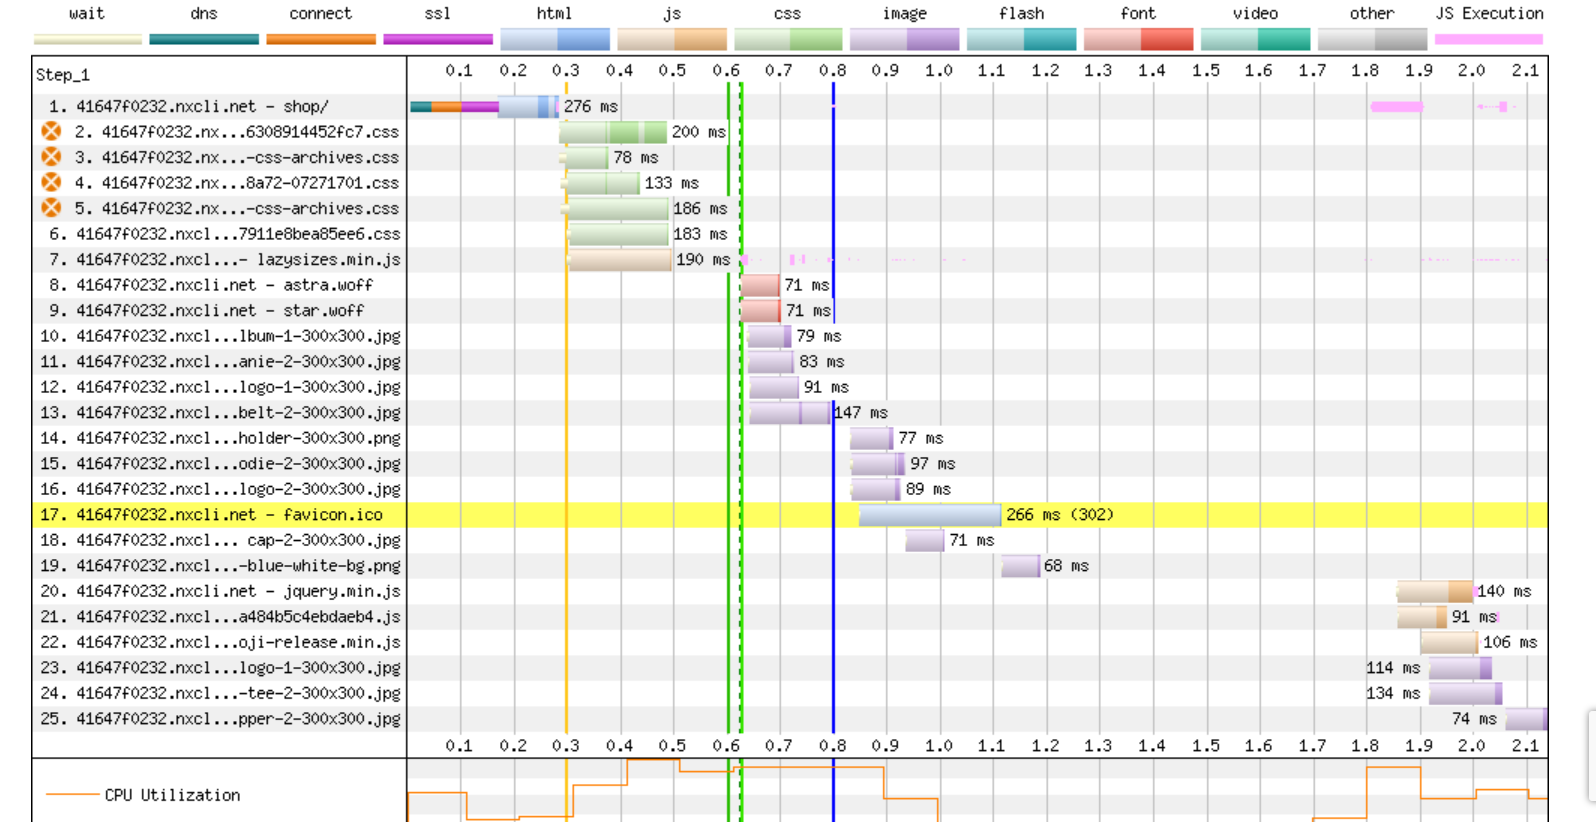
GTmetrix will give you a lot of useful information in the resulting waterfall which shows you all of the requests that are loading on your site. When reviewing this, you can see which requests being made on the site are slow and as well as which external requests are slow.
Using WebPageTest is a lot like GTmetrix when it comes to testing website speed. You will need to select the testing locations and then copy and add the site URL that you wish to test.
To find the most relevant details of your site test, click on the “Details” tab. This will show a waterfall that is similar to the one that GTmetrix produced.
If you run a search for site performance monitoring tools, you’re going to find a ton. Here are some of our favorites.
Query Monitor
Query Monitor helps you find which database queries and duplicates. It also identifies which ones are the slow database queries on your site.
Debug Bar
Debug Bar is a great plugin if you have debugging enabled to find the queries and transients which are being run on your site.
WP Crontrol
Cron events that are running your site can have an effect on your site’s performance. You can identify those with WP Crontrol.
New Relic
New Relic allows you to find which plugins and external services might be causing performance issues on your site.
Google Analytics
Google Analytics gives you performance metrics from your site that will help your [WooCommerce Analytics](https://www.nexcess.net/blog/woocommerce-analytics) in being able to see what customers are doing on your site. It can also help identify any performance issues which might be happening.
Each of these plugins enable you to monitor your performance as well as identify the problem areas that can lead to site slowdown. You may find more promising ones, but it’s important to monitor how activating them affects our site.
We recommend adding one at a time and testing to get an idea of whether it impacts speed or performance. It is not recommended to use the P3 (Plugin Performance Profiler) plugin since it can end up causing performance issues on the site.
Why This Matters For Ecommerce Shops
Testing and finding which plugins cause performance issues on your site can have an indirect effect on conversions.
For example, if your cart or checkout pages are slow due to a plugin or extension you’re using there, you may end up with a few abandoned carts. Customers don’t like to wait. If they can get it faster on another site because yours is still loading, they will.
Opportunities to upsell with related items or special deals will also decline.
Things To Keep In Mind
Think about which features the plugins you use provide. If any of those features could be offloaded to a service that has no effect on your site performance, that’s probably a better option. Examples of this include site newsletters, site automation, and follow-up emails to customers.
Less is more. One plugin that performs the task you want is enough. Running multiple plugins for caching, forms, or site security only bogs down site speed.
Find the best plugins for the site features you’re interested in and stick with them. If you’re looking for ways to boost WooCommerce speed, we’ve got suggestions for that, too.
Ready To Try Something Easier?
What if you didn’t have to think about all your plugins all the time? What if you could focus on what was most important to you — running your store — without needing to test and research and analyze constantly?
What if it was already included in your hosting package?!
The plugin performance monitor is a feature provided on all Hostdedi Managed WordPress and Managed WooCommerce plans.
The plugin performance monitor runs a series of daily tests on your site and then shows you ways to improve performance, AND lets you know if adding specific plugins to your site caused performance issues.
The plugin performance monitor is exclusive to Hostdedi and is already running if you host your store with us.
Haven’t yet? When you try us out, it’s already there waiting for you.
Magento is a website platform that specializes in ecommerce websites. Its users have access to hundreds of unique features that help users to connect with their customers and sell their products.
Magento empowers thousands of retailers and brands with the best ecommerce platforms and flexible cloud solutions to rapidly innovate and grow their business.
With recent changes in the Magento community, you may be wondering about migrating to Magento 2. Keep reading for a full overview of Magento 2, the costs of migrating, and more.
Understanding Magento 1 and Magento 2
Magento is an open source ecommerce platform written in PHP language. It uses multiple other PHP frameworks, such as Laminas and Symfony. Magento source code is distributed under Open Software License v3.0.
Magento released Magento 2, which is an upgrade to Magento 1. Magento 1 and Magento 2 aren’t the singular versions of Magento. Magento 2 is better than Magento 1 in terms of security, performance, SEO, speed, and ease of use.
The major difference between Magento 1 and Magento 2 is that Magento 2 is faster, more SEO friendly, and more user friendly than Magento 1. Magento 2 also supports the latest PHP and that improves the overall speed of the website.
Magento 2 can take more orders per hour than Magento 1. Page load time is faster too. In addition to that, it also has cleaner coding and a user-friendly dashboard. Magento 2 also offers meta tag functions for better SEO, a critical feature which was missing in Magento 1.
Now let’s discuss some of the other differences between Magento 1 and Magento 2.
6 Key Differences Between Magento 1 and Magento 2
Architecture
Speed & Performance
Extensions
Dashboard
SEO
Security
Architectural Differences
One of the key differences between Magento 1 and Magento 2 is that Magento 2 supports the latest PHP versions. These versions include security improvements that affect the store’s speed.
Speed & Performance
When compared to Magento 1, Magento 2 offers a faster page load speed. If you’re a Hostdedi Magento user, we have a Redis cache option, which will help to improve your site performance.
One of the problems with Magento 1 is the extension conflicts. If two or more extensions are there, they try to rewrite the same functionality. This issue could only be solved manually before, which was an expensive and time-consuming process.
However, with Magento 2, plugins allow code to overlap with core code rather than override it.
Dashboard
As mentioned above, Magento 2 has a user-friendly and interactive admin panel.
The dashboard enables you to find information quickly, navigates to all parts of the admin panel, and manages your store more efficiently, which makes the interface user-friendly.
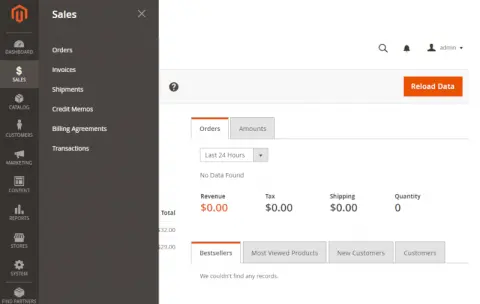
Also, Magento 2 has a comprehensive dashboard that shows lifetime sales, last orders, average orders, top search terms, revenue tax, and other functions.
SEO: Search Engine Optimization
Comparing Magento 1 and Magento 2, Magento 2 has not made a great leap from Magento 1 in terms of SEO. But it is better than Magento 1. Magento 2 provides a canonical tag, so you can avoid duplicate content issues. It also enables meta tags for optimizing individual pages.
Security
As Magento 1 is at the end of life, there will be no more updates, security patches, or bug fixes for Magento anymore, which leaves the outdated software vulnerable to threats.
Magento 1, End Of Life
Magento 1 reached its end of life in June 2020. However, there’s a way it can still be used safely. M1 can be used on Hostdedi servers provided it’s utilizing the Safe Harbor add-on. Safe Harbor will be available through March 2022.
When new versions of software/applications are released, older versions are maintained for a certain period of time. After that, they are no longer supported.
Magento 1 has reached EOL in June of 2020, which means if you want to extend the life of your store as you decide what’s next, you’ll need to take action to ensure you stay secure.
It can still be hosted on the Hostdedi servers provided it’s using the Safe Harbor add-on.
Safe Harbor is an add-on which enables businesses like yours to keep their sites on Magento 1 after EOL by providing security and technology updates for an extended period of time. So, whether you’re still searching for your options, or already have plans to migrate, Safe Harbor can offer the flexibility you need until you’re ready to move off of Magento 1.
Migration from Magento 1 to Magento 2 can cost anywhere from $50,000 to $100,000. Considering the impact of these costs on users, it’s easy to understand why many have been hesitant to make their next move.
Safe Harbor is a product that will give you more time to make the right decision for your website. Safe Harbor provides a cost-effective way for users to remain on Magento 1 while you evaluate your options. Safe Harbor is estimated to add 35% to your current total hosting cost.
As of June 2020, sites using Magento 1 will no longer be supported. They will remain active with all its functionalities, but without the support and updates from Magento.
Once Magento 1 support ends, hackers will try to find the loopholes or opportunities to steal data from users’ unsupported M1 stores.
There are many ways hackers can get information from the store database like DDoS attacks, brute force, spam registrations, and SQL injection. Unsupported sites are easy targets as they lack security.
You may be wondering, what are my best options to avoid a situation like that?
Migrate to Magento 2.
Move over to different ecommerce platforms.
Migrating to Magento 2
Comparing Magento 1 with Magento 2, Magento 2 is undoubtedly a better ecommerce platform. So after the migration, the users will find an easy-to-use admin interface and improved site performance. Best of all is the support from Magento.
However, please note that migrating to Magento 2 is not only an upgrade. Magento 2 is an entirely new platform with a different framework and structure.
This is not as simple as some one-click upgrade to the next version, but it’s a complete transition to a new platform that requires a plan, lots of time, and resources.
All customized extensions, codes, and theme modifications have to be redone and rewritten to make them work with Magento 2 and the latest PHP.
Moving Over to Different Ecommerce Platforms
There are plenty of ecommerce platforms available on the market. You have to determine if your store is ready to adapt to the new-found technologies and migrate the website content so that you gain a competitive advantage.
It depends on factors like software stack, structure, and architecture of your platform. However, the migration process would still be complicated as you are moving to an entirely different atmosphere.
You can either replace an open source ecommerce platform with another open source platform or you can move to proprietary software.
You can also move your platform to WooCommerce, but you will be entirely starting the website building process with WooCommerce. As we know, WooCommerce is a free, open source plugin for WordPress sites that adds ecommerce functionality to any WordPress site.
As Magento 1 is at its End of life, Magento is not forcing anyone to upgrade to Magento 2. Your store will not disappear if you do not upgrade to Magento 2. However, as there is no support for Magento 1, it’s better to switch to any other platform.
Magento 2 has more advanced features than Magento 1. Magento 2 is more secure, fast, optimized than Magento 1. You can also go with any other platform to migrate your store, such as WooCommerce.
Consider Hosting With Hostdedi
Web hosting is a service that stores your website and website contents, so you can publish it online. Regardless of the application you use, your website will be hosted somewhere.
Hostdedi offers powerful hosting technology designed for what you need. Our hosting plans include boosted speed, security, scalability, and support for your site.
Also, guess what … FREE site migrations are included with every plan — whether that’s for WooCommerce or Magento.
The end of a year is the perfect time to reflect on the last year and set goals for the year ahead.
Perhaps you experienced burnout and want a little more work-life balance? You could be thinking of mentoring someone or learning a new skill.
In the same way you create a list of resolutions for yourself, why not make a list of new year resolutions for your business to guide you in the coming year?
Many people forgo setting business new year’s resolutions because they think it might not be achievable. However, the secret is setting realistic goals.
If you’re having a hard time setting small business goals for 2022, read the following suggestions for top new year resolutions for businesses.
New Year Resolutions for Business
Build a website.
Start a blog and update it regularly.
Give your store a new look.
Enhance your website’s experience.
Make your customers’ lives easier.
Work smart.
Let’s have a more in-depth look at these resolutions.
1. Build a Website.
If there is something the 2020 pandemic showed us, it’s the importance of having an online presence. Even then, a survey from Top Design Firms showed 28% of businesses don’t have a website.
Not only does having a website make you appear more credible, a good business website brings additional benefits such as:
Increased sales
Audience growth
Brand recognition
Even if you don’t sell products, having a website lets new customers and clients find you via search engines. It can also serve as a medium to share your work or a platform where people can contact you.
Enabling you to share valuable information with your audience.
Giving you content to repurpose on social media.
Positioning you as a thought leader.
You don’t have to blog every day — one high-quality post a week is better than substandard posts daily.
Make blogging a part of your marketing strategy. Growth may be slow initially, but it will pay off. Just remember to be consistent.
3. Give Your Store a New Look.
You don’t have to rebrand to give your store a facelift — the new year is as good a time as any for a new look.
Why change your website’s look in the first place?
Your homepage is like a physical shop’s storefront. No one will enter or even purchase if it’s not beautiful or welcoming. According to Neil Patel, more than 90% of buyers say that a website’s visual appearance matters.
The good news is, you don’t even need to hire a web designer to give your online store a new look.
Besides Hostdedi’ premium WordPress hosting, StoreBuilder also includes the Kadence theme and plugins — creative tools you can use to improve the look of your WordPress website.
As with a physical store, your online storefront may get people looking around, but it’s your website’s usability that will get them to buy and return for repeat purchases.
In that sense, a new year resolution for business success could be improving your website’s customer experience. After all, it is critical to sustaining business growth, helps in customer retention, and promotes loyalty.
Besides that, it has SEO benefits. Google released a Page Experience update that determines whether a website should be rewarded with a higher ranking or penalized with a lower one.
If you want to improve customer experience, one of the easiest ways is optimizing speed. Over half of visitors will leave your website if it takes more than three seconds to load. There are several ways to improve website speed, but one of the easiest ways is to choose the right web hosting provider.
If you’re running an ecommerce store, another great new year resolution idea for your business is to think of ways to make your customers’ lives easier.
As a new small business owner, you often have to take on many roles. While at first you may think you can do it all, you’ll soon realize you can’t — and that’s perfectly fine.
Many entrepreneurs think to be “hands-on” in business means they must have their hands on everything, but that’s not the case. Sometimes, entrepreneurship is about working smart, not working hard — and that should be another new year resolution for business owners.
First, eliminate. Assess everything you need to do and say no to things that don’t bring you results or value. For example, you can remove distractions or turn off notifications to prioritize important tasks.
Next, look for ways to automate. There is different automation software available. For example, email marketing makes it possible to send abandoned cart emails automatically. Social media schedulers help automate your marketing efforts.
Lastly, save time by delegating tasks you dislike, such as social media or taxes.
In his book, The 4-Hour Workweek, author Tim Ferris shares:
“Never automate something that can be eliminated, and never delegate something that can be automated or streamlined. Otherwise, you waste someone else’s time instead of your own, which now wastes your hard-earned cash.”
Final Thoughts – 6 Best New Year Resolutions for Business
As we close out 2021, we bring the wins and lessons for 2022. Take notes from this list of new year resolution ideas for business to guide you in the next year.
Maybe one of your resolutions is to make your website faster and more secure? If so, check out fully managed WordPress hosting from Hostdedi.
You might be evaluating different order fulfillment methods as the success of your online business depends a lot on how efficiently you deliver products.
The online business ecosystem offers several methods for order fulfillment. Ecommerce fulfillment and dropshipping are two major models.
Statista reports dropshipping had a $128.6 billion market value in 2020. It’s expected to grow a whopping 370% by 2026.
In this guide, let’s compare dropshipping vs. ecommerce and see which one suits your business best.
Dropshipping is not an ecommerce alternative. It’s just another ecommerce business model.
Online stores that use dropshipping have no inventory of their own. Instead, they partner with an order fulfillment vendor, also known as a dropshipper.
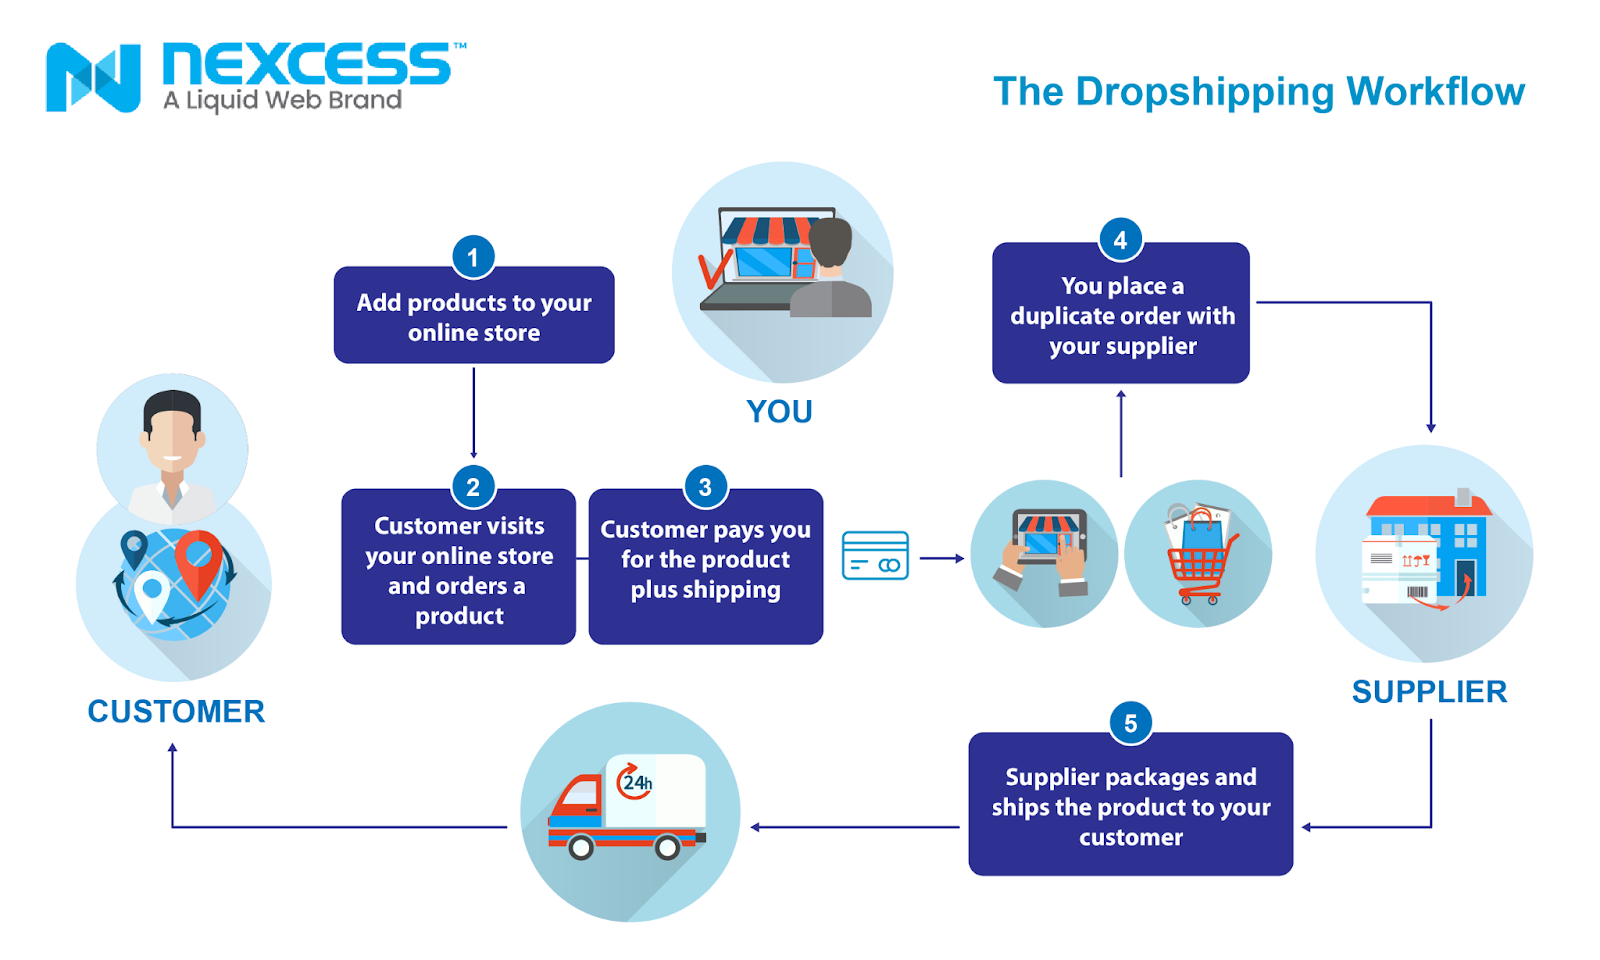
Here are the basic steps for running a dropshipping store:
You own the store and list products, but you don’t own inventory.
A customer places an order and pays online.
You put a duplicate order with your dropshipper.
The dropshipper picks the product from their fulfillment center.
The dropshipper packs the customer order and ships it to your customers.
Please note that dropshipping is different from 3rd party logistics (3PL). In 3PL, you own the inventory, but a third party does the warehousing. You only outsource the storage, packing, and shipping. But in dropshipping, the dropshipper owns the inventory.
In a nutshell, you can start a dropshipping store without even having a single product in your stock. You procure the product from your dropshipper only when a customer places an order.
The infographic below portrays the workflow of the dropshipping business model:
Now that you know how dropshipping works, let’s compare dropshipping vs. ecommerce to see which works best for you.
Similarities Between Ecommerce and Dropshipping
To start with, when we mention ecommerce, we mean the traditional ecommerce fulfillment process.
Ecommerce and dropshipping follow the same workflow till the order fulfillment step:
The online retailer builds a website.
They upload the product catalog.
They design the checkout flow.
They advertise and market their products.
There are a lot of commonalities between dropshipping and ecommerce.
How do they differ?
Difference Between Ecommerce and Dropshipping
In the traditional ecommerce fulfillment method, store owners source products and store them in a warehouse. In dropshipping, the business owner orders a product from the dropshipper after a customer places an order. The dropshipper sources, packs, and delivers the products to the customer.
The infographic below illustrates the primary differences between ecommerce fulfillment and dropshipping:
Dropshipping vs. Ecommerce: Choosing the Best Option
Now that you know the key differences and similarities between ecommerce and dropshipping, let’s see how you can choose a method that suits you.
Dropshipping and Ecommerce: Key Business Impact
Ecommerce and dropshipping are different business models. They both impact the success of your ecommerce site in different ways.
To choose the best method, you need to compare the impact of these models on the following key business aspects.
Initial Investment
Dropshipping: You can start without initial investment as you work without inventory or warehouse.
Ecommerce: You need to procure products and set up a warehouse. It needs initial capital.
Profitability
Dropshipping: Your profit margins will be low as you buy products from a dropshipping supplier — a middleman. Your supply chain may also cost you more as you might need to pay for fulfillment services.
Ecommerce: Your profit margins will be high as you buy products at a wholesale price. You can also minimize the packaging and shipping costs.
Ease of Business
Dropshipping: As a beginner, dropshipping makes it easy to do business. You can avoid upfront product costs, storage, and packaging.
Ecommerce: As you need to procure, store and package products, this method is complex. You may need an experienced workforce.
Branding
Dropshipping: You have minimal control over the quality of products the dropshipper acquires for you. You won’t be able to sell custom products or use unique branding.
Ecommerce: You have complete control over the product you sell. You can sell your own products and brand them as you wish. It helps to create a powerful brand.
Risk
Dropshipping: If you don’t get quick sales, you have no risk as you don’t hold any inventory. But you’ll have some legal risk if the dropshipper doesn’t comply with regulations.
Ecommerce: You’ll face higher losses if products don’t sell. But you control the complete sales process, so you won’t have to deal with legal issues with a third party.
Based on these critical aspects, let’s look at a few tips on when to use dropshipping and ecommerce.
When To Choose Dropshipping Model
Here are a few scenarios when you should choose dropshipping.
You are a beginner and want to open your store quickly.
You want to minimize the startup costs.
You sell products for which branding isn’t necessary.
You want to minimize risks related to unsold inventory.
When To Choose Ecommerce Fulfilment Model
Here are a few scenarios when you should choose ecommerce fulfillment.
You have enough funds and a capable workforce.
You are selling your own branded products.
You want to have complete control over your order fulfillment.
Final Thoughts: Dropshipping vs. Ecommerce: A Basic Guide To Order Fulfillment
Dropshipping and ecommerce are two useful order fulfillment methods. Both have their pros and cons.
While choosing dropshipping vs. ecommerce, you need to carefully consider the impact of these models on business aspects like:
Initial Investment.
Profitability.
Ease of Business.
Branding.
Flexibility.
No matter which fulfillment model you choose, you need to create an excellent store to create a vast customer base.
Are you ready to take that first step in building an online store? You can do it in a few clicks using Hostdedi’s StoreBuilder.