CAll Us: +1 888-999-8231 Submit Ticket

How to Build a WordPress Online Store in 6 Easy Steps [2022]

Building a WordPress online store is a great way to monetize your blog or grow your retail business.

As the most popular content management system in the world, WordPress provides a perfect platform for setting up an ecommerce site. The WordPress ecosystem offers the best selection of ecommerce plugins, developers, and themes.

Learning how to build an online store with WordPress is simple. In this post, we cover why WordPress is a great choice for online stores and how to set up a store on WordPress.

WordPress Ecommerce Advantages

Most WordPress online stores run on WooCommerce, an ecommerce system developed by WordPress. WordPress and WooCommerce differ from other ecommerce platforms because they’re open source. In proprietary systems like BigCommerce or Shopify, you build a store that only works as long as you keep paying for a BigCommerce or Shopify subscription.

As an open source system, you only have to pay for web hosting with WordPress and WooCommerce. In addition to lower operating costs, WooCommerce and WordPress also offer great flexibility and customization. WooCommerce offers the largest collection of plugins for nearly limitless customization options.

How to Build an Online Store with WordPress

Adding an online store to your website requires installing an ecommerce platform. For this guide, we’ll review the steps for setting up WooCommerce, the most popular and powerful online store plugin for WordPress.

Install WooCommerce on Your WordPress Website

We’ll start our process assuming you already installed and set up a WordPress website. If you don’t have a WordPress site already, consider purchasing a managed WordPress hosting account to simplify the WordPress installation.

Add the WooCommerce plugin to your website by:

  1. Signing in to your WordPress dashboard.
  2. Go to plugins in the navigation menu. Select “Add New.”
  3. Type WooCommerce in the search bar.
  4. On the WooCommerce box, select “Install Now.”
  5. Then choose “Activate.”

Configure WooCommerce

WooCommerce offers a simple setup process. After activating the plugin, you can launch a self-guided setup wizard. After answering some questions about your online store, you’ll be ready to add products and design your store.

Adding Products to Your Online Store

After completing the setup wizard, you’ll see a checklist for setting up your WooCommerce store. The next step is to add products.

Clicking the “add my products” links gives four options:

  1. Start with a template
  2. Add manually
  3. Import via CSV
  4. Import from another service

When you’re new to WooCommerce, the template options work best. This option takes you to the add product screen, where pop-up balloons walk you through each step.

Configure Your Payment, Tax, and Shipping Options

For your online store to work, you need a way for people to pay you.

From the setup checklist, the “Get Paid with WooCommerce Payments” link will walk you through how to integrate with WooCommerce’s native payment gateway. But WooCommerce supports different payment methods. If you want to use a different payment gateway, follow the provider’s instructions for integrating with WooCommerce.

After payment gateways, the checklist covers taxes and shipping. WooCommerce and Jetpack offer an automatic option for calculating sales tax. You also have the option of manually configuring your sales tax settings.

The default shipping method is flat-rate shipping. If you want to calculate shipping costs at checkout, you need to install a shipping plugin.

Set Up Optional Marketing Tools

WooCommerce recommends installing and setting up marketing tools next when setting up your online store. In practice, you may find it easier to skip this step until after you finish the store setup.

Design Your Online Store

The final step in the WooCommerce getting started checklist is to “personalize my store.”

Click that link to get options to create a custom homepage, upload a logo, and set a notice.

Click the “Create Homepage” button and complete uploading a logo. You can wait to set a store notice until later.

You’ll then see an option to “Design your store with Storefront.” Click “Let’s Go” to get started. Create a homepage and upload a logo. You can skip the store notice if you don’t need one.

You’ll then see an option to use Storefront to design your store. Click “Let’s Go!”

Then hit “Let’s Go” again.

Use the customizer to change the look and feel of your store by updating fonts, colors, or layout. The WooCommerce pop-up balloons walk you through each step.

Simplify Setting Up Your WordPress Online Store

Building an online store with WordPress is simple, but using StoreBuilder by Hostdedi eliminates the most tedious parts, so you can start adding and selling products sooner.

StoreBuilder harnesses the power of WordPress and WooCommerce, so you still reap all the benefits of using the open source ecommerce platform. StoreBuilder replaces WooCommerce’s traditional setup wizard with a more intuitive setup process. Just answer some questions about your business, and StoreBuilder does all the work for you. StoreBuilder also includes premium themes and designs, so you can launch a professional-looking online store in less time.

StoreBuilder also saves you time by installing the best plugins for running an online store on WordPress. The Hostdedi team vetted every plugin, eliminating the need for you to research, download, and install plugins to customize your online store.

Throughout the entire process, the Hostdedi team of WordPress and WooCommerce experts can help solve any challenges as you learn how to set up a store on WordPress.

Sign up today and get your first month free.

Source link

Should Freelancers Join Hosting Affiliate Programs?

As a freelancer, do you want to get paid without completing a project or even sending an invoice? Sounds too good to be true? It’s not if you join hosting affiliate programs.

Web hosting companies offer affiliate programs where they pay a commission for referring new customers. In this post, we’ll explore how hosting affiliate programs work, and the benefits and limitations of these programs.

How Web Hosting Affiliate Programs Work

Affiliate marketing dominates the internet. Website owners include links to products or services on their sites. Companies can track who clicks on the link. If the people who click make a purchase, the company pays a commission to the website owner. If you’ve ever wondered why every food blogger includes a long-winded story with links to four different Amazon products before they get to a recipe, now you know why.

Details of affiliate programs vary by company. In general, you can expect to earn either a percentage of the total purchase or a fixed rate based on product type. Most affiliate programs only pay commissions on the first purchase. You will not earn commissions on renewals.

The key to earning money as an affiliate marketer is to join a program with high commissions and identify products and services that are a good fit for your audience. Web hosting affiliate programs align well with freelance web developers’ clients. Your clients need a hosting service for the awesome websites you build. Joining an affiliate program allows you to earn additional income when you recommend a hosting service to your clients.

Affiliate commissions work for more than client referrals. If you have an active blog, social media following, or newsletter audience, you can promote the hosting affiliate links to your larger audience beyond clients.

Benefits of Hosting Affiliate Programs for Freelancers

Web hosting affiliate programs offer tremendous upsides for freelance web developers, including additional income, customer service, and promotional resources

Additional Income

Most freelancers relate to the struggle of finding their next freelance development client. Affiliate programs offer freelancers the chance to earn additional income without taking on more projects. Most freelancers make recommendations for hosting services to some or all of their clients. By joining an affiliate program, freelancers can earn income from a recommendation they would make anyway.

Customer Service

The most significant advantage of joining an affiliate program is that you’re not responsible for customer service. From billing to technical support, the hosting company remains responsible for the customer relationship. This is one of the main benefits of hosting websites for clients.

Promotional Resources

Many affiliate programs provide you with the resources you need to encourage people to sign up for hosting. From custom landing pages and content to banner ads, programs can help you find ways to promote hosting services in addition to sending client referrals.

Limitations of Hosting Affiliate Programs for Freelancers

While everyone loves additional income, affiliate programs do have some downsides. Mainly, you make less money through affiliate marketing than you would hosting clients’ sites. And the programs have certain regulations.

Lower Margin

Most affiliate programs pay out a one-time commission. You won’t earn money on any renewals. You can make more money by hosting clients’ websites yourself in the long run, especially if you bundle your hosting services with a maintenance package for your clients.

Program Regulations

When signing up for an affiliate program, review the terms and conditions carefully. The terms should clearly define how and when you get paid as an affiliate. If you’re thinking you could double dip and sign up for an account yourself to use for hosting clients’ sites via your affiliate link, know that most programs won’t pay a commission in this case and may disqualify you as an affiliate.

Disclosure Requirements

If you earn a commission from affiliate marketing, you must disclose your relationship as an affiliate. Federal Trade Commission guidelines require disclosure to be “clear and conspicuous” so the average reader can clearly understand that you make money off of the recommendation.

Should Freelancers Join Hosting Affiliate Programs?

The answer to if a web hosting affiliate program is right for you depends on if you want to host clients’ sites. If you want to host clients’ sites, you’ll probably make more money during the account’s lifetime by hosting the site for your clients and marking up the service. If you don’t want to deal with the hassle of being on call 24/7 as the hosting tech support for all your clients, an affiliate program is an excellent way to earn money with less work.

Affiliate programs and selling hosting services are not mutually exclusive. You could choose a combination approach where you host a few smaller client sites and use your affiliate status for larger projects requiring around-the-clock support.

What’s the Best Web Hosting Affiliate Program?

Obviously, we’re a bit biased, but we think the Hostdedi affiliate program is the best choice for freelance web developers.

Benefits of the Hostdedi hosting affiliate program include:

  • Generous Payouts. You’ll earn the higher end of $150 or 150% of the first month’s service per referral sale.
  • 90-Day Window. Earn commissions on customers who convert up to 90 days after their first click from your site.
  • Promotional Content. Our team provides ready-to-go messaging, blogs, banners, ads, and more.
  • Excellent Service. When you refer clients to Hostdedi, you can trust they’ll receive top-quality hosting.

Sign up today to start earning money as a Hostdedi’s affiliate.

Source link

Make Your Business Successful With These 5 Marketing Ideas for the New Year

A new year always comes with new beginnings. For small ecommerce stores, it’s time to assess your performance from the last year and devise strategies that can help your business grow.

On the one hand, there’s the rapid advancement in marketing trends, and on the other, your business has some goal setting to do. The best way to tackle these challenges is to revisit your existing marketing strategies and create better ideas for the year ahead.

Some marketing campaign ideas to promote your business with the new year include launching new products, introducing discount coupons, and offering referral programs. Those and other new year marketing ideas can help you boost sales and improve your customer experience.

Read along as we highlight some of the best marketing ideas for the new year.

The Need for New Year Marketing Campaigns

New Year Marketing Ideas

1. Run New Year Marketing Promotions
2. Pay Attention to Best-Performing Products
3. Automate Your Online Marketing
4. Use the Power of Social Media
5. Start a Referral Program

Final Thoughts: 5 New Year Marketing Ideas To Revolutionize Your Business

The Need for New Year Marketing Campaigns

The start of the year is the perfect time for you to look back and reflect on your company’s performance. It’s the best time to create brand awareness by implementing fabulous marketing ideas and leaving a mark on your audience’s heart and mind.

In the world of ecommerce marketing, the new year and holiday season are a time to carve a space in the market. By creating effective advertising campaigns at this time, such as social media posts and digital marketing, you can increase your online sales.

With the beginning of another year, it’s time for all of your new year content ideas to come alive.

New Year Marketing Ideas

  1. Run new year marketing promotions.
  2. Pay attention to best-performing products.
  3. Automate your online marketing.
  4. Use the power of social media.
  5. Start a referral program.

These new year ideas can help you create a comprehensive strategy while focusing on your marketing ideas for each month. That will help you stay organized and fit your smaller plans into your bigger yearly targets.

Here are the five best new year marketing tips that you can use to create effective strategies and gain your customers’ trust this year.

1. Run New Year Marketing Promotions

The first month is a great time of year to boost your sales. When creating marketing ideas for January, focus on running holiday sales, new year promotions, and giveaways.

That’s where email marketing and targeted text messaging can be of great help. By sending out customized marketing emails and discount codes to potential customers, you’ll see an increase in your number of conversions — an excellent start to the new year.

You should also focus on tying your brand image with the new year’s theme. For example, try using a common new year resolution to promote a certain product or service.

This is also a good time to use the power of content marketing. You can create attractive blog posts to spark interest in your new year sales. Sending out new year emails should also be a significant part of your January marketing strategy.

2. Pay Attention to Best-Performing Products

When gathering new year marketing ideas, don’t ignore the products performing well over the last few months. When you analyze the last year’s progress, it isn’t hard to pinpoint your successes based on customer reviews. Now’s the time to use that important information.

Your high-performing products need more attention. You can use focused product marketing strategies to attract new customers. You can also use your best products as the central point of your marketing efforts.

But don’t neglect other products. To be truly successful, a small business must also learn from its mistakes. Promote products that didn’t perform as expected and need more help selling, so your customers are attracted to them.

3. Automate Your Online Marketing

One of the critical aspects of modern businesses, especially if you’re relying on ecommerce sales, is the automation of digital marketing. If you’re a small business owner and your marketing campaigns aren’t automated yet, now is the time to set this goal for the year.

According to Iterable, 39% of organizations are using marketing automation tools — and that number will only get higher. Online marketing automation software like Marketo, HubSpot, and Mailchimp are becoming vital for ecommerce businesses.

If you’re already benefiting from marketing automation, you can use the data to track your performance, create email campaigns, and promote social media posts to grow your business this year.

4. Use the Power of Social Media

Social media channels are one of the most powerful modes of marketing. If you’re running an ecommerce store, you can never ignore the power of social media platforms and the value they can bring to your business. If Google ads can help you increase traffic to your website, Facebook ads and Twitter hashtags can do even more. Not only can you create targeted ads, but you can also engage your potential clients in a conversation. Social channels provide a way to create a strong connection with your audience and make them feel valued.

According to Criteo, 47% of marketers believe their budget for social media marketing will increase in the coming year. When thinking about new year marketing ideas, you should focus on creating a social media calendar to promote your business.

5. Start a Referral Program

Referrals are always a great way to broaden your customer base. If your online business doesn’t have a referral program in place, it should be one of your targets for the new year. Referrals also serve as authentic testimonials, along with your already available online reviews.

You can create programs where your existing loyal customers can refer clients to you. In return, you can offer gift cards and discount coupons as incentives to promote customer loyalty.

Focus on expanding your customer base this year to gain a competitive edge and increase sales. When listing marketing ideas to start the new year, pay due attention to referral programs. We can’t overstate the benefits of these programs as a marketing tool for online businesses.

Final Thoughts: 5 New Year Marketing Ideas To Revolutionize Your Business

The start of the new year is the time where you can revolutionize your business. It provides an opportunity to create new effective marketing strategies and boost sales. For ecommerce businesses, it’s essential to think about unique new year marketing ideas and learn from the success stories of other brands in your niche.

Interactive websites and online stores are extremely important for ecommerce businesses. Create a compelling website and online store with Hostdedi to significantly increase your sales and improve your marketing strategies this year.

Check out StoreBuilder by Hostdedi. It’s the fastest and easiest way to create an online store with WordPress.

Source link

Beginner’s Guide to WordPress Bootstrap

More than 90 percent of internet users get online using their mobile devices at least some of the time. In fact, the average smartphone user spends 5-6 hours on their phones on a daily basis — and that doesn’t even include stuff related to work.

Since smartphones are that widely used, it’s essential for you to make your website mobile friendly. WordPress users have numerous mobile responsive themes and plugins that allow them to present their web content on screens of all sizes.

However, you can also build your own mobile-friendly WordPress theme using Bootstrap. It’s a free mobile-first framework you can integrate into your WordPress installation.

Keep reading to learn what Bootstrap is, its benefits, and how to use WordPress Bootstrap.

What is WordPress Bootstrap?

Frameworks are basic structures you can use as the foundation to build a website and adjust it according to your own preferences and needs. They provide you with quality code already, so you don’t have to code from scratch. Frameworks make the entire process much quicker and more accurate.

Now, what is WordPress Bootstrap?

Bootstrap is a fully designed front-end framework that makes developing your mobile responsive site fast and easy. In other words, it’s like a skeleton to build websites. Bootstrap includes a set of CSS and HTML — elements that help you create custom features like navigation bars, buttons, and typography.

It also works with plenty of optional JavaScript plugins for a responsive layout and better functionality. Both WordPress and Bootstrap are free. You can download and customize them, knowing they are widely accepted and supported by a community of developers.

Bootstrap vs WordPress: What’s the Difference?

Bootstrap is an open source framework based on HTML (for structure), CSS (for presentation), and JavaScript (for interactivity). It’s actually the most popular framework when it comes to building responsive, mobile-first websites quickly and easily. Bootstrap comes as a powerful and uniform solution developers can use to build an interface.

WordPress is an open source content management system (CMS) written on PHP, where users can build their own blogs and websites. It’s a tool that helps you manage the media files and folders. WordPress is the most popular CMS in the world.

WordPress is a widely used solution because it’s relatively easy to use and allows a user to manage, update, and customize the site from its back-end CMS and components. It provides numerous useful plugins, together with a highly flexible interface that reduces both your costs and time.

Bootstrap doesn’t have features of the pre-existing theme, while WordPress offers plenty of them to help you create your very own dynamic site. To develop a site on Bootstrap, you need to be familiar with coding as well as have strong knowledge of HTML and CSS. In WordPress, on the other hand, you don’t need to know this.

Bootstrap is based on a grid system where you adjust the web pages on different sections of your site. When it comes to WordPress, you’ll mostly drag and drop features you want to use for the website. Also, unlike Bootstrap, WordPress is SEO friendly.

Can I Use Bootstrap in WordPress?

Bootstrap can be used in various applications as well as WordPress theme development. You can easily hook it to the CMS, plus it provides predefined classes that help developers with creating custom, responsive WordPress themes rather fast.

You can develop a WordPress theme with Bootstrap from scratch, customize an existing one, or simply create a theme using only HTML, CSS, and JavaScript. Either way, you’ll have all it takes to create a unique and functional WordPress site.

To make the most out of Bootstrap, you need jQuery. It’s a popular JavaScript library that makes JavaScript compatible across different browsers as well as supports its plugins.

The Benefits of Using WordPress Bootstrap

It’s Bug-Free & Works Across All Browsers

Chrome, Internet Explorer, Mozilla Firefox, Microsoft Edge — these are just some of the browsers people across the world use when searching the Internet. Tools you use need to make your website available across various browsers. Bootstrap is an excellent framework where you won’t experience browser incompatibility.

It Makes the Web Development Process Faster

The less time you spend on building your website, the slimmer your bill will be. Bootstrap takes a lot of routine work off the shoulders of web developers, which means they don’t have to deal with media queries, fonts, or layout. That way, they remain free to work on custom features without getting distracted by regular technicalities.

It Helps You Meet Specific Requirements of Your Business

One of the best things about Bootstrap is that although it’s a framework, it is not set in stone. It’s like you go shopping — you go to a shop and get to choose the things you like. Similarly, Bootstrap allows a user to pick the preferred elements and create their own custom library.

You Won’t Get Lost in a Bunch of Different Plugins

When creating a website, you’ll probably include plenty of interactivity features. Still, if you add too many of them, you could experience browser issues, version mismatches, and some other potential issues. Bootstrap has plenty of built-in jQuery elements you can smoothly integrate with your website.

3 Popular WordPress Bootstrap Themes

Here are some of the most popular WordPress Bootstrap themes you might like to check.

1. WP Bootstrap Starter

WP Bootstrap Starter theme is an excellent starting point for any WordPress project. It’s a free and highly customizable solution, based on the Bootstrap framework. It’s a lightweight solution that comes with numerous different page templates such as full-width, left sidebar, right sidebar (the default), and blank with/without a container.

Each template has a branded link with the title “Bootstrap WordPress Theme” in the footer — but, of course, you can remove it if you want.

Also, to make the theme your very own, you can use WooCommerce, Elementor, Contact Form 7, or some other compatible WordPress plugin.

2. Shapely

Shapely is a great choice for your business or landing page sites. It will provide you with features you need to showcase your website, including widgets for adding a portfolio, products, services, clients, shop, etc.

It’s a tool developed using Bootstrap 3 and it has a 12-column grid layout excellent for displaying projects, posts, and products on the page. Coupled with that, it’s quite responsive and will help you create a website optimized for iPhones, iPads, Androids, and other devices.

3. Evolve

If you want your WordPress website to look professional, there’s an excellent multipurpose theme called Evolve. It’s a great solution, whether you’re looking for something for a personal blog or a business site.

Evolve is based on the Bootstrap and Kirki framework, which is a rather popular customizer tool. It’s a flexible and customizable theme where you can find plenty of blog layouts, header layouts, slider options, widget areas, and other useful features.

How to Integrate Bootstrap With Your WordPress Site in 5 Steps

Here are five simple steps to integrate Bootstrap with your WordPress website.

1. Unload Bootstrap

Before you start using Bootstrap, you’ll need to enable a hosting account. Choose your web host to be able to properly use and customize your website. After you do that, download Bootstrap. Unzip it and connect it to the server through an FTP program.

Go to wp-content, then choose Themes. While there, make a new folder and upload the content from the unzipped files in the folder. Don’t forget you’ll need the standard files header.php, index.php, footer.php, and style.css for everything to work properly.

2. Configure Bootstrap

In the folder with the uploaded content, open the style.css and configure it according to the setup of your site. This way you’ll be able to personalize your theme’s description which will help your site stand out.

3. Copy The Code

Copy the code from the bootstrap.min.css and paste it in the style.css file. This will allow you to stylize the interface the way you prefer.

4. Set Up the HTML Template

An excellent way to set up the HTML of your website is to have a well-set template where you only have to make small changes to get what you really want.

When it comes to WordPress, the built-in functions get_header() and get_footer() are respective to the header.php and footer.php files that are a part of your page’s design.

Cut the top of the HTML code until the first div line. Paste the code into the header.php file. Now you’ll have the rest of the code in the footer.php file. Go to the index.php file and then paste this code there:

<?php get_header(); ?>
<?php get_footer(); ?>

This is how you’ll activate them. Now, you’ll have the header and footer features loaded on your site — but, there won’t be any styling.

5. Set the Header & Footer Elements

Add the Bootstrap stylesheet in the header.php file with one of the WordPress functions called echo get_stylesheet_uri(). Now, import the style.css into your site, and you’ll see it displaying a top menu bar.

Still, you need to take more steps to activate the changes you’ve made to your website. To make it all work properly, import the JS files of the preferred template in the footer.php. Now, paste the code before you get to close the body tag.

<script src=”../wp-content/themes/(name of the template folder/js/bootstrap.min.js”></script>

At this point, your header and footer should be working. In this phase, you can go to WordPress settings and stylize everything the way you want.

Power Your WordPress Site With Fully Managed Hosting From Hostdedi

WordPress hosting is a form of website hosting that provides both storage and access to a site. It’s simple to use because it provides plenty of different features that help you design a unique website for your business.

Hostdedi offers managed WordPress hosting and has numerous hosting packages you can design according to your business needs. We’ll take care of the technical aspects and make sure your website stays secure, scalable, and high performing.

Check out our fully managed WordPress hosting plans to get started today.

Related Resources

Source link

How To Minimize Redirects in WordPress

If you’re redesigning your website, changing your website structure, or updating old content, you’ll want to set up redirects so you don’t lose traffic.

Keep reading this blog to learn best practices around redirects, and how to minimize redirects in WordPress.

What is A Redirect?

A redirect is a way for users and search engines, such as Google, to get to a web page with a different URL than they originally requested. Sometimes a URL changes, or a page is taken down. A redirect is set up to take users to another page with a different URL. This provides a better user experience.

When setting up redirects, you’ll want to follow search engine optimization (SEO) and WordPress best practices.

Why Is It Important To Minimize Redirects In WordPress?

Redirects can impact your website’s performance in a number of ways. Because of that, it’s important to minimize redirects in WordPress.

When you incorrectly type in a URL, WordPress automatically redirects you.

For example, if your page is at example.com/mall/food-court but you incorrectly type in example.com/food-court — WordPress is smart enough to send you to the right location.

Unfortunately, it doesn’t always work as planned. One example is when you have http to https. Another example is when you have www to non-www.

The following could end up happening to your visitors:

  • Step 1: The visitor is redirected from http to https
  • Step 2: The visitor is redirected from non-www to www
  • Step 3: The visitor is redirected from food-court to mall/food-court
  • Step 4: The page loads

This makes development easy but it has its pitfalls:

  • Google punishes you for each redirect
  • Site speed suffers from redirects
  • A redirect loop can occur

There are other things that can make it hard to minimize redirects in WordPress. You may have images, Javascripts, CSS files, and links that are setup to the wrong location and will therefore redirect with each page load sneakily without you even noticing.

How To Minimize Redirects In WordPress

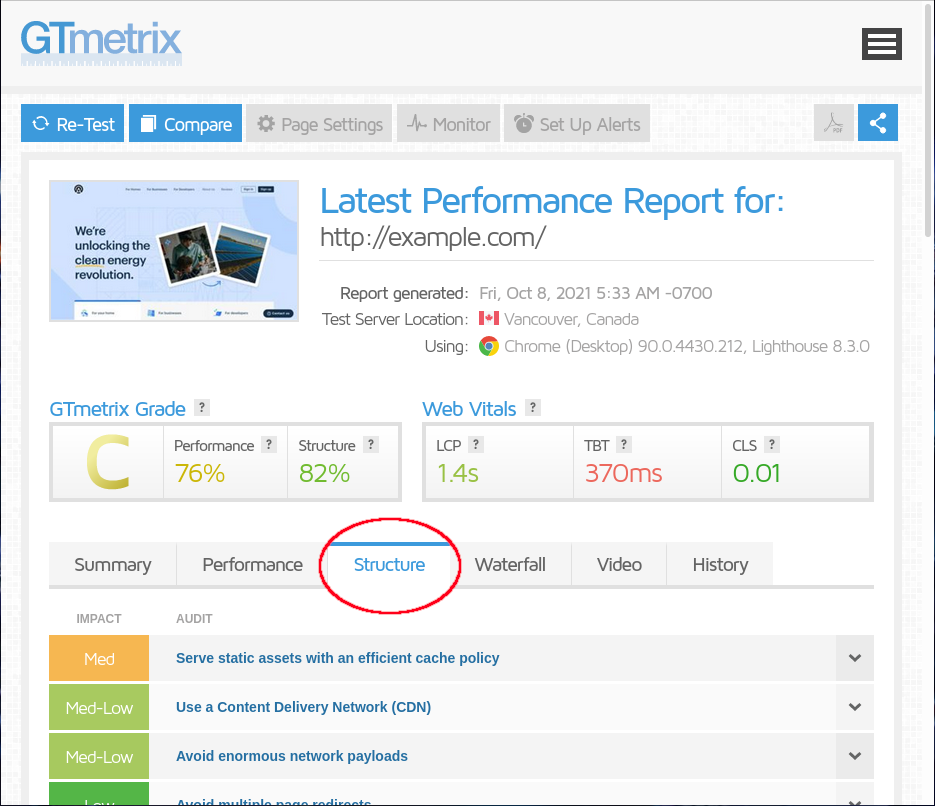
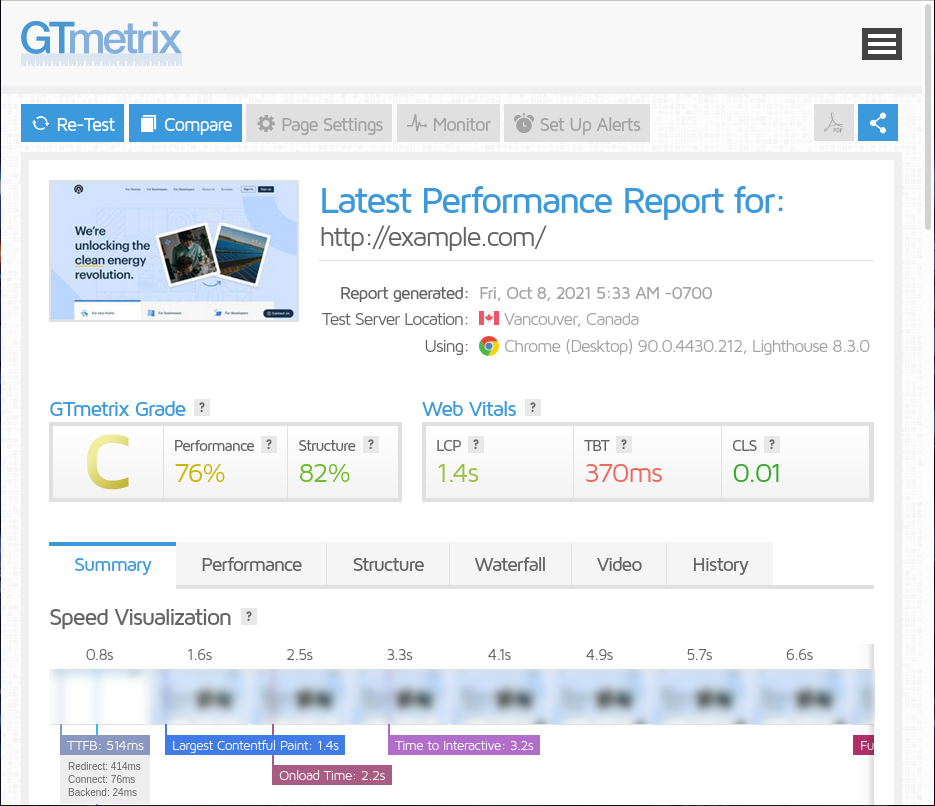
There’s a number of things you can do to minimize redirects in WordPress. You can use various online tools to check your page. Check out our article on debugging redirects. You can also use GTmetrix to find them https://gtmetrix.com. With GTmetrix, you’ll see something like this when you test your site:

  1. Go to the Structure section

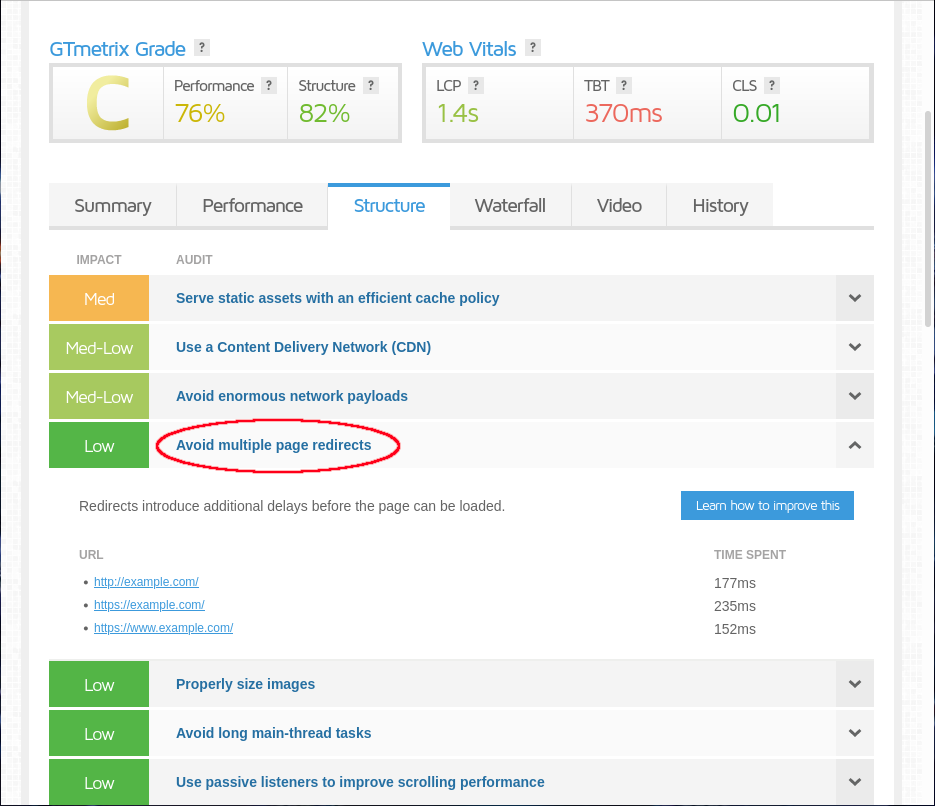
  1. Open the Avoid multiple page redirects section.

Here you can see the problem:

These redirects took a total of 564ms. That’s almost half a second. While half a second may not seem like a big deal, issues like this do affect your Google ranking and your user experience.

In this example, you only see issues with the home page redirecting. But, you may have linked resources redirecting as well. If you stack all of these issues together, they can add up to multiple seconds of wait time. GTmetrix will show you all of the redirecting resources.

How To Fix And Minimize Redirects

First of all, double check that links on your site are updated to the correct URLs.Make sure that all of your resources on your page are linked to the final destination.

Secondly, you’ll want to make sure that what’s in your database matches what’s in Google and the other search engines.

For example, let’s say Google has you indexed as: https://www.example.com

But you have in your database:

siteurl: http://example.com

home: http://example.com

It should be:

siteurl: https://www.example.com

home: https://www.example.com

Need help? Host with us and get best of class hosting support.

How To Minimize Redirects With A WordPress Plugin

If you’re redesigning or restructuring your site, you’ll want to map your old urls to the new urls. You can do this with a WordPress redirect plugin. Redirection is a good example of one.

While you can minimize redirects with the WordPress plugin, it does have its limitations. You still will want to set up a canonical domain redirect. For that, we use .htaccess. You’ll have to choose which option works best for you.

Option A: Force non www. version and https

Option B: Force www. version and https

Note: It’s recommended to use https on your entire site but, if you don’t want to, you can do the same thing for http using the options below.

Option C: Force non www version and http

Option D: Force www version and http

These will not only do 2 redirects at the same time, they will also redirect all of your sub-pages. The $1 is what handles the sub-page redirect.

As I stated previously, if you’ve redesigned your site or changed its structure, you’ll want to redirect those pages as well. You can either do this part in the WordPress plugin to minimize redirects or you can do this in .htaccess using the code below.

You’ll typically want to use 301 redirects. However, if you’re temporarily moving a page, you’ll want to use 302 instead of 301.

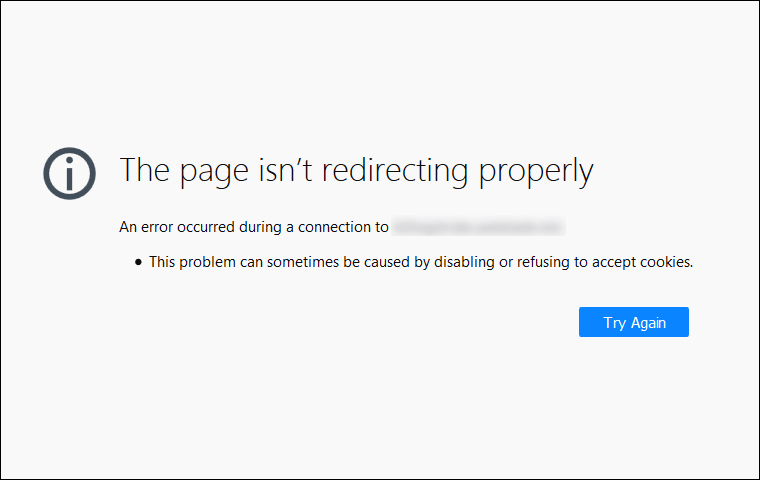
Too Many Redirects

If you notice this error, check out our Too Many Redirects article.

Other Issues Affecting Redirects and Performance

If you’re running outdated WordPress, plugins, or themes, you can get errors like unnecessary redirects. However, installing updates can also break things. Read our article for best practices on updating your WordPress website safely.

You may at times need to put your WordPress site in maintenance mode during updates. Read our blog to learn how to put your WordPress website into maintenance mode.

Sometimes, you’ll need to clean up your site to remove malicious redirects. Check out our blog on WordPress cleanup for recommendations there.

Consider Hosting Your WordPress Site With Hostdedi

Now you know how to reduce the number of redirects on your WordPress website to improve page speed and rank higher in search engines like Google.

Choosing a host like Hostdedi for your site can also boost page speed, help you rank higher, and keep your site secure.

Explore our many WordPress hosting plans to get started today.

Related WordPress Resources

Source link

How to Use Your WordPress Admin Login Page

If you’re having a difficult time finding the WordPress admin login page of your website, you’re not alone. Beginners often find it challenging to locate their WordPress login URL, which is the portal to the management dashboard of their site.

Below, we will break down how you can easily find and log in to your WordPress dashboard. Keep reading to learn why you might not be able to log in and get other WordPress admin login page tips and best practices.

How to Log in To My WordPress Dashboard

Before you can create a blog post, add landing pages, change your site design, or explore WordPress plugins, you must first locate your WordPress admin login page. To find this page, simply add “/login/” or “/admin/” to the end of your website URL string. For example:

www.yourwebsitename.com/login/

www.yourwebsitename.com/admin/

Both URL strings will take you to your WordPress dashboard login page but be sure you replace “yourwebsitename” with your site’s domain name. If either of these options are not working, you can also use the following URL string format:

www.yourwebsitename.com/wp-admin/

If your WordPress website is installed in a subdirectory (e.g., “/blog/”), you can access your dashboard login page using the following three URL string formats:

www.yourwebsitename.com/blog/login/

www.yourwebsitename.com/blog/admin/

www.yourwebsitename.com/blog/wp-admin/

If your WordPress website is installed on a subdomain, be sure that the URL string you type into your search bar reflects this. All three of the following URL string formats below will redirect you to your WordPress dashboard login page:

www.subdomainname.yourwebsitename.com/login/

www.subdomainname.yourwebsitename.com/admin/

www.subdomainname.yourwebsitename.com/wp-admin/

Note: Several WordPress website hosting providers offer shortcut links to access your WordPress dashboard directly through your hosting provider’s dashboard. This allows you to skip signing into the WordPress dashboard login page.

How to Login to My WordPress Dashboard

Once you have located your WordPress dashboard login page, logging in is a breeze. Simply input the username and password you created when you first installed your WordPress website.

After entering your correct username and password, you will be redirected to your WordPress management dashboard.

What If I Can’t Log in To My WordPress Dashboard?

There are several reasons that prevent users from logging into their WordPress dashboard, and some of the most common are forgetting your username or password. But if your account management tools are located within your WordPress dashboard, just how can you access your account to make any changes?

Keep reading to learn what to do if you’ve forgotten your username or password, as well as tips for easier WordPress account recovery in the future.

Forgotten Username or Password

If you’ve forgotten your WordPress username or password, there are a few account recovery methods you can follow, including:

Resetting Your Password: Remembering several passwords for different logins can be challenging. If you happen to lose your WordPress password, you can easily reset it via the WordPress lost password form. Using this form, simply enter your WordPress.com username or email address, and wait to receive your recovery details via the email address associated with your WordPress account. Then, follow the instructions to reset your password.

Account Recovery Form: If you’ve forgotten your username and password, the WordPress account recovery form is a helpful tool. Using this form, you must provide proof of ownership—such as a transaction ID or your activation URL or key—along with the email address associated with your account, your site’s domain name, as well as any other information that can help identify you.

Tips for Easy WordPress Account Recovery

Once you’re able to access your WordPress dashboard, there are a few ways you can make account recovery easier should you lose your username or password again in the future:

SMS Recovery with Two-Step Authentication: An easier and faster way to reset your WordPress password is to set-up SMS recovery with two-step authentication in your account settings. This enables you to reset your password by entering a code sent to your mobile device into the SMS Account Recovery box.

Recovery Email and SMS Number: Another way to quickly recover your WordPress account is to navigate to the “Account Recovery” tab in your account settings. Here you can add an alternative email and SMS number to be used to verify your identity should you forget your username or password.

Can You Have Multiple Users Log in to Your WordPress Dashboard?

As a WordPress administrator, you can allow multiple designated users to log in to your WordPress dashboard. To add a user, simply log in to your WordPress dashboard, navigate to the admin control panel on the left side of the page, and find the “Users” tab. Here, select “Add New” and fill out the user’s username, email address, first name, last name, website, and password, as well as select their user role.

There are six predefined WordPress user roles you can select from when adding new users, including:

Super Admin: Has access to all site network administration tools and features.

Administrator: Has access to all site administration tools.

Editor: Has access to all website posts, which includes managing and publishing posts.

Author: Has access to their individual posts, which includes managing and publishing their own posts.

Contributor: Has access to create and manage their individual posts, but they aren’t permitted to publish them.

Subscriber: Has access to manage their own profile.

Does Updating My Site Affect the WordPress Admin Login Process?

When you update your WordPress software, themes, or plugins from your dashboard, WordPress will automatically deploy its built-in maintenance mode. This allows the system to perform any updates while ensuring that those who need access to your site still have it.

During maintenance mode, WordPress will install a file titled “.maintenance” in the root folder of your site (i.e., the same folder that contains your “wp-admin” folder and “wp-config.php” file). Unfortunately, sometimes your website can get stuck in maintenance mode, which can affect the WordPress admin login process.

If your site is stuck in WordPress maintenance mode, you will need to log in to your website via your FTP client, locate the “.maintenance” in the root folder of your site, and delete it.

Note: If you’re having a difficult time logging in to your FTP client or don’t feel comfortable changing files in your site’s root folder, be sure to reach out to your FTP client for support.

Other Issues That Could Affect the WordPress Dashboard Login Process

There are several other issues that could affect the WordPress dashboard login process, including:

Constant refreshing or redirecting back to the login page: One of the most common reasons this issue occurs is failure to set login cookies. To fix this, try to clear your browser cookies and cache, and ensure your browser has cookies enabled.

WordPress keeps logging you out: This could occur when your WordPress URL and the site address URL are different. Within your WordPress dashboard, navigate to the admin control panel on the left side of the page and find the “Settings” tab. Here, select “General” and ensure the URL in the “Site Address (URL)” and “WordPress Address (URL)” fields are the same.

Too many redirects: If you’re receiving an “Error Too Many Redirects” message after logging in to your WordPress website, there are several ways you can troubleshoot—many of which are like the strategies above. First, try clearing your browser cookies/cache and ensure your browser has cookies enabled. If you can access your WordPress dashboard, deactivate your plugins and reactivate them one by one while testing the functionality of your site. Also, be sure your WordPress URL and site address URL are the same.

Note: If you’re unable to access your WordPress dashboard to resolve these issues, you might have to manually change files in your cPanel or with your FTP client. If this is the case, be sure to reach out to your web hosting provider or FTP client for support.

Can You Change Your Dashboard Login Page to Match Your Website’s Theme?

As a WordPress administrator, you can easily create a custom WordPress dashboard login page to match the theme of your site. You can do this by selecting from several WordPress plugins, or by creating your own custom login forms using a handy form builder.

4 Tips for Logging in to Your WordPress Dashboard Faster

When you want to make changes to your WordPress website, dealing with a lengthy or difficult log in process can be frustrating. Here are four tips for logging in to your WordPress dashboard faster:

  1. Add your WordPress admin login page link to your browser’s bookmark bar.
  2. Add your WordPress admin login page link directly on your website, such as in your footer, sidebar, or menu. To do this, navigate to the admin control panel in your WordPress dashboard and find “Appearance.” Under this tab, click “Menus” and find the “Custom Links” option. Here, you can type in your WordPress login link and anchor text.
  3. Select the “Remember Me” checkbox the next time you log in to your WordPress dashboard. If you’d rather not have your browser save this information, you may want to consider a password manager that will retain not only your WP admin login URL, but all of your login credentials.
  4. Set up a password manager that keeps all your WordPress login information saved and secure.

Host Your WordPress Site With Hostdedi

In need of a WordPress hosting solution that is easy to scale, provides always-on website security, and makes your site faster? Hostdedi is here to help. With our fully managed WordPress hosting solutions, you can create and run a better website while gaining access to 24/7 WordPress support.

Discover how Hostdedi can help you optimize your WordPress site today.

Related Resources

Source link

The Ultimate Guide to Adding a Simple Product in Magento 2

Magento 2 supports several advanced product types, including configurable, bundled, downloadable, and virtual products.

But one of the most versatile Magento product types is the simple product.

Simple products in Magento can exist as both standalone products and as a part of other product types such as grouped and configurable products. Thus, learning how to add simple products in Magento 2 is essential for Magento store owners.

Keep reading to learn:

What Is a Magento 2 Simple Product?

The Difference Between a Simple and Configurable Product in Magento 2

How To Create a Simple Product in Magento 2

Final Thoughts: How To Add a Simple Product in Magento 2

What Is a Magento 2 Simple Product?

adding a simple product in Magento

A simple product in Magento 2 is a product type that exists without any variations. It’s associated with a single SKU in the inventory and can be sold individually or with another Magento product type, such as bundle products.

You can also use simple products with customizable options in Magento. Such products are called composite products. They’re associated with the same SKU; however, shoppers can customize them using preset custom options at the time of purchase.

The Difference Between a Simple and Configurable Product in Magento 2

When you add a simple product in Magento, it is associated with one SKU and has no product variations. In contrast, a configurable product in Magento 2 is associated with a collection of multiple simple products.

Each variable option is created using an assigned attribute in Magento and is associated with a unique SKU. These options represent the same product but with different product attributes such as color or size.

Although you can also achieve this result with composite products, configurable products allow you to track inventory levels for each SKU separately.

You can choose between the two product types based on your inventory management needs.

How To Create a Simple Product in Magento 2

Adobe has made the process of adding products in Magento 2 extremely intuitive. Here’s a guide that shows you how to create a product in Magento:

Step 1: Select the Product Type

selecting the simple product type in the Magento admin panel

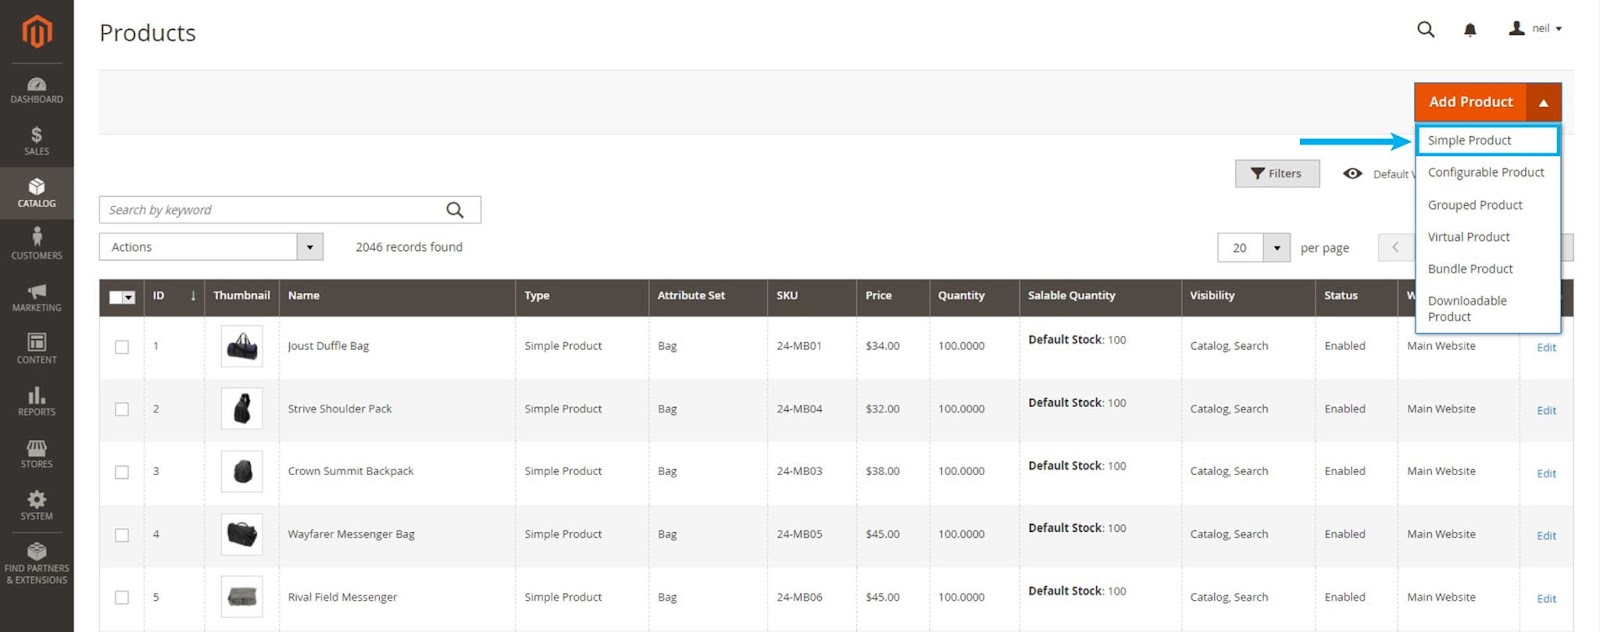
  1. Log in to the Magento store admin and navigate to Catalog > Products in the admin sidebar.
  2. Expand the Add Product menu in the top-right corner, and select Simple Product from the dropdown options.

Step 2: Select an Attribute Set

selecting attribute set to add products in Magento

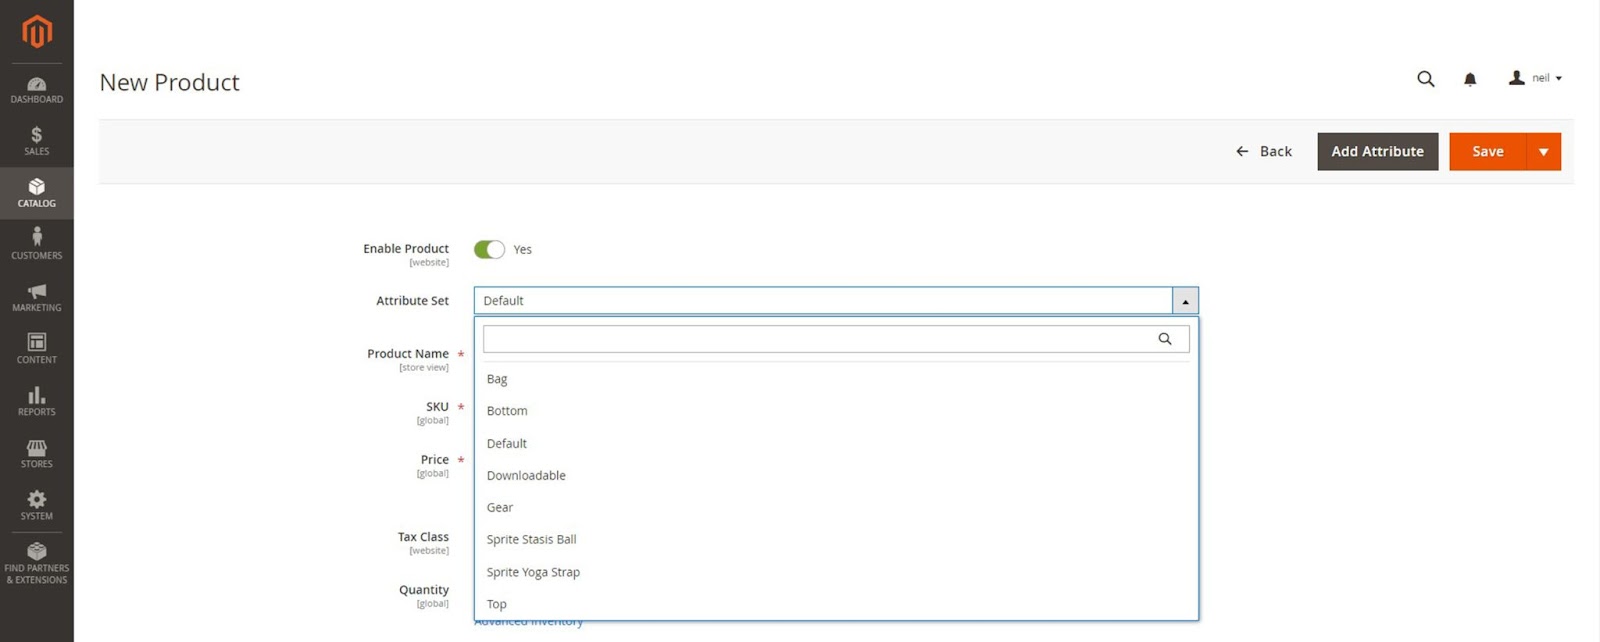
On the New Product template page, expand the Attribute Set menu and choose the attribute set from the available options. If you haven’t configured attribute sets, proceed with the default option.

Step 3: Add Mandatory Product Information

adding mandatory information to products in Magento

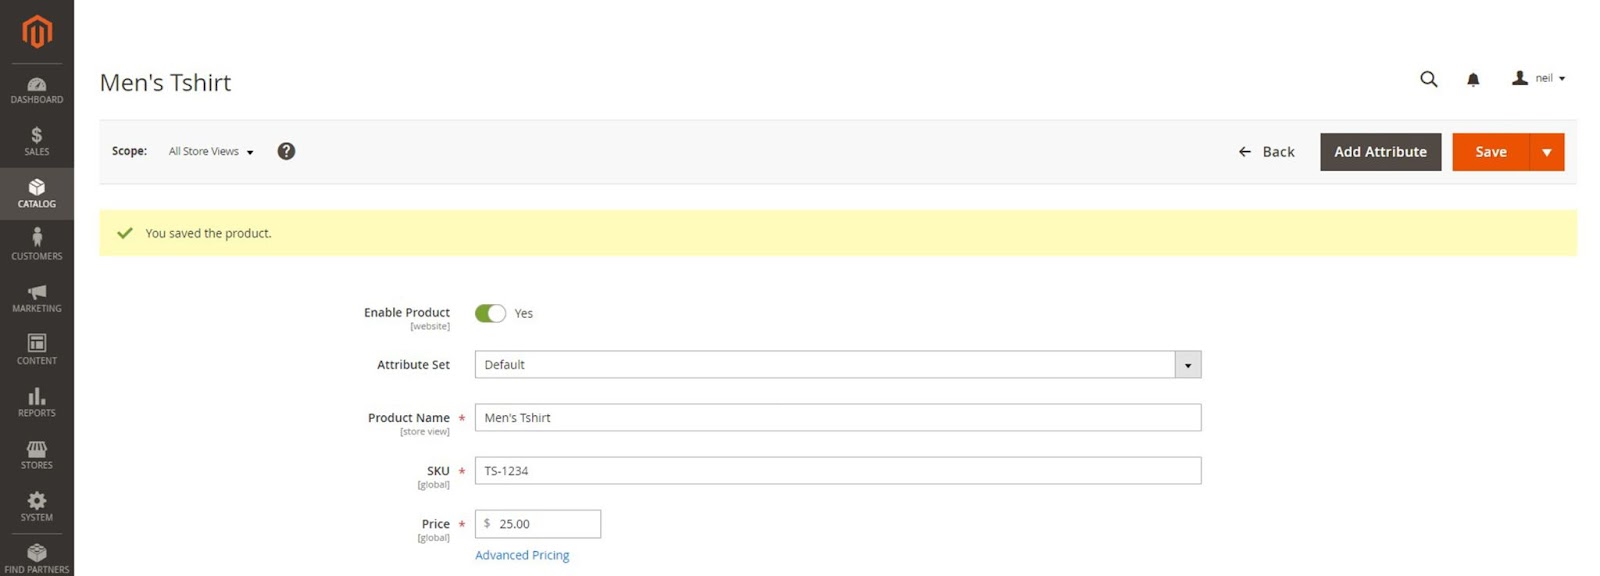
  1. Enter the information in the required fields marked with an asterisk — product name, SKU, and price.

  2. Switch the Enable Product toggle to No and click the Save button.

  3. (Optional) If you’re using a multi-store installation of Magento 2, assign the product to a Store View from the options in the upper-left menu. If you’re using a single store setup, you can use the default value.

Step 4: Update Basic Settings

adding basic information to products in Magento

  1. Expand the Tax Class dropdown and assign a tax class to your product.
  2. Add the amount of inventory available for the product in the Quantity field and set the Stock Status to In Stock. If stock isn’t available when adding products in Magento, you can set it to Out of Stock.
  3. Add the weight of the product. Magento uses this information to calculate shipping during checkout.
  4. Assign the product to a category from the Categories dropdown menu. If the category name doesn’t exist, you can add it using the New Category button.
  5. Set the product visibility. You can leave it as the default option or select a value from the dropdown menu.
  6. Select a value from the Country of Manufacture dropdown menu.

Step 5: Assign Inventory Sources

assigning inventory sources to a simple product in Magento

  1. You can add inventory source information by clicking on the Assign Sources button in the Sources section. This section won’t be visible if you aren’t using multi-source inventory.
  2. On the Assign Sources page, select from the available source options and click Done on the upper right corner to add the sources.
  3. You can manage the status and quantity of the assigned sources by clicking on Advanced Inventory and setting Manage Stock to Yes. Once enabled, you can edit the Source Item Status, Quantity, and Notification Quantity.

Step 6: Configure Optional Product Settings

adding option information to simple products in Magento

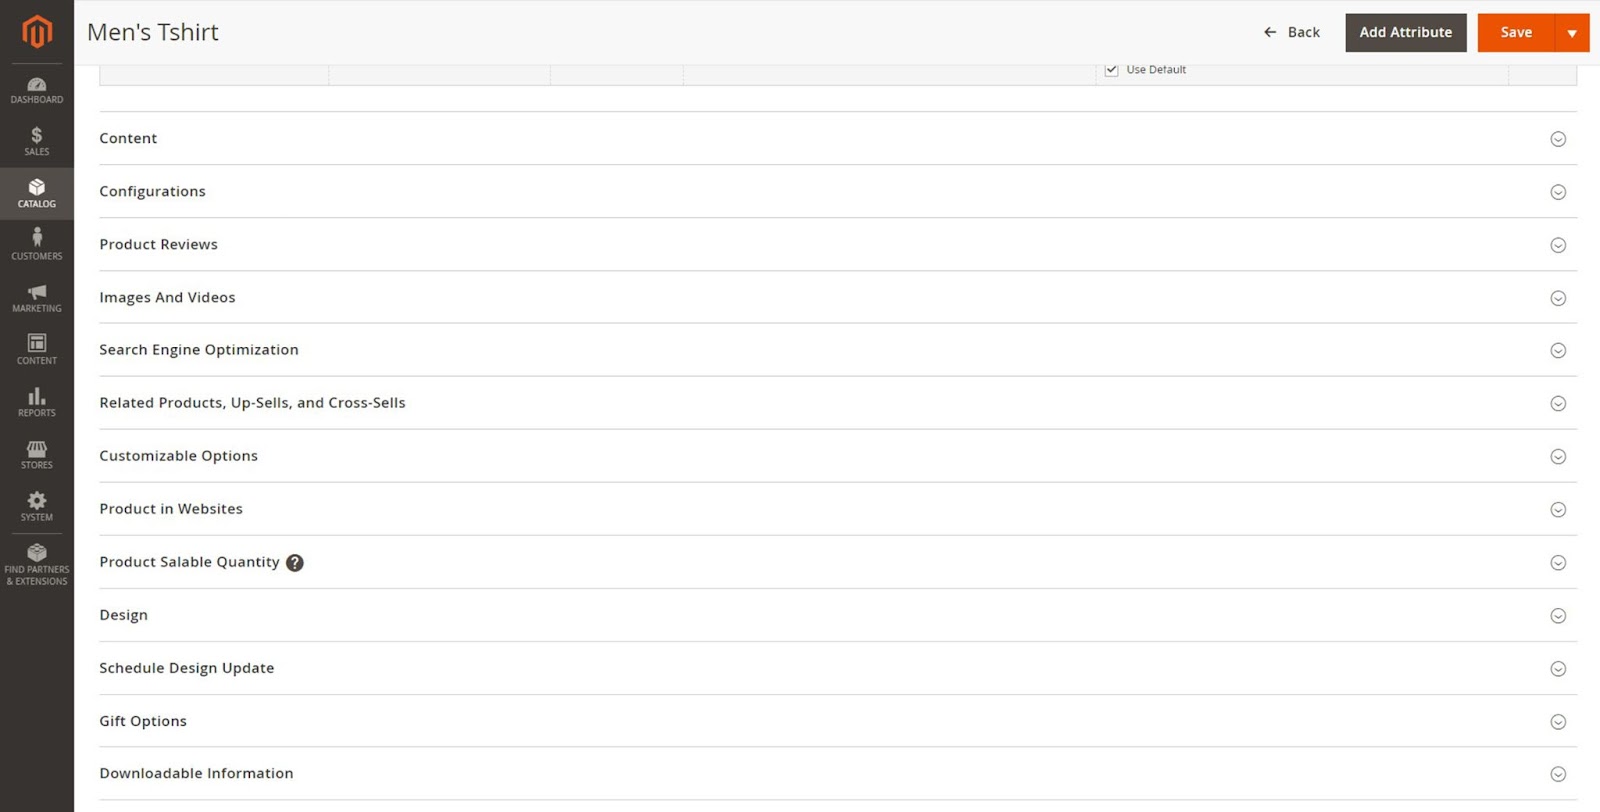
There are several other optional settings to enhance the information on the product page. Here’s how you can update them:

  1. Content: Describe the product in the main product description section. Add a short description for RSS feeds here using the default WYSIWYG editor or the Magento Page Builder if you’re using Magento 2.4.3 or above.
  2. Images and Videos: Add product images or videos in this section.
  3. Related Products, Up-Sells, and Cross-Sells: You can add promotional product blocks to increase product visibility and boost sales here.
  4. Search Engine Optimization: Edit the product URL key and metadata in this section.
  5. Customizable Options: Add and import product customization options here.
  6. Products in Websites: Add and remove the products from different websites here.
  7. Design: Assign and unassign design changes using custom XML code here.
  8. Gift Options: Provide your customers with the option to add a gift message during purchase and set the price in this section.

Step 7: Save and Publish the Product

save and publish a simple product in Magento

After you’ve configured all the product information, switch the Enable Product toggle to Yes and click Save to publish the product to your store.

Final Thoughts: How To Add a Simple Product in Magento 2

We hope you found our guide on adding products in Magento 2 useful. Once you’ve created your first simple product, you can use it independently, with product options, or add it to other product types in Magento, such as downloadable products.

No matter how you use it, make sure your Magento store has the resources to host your catalog without compromising performance.

Managed Magento hosting by Hostdedi gives you access to hassle-free hosting so you can focus on running your business without worrying about your ecommerce store performance.

Check out our fully managed Magento hosting plans to get started today.

Related Resources

Source link

An Ecommerce Business Owner’s Guide to Setting New Year Business Goals

The new year marks the beginning of tax season. As you get ready to pay Uncle Sam, you look at your numbers and see how your business did over the past year and what goals you achieved. Your success might encourage you to do more with your business and set new year business goals.

Your new year business goals can be just what you need to scale your ecommerce business and capitalize on the industry’s estimated 18.7% growth.

Setting business goals for the new year is exciting, but you might need some inspiration.

Read on to learn:

5 New Year Business Goals for Your Ecommerce Business

How To Achieve Your New Year Business Goals

Final Thoughts: How To Set New Year Business Goals for Your Ecommerce Business

5 New Year Business Goals for Your Ecommerce Business

Set new year  business goals and grow your ecommerce business.

Source

Ecommerce store owners have a full plate and countless milestones to achieve. If you’re finding it a tad overwhelming to set new year business goals, here are some goals for inspiration that you can consider.

1. Invest in Organic Growth

Do you still rely on paid ads to get new customers for your ecommerce business?

You may be missing out big time. You can put your growth on autopilot by investing in organic growth.

Try focusing your marketing strategy on search engine optimization (SEO), content marketing, and social media during the upcoming year.

Content has a long shelf life in most cases and can continue to bring traffic to your ecommerce website for a long time without you spending a dime.

2. Take on Operating Leverage

Cost optimization can have a significant impact on your profitability. As a small business owner, you work with low operating leverage (i.e., fixed expenses like salary) when you’re starting and go with variable costs (for instance, an hourly rate for work done).

Choosing variable costs minimizes operational risk but comes with higher costs. But business growth gives you more room to take on operating leverage.

Suppose you sell 100 units of product X through your ecommerce store. You hire an external agency to package your product because you can’t pay a full-time employee. But as you scale, you’ll need to package more units. Instead of paying an agency, you can hire an employee full-time and reduce expenses.

3. Innovate a Product

Your product portfolio is the core of your ecommerce business. Consider optimizing your product portfolio when setting business goals for the new year. Reevaluate your portfolio to identify and get rid of poorly performing products.

As an entrepreneur, you should also aim to innovate in the coming year. Once you understand your target audience, brainstorm ways to innovate a product that can address their pain points better than other products in the market.

4. Get Your Finances in Order

Finances are the core of your new year business goal-setting process. Every goal you set for your business ultimately ties into bringing in more cash. Instead of looking at the financial metrics at the end of the year, set goals for the next year to take control of your finances.

Financial planning for an ecommerce business can feel challenging, but it gets easier once you start.

As part of your new year’s resolutions, set specific goals you’d like to achieve financially for your ecommerce business — a revenue amount, profit margin, or valuation — and develop a business plan to achieve those financial goals.

5. Go Omnichannel

The pandemic offered ecommerce stores a unique opportunity and made omnichannel a standard. It encouraged shoppers to explore online stores for buying everything from clothing to luxury gifts. McKinsey shares that two-thirds of current buyers prefer remote human interactions.

Ecommerce is the best sales route right now. But you should also consider a brick-and-mortar store when setting business goals for the new year if you have the budget for it.

If you sell items like perfumes or clothing, a brick-and-mortar could significantly reduce your returns. Customers will have the option to book online, try the product, and pick it up from the store. It’s a win-win.

How To Achieve Your New Year Business Goals

Setting new year business goals is great. But you need to stay on top of them as you go through the year.

It’s easy to get busy with business as usual, so here are a few tips you can use to achieve your goals.

1. Use the SMART Goals Framework

After setting business goals for the new year, you can turn your goals into SMART goals by making them specific, measurable, attainable, relevant, and time-based.

If your goal was to increase your profit margin, your smart goal could be to increase it by 4% before the end of the year.

2. Plan and Commit to Your Goals

While you’ve set achievable, realistic goals for yourself, you’ll still need to commit to bringing those goals to fruition.

Create a roadmap of how you’ll get from point A to point B, set deadlines, and stick to them.

3. Break Your Goals Into Smaller Goals

Break your long-term goals down into short-term goals.

Increasing your profit margin by 4% sounds daunting? Focus on improving your profit margin by 1% each quarter.

Smaller goals appear less intimidating and lets you take baby steps towards your larger goal.

4. Be Flexible With Your Goals

All ideas don’t work. If your goal was to generate a bucketload of cash from a new product and it’s just not happening, move on.

Your time is valuable. Focus on what’s working. Experiment and invest your time and energy into what works for your business.

Final Thoughts: How To Set New Year Business Goals for Your Ecommerce Business

Setting business goals for the new year is a great way to give your business a fresh start with new ideas and growth. Goal-setting helps your business grow and gives you better control over your business’s future.

If you’re an ecommerce store owner, you should also consider optimizing your website. After all, that’s where the magic happens.

Consider signing up for the fully managed WooCommerce hosting plan from Hostdedi to make your ecommerce website faster and more secure.

Check out our plans to get started today.

Related Resources

Source link