CAll Us: +1 888-999-8231 Submit Ticket

How To Minimize Redirects in WordPress

If you’re redesigning your website, changing your website structure, or updating old content, you’ll want to set up redirects so you don’t lose traffic.

Keep reading this blog to learn best practices around redirects, and how to minimize redirects in WordPress.

What is A Redirect?

A redirect is a way for users and search engines, such as Google, to get to a web page with a different URL than they originally requested. Sometimes a URL changes, or a page is taken down. A redirect is set up to take users to another page with a different URL. This provides a better user experience.

When setting up redirects, you’ll want to follow search engine optimization (SEO) and WordPress best practices.

Why Is It Important To Minimize Redirects In WordPress?

Redirects can impact your website’s performance in a number of ways. Because of that, it’s important to minimize redirects in WordPress.

When you incorrectly type in a URL, WordPress automatically redirects you.

For example, if your page is at example.com/mall/food-court but you incorrectly type in example.com/food-court — WordPress is smart enough to send you to the right location.

Unfortunately, it doesn’t always work as planned. One example is when you have http to https. Another example is when you have www to non-www.

The following could end up happening to your visitors:

  • Step 1: The visitor is redirected from http to https
  • Step 2: The visitor is redirected from non-www to www
  • Step 3: The visitor is redirected from food-court to mall/food-court
  • Step 4: The page loads

This makes development easy but it has its pitfalls:

  • Google punishes you for each redirect
  • Site speed suffers from redirects
  • A redirect loop can occur

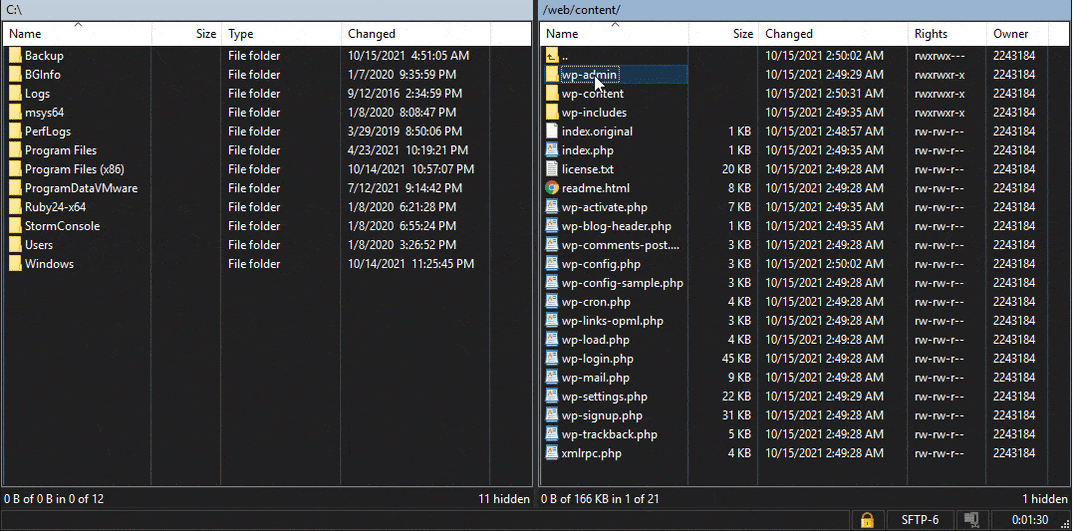
There are other things that can make it hard to minimize redirects in WordPress. You may have images, Javascripts, CSS files, and links that are setup to the wrong location and will therefore redirect with each page load sneakily without you even noticing.

How To Minimize Redirects In WordPress

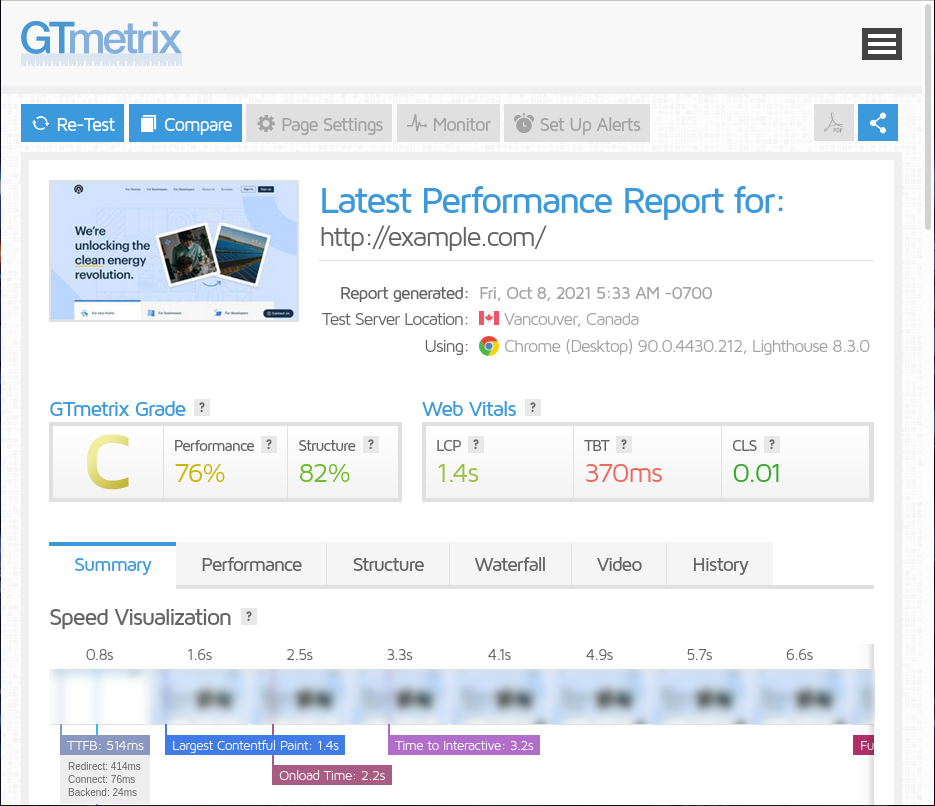
There’s a number of things you can do to minimize redirects in WordPress. You can use various online tools to check your page. Check out our article on debugging redirects. You can also use GTmetrix to find them https://gtmetrix.com. With GTmetrix, you’ll see something like this when you test your site:

  1. Go to the Structure section

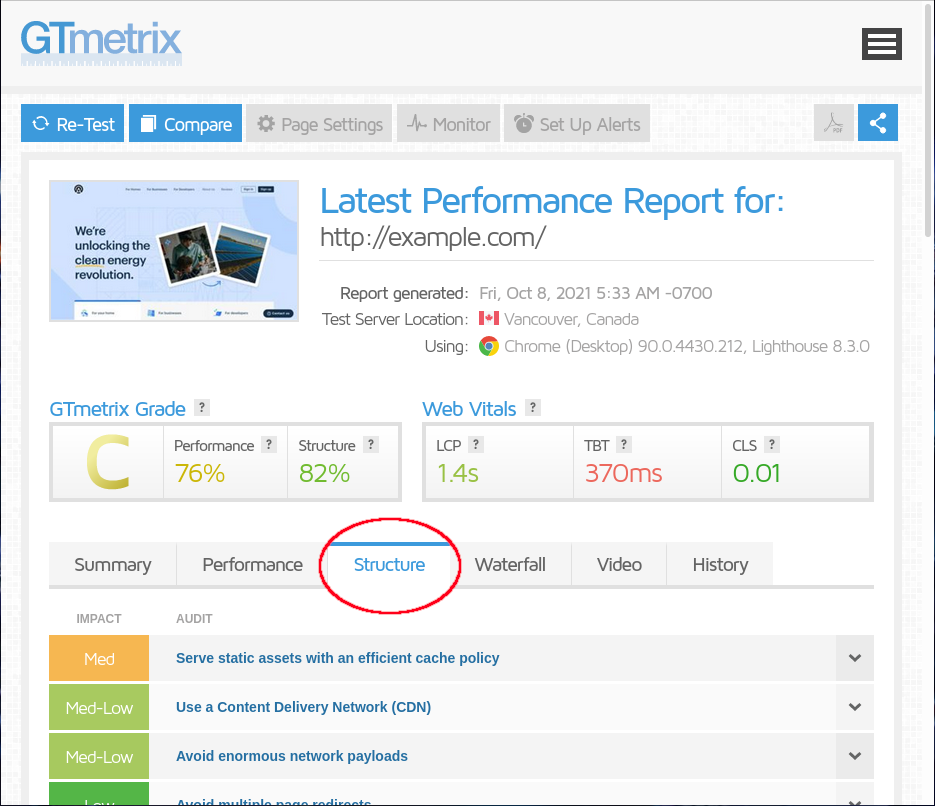
  1. Open the Avoid multiple page redirects section.

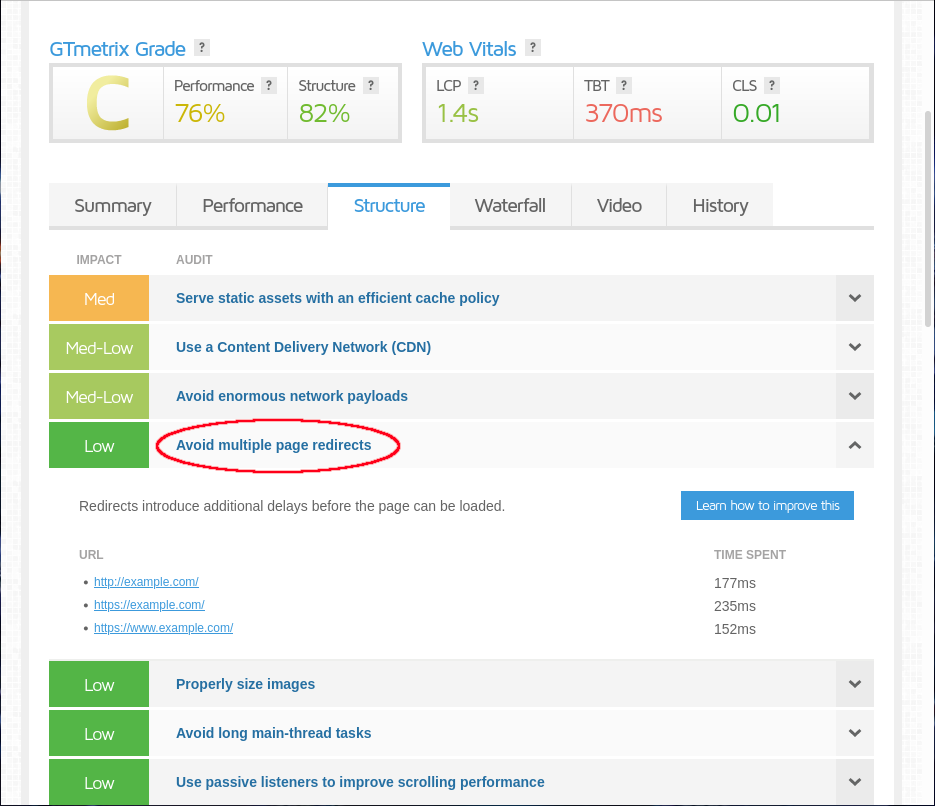
Here you can see the problem:

These redirects took a total of 564ms. That’s almost half a second. While half a second may not seem like a big deal, issues like this do affect your Google ranking and your user experience.

In this example, you only see issues with the home page redirecting. But, you may have linked resources redirecting as well. If you stack all of these issues together, they can add up to multiple seconds of wait time. GTmetrix will show you all of the redirecting resources.

How To Fix And Minimize Redirects

First of all, double check that links on your site are updated to the correct URLs.Make sure that all of your resources on your page are linked to the final destination.

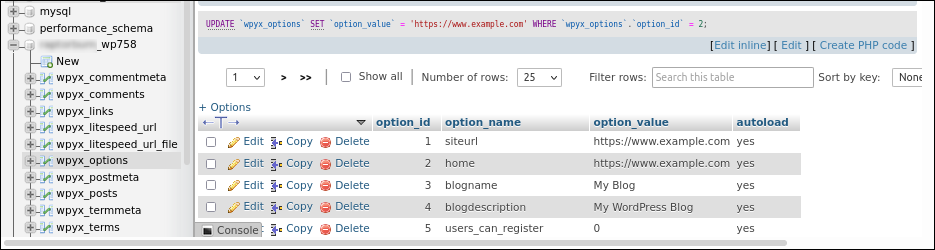
Secondly, you’ll want to make sure that what’s in your database matches what’s in Google and the other search engines.

For example, let’s say Google has you indexed as: https://www.example.com

But you have in your database:

siteurl: http://example.com

home: http://example.com

It should be:

siteurl: https://www.example.com

home: https://www.example.com

Need help? Host with us and get best of class hosting support.

How To Minimize Redirects With A WordPress Plugin

If you’re redesigning or restructuring your site, you’ll want to map your old urls to the new urls. You can do this with a WordPress redirect plugin. Redirection is a good example of one.

While you can minimize redirects with the WordPress plugin, it does have its limitations. You still will want to set up a canonical domain redirect. For that, we use .htaccess. You’ll have to choose which option works best for you.

Option A: Force non www. version and https

Option B: Force www. version and https

Note: It’s recommended to use https on your entire site but, if you don’t want to, you can do the same thing for http using the options below.

Option C: Force non www version and http

Option D: Force www version and http

These will not only do 2 redirects at the same time, they will also redirect all of your sub-pages. The $1 is what handles the sub-page redirect.

As I stated previously, if you’ve redesigned your site or changed its structure, you’ll want to redirect those pages as well. You can either do this part in the WordPress plugin to minimize redirects or you can do this in .htaccess using the code below.

You’ll typically want to use 301 redirects. However, if you’re temporarily moving a page, you’ll want to use 302 instead of 301.

Too Many Redirects

If you notice this error, check out our Too Many Redirects article.

Other Issues Affecting Redirects and Performance

If you’re running outdated WordPress, plugins, or themes, you can get errors like unnecessary redirects. However, installing updates can also break things. Read our article for best practices on updating your WordPress website safely.

You may at times need to put your WordPress site in maintenance mode during updates. Read our blog to learn how to put your WordPress website into maintenance mode.

Sometimes, you’ll need to clean up your site to remove malicious redirects. Check out our blog on WordPress cleanup for recommendations there.

Consider Hosting Your WordPress Site With Hostdedi

Now you know how to reduce the number of redirects on your WordPress website to improve page speed and rank higher in search engines like Google.

Choosing a host like Hostdedi for your site can also boost page speed, help you rank higher, and keep your site secure.

Explore our many WordPress hosting plans to get started today.

Related WordPress Resources

Source link

How to Use Your WordPress Admin Login Page

If you’re having a difficult time finding the WordPress admin login page of your website, you’re not alone. Beginners often find it challenging to locate their WordPress login URL, which is the portal to the management dashboard of their site.

Below, we will break down how you can easily find and log in to your WordPress dashboard. Keep reading to learn why you might not be able to log in and get other WordPress admin login page tips and best practices.

How to Log in To My WordPress Dashboard

Before you can create a blog post, add landing pages, change your site design, or explore WordPress plugins, you must first locate your WordPress admin login page. To find this page, simply add “/login/” or “/admin/” to the end of your website URL string. For example:

www.yourwebsitename.com/login/

www.yourwebsitename.com/admin/

Both URL strings will take you to your WordPress dashboard login page but be sure you replace “yourwebsitename” with your site’s domain name. If either of these options are not working, you can also use the following URL string format:

www.yourwebsitename.com/wp-admin/

If your WordPress website is installed in a subdirectory (e.g., “/blog/”), you can access your dashboard login page using the following three URL string formats:

www.yourwebsitename.com/blog/login/

www.yourwebsitename.com/blog/admin/

www.yourwebsitename.com/blog/wp-admin/

If your WordPress website is installed on a subdomain, be sure that the URL string you type into your search bar reflects this. All three of the following URL string formats below will redirect you to your WordPress dashboard login page:

www.subdomainname.yourwebsitename.com/login/

www.subdomainname.yourwebsitename.com/admin/

www.subdomainname.yourwebsitename.com/wp-admin/

Note: Several WordPress website hosting providers offer shortcut links to access your WordPress dashboard directly through your hosting provider’s dashboard. This allows you to skip signing into the WordPress dashboard login page.

How to Login to My WordPress Dashboard

Once you have located your WordPress dashboard login page, logging in is a breeze. Simply input the username and password you created when you first installed your WordPress website.

After entering your correct username and password, you will be redirected to your WordPress management dashboard.

What If I Can’t Log in To My WordPress Dashboard?

There are several reasons that prevent users from logging into their WordPress dashboard, and some of the most common are forgetting your username or password. But if your account management tools are located within your WordPress dashboard, just how can you access your account to make any changes?

Keep reading to learn what to do if you’ve forgotten your username or password, as well as tips for easier WordPress account recovery in the future.

Forgotten Username or Password

If you’ve forgotten your WordPress username or password, there are a few account recovery methods you can follow, including:

Resetting Your Password: Remembering several passwords for different logins can be challenging. If you happen to lose your WordPress password, you can easily reset it via the WordPress lost password form. Using this form, simply enter your WordPress.com username or email address, and wait to receive your recovery details via the email address associated with your WordPress account. Then, follow the instructions to reset your password.

Account Recovery Form: If you’ve forgotten your username and password, the WordPress account recovery form is a helpful tool. Using this form, you must provide proof of ownership—such as a transaction ID or your activation URL or key—along with the email address associated with your account, your site’s domain name, as well as any other information that can help identify you.

Tips for Easy WordPress Account Recovery

Once you’re able to access your WordPress dashboard, there are a few ways you can make account recovery easier should you lose your username or password again in the future:

SMS Recovery with Two-Step Authentication: An easier and faster way to reset your WordPress password is to set-up SMS recovery with two-step authentication in your account settings. This enables you to reset your password by entering a code sent to your mobile device into the SMS Account Recovery box.

Recovery Email and SMS Number: Another way to quickly recover your WordPress account is to navigate to the “Account Recovery” tab in your account settings. Here you can add an alternative email and SMS number to be used to verify your identity should you forget your username or password.

Can You Have Multiple Users Log in to Your WordPress Dashboard?

As a WordPress administrator, you can allow multiple designated users to log in to your WordPress dashboard. To add a user, simply log in to your WordPress dashboard, navigate to the admin control panel on the left side of the page, and find the “Users” tab. Here, select “Add New” and fill out the user’s username, email address, first name, last name, website, and password, as well as select their user role.

There are six predefined WordPress user roles you can select from when adding new users, including:

Super Admin: Has access to all site network administration tools and features.

Administrator: Has access to all site administration tools.

Editor: Has access to all website posts, which includes managing and publishing posts.

Author: Has access to their individual posts, which includes managing and publishing their own posts.

Contributor: Has access to create and manage their individual posts, but they aren’t permitted to publish them.

Subscriber: Has access to manage their own profile.

Does Updating My Site Affect the WordPress Admin Login Process?

When you update your WordPress software, themes, or plugins from your dashboard, WordPress will automatically deploy its built-in maintenance mode. This allows the system to perform any updates while ensuring that those who need access to your site still have it.

During maintenance mode, WordPress will install a file titled “.maintenance” in the root folder of your site (i.e., the same folder that contains your “wp-admin” folder and “wp-config.php” file). Unfortunately, sometimes your website can get stuck in maintenance mode, which can affect the WordPress admin login process.

If your site is stuck in WordPress maintenance mode, you will need to log in to your website via your FTP client, locate the “.maintenance” in the root folder of your site, and delete it.

Note: If you’re having a difficult time logging in to your FTP client or don’t feel comfortable changing files in your site’s root folder, be sure to reach out to your FTP client for support.

Other Issues That Could Affect the WordPress Dashboard Login Process

There are several other issues that could affect the WordPress dashboard login process, including:

Constant refreshing or redirecting back to the login page: One of the most common reasons this issue occurs is failure to set login cookies. To fix this, try to clear your browser cookies and cache, and ensure your browser has cookies enabled.

WordPress keeps logging you out: This could occur when your WordPress URL and the site address URL are different. Within your WordPress dashboard, navigate to the admin control panel on the left side of the page and find the “Settings” tab. Here, select “General” and ensure the URL in the “Site Address (URL)” and “WordPress Address (URL)” fields are the same.

Too many redirects: If you’re receiving an “Error Too Many Redirects” message after logging in to your WordPress website, there are several ways you can troubleshoot—many of which are like the strategies above. First, try clearing your browser cookies/cache and ensure your browser has cookies enabled. If you can access your WordPress dashboard, deactivate your plugins and reactivate them one by one while testing the functionality of your site. Also, be sure your WordPress URL and site address URL are the same.

Note: If you’re unable to access your WordPress dashboard to resolve these issues, you might have to manually change files in your cPanel or with your FTP client. If this is the case, be sure to reach out to your web hosting provider or FTP client for support.

Can You Change Your Dashboard Login Page to Match Your Website’s Theme?

As a WordPress administrator, you can easily create a custom WordPress dashboard login page to match the theme of your site. You can do this by selecting from several WordPress plugins, or by creating your own custom login forms using a handy form builder.

4 Tips for Logging in to Your WordPress Dashboard Faster

When you want to make changes to your WordPress website, dealing with a lengthy or difficult log in process can be frustrating. Here are four tips for logging in to your WordPress dashboard faster:

  1. Add your WordPress admin login page link to your browser’s bookmark bar.
  2. Add your WordPress admin login page link directly on your website, such as in your footer, sidebar, or menu. To do this, navigate to the admin control panel in your WordPress dashboard and find “Appearance.” Under this tab, click “Menus” and find the “Custom Links” option. Here, you can type in your WordPress login link and anchor text.
  3. Select the “Remember Me” checkbox the next time you log in to your WordPress dashboard. If you’d rather not have your browser save this information, you may want to consider a password manager that will retain not only your WP admin login URL, but all of your login credentials.
  4. Set up a password manager that keeps all your WordPress login information saved and secure.

Host Your WordPress Site With Hostdedi

In need of a WordPress hosting solution that is easy to scale, provides always-on website security, and makes your site faster? Hostdedi is here to help. With our fully managed WordPress hosting solutions, you can create and run a better website while gaining access to 24/7 WordPress support.

Discover how Hostdedi can help you optimize your WordPress site today.

Related Resources

Source link

The Ultimate Guide to Adding a Simple Product in Magento 2

Magento 2 supports several advanced product types, including configurable, bundled, downloadable, and virtual products.

But one of the most versatile Magento product types is the simple product.

Simple products in Magento can exist as both standalone products and as a part of other product types such as grouped and configurable products. Thus, learning how to add simple products in Magento 2 is essential for Magento store owners.

Keep reading to learn:

What Is a Magento 2 Simple Product?

The Difference Between a Simple and Configurable Product in Magento 2

How To Create a Simple Product in Magento 2

Final Thoughts: How To Add a Simple Product in Magento 2

What Is a Magento 2 Simple Product?

adding a simple product in Magento

A simple product in Magento 2 is a product type that exists without any variations. It’s associated with a single SKU in the inventory and can be sold individually or with another Magento product type, such as bundle products.

You can also use simple products with customizable options in Magento. Such products are called composite products. They’re associated with the same SKU; however, shoppers can customize them using preset custom options at the time of purchase.

The Difference Between a Simple and Configurable Product in Magento 2

When you add a simple product in Magento, it is associated with one SKU and has no product variations. In contrast, a configurable product in Magento 2 is associated with a collection of multiple simple products.

Each variable option is created using an assigned attribute in Magento and is associated with a unique SKU. These options represent the same product but with different product attributes such as color or size.

Although you can also achieve this result with composite products, configurable products allow you to track inventory levels for each SKU separately.

You can choose between the two product types based on your inventory management needs.

How To Create a Simple Product in Magento 2

Adobe has made the process of adding products in Magento 2 extremely intuitive. Here’s a guide that shows you how to create a product in Magento:

Step 1: Select the Product Type

selecting the simple product type in the Magento admin panel

  1. Log in to the Magento store admin and navigate to Catalog > Products in the admin sidebar.
  2. Expand the Add Product menu in the top-right corner, and select Simple Product from the dropdown options.

Step 2: Select an Attribute Set

selecting attribute set to add products in Magento

On the New Product template page, expand the Attribute Set menu and choose the attribute set from the available options. If you haven’t configured attribute sets, proceed with the default option.

Step 3: Add Mandatory Product Information

adding mandatory information to products in Magento

  1. Enter the information in the required fields marked with an asterisk — product name, SKU, and price.

  2. Switch the Enable Product toggle to No and click the Save button.

  3. (Optional) If you’re using a multi-store installation of Magento 2, assign the product to a Store View from the options in the upper-left menu. If you’re using a single store setup, you can use the default value.

Step 4: Update Basic Settings

adding basic information to products in Magento

  1. Expand the Tax Class dropdown and assign a tax class to your product.
  2. Add the amount of inventory available for the product in the Quantity field and set the Stock Status to In Stock. If stock isn’t available when adding products in Magento, you can set it to Out of Stock.
  3. Add the weight of the product. Magento uses this information to calculate shipping during checkout.
  4. Assign the product to a category from the Categories dropdown menu. If the category name doesn’t exist, you can add it using the New Category button.
  5. Set the product visibility. You can leave it as the default option or select a value from the dropdown menu.
  6. Select a value from the Country of Manufacture dropdown menu.

Step 5: Assign Inventory Sources

assigning inventory sources to a simple product in Magento

  1. You can add inventory source information by clicking on the Assign Sources button in the Sources section. This section won’t be visible if you aren’t using multi-source inventory.
  2. On the Assign Sources page, select from the available source options and click Done on the upper right corner to add the sources.
  3. You can manage the status and quantity of the assigned sources by clicking on Advanced Inventory and setting Manage Stock to Yes. Once enabled, you can edit the Source Item Status, Quantity, and Notification Quantity.

Step 6: Configure Optional Product Settings

adding option information to simple products in Magento

There are several other optional settings to enhance the information on the product page. Here’s how you can update them:

  1. Content: Describe the product in the main product description section. Add a short description for RSS feeds here using the default WYSIWYG editor or the Magento Page Builder if you’re using Magento 2.4.3 or above.
  2. Images and Videos: Add product images or videos in this section.
  3. Related Products, Up-Sells, and Cross-Sells: You can add promotional product blocks to increase product visibility and boost sales here.
  4. Search Engine Optimization: Edit the product URL key and metadata in this section.
  5. Customizable Options: Add and import product customization options here.
  6. Products in Websites: Add and remove the products from different websites here.
  7. Design: Assign and unassign design changes using custom XML code here.
  8. Gift Options: Provide your customers with the option to add a gift message during purchase and set the price in this section.

Step 7: Save and Publish the Product

save and publish a simple product in Magento

After you’ve configured all the product information, switch the Enable Product toggle to Yes and click Save to publish the product to your store.

Final Thoughts: How To Add a Simple Product in Magento 2

We hope you found our guide on adding products in Magento 2 useful. Once you’ve created your first simple product, you can use it independently, with product options, or add it to other product types in Magento, such as downloadable products.

No matter how you use it, make sure your Magento store has the resources to host your catalog without compromising performance.

Managed Magento hosting by Hostdedi gives you access to hassle-free hosting so you can focus on running your business without worrying about your ecommerce store performance.

Check out our fully managed Magento hosting plans to get started today.

Related Resources

Source link

An Ecommerce Business Owner’s Guide to Setting New Year Business Goals

The new year marks the beginning of tax season. As you get ready to pay Uncle Sam, you look at your numbers and see how your business did over the past year and what goals you achieved. Your success might encourage you to do more with your business and set new year business goals.

Your new year business goals can be just what you need to scale your ecommerce business and capitalize on the industry’s estimated 18.7% growth.

Setting business goals for the new year is exciting, but you might need some inspiration.

Read on to learn:

5 New Year Business Goals for Your Ecommerce Business

How To Achieve Your New Year Business Goals

Final Thoughts: How To Set New Year Business Goals for Your Ecommerce Business

5 New Year Business Goals for Your Ecommerce Business

Set new year  business goals and grow your ecommerce business.

Source

Ecommerce store owners have a full plate and countless milestones to achieve. If you’re finding it a tad overwhelming to set new year business goals, here are some goals for inspiration that you can consider.

1. Invest in Organic Growth

Do you still rely on paid ads to get new customers for your ecommerce business?

You may be missing out big time. You can put your growth on autopilot by investing in organic growth.

Try focusing your marketing strategy on search engine optimization (SEO), content marketing, and social media during the upcoming year.

Content has a long shelf life in most cases and can continue to bring traffic to your ecommerce website for a long time without you spending a dime.

2. Take on Operating Leverage

Cost optimization can have a significant impact on your profitability. As a small business owner, you work with low operating leverage (i.e., fixed expenses like salary) when you’re starting and go with variable costs (for instance, an hourly rate for work done).

Choosing variable costs minimizes operational risk but comes with higher costs. But business growth gives you more room to take on operating leverage.

Suppose you sell 100 units of product X through your ecommerce store. You hire an external agency to package your product because you can’t pay a full-time employee. But as you scale, you’ll need to package more units. Instead of paying an agency, you can hire an employee full-time and reduce expenses.

3. Innovate a Product

Your product portfolio is the core of your ecommerce business. Consider optimizing your product portfolio when setting business goals for the new year. Reevaluate your portfolio to identify and get rid of poorly performing products.

As an entrepreneur, you should also aim to innovate in the coming year. Once you understand your target audience, brainstorm ways to innovate a product that can address their pain points better than other products in the market.

4. Get Your Finances in Order

Finances are the core of your new year business goal-setting process. Every goal you set for your business ultimately ties into bringing in more cash. Instead of looking at the financial metrics at the end of the year, set goals for the next year to take control of your finances.

Financial planning for an ecommerce business can feel challenging, but it gets easier once you start.

As part of your new year’s resolutions, set specific goals you’d like to achieve financially for your ecommerce business — a revenue amount, profit margin, or valuation — and develop a business plan to achieve those financial goals.

5. Go Omnichannel

The pandemic offered ecommerce stores a unique opportunity and made omnichannel a standard. It encouraged shoppers to explore online stores for buying everything from clothing to luxury gifts. McKinsey shares that two-thirds of current buyers prefer remote human interactions.

Ecommerce is the best sales route right now. But you should also consider a brick-and-mortar store when setting business goals for the new year if you have the budget for it.

If you sell items like perfumes or clothing, a brick-and-mortar could significantly reduce your returns. Customers will have the option to book online, try the product, and pick it up from the store. It’s a win-win.

How To Achieve Your New Year Business Goals

Setting new year business goals is great. But you need to stay on top of them as you go through the year.

It’s easy to get busy with business as usual, so here are a few tips you can use to achieve your goals.

1. Use the SMART Goals Framework

After setting business goals for the new year, you can turn your goals into SMART goals by making them specific, measurable, attainable, relevant, and time-based.

If your goal was to increase your profit margin, your smart goal could be to increase it by 4% before the end of the year.

2. Plan and Commit to Your Goals

While you’ve set achievable, realistic goals for yourself, you’ll still need to commit to bringing those goals to fruition.

Create a roadmap of how you’ll get from point A to point B, set deadlines, and stick to them.

3. Break Your Goals Into Smaller Goals

Break your long-term goals down into short-term goals.

Increasing your profit margin by 4% sounds daunting? Focus on improving your profit margin by 1% each quarter.

Smaller goals appear less intimidating and lets you take baby steps towards your larger goal.

4. Be Flexible With Your Goals

All ideas don’t work. If your goal was to generate a bucketload of cash from a new product and it’s just not happening, move on.

Your time is valuable. Focus on what’s working. Experiment and invest your time and energy into what works for your business.

Final Thoughts: How To Set New Year Business Goals for Your Ecommerce Business

Setting business goals for the new year is a great way to give your business a fresh start with new ideas and growth. Goal-setting helps your business grow and gives you better control over your business’s future.

If you’re an ecommerce store owner, you should also consider optimizing your website. After all, that’s where the magic happens.

Consider signing up for the fully managed WooCommerce hosting plan from Hostdedi to make your ecommerce website faster and more secure.

Check out our plans to get started today.

Related Resources

Source link

How to Backup a WordPress Website Manually

Everyone wants their websites to run without a hitch. But no one is immune from accidents. Hackers, poorly coded plugins, faulty hard drives, or human error may break your site by corrupting or deleting data.

Fortunately there is a simple solution to it — backups. Simply put, a backup is a full copy of all your media files, plugins, theme files, settings, and databases. In case something goes wrong it will always be possible to restore your WordPress site to the point at which the backup was made.

Keep reading for a full overview on how to backup your WordPress website manually.

Why WordPress Backups Are Important

Having a restoration point can save you a lot of trouble, as it is not always possible to repair a site after an accident. The site can be infected so badly it would make no sense to scan and clean up all the affected files. In that case, it is easier to revert the site to its original state by using backups.

The example above is just one situation that can happen to your site so it is highly recommended to take backups at least weekly. The frequency mainly depends on what kind of website you have. While small low-activity blogs do not require numerous backups, it is a must for online stores to have daily or even hourly backups in order not to lose information related to new orders. Also, it is advantageous to make backups before updating or adding new WordPress plugins as they may potentially break your site.

The absence of backups in a critical situation can severely damage your business if not destroy it completely. Data loss is inconvenient. It also means you would need to rebuild your site from scratch. That involves extra time and lost potential revenue while your site is unavailable, not to mention credibility losses.

The golden rule is to have at least 3 off-server backups in different places. These can be any cloud storage solutions like OneDrive or Google Drive, a USB flash drive, portable SSD, and even your email account — just make sure to star it or put an important label on it. Any place you can easily access to download your backups is good to store them in.

Automatic vs. Manual Backups

Today there are a number of plugins on wordpress.org designed to make backups automatically. It is definitely a great method, but not ideal. Most of such plugins use up your disk space to store backups. It might not be a good solution if you are limited with your disk space or if your hosting company bills you for disk space usage — making weekly backups, let alone daily, very expensive.

Additionally, if the server containing local backups crashes, you will not be able to use them for restoration as they will be lost together with other data. And finally, if you decide to stick to the 3-backup rule mentioned above, it might not be possible to automate this process due to lack of integration with certain remote destinations — or in cases with SSD or USB flash drives.

On the other hand, manual backups require logging into the server each time you want to make a backup. It can be tedious but manual backups pay off with a higher degree of control — you can take a copy of specific folders or files, or make a database-only backup.

Usually, plugins help make only full site backups, however there are a few on the market like iThemes BackupBuddy that also allow making database-only backups.

Also, manual backups are a must if you just made a considerable update to your website and the next automated backup is scheduled to be made in 5 days. You cannot risk losing your progress if something happens to the website or server within these 5 days.

Ideally, automated backups should be combined with manual backups where needed. This will ensure your website is fully protected after each update.

While automated backups are typically easy to configure within the plugin’s menu or your server’s dashboard, it is important to know how to back up a WordPress site manually.

How to Backup a WordPress Website Manually Using SFTP

SFTP stands for Secure File Transfer Protocol or SSH File Transfer Protocol — it is a network protocol used to access and manage files remotely. In terms of manual backups, we can use it to access the server which hosts the website and make a copy of the entire site or certain folders.

The first step would be to download and install an SFTP client. The most widespread are WinSCP or Filezilla, but you can choose any you like since in most cases this kind of software shares similar interface and features.

Once you have installed the SFTP client, you need to obtain credentials to connect to the server — SFTP server Hostname, Username, Password, and Port. If you do not have the credentials already, they can be obtained by contacting your hosting company’s support staff.

By default, SFTP utilizes port 22 so you can use it unless specified otherwise by your hosting company. Before you actually connect to the SFTP server, you might see something similar (WinSCP image below):

After you have connected to the server, you will see two panels representing files on your local machine (on the left) and on the remote server (on the right):

Depending on your server file structure, your WordPress installation might be located in different directories. In our example, it is /web/content, but in many cases it can be found in /public_html.

By selecting all the folders and files in this directory and dragging them to a folder on the left panel, you can backup your WordPress website manually.

Once you have copied all the files, you can rename the folder into the “website.tld – mm.dd.yyyy” format to keep track of all your backups.

Since full site backups can be large in size it is also recommended to compress them by zipping. Also, having a single file makes it easier and faster to send it to remote destinations.

How to Backup a WordPress Site Manually Using phpMyAdmin

phpMyAdmin is a web-based tool used to manage MySQL databases. This method is used to make database-only backups but they are as vital as full site backups if your website crashes — they contain various settings, posts, pages, comments, and many other things that ensure your site works and displays the information properly.

The exact ways to access it may vary depending on your hosting company or control panel, but usually it is a link or button that brings you directly to the phpMyAdmin menu.

A fragment of the main page:

It is possible to make a backup of all the databases stored on the server — to do so just navigate to the “Export” tab on the header menu; for database-specific backup select one from the list on the left and then go to the “Export” tab.

The Quick Export method should be fine for most cases, but advanced users can have a look at the Custom method if they have some special requirements.

The format should be set to SQL and upon clicking “Go” the database will be downloaded to your local machine in .sql format. This file can later be used in the “Import” tab to restore the database.

Consider Hosting With Hostdedi

All Managed WordPress plans at Hostdedi come with automatic 30-day daily backups. Not only will they ensure the safety of your data, but also save you some time and effort.

Our expert team will assist you with restoring your site using a backup no matter what — be it a cyberattack or termination over the past-due bill — we will always be here to help. Knowing your site is always protected will give you peace of mind allowing you to focus on expanding your business.

Combined with industry-leading performance and optimization, Hostdedi brings Managed WordPress hosting on the next level.

Check out our fully managed WordPress hosting plans to get started today.

Related Resources

Source link

How To Use Social Media as a Social Commerce Platform

Do you know how much time internet users spend on social media every day? 2 hours and 25 minutes.

Businesses have been capitalizing on the popularity of social networks through social media marketing. However, now there is a new way to sell products through social media platforms — social commerce.

Social commerce enables ecommerce businesses to set up product pages on social media.

Major social networking sites like Facebook, Instagram, Snapchat, Pinterest, and Tiktok have already turned into social commerce platforms.

eMarketer reports that social commerce revenue will cross $45.74 billion by 2022. That means social commerce can undoubtedly help you [boost sales](https://www.nexcess.net/blog/8-ways-to-use-social-media-to-grow-your-small-business/) and improve brand awareness, so let’s see how you can set up social commerce on popular social media.

Here’s what we’ll cover:

Social Commerce Sites

Setting Up Social Commerce on Facebook and Instagram

Setting Up Social Shopping on Snapchat

Setting Up TikTok Social Commerce

Setting Up Social Commerce on Pinterest

Final Thoughts: How To Use Social Media as a Social Commerce Platform

First, let’s look at the major social commerce platforms for you to boost your sales.

Social Commerce Sites

  • Facebook
  • Instagram
  • Snapchat
  • Tiktok
  • Pinterest

Now, let’s see the step-by-step procedure to sell on these social commerce platforms.

Setting Up Social Commerce on Facebook and Instagram

Facebook and Instagram rolled out the ‘Shop’ feature to support social commerce. You can link your businesses’ Facebook page or Instagram profile to this shop.

Social Media Users Can Purchase Products Right on Facebook Through Shops.

Source – Screenshot

Here’s the step-by-step procedure for setting up Instagram and Facebook Shops.

Note: This feature is only available for businesses in the U.S.

Steps To Set Up a Facebook/ Instagram Shop

To enable social commerce, Facebook has introduced a new tool called commerce manager. Here’s how you can set up your shop on Facebook/Instagram using the commerce manager.

Step 1: With your Facebook account, log in to the commerce manager and click on Get Started.

Step 2: Choose where you want to set up a shop — Facebook or Instagram.

Use Commerce Manager on Facebook to Kickstart Your Social Commerce Strategy.

Source – Screenshot

Step 3: Choose a payment method. If you want your customers to pay on Facebook/Instagram, choose the new checkout feature.

Note: After June 30, 2022, Facebook will charge a service fee for the checkout feature.

Facebook Offers the Checkout Functionality To Enable In-app Payments.

Source – Screenshot

Step 4: Provide the shipping and return details.

Provide Your Shipping Details and Address To Enable Online Shopping on Facebook.

Source – Screenshot

Step 5: Choose a sales channel. It means you need to connect one of your Facebook pages/Instagram profiles to your shop. If you don’t have a page, you can create it right on this step.

You Need to Link Your Existing Page With Your Facebook Shop.

Source – Screenshot

Step 6: You need to provide the name and email address of your business manager. Facebook will use this to create a business account.

Step 7: Agree to Facebook’s seller terms and send your shop application for approval.

Finish Setting up Your Facebook Shop.

Source – Screenshot

Facebook/Instagram will review your application, and once you receive approval, the ‘shop’ tab will appear on your page. You can start adding products to your page using the commerce manager.

Note: Facebook/Instagram will verify your catalogs before they appear in your shop.

The Tiny Tassel - A Social Commerce Example.

Source – Screenshot

Setting Up Social Shopping on Snapchat

Snapchat supports social commerce through the shoppable augmented reality (AR) lens. These lenses will appear on your customer’s social feed.

They can try out your products by applying these AR lenses to their photos. By clicking the Shop Now button on this lens, users can instantly buy the products.

Potential Customers Can Try On and Buy Gucci Shoes Through Snapchat’s AR Lenses.

Source – Snapchat

Do you want to set up a cool lens like the one above? Let’s have a look at how you can set up Snapchat social commerce.

Steps to Set Up Shopping On Snapchat with Augmented Reality Lenses

Step 1: You need to create an AR lens using the Lens studio or Snapchat’s in-app AR builder.

Lens Studio Helps Retailers Create a Variety of AR Lenses.

Source – Screenshot

Step 2: Submit your AR lens to Snapchat through the Publish Lens button, under the Sponsored Lenses category.

Step 3: Once the AR lens is approved, enter your AR lens into the lens auction.

Note: Snapchat uses AR lenses with Snap Ads to enable social selling. If your AR lens wins the ad auction, Snapchat will display it on the social feeds of your prospective customers.

Setting Up TikTok Social Commerce

TikTok started its social commerce endeavors by partnering with Shopify. Shopify store owners can create, run and monitor their TikTok marketing campaigns from the Shopify dashboard.

In 2021, TikTok took it one step further with the in-app shopping experience. Shopify store owners can now set up a mini-store on TikTok. The store will appear as a new tab on your TikTok profile.

TikTok Profile With a Shopping Tab Enables Product Discovery and Sales.

Source – Screenshot

Steps To Set Up Shopify Mini Store on TikTok

To create a store on TikTok, you need a business account. Once you have it, follow these steps to create a storefront right on your TikTok profile.

Step 1: Sign up to TikTok’s shop seller center to register as a seller.

TikTok Acts as a Social Commerce Platform Through Its Sellers Center.

Source: Screenshot

Step 2: Verify your phone number and email address.

Step 3: Provide your business’s information — address, warehouse location, and return address.

Step 4: Scan and submit your documents. TikTok needs your business registration number and bank account details.

Once TikTok verifies your documents, a Shop tab will appear on your profile. You can start selling by adding products to your TikTok shop. You should also explore how to add product anchors to your TikTok videos.

Once You Are an Approved Seller, You Can Create Shoppable Posts on TikTok.

Source – Screenshot

ALT:

Note: TikTok hasn’t integrated the in-app payment in all locations. TikTok is piloting in-app payments in Indonesia. In other locations, TikTok has partnered with Shopify to fulfill the payment process.

Setting Up Social Commerce on Pinterest

You can enable social commerce on Pinterest by creating a shop. Users can quickly make purchase decisions by browsing your shoppable pins. Pinterest also supports the complete checkout process, including payment, to provide a seamless social shopping experience.

Pinterest Shop Helps Small Businesses To Reach Their Target Audience Easily.

Source – Pinterest

Steps To Set Up a Shop Pinterest

Here’s how you can set up your store on Pinterest. You’ll need a business account to do this.

Step 1: Log in to Pinterest using your business account.

Step 2: Create a data source for importing your products.

Step 3: Create product groups on Pinterest.

Step 4: Select a manually created product group to feature in your shop.

Once you select a product group, a shop tab will automatically appear on your Pinterest profile.

Pinterest also offers shopping ads for you to enable social commerce on Pinterest.

Final Thoughts: How To Use Social Media as a Social Commerce Platform

Social commerce presents an excellent opportunity for ecommerce sites to sell their products directly on social media. All major social networks are striving to turn themselves into social commerce platforms.

You can drive sales by setting up your shop on Facebook, Instagram, TikTok, and Pinterest. Snapchat supports social commerce through shoppable AR lenses. Social commerce is still in its infancy. If you start now, you’ll get a headstart over your competitors.

Are you ready to set up your ecommerce website and leverage the power of social commerce? Start by building your store with Hostdedi’ StoreBuilder.

Check out our plans to get started today.

Related Resources


Source link