How to Migrate Your WordPress Site All on Your Own
Migrate WordPress Site
Migrating a WordPress site on your own can feel like an overwhelming task, especially because there are so many factors and steps to consider.
From properly preparing a site for transfer to successfully setting it up on a new hosting platform, many people are forced to turn to expensive WordPress migration services. Or, they seek out new hosts that provide migration services as part of their package — to ensure a smooth and streamlined process. However, the act of migrating a WordPress site doesn’t have to be costly or stressful when you’re equipped with the right tools and knowledge.
In this guide, we will break down how to migrate a WordPress site without spending a premium or needing advanced programming knowledge. This includes migrating a site manually, as well as how a few WordPress plugins can help you automate the process.
Uncover how you can prepare for and complete a WordPress site migration regardless of your skill level below.
What Does It Mean to Migrate a WordPress Site?
A WordPress migration is a process of transferring a WordPress website from one server to another — or from one hosting service to another — without affecting its appearance, content, or functionality. During this process, the content of a WordPress site (i.e., its files, content, and databases) are copied and uploaded to a new server while the site content on the old server remains unaffected. We want to help you manually transfer a wordpress site with a successful outcome.
Recommended Easiest Way to Migrate a WordPress Site
If you are migrating to a Managed WordPress or a Managed WooCommerce plan then you should use the BlogVault service and plugin.
Common Reasons You Might Need to Migrate a WordPress Site
People choose to migrate a WordPress site for many different reasons, including:
- Swapping hosting providers: Many people migrate their website to swap their WordPress hosting providers. This could be due to hosting performance issues or downtime caused by shared server resources, or a lack of customer support from the hosting provider. People also swap hosting providers to meet the demands of their scaling business (e.g., switching to more powerful dedicated servers or cloud servers) or to dial back server resources and cut costs.
- Moving to or from a WordPress Multisite network: People sometimes need to move an existing WordPress site into a Multisite network, or remove a single WordPress site from an existing Multisite network and migrate it into a fresh WordPress installation. This process is more complicated than moving a single site to a new hosting provider, but it can be done.
- Changing a domain name: Domain name changes are sometimes needed as businesses evolve (e.g., shortening a long domain name, rebranding a business, etc.), and a WordPress site migration can be required to change them. It’s important to note that domain name changes require permanent 301 redirects from the old domain to the new one to maintain search engine rankings and prevent 404 errors for users following any existing site links.
Migrate a WordPress Site Manually in 6 Steps
While there are several WordPress duplicating, cloning, and migration tools that aim to simplify the migration process, understanding how to manually transfer a WordPress site is important.
For example, if you have a large website or you’re transferring between hosting companies, many of these tools can timeout or fail — leaving you at square one.
How to Manually Migrate a WordPress Site
The steps of migrating a WordPress site from one hosting service to another manually can be broken down into six overarching steps:
- Backup/Download Your Site Data
- Create a New WordPress Installation with Your New Host
- Upload Your Database Files into Your New Hosting Account
- Upload Your Content into Your New Hosting Account
- Adjust Your “wp-config.php” File
- Perform Post-Migration Cleanup
1. Backup/Download Your Site Data
The first step to manually migrating your WordPress site is to backup/download all your site data — regardless of how small or large it is. The migration process could cause you to lose website data, which in turn could damage your site.
While backing up your site data should already be a security best practice, it is also a critical component of the data transfer process.
There are several plugins you can use to back up your WordPress sites — such as Duplicator or UpdraftPlus — allowing you to utilize built-in settings to control which files are backed up, backup schedules, and where your data is stored. Alternatively, you can also back up your WordPress site manually. This process can be done two ways:
- Through your cPanel
- Via a file transfer tool (FTP)
cPanel
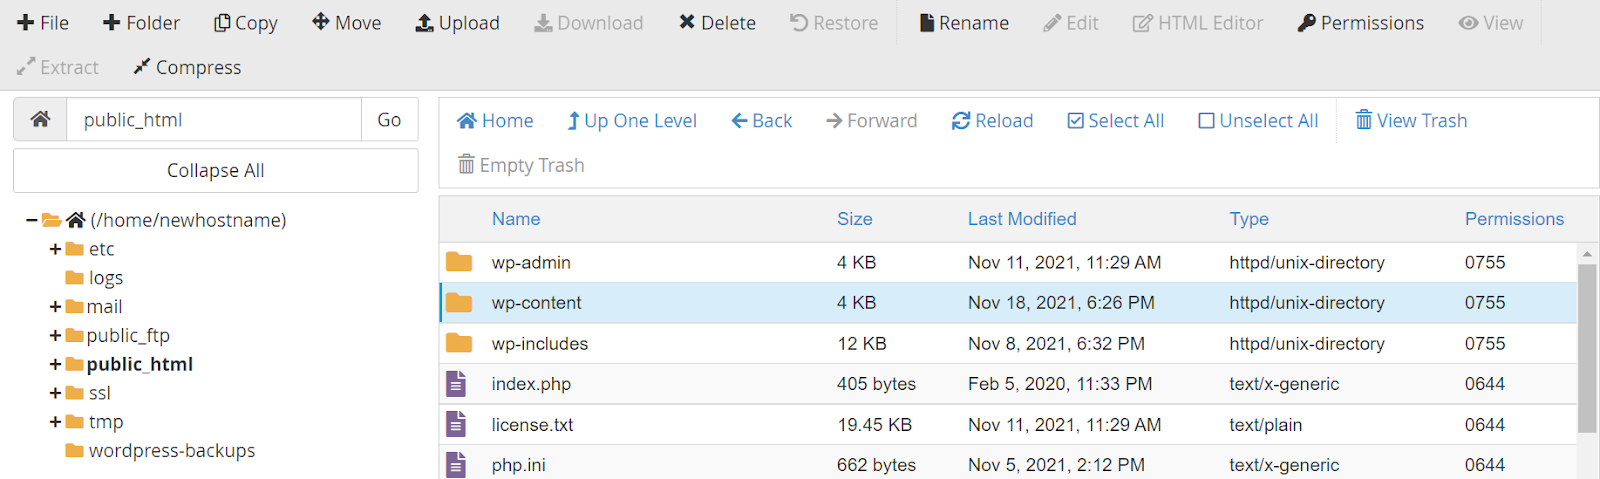
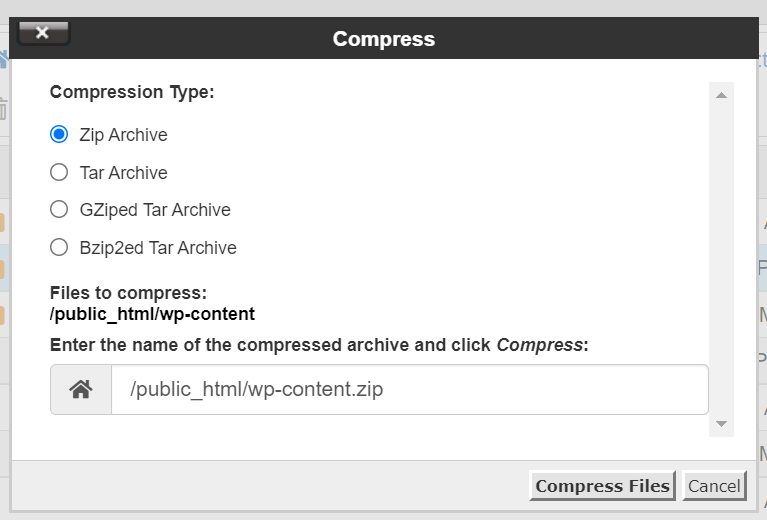
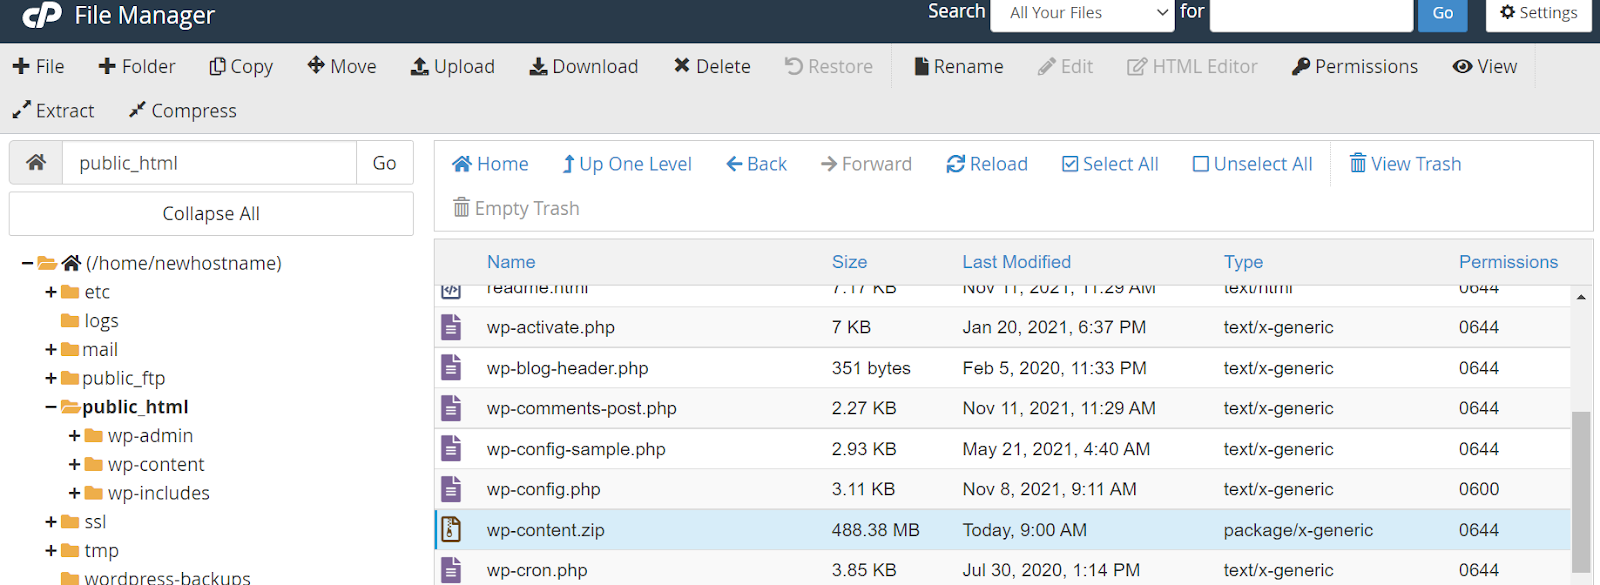
Log into your old hosting provider and navigate to your cPanel. There, open “File Manager,” select the document root for your domain, check “Show Hidden Files,” and click “Go.” Here, you need to locate two files: “wp-content” and “wp-config.” To compress your “wp-content” folder you can select the zip format and then when the zip file has been created, download it.
You will only need to download the “wp-config” file. You can also compress the wp-content to a tar gzipped file which might be smaller than a zip file. If you are familiar with the command line then you can wget over the zip or tar.gz file directly from your old host to your new host without having to download locally and upload a file.

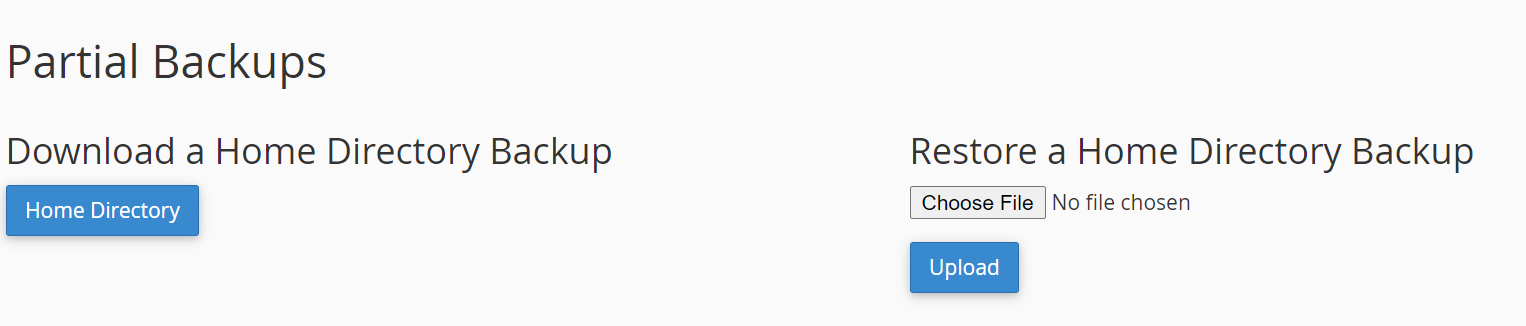
Log into your old hosting provider and navigate to your cPanel. There, open “Backup,” from backup in cPanel you can download a full backup, partial backup as well as backups of your site’s database.

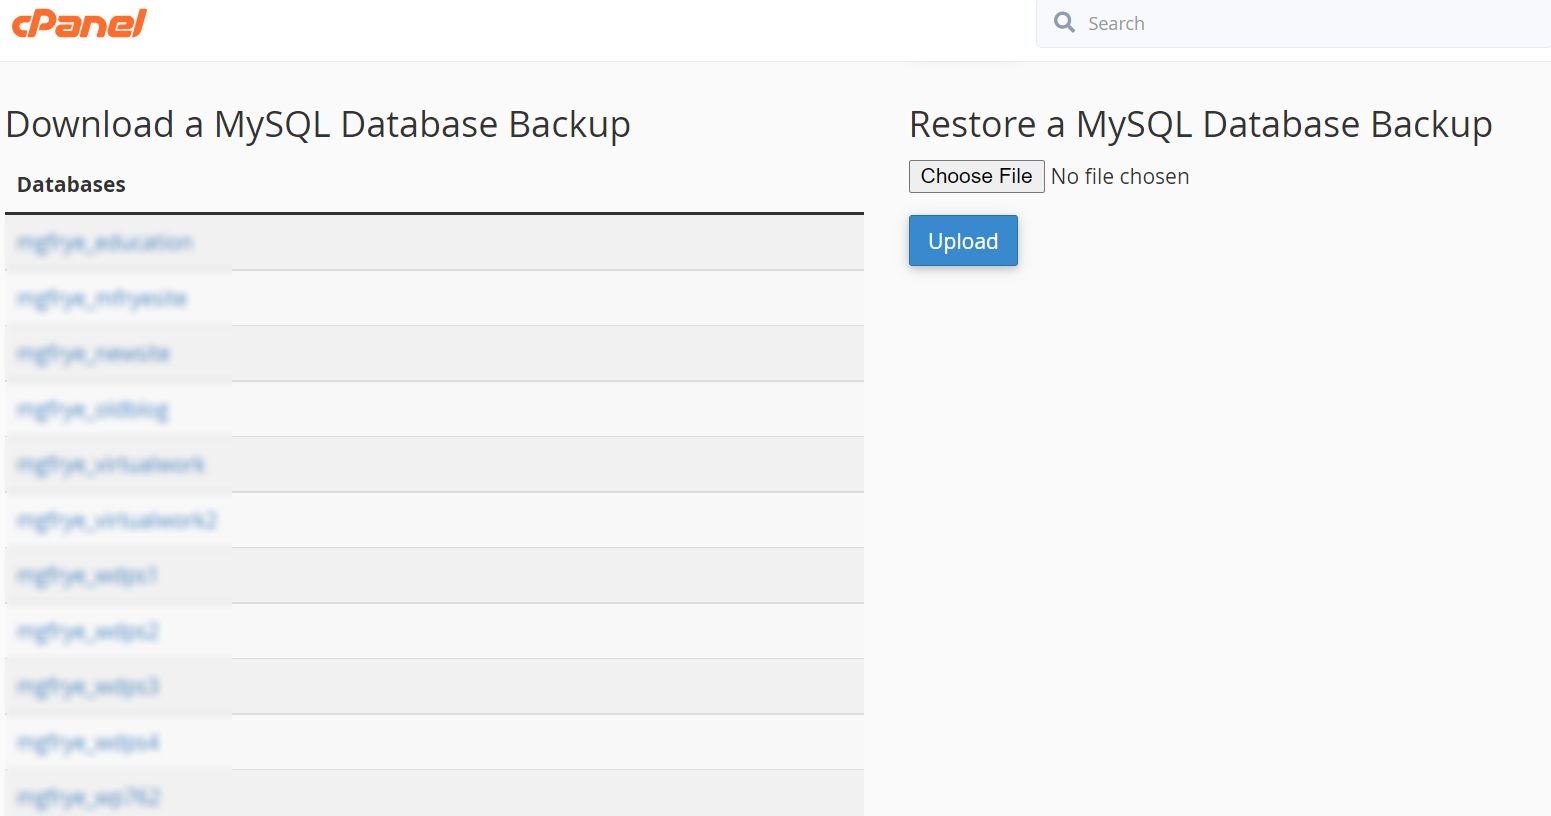
Now, back out to your cPanel homepage, locate “Backup,” and click on it. Here, you will see all the databases you have on your server. Be sure to navigate to the correct one and click on it. Once you have selected the correct database backup for the site, it will allow you to download the “sql.gz” file.
At this point, you should have three separate downloads, including:
- “wp-content.zip” file
- “wp-config.php” file
- “sql.gz” file
It’s important to note that this process is typically faster than using an FTP tool.
FTP Tool
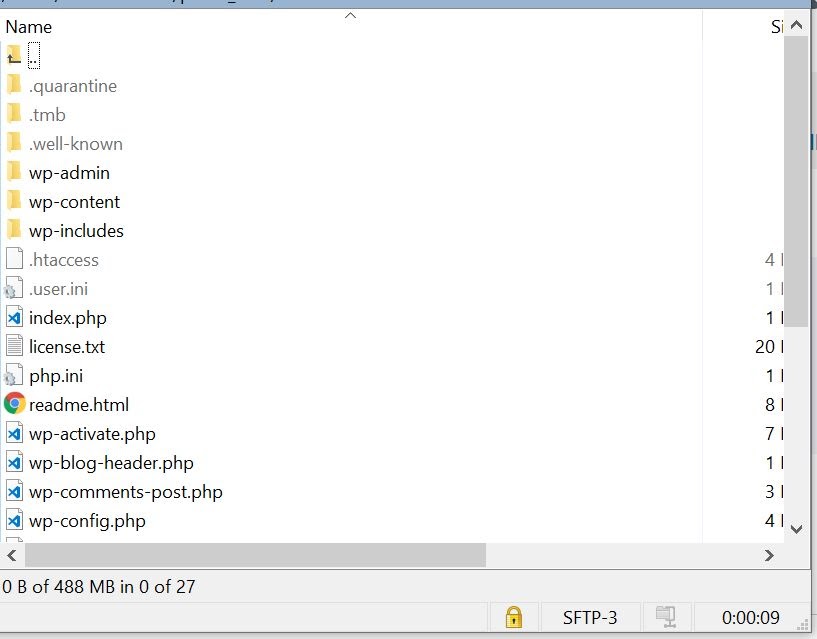
FTP programs such as FileZilla (PC) and Transmit (Mac) are popular tools for downloading WordPress files and databases. After choosing an FTP program and installing it on your computer, use your SFTP credential (sourced from your web host account) to directly connect to your site’s server.
Here, you can select and download all files and databases in your WordPress site’s directory. But don’t forget to include hidden files such as “.htaccess,” as these might be hidden. Review your FTP program’s help file to ensure you are seeing hidden files. If you are used to using the command line then you can create both a MySQL dump of the site’s database and then gzip compress or zip up the WordPress site. The command-line method will be much faster.
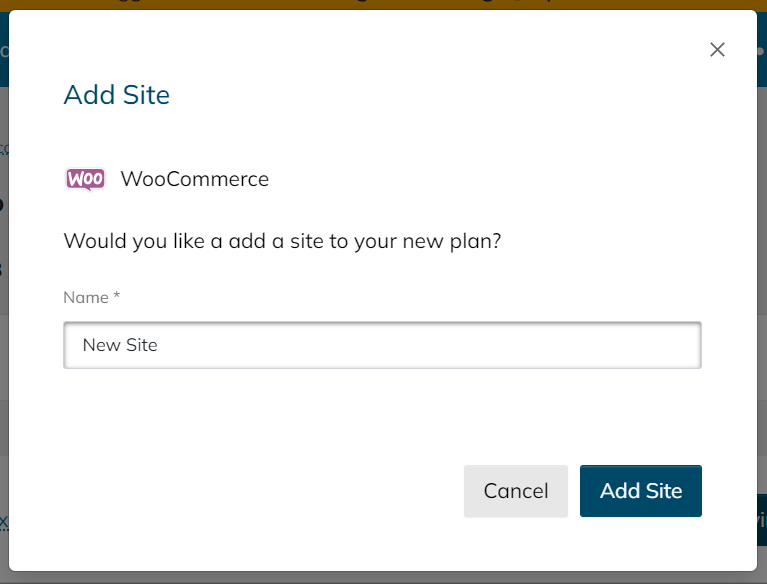
2. Create a WordPress Installation with Your New Host
The second step to manually migrating your WordPress site is to log into the portal on Hostdedi to create a new site on an existing plan or a new install site would be created when you sign up for your new plan on Hostdedi.
When you add a site in the portal where your plan details are managed, it will install WordPress on it.
Be sure to review and/or edit these sections based on your site needs, and don’t forget to securely record your admin username and password. Additionally, you can change the automated database name and table prefix if you see fit. You can also leave them as-is, but be sure to remember/record your database name and table prefix, as you will need to reference them later.
Once the installation of WordPress is installed, head back to your portal to get the SSH credentials to prepare to upload the files and database from your old site.
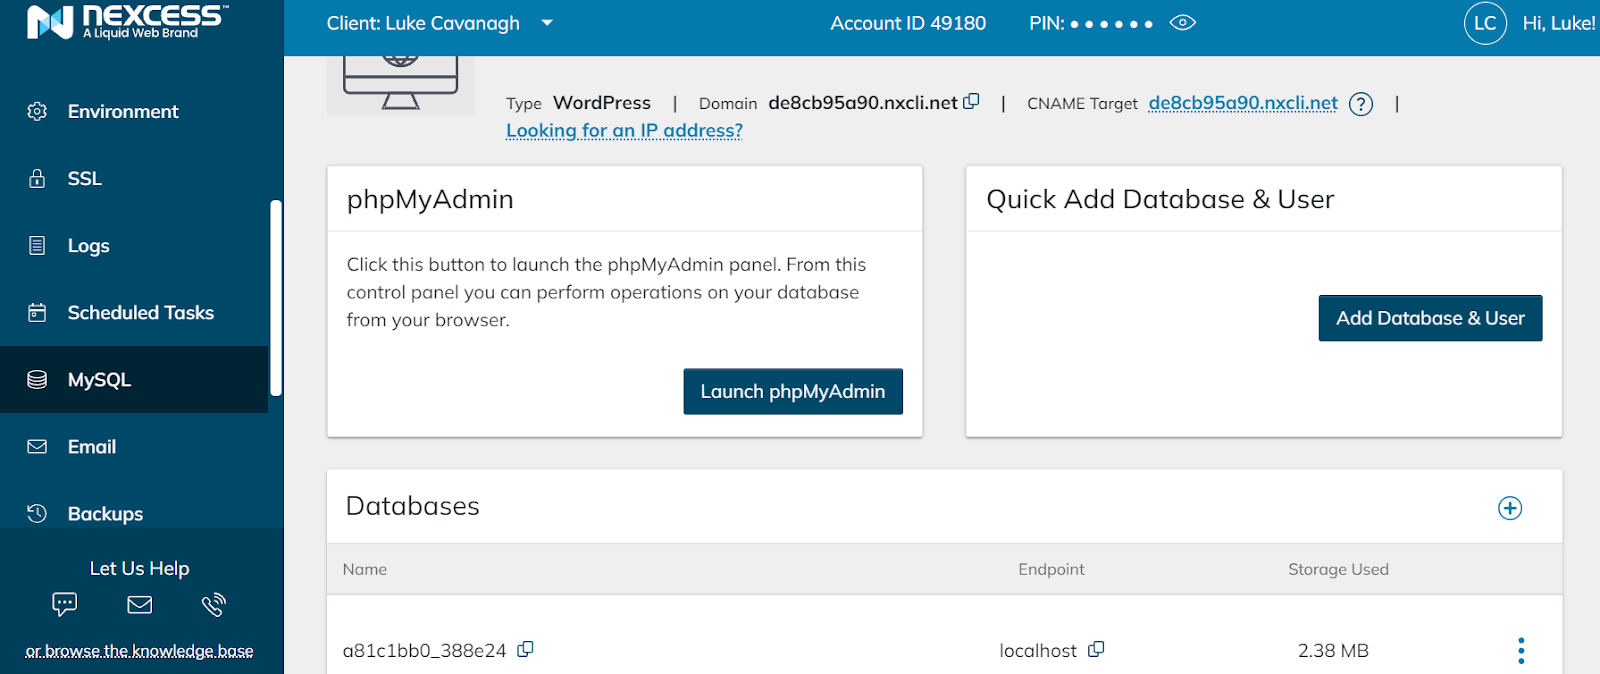
3. Upload Your Database into Your New Hosting Account
Now it’s time to import the actual pages of your current site into your new hosting account. To do this, navigate to “phpMyAdmin” under the “Databases” section and click on it. Once in, locate your database name and click on it.
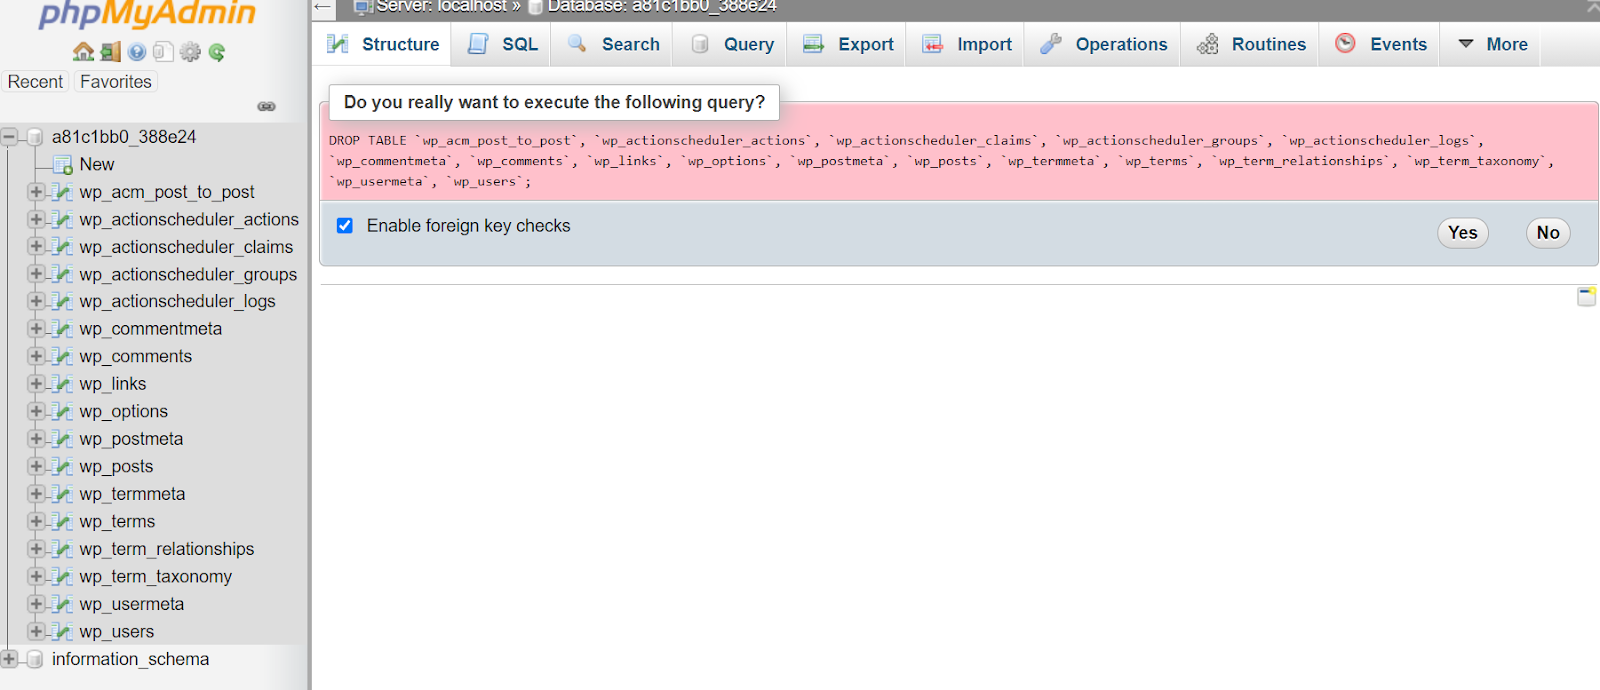
Here, you will see blank database tables that were created with your blank WordPress installation. What you want to do is select the “Check all” box underneath these blank database tables, click the dropdown menu titled “With selected,” and then choose the “Drop” option. This will delete all blank tables in your database.
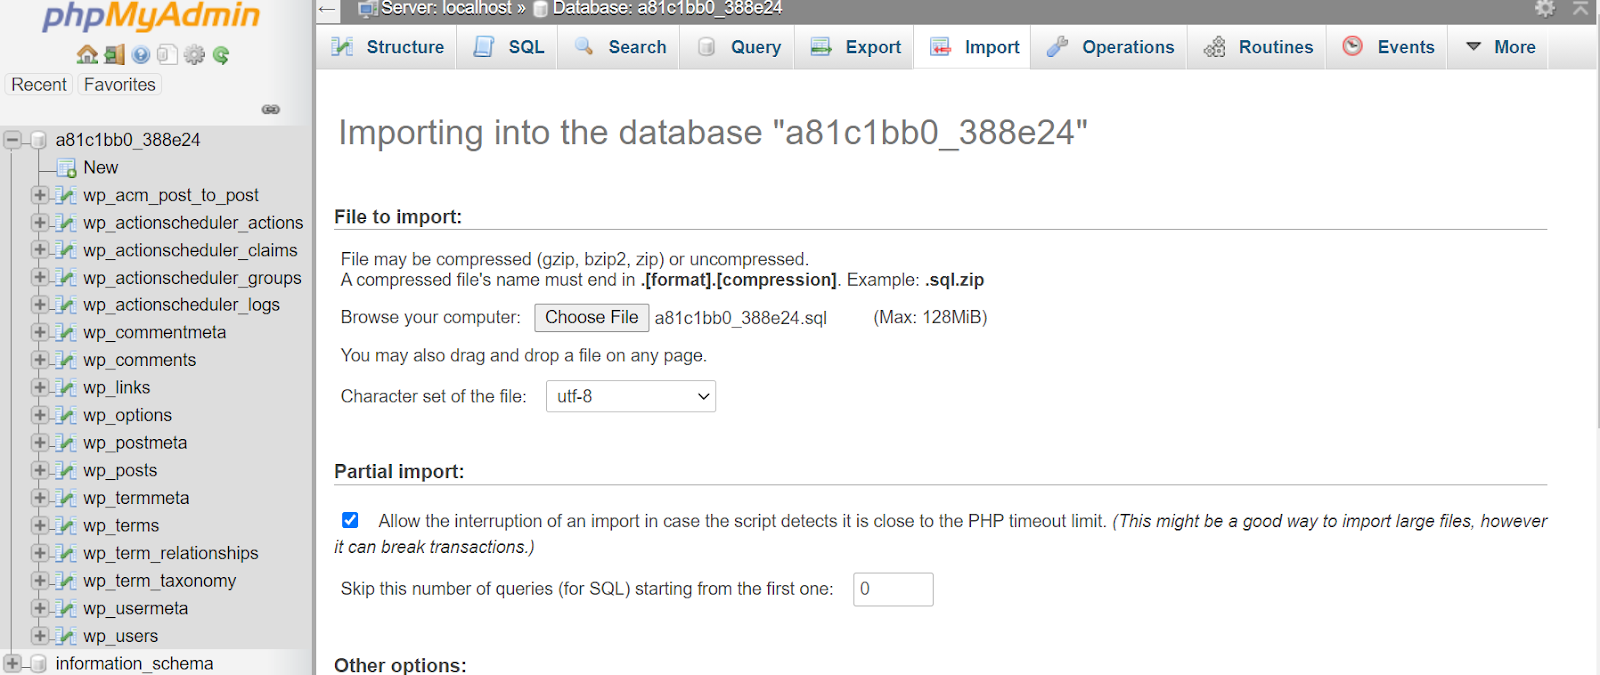
With all tables deleted, it’s time to import the database that you previously backed up. Select “Import” near the top of the page and navigate to the “File to Import” section.
Here, select the “Choose File” button next to the “Browse Your Computer” text, locate the SQL database file you downloaded earlier, and click “Open.” Then, uncheck the “Partial Import” box, scroll to the bottom of the page, and click “Go.” This will import all the tables that feature your current site’s content.
Once your new tables are imported, navigate to the table that features the word “options.” Here is where you can find and edit the URL of your site. Locate “siteurl” underneath the “option_name” column, select the “Edit” button, change the URL to your new site’s URL string, and click “Go.” Then, locate “home” underneath the “option_name” column and update it to your new URL string, as well.
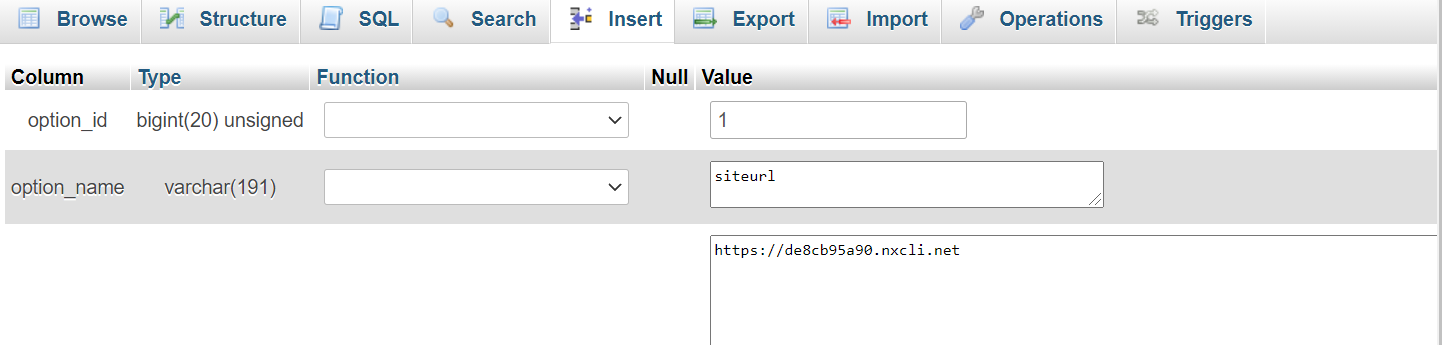
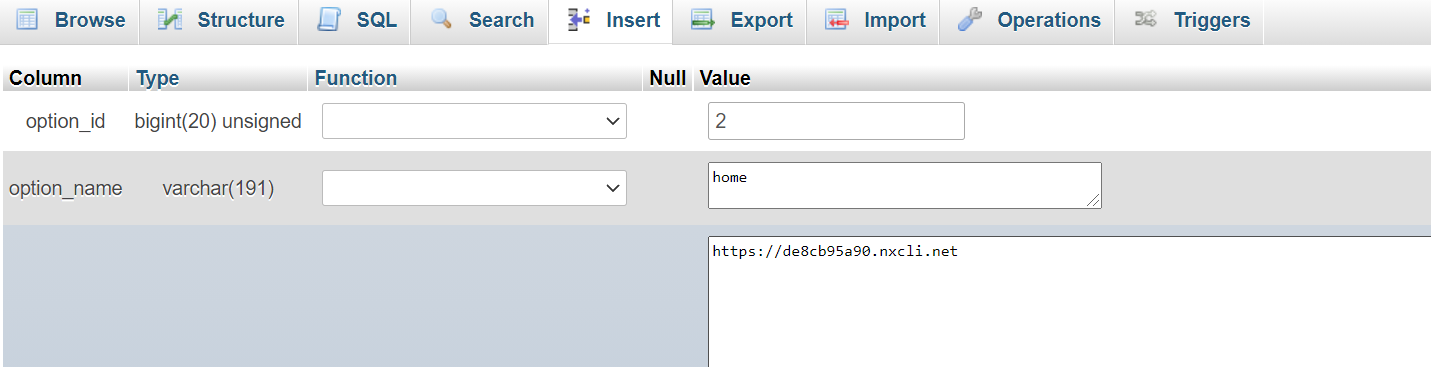
Note: If you cannot find the “siteurl” or “home” paths easily in your hosting provider’s portal, you can “Google” where these paths are found or reach out to customer service for help.
4. Upload Your Content into Your New Hosting Account
Head back to the new hosting portal and locate the “Access” tab which will be able to give you the SSH credentials.
Using your file manager application then upload the backup into the public_html folder of your site.
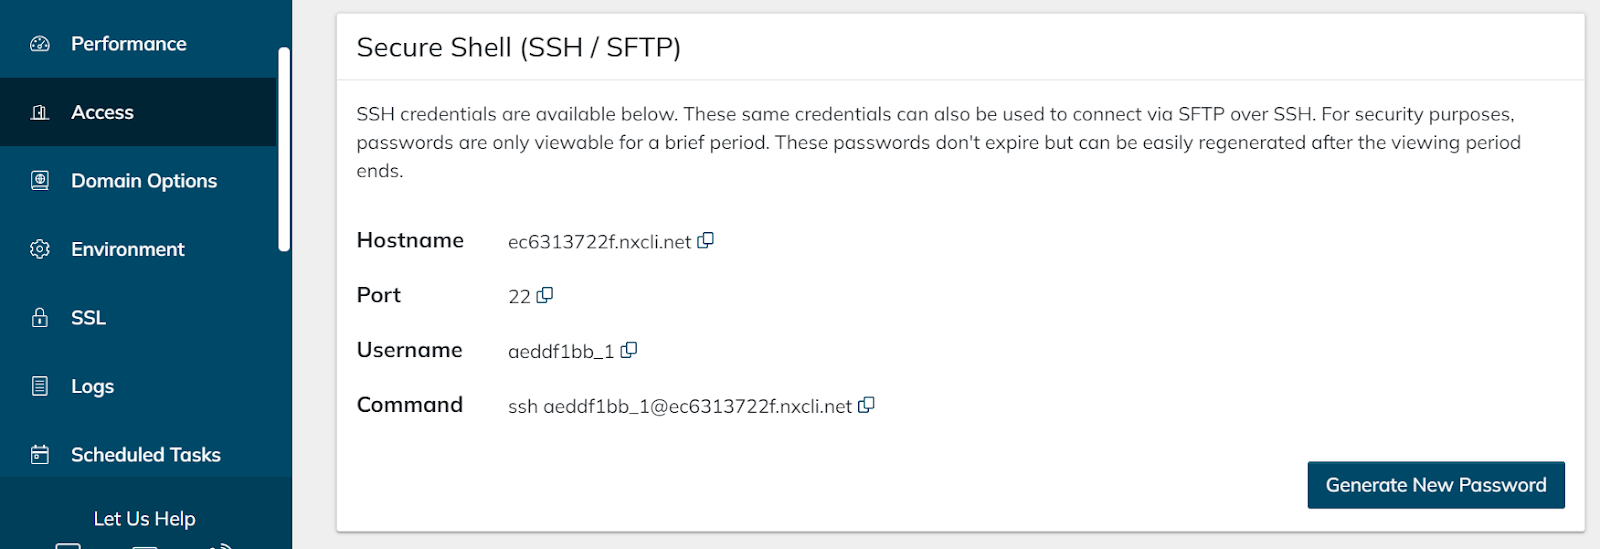
Now using the SSH credentials you will need to add those into your file manager application.

You will need to use a gzip decompress command to extract the backup. Once extracted, be sure to go back and delete the actual zipped folder or the original gzip compressed file. The same step will apply if you upload a backup of your site in a zip file format you can use a command such as unzip to extract out the file.
tar -xvf wp-content.tar.gz
unzip wp-content.zip
At this point, there is one more thing you need to do to ensure your content is pulling up correctly: adjust your “wp-config.php” file if needed if the database prefix is different.
5. Adjust Your “wp-config.php” File
Navigate back to your file manager application and locate the “wp-config.php” file. Rather than editing the file directly in your file manager, it’s easier to download it and edit it in a text editor. Right-click on the file, select “Download,” and open it in a text editor or code editor of your choice. At this point, you’ll need to locate two things:
- “define(‘DB_HOST’, ‘localhost);” — If you are moving to a new hosting provider, you might have to adjust the local hostname in your “wp-config.php” file. Be sure to check with support to see if this needs to be changed.
- “$table_prefix” — Using the table prefix you recorded earlier, locate the “$table_prefix” lines in your “wp-config.php” file and update it with the appropriate prefix.
Once these two lines are updated in your text editor, save your new “wp-config.php” file. Now, go back into your file manager and overwrite the obsolete “wp-config.php” file with the new one. You can do this by navigating to the file manager and selecting the file to upload. Depending on the file manager you are using, it will provide a warning if you want to replace the existing file or not.
At this point, all your current WordPress site’s files should be uploaded and updated, which means your site should display and function exactly as it did with your old hosting provider.
6. Post-Migration WordPress Cleanup
Once your site has been successfully migrated to your new hosting provider, it’s time to begin the WordPress cleanup process.
Replace Old URLs with New Ones
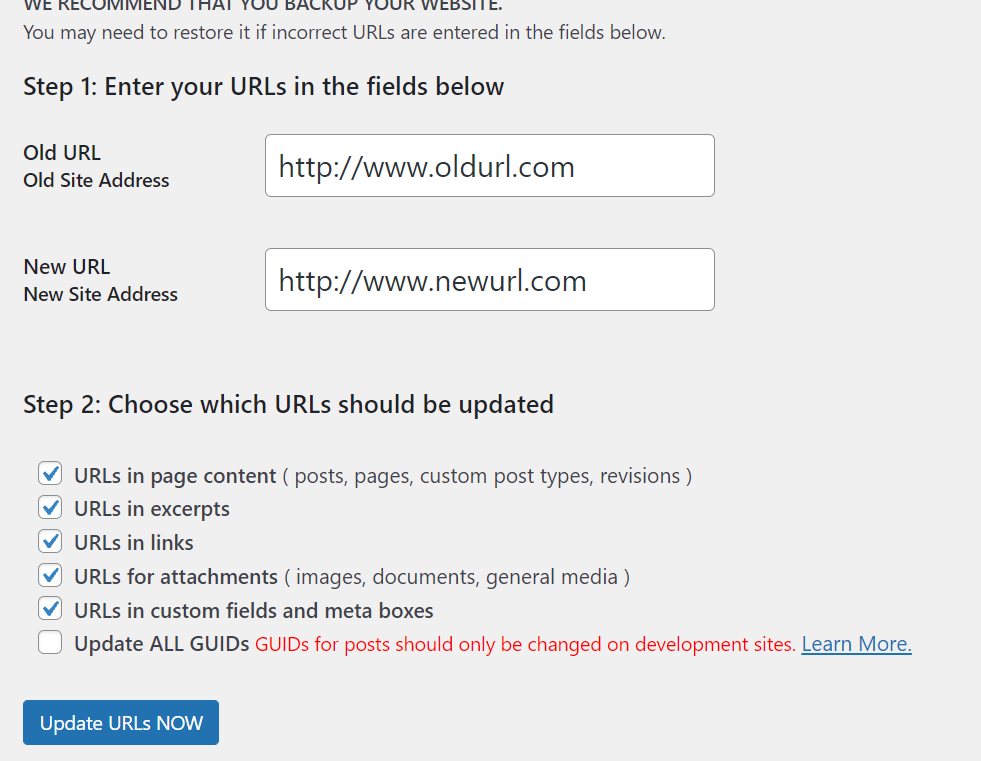
First, you will need to log into your new site and ensure that internal links to pages and references to images are updated by replacing old URLs with new ones. While you can do this manually, there are WordPress plugins you can use — such as the Better Search Replace plugin — that streamline this process.
Using the Better Search Replace plugin, navigate to “Tools” in your WordPress dashboard and select “Better Search Replace.” Here, you will input your old domain URL and your new domain URL, as well as check all the boxes listed underneath “Choose which URLs should be updated.”
Now, select “Run Search/Replace.”
Reach Out to Publishers to Reclaim Potential Lost Backlinks
If you are concerned about backlinks that point to your old domain, you will need to reach out to each individual publisher manually to have them update any featured links. It’s recommended to focus on your highest quality backlinks, as this process can be tedious.
Reconfigure Your Domain’s DNS Settings
You will also need to reconfigure your domain’s DNS settings to point to your new hosting provider. Your domain registrar will have all the details you need to make this change. It’s important to note that DNS changes can take up to 48 hours to take effect, so be sure to make these changes during a period when you expect lower levels of traffic.
Once your site migration has been completed, all URLs have been updated, and your DNS settings have been reconfigured, you can manually delete website files, databases, and content on the old server.
5 Best Plugins for Manual WordPress Migration
There are many helpful WordPress migration plugins out there, but it’s important to recognize that some of them cause conflicts with other caching plugins or themes, and they may also lead to performance issues for your hosting server.
Before you select a migration plugin to use, be sure to consult with your new hosting provider to see which ones are compatible. Currently, five of the best plugins for manual WordPress migration include:
1. Duplicator
Featuring over 25 million downloads, Duplicator is a trusted WordPress migration tool that gives users the ability to migrate, copy, or transfer a site from one host to another — bundling plugins, themes, and content files into a .zip file package. Additionally, it can also be used as a handy WordPress site backup tool.
Duplicator also claims zero downtime while migrating your site, which means visitors can still view and interact with a live version of your site in a pre-defined staging area. The pro version of Duplicator comes with even more features, such as drag-and-drop installs and cloud storage provider compatibility.
2. UpdraftPlus
With a user-friendly interface, UpdraftPlus is a popular WordPress migration tool. Featuring over 3 million active downloads, this tool allows you to schedule automatic backups and restore those backups instantly.
It also backs up a plethora of cloud options and the ability to backup multiple sites at once from a central platform with UpdraftCentral. For even more features, UpdraftPlus Premium offers multisite network compatibility, database encryption, and dedicated customer support.
3. Migrate Guru
Powered by BlogVault, Migrate Guru claims to be the fastest way to migrate a WordPress site — including with difficult WordPress migrations such as multisite networks or sites that are 200 GB or larger.
Operating on its own servers, Migrate Guru can automatically rewrite URLs, bypass import/export scripts, and manage serialized data. It also duplicates WordPress sites without any manual work or additional tools.
4. WP Migrate DB
WP Migrate DB features an easy-to-follow 3-step process that includes:
- Use the WP Migrate DB interface to find and replace your site data.
- Export the SQL file.
- Import the SQL file into your new database.
This plugin also supports serialized data and arrays, which minimizes the chances of database corruption during the migration process. With the pro version of WP Migrate DB Pro, you also gain access to themes, plugins, and upload files.
5. All-in-One WP Migration
With over 4 million active installations and nearly 6,000 5-star reviews, All-in-One WP Migration is a highly trusted WordPress migration plugin. Much like WP Migrate DB, this tool features three simple steps that make migration easy:
- Install the All-in-One WP Migration plugin.
- Click the export button to package up your database, media files, plugins, and themes.
- Unpack the file at your new location with the drag-and-drop feature in your WordPress dashboard.
All-in-One WP Migration syncs with top cloud storage services and is compatible with most WordPress plugins and themes. If you are using the free version of the plugin there is a 512MB size limit.
Consider a Move to Managed WordPress Hosting
While there are many steps involved with manually migrating a WordPress site from one host to another, it can be done. Just be sure to follow the steps we’ve outlined above carefully, and always ensure your site’s files, databases, and content are fully backed up prior to beginning the migration process. If something goes wrong, you will still have all your original files to refer to back to.
If you’re considering moving from shared hosting to WordPress hosting, Hostdedi is trusted by many WordPress experts. With premium image compression, a built-in content delivery network (CDN), and advanced caching, we optimize WordPress sites to be faster, better, and more intuitive. When you host your WordPress site with Hostdedi, you gain access to:
- Automatic core WordPress updates
- Staging and production sync
- Developer tools
- Instant backups
- Stencils for site creation
- Multi-layered caching
- Malware monitoring
- One-click staging
- Email hosting
- Full server access
- Automatic plugin updates
- Automate SSL
- PHP optimization
Featuring several managed WordPress hosting plans, you can choose one that easily meets your needs now and scales up or down as your needs evolve. Plus, free WordPress site migrations are included with every Hostdedi WordPress Hosting Plan. This means you can avoid site downtime that’s typically associated with manually migrating a WordPress site.
Find out how Hostdedi can help you optimize your WordPress site through fully managed hosting.
Check out our fully managed WordPress hosting plans to get started today.